Building Better Tables

As a miniatures wargame, the gaming table is an essential component of Team Yankee. More than that, the gaming table can have a huge effect on the enjoyment of a game, not only from the look and immersion but also the game design, balance, and level of strategy that needs to be employed. Unfortunately, sometimes the battlefield gets overshadowed by the excitement of list building, painting, and tactical planning, which can result in awkward or non-immersive battles. Let’s look at building better tables for better games.

Build from the ground up

WWIII: Team Yankee is fought in Europe, specifically Central/North-Eastern Germany. The terrain is vastly different from other regions, and the philosophy behind the infrastructure built over the last hundreds of years reflects this.

  • Houses tend to be grouped into tight villages to maximize crop/field space. This is evident in smaller villages right up to growing towns and suburbs
  • Large sections of woods on ground unsuitable for farming or rough/hilly terrain
  • Lots of linear features ie streams, hedges, tree lines, and irrigation ditches 
  • Roads will avoid linear features and take the easiest route through the terrain

Google Maps is a great tool that you can use to understand the terrain you’re fighting over. Satellite imagery is brilliant to study linear terrain, roads, railways, streams, and rivers, etc. Street view is also super handy at getting an idea of things like scale and separation, so use this to your advantage. Topographical maps are also available and can help you understand the elevation variance that can’t be seen just using satellite imagery. This is useful if you’re looking at terrain around the Fulda Gap, a key defensive site for NATO troops.

The battle of WWIII: Team Yankee primarily takes place along and around some of the main rivers or canals that run through central Germany, so they’re a good place to start your search. The national Army Handbooks also have brilliant maps in the opening pages, so with a bit of searching, you can very easily find some real-world locations to draw inspiration from.

Be aware that trying to replicate an area 1 for 1 can be extremely difficult due to the scale that we wargame at, so focus on pulling key features from areas and incorporating them into your battlefield design.

So what does all of this look like in a game of Team Yankee? Here are some key points to consider when building a European battlefield:

Roads

Roads are the easiest place to start, as they can be awkward to fit on a table. Start by placing roads, but think about why the road has been placed the way it is. Are you adding curves to avoid hills and woods, or to make the road run alongside a stream or a line of trees? The German road network is famous for its autobahns, large straight sections of multilane road that would make moving troops around very easy, so ask yourself if your table features a flat area that an autobahn could run through?

Area Terrain

Once the roads are down you can start thinking about those other larger features. Take stock of your terrain and start thinking about what story you can tell. Have four woods pieces? Maybe the road curves around some large woods to get to an ideal village or factory location, so group the woods together to provide a large patch of cover. A particularly windy road could be winding around hills or mountains, and an autobahn could cut right through these with some embankments. Flat areas could be covered with large crop or ploughed fields separated by hedges and bocage, tree lines or irrigation streams providing cover or impairing mobility.

Buildings

Buildings are another place to improve your tables, and a great way to add area terrain if done correctly. In Europe especially, where space is at a premium, houses tend to be grouped closely together. Instead of placing a building every hundred or so meters, clump your buildings together to form a small township, village, or especially with Team Yankee a small industrial park or compound. Vehicles require a 2cm gap between buildings to shoot through, so keep that in mind. This will force units in towns to spread out to shoot through the gaps in the buildings, another layer of strategy to consider!  

Road placement can also affect how you build up urbanized areas. Industrial parks might require autobahn and rail access, adding some good linear terrain options. Villages and townships can tend towards grid layouts for space efficiency, so use your junctions to create town roads.

Streams/Brooks

Europe is a humid continent, so rivers and streams frequently cut through the landscape. Like other wastelands, they are often overgrown with bushes and tree lines along the banks. When adding these to your table, think about 
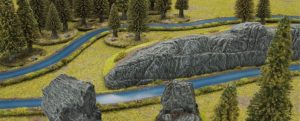
how they flow down from hills towards and through the flatter areas. Roads will tend to avoid crossing them and will run alongside them often as well. Train lines can have the same effect and tree lines that will grow alongside rivers and streams. Irrigation streams can have the same effect in large fields, often without the vegetation lining the edges. 

Linear Terrain

After all the large area terrain has been placed, linear terrain is the next step. However, linear terrain like walls, hedges, and treelines are often overlooked or completely ignored, and even if added they are often just there for visual interest and not used with the rules. Linear terrain is extremely important in the game, as it can have a huge tactical impact for a very low terrain cost. Use streams, hedges, walls, train tracks, etc. to add texture to the table, force cross-checks, and make you think twice about your approach. They also have a double benefit in adding a lot of visual appeal and immersion, so don’t be shy when using them! Autobahns would often be lined with walls, and likewise industrial areas. Buildings will use fences or walls to mark property bounds, and crop fields can be lined with fences or treelines.  

Tips from Phil

  • When designing a table, don’t focus on balance. Tables don’t need to be symmetrical and realistically terrain never will be. Focus on the story you’re telling with your terrain pieces. The missions are designed to challenge your list building skills and how you interpret and interact with the battlefield that is being played on. Do however make sure that you walk around to the other side of the table occasionally while laying out the terrain, as placing all of your terrain in a single corner could make an attacker quite upset! 
  • Take stock of the terrain available to you and let that decide how you build tables. Roads are awkward to place, so placing them first can let them dictate how the rest of the table comes together. If you have only a few woods pieces, placing them together to create one large woods is more beneficial than scattering them all over the table. Likewise, hills can be grouped to form ridges and buildings clumped to create villages. If you have very few bits of terrain, look at larger crop fields or even modelling a desert, and use linear terrain to split the map up. 
  • Linear terrain has a huge impact on Team Yankee. Use walls, fences, hedges, and tree lines to add visual interest and provide a huge amount of tactical depth. Remember to use the terrain guides at the start of the rulebook to see how the linear terrain affects your gameplay, such as providing cover, bulletproof cover, forcing cross-checks etc. See pages 24-27, 33 of your rule book for a more detailed explanation of how different terrain interacts with the game.

Putting it to practice – Building a European Table 

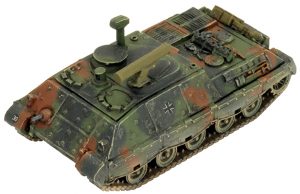
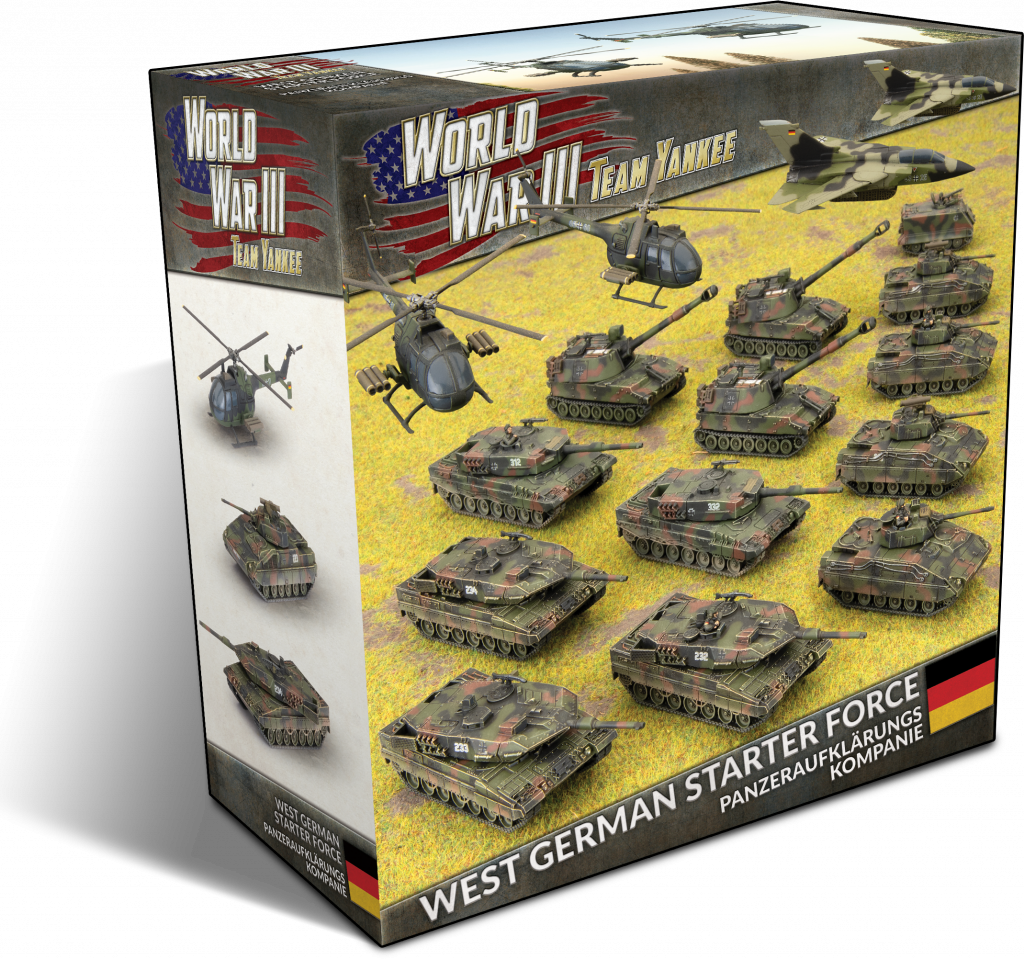
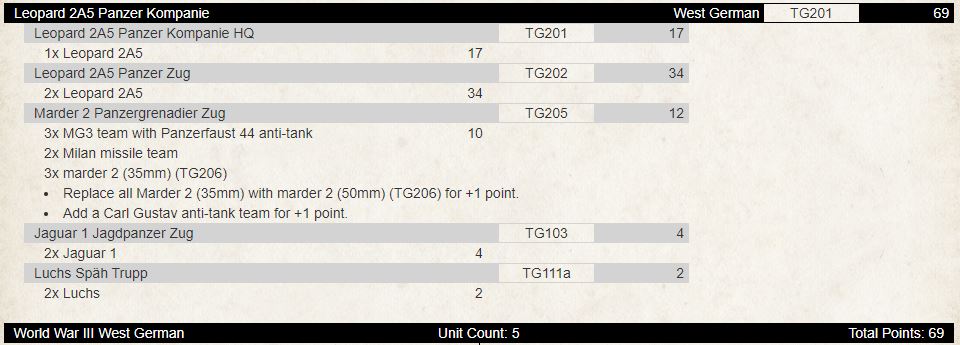
After a fighting withdrawal on the 11th of August from Bremen and reconsolidating their position on the southern bank of the Mittelland Canal, Panzerlehrbrigade 9 was withdrawn to reequip. As the Heer’s demonstration formation they were deemed the best unit to be issued with two pieces of new equipment. These were the Leopard 2 fitted with the improved modular armour upgrade package and a vehicle for their Panzergrenadiers, the newly designed heavy infantry fighting vehicle, the Marder 2. With them came a cadre of replacement troops who had been busy training with these new vehicles, familiarizing themselves with the ins and outs of both the vehicles and their weapon systems.

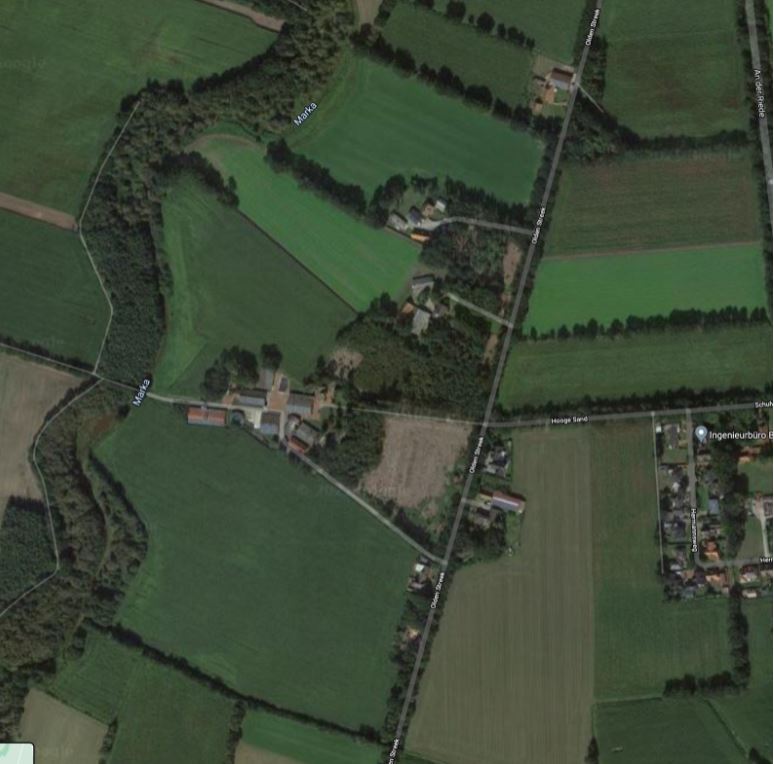
On the 15th 1 Panzerdivision, with Panzerlehrbrigade 9 in the lead, advanced from positions between Rheine and Osnabruck across the Mittelland Canal, and north towards Oldenburg. This fictional piece from the new WWIII: West German book is a great place to draw inspiration for our European battlefield. A quick look on Google Maps and we can have a look at exactly where these battles took place:

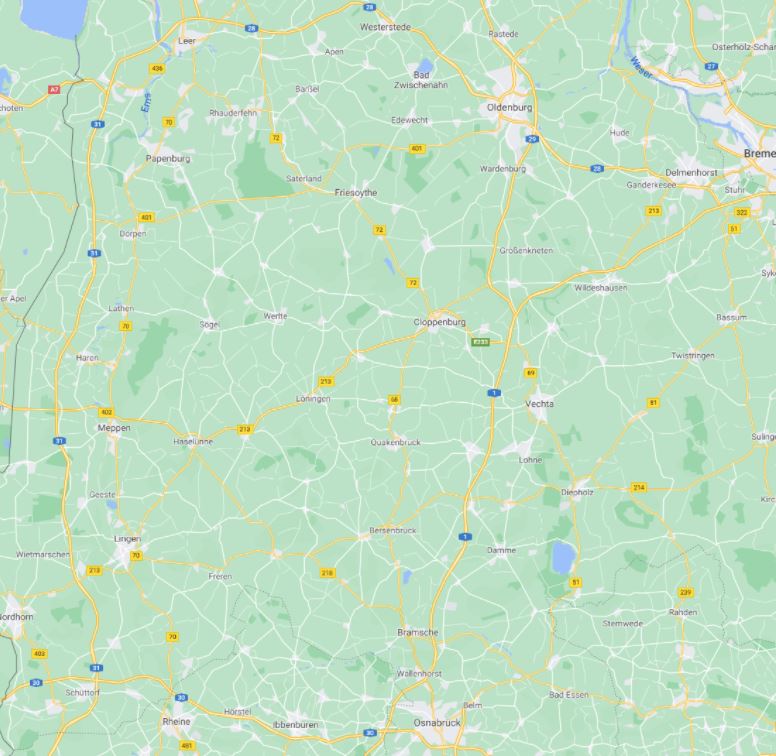
This is a very interesting bit of countryside to be fighting over and provides plenty of exciting opportunities when it comes to designing a table. One thing of note is that using the satellite view we can see the vegetation in the area.

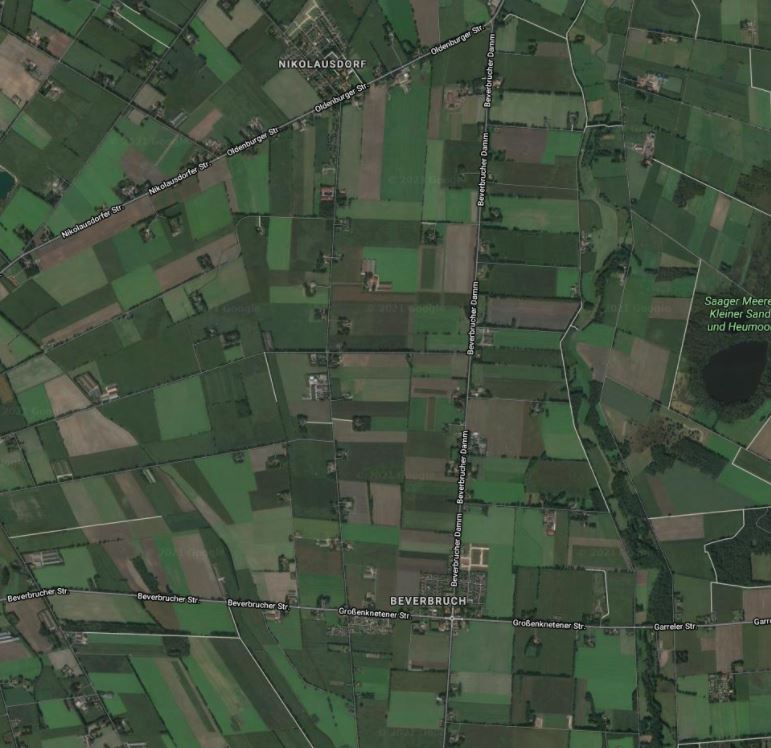
Lots of tree-lined fields and roads and tightly grouped clumps of buildings, with the occasional river wandering through the terrain, and lots of smaller streams and brooks (hint: using the map view draws all waterways in blue, making them very easy to see)

Scrolling between the main towns of our engagement, Osnabruck, and Oldenburg, I’ve picked out a few features that I would like to incorporate into my table design.

This image shows a small industrial/farming block, with a lot of woods and fields close by. This image also inspires road placement, with bigger, straighter arterial roads leading to the bigger towns, and the smaller roads following terrain and linking the infrastructure together. There is also a stream present in this shot, which is lined with foliage.

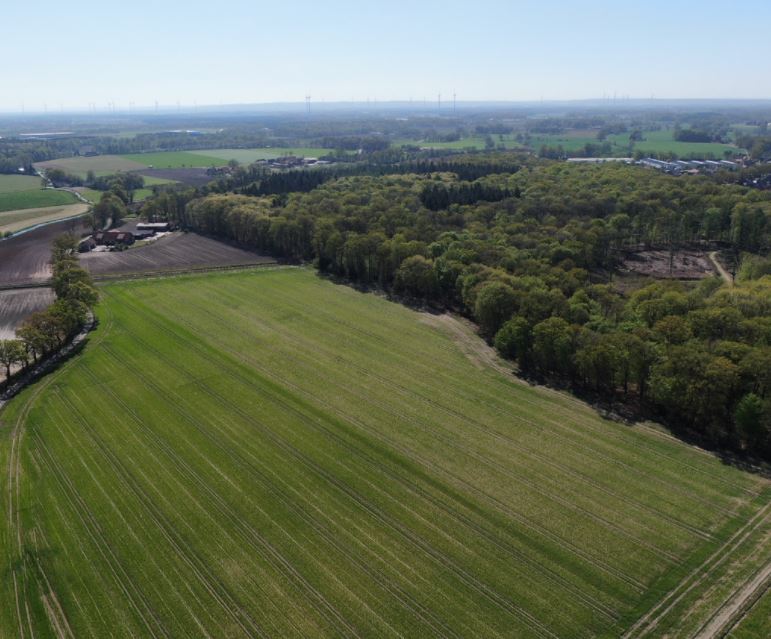
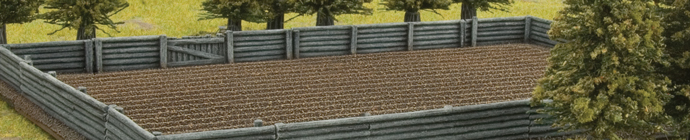
And this is a great drone shot of the landscape, which reinforces how green Germany is. Lots of woods and tree lines that could provide cover and concealment, and big open fields for maneuvering units quickly and efficiently.

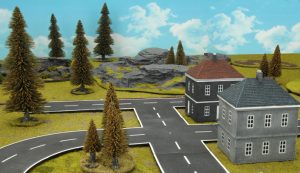
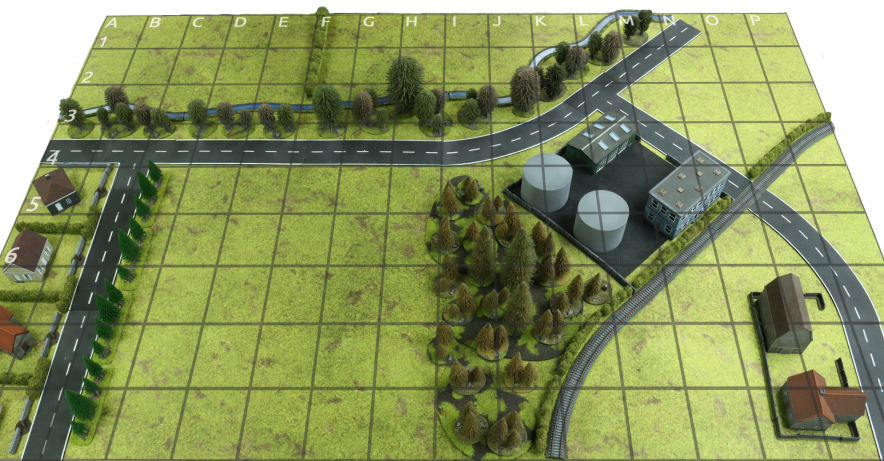
With all this in mind, I set about designing and building a table.

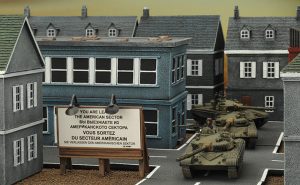
And that’s what I’ve come up with! Without focusing on balance I’ve built a table that has a huge amount of visual interest but more importantly allows for far deeper tactical strategy. This table, although it looks like it’s covered in terrain, could realistically be constructed without everything pictured. As an example, a lot of the trees can be removed and the woods base tiles can substitute, the treeline along the river can be represented with far fewer trees, and the walls and hedges can be represented with other pieces of linear terrain to achieve the same effect.

The most important part of this table, and one of the most important parts of any European table, is the linear terrain. Battlefield in a Box sells a very expansive range of options that make obtaining some great looking terrain very easy, however, making your own is also an option if you have the time and resources. Check out the key linear features I’ve used here:

This battlefield will feature live in our first-ever Twitch Plays event! Make sure you tune in live and check it out over at our Twitch Channel to find out how well it plays, with you in the driver’s seat!

Most importantly, keep posting your table designs on the social media pages! Table building is just as collaborative as list building, so post your tables and discuss designs with others to help everyone get the most out of the hobby!

~ Ryan

Second line formations

When players think of the West German army they usually think of an elite force, with highly skilled infantry, good morale, and very modern vehicles. In Team Yankee v1 West Germany had the Leopard 2, the best tank in the game and now that we’re running v2 the Leopard 2A5 will dominate the field, West German infantry is second only to the Israelis but with better weapons, like the Milan.

This is reflected in the ability to only deploy small but effective units. Multiple formations are not common in NATO (with some exceptions like British recce or American HMMWV) but are also far rarer when talking about West German. When considering this you run the risk of being outnumbered by the enemy, especially in a blue vs red game.

Coming in at 33 points is a Leopard 2 Zug, which now isn’t the most expensive tank in the West German arsenal. Czechs and Syrians can deploy 33 T-55AM2s for the same amount, Iranians can deploy 24 T-62s, and East Germans can deploy 12 T-72Ms. Despite these tanks not being a threat for a Leopard 2 frontally, their number may allow them to flank the Front Armour 18 tank and easily destroy them.

If you are already a West German player you’ll know what I’m talking about, but playing expensive tanks that cost 17 points each, or the latest IFV like the Marder 2 may not be the best way to field West German forces and this where the M113 Panzergrenadier Kompanie really shines!

M113 Panzergrenadier Kompanie
A Panzergrenadier battalion consists of three Panzergrenadier companies. Two of them are mounted in Marders 1 and one is mounted in M113s. The M113 equipped Zug are organized the same as Marder-equipped ones, but they have three Milan anti-tank missile systems instead of two.  Unfortunately, they don’t have access to the Carl Gustav anti-tank team, but that shouldn’t be a problem.

M113s are equipped with a 7.62 machine gun so they’re good at pushing back assaulting infantry during the defensive fire stage, but cannot manage enemy armoured personnel carriers. They lack the great gun on the Marder 2 (ROF 3/3, AT11, FP 4+) or the good gun on the Marder 1 (ROF 3/2, AT 7, FP 5+) but they keep the platoon cheap. A full M113 Panzergrenadier Zug costs the same as a full Marder 1 Panzergrenadier Zug and is 33% cheaper than a Marder 2, and in both cases, you get an extra Milan team.

The M113 Panzergrenadier Kompanie is composed of the HQ  and two compulsory slots. One must be a M113 Panzergrenadier Zug, while the other one can be another M113 Panzergrenadier Zug or a Leopard 1 Panzer Zug. There is also another slot that is not compulsory, for another M113 Panzergrenadier Zug. As expected of a West German formation other slots give core units all the support required. There are two reconnaissance slots for Luchs armoured cars, which are the perfect fit to provide some cheap spearhead movement costing only 2 points for two vehicles. 

Artillery is an important part of every war and the M113 Panzermorser is a definite must-have with its low cost and ability to shoot smoke bombardment. Adding an additional 6 armoured mortars should be enough to provide you with the necessary support, however, if you want higher quality you can always look at the M109G as an alternate option. It’s more expensive but is also more effective. Unfortunately, the  M113 Panzergrenadier Kompanie only has access to the American version of the M109 instead of the newer M109A3G, but West German players can find all the support needed inside the formation anyway.

Aircraft are usually a great threat for elite forces with their attacks being lethal against expensive tanks. Because of this having an anti-aircraft element is essential in every World War III list, particularly in a West German one. Even though this isn’t a tr
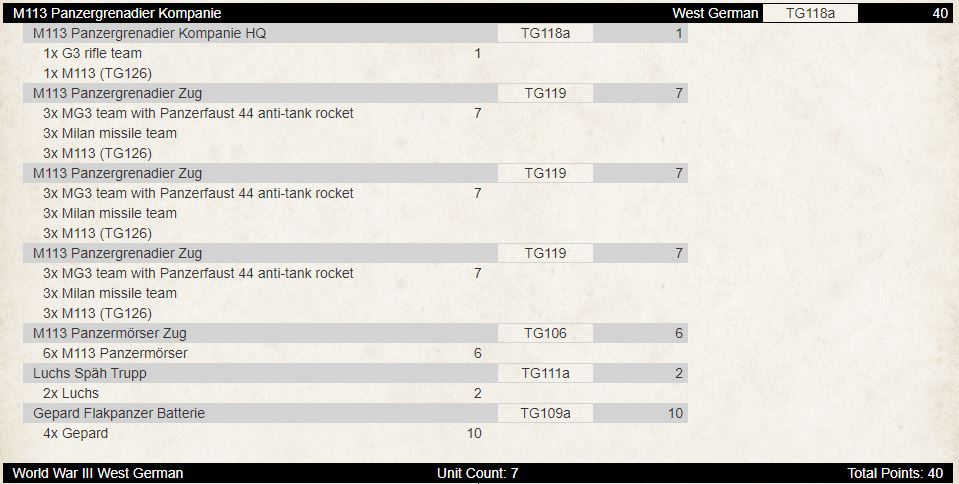
aditional West German list, including anti-aircraft is important, try adding 4 Gepards since they’re also extremely effective against IFVs. Last but not least we have more AT21 because sometimes 9 Milan anti-tank teams are simply not enough. If you are looking for an alternate option try the Jaguar. They’re an interesting choice and thanks to the Forward Defense rule they can be deployed in addition to a normal tank platoon with a front armour of 4+.

This is my M113 Panzergrenadier formation:

This is a great base for a West German Formation, consisting of three M113 Panzergrenadier Zug with 9 Milan anti-tank teams. Don’t focus only on Milan mind you, keep in mind we are talking about three units and that means you can occupy more ground by deploying them from different points. For example, take the Manoeuvre stance where some units have to stay and others have to move, you have recon for the Spearhead movement. Anti-aircraft or anti-IFV shots are provided by Gepards while the M113 Panzermorser platoon gives artillery or smoke support all for just 40 points. That means you still have more than 50% of your points for the rest of the force. Nice for a West German force, don’t you think? The rest is up to you, you could also deploy 3 Leopard 2s or 2 Leopard 2A5s if you really miss 3rd generation Main Battle Tanks, but this isn’t something I would recommend. 

Leopard 1 Panzer Kompanie

Let’s look at another second-line formation with the German-made tank after World War II: the Leopard 1. These days there are many Main Battle Tanks roaming the World War III battlefields, however, this older tank can still be a threat for many WARPAC tanks. That’s the reason why the Bundeswehr didn’t retire them from service.

A Panzerdivision was made up of three brigades. Two of these brigades were equipped with Leopard 2 main battle tanks while the third brigade was a panzergrenadier brigade equipped with Leopard 1 tanks. They were to be the second line of defence after the Leopard 2s had engaged enemies and were on the retreat.

In the game the Leopard I is a lightly armoured tank. Its front armour is only 9, which is not enough to block a main battle tank’s shots. The good news is that every shot from an anti-tank over 17 will kill you without any hope of survival. Why is it good news? Well, if your opponent is shooting at your Leopard 1s with an anti-tank of 21 or 22, then their tanks definitely cost more points. 

That means your opponent is investing many points into destroying just a few of your tanks. Because Leopard 1s are hit on 4+, statistically only 50% of shots should connect, (33% if you are maneuvering carefully using some concealment) meaning your maneuverability is your best defence. The side armour is quite poor at a value of 5, but the Leopard 1 also does benefit from Bazooka skirts which can provide a little bit of protection but won’t stop an assault from enemy infantry.

The third armour value is the top armour and is lower than the standard at just 1. This doesn’t make a great difference in close combat but will against artillery. Keeping your Leopard 1 moving and close to terrain should help with this problem. By now you’ll know not to trust the Leopard 1 armour, just try not to get hit! Its saving grace is the 105mm L7 gun with a range of 40” it can hit a target before the target has an opportunity to fire back. In fact, the Leopard 1s ROF is the same halted and moving, giving you the added benefit of moving out fast and getting off the first shot with anti-tank 19! This will be a real threat for the tanks of the WARPAC that usually put West Germany in trouble. A front Armour of 14-15 won’t offer much protection against this gun, so deploying a larger number of tanks is recommended. For less than 10 points you can deploy 3 Leopard 1s and with a small extra point spend you can have 4 tanks deployed. Being able to deploy a four-tank platoon is quite an incredible feat for West Germany.

The Leopard 1 Panzer Kompanie must be consist of an HQ (that can be composed of one or two tanks) and one Leopard 1 Panzer Zug. The second compulsory platoon can be another Leopard 1 Panzer Zug, a Marder 1 Panzergrenadier Zug or a M113 Panzergrenadier Zug. Usually, if you need an infantry platoon in the formation, I suggest the M113 Panzergrenadier Zug as it adds more anti-tank 21 to the force. You can also add another Leopard 1 Panzer Zug to bring more tanks to the table. The rest of the formation choice is the same as the M113 Panzergrenadier Zug we discussed before as both these formations are in the same brigade

This an example of a Leopard 1 formation:

With 4 Leopard 1s per Zug,  managing a tank swarm should be easy since you shoot at least 28 shots a turn. Anti-aircraft (and as we know anti-IFV) fire is provided by Gepards while high-quality artillery support is guaranteed by M109. Depending on the force you should have enough points left for support to deploy what the formation lacks. High anti-tank support is heavily recommended with an infantry platoon. An M113 Panzergrenadier Zug with three Milan missiles will be the perfect addition, adding both infantry team and anti-tank support for cheap!

To properly finish this article I’d like to share the new version of my old West German list:

As I’m sure you notice I have used more or less the same base I used on the base formations. The most important thing is to balance the support units between the formation. Remember that Leopard 1s are quite easy to destroy (at least if you are able to hit them!) so giving this formation some extra units should allow it to survive until the end of the match.

New Starter Force, New Army!

With the launch of the WWIII: West German, I thought I would look at how a new player or someone on a budget could get a competitive force on the table with new equipment such as the Leopard 2A5, Marder 2, Wiesel, and JagdpanzerKanone.  For a new player, it opens the door to playing WWIII without needing to buy, assemble or paint too much and get into playing the game quicker. So, if we look at what we get in the starter set, that might help us decide what formations to run.

The starter set contains the following:

  • Complete A5 Rulebook
  • West German “Start Here” booklet
  • 3 x Leopard 2A5 Tanks
  • 2 x Leopard 2 Tanks
  • 4 x Marder 2 Scouts
  • 3 x M109A3G or M109G 155mm Self-propelled guns
  • 1 x M113 OP
  • 2 x PAH Helicopters with rare earth magnets and flight stands
  • 2 x Tornado aircraft with rare earth magnets and flight stands
  • 4 x Decal Sheets
  • 12 x Unit Cards

Because the rulebook is included in the box you’re already saving some money. One very cool thing about this starter box – is it includes an OP.  Now if we look at what formations are in the WWIII: West German book we should be able to figure out how to use what comes in this starter force. The best formations straight out of the box are the Leopard 2 Panzer Aufklarungs Kompanie, Leopard 2A5 Panzer Kompanie, and the Marder 2 Panzergrenadier Kompanie.

We are going to look at the Leopard 2 Panzer Aufklarungs Kompanie formation first:

  • 1 Leopard 2 Panzer Aufklarungs Kompanie HQ
  • 2-4 Marder 2 Spah Trupp
  • 1-2 Leopard 2A5 Panzer Zug or Leopard 2 Panzer Zug
  • 0-1 Fuchs Panzer-Aufklarungs Zug
  • 0-1 Gepard Flakpanzer Batterie

Straight out of the box we can use all the Leopards and Marders as part of this formation and apply the rest of the box as support.  Looking at 105pts, this is what we could build using this starter force and an extra box:

FORMATION
Leopard 2 Panzer Aufklarungs Kompanie HQ 1 x Leopard 2A5 17pts
Marder 2 Spah Trupp 2 x Marder 2 Scout (50mm)  4pts
Leopard 2A5 Panzer Zug 2 x Leopard 2A5 34pts
Leopard 2 Panzer Zug 2 x Leopard 2 22pts
SUPPORT
M109G Panzerartillerie Batterie 3 x M190G   7pts
M113 OP Observation Post 1 x M113 OP   1pt
PAH Anti-tank Helicopter Flight 2 x PAH   8pts
Tornado Strike Flight 4 x Tornado   8pts

We have used everything in the box and added a box of two Tornados.  Now this formation has five units for the break – and all small units at that. Bearing in mind that whilst small, they can be used with great skill and frustrate opponents. The Marder 2s have been upgraded to 50mm for 1pt this means the unit has AT13 instead of AT11, which is worth it.  Note, that the sprue contains both barrels but only one turret, so you could magnetize the barrels to interchange them or just glue in the one you prefer.

To buy this army you need only to purchase the following for $170:

1 x TGRAB03 West German Starter Force: Panzeraufklärungs Kompanie (Plastic)   110
1 x TGBX15 Tornado Strike Flight (Plastic)     35
1 x WW3-05 WWIII: West German, Hardback     25
TOTAL $170

We can change up this formation by adding a few extra models and not using everything in the starter force to give you some more options and make the formation a bit more resilient.  An example force could look like this:

FORMATION
Leopard 2 Panzer Aufklarungs Kompanie HQ 1 x Leopard 2 11pts
Marder 2 Spah Trupp 2 x Marder 2 Scout (35mm)  3pts
Leopard 2A5 Panzer Zug 3 x Leopard 2A5 51pts
Gepard Flakpanzer Batterie 6 x Gepard 15pts
SUPPORT
M109G Panzerartillerie Batterie 3 x M190G   7pts
M113 OP Observation Post 1 x M113 OP   1pt
Tornado Strike Flight 4 x Tornado   8pts

Now this formation has only five units to break before it has to roll formation morale – and all small units at that. Keep in mind that whilst small, they have a high skill cap and are very capable of frustrating opponents. With a three-tank unit of Leopard 2A5s and a unit of six Gepards, you now have two units that should be more robust and output a lot more firepower.  Note, to achieve this, we had to downgrade the Marder 2s to a 35mm gun.

To buy this army you need only to purchase the following for $301:

1 x TGRAB03 West German Starter Force: Panzeraufklärungs Kompanie (Plastic)   110
1 x TGBX15 Tornado Strike Flight (Plastic)     35
1 x TGBX19 Marder II Zug     50
3 x TGBX07 Gepard Flakpanzer Batterie     81
1 x WW3-05 WWIII: West German, Hardback     25
TOTAL $301

You could also drop two Gepards and add in an infantry platoon – either in formation Fuchs Panzer-Aufklarungs Zug for 4pts (and upgrade one Marder 2 Spah Trupp to 50mm for 1pt) or take an Fallschirmjäger Zug for 5pts.  Whilst the Fuchs infantry is in-formation, it is small with four stands and the Fallschirmjäger has six stands which would hang around longer but being support, does not count towards the formation break.

The next formation we can look at is the Leopard 2A5 Panzer Kompanie.  This formation is made up of the following units:

  • 1 Leopard 2A5 Panzer Kompanie HQ
  • 1-2 Leopard 2A5 Panzer Zug
  • 1 Leopard 2A5 Panzer Zug or Leopard 2 Panzer Zug or Marder 2 Panzergrenadier Zug or Marder Panzergrenadier Zug
  • 0-1 Jaguar Jagdpanzer Zug
  • 0-1 Gepard Flakpanzer Batterie
  • 0-2 Luchs Spah Trupp
  • 0-1 M109G Panzerartillerie Batterie or M109A3G Panzerartillerie Batterie

From our starter box we can go two ways to filling out the formation, depending on your preference – Leopard 2s or Marder 2 Infantry in the second compulsory unit.  the good news is that the M109s are now part of the formation and you can choose the short or long barrel option.  An example force with Leopard 2s:

FORMATION
Leopard 2A5 Panzer Kompanie HQ 1 x Leopard 2A5 17pts
Leopard 2A5 Panzer Zug 2 x Leopard 2A5 34pts
Leopard 2 Panzer Zug 2 x Leopard 2 22pts
Gepard Flakpanzer Batterie 4 x Gepard 10pts
M109G Panzerartillerie Batterie 3 x M190G   7pts
FORMATION SUPPORT
Marder 2 Spah Trupp 2 x Marder 2 Scout (35mm)  3pts
SUPPORT
M113 OP Observation Post 1 x M113 OP   1pt
Roland Flarakpanzer Batterie 2 x Roland   3pts
Tornado Strike Flight 4 x Tornado   8pts

As you can see, using everything except the PAHs and 2 Marder 2s.  The formation break is 5 units and with the M109s in formation we can still use a troop of Marder 2 Spah as support.

To buy this army you need only to purchase the following for $251:

1 x TGRAB03 West German Starter Force: Panzeraufklärungs Kompanie (Plastic)   110
1 x TGBX15 Tornado Strike Flight (Plastic)     35
2 x TGBX07 Gepard Flakpanzer Batterie     54
1 x TGBX08 Roland Flak Batterie     27
1 x WW3-05 WWIII: West German, Hardback     25
TOTAL $251

If we took the Marder 2 infantry instead of Leopard 2s in the formation, this is how it could look:

FORMATION
Leopard 2A5 Panzer Kompanie HQ 1 x Leopard 2A5 17pts
Leopard 2A5 Panzer Zug 2 x Leopard 2A5 34pts
Marder 2 Panzergrenadier Zug 3 x MG3 team with Panzerfaust 44 anti-tank

2 x Milan missile team

1 x Carl Gustav anti-tank team

3 x Marder 2 (50mm)

12pts
Gepard Flakpanzer Batterie 4 x Gepard 10pts
M109G Panzerartillerie Batterie 3 x M190G   7pts
SUPPORT
M113 OP Observation Post 1 x M113 OP   1pt
PAH Anti-tank Helicopter Flight 4 x PAH 16pts
Tornado Strike Flight 4 x Tornado   8pts

We are using everything except for two Leopard 2s and one Marder 2.  Adding the usual Gepard Flakpanzer Batterie and additional PAHs and Tornados.

To buy this army you need only to purchase the following for $272:

1 x TGRAB03 West German Starter Force: Panzeraufklärungs Kompanie (Plastic)   110
1 x TGBX15 Tornado Strike Flight (Plastic)     35
1 x TGBX12 BO-105P Anti-tank Helicopter Flight     35
2 x TGBX07 Gepard Flakpanzer Batterie     54
1 x TGR703 Panzergrenadier Zug     13
1 x WW3-05 WWIII: West German, Hardback     25
TOTAL $272

Looking at the Marder 2 Panzergrenadier Kompanie now, this formation is made up of the following units:

  • 1 Marder 2 Panzergrenadier Kompanie HQ
  • 1-2 Marder 2 Panzergrenadier Zug
  • 1 Marder 2 Panzergrenadier Zug or Leopard 2A5 Panzer Zug or Leopard 2 Panzer Zug
  • 0-1 Jaguar Jagdpanzer Zug
  • 0-1 Gepard Flakpanzer Batterie
  • 0-2 Luchs Spah Trupp
  • 0-1 M113 Panzermorser Batterie
  • 0-1 M109A3G Panzerartillerie Batterie

Straight out of the box we can use most of the kit except for the Leopard 2s (unless we add them as Formation Support black box choice):

FORMATION
Marder 2 Panzergrenadier Kompanie HQ 1 x G3 rifle team

1 x Marder 2 (35mm)

  2pts
Marder 2 Panzergrenadier Zug 3 x MG3 team with Panzerfaust 44 anti-tank

2 x Milan missile team

1 x Carl Gustav anti-tank team

3 x Marder 2 (35mm)

11pts
Leopard 2A5 Panzer Zug 3 x Leopard 2A5 51pts
Gepard Flakpanzer Batterie 4 x Gepard 10pts
Jaguar Jagdpanzer Zug 3 x Jaguar 1   6pts
M109A3G Panzerartillerie Batterie 3 x M190A3G   8pts
SUPPORT
M113 OP Observation Post 1 x M113 OP   1pt
PAH Anti-tank Helicopter Flight 2 x PAH   8pts
Tornado Strike Flight 4 x Tornado   8pts

We use everything in the box except for the two Leopard 2s.  It’s versatile and provides six units for the formation break.  M109A3Gs are part of the formation.  I have added Jaguars to provide some long-range AT23 goodness.

To buy this army you need only to purchase the following for $279:

1 x TGRAB03 West German Starter Force: Panzeraufklärungs Kompanie (Plastic)   110
1 x TGBX15 Tornado Strike Flight (Plastic)     35
1 x TGBX04 Jaguar Jagdpanzer Zug     42
2 x TGBX07 Gepard Flakpanzer Batterie     54
1 x TGR703 Panzergrenadier Zug     13
1 x WW3-05 WWIII: West German, Hardback     25
TOTAL $279

If you wanted a second infantry platoon in formation, then remove the PAHs and Jaguars and add a second Marder 2 Panzergrenadier Zug and an M113 Panzermorser Batterie:

FORMATION
Marder 2 Panzergrenadier Kompanie HQ 1 x G3 rifle team

1 x Marder 2 (35mm)

  2pts
Marder 2 Panzergrenadier Zug 3 x MG3 team with Panzerfaust 44 anti-tank

2 x Milan missile team

1 x Carl Gustav anti-tank team

3 x Marder 2 (35mm)

11pts
Marder 2 Panzergrenadier Zug 3 x MG3 team with Panzerfaust 44 anti-tank

2 x Milan missile team

1 x Carl Gustav anti-tank team

3 x Marder 2 (35mm)

11pts
Leopard 2A5 Panzer Zug 3 x Leopard 2A5 51pts
Gepard Flakpanzer Batterie 4 x Gepard 10pts
M113 Panzermorser Batterie 3 x M113 Panzermorser   3pts
M109A3G Panzerartillerie Batterie 3 x M190A3G   8pts
SUPPORT
M113 OP Observation Post 1 x M113 OP   1pt
Tornado Strike Flight 4 x Tornado   8pts

This now gives you seven units for the formation break and gives the option to attack and defend and now has two templates.

To buy this army you need only to purchase the following for $330:

1 x TGRAB03 West German Starter Force: Panzeraufklärungs Kompanie (Plastic)   110
1 x TGBX15 Tornado Strike Flight (Plastic)     35
1 x TGBX19 Marder II Zug     50
1 x TGBX09 M113 Panzermorser Zug (x3)     30
2 x TGBX07 Gepard Flakpanzer Batterie     54
2 x TGR703 Panzergrenadier Zug     26
1 x WW3-05 WWIII: West German, Hardback     25
TOTAL $330

You could swap out the M113 Panzermorser Batterie and replace it with a Formation Support Marder 2 Spah Trupp thus maximizing your Marder 2 purchase. You could use the starter box to expand on the formations above, however, I am interested in the new formations the book has to offer and I wanted to see how the starter box is applicable to them as well.  I believe this is a great starting point to add the Black Box Formation Support.  For example, the new Fallschirmjager Kompanie with the Wiesels!  This formation is comprised of:

  • 1 Fallschirmjager Kompanie HQ
  • 2-3 Fallschirmjager Zug
  • 0-1 Wiesel TOW Panzrabwehr Zug
  • 0-1 Wiesel FK 20mm Flugabwehr Zug

It has no inherent tank, reconnaissance, or artillery support, but if we add the starter force it gives you all three.  An example force could look like this:

FORMATION
Fallschirmjager Kompanie HQ 1 x G3 rifle team   1pts
Fallschirmjager Zug 5 x MG3 & G3 team with Panzerfaust 44 anti-tank rocket

1x Milan missile team

  5pts
Fallschirmjager Zug 5 x MG3 & G3 team with Panzerfaust 44 anti-tank rocket

1x Milan missile team

  5pts
Fallschirmjager Zug 5 x MG3 & G3 team with Panzerfaust 44 anti-tank rocket

1x Milan missile team

  5pts
Wiesel TOW Panzrabwehr Zug 4 x Wiesel TOW   5pts
Wiesel FK 20mm Flugabwehr Zug 6 x Wiesel 20mm   4pts
FORMATION SUPPORT
Marder 2 Spah Trupp 2 x Marder 2 Scout (50mm)   4pts
Leopard 2A5 Panzer Zug 3 x Leopard 2A5 51pts
SUPPORT
M113 OP Observation Post 1 x M113 OP   1pt
M109G Panzerartillerie Batterie 3 x M190G   7pts
Roland Flarakpanzer Batterie 6 x Roland   9pts
Tornado Strike Flight 4 x Tornado   8pts

You want to take all three infantry platoons and max out on Wiesel’s for the formation break of six units.  Add Leopard 2A5s and Marder 2s as formation support with the artillery, AA, and the Tornados will round out the force to give it some balance.  If you want one or two of your platoons to have the option of Huey’s to provide some mobility on the battlefield, then you could drop some of the Roland’s to achieve it.

To buy this army you need only to purchase the following for $376:

1 x TGRAB03 West German Starter Force: Panzeraufklärungs Kompanie (Plastic)   110
1 x TGBX15 Tornado Strike Flight (Plastic)     35
3 x TGBX08 Roland Flak Batterie     81
1 x TGR002 Wiesel TOW Panzerabwehr Zug     27
2 x TGR001 Wiesel FK 20mm Flugabwehr Zug     44
3 x TGR712 Jäger Zug     54
1 x WW3-05 WWIII: West German, Hardback     25
TOTAL $376

The same approach can be taken to apply to the other new formations including the Gebirsjager Kompanie and the Heimatschutzbrigade Jager Kompanie.  I have existing formations already but I wanted to add some new models to them with the starter force in mind.

As you can see, the starter set is very useful as starting block to build your army. It provides lots of different options based on what sort of list you want to run, whether you are on a budget, or if you want to flesh out the last part of your list.  I will be getting one of these boxes to start my West German journey (yes yet another army) and I will be looking to create a Marder 2 Panzergrenadier Formation as my first stop!

~ John.


WWIII: West German Spotlight

WWIII: West German Spotlight

Leopard gets new spots with Wayne Turner

It’s 1985 and the Cold War just got hot!

Hauptmann Müller watched from his turret as the Soviet T-72s emerged from the village. ‘Wait’ he thought to himself as more enemy tanks moved beyond the cover of the village houses. The Soviet tanks keep coming, he counted eight, no nine, but more kept coming. They spread out slowly into line abreast, unaware that Müller’s company of Leopard 2 tanks were watching them from the forest just 1500 meters away.

Müller could wait no longer. “FIRE,” he ordered and the world around the Soviet tanks erupted in flame and destruction.

Check out WWIII: West German in the online store here…

Formations and Units

World War III: West German allows you to build twelve different fighting companies. You can field three different tank companies including the new Leopard 2A5 Panzer Kompanie. This formation fields the up-armored Leopard 2 with its distinctly angled spaced armor on its turret front, as well improved side armor. These improvements make it one of the most heavily armored tanks available with its Front 22, Side 12, and Top 2. This is further enhanced by sophisticated Chobham Armour giving it further protection from HEAT (High Explosive Anti-tank) weapon commonly used by infantry anti-tank weapons and guided missiles. On top of this it is armed with the powerful 120mm L/44 gun (Anti-tank 22) with an advance stabilizer, making it just as effective stationery or on the move (ROF 2 Halted or Moving).

WWIII: West German Spotlight

World War III: West German is the latest supplement for World War III: Team Yankee. It introduces the forces of West Germans to the turbulent battles of World War III from 1985. World War III: West German and the West German range of Team Yankee models contains everything you need to hold back the red menace.

Inside you will find background on the West German Bundeswehr (armed forces) and Heer (army) and their role in the initial stages of World War III. You will also find the stories of Panzer Division 1 and Kampfgruppe Müller as they fight to defend their country from the invading communist forces

WWIII: West German Spotlight


The Leopard 2 Panzer Kompanie is based around the excellent Leopard 2 main battle tank. This tank does not have as much armour (Front 18, Side 7, Side 2) as the Leopard 2A5, but is still at the cutting edge of modern weapons technology. It is armed with the same excellent gun as the Leopard 2A5. The West Germans also fielded large number of Leopard 1 tanks. These usually provide the Panzergrenadier Brigades with their tank element. The Leopard 1 is armed with a 105mm L7 gun (Anti-tank 19) that is fully stabilised giving it a ROF of 2 whether stationary or moving. The Leopard 1 is lightly armoured (Front 9, Side 5, Top 1) and is quite mobile.

The Leopard 2, Leopard 2, and Leopard 1 tanks’ parent Panzer Kompanie formations are adaptable. In each Panzer Zug unit can be swapped with one of the different types of Panzergrenadier Zug. This gives the company an integrated infantry element. These Formations also contain various units from the division as part of a battlegroup that includes Jaguar 1 tank-hunters armed with the powerful HOT anti-tank missile (anti-tank 23), Luchs Späh Trupp (armoured car patrol) to advance ahead of your force, discovering the enemy, Gepard anti-aircraft tanks to sweep the sky of Soviet aircraft, and M109G self-propelled guns to prepare the enemy’s positions before an attack. The Leopard 2A5 and Leopard 2 formations also get access to the M109A3G. This self-propelled artillery vehicle is updated with the longer 155mm howitzer improving the bombardment firing range out to 112”/280cm!


WWIII: West German Spotlight


World War III: West German contains three different Panzergrenadier Kompanie formations representing the mechanized infantry of the Heer (Army) of the Bundeswehr (Federal Armed Forces).

The Marder 2 Panzergrenadier Kompanie lets you field the Marder 2 infantry fighting vehicle. This vehicle was designed, but never adopted by the West German due to the end of the Cold War. However, the alternative World War III: Team Yankee timeline it made a logical addition to the arsenal of the Heer. The Marder 2 was one of the most heavily armoured and armed infantry fighting vehicles to be designed. It is designed to replace the Marder 1 (see below), taking the same number of passengers (2). However, the Marder 2 IFV is well armoured (Front 6, Side 4, Top1) with the addition of composite layered armour giving it Chobham (Front and Side Armour 16 against HEAT weapons), making it near invulnerable to a weapon like Soviet RPG. It is also uniquely armed with Rh 503 autocannon which can be either 35mm or 50mm caliber. Both calibers have ROF 3/3 and Advanced Stabilisers and Laser Range Finders. The 35mm is AT 11, FP 4+, while the 50mm is AT 13 and FP 4+. The Marder 2 can also mount a Milan anti-tank guided missile with the Milan Mount rule. You can also field a Marder Panzergrenadier Kompanie with the older Marder 1 IFV. The Marder adds additional firepower to the Panzergrenadiers with its 20mm Rh 202 gun (ROF 3 halted, 2 moving). The third type of Panzergrenadier Kompanie formation is mounted in M113 armored personnel carriers.

WWIII: West German Spotlight

he Panzergrenadier Zug units are small but well-armed. Its three MG3 teams (ROF 3 halted, 2 moving) are additionally armed with Panzerfaust 44 anti-tank rockets (Anti-tank 15). The Zug also comes with two Milan anti-tank missile teams, or three in the case of the units mounted in the roomier M113 APC. The Milan is a powerful European developed anti-tank weapon more than capable of taking out most Soviet tanks (Anti-tank 21).

Like the Panzers, the Panzergrenadiers often swapped one of their three Panzergrenadier Zug units for a Leopard 2A5, Leopard 2, or Leopard 1 Panzer Zug. Panzergrenadier Kompanie formations are also well supported by attached units from the brigade and division. As well as the Panzergrenadiers and Leopard tanks, you can field M113 Panzermörser 120mm self-propelled mortars to provide immediate fire support. Anti-tank fire support comes from Jaguar 1 or Jaguar 2 tank-hunters. The Jaguar 2 is armed with an American Improved TOW missile (Anti-tank 21). The Panzergrenadiers are also supported by Luchs recon, Gepards anti-aircraft, and M109G artillery.

The third type of formation you can build is the reconnaissance troops. There are three different Panzeraufklärungs Kompanie. These troops come from the Panzer Division’s Panzeraufklärungs Bataillon, or armoured reconnaissance battalion. As the testbed for both the Leopard 2A5 and Marder 2, Panzerlehrbrigade 9 has formed an experimental Panzeraufklärungs Kompanie armed with Leopard 2A5 or Leopard 2 and Marder 2 IFVs. The Marder 2s are organized into Späh Trupp units of two vehicles with the Scout and Spearhead rules.

The Leopard Panzeraufklärungs Kompanie is built around the mixed company of the battalion and contains Luchs armored cars and Leopard 1 tanks. The Leopard 1 tanks are an older model of main battle tank build for maneuver and firepower over armor and many are still in service with the West German Heer in 1985. The Leopard 1 tank’s role in the Panzeraufklärungs Kompanie is to provide heavy firepower while the Luchs armored cars advance ahead. The Leopard 1 is armed with a 105mm L7 gun (Anti-tank 19), a weapon that can cause problems for any Soviet spearhead.

WWIII: West German Spotlight

The Luchs itself is an impressive vehicle. It’s as long as a Leopard and is 8-wheel drive giving it fast on-road performance and excellent cross-country capabilities. It is armed with a 20mm RH 202 gun. The Luchs Späh Trupp has both the Scout and Spearhead rules, allowing them to fulfill their role with skill, pushing to the edge of the enemy’s positions and then quickly escaping when the fireworks start. The Panzeraufklärungs battalion has its own infantry for clearing and reconnoitering terrain such as dense woods and villages in support of the Luchs.

The Fuchs Panzeraufklärungs Kompanie represents the infantry element of the battalion. The Fuchs Panzeraufklärungs Zug is mounted in Fuchs 6-wheeled armoured transports. They are organized much the same as the Panzergrenadiers but only have one Milan anti-tank missile team. The rest of the formation is made up of Luchs Späh Trupp units and options for Gepard AA tanks and Leopard 1 tanks.

WWIII: West German Spotlight


World War III: West German also contains three infantry formations. The first of these is the Fallschirmjäger Kompanie. These troops give West German a helicopter-borne infantry element. A Fallschirmjäger Kompanie comes with three Fallschirmjäger Zug unit, each containing five MG & G3 teams (Range 16”/40cm, ROF 2/1, AT 2, FP 5+) with Panzerfaust 44 anti-tank rockets (Range 12”/30cm, ROF 1/1, AT 15, FP 5+, HEAT, Slow Firing). The unit also has a Milan ATGM and can be mounted in two UH-1 Huey helicopters. The Fallschirmjäger also has its own light armor, the Wiesel. This light tracked vehicle comes in two variants, the Wiesel TOW armed with the Improved TOW ATGM, and the Wiesel FK 20mm armed with the 2cm Rh 202 anti-helicopter cannon.

You can also field a Gebirgsjäger Kompanie (Mountain Infantry Company). This formation has four Gebirgsjäger Zug units as well as their own tanks, recon, mortars, and anti-aircraft weapons. Each Gebirgsjäger Zug has five to seven MG & G3 teams with Panzerfaust 44 anti-tank rockets and one or two Milan ATGMs. These troops have the Mountaineers rule allowing them to scale cliffs and similar impassable terrain.

Finally, we have the Heimatschutzbrigade (Homeland Security Brigade) Jäger (Light Infantry). The Jäger Kompanie formation contains three Jäger Zug units, a M113 Jäger Panzermörser Zug, and either a Kanonenjagdpanzer Zug or a Heimatschutzbrigade Leopard 1 Panzer Zug. All these Heimatschutz troops are reservist troops with less Skill (4+ instead of the normal West German 3+) and have lower Rally and Remount ratings (4+ instead of 3+), but retain the West German Morale rating of 3+. The Kanonenjagdpanzer Zug contains 3-4 Kanonenjagdpanzer assault guns armed with 90mm guns (Range 32”/80cm, ROF 2/1, AT 16, FP 2+, Forward Firing, HEAT). They have enough armor to protect them from lighter weapons (Front 6, Side 3, Top 1).

WWIII: West German Spotlight

Support

All these formations have access to supporting forces that include rocket artillery, artillery observers, anti-aircraft missiles, anti-tank helicopters, and ground attack aircraft. The LARS Raketenwerfer Batterie (LARS Rocket Launcher Battery) is armed with two to four truck-mounted LARS (Leichte Artillerie-Rakuten-system, light artillery rocket system). Each LARS truck mounts two 18 tubes 110mm rocket pods and can fire all 36 rockets within 18 seconds giving you a devastating SALVO template.

The West Germans also field the heavier 227mm MARS Raketenwerfer Batterie (MLRS in US service). This weapon system has a longer artillery range and uses the MLRS rule that sees each launcher count as two weapons when firing a SALVO bombardment. Both the LARS and MARS can fire optional Minelets, allowing them to drop a minefield on an enemy position during the battle. The M113 OP observation post can act as an observer the LARS, MARS, M109Gs, M109GA3s, or Panzermörser mortars.

To supplement the firepower of Gepard anti-aircraft tanks is the Roland FlaRakpanzer Batterie (Roland anti-aircraft rocket battery). Like the Gepards, you can take 6, 4, or 2 Rolands in your battery. The FlaRakpanzer is armed with the Roland 2 anti-aircraft missile with excellent range (56”/140cm) and is guided (no To Hit penalty for range over 16”/40cm). Additional anti-aircraft troops can be added to your force with the Fliegerfaust Gruppe. This unit can only be added to your force if you already have Gepards or Rolands. It added 2 to 6 Redeye teams to your force. The Redeye is an American man-portable guided surface-to-air missile (range 48”/120cm).

The PAH (Panzer-Abwehr-Hubschrauber, or anti-tank helicopter) is a light and highly maneuverable Bölkow Bo-105P helicopter armed with six HOT anti-tank missiles. The PAH pops above the trees to fire its guided missiles, before dropping back down into concealment. The powerful HOT missile easily cuts through most armored vehicles.

Air support comes from the Tornado Strike Flight. The Luftwaffe (air force) operates Tornado Interdictor Strike (IDS) aircraft. These come in low and fast before dropping their KB44 bomblet payload from their MW-1 submunition dispenser (SALVO, anti-tank 8, Firepower 3+).

Main Changes to Note from Leopard

The main changes those of you with Leopard will notice are the additional Formations and Units. We have added six new formations; Leopard 2A5 Panzer Kompanie, Marder 2 Panzergrenadier Kompanie, Leopard 2 Panzeraufklärungs Kompanie, Fallschirmjäger Kompanie, Gebirgsjäger Kompanie, and Jäger Kompanie. World War III: West German now also includes the three Formations from the Panzertruppen booklet; Leopard 1 Panzer Kompanie, M113 Panzergrenadier Kompanie and Fuchs Panzeraufklärungs Kompanie.

We have added options for an additional Marder transport and an M3 team in the Marder Panzergrenadier Kompanie HQ, while the Panzergrenadier Zug can add a Carl Gustav team to the Unit (Range 16”/40cm, ROF 1/1, AT 17, FP 3+, Assault 5, HEAT, Slow Firing). We have also reorganized the Panzer Kompanie formations into three Panzer Zug units with up to four tanks in each Panzer Zug unit.

We have also broken up the Gepard FlaKpanzer Batterie into more options, so now you can take 6, 4, 3, 2 Gepards in your Unit. We have done the same thing with the M109G and M109A3G Panzerartillerie Batterie units. However, the Luchs Späh Trupp units have gone up and they now cost 2 points per Unit, which is still good value for a very handy Spearhead unit.

We have updated the Milan Mount rule to be more flexible. Instead of having to commit your Milan team to be removed from the game to have its missile mounted on its Marder, you can now fire the Milan from the Marder as long as the Milan team is a Passenger. Once the Milan team dismounts the Marder can no longer fire a Milan weapon.

WWIII: West German Spotlight

Scenarios

World War III: West German also contains three scenarios to test your skills with your West German force.

The first scenario, ‘At the Forward Edge of Battle’, pits a Marder Panzergrenadier Kompanie against the initial wave of the Soviet attack. You must delay them before withdrawing to your next delaying position.

The second scenario, ‘Delaying Attack’, sees a Leopard 2 Panzer Kompanie advancing to head off a Soviet attack, delaying it until their fellow units can prepare positions in another location.

The third scenario has a Leopard 2 Panzer Kompanie advancing to attack a surprised Soviet force that has advanced beyond its immediate reserves.

WWIII: West German Spotlight

Painting Guides

World War III: West German also contains a detailed painting guide to help you prepare your West Germans for combat. You will find details on what colors to use, with options for the three-color NATO scheme or simple one-colour Gelboliv (Yellow Olive) scheme. It also contains guides for painting and basing your panzergrenadiers.

WWIII: West German Spotlight

New Models

The key new models to come out with World War III: West German are:

TGBX18 Leopard 2A5 Panzer Zug (x5 Tanks) (Plastic)
TGBX19 Marder 2 Zug (x5 IFVs) (Plastic)
TGBX17 UH-1 Huey Transport Helicopter (x2 helicopters) (Plastic)
TUBX24 M109 Field Artillery Battery (x3 SP guns) (Plastic)
TUBX25 M270 MLRS Rocket Launcher Battery (x3 SP rocket launchers) (Plastic)
TGR703 Panzergrenadier Zug or Panzeraufklärungs Zug
TGR712 Fallschirmjäger Zug, Gebirgsjäger Zug, or Jäger Zug
TGR001 Wiesel FK 20mm Flugabwehr Zug (3x Wiesel FK 20mm)
TGR002 Wiesel TOW Panzerabwehr Zug (4x Wiesel TOW)
TGBX16 Kanonenjagdpanzer Zug (4x Kanonenjagdpanzer)

Plus all the other great models you need to build a West German force for World War III; Team Yankee.

~Wayne

Welcome to the WWIII: West German Live Launch!

It’s time for the WWIII: West German Live Launch! Join us over the next 12 hours as we upload articles and videos all about the latest WWIII: Team Yankee book as we take a look at the West German forces as the cold war goes HOT!

Be sure to tune in to our Live game of WWIII: Team Yankee, as our Soviet underdog Luke is playing against the West German Twitch Chat!

Click here to tune in  12.30pm PST/19.30 PM GMT time and watch the carnage happen… 

Twitch Plays World War III: Team Yankee – West German

Join us LIVE on Twitch 16th May 18:30PST/13:30GMT for the VERY FIRST game of Twitch Plays World War III: Team Yankee.

It’s the Soviet army (Guest Staring: Luke from Battlefront Miniatures) VS the West German Twitch chat (YOU) in this fast-paced 70pt skirmish. Be sure to check out our Twitch channel in the link below and follow us so that you don’t miss it!

Click here to go to the Battlefront Miniatures Twitch Channel…

The Battlefield

So that chat can get right into this we’ve taken the liberty of rolling a mission so that people can figure out their plans!

The mission is Dust Up. You can find the WWIII Missions PDF here. See you all on the Live Launch!

Bagration: German Launch Round-Up

Bagration: German Live On Forces and Digital
Bagration: German Spotlight
Bagration: German Command Card Previews
Bagration: German Previews
A Look inside Firestorm: Bagration

Articles

Building A Bagration German Forces with the Tank-hunter Kampgruppe Starter Box
Ambush Predator: The Hetzer in Flames of War
Panzer IV/70 Tank Company – A Dangerous Duck
Tigers in the Mud Otto Carius on the Eastern Front, 1942-1944
Preparing the Big Guns: My Paint Scheme for Bagration: German
Building a Bagration German Half-Track Scout Company
Rapid Fire Assaults! The German Escort Platoon in Flames of War
One Elefant, Two Elefant, Three Elefant
Bagration River Battles: Terrain for Operation Bagration Scenarios
Anti-tank Support Options for a Bagration German Force
78. Sturmdivision – The Iron Hands of Eastern Front
Artillery Support Options for a Bagration German Force
Playing with Looted Soviet Tanks
Riding into Battle in Style…. the StuG Assault Gun Battery
Luke’s Panzer IV List

Videos

Bagration: German Showcase
Setting up an Eastern Front Board
How To Paint A Hetzer: Flames of War Painting Tutorial
All Miniatures Great and Small – Flames of War Unit Overview – German Bagration Elefant
All Miniatures Great and Small – Bagration: German Panzer IV/70
German Stater Force – Tank-hunter Kampfgruppe Unboxing
Wirbelwind/Ostwind Assembly Guide
Hetzer/Marder Assembly Guide
Panzer IV/70 Assembly Guide
Getting Started with Flames Of War Bagration: German: Part One
Getting Started with Flames Of War Bagration: German: Part Two
How To Paint A Panzer IV/70: Flames of War Painting Tutorial

Thanks For Watching

Thanks for tuning in everyone! We’ve had a great time and hope you’ve had a chance to check out all the content! But don’t worry, it’s not going anywhere and you can check all of it out at your own pace.

Hopefully, you’ve found something to inspire you and your German armies as we move forward into 2021 with our first Live Launch of the year!