Whats the “Marder 2” With You?

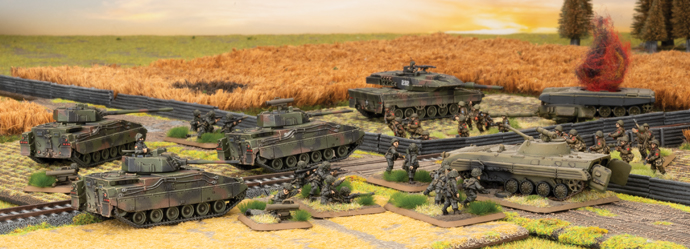
The new World War III: West German book brings to the table another wonderful model, we are talking about the Marder 2. Despite the fact I only play East German at the moment I will be buying this model, I love it! The Marder 2 is a German-built second generation of Armoured Personnel Carrier (APC) and can be compared to the American Bradley or British Warrior.

History

The decision to develop a new APC for the West German infantry was decided in 1979 when the Leopard 2 entered service. The High Command was looking for a vehicle faster than any main battle tank, with a better gun, improved protection, and could transport 7 men. The contract was signed in the mid-1980s but field trials only began in 1991. The Marder 2 IFV planned to enter service at Bundeswehr in 1998 and replace the old Marder 1, but, with the end of the Cold War, the vehicle was no longer needed so was decommissioned due to funding problems. However, I think it’s safe to assume that things would be different if the Cold War went HOT!

Weapons and Amour

The Marder 2 was equipped with a stabilized Rheinmetall MK 35/50 Rh-503 twin-calibre automatic cannon. Curiously this gun had an interchangeable barrel mounted on a universal breach and can be fitted with either a 35mm or 50mm calibre. Thanks to the thermal channel and the laser range finder the gun would be effective both at night and at long distances. The gun could use both APFSDS-T and HE rounds with a ROF of 400-177 rounds per minute, depending on which barrel was used. The Marder 2 armour was supposed to stand a 30mm AP round from the front and 14.5mm round on its sides, this was achieved through modular passive armour bolted onto the hull. Bringing the weight of this monster to 43 tonnes, which is heavier than the initial production of the Soviet T-72! A big tank needs a big engine and the MTU MB-883 turbocharged diesel engine with 1000 hp, provided the necessary power to meet the speed objective, allowing them to run the Leopard 2 off-road.

Marder II in World Word III: Team Yankee

Here we go, guys! Let’s have a look at how Marder 2 appears on our battlefields. West German has the best NATO troops and the Marder 2 isn’t an exception. They have a wonderful hit rating of 4+ making them extremely hard to land hits on (this is probably one of the best advantages of NATO) Embarked infantry will very appreciative! They also have a 3+ Skill that almost guarantees orders like Blitz and Shoot and Scott.

The Assault and Counterattack ratings are interesting with a rating of 4+. Usually, this kind of unit is pushed back by defensive fire so attacking isn’t always the best decision. Thanks to Chobham Armour that guarantees good protection against Heat weapons the Marder 2 is different, with a side armour rating of 16, it will definitely be a challenge for infantry units to engage, especially if they have suffered some losses or are pinned down. So look carefully at the Assault and Counterattack rating. The moral is the standard West German one of 3+ except for the Remount value of 4+ that makes remounting after being bailed out slightly more difficult, however, they should be protected by their hit values. The Marder 2 still has Thermal Imaging for the night fighting and may mount an infantry-carried Milan and two infantry can mount on the vehicle (same as Marder 1).

The standard Marder 2 weapon is the 35mm gun, it’s extremely effective and has a ROF rating of 3 both stationary and moving. This is impressive especially if you have to manage a Soviet swarm like BMP and BTR.

Advanced stabilizers allow the Marder 2 to move fast until 14” and still shoot like a Leopard 2. The range is an incredible 28” that makes them effective at long range thanks to the laser range finder. If math is not an opinion you can move up to 14” and shot at 28”, which means you can hit a target within 42” from your starting position. With an anti-tank value of 11, you have enough power to properly penetrate any second-generation IFV, and any shot that penetrates enemy armour will be very effective with a firepower of 4+. If you feel that 11 is not enough for what you intended to do with your Marder 2 you could consider upgrading to either a 35mm or a 50mm gun. This gives 2 extra points of anti-tank (13) for just 1 point. No other characteristic change, just the opportunity to penetrate more armour. Speed is another important element of Marder 2. The tactical speed is 14” (the same as the Leopard 2) this means they’ll be able to follow the West German main battle tank while shooting . Terrain dash is less impressive, with 18” on the Terrain Dash, 28” on Cross-Country dash, and 32” on Road Dash the Marder 2 is a little bit slower than the leopard 2. That shouldn’t be a big problem thanks to great tactical movement and the long-range options. The Marder 2 has many advantages if compared with the Marder 1, this obviously doesn’t come for free. The same Panzergrenadier Zug with Marder 2 costs almost 50% more than one equipped with Marder 1.

A comparison between IFV
The Marder 2 is the West German version of the 2nd generation IFV. Let’s have a fast comparison between them!

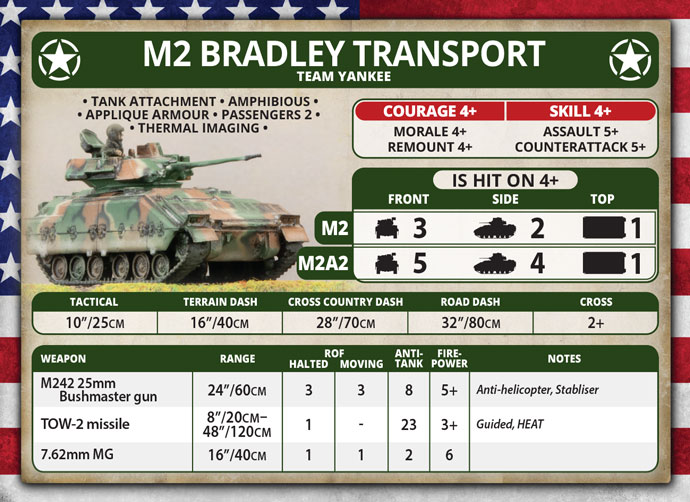
Apart from skills and morale that are determinate by the nation, the first thing to note is that it has less protection than the Bradley. With the M2A2 version, the front armour is only 5 against the 6 of the Marder 2, side armour could seem the same but it’s just an appearance. Because the Bradley only has Appliqué Armour (that guarantees side armour 13 against HEAT weapon) instead of the super effective Chobham Armour (that guarantees 16). Have a look also at Assault and Counterattack values, the Bradley is not as effective while assaulting. Movement is another big difference with the American counterpart as it’s slower on tactical movement (which is the most important in my humble opinion) and similar in its dash movement. The main Bradley weapon is the 25mm Bushmaster gun, that have the same ROF (both halted and moving), but is less effective with a range of only 24”, an anti-tank of 8, and firepower of 5+.

The gun has a Stabilizer instead of an Advanced Stabilizer and lacks a laser rangefinder, at least the Bradley can shoot at a Helicopter, where the Marder 2 can’t. The advantage of the Bradley is without any doubt the TOW-2 missile with an anti-tank 23. The Marder 2 can only mount the Milan missile, which is usually quite effective.

The British Warrior appears similar to the 1st generation IFV if you compare it to the Marder 2, despite that it can carry up to three infantry bases. It lacks any sort of protection against HEAT rounds and only has Infra-Red instead of Thermal Imaging. This makes the rating of the Assault and Counterattack less attractive as any infantry will be able to push them back with defensive fire due to the poor side Armour of 2, also, the front armour isn’t impressive, it’s half of the West German one unless you pay for the unarmoured version. Tactical speed is the other big difference between the Warrior and Marder 2. The British one can only move and shoot at 6” while, as we know, the West German one can do the same things moving at 14”. The weapons are the 30mm Rarden gun which has less range, less anti-tank, and less firepower. The Anti-Tank rating is honestly quite similar to the German one but the difference of one point on firepower is very important. Like the Bradley, the Warrior lacks a laser rangefinder but can shoot at helicopters.


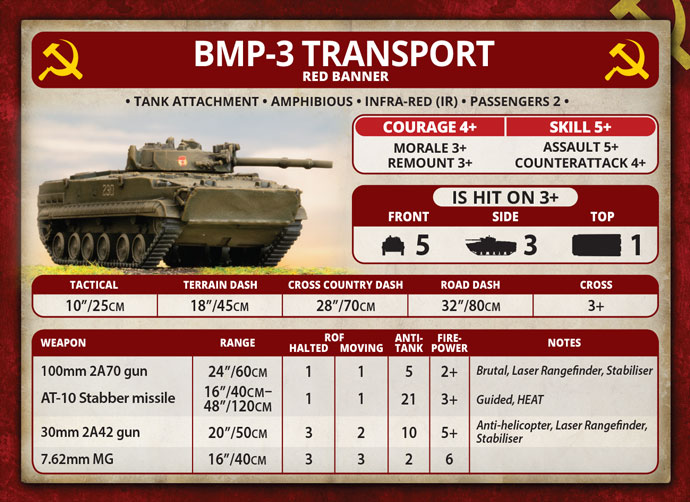
The comparison with the Soviet BMP-3 is the most difficult because the warfare of West German is exactly the opposite of the Soviet one. The  West Germans are an elite force that must be very careful not to expose themselves to their opponent (they are so expensive!) while the Warpact plays like a swarm, with tons of tanks and infantry moving to the opponent. The IFV characteristic represents this style. The BMP-3 doesn’t have any protection on the side with a rating of 3 (however it’s enough to manage 12.7mm) and the front armour is slightly lower than the Marder 2. The speed of the BMP-3 is the most common with a rating of 10” and they have similar ratings for dash movement.

The BMP-3 has a lot of weapons, the 30mm gun is similar to the Warrior one but only has a range of 20”. At least it has a laser range finder that helps. The 100mm gun is definitely not as effective against tanks or IFV due to the poor anti-tank rating of 5 but is useful against vehicles with an armour of 0 and dug-in infantry thanks to firepower 2+. It also has Brutal which helps not only against infantry but also against unarmored vehicles. Laser rangefinder helps at long range, but don’t forget that the range is 24”. The best BMP-3 weapon is the Stabber missile that can be shot while moving. This means that they can move from a hidden place and shoot their anti-tank 21 missiles. This mix of weapons (missiles for tanks, 100mm gun for infantry, and 30mm gun for IFV) makes BMP-3 more flexible than the Marder 2, but the difference of rating and playstyle doesn’t allow us to make a real comparison.

Marder 2 in the book

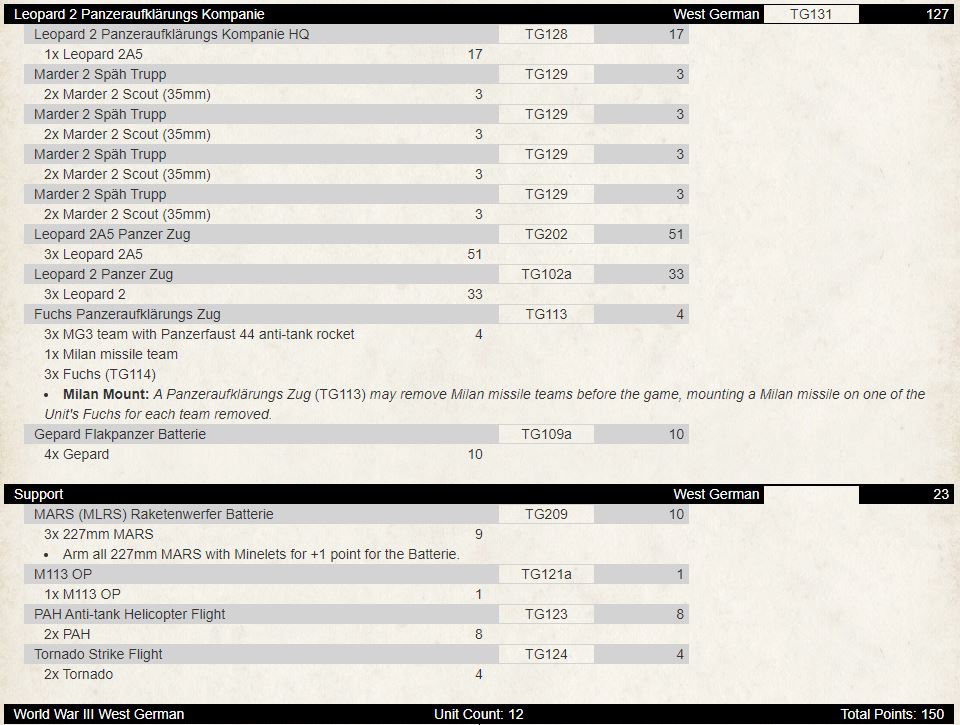
In the new World War III: West German we find the new IFV can be found in the compulsory slot of Leopard 2A5 and Leopard 2. A particular Marder 2 unit can also be found in the Leopard 2 Panzerauflarungs Kompanie. Before you ask, of course, Marder 2 also has a dedicated formation in the book.
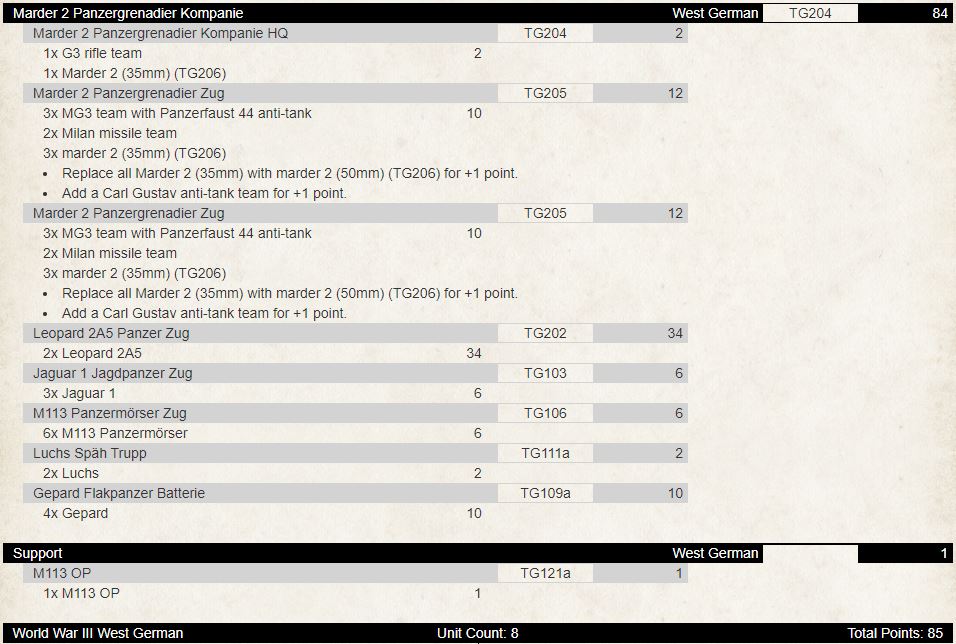
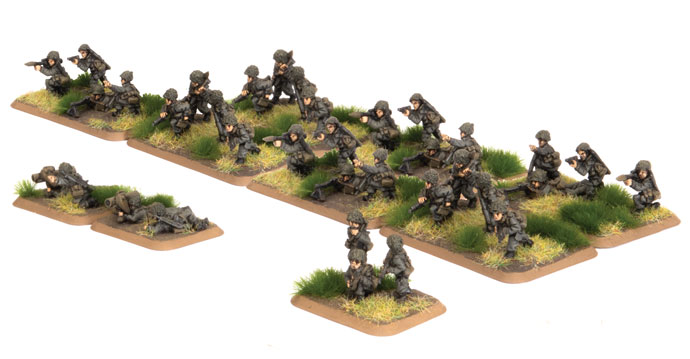
The Marder 2 Panzergrenadier Kompanie must be composed at least by a Marder 2 Panzergrenadier Kompanie HQ, a Marder 2 Panzergrenadier Zug and another platoon between Marder 2 Panzergrenadier Zug, Leopard 2A5 or Leopard 2 Panzer Zug. Curiously the HQ can be composed of a G3 Rifle Team and a Marder 2 or a G3 Rifle Team, an MG3 Team with Panzerfaust 44 anti-tank, and 2 Marder 2. This should allow the HQ to survive! The Mader 2 Panzergrenadier Zug can have 2 different sizes. As usual West Germans are not so good in numbers, the size is quite limited. The bigger Zug is composed of 3 MG3 Team with Panzerfaust 44 anti-tank and 2 Milan with 3 Marder 2, while the smaller only has respectively 2 and one of the same teams with 2 Marder 2. One of the new book additions (that is available for other infantry units) is the option to add one Carl Gustav Team and the formations still have more slots. You can add another Marder 2 Panzergrenadier Zug as well: this means you can deploy 3 -2 platoons and a Leopard 2 platoon.

The reconnaissance slots are composed of up to 2 Luch platoons, which are great to have as a cheap recon unit to make use of the spearhead movement. There are two different artillery slots in the formation. M113 Panzermorser is the cheaper option to bring on the table some smoke and an artillery template to manage red hoard. But you can also deploy something better, really better, and more effective. The M109A3G is another new entry in the book. This is a west German-made conversion of the American M109. The barrel upgrade allows it to use special ammunition variations. Yes, that means bomblets. This new version is a little bit more expensive than the older one but also has a better antitank rating of 15 at direct fire if someone comes too near. If you feel you need some more anti-tank (you never have enough) the Jaguar 1 is the best option to bring some anti-tank 23 on the table. Personally, I love them thanks to the Forward Defense special rule they can also be deployed on the table with another tank unit. The last slot is a must-have slot. Gepard is the perfect solution to manage both enemy aircraft and enemy IFV. They’re cheap and effective you can’t deploy any West German formation without them.
Last but not least the Leopard 2A5 or Leopard 2 option I have already mentioned. You can choose one of them instead of the Marder 2 Panzergrenadier Zug. Usually, it’s a good idea but they aren’t cheap and will force you to make some tough choices.

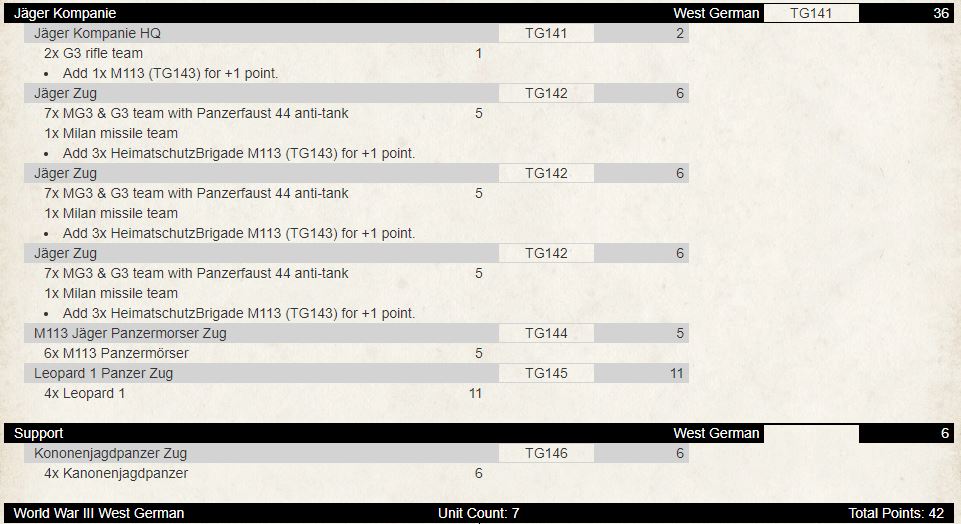
And that’s would probably be my Marder 2 formation:

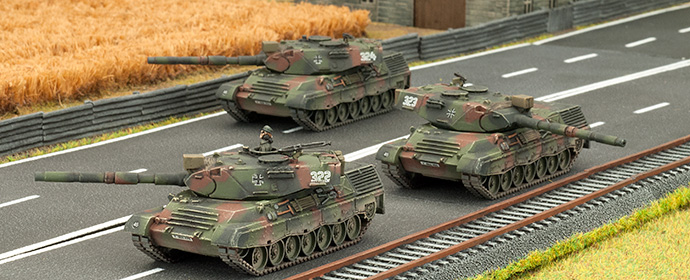
The list is quite short, as expected from a West German elite formation. The infantry is supposed to sit on the objective and resist the Red Hoard thanks to the Milan and Marder 2 support. The Jaguar will wait to ambush against a heavy tank formation while the Leopard 1 stays behind as a mobile reserve against fewer armoured tanks. The Gepard could also be an option for an ambush as your opponent is playing a BTR-60 swarm. Aircraft should be properly managed by Gepard so Leopard 2A5 will dominate the field, fearing no enemy tanks on the front. Luchs will lead the spearhead in mobile battles like Counterattack, maybe followed by the Leopard 1. I would also really like to add some M109A3G but I feel that a cheap tank unit is more important for this list. However, 6 M113 Panzermorser should help against infantry, especially with the help of M113 OP.

I can’t wait to assemble the list and play it on the battlefield!

Twitch Plays

We’re LIVE on twitch for the FIRST game of WWIII: Team Yankee where you’re in control! The Twitch chat is playing West German vs our Soviet underdog Luke from Battlefront!  As a collective, Twitch chat must collaborate and strategise to come up with the best course of action against the Soviet forces.

HOW TO PLAY:

In your turn, you must decide what your troops are going to do alongside the rest of the viewers. Throughout the main phases of your turn, each unit you control will activate, giving you the opportunity to control it. Using the grid overlaid onto the table, type in chat where you think units should move, shoot, assault, etc. as required. The most suggested options in chat will be put into a poll, and the winning option in the poll is the strategy that will be employed! 

Collaborate with your fellow viewers, debate the best strategy, and hope for good dice rolls to take the win in the first Battlefront Twitch Plays!

Watch the carnage below or go to our twitch channel to join in! www.twitch.tv/battlefrontminiatures

Robs West Germans

Rob is one of our resident rivet counters in the office, loving all things Bundeswehr. When developing Leopard he brought in a wealth of information for the team to read and review. He also brought in a rather impressive 1/6 scale remote control Leopard II that patrolled the office rolling over anything that got in its way. Although we have new models, missions and stats this original Leopard 1 Panzer Kompanie is still one of the coolest Kompanies we’ve seen!

Leopard 1 Panzer Kompanie
Rob's West Germans
Rob's West Germans
Marder Panzergrenadier Zug
Rob's West Germans
Rob's West Germans
Fuchs Panzeraufklärungs Zug
Rob's West Germans
Scratch built M113 Green Archer and M113 Panzermorser
Rob's West Germans
M113 Panzermorser Zug
Rob's West Germans
M109G and Gepard
Rob's West Germans
M109G Panzerartillerie Batterie
Rob's West Germans
Gepard Flakpanzer Batterie
Rob's West Germans
LARS Raketenwefter Batterie
Rob's West Germans
M48 AVLB Bridgelayer
Rob's West Germans
Rob's West Germans
PAH Bo-105 “Giraffe” Helicopter
Rob's West Germans
Rob’s Growing West German Force
Rob's West Germans


Ryan’s WWIII West German Army!

I have been a long-time lurker on the Flames of War and Team Yankee pages but being a poor student with no time (or money), the thought of one day building a collection of modern vehicles has always been on my mind. After discovering and promptly investing in Tanks: The Modern Age at the beginning of last year, I very quickly decided that I wanted to collect a small West German force out of a love of the Leopard 2 and the PAH. I bought the WWIII: Team Yankee rulebook a few weeks later deciding I would collect some small armies to play games over lockdowns with some of my mates. 

Fast forward a few months, one lockdown and one job interview later and I found myself in Auckland making videos for the D-Day: Waffen SS Live Launch! As an enthusiast in the hobby, the office was quick to discern that I was interested in West Germans, and a couple of boxes would find their way onto my desk along with a sneak peek at the new WWIII: West German book that was in the pipeline. Over the next few weeks, I began list noodling and deciding how I wanted to paint up my new toys. I was determined not to do the standard NATO three-tone, and was looking around for inspiration when I came across this image on the Tanks Encyclopedia:   

The Finnish Army purchased 124 Leopard 2A4s from surplus German stock in 2003, replacing the aging T-72 and T-55M. The camouflage pattern stood out as unique but not too difficult so I decided to have a dig around and see what else I could proxy into a Finnish army. The next big find had to do with Finnish AA. The Marksman AA system, currently an option for the British forces, was actually only purchased by the Finns and mounted on T-55AM chassis as the ITPSV 90, before recently being mounted on Leopard 2 chassis to provide a more mobile and stable firing platform. I can very easily proxy these as Gepards so I picked up a box of Chieftain Marksman and some spare Leo 2 and T-55 sprues from around the office.

The Finns also currently deploy the 298 RSRAKH 06, the 227mm MLRS system. This has been upgraded to fire the ATACMS missile, and visually there are very few differences.


My last bit of research came in the form of Air units. The Finnish Airforce currently operates the F-18C and NH-90, neither of which easily fit my proxy range with the West German equipment on offer. Doing some digging, however, I discovered that during the 70s/80s the Finnish Airforce utilized the Swedish Saab 35, and a bit of digging later I found this image:

The Swedish Airforce deployed the HKP 9A, a TOW variant of the BO105 PAH. In the fictional scenario that WWIII: Team Yankee offers I’m happy to use Swedish air support to stop a Soviet advance through the Finnish wetlands. They were originally trialed with quad TOW pods similar to the Lynx, which sounds like enough of a hobby project for me to give it a nudge! 

After discovering all of this, the last thing to do was to put it all together in a playable list. Armed with the new WWIII: West German book I set about deciding what force to construct. 

The Panzerauflakrungs Kompanie is a very popular choice here at the office as a way to get both of the cool new plastics into one army without sinking all the points into the new tanks and also having a solid range of support options. Whilst the Finns did not upgrade to the 2A5 variant, they did purchase 100 Leopard 2A6s in 2014 from the Netherlands. Discovering that the longer L/55 gun is on the sprue made this a viable proxy option so this went straight into the list.

The other new unit is the Marder 2. The Finns recently took delivery of the Swedish-made CV9030FIN, which could very easily stand in for the new Marder. It might not look the same, but until I find a nice kit/file I’m more than happy to paint some Marder 2s up in the Finnish camo scheme!

Another bonus with taking the new Leo 2 Panzeraufklarungs Kompanie is that you can field a Fuchs Panzeraufklarungs Zug from the old book. I love the Fuchs model, and it is very close to the Patria Pasi XA-180 that the Finnish Army still uses so another one to paint up.

I’ll throw in some Tornados to fill out the Air support until a suitable Swedish replacement makes itself clear to me (Saab 37 perhaps?), a BMP-1 to stand in as an M113 OP, and some custom ‘little green men’ infantry sculpts to modernize my infantry’s armor and weapons, and I’ve ended up with this list:

A pretty good attempt at a modern Finnish Defence Force, with some Swedish support to back them up! A lot of points for a relatively small amount of models – sounds like a perfect starter army for me! I’m looking forward to figuring out how I achieve the angular camouflage on the armor without an airbrush and have been testing some ideas already. The army is currently in the assembly stage as I still have a few new models to acquire and build (waiting on some more Marder 2s to arrive at the office), and I have a bit of learning to do with plasticard and milliput to modify some vehicles to achieve the look I’m going for, but I’ll be sure to keep photos coming in as they approach the table ready status.

Is it a competitively viable army? Definitely not. But here at the office, we’re all keen to play larger 150pt games to allow us to take some of the big vehicles, so for the purpose of throwing big tanks at big tanks this army will do nicely. I’m already thinking about dropping a 2A5 to allow me to fit some more PAHs, Tornados, and upgrade some Marder 2s to the 50mm cannon but I’ll get this force done and battle-tested first. I have a lot more thinking ahead of me if I want to bring this down to the 100-120pt tournament level, but that’s a problem for another day.   

~Ryan

Gebirgsjägers in WW3 – Where others stop, we get going!  

Modern Gebirgsjäger – note the stocks used to provide a stable firing position

 One of my first and favourite Flames of War German units is the Gebirgsjäger or Mountain light infantry. Originally they were the various alpine troops from Germany, Austria, and Switzerland as part of the Austro-Hungarian Empire, but the German units were formed as the German Alpenkorps during WWI. After hard fighting against similar elite units from the French (Chasseurs Alpins) and the Italians (Alpini) during the Mountain fighting on the Alpine Front, between German, French and Italian forces, they were given their own insignia, the edelweiss, and was later made into a metal lapel pin.

The Gebirgsjäger often wore the storied edelwiess flower on their uniform, which only grew high in the Alps and it was said: “the possession of one is a proof of unusual daring”. It was so popular with troops from these units that they would often have a dried flower somewhere on their uniform or their cap, as a symbol of bravery in lonely peaks and pure mountain air. Their motto was “Wo andere Aufhoren, fangen wir erst an!” – or “Where others stop, we get going!”

Gebirgsjäger in WWII – seems beards and pipes were mandatory

The incredibly tough fighting in high altitudes and freezing temperatures included drawn-out trench warfare, tunnelling through glacial ice and hard carbonate rock, as well as avalanches caused by shell fire. Casualties due to shellfire in this terrain were 70% higher than those in the soft mud of Belgium and France, due to rock shrapnel inflicting additional casualties. Also, the environment itself was hard on soldiers with frostbite and malnutrition generating even more casualties because of the difficulty re-supplying food, medical supplies, ammunition, and other provisions.

This type of mountain fighting also introduced new tactics and weapons, like the lightweight Gewehr 33/40 rifle in WWII, and many lightweight artillery pieces were introduced, called mountain guns, these typically were smaller or able to be broken up into many parts for easy transport via mules or as man-pack pieces. In WWII a German 10.5cm GebH 40 mountain howitzer was designed and produced, made with lightweight alloys, and able to be broken up into parts for mule transport. It was significant in that previously the largest mountain guns only had a barrel width of 75mm or less, and a larger 10.5cm calibre gun was not considered practical due to its weight and size.  It was still in use until the 1960s and was considered one of the best mountain guns ever made, and it was used by multiple European countries.

The modern Gebirgsjäger was reformed in 1956 when the West German Bundeswehr was formed, where they were organized as the 1. Gebirgsdivision, and were mainly stationed to the south of West Germany, in the mountainous Bavarian region, to defend from Soviet attack through the Danube Valley or from the border shared with Austria if the Soviets ignored its neutrality.  They are a specialist unit with their main tasks being, warfare in extreme conditions, winter warfare, warfare in urban terrain, and warfare in the arctic, mountain, and desert terrain. They also have traditionally a very close comradeship and a distinct esprit de corps, with a special perception of discipline which can be seen in a relatively informal relationship between officers and soldiers during normal day duty. For example, during WWII the Lieutenant General of the 5th Gebirgsdivision Julius Ringel (an Austrian), was called “Papa” Ringel by his men, showing the close relationship the officers had with their men.

Julius ‘Papa’ Ringel – was later promoted to General der Gebirgstruppe

In the 1985 period of Team Yankee, the Bundeswehr 1.Gebirgsdivision was part of 2 Korps in the South of West Germany (Bavaria) and consisted of, 23rd Gebirgsjäger Brigade, 22nd Panzergrenadier Brigade “Oberland”, 24th Panzer Brigade “Niederbayern”, 8th Gebirgsartillery Regiment and Heimatschützbrigade 56.

As far as equipment the 1.Gebirgsdivision had its own divisional Panzeraufklärungs Kompanie as well as Gepards and Fliegerfausts for anti-air capability,  and the 8th Gebirgsartillery Regiment provided 227mm MARS and LARS Raketenwerfer batteries, as well as larger 203mm Sf M110 self-propelled artillery, and CL-89 rocket launched surveillance drones.

The equipment for the more mechanised parts of the Division, 22nd Panzergrenadier Brigade “Oberland” was equipped with Marders, Leopard 1s and M109G self-propelled artillery, and 24th Panzer Brigade “Niederbayern” was similar with Marders, Leopard 2s and M109G artillery. The Heimatschützbrigade 56 was the best equipped Heimatschützbrigade in the Bundeswehr, with Leopard 1’s, M109Gs, and a mix of Marder and M113 equipped Panzergrenadier Kompanies, and was really for all intents and purpose considered a line unit and not a reserve Heimatschützbrigade.

Troopers from the 23rd Gebirgsjäger Brigade – working with Austrian Jägerbrigade 6

The 23rd Gebirgsjäger Brigade, the actual unit carrying on the Gebirgsjäger tradition, was not mechanized like the other brigades in the 1.Gebirgsdivision, it was mainly a light infantry unit armed with Milan anti-tank missiles, but with larger platoon sizes than the smaller Panzer grenadier Zugs. It consisted in the 1980s of four standard Gebirgs Battalions and one Gebirgs Artillery Battalion, as well as its own Leopard 1 Panzer Kompanie and Pioneer Kompanie.

Each Battalion had a heavy support Kompanie with six M113 Panzermörsers, six twin-20mm Flak cannons, and a small Milan anti-tank Zug of six launchers. But interestingly they still use mules to help transport their heavy equipment in mountainous terrain, so another tradition that while old still works.

Another unique feature of the 23rd Gebirgsjäger Brigade was their Hochgebirgsjägerzüg, or High Mountain Jäger Zugs, an elite force inside the already specialized Gebirgsjäger Brigade. To qualify they must have excellent fitness, endurance, as well as alpine and skiing skills, with a range of tasks that go beyond even the usual tasks of the mountain troops. These included high-altitude reconnaissance, mountain rescue, and advanced mountaineering skills.

A Hochgebirgsjägerzüg sniper team

These high-altitude alpine Special Forces troops are trained to attack, defend, and survive in the harshest of terrain. They are also trained in ambushing, specialized sniper skills, surveillance, and hunter-killer groups, and there was only ever one Zug per Battalion, which was part of the HQ Kompanie. They were also to be used as a quick reaction blocking force and were allocated either CH-53G Sea Stallion or UH-1 Huey helicopters, to quickly deploy them high in the mountain passes. They would then set up in bottlenecks as an ambush force, or to report on enemy movements, they were even able to quickly and easily deploy Milan teams to help stop any heavy vehicles that did make it up to the alpine areas.

So how does all this translate into WWIII West German?? Well for me this force is one of the best, if not the best, West German infantry formations that you can get. It is excellent for a defensive stance, with each Gebirgsjäger Zug containing 9 stands: 7 – MG3 & G3 teams with panzerfaust 44 anti-tank weapons and 2 Milan missile teams. You can also take up to four Gebirgsjäger Zugs, rather than the three Zugs usually available to other West German infantry Kompanies, which makes it very durable due to its large platoon size and more Zugs.

Additionally, it is one of the larger West German infantry formations, with 10 units in the formation. A HQ, up to 4 Gebirgsjäger zugs, 2 Luchs Zugs, a Gebirgspanzerjäger Leopard 1 Zug, a panzermörser Zug and a Gepard AA Zug. The Leopard 1 Gebirgspanzerjäger Zug is unique in that instead of having the Jaguar 1 or 2 that other formations would have as their tank hunter platoons, the Gebirgsjäger had Kanonenjagdpanzers until 1984, when they were replaced with a Kompanie of 17 Leopard 1 tanks. It has an HQ of 2 tanks, and 3 Zugs of 5 Leopard 1 tanks each. So the Gebirgspanzerjager Zug has up to 5 Leopard 1 tanks instead of the normal 4 tanks Zug.

Another thing to not forget is their special Mountaineers rule, which allows them to cross previously impassable terrain like cliffs or embankments. Teams that start their movement turn adjacent to a cliff or mountainside (or other similar terrains) can roll a skill test, if passed they may move across the terrain with their terrain dash speed of 8”. This can be used to surprise an enemy which may have forgotten this, so keep that in mind when you need to assault an enemy position.

All of this makes the formation when fully fleshed out the largest in the West German book. At full strength, it can have, 37 infantry stands (including 8 Milan teams), 5 Leopard 1s, 4 Luchs, 6 Panzermörsers, 6 Gepards (not to mention another 6 Fliegerfaust Redeye teams if wanted), for a total of 41 infantry/weapons teams, and 21 vehicles. The infantry when dug in will be hard to dislodge, and has the numbers to take casualties.

If you wanted to represent the Hochgebirgsjägerzüg ( I know I want to), you can either take it as a smaller Gebirgsjäger Zug ( 5 MG3 & G3 teams, 1 Milan) or take a Fallschirmjager Zug as a support option, which is the same size but allows you to take two helicopters for 2 extra points. Now the Gebirgsjäger used either CH-53G Sea Stallion helicopter or UH-1 Huey, the Sea Stallion is huge and would be impressive, but the BF UH-1 Huey is excellent and easier to obtain. I can see myself researching up paint scheme for West German helicopters now…… and most likely it’s a start on a Fallschirmjager list as well…..

So I have put together a 100 point list with the new Gebirgsjäger formation, it seems reasonably tanky, with 3 large Gebirgsjäger Zugs, totalling 6 Milans, to hold positions and should be able to take a beating. I have also taken a small Fuchs Panzeraufklärungs Kompanie for two reasons, one is it adds an extra formation, so more resilience for your force, and it was the same cost to get the units in this than to get another large Gebirgsjäger Zug. It adds 2 small Zugs with a Milan each and a Luchs troop to spearhead and harass artillery and AA.

The extra Milans always help, and splitting them into two platoons means it’s two targets the enemy needs to target and take out, and if they ignore them because they are small I win then too. This gives me 8 Milan teams in total, which does not compare to how many the British can pump out, but it is still significant. The Milan is a very good AT weapon and can take out most armour, but it will have trouble with more expensive NATO tanks like the M1a1, Challengers, and Soviet T80.

For this reason, I took a small PAH flight with the AT23 HOT missiles. Normally I find them overpriced for their use, but as I cannot take Jaguar 1s in this formation, and Leopard 2s of both types are too expensive for this formation, this is the only way I can get HOT missiles to try and attack high armour enemy tanks frontally.  The best way to use these is as mobile flankers, using your Hunter killer pop-up attacks around terrain, but as you cannot move and shoot they often are only firing once every two turns unless you place them carefully at the start of the game. The only thing you need to be aware of is the AA umbrella of your enemy and enemy aircraft, so try to keep out of enemy AA range, and also make sure your AA can support you if enemy aircraft try to take them out.

For artillery support, you have the M113 Panzermörsers, great against dug-in infantry and low top armour units like AA and self-propelled artillery. Even if you range in, and have a low chance to do damage, it may make a WARSAW PACT artillery unit move to get out of under the template, so it will lose its range in marker, which can be hard for it to do again. You also have LARS which is similar but can also drop minelets to restrict or channel the movement of the enemy. I also always take 4 Tornados, which have excellent cluster munitions but are easy to kill being hit on 4+ and only a 5+ save, so try to destroy any AA before you bring them in, or you will take casualties…. but sometimes it is worth it, AT8 death from above is no joke!!

Lastly, we have one of my other favourites, the cheap and cheerful Leopard 1, with excellent mobility, a moving RoF of 2, and stabilizers. It is an excellent flanker, still able to punch holes in the sides of more expensive top tier tanks with its AT19 main gun. Also as it is not HEAT like many other similar tanks, the enemy tanks won’t get buffs to its side armour with Chobham, ERA, and bazooka skirts, so make sure you make use of your movement orders to get those flank shots in. Also when combined with a unit of Gepards, you will make short work of enemy IFVs if they let you.

This force will be a very different play style to most West German forces from the older Leopard book, so it will take a few games to get used to. But I think it offers some much-needed variety to a West German force, and I really look forward to playing with the new options it can give you. I do look forward to finally being able to hold a position against other enemy infantry, these guys will be a hard nut to crack, especially in defensive scenarios with extra minefields, you will be able to channel the enemy into your kill zones.

So have a look yourself and see what you can make of it, and hopefully, you can even use your Mountaineers special rule, I would be making that a gaming life goal for myself!! Remember – Where others stop, we get going!

~ Adam

New Support Options for WW3: West German Force

With all the new cool stuff being released for WW3: West German such as the Leopard 2A5, Marder 2, Wiesels, and new infantry formations, I thought I would look at the new support options available for the West Germans to complement the existing ones.  We have two new artillery options – the 227mm MARS Raketenwerfer and M109A3G (ok not new to the game but are FINALLY available for the West Germans) and something a bit different and unique to this force – the Kanonenjagdpanzer!

The MLRS is finally able to be used in West German forces.  The card has been available in the box for some time but now you can use it in anger.  You can take this unit as an additional artillery slot – so you could potentially both the LARS and MARS if you want to have double salvo template options (treble if you count the salvo template available to the Tornadoes!).  Each weapon counts as two when firing so if you take three of them, counts as six and means you will reroll misses.  It has a range of 120” AT3 and FP 5+.  A useful AT3 for hitting non tanks but not a great FP.  Very useful though to pin enemy infantry or put enemy AA units out for your attack run with the Tornadoes.  You can take two for 6pts, three for 9pts, four for 12pts.  You can also fire minelets for an additional 1pt for the batterie.


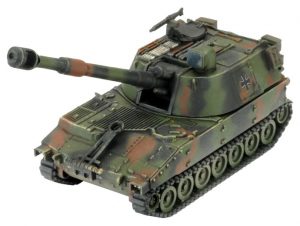
The M109A3G is basically the long-barrelled version of the M109G.  Its not available as a support option per se but available only in the following formations:

  • Leopard 2A5 Panzer Kompanie
  • Leopard 2 Panzer Kompanie
  • Marder 2 Panzergrenadier Kompanie
  • Marder Panzergrenadier Kompanie

The differences that the M109A3G has over the M109G is it has AT15 direct fire, longer range of 112”.  Still has the same AT4 FP2+ with indirect fire and can fire bomblets and a smoke bombardment, auto FP, brutal and smoke in direct fire.  Three for 8pts, four for 11pts, five for 13pts, six for 16pts.

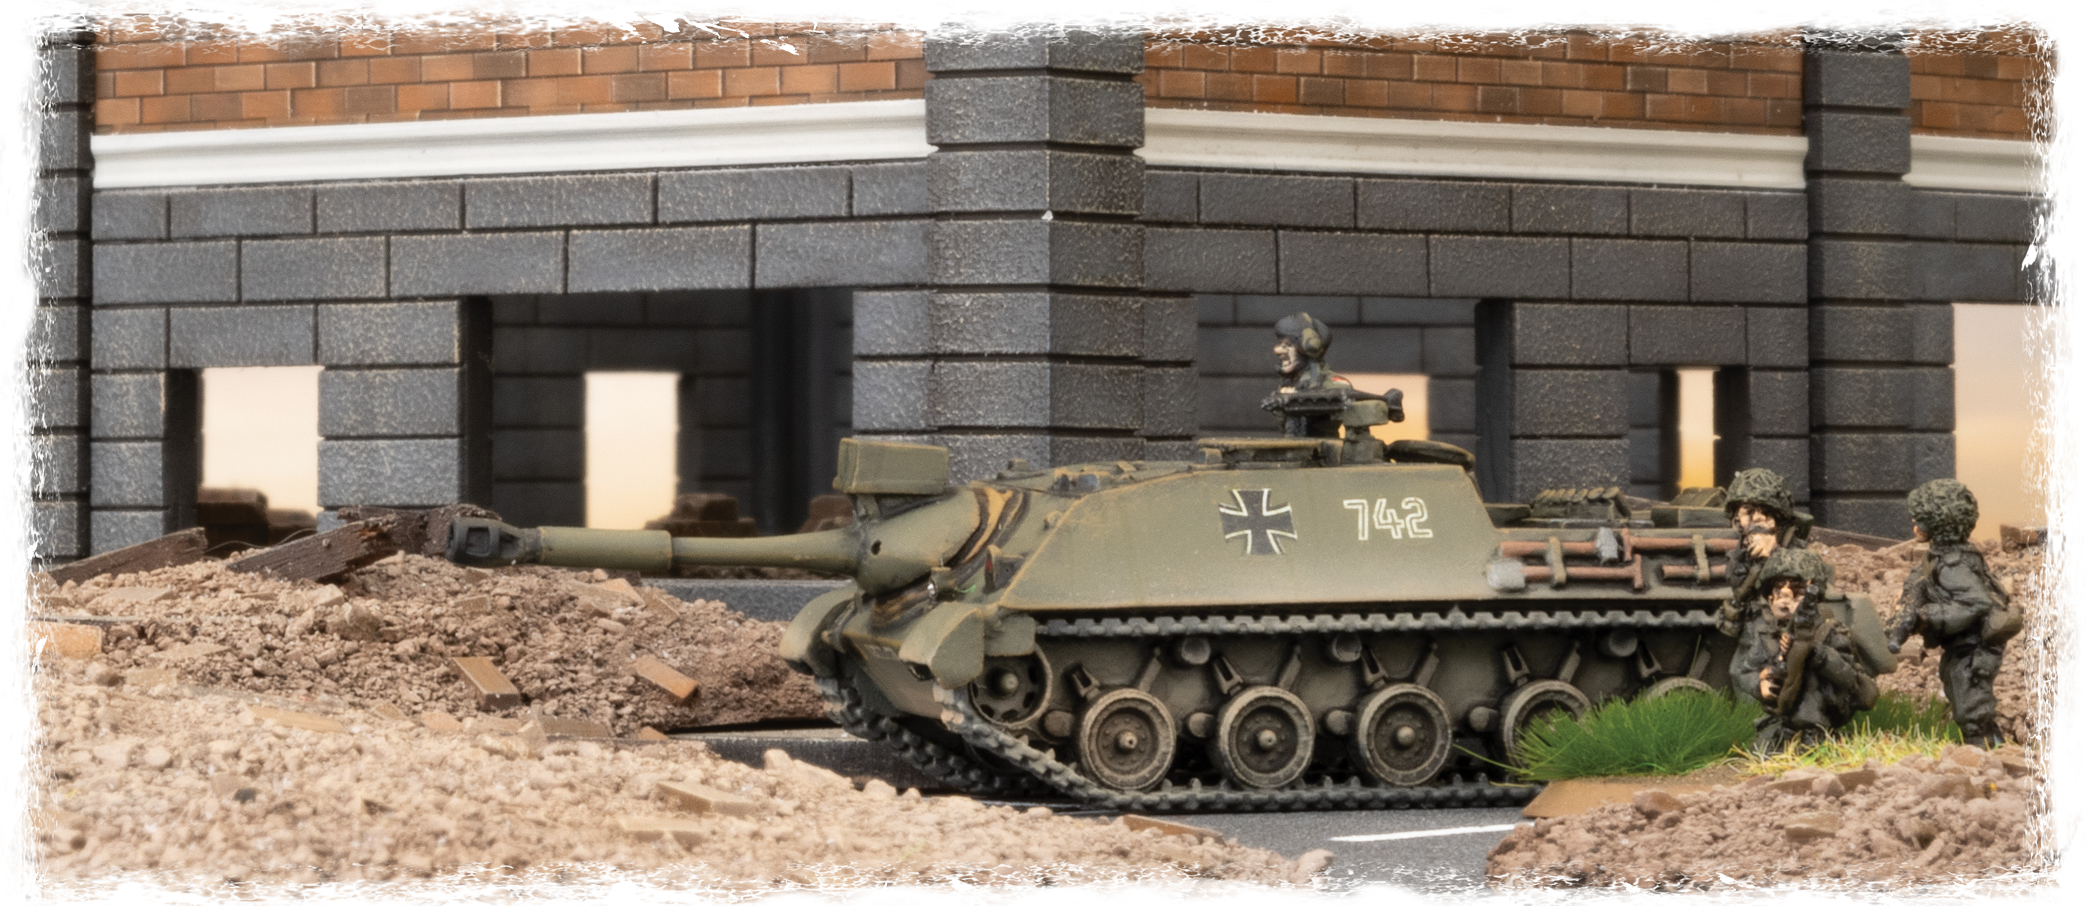
The Kanonenjagdpanzer is a cool looking Tank destroyer but was already obsolete by this stage, so was assigned to the Heimatschutzbrigade (Home Security Units).  For those who play Flames of War and love the tank destroyers – this is for you!  You can take it as an in-formation unit for the Jager Kompanie and is available as well as a support choice.   It has a 90mm gun and has AT16 with 32” range and a handy FP2+.  FA6 SA3 TA1.  Useful cross check of 3+.  Fires HEAT so will struggle against the side armour of top tier tanks but not such a problem against Tier 2 and 3 tanks.  Useful to use to hunt down enemy AA units to clear the path for your Tornadoes or take out enemy IFVs and APCs.  Now they are hit on 3s so you will need to be careful with them. They cost 4pts for three and 6pts for four.  If you are running the Jager formation and do not have enough points to take the Leopard 1s, take the Kanonenjagdpanzer.  In fact, take them because they are cool!

So, consider looking at these new options to go along with the other new options available to the West Germans!