With Chris Allen
Successful Soviet Combat Operations are predicated on the effective and consistent use of the algorithm. Soviet military scientists applied rigorous consideration, and research to provide commanders with decision action tools. If you go through Soviet Doctrine you’ll find no shortage of these. They were made to be simple and effective means to plan operations. My personal favorite is a chart where you plot the speed of yourself, the enemy and the range you’re at and it pops out the time you have before the engagement starts. They are really useful and we now see the West today coming out with similar things on digital platforms. But where a million-dollar space pen was designed, a pencil still worked just fine. The same can be said of the Soviet algorithm tables and charts.
So how do you use this ‘calculator’ or algorithm chart?
First off you need to make a prediction of the enemy air power threat. There are two aspects to this process, first you understand your vulnerability to air power. What air power often does is reduce your freedom of movement. It seems weird at first, but follow me here. By having a bogey man of suddenly appearing threats, air reduces your freedom to move out of cover or away from air defence. It’s meant to scare you into smaller less advantageous action and then punish you when you don’t. The amount to which this can affect you is based on your own composition.
If your army is composed of BTR-60s, how much of a threat does air pose to this force? I would argue against something like this the threat of certain air platforms such as Apaches or Cobras is low. What is a hellfire or a TOW missile going to do that say a M242 Bushmaster isn’t? Not much. Turn this around and consider a force comprised of T-80s, where these high value tanks are vulnerable to high AT weapons with LOS to the whole table and you find yourself considering air weapons platforms as a high threat. This doesn’t mean that a force based on BTRs is always low threat, or that one with T-80s is always high. You need to understand your force and how you see the path to victory. The same BTR-60 formation could have a platoon of Shock T-80Us and that unit is needed to take the objective. This might then be a high threat consideration. But that part is up to you.
Once you’ve considered your vulnerability to air, to your force and your plan, you need to consider the threat that you expect. This can be difficult as it’s a prediction of the future and you’re working with very limited info. In casual play with friends you know your buddies, you know units they always take and if this includes air, it’s a good indication. Newly painted Hind platoon? Bet it’s showing up. Tournaments and other events like game nights are more difficult, but I find that if I expect at least one unit of air, be it strike aircraft or helicopters, I’m rarely disappointed in choosing to always bring ground-based air defence units. If you’re in a place where air is less common you can also consider taking platforms that are dual purpose like the ZSU-23-4 Shilka or the 2S6 Tunguska that can provide both anti air fire and suppress ground targets with their high rate of fire.
Once you’ve considered your vulnerability and the expected air threat, you should have an idea of what you’re going to see show up and how big a worry it is to you. This is where you start to prepare your force and how you are going to kill them. Using the table you can essentially add up the kill rate you believe you need to deal with a given threat by using the right hand column.
The table below gives you the expected normal output of full batteries of air defence weapons systems in service for the Soviets against expected targets based off their to hit and save values. So if you’re expecting a group of A-10s, consult the 3+ save sections, Hinds or Apaches look up the 4+ save areas based on their respective hit value. This will give you all of your relevant destruction data for the battery vs the target. If you are planning on using half platoons just reduce the expected kills per turn by half.
| Vs to hit 3+ 5+ save | ||||
| % chance to kill | Shots to kill | Shots per pl | Kills per turn | |
| Missile systems | ||||
| Gaskin | 14.81% | 6.75 | 8 | 1.19 |
| Gopher | 22.22% | 4.5 | 8 | 1.78 |
| Gecko | 29.63% | 3.375 | 12 | 3.56 |
| Tunguska | 29.63% | 3.375 | 8 | 2.37 |
| Gun systems | ||||
| Shilka | 14.81% | 6.75 | 24 | 3.56 |
| Tunguska | 14.81% | 6.75 |
28 |
4.15 |
| Vs to hit 3+ 4+ save | ||||
| % chance to kill | Shots to kill | Shots per pl | Kills per turn | |
| Missile systems | ||||
| Gaskin | 11.11% | 9 | 8 | 0.89 |
| Gopher | 16.67% | 6 | 8 | 1.33 |
| Gecko | 22.22% | 4.5 | 12 | 2.67 |
| Tunguska | 22.22% | 4.5 | 8 | 1.78 |
| Gun systems | ||||
| Shilka | 11.11% | 9 | 24 | 2.67 |
| Tunguska | 11.11% | 9 |
28 |
3.11 |
| Vs to hit 4+ 5+ save | ||||
| % chance to kill | Shots to kill | Shots per pl | Kills per turn | |
| Missile systems | ||||
| Gaskin | 11.11% | 9 | 8 | 0.89 |
| Gopher | 16.67% | 6 | 8 | 1.33 |
| Gecko | 22.22% | 4.5 | 12 | 2.67 |
| Tunguska | 22.22% | 4.5 | 8 | 1.78 |
| Gun systems | ||||
| Shilka | 11.11% | 9 | 24 | 2.67 |
| Tunguska | 11.11% | 9 | 28 | 3.11 |
| Vs to hit 4+ 4+ save | ||||
| % chance to kill | Shots to kill | Shots per pl | Kills per turn | |
| Missile systems | ||||
| Gaskin | 8.33% | 12 | 8 | 0.67 |
| Gopher | 12.50% | 8 | 8 | 1.00 |
| Gecko | 16.67% | 6 | 12 | 2.00 |
| Tunguska | 16.67% | 6 | 8 | 1.33 |
| Gun systems | ||||
| Shilka | 8.33% | 12 | 24 | 2.00 |
| Tunguska | 8.33% | 12 | 28 | 2.33 |
| Vs to hit 4+ 3+ save | ||||
| % chance to kill | Shots to kill | Shots per pl | Kills per turn | |
| Missile systems | ||||
| Gaskin | 5.56% | 18 | 8 | 0.44 |
| Gopher | 8.33% | 12 | 8 | 0.67 |
| Gecko | 11.11% | 9 | 12 | 1.33 |
| Tunguska | 11.11% | 9 | 8 | 0.89 |
| Gun systems | ||||
| Shilka | 5.56% | 18 | 24 | 1.33 |
| Tunguska | 5.56% | 18 | 28 | 1.56 |
| Vs to hit 5+ 5+ save | ||||
| % chance to kill | Shots to kill | Shots per pl | Kills per turn | |
| Missile systems | ||||
| Gaskin | 7.41% | 13.5 | 8 | 0.59 |
| Gopher | 11.11% | 9 | 8 | 0.89 |
| Gecko | 14.81% | 6.75 | 12 | 1.78 |
| Tunguska | 14.81% | 6.75 | 8 | 1.19 |
| Gun systems | ||||
| Shilka | 7.41% | 13.5 | 24 | 1.78 |
| Tunguska | 7.41% | 13.5 | 28 | 2.07 |
| Vs to hit 5+ 4+ save | ||||
| % chance to kill | Shots to kill | Shots per pl | Kills per turn | |
| Missile systems | ||||
| Gaskin | 5.56% | 18 | 8 | 0.44 |
| Gopher | 8.33% | 12 | 8 | 0.67 |
| Gecko | 11.11% | 9 | 12 | 1.33 |
| Tunguska | 11.11% | 9 | 8 | 0.89 |
| Gun systems | ||||
| Shilka | 5.56% | 18 | 24 | 1.33 |
| Tunguska | 5.56% | 18 | 28 | 1.56 |
| Vs to hit 5+ 3+ save | ||||
| % chance to kill | Shots to kill | Shots per pl | Kills per turn | |
| Missile systems | ||||
| Gaskin | 3.70% | 27 | 8 | 0.30 |
| Gopher | 5.56% | 18 | 8 | 0.44 |
| Gecko | 7.41% | 13.5 | 12 | 0.89 |
| Tunguska | 7.41% | 13.5 | 8 | 0.59 |
| Gun systems | ||||
| Shilka | 3.70% | 27 | 24 | 0.89 |
| Tunguska | 3.70% | 27 | 28 | 1.04 |
| Vs to hit 6+ 5+ save | ||||
| % chance to kill | Shots to kill | Shots per pl | Kills per turn | |
| Missile systems | ||||
| Gaskin | 3.70% | 27 | 8 | 0.30 |
| Gopher | 5.56% | 18 | 8 | 0.44 |
| Gecko | 7.41% | 13.5 | 12 | 0.89 |
| Tunguska | 7.41% | 13.5 | 8 | 0.59 |
| Gun systems | ||||
| Shilka | 3.70% | 27 | 24 | 0.89 |
| Tunguska | 3.70% | 27 | 28 | 1.04 |
| Vs to hit 6+ 4+ save | ||||
| % chance to kill | Shots to kill | Shots per pl | Kills per turn | |
| Missile systems | ||||
| Gaskin | 2.78% | 36 | 8 | 0.22 |
| Gopher | 4.17% | 24 | 8 | 0.33 |
| Gecko | 5.56% | 18 | 12 | 0.67 |
| Tunguska | 5.56% | 18 | 8 | 0.44 |
| Gun systems | ||||
| Shilka | 2.78% | 36 | 24 | 0.67 |
| Tunguska | 2.78% | 36 | 28 | 0.78 |
For example, if you want to destroy a unit of 4 Harriers before they can engage you with cluster munitions, you can consult the 4+ to hit column, or the 5+ to hit column if you expect to keep your ground-based air defence teams concealed in woods or behind buildings. With these inputs, we can see that a battery of Tunguskas should kill 3 Harriers, 2 if concealed, while two platoons of Shilkas will probably down 5 or 3-4 if concealed. Because the harrier has to get close to do it’s work, these gun systems are probably the best bet.
How about a pair of Cobras? Well consider that they will almost always be either a 5+ or 6+ to hit, and sitting in their own backfield you probably want to use a missile system. Geckos look to be the thing you need, but you could also consider taking Gophers, or even Tunguskas backed by Gaskins. This should give you coverage and enough scare factor to either keep the helicopters off the table until your air defence has been knocked out, or possibly have your opponent not fire for risk of losing their birds.
Purpose built or multi-tool?
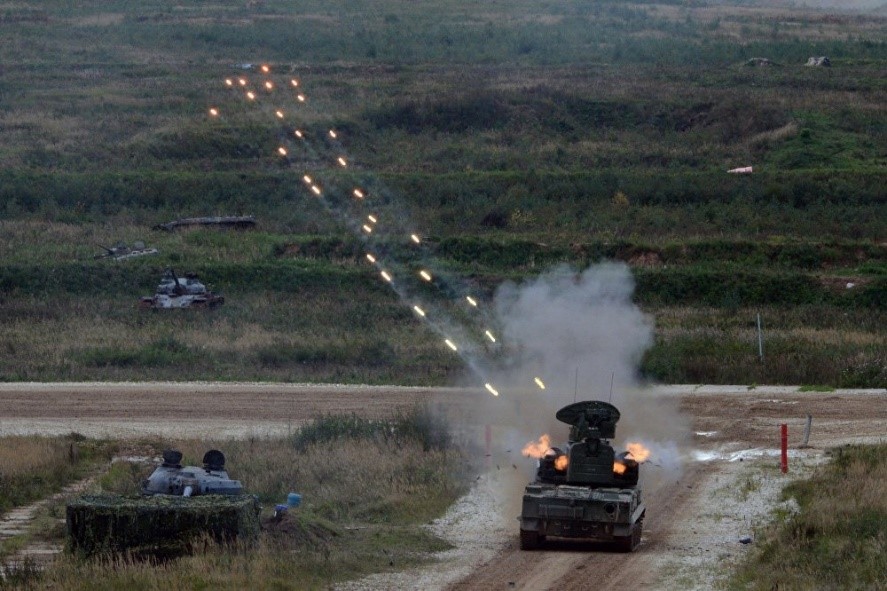
Gun systems bring a lot to the table, and this includes the ability to fire at ground targets which is fairly amazing as anyone who’s ever run Shilkas can attest to. But while the gun systems have higher expected output than missile teams due to rate of fire, you need to remember that they also have a dramatically reduced range. This means you’ll have to escort units across the table if you want to protect them, or project your AA against long range missile systems like Apaches. If you want to take down these long-range systems, you need to either go get them or invest in missiles. Gaskins, Gophers, Geckos, even the lowly Gremlin (not included in the table but you can get the percentages from the Gaskin) can dominate the entire table being able to provide anti-aircraft fire to anything that shows up.
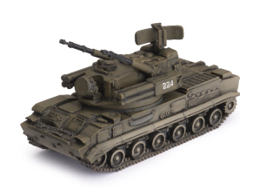
What the Shilka has going for it is its high rate of fire, albeit at a short range. With the introduction of the Tunguska you get the best of both worlds, an all-in-one package. It has missiles with the same profile (but lower rate of fire) as the Gecko and an amazing gun with a higher rate of fire than the Shilka and higher AT for all those ground targets. It’s kind of perfect.
The Soviet army had the largest most integrated and varied ground based air defence in the world, and this is no different in WWIII:Team Yankee. You can own the sky from the ground and gain freedom of movement for your forces to spread the Soviet Union’s ideals across Europe and beyond. Add to that the fact that these are some of the coolest models in the range, covered in guns and missiles, and there’s pretty much no reason to leave home without them.
Happy Hunting.