Fire for Effect Artillery in World War III Team Yankee Soviet

I am new to WWIII: Team Yankee but have a few years of experience with Flames Of War.  During this time, I have really come to love how artillery works.  The idea that you can use it to exert your willpower across the table to make your opponent react to your plans is very cool and I think it adds a level of realism to the game.  The big guns can be a surgical instrument, a shield for your advancing units, or any other of a host of tactical options limited by your imagination, terrain and the opponent’s army composition.  So, when I was introduced to Team Yankee and saw the artillery weapons that are available in the system, I got pretty excited!  Now with the launch of World War III: Soviet we have a range of brand-new, excellent artillery options to consider.

In this article I would like to take a closer look at the mighty Soviet artillery Battlefront is about to unleash on the WWIII: Team Yankee battlefield.   The Soviets have a lot of units vying for the points allotment in a normal game and I am sure the lion’s share will be directed towards tanks.   Because of this, we should shed some light on these units so you can pick and choose which weapons are right for you and still come up with a flexible army list.

2S1 Carnation

The Carnation is a good general option for Soviet Artillery.  In terms of special rules, it is pretty typical with an artillery template, Antitank 4, 3+ Firepower and Smoke.  In direct fire it is range 24 and AT 21, Brutal, HEAT, Slow Firing.  These stats mean it is a decent option for bombardments and its direct fire (if you can get close enough) is good enough to do double duty shooting tanks if there are no other options.  Despite this, at first glance, you may want to consider other heavier hitting options like the Acacia or TOS-1, but this might be a mistake.  The carnation is cost effective with 3 vehicles being 5 points, but most importantly it is a formation choice for all of the formations in the book, except the for (unsurprisingly) the Air Assault Company.  This makes it really easy to slot into your force.  If you are afraid you have too low of a break point for your formation(s) in your army, the Carnation can boost your chances of staying on the field, while providing a decent, flexible weapon.

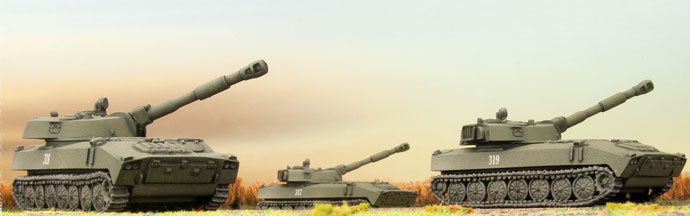
2S3 Acacia Heavy SP Howitzer

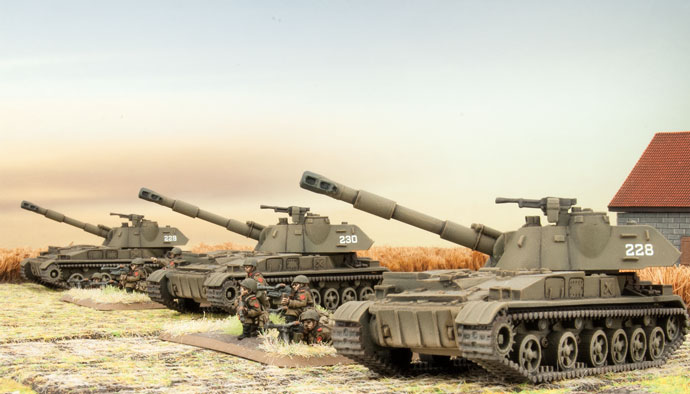
This is the heavy gun option for the Soviets.  The Acacia is similar to the smaller Carnation but you add a Firepower of 2+.  Direct fire against tanks with the Acacia is not much of an option with an AT of only 14, but its Firepower is Auto!  If you need to direct fire on dug in infantry or those sheltering in buildings though, this gun is very potent.  The really interesting option with this gun is the Kransopol projectile.  This is a laser guided howitzer shell with a minimum range of 16 and a maximum of 88 inches.  It does not suffer penalties for being used at long range and is guided by an observer.  Also, it hits tank top armour at AT 4. But what is truly scary is if the Kransopol is used against lighter targets.  This is because it has the Brutal rule so infantry hit by it re-roll successful saves (then the Firepower test succeeds automatically).  Additionally, the Kransopol projectile is not an artillery template, but an individual shot for each gun, so you can potentially get several shots on the target in the shooting step.  When you absolutely need to destroy your target, a battery of Acacias with the Krasnopol upgrade is the choice for you.  You get flexibility with regular artillery and direct fire and the terrifying surgical precision from the special ammunition all from 1 weapon!

BM-21 Hail Rocket Launcher

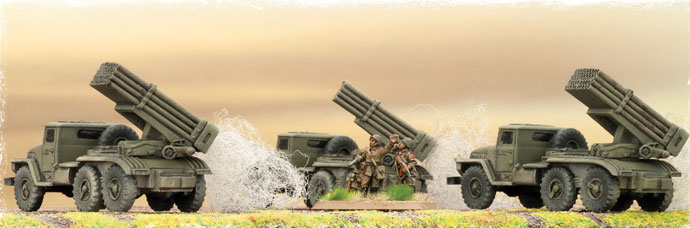
This is a tried and true option for Soviet artillery.  The BM-21 Hail is a comparatively light weapon at AT 3, Firepower 4+, but it uses the salvo template to cover a wide area.  It is also very cheap in terms of points, running at 4 points for 3 launchers.  Being a salvo rocket launcher, it does not have a direct fire option but can launch Smoke.  The BM-21 Hail is your choice if you are looking for a simple and cheap option to take on infantry or provide counter battery fire against other artillery.  It is not devastatingly powerful but will allow you to slide a salvo template into your army list without devouring too many points which you can save for tanks or aircraft!

BM-27 Hurricane Rocket Launcher

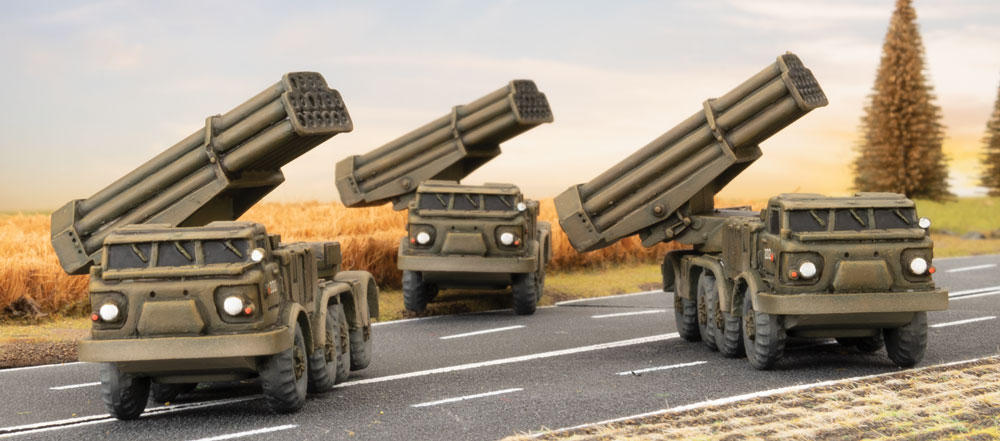
This is the BM-21 but on steroids!  The launcher is similar but gets a boost in range and has a better Firepower and Antitank rating.  The big difference here is these launchers also have the Minelets rule so they provide some are denial effects.  Overall the Hurricane is still more of an anti-troop option than anything else, but considering that it does have an AT of 4 and a 3+ Firepower, it can still destroy the odd tank with top armour hits making this option more flexible than the BM-21 Hail.

TOS-1 Thermobaric Rocket Launcher

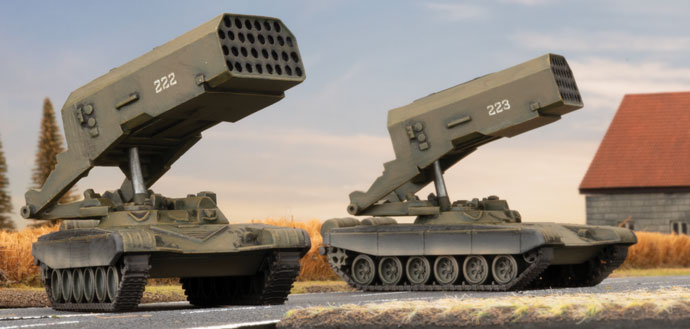
When I saw this unit, I did a double take…basically it is a flame thrower that uses a salvo template!  Mercifully the AT value is only 2, so as an antitank weapon it does not have much going for it.  But that is where this weapon’s limitations stop.  With the large template, a Firepower of Auto and the Brutal rating this means that when you hit the opponent’s infantry they must re-roll successful saves.  Foxholes or buildings which provide bulletproof cover are of no value because of the Auto Firepower.  3 launchers are 10 points so these are expensive to take (justifiably so), but this weapon will simply erase opposing infantry off the board.  If your opponent uses a lot of troops on foot this is the option you have been waiting for…and what they have always dreaded.

BMP-1 Observer Post

Do you have an extra BMP-1?  If not go get one.  Though the BMP-1 Observer is not technically artillery, this unit goes hand in hand with the Soviet artillery assets.  The reason you need it is because the Soviet forces get a dismal skill of 5+.  On the WWIII: Team Yankee battlefield this is not that big a deal when missiles and 100+ mm guns are doing most of the work, but trying to roll a 5+ (or 6 if the template overlaps terrain) will burn up your Range In Rolls fast.  Since the BMP-1 Observer has the Observer special rule it can lower your range in attempts to 4+.  This is still not the best in the game, but for 1 point it is essential if you are spending any of your precious points on artillery.

Let the Fire Rain Down

If you were considering ignoring the artillery options when making army lists from WWIII: Soviet, I hope this article has helped change your mind.  The amazing array of tanks, IFVS and aircraft this book introduces to the game could understandably distract you from humble long-range fire support.  But as we have seen, the options for the big guns and rocket launchers have what it takes to not only obliterate your opponent’s forces but also dictate the course of the battle through laying Smoke and Minelets. If your opponent thinks their infantry is safe in a building, introduce them to the TOS-1 and burn them out!  If he or she hides their tanks out of sight, send in a laser guided Kransopol shell after them!  With some careful and imaginative use of the awesome new Soviet artillery there will be nowhere to hide as you project the wrath of the Red Banner across the battlefield.


Victor’s WWIII Soviet Lists

The new releases for the Soviets in World War III: Team Yankee offer so many cool new options. When the new kits like the T-80, BMP-3, TOS-1, and Tunguska started appearing in the studio, I started noodling lists to try and include all of them.

Soviet armies get stereotyped as large hordes of questionable quality units, relying on sheer numbers to overwhelm the enemy. This is often true, but with modern equipment, and the new T-80 Shock Tank Company, I saw an opportunity here to find a middle ground between quantity and quality.

Here is the first list a came up with:

This is the type of list I normally gravitate to; max out on expensive tanks, and fill the rest with something cool. Unfortunately on the table it doesn’t have a combined arms approach and is easily countered, so I evolved it to this:

Now here I feel like I’ve got a little bit of everything, and most of it is in formation. I dropped a T-80 company which made room for Carnations and an OP, Gaskins, more recon, and some missiles. The two platoons of BMP-3’s are maybe a little redundant, but the end goal is to have 8 painted so I can run 3 as recon, and 5 to carry infantry as you’ll see below…

A few of us in the studio have been talking about playing some larger 150 point games, focusing on more modern equipment, so I wanted to see if I could easily make the army work at both 100 and 150 points with minimal extra painting. Here is how the above list grows:

I put the third company of T-80’s back in, and upgraded the formation to the Shock Company. The biggest addition is the Motor Rifle Company, but I think these improve the list greatly, and will be a fun painting project later down the line.

I’m excited to have two lists to throw down whether it’s at a 100 point tournament, or a friendly game with one of the Big Four at 150 points, without a huge change in model count. It’s mostly thanks to the new Shock Tank Company offering the option to have Soviets hit on 4+ for a bit more points, and I’m eager to try out both.

– Victor

Building a Forward Detachment Formation

With John Lee

With the release of Bagration: Soviet I was happy to see the Forward Detachment Formation appear in the Command Cards. This is one of my favourite formations as it embraces combined arms in the one formation. Its not all tanks, it is not all infantry – it has a bit of everything. This is how the formation looks:

  • 1 Hero Motor Rifle Battalion HQ or Hero T-34 Tank Battalion HQ
  • 1 Hero T-34 Tank Company or Hero T-34 (85mm) Tank Company
  • 1 Hero Motor Rifle Company or Hero SMG Company
  • 0-1 Hero T-34 Tank Company or Hero T-34 (85mm) Tank Company or Hero T-70 Tank Company or Hero Valentine Tank Company
  • 0-1 82mm Mortar Company
  • 0-1 SU-76 Light SP Battery
  • 0-1 ZSU M17 Anti-Aircraft Platoon

You can have three to seven units in the formation so you can make it relative strong. It has tanks, infantry, artillery and AA organic to the formation allowing you to take some different options for support.
If we look to maximise the units in the formation and we can add some high-end AT options – either IS-2s or Decoy Company with captured German Panzers. Let us look at a 100pt list using IS-2s first and then the Decoy Tank Company option.

This list has nine tanks with AT12 and are Crafty which means they can do Blitz or Shoot and Scoot on 3+. Infantry can attack and defend, have their own intrinsic AT with the RPG-6 Anti-tank grenades. They can also assault on 2+! Two artillery units with the ability to reroll misses. AA support which can double as anti-infantry and anti-light vehicle platforms. High end AT provided by FA SA 8 TA 2 IS-2s with AT-14 and the BA-64 Armoured Car Platoon providing spearhead to get your force into a better attack position in those missions that allow it.

Let us modify this a bit to fit in the Decoy Tank Company and Shturmoviks instead of the IS-2s and BA-64 Armoured Cars.

The “Decoy Tank Company” command card provides us with the ability to have some captured German tanks with spearhead. This company replaces the BA-64 slot in support or in the Reconnaissance Company. A maximum of three tanks and you can select from a single Tiger and up to three of Panther, StuG and Panzer IV in whatever mix you like, and adds some flavour to your force and a change from Soviet green!

So, we still have our high-end AT with the Decoy Tank Company but now pulls double duty for spearhead where appropriate. Added the Shturmoviks for a third template and a secondary AT option with AT5 vs top armour.
A couple of combined arms lists that are like a swiss army knife to be able to take on most armies and is adaptable with lower points if required. Have fun list building and give this list a go!

~Joe


Object 249 and the ‘Killer of Beasts’

With Adam Brooker

So usually I am fighting off the Red hordes with my Germans or pushing from the other Fronts with my British, so I have hardly ever fielded the glorious People’s Army on the field and then usually with a borrowed army. But… even in the old Red Bear book the units that really used to turn my head were the Assault Gun units, like the ISU-122, ISU-152, SU-76 and SU-122. Luckily, or unluckily for my back-log of painted minis, I recently found a lot of Soviet LW items on sale at a recent convention. I was suddenly overcome with the zeal of the Peoples Forces and was compelled by the ghost of Stalin to procure them….  suddenly I had then found myself with 15 ISU-122/152 and 10 IS-2/85s, a bucket full of T-34s, plus a few SU-85s and SU-122s, with the goal of making a assault gun lists for both Mid War and Late War.

With the release of the new Soviet Bagration Book, it looks like this is the perfect time to put these beasts together. I must say that the ISU-152 assault gun is the type of vehicle that really seems to display the Soviet design philosophy of slap the biggest gun you can on the biggest piece of metal that you can! It just looks brutal, and certainly not something I would like to try to face as a German infantryman in a trench in WW2.

These huge BEASTS came about as a direct result of the Tigers and Elefants the Germans were producing, and the need for a Heavy Tank Destroyer, using a KV-1s as a base for the vehicle, they slapped a 152mm monster gun on it. This was initially designed as a heavy self-propelled artillery piece against fortified positions, but in its first battles at Kursk it worked well as an impromptu tank destroyer when used in ambush. Despite only having HE shells and no AP shells, it was able to work well enough as the huge HE shells either disabled the tanks in one shot, or disabled the crew inside, and in many cases literally blew the turrets off the tanks. The only real limitation was the lack of turret and because of the limited gun traverse due to the tight-fitting breach block of the huge gun, the gun literally had to be aimed by moving the assault gun.

When the older SU chassis was going to be stopped in favour of the newer IS designs in 1943, they then made plans to mount the same gun on the IS chassis. Although this still had the same limitation of not being able to traverse the gun without moving the tank, it did gain significant armour protection.

It was also noted that the SU-152 has worked well as an impromptu tank destroyer previously, so two variants were made, the Object 249 with an A19 122m gun (the same gun as the IS-2 tank) which became the ISU-122, and the Object 241 with the ML-20S 152mm gun which became the ISU-152. The ISU-152 was given the affectionate nickname the BEAST KILLER or KILLER of BEASTS, which it inherited from the SU-152, which had the same weapon. Presumably because it killed all the Beasts the Germans called their tanks eg. Panthers, Tigers, and Elefants.

During the Bagration Offensive, these Heavy Self-Propelled Artillery Regiments were used to spearhead the assaults against the German lines, with either the ISU-122s providing overwatch fire on the flanks supporting the assaulting infantry, or the ISU-152s advancing with the infantry to directly assault the fortified positions or entrenched infantry.

Well now we know why these beasts existed, now let’s have a little look at the Formation in the new book. It’s pretty simple, an IS-2 tank as a HQ and 2-4 Batteries of ISU-152/ISU-122, plus the option of taking some attached infantry, so an SMG Company/Hero SMG/ or Engineer Sappers. Also it should be noted that these are also a Guards Company, so they do have the better stats associated with the IS-2 and IS-85 Guards, and access to the more elite Engineer/Sapper troops. This is a very limited Formation, but given the point cost of the assault guns it really needs to be. In an average game you would be hard pressed to fill out this formation. To me this will not be a typical Soviet force from MW or Fortress Europe, this is a high point cost, elite force, so very much like playing a German list, but being hit on a 3+.

The ISU-122 is very much a tank destroyer, with a formidable AT of 14, 2+ Firepower and a decent range of 28”, this gun will rip massive holes in any German or Allied armour. It is also Brutal, so can be used to also knock out dug in anti-tank gun teams or infantry. But it does have a low ROF of 1 and Slow Firing (-1 to hit if you move), so you either take your chances with a 50/50 blitz roll, or try to find a good firing position at the start with good fields of fire and blaze away.

I will say this has its challenges, as you are 3+ to hit, if you are facing any AT 12 or greater weapons, you will want to be either in concealment or hull down with a good field of view, so you can still take your shots, but be harder to hit in return, or also gamble on a 50/50 scoot and shoot. But if there is only AT 10 or less facing you, then just advance to short range and blast away, as they really can’t hurt you with your Front Armour of 9 (they may at best bail you). Just be wary of being flanked, your Side Armour is still 8 which is very good, but just that bit less, which you can fail with some bad rolls.

The ISU-152 is very similar in all respects, except its gun has a bombardment option and a slightly lower AT of 13, but has an AUTO for firepower, meaning anything that it hits and penetrates is dead, DED dead. This does come at the extra cost of 1 point per model compared to the ISU-122, which depending on your force, may or may not be worth it. As 3 or 4 points in a Soviet Army can be a unit of AA half-tracks, or some scouts, or even a few T-70s. I will say I do like the versatility of having the bombardment option ( 64”, AT 3, 2+ Firepower), it is no small thing, and usually you get a few opportunities in a game to drop a few templates. I would not like to be under a repeat bombardment from these guns, and the Reconnaissance by Combat card, which allows you to re-position a pre-game ranged-in marker, would work well here to dig out enemy anti-tank guns or infantry early.

Also don’t forget to grab the AA gun upgrade for each battery at 1 point, not only is it great value, but it allows you to have a chance at shooting down any planes your opponent sends against you, but more importantly also gives you something to ward off infantry assaults, as you have no hull MGs fitted, there was simply no room.

Also as for the infantry unit that is included in this formation, I think the best pick is the Engineer-Sapper Company, and then behind it is the Hero SMG Company, as it is cheap at 7 points and can hold an objective for you.

Although the Engineer-Sapper Company is expensive as far as Soviet troops cost, the benefits are worth it. They have Sapper Body Armour, Assault Smoke pots, and the Pioneer special rules, which in combination make an excellent assault unit. Sapper Body Armour means when in assault, if they are hit by the enemy, instead of just dying, on a roll of a 6 they are unharmed. Assault Smoke Pots allow 2 stands, instead of firing, to generate a smoke template to cover their assault, making it harder for the enemy to shoot them in defensive fire, and Pioneer allows you to cross minefields on a 2+ and can clear the minefields automatically next turn if they are still inside it. They also can have a variety of heavy weapons including HMGs, flamethrowers, and 2 captured panzerfausts in each unit. With a 3+ Assault value, and as well as being fearless, this makes both a potent attacking unit, and quite a resilient one when it has taken or holding an objective. Give them the RPG 6 Card as well and they have plenty of AT to deal with any tanks foolish enough to try to assault them.

So here is the first list I came up with, as you can see it focuses on the ISU-122 providing the bulk of my anti-tank weapons, but I have included a large unit of Engineer-Sappers as my Assault element. For artillery Support I have brought some 76mm artillery, mostly for smoke…. , and as anti-tank in a pinch to protect my objective, and some SU-76 assault guns. The SU-76 is a great, versatile unit, with a decent AT of 9 and it can also bombard, for 10 points I think it’s a great buy.

The plan is for the Engineer Sappers and IS-2 HQ to move forward with help of spearhead from the BA-64s, and to advance under the smoke provided from the Under Cover of Smoke Card (lasts until the end of the opposing players 2nd turn), which is also why I need the 76mm artillery. The ISU-122s will also advance on the flanks to help knock out any tanks or other units that threaten the main advance. While the rest of my force holds the objective. Not the easiest list to play, as it requires good timing and some good luck, but I think if you move fast enough, especially with spearhead, and the extended smoke screen that the Under Cover of Smoke Card provides, you can catch your opponent unawares. He may not be able to provide enough forces quickly enough to stop your assault.

The other list I looked at using focuses on the ISU-152 and an armoured assault element of IS-85s. Now this is a very compact list, what I call a Sledgehammer list, and it means that you will really have to focus on one point and smash it, assault it quickly to put your opponent off balance. The 2 units of ISU-152s can be used either in direct fire or in bombardment, these can be devastating to soften up the target of the IS-85s assault, or to knock out any flanking anti-tank guns that can possibly fire at them. The IS-85s have the advantage that they can still move and shoot without the usual Slow Firing penalty of the IS-2s, and their AT12 guns can take care of most enemy tanks. Also they are an easy 40 points if you have to put forces in reserve.

Once again, the only real point of the BA-64s is to put your assault unit in the best position and give them the shortest or safest route to their assault. I do like this list for its simplicity, and also I think it will be a barrel of laughs, you will either win quickly, or lose quickly, but either way you should have fun. The HQ and IS-85s move up in assault, the ISU-152s covering, while the BA-64 and ZSU half-tracks sit back and try to defend your objective (a thin hope really…lol).

What you need to be careful of in this list, is losing due to your formation breaking, as you only have 3 units, the HQ and 2 units of ISU-152s. It would be nice if I could find some more points for some Hero SMGs. You could maybe lose a IS-85 and add a small unit of them, but all they would be doing is saving you from a formation break. I think its better if you keep your ISU-152s moving and out of fields of fire of most of the enemy. Also watch out for swarm lists, it will probably require you to keep your ISU-152s back to defend your objectives, but always make sure you are using your IS-85s to threaten theirs.

Additionally, just because they are called assault guns, doesn’t mean they are great in assault in this version. As they are classed as self-propelled guns, and not tanks, they have poor ratings for assault and counter-attack, as that is not really their role, they are not designed for this and have poor fields of view. Both the ISU-122 and ISU-152 only have a 5+ for counter attack and assault values, so if you do assault, they will probably not hit anything, and will probably not hang around very long in an assault. So taking the AA MGs upgrade is crucial to give you something to try to stop an infantry assault against them. Please keep that in mind.

Historically the crews were given 2 PPsh submachine guns and 20 or so grenades to fight off infantry assault, but to use them they would have to unbutton the hatches, so it would leave them vulnerable.

Additionally I can see the ISU-152 being a great support unit for a lot of Soviet armies, especially with its versatility with such a great anti-tank weapon and a devastating artillery bombardment as well. Four of these monsters assisting another list would be excellent at 30pts, either blowing up tanks or using their huge guns to dig out infantry and dug in gun teams. They would also be a good distraction, while they are focusing on how to kill these, you advance with everything else.

Well I hope this has given a few of you some ideas on how to use these huge Brutes, and you will learn to appreciate these heavy assault guns as much as the Soviet Infantry did that they supported. They used to say of them “Nekrasivo, no spasibo!” (Not Pretty, but Thanks!”), they are certainly not the prettiest of vehicles, but they did their job well!

~Adam

Multi-Mission Infantry – The Soviet Engineer-Sapper Company

With Joe Saunders

When building army lists in Flames Of War we are often faced with tough decisions, do you pick offensive troops or defensive troops, heavy armour or light armour?  As is only proper, there is rarely a military unit available that is appropriate for all missions.  With the release of Bagration: Soviets though, there is an answer to this age-old gaming conundrum; The Engineer-Sapper Company!

The Engineer-Sapper troops of the Red Army arose from the need to have specialists in constructing fortifications and other engineering tasks such as laying bridges on the battlefield.  Over time these specialized troops became distinguished not only for their construction abilities but also for the knowledge of how to destroy the enemy’s defenses.  The result was a well trained and equipped unit of specialists that could both defend and attack. Now that we are revisiting the Eastern Front in Late-War Flames Of War, these specialized troops are available as a fantastic new option.  Let’s take a closer look!

The Stats

The Engineer Sapper Company is well appointed with a very solid stat line.  Like virtually all Soviet infantry they are Aggressive, being hit on a 3+ with a Skill of 4+.  However, they have boosts in their Assault rating to 3+ and Tactics of 3+.  This makes them very adaptable with good chances of passing any special movement orders and provides an assault ability that matches most elite troops.   Most importantly though they have a motivation of Fearless 3+, which makes them a real contender in close combat.  We all know that it is the counterattack roll that really makes or breaks the assault phase and a 3+ is about as good as you can get to ensure that your units are going to keep on slugging.

Pioneers

Another thing that should not be overlooked in the stats is the Pioneers rule.

Minefields, when placed well, can be a real pain for attacking armies in scenarios such as Bridgehead…but with the Pioneers rule, they will be much less of a threat to Engineer-Sappers, allowing them to preserve the momentum of the attack!

Sapper Body Armour

This special rule requires its own section because it is so unique.  In Flames Of War the Assault step is always the most decisive, because there are no saving throws against your opponent’s skill-based attacks!   Until now.

Smoke Pots

Another first for the rules…the Engineer-Sappers are infantry that can launch a smoke barrage but still move and assault.  It counts as a 2-gun barrage so this means that each company of Engineer -Sappers can lay down an 8-inch smoke screen once per game.  Because of this, if you need cover for an assault you are good, or if you want to mask your movement through open spaces now you have an option.

Weapons

Though the large number of special rules makes the Engineer-Sappers impressive, we have not even got to the weapon options yet.  Options that take up no less than 2 full unit cards!  The base weapons include the smoke pots, PPSh submachine guns and for units of 15 or more stands, a DP MG team.  This provides plenty of firepower to start with.  You can add to this panzerfausts (that they have captured) with the Limited 2 rule, which means they can have 2 panzerfaust shots when shooting or in assault!  From here you can continue to customize your unit by replacing up to 6 teams with 2 of all of the traditional Soviet upgrade weapons such as the PTRD, flame throwers, mortars and heavy machineguns.  This lets you mix and match to prepare your company for any battlefield role.  Best of all, with the exception of the panzerfaust upgrade, the additional weapon options do not cost more points!

Engineer-Sapper Battalion

The Engineer-Sappers have their own force organisation chart and formation so they won’t have to be relegated to just support if you don’t want.   With the Engineer-Sapper Battalion formation you can make these tough flexible warriors the star of your army list.   Let’s face it, with the huge number of options on top of their solid stats, this makes Engineer-Sappers a very fun, if somewhat elite force, that EVERYONE will want to put on the table.  Let’s take a look at a 100-point example army list that can showcase the Engineer-Sappers and which will work flexibly for most scenarios.

Engineer-Sapper Battalion Army List

Using the List

This list is designed to capitalize on the various abilities of the Engineer-Sappers.  On the attack the large squad with IS-2 Support can attack directly and possibly get a boost from the BA-64’s Spearhead.  Using the Cover of Smoke command card will make this more secure and you can cover your flanks from pesky supporting fire with smoke pots. If the opponent has deployed mines to limit your progress, you can rely on the Pioneers rule and go straight through them! The smaller units of Engineer-Sappers and the SU-76s can hang back and defend objectives.  Don’t be afraid to go after assaults with the big company, as with 22 stands, 2 flame throwers, Assault and Motivation 3+, the Body Armour rule and 4 antitank attacks each turn, nothing should be able to contend with these troops when the fighting get in close!

If you need to defend with this list, the infantry units, once dug in, will be hard to move off of objectives.   Using smoke pots and the Cover of Smoke command card will force your opponent to close for assaults (where you are likely better) or seriously limit their lines of site forcing them to maneuver where you can counter attack with the IS-2s.

Time to Fight!

As we have just discussed, the Engineer-Sappers come pretty close to having it all in Flames Of War.  In fact, they are pretty unique in having almost no specific weaknesses, being customizable for any mission and they have plenty of special rules to function in both defence and attack.  The main limiting factor that you will have as a Soviet player (besides points limits) is going to be your imagination (and remembering all of the cool special rules)!  So, get your Engineer-Sappers ready for your next game and see just how flexible and fun to play they can be.  Onward to victory for the Motherland!

~Joe

Hunting the Big Cats – A Look at the IS Series in Flames Of War

With Joe Saunders

For some time, Tiger and Panther tanks were the top predators on the World War II Eastern Front. Designed to readdress the technological gulf between the medium panzers (III and IV) and the T-34 and KV-1, the “Big Cats” made up for Germany’s shortcomings and then quickly surpassed them. Where Tigers and Panthers went, kill ratios for tanks skyrocketed with the Third Reich’s innovations in armoured technology coming out on top. Or at least that was the case until late 1943 when the IS (Iosef Stalin) series of armoured vehicles started to appear on the battlefields of the Eastern Front. Capitalizing on lessons learned in tank automotives, armour design and firepower, the IS turned the tables on Hitler’s prized tanks. The battlefield hunters quickly found out that they could become the hunted!

In Flames Of War the IS series of tanks, featured in the new book Bagration: Soviet, provides the Soviet player with some serious tools to fight back against the Tiger and Panther tanks that dominate the game table (and it also works quite flexibly in support of infantry too). Do not let this fool you though, while the IS tanks can outfight the German predators, they are not the same. The IS vehicles require a different approach on the games table, which we will discuss here.

The IS -2 Tank

The IS-2 is a real monster! Front Armour 10, Side Armour 8 and Top Armour 2 makes it one of the most heavily armoured vehicles in the game. If opponents shoot it out at long range, the IS2 will be immune to medium tanks like the Panzer IV. It will also stand a pretty good chance of shrugging off 7.5 cm and 8.8cm shots from Panthers and Tigers.  When you consider it will be Front Armour 11 (for range) and the German “cats” have AT 14, IS tanks will be bouncing their shots 50% of the time. Other than the later marks of Churchill, no other allied tanks in the game have similar armour to even stand a chance against these big German guns!  The IS-2 also has a Last Stand of 3+ and Veteran Skill so it can make Blitz moves or Shoot and Scoot fairly reliably. In a straight comparison with a Tiger, the IS-2 is hit on a 3+ instead of a 4+, but it also has Front Armour 10 while the Tiger has a value of 9!

Despite these stats though, the big difference with the IS-2 is the gun. Compared to the Tiger and Panther the IS-2’s 122mm canon range is only 28” while the German tanks both have a range of 40” and they all have the same AT rating of 14. Additionally, the 122mm is rate of fire 1 and is Slow Firing. Because of this the IS-2 is not the mobile long-range anti-armour sniper that the German tanks are. Sitting back and taking pot shots is not really an option for the Russian heavies! But when you hit your target this is when the IS-2 shines.  A penetrating hit from the 122mm canon out classes even the German 88! The AT is a fearsome 14, and more importantly the IS-2 has an amazing Firepower of 2+. If you can Hit with the IS-2 you are going to break something. Moreover, it also has the Brutal rule so the 122mm has quite a lot of flexibility which the German guns do not have. If you want to take on dug in infantry instead of tanks it should be no issue. The rerolls for saves caused by Brutal guns combined with the Firepower of 2+ will outperform the Tiger and Panther all day long (who lack the Brutal Rule and are only Firepower 3+).

The IS-85

Though the IS-2 is impressive, its predecessor the IS-85 also bears some separate consideration. The IS-85 was used as an interim design mounting the plentiful 85mm gun used on T-34s and SU-85 Self Propelled Guns. This was necessary as a stop gap measure while the 122mm canon was produced in enough numbers to catch up to the Russian heavy tank program which had already turned out hulls for the IS-2. Rather than having the tank sit idle, the lighter gun was used to get the tanks on the battlefield. Because of this, The IS-85 is in all ways the same as the IS-2 except, unsurprisingly, for its’ gun’s performance (and it costs 1 point more). The 85 mm canon is range 28” with a Rate of Fire of 2, AT 12 and Firepower 3+. This means that when it comes to performance it splits the difference between the 122mm and the 88cm or 7.5cm guns of the German “Cats”. The Anti-Tank value of 12 is not as high but is respectable and it shoots twice when stationary (or Blitzing). Also, unlike the IS-2, it does not take the slow firing penalty. So, if you think that the lower chances of hitting with the 122mm canon, in exchange for the impressive 2+ Firepower, are too big of a risk for you to take, then the IS-85 might suit you. Or better yet, you can use both IS series tanks in combination!

Putting it Into Practice:

To create a 100-point army list that gets the most out of your IS series tanks you should start with (unsurprisingly) the IS-2 Heavy Tank Regiment from the book Bagration: Soviet. I would suggest the following composition as an example

Tactics

On the table you will want to rely on your (likely) superior numbers of heavy tanks and their Front Armour of 10 to get in close to any Tigers, Panthers or other tanks to take them out. Fortunately, you can do this fairly easily. The IS-2 is only around 7 points where the Tiger costs 13 points (for the SS version) so quantity should be on your side. The key here is to be aggressive with the IS-2s moving quickly relying on cover, speed and good armour to put the pressure on the opponent’s line! The IS-85 Company can advance to moderate ranges then take pot shots with their 85mm guns at the enemy to provide covering fire while the IS-2s dash into position to attack (then Blitz in subsequent turns to bring the enemy into the sights of their 122mm canons). The Hero SMG Company can increase the numbers in your formation offsetting its break point while staying close to the advancing tanks to ward off infantry, or commit a timely assault on anti-tank guns or bailed out tanks. Lastly, the Hero Rifle Company and the 76mm Artillery can provide a base of fire to back up your advancing units and guard objectives. For reserves you can leave the 2 IS-2 Companies off the board and dash them forward when they arrive, or they can surprise opponents that have pushed forward into your deployment area by moving onto the board and quickly lining up an assault.

Put Your Tanks on The Table

As we have seen in this article, the IS series of tanks from the new Bagration: Soviet book should be more than a match for any Panther or Tiger Tank that you may face on the Flames Of War battlefield. But to be victorious you will need to keep in mind the details peculiar to these tanks and play both aggressively and smart. Front Armour 10 and the powerful 122mm (or 85mm) gun in the hands of a good player makes an effective combination that any German player is soon going to learn to fear. So, grab your heavy tanks, paint on the red star and unleash the unstoppable might of Mother Russia on the Hitlerite Invaders!

~Joe

Anything More Than A 76mm Is Overkill

With Chris

One of the fun things about a new book hitting the shelves is taking a look at the armies you previously built but have since been eclipsed by something newer and therefore shinier. One of the unloved boxes in my cabinet just happens to be a Light SP Artillery Regiment and having a reason just to pull it off the shelf and check out the models has been a source of joy this week!

The original army was built to a fairly straight forward specification, how many SU-76s can I put in the list. After all more tanks is a good thing when it comes to a Soviet list. I was under no illusions though and I certainly understood that SU-76s were not going to get the job done by themselves so I remember painting up some IS-2 tanks for a little extra firepower and to have something with some armour in my force. BA-64s were (of course) included as you always needed recon under V3. It is too long ago to remember what else was in there but I can recall the one major tournament that I took it too and let me tell you, it was a FUN list. There was something about having 20 pairs of 76mm guns, each more than capable of knocking out a Sherman or Panzer IV. Having so many of them also meant that I could afford to be a little reckless – they even assaulted some infantry off an objective, or maybe they tried… It is my story so I am going to say it ended well, the commanders were presented medals and they were not wiped out by the defending troops (which is more likely!)…

Taking a look at the SU-76 under the Bagration: Soviet book and they are really interesting having gone through a stat overhaul in some areas. They are still a moving piece of tissue paper with armour 4 and top armour 0. They are relatively skilled (4+) so whilst they cannot be counted on to do anything too tricky it is worth trusting the dice for a Blitz or Shoot and Scoot (especially if you have the Make Your Own Luck Command Card!). Their 76mm gun has gained an Artillery stat line which means that the days of having to drive up to gun lines and duel it out are gone, instead it is raining HE all day! Best of all they are only 13 points for a platoon!

My plan for V4 remains largely unchanged from V3, mainly because it is completely hypothetical at this stage. Start with a full force of SU-76 “tanks”. I have all of these painted so it seems like a waste to not use them, and I really love the little things. Add in a Hero SMG Company with my favourite Command Card, Hero Tankodesantniki, so they can jump on board some tanks and ride into the teeth of the enemy and deliver close range SMG fire and grenades. Speaking of tanks… you know what is coming next… IS-2 platoon! I originally painted seven but only have the points spare for four right now. That still gives me an awesome little threat unit and with the Hero SMG unit on top comes out to an even 40 points – hello Reserve unit.

Rounding out the force are a couple of old friends, the ZSU platoon with their meat chopping .50cals and a unit of BA-64 armoured cars. With armour like a damp sock the SU-76s need to be in an optimal position as soon as possible so a quick Spearhead up with the BA-64s should help considerably.

Rounding out the force is the Lucky Command Card. Or as I call it, the first point that I spend in most of my lists.

Is this a tournament winning force? Unlikely, and certainly not in my hands. Is it fun, filled with interesting models and has the ability to throw a wrench in someone else’s plans? Absolutely!

~Chris

Building a Medium SP Artillery Regiment

With John Lee

I have eagerly been waiting for the launch of Bagration: Soviet for some time as one of my favourite organisations is the Soviet Medium SP Artillery Regiment.  I played this formation in V3 with some considerable success and my opponents tended to underestimate how well it played.  With V4 there have been some changes to the how this medium assault gun plays out in the game.

The biggest change for all three assault gun variants (SU-85, SU-85M, SU-100) is that they are now Fearless Veteran Careful.  This is one of the few careful units in the Soviet army.  Now they are harder to hit on 4+.  Veteran skill means you have a better chance of pulling off tactics such as Blitz or Shoot and Scoot.  Fearless makes it easier to remount when bailed out and for last stand checks.  The other change for SU-85M and SU-100 is they lose FA9 down to FA7.  FA7 is still better than FA5 in the SU-85 but with being careful now means they should have a better chance to take less hits anyway.  The SU-85 and SU-85M have a 4+ cross check and the SU-100 has a 5+ cross check – so watch out trying to ambush from the woods!  Fortunately, there is a new command card called “Unditching Logs” that for 1pt allows you to reroll failed cross checks for that unit until the end of the turn.  This will help improve your chances of moving in or out of woods.  Now if we look at firepower now, the SU-85 and SU-85M have ROF 2 AT12 with a range of 28” and the SU-100 have ROF 1 AT15 with a range of 32” but also the slow firing rule.

Let us have a look at the formation:

  • 1 Medium SP Artillery Regiment HQ
  • 2-4 SU-85 Tank-Killer Battery or SU-85M Tank-Killer Battery or SU-100 Tank-Killer Battery
  • 0-1 SMG Company or Hero SMG Company

As you can see, we can have mixed assault gun batteries in the same formation along with an intrinsic infantry unit as well to help balance the formation and make it more robust.  The HQ is a single T-34 but it is also Fearless Veteran Careful – very useful to have.

So, in my mind there are two ways to build this list – have a mixed regiment of SU-85M and SU-100 or just either SU-85 or SU-85M and get you high end AT from other units such as IS-2, ISU-122, 100mm AT guns or using the “Decoy Tank Company” command card.  The decisions will normally come down to what points you will be playing and your playstyle.  For the purpose of this article, we will use the standard 100pts list.

First, we will look at the mixed battery option:

The formation comes in at 71 pts leaving us 29 pts to add some support options to bolster your force.  I like to run a balanced force so I would want to add some artillery options – ideally two if I can plus some recon.  Equipping your infantry with the “RPG-6 Anti-tank grenades” command card gives them some intrinsic AT capability – especially for assaults where the Hero SMG company assaults on 2+!

So far, the formation has high end AT with the SU-100 battery and decent ROF2 AT12 for everything else.  I like to have five in the SU-85M battery if possible as it gives me 10 stationary AT12 shots.

We have a range of artillery options for the Soviets.  We can take a SU-76 light SP battery in formation support plus we have the options from support to take up to SIX units of artillery ranging from 76mm, 122mm, 152mm batteries and the mighty Katyusha! Not only that, but we also now get an option to take an observer as well.  One other multi-purpose unit we could also consider is the Flying Tank, the IL-2 Shturmovik which has a AT5 against top armour template to take care of  everything, from infantry and guns to the heavy tanks such as the Tiger and Elephant.

With recon we have three options available to us. Armoured Reconnaissance Platoon or Reconnaissance Infantry Platoon as formation support from the Reconnaissance Company formation, BA-64 Armoured Car platoon from support, and “Decoy Tank Company” command card.

So, lets add a couple units of artillery, air support and some recon to round out the force:

Adding in these options gives you the ability to have 3 templates plus a secondary AT option with the Shturmoviks, an OP to range in everything and recon to spearhead you in those missions that allow it to get into a great attack position.

Now our second option is to look at taking just SU-85Ms and getting our support options to provide the high-end AT, artillery and recon.  The “Decoy Tank Company” command card provides us with the ability to have some captured German tanks with spearhead.  This company replaces the BA-64 slot in support or in the Reconnaissance Company.  A maximum of three tanks and you can select from a single Tiger and up to three of Panther, StuG and Panzer IV in whatever mix you like, and adds some flavour to your force and a change from soviet green!

So, you get Spearhead with the Decoy Tank Company and pulls doubles duty as your high end AT along with some heavy artillery to defend an objective with AT12 and FP 2+ in bombardment to dig out enemy guns and infantry teams.  With 35pts left over in support you could also swap out the heavy artillery, decoy tank company with 3 x IS-2s for 22 pts, 122mm artillery battery for 8pts, observer BA-64 for 1pt and BA-64 armoured car platoon with 7 for 4 pts.  Another option is to use the 100mm Tank Killer Company for your high-end AT.  Fearless Veteran Careful with AT15 for 11 pts.  This opens the options to take two artillery batteries for 16 pts (you choose your combo), Shturmoviks for 7 pts and an observer.  Lots of mixing and matching support options with this formation.

I have 10 SU-85Ms and 5 SU-100s that are ready to be dusted off the shelf now that Bagration: Soviet has been launched that I plan to terrorise my opponents with.  Happy list building!
~John

Tiger Tiger, Burning Bright

With Casey

I, like most people, love the idea of fielding captured equipment as evidenced by my Das Reich T-34 Beute Panzerkompanie.

The tide has now turned back to the Soviets. Back when they first appeared in Version 3 in Hammer & Sickle a pair of captured Panthers were a mainstay of any tank army that I built as it was one of the cheapest and easiest ways of getting some anti-tank 14 into my army.

Fast forward a few years and captured tanks are back, and better than ever!

The Captured Tank Command Card allows you to field a Captured Tank Platoon in place of a BA-64 Scout Platoon. I plan on painting up a platoon of Captured tanks because they look cool.

I’m planning on painting a platoon that consists of 2 Panthers and one Tiger. To fit in with my Winter-wash paint scheme I’ve chosen to paint a Mid war Tiger I and 2 late Panther G tanks mainly because they don’t have zimmerit and are easier to paint in my version of whitewash.

I started with the Tiger I as a test piece as the colours and process are slightly different to my white washed green.

I have always liked solid yellow on Tigers, so I have kept the basecoat plain and just added green squares and red stars where the original German markings were. I stole an idea off Victor and also removed the tow cable on the side to add more flat panels for whitewash and make it look more used. I have assembled my Panthers, but these will get a 3-colour camo treatment before getting their whitewash.

Captured tanks in the game

On the card you get options for Panzer IVs, StuGs, Tigers, and Panthers. I’m not really going to talk about Panzer IVs or StuGs here though.

The obvious comparison to the captured tanks are IS-2s. Three IS-2 tanks come in at 22 points, while three captured Panthers come in at 21 points (22 points if you replace one Panther with a Tiger, but for the ease of comparison I’ll stick with Panthers).

Looking at the main stats, the IS-2 has Anti-tank 14, ROF 1, Firepower 2+ with Brutal, as well as Front Armour 10, Side Armour 8 and Top Armour 2.

Panthers on the other hand have Anti-tank 14, ROF 2, Firepower 3+, but only have Front Armour 9, Side Armour 5 and Top Armour 1.

You are essentially trading the better armour of the IS-2 for slightly better mobility and the higher ROF and longer-range gun. You are also giving up your recon slot by taking the captured tanks as well, but your captured tanks do have Spearhead.

Another note to make is that the captured tanks are also Green, so won’t really be able to pull off many tricky movement orders.

I don’t think a captured tank platoon is an automatic choice, as they do slightly different jobs. IS-2s have a slight advantage because they are now cheap enough to take a whole formation of them now and have them count towards morale.

Where captured tanks really shine in a Rota Razvedki, or Reconnaissance Company. Here they can replace your BA-64 platoon and give you a tough tank platoon inside your formation. The added bonus here is that they will now count towards morale, and you can still take a divisional support platoon of BA-64s for a second Spearhead option.

Funnily enough, a Rota Razvedki is a list that I have always wanted to make, more on this later…

~Casey

Army Building With The Heavy Assault Group Starter Box

With John Lee

With the launch of the Bagration: Soviet release, I thought I would look at both new starter boxes to see what sort of force you can put on the table.  This article covers the Heavy Assault Group starter box.  This box is ideal for someone either starting out or for the veteran player who needs to add some additional firepower to their existing force.  For the new player, it opens the door to playing Flames Of War without needing to buy, assemble or paint too much and get into playing the game quicker.

So, if we look at what we get in the excellent value starter set (Heavy Assault Group), that will help decide what Formation(s) to run.  The starter set contains the following:

  • Complete A5 Rulebook
  • Soviet “Start Here” guide
  • 4 x IS-2 or IS-85 Tanks
  • 4 x ISU-122 or ISU-152 Assault Guns
  • 4 x SU-76 Assault Guns
  • 3 x BA-64 Armoured Cars
  • 4 x 57mm or 76mm Guns
  • 1 x Hero Shock Rifle Company
  • 2 x Decal Sheets
  • 12 x Unit Cards

The bonus here is that the rulebook is included in the box – so the new player makes a saving right away.  Now if we look at what Formations are in the Bagration: Soviet book, we can see what we can maximize from what we get in the starter box.  The best Formation to maximize this straight out of the box is the Heavy SP Regiment.  Let us look at what units comprise this Formation:

  • 1 Heavy SP Artillery Regiment HQ
  • 2-4 ISU-122 Guards Heavy SP Battery or ISU-152 Guards Heavy SP Battery
  • 0-1 SMG Company or Hero SMG Company or Engineer-Sapper Company

Looking at the Formation and what we get in the starter box, we can use all the Heavy Assault Guns in the Formation plus one IS-2.  To maximize our investment, we can add an IS-2 or IS-85 Guards Heavy Tank Company in Formation support along with a SU-76 Light Artillery Battery and a Hero Shock Rifle Company. We can also add the following support options; 57mm or 76mm Gun Battery and an Armoured Car Platoon.  This means we can use everything in the box for our list!  So how does this look from a list building perspective:

This is a fragile build with only three units in the Formation, but the ISU’s have FA9 SA8 TA2 and the IS-2s are even better with FA10!  So, if handled with care, they will still be deadly.  The other benefit with this list is that it has three artillery templates.  That is right – three!  The ISUs pull double duty, they can bombard and have high AT.  The IS-2 is a beast with AT-14 but nearly impervious in assaults.  You can assault with the IS-2s and infantry after pinning the enemy down with your three templates.  There are Fearless Careful 57mm AT11 guns for defending your objective or rolling up the guns to help the assault.  Shturmoviks (Flying tanks) to provide ability to either take on enemy heavy armour with rockets AT5 against TA2 such as Tigers and Elephants or drop a fourth template on some hapless infantry and gun teams.  Armoured Cars to provide spearhead in those missions where it can be used to get your army into a better attack position.

To buy this army you need to only purchase the following for $155:

1 x SUAB13 Soviet LW “Heavy Assault Group” Army Deal $100
1 x FW266 Bagration: Soviet Book $20
1 x SBX77 IL-2 Shturmovik Assault Company $35
TOTAL $155

Now if we look at expanding this starter set with another couple of boxes, we can fortify the above Formation and look at the Guards Heavy Tank Formations.

So, adding a box of five ISUs will allow us to have a stronger Formation with four or five units and we can use the infantry in the box to become a Hero SMG Company to become part of the Formation.  This is how it could look with two batteries of four ISU:

Costing:

1 x SUAB13 Soviet LW “Heavy Assault Group” Army Deal $100
1 x FW266 Bagration: Soviet Book $20
1 x SBX63 ISU Heavy SP Battery $45
TOTAL $165

Or with three batteries instead:

Costing:

1 x SUAB13 Soviet LW “Heavy Assault Group” Army Deal   100
1 x FW266 Bagration: Soviet Book     20
1 x SBX63 ISU Heavy SP Battery     45
1 x SB76 BA-64 Armoured Car Platoon     18
TOTAL $183

Now we can add a box IS-2 tanks to create a Guards Heavy Tank company, we can use most of the starter box.  The IS-2 Guards Heavy Tank Regiment which is made up of:

  • 1 IS-2 Guards Heavy Tank Regiment HQ
  • 1-3 IS-2 Guards Heavy Tank Company
  • 1 IS-2 Guards Heavy Tank Company or IS-85 Guards Heavy Tank Company
  • 0-1 SMG Company or Hero SMG Company or Engineer-Sapper Company

Running a mix of IS-2 and IS-85 gives you flexibility around ROF and AT.  We can also change out the ISU-152 battery with the SU-76s and the 57mm Tank-Killer Battery for the same points which are part of the starter box.  Armoured Cars to spearhead your assault tanks into position.  This will cost:

1 x SUAB13 Soviet LW “Heavy Assault Group” Army Deal   100
1 x FW266 Bagration: Soviet Book     20
1 x SBX62 IS-2 Guards Heavy Tank Company     45
TOTAL $165

There is also the IS-85 Guards Heavy Tank Regiment which is made up of:

  • 1 IS-85 Guards Heavy Tank Regiment HQ
  • 2-4 IS-85 Guards Heavy Tank Company
  • 0-1 SMG Company or Hero SMG Company or Engineer-Sapper Company

IS-85 has ROF 2 with AT-12 so you will need the ISU-122s for the AT14.  This is still a hard-hitting force – needs a bit of finesse to run it.  You can always change out the Hero SMG Company for Shturmoviks if you want that extra AT hitting power.

There are so many more options you could run with this box – get the book or hop online to forces website to see what you can out together for under $200 that suits your playstyle.

Even if you run other tank or infantry Formations, adding this box provides you a range of support options to go with them – great value for $100!

~John