The Boxer vs The Bruiser Comparing the M1 Abrams with the T-80

With Joe Saunders

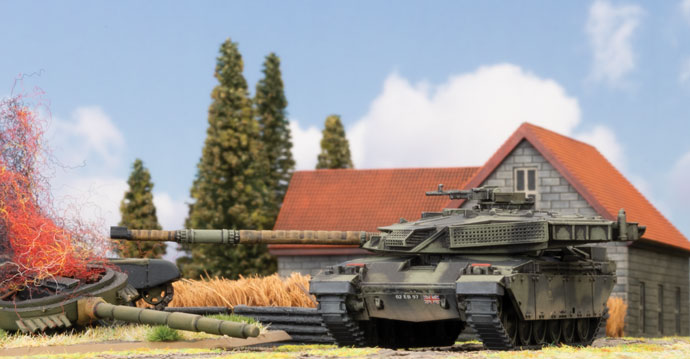
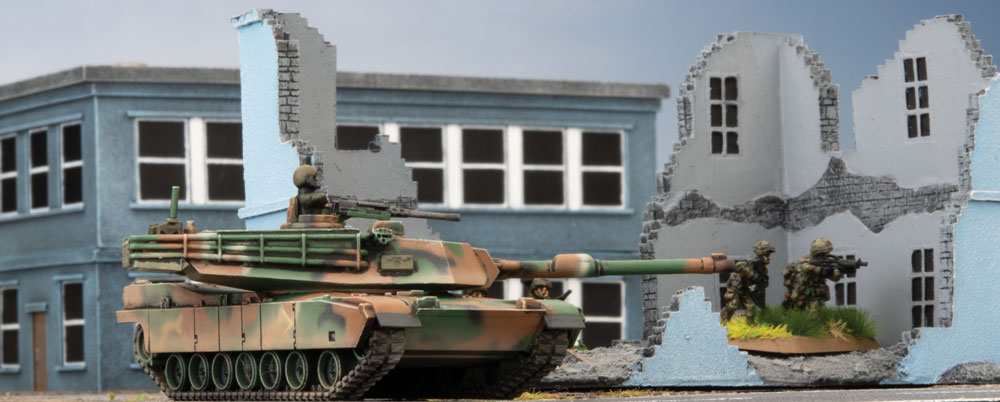
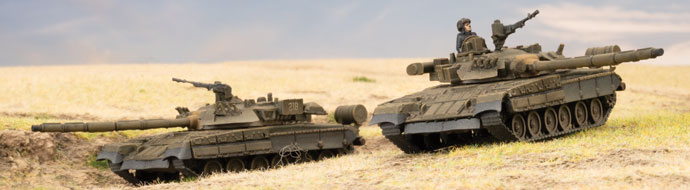
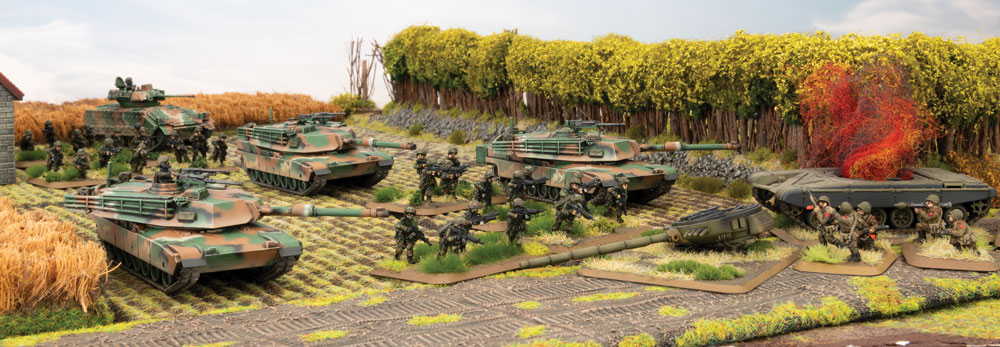
On the World War III: Team Yankee battlefield the undisputed top predator is the M1 Abrams and its variants. With a front armour value of 18 ranging to 21 and a main gun AT rating of 20 for the 105mm, or 23 for the 120mm, the Abrams hits hard and can soak up massive amounts of punishment. This is made even better by a Hit On rating of 4+ and an amazing remount of 2+. But this battlefield titan is not unstoppable.

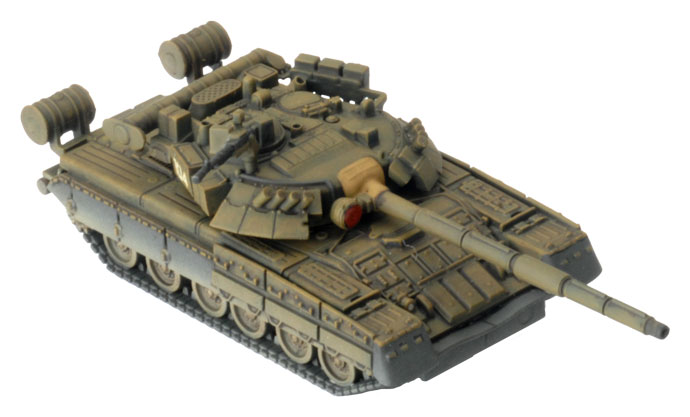
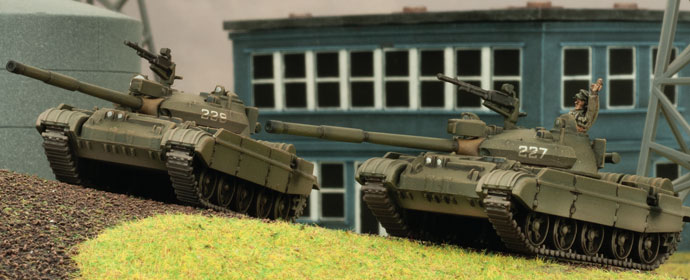
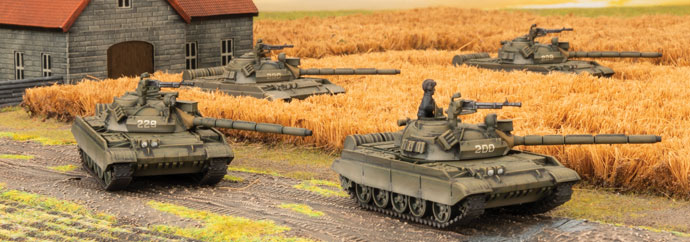
The main tactic for Warsaw Pact and Soviet players to take these machines down was always to go with quality over quantity. An M1A1HC for instance costs 18 points compared to a T-64 which costs 4.3 points. This means that the Warsaw Pact can put at least 4 T-64s on the table to every one M1A1HC. This solution however is imperfect for World War III players. Sometimes you want to play a small elite force, or the wallet just won’t let you buy the 20 T-55AMs (and the paint) you would need to begin to equal the points your opponent would spend on 4 M1 Abrams (the basic model). This has traditionally left the gamers who want to play forces of the more communist variety at a loss…until now. With the new core set and the World War III: Soviet book you can get your hands on the T-80. This marvelous tank, while remaining most definitely Soviet in design and application, has what it takes to go toe to toe with the M1 Abrams. Let’s take a closer look.

Background

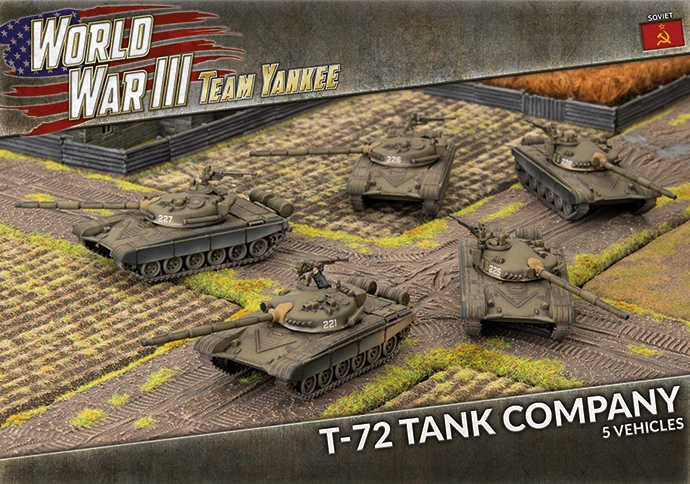
The Warsaw Pact forces of the 70s and 80s were set on a very specific type of battlefield doctrine that caused the form of their tanks to follow the function of their strategy. This resulted in lighter, smaller, though heavily armed main battle tanks that did not match the size of western behemoths like the M1 or Leopard 2. Part of this was the recognition that the communist forces would maintain the edge in terms of numbers through vast armies of conscript troops.  This necessitated simple designs that were faster and cheaper to make and more easily crewed by troops with less training. Moreover, these tanks such as the T-72, were intended for widescale export so they skimped on technology in favour of ease of maintenance as they could be put in service in remote locations ranging from the desert to the artic, far from technical support.  The T-80 however was a partial divergence from this trend. Initially, not intended for export, the T-80 was loaded with the current innovations in armoured warfare, while still staying true to the Soviet strategy of having smaller more numerous tanks. The T-80, though it looks superficially like other Soviet tanks of the time, has better armour (supplemented be Explosive Reactive Armour- ERA) and a gas turbine engine that gave it outstanding speed. For armament it had the same autoloaded 125mm gun of its less technical T-64 and T-72 brothers, but it had the option for using the latest generation of gun barrel launched anti-tank missiles.

The Stats

The T-80 has the stats to contend with the other NATO tanks. The front armour of 20 outclasses all iterations of the M1 except the M1A1HC which only edges it out by 1 point. Because of this, it can definitely take a punch! (The Abrams, only has one point better in side armour too.) The T-80’s side armour has ERA making it side armour 16 against HEAT weapons.  This puts it neck in neck with the M1’s Chobham armour which also has a side armour rating of 16 against HEAT weapons (Though passengers can’t ride on tanks with ERA, because they would be blown up when the ERA goes off!)

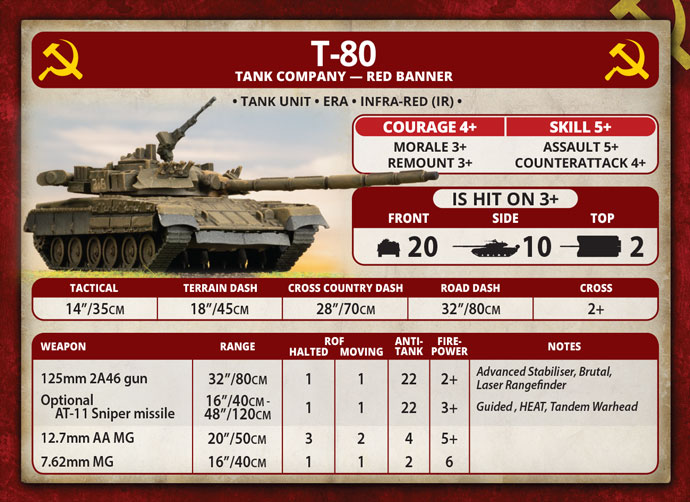
In terms of mobility both tanks are the same in all respects and both sport advanced stabilizers for 14-inch tactical moves and have a cross of 2+. I imagine that this similarity is due to the fact that both have gas turbine engines and represent the pinnacle of tank automotives for both major super powers in the mid 80s.

This brings us to firepower, which is where these tanks diverge. The M1’s main gun can be a 105mm or 120mm canon depending on the variant and both are very good guns. They have 2 dice of shooting whether they are stationary or not, have a high AT, a range of 40 inches, and 2+ firepower. The 120mm in particular has a whopping AT of 23 due to it having cutting edge, fin stabilized depleted uranium long rod penetrator rounds! But this canon is very much maximized for anti-tank work. On the anti-troop side, the M1 comes in a little light at 5 dice of machine guns. The T-80 is different in the weapons department with a much more diverse armament. The 125mm Soviet gun has a range of 32”, rate of fire of one (whether moving or not) the brutal rating, and is AT 22 and a firepower of 2+. This makes it equally deadly against both infantry and armoured vehicles.  The lower rate of fire makes the T-80 maybe slightly less competent in destroying armour… but wait, there is also the barrel launched Sniper missile! This AT 22, fire power 3+, Guided, HEAT weapon can reach out to 48 inches (with a minimum range of 16 inches) actually giving the T-80 a longer reach than the Abrams. Being the pinnacle of anti-tank weapons for the Soviets, this missile has the Tandem Warhead rule. This means that thought the Sniper Missile is a HEAT weapon, armours such as Chobham, Bazooka skirts etc. do not cause a boost in side armour ratings. So, go ahead and shoot an M1A1HC or Leopard 2 in the side armour with this missile and you can have that satisfaction of going straight to the firepower test!

Training

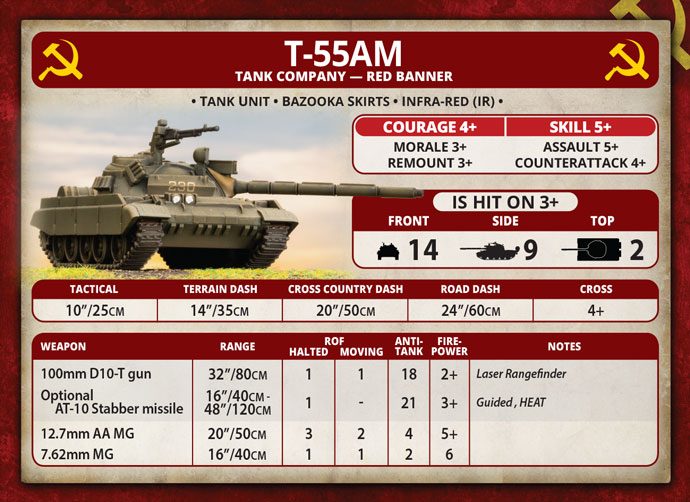
So far, we have seen that the technical details make the T-80 pretty close to the other NATO MBTS but there is a difference and that boils down to training. As we discussed earlier in the article, the Warsaw Pact doctrine in the 80s was to rely on large numbers of conscript troops and use numbers to overwhelm their adversaries.  The values on the T-80’s unit card represent this. The Hit on Number is 3+, Skill is 5+. These numbers are not so favourable compared to the typical NATO ratings. The American tanks for instance are hit on a 4+ and have a skill of 4+. The difference is represented in the points values with the T-80 running at about 7.3 points each where the comparable NATO tanks cost more. Because of this the Warsaw Pact forces will always have a slight edge in numbers because of the decrease in training. The lower Hit On value may also not be such a serious issue. With the armour ratings on the T-80 being up there with the NATO MBTS, you can compensate for the lower hit on number by keeping your opponents to the front and relying on the tank’s considerable manoeuvrability.

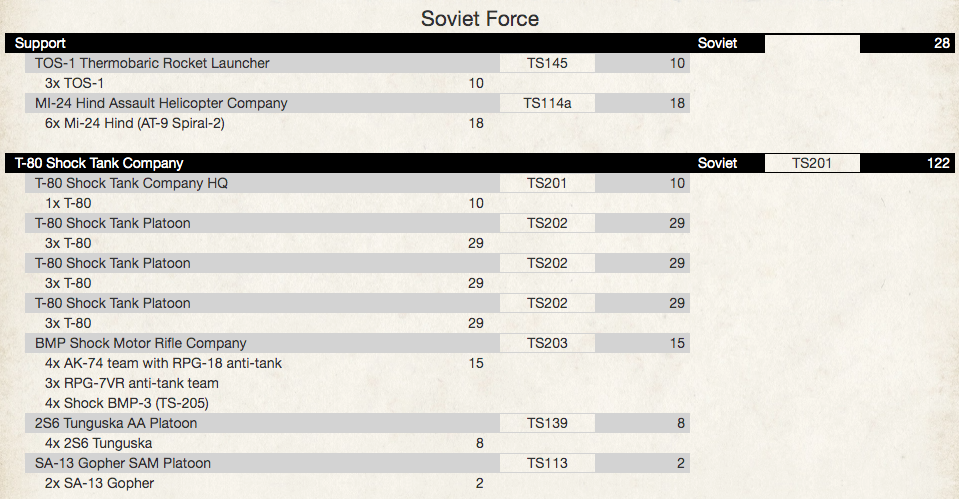
There is also another option to adjust for the T-80’s decreased stats… you can go elite. The T-80 Shock Company in the new Team Yankee: Soviet book represents the best Soviet Tankers of the time and this brings both the statistics and points costs into line with most NATO armies. The Hit On number goes to a respectable 4+ and the skill goes to an excellent 3+. (This opens up a lot of new options, but since the T-80 Shock Company is fairly different from other Soviet Formations and will be covered in a separate article.)

Other Considerations

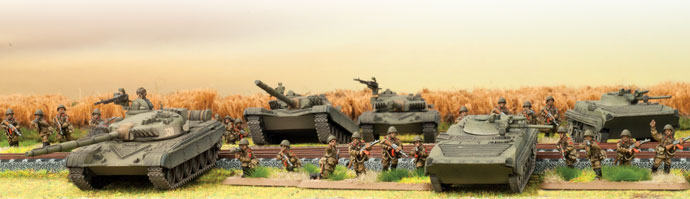
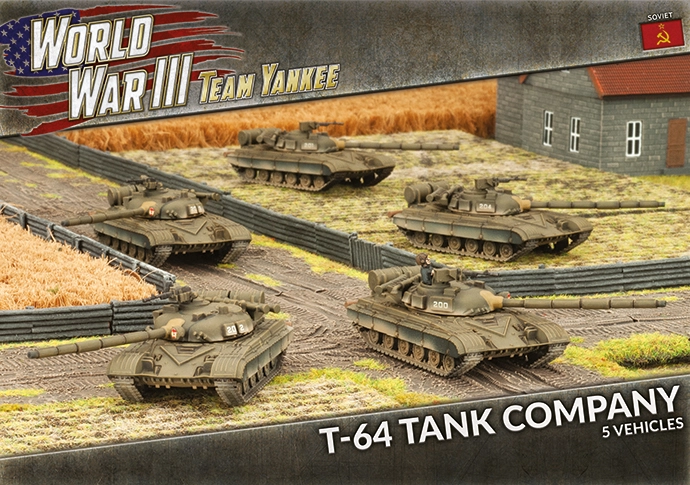
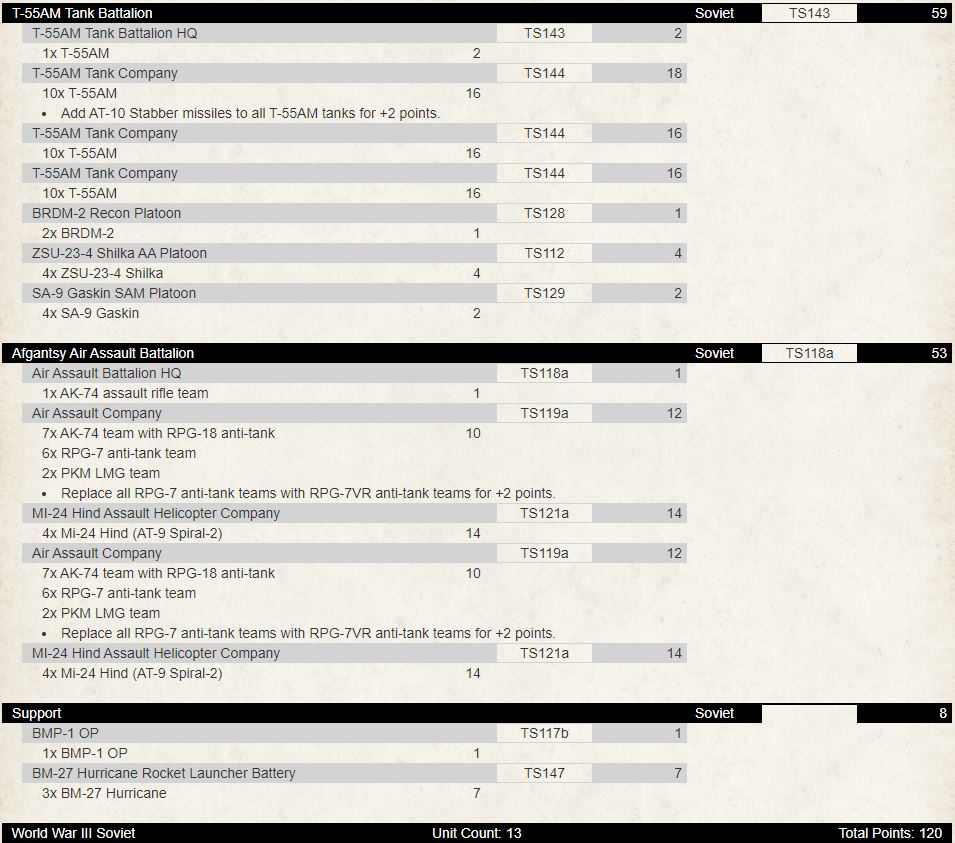
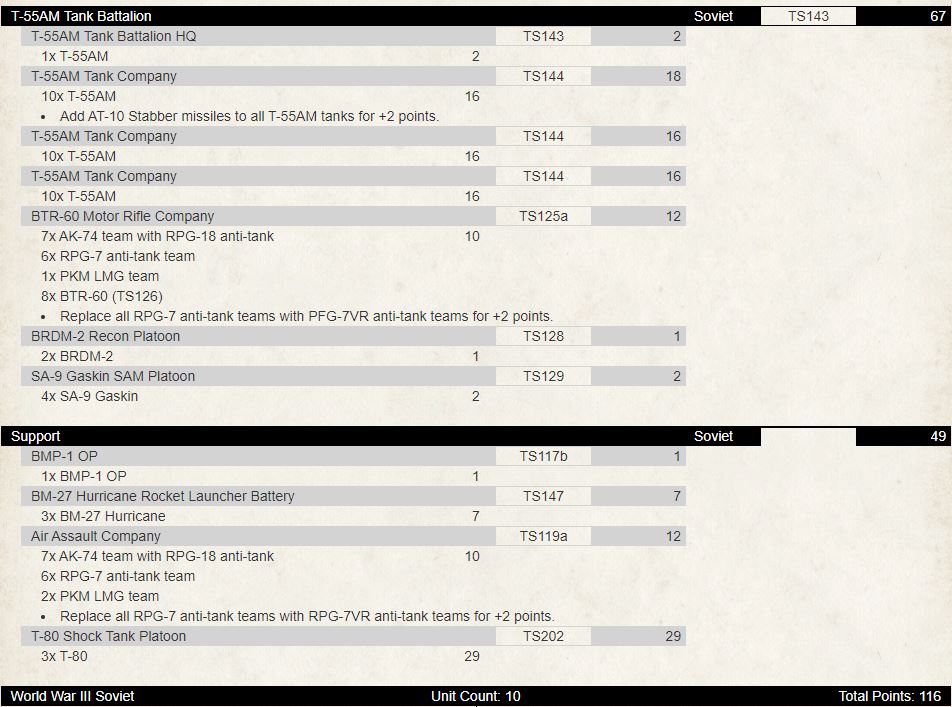
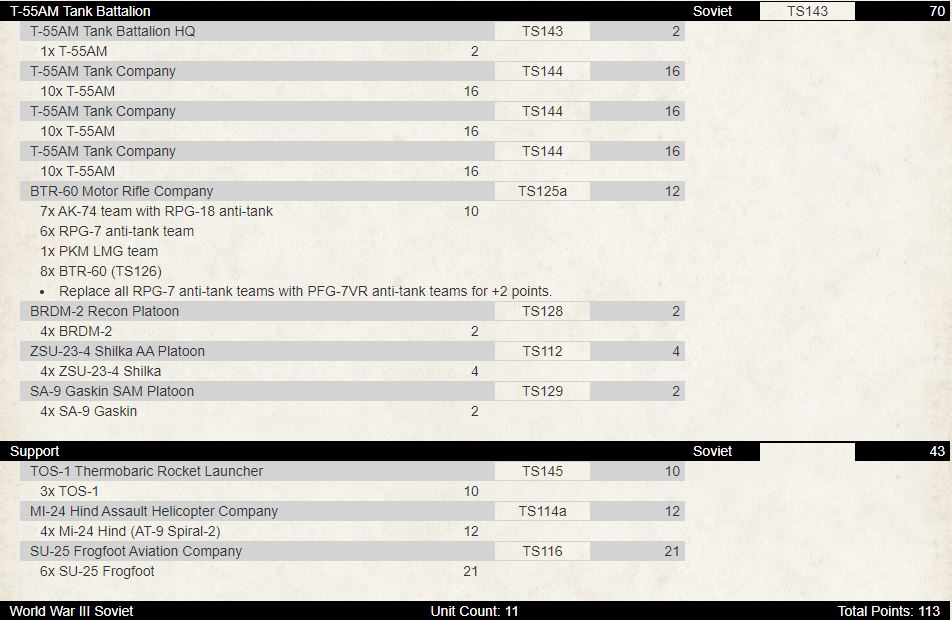
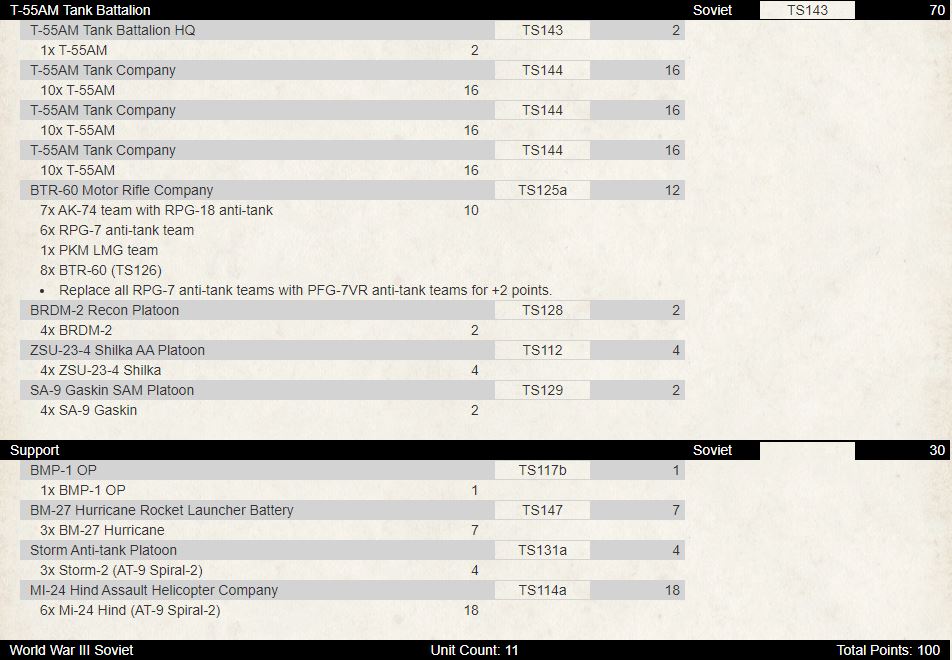
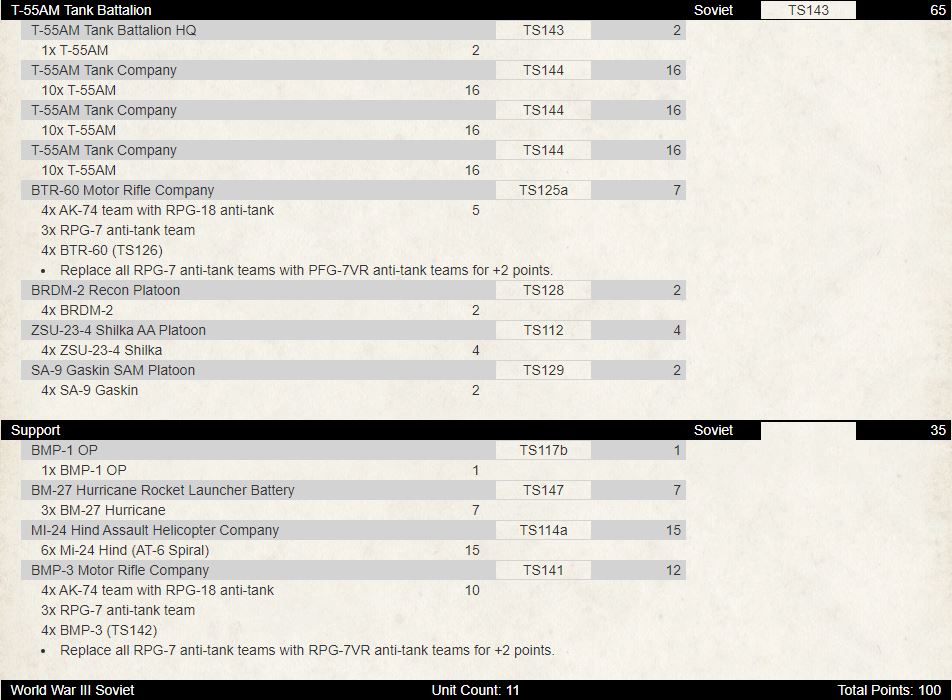
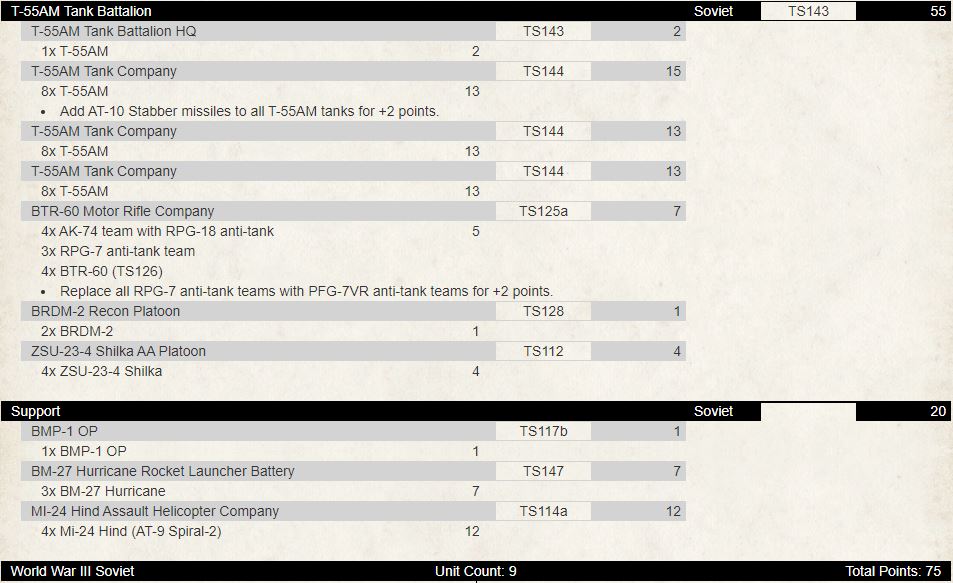
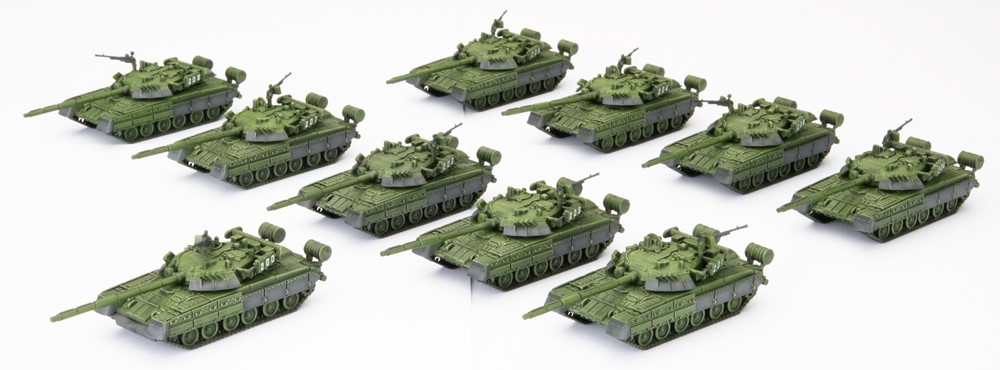
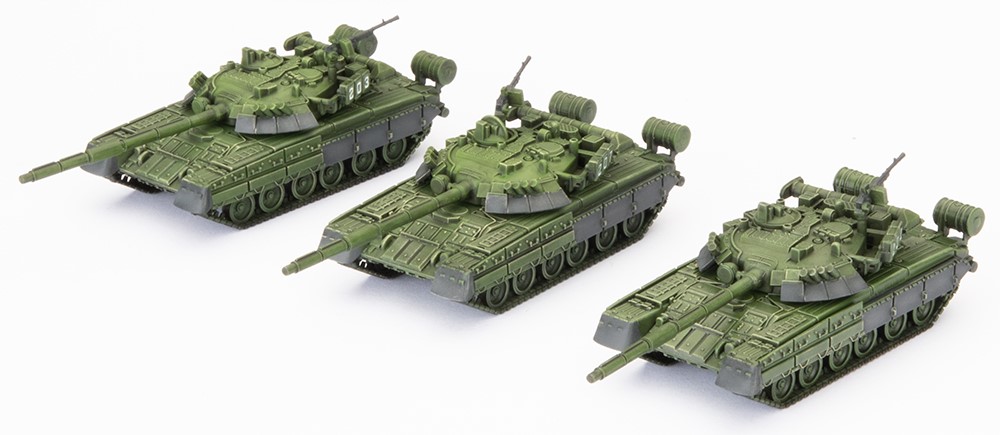
So far, we have looked at the statistics, but there is another, real world, consideration with the T-80.  By Soviet standards it is worth a lot of points! This means that for a World War III Team Yankee player that is either new to the hobby or who is on a budget, they can get to the 100-point limit fairly quickly by purchasing or painting fewer tanks. 10 T-80s is 79 points. (89 points if you give them missile upgrades.) That is just 2 boxes of models. Previously Soviet players would have to have relied on T-64s which would require at least another whole box with maxed out upgrades to get into the same ballpark points wise. So, if you are new to the game or just getting up to speed with a Soviet force, T-80s are your first choice to get not only modern options to take on NATO players, but also to get a bunch of points on the table with fewer (but seriously cool looking) models.

Time to Unleash The T-80

In this brief tour of the T-80 and how it stacks up to the M1 Abrams we have touched on the similarities and differences between these mighty machines. Now you should have a clear picture of just what the T-80, as a new battlefield predator, can offer the Soviet player in Team Yankee. All that remains is to get your Warsaw Pact Forces together and go forth to destroy the decadent and corrupt capitalists!

The Legions of The Red Banner Infantry in In World War III Team Yankee: Soviet

With Joe Saunders

I grew up in the 80s.  When we played outside we were always pretending to be the Canadian military battling the hordes of Soviet Russia invading from the north.   This meant that nameless and faceless Soviet Infantry were always the enemy.  Then I was introduced to the movie Red Dawn (I choose to ignore the remake).  In this Patrick Swayze movie I got a better look at the infantry of the Soviets (or what they were thought to be like).   Now in my mid 40s I find myself reminiscing on that movie and wishing I could take control of those forces.  I would like to try my hand against the superior military skills of Charlie Sheen’s ragtag assortment of high school students and the armies of the corrupt American capitalists….  Now, thanks to the new WWIII: Team Yankee book World War III: Soviet I can stop reminiscing, the time has finally come to dive in and take command of the legions of the red banner.

In this article I will take you on a guided tour of the infantry of the Soviet Union (in distinctly game terms) so we can investigate the nuances and capabilities of these cold war bad guys in WWIII: Team Yankee.

Background

The Soviet doctrine for fighting World War III always relied on the idea that numbers would be on their side.  The Warsaw Pact was mostly composed of conscript soldiers, equipped with simple yet effective equipment that could operate in rugged conditions.  although their strategy also called for aggression.   Fast moving penetration into the heart of NATO forces was perceived as the best option to take on the less numerous but better trained foes.  This required a large amount of mobility and the Soviets were the first to take the concept of the infantry transport and blur it with armed vehicles to provide them with integrated heavy weapons support.  On the ground this took the form of the various BMP Infantry Fighting vehicles (IFVs) and in the air the Hind Gunship (which if you grew up in the 80s… and excuse the Dirty Dancing/Red Dawn comment, will know definitely put Baby in a corner).  Because of this, looking at the Soviet infantry of the era will also require a close look at their transportation.

BMP Motor Rifle Battalion

This is the basic building block of the Soviet Infantry.  If your army is composed of tank formations you will usually find that a company of BMP Infantry can be added on as part of the formation.  This is handy as infantry is a good option for guarding objectives or fighting where terrain is dense.

The choices for the BMP Company come in 3 varieties, varying by the type of BMP taken.  Otherwise the infantry themselves have the same stats and weapon options.  Here we see the effect of the conscript army approach to warfare.  Courage is 4+ (with 3+ Morale and Rally) and Skill is 5+ (Counterattack 3+) and their Hit On value is 3+.   These stats are decidedly lack lustre.  They could be worse, but definitely are not top tier.  But this brings us to points cost…They are cheap and come in large numbers.  5 stands of troops in 3 Bradley IFVs cost American players 10 points, but 7 Stands of Soviets and 4 BMP- 2s cost the Soviets 8 points.  With these troops you can keep numbers on your side.

Weapon options are very flexible with the ability to arm grenade launchers, AA missiles and improved RPGs for unit level upgrades.  This allow you to tweak your squads for their purpose in your force.  If you want to sit back and guard objectives take a Gremlin AA missile to ward off airstrikes.   If you are attacking then go with an AGS-17 grenade launcher, or mix both for flexibility.  This brings us to the BMPs themselves.  Here you can also choose the vehicle for the task.  If you want to keep the cost down, but still have some decent weapon options, the BMP-1 is a good choice.  The BMP-2 splits the difference and gives you pretty good options for taking on NATO MBTs, while the BMP-3 gives you weapons that rival some Tanks (thanks to the Sniper missile).  Which you choose will depend on the roles you want your infantry to fill, with the BMP-2 probably being the choice of a player looking for a general composition.

BTR-60 Motor Rifle Company

If being economical with your points is your objective, the BTR-60 Motor Rifle Company is for you!  Let’s face it, sometimes you want to go with the big guns and max your army composition out with tanks (especially the awesome T-80).  However, infantry is almost always a necessity for guarding objectives or going where armour can’t. The BTR-60 Motor Rifle Company will not break the bank for points while still fitting the bill.

The stats and weapon options for this unit are the same for BMP mounted troops, but the BTR-60 is armed only with machineguns and very light armour which brings the expense down.  Because of this, you can get 7 stands of infantry and 4 BTR-60s for only 5 points.  Though the BTR-60 is not likely to go toe to toe with anything other than opposing Infantry, it is a good way to leave room for other unit choices.

Rather than use the value of the BTR-60 Company to slide a few infantry stands into our army, you could go in the other direction and maximize your infantry.  23 points gets you a maxed-out squad complete with all of the heavy weapon options.  That’s 25 stands and 16 BTRs per unit!  Go ahead and use the BTR-60 Motor Rifle formation and fill up the infantry slots! You can have 76 infantry stands and 49 transport vehicles for 70 points!  This would certainly be interesting to play and you would definitely outnumber your opponent, though you may not have enough paint….

Afgantsy Air Assault Company

These veterans of the war in Afghanistan have statistics that reflect their hard-earned experience.  Though they have the same weapon options and unit sizes as the other Soviet units, they have a Courage of 3+ and a Skill of 4+.  Though these stats are not outstanding, they are an improvement over the regular Soviet infantry stats and are still quite reasonable in terms of points.  7 stands will run 4 points.  The main difference however is the Afgantsy don’t have transports as a basic option.  Instead they are transported by Hind MI-24 Helicopters that are also a black box choice in the formation.

Obviously having helicopter gunships as their transport gives the Afgantsy Air Assault Company a massive boost in firepower.  Spiral missiles provide AT ratings of up to 24, and they also bring Gatling guns and a one-shot salvo template weapon to the fight too!   This makes this unit about a flexible as you can get for fighting all types of opponents.

In terms of tactics the Afgantsy Air Assault Company adds extreme maneuverability to the Soviet player’s list of options.  Because the Hinds can both transport troops and provide devastating firepower, they can deliver the Afganstsy infantry to almost any point on the battlefield (game table) then either fly off on other missions, or stay near their infantry and defend them from armour and other serious threats.

BMP Shock Recon Platoon

The final infantry option in WWIII: Soviet is a bit different from the others.  Where all of the other Infantry options can come with a full formation dedicated to them, the BMP Shock Recon Platoon does not.  Instead this unit is a single choice in the T-80 BMP Shock Tank Company, which is the pinnacle of elite troops in the book.  For this reason, this platoon has great stats, with a Skill of 3+ and a Hit on number of 4+.  As far as Soviet Infantry goes, these guys are the best quality and also very expensive.  The same 7 stands and 4 IFVS you would pay 8 points for in regular BMP units costs a lot more.   You pay a whopping 15 points with the BMP Shock Recon Platoon!

In terms of firepower the BMP Shock Rifle Platoon is the same as the regular BMP motor rifle troops.  This still means they have a ton of options for weapons, suitable for many different battlefield roles.  On top of this they can have the BMP-3 or BMP-2s for transport and fire support.  This unit can have a lot of firepower in a small package, that fights more like a NATO infantry squad!

In terms of tactics the BMP Shock Platoon is pretty limited because it is not a black box choice, so it will only ever be deployed in support of the Shock Tank Company’s equally elite tanks.  This means their role will likely be guarding objectives or attacking in dense or urban terrain.  In distinctly real-world terms, the high points cost allows for a low model count.  Since the rest of the T-80 Shock Rifle Company is similar, with very expensive elite tank units (in the black box choices) this formation and its accompanying infantry is a good option for new players who have not painted a lot of models or who don’t want to break the bank on model kits.

The Soviets are Coming!

As we have seen the Soviet infantry options in World War III Team Yankee are fairly varied yet highly adaptable with upgrades and transport options to strike hard and tackle different missions.  We have also explored the interesting way in which the lower quality, yet more numerous unit sizes embody the unique aspect of how the Soviets planned to fight should the Cold War escalate to World War III.  With this new-found knowledge now is the time to gather your forces under the red banner and conquer the corrupt capitalists.  Patrick Swayze, Charlie Sheen and those pesky high school students won’t stand a chance against the might of Soviets this time!

Soviet Armour: Comparing the T-72, T-64 and T-62M

With John Lee

With all the new cool stuff coming out for this release, I thought it would be a good opportunity to also review the existing Main Battle Tanks.  When Team Yankee was first launched there was only the T-72 that Soviet players could take.  With the release of Red Thunder, the T-64 was introduced.  Oil Wars brought us the T-62M.  This release brings all these tanks together in one book alongside the new T-80 and T-55AM.

So many choices now for the Soviet player and with V2 of the rules, allows to take Black Box units as Formation Support giving us more options to field combinations of tanks depending on your play style.  In this article, we look at the existing tanks (T-64, T-72, T-62M), their stats, cost and comparisons.

The T-64:

Starting off with the T-64, prior to this release was the premier go to Tank for the Soviet player.  It has FA17 SA9 TA2, BDD armour (side 13 against HEAT), tactical 14” move, 32” range AT22 gun with advanced stabiliser, optional AT21 missile with range out to 48” that can be fired on the move!

The gun – AT22 with advanced stabiliser means moving up to 14” and able to fire its main gun on the move with no penalty.  So effectively its range is up to 46” if you move and fire.  Brutal – hit dug in infantry with it and that infantry team is re-rolling its saves!  Laser rangefinder – No +1 to hit targets over 16”.

The missile – AT21 that can be fired on the move with 16” – 48” range increases with tactical move of 14” to 62” range!  Guided – no +1 to hit over 16”.  HEAT – no +1 to armour save for over 16” range.  For those missions where you have scattered reserves and they turn up at the other end of the table – no problem anymore with coming on at tactical and firing your missile giving you 62” range.

The armour – FA17 SA9 TA2.  SA9 with BDD (effective against some of the infantry HEAT weapons by increasing to SA13) – a better chance for assaulting.

The speed – 14” tactical speed means you will keep moving suffering no penalties for moving and firing.  3+ cross check which means you will pass them 67% of the time.  16” terrain dash and 24” cross country dash if you need it.

The stats – Skill 5+ so you will not be doing much blitzing or shooting and scooting.  Remount is 3+ so easier to get back in.  Morale 3+ to stay in the battle.  Assaults are 5+ but counterattack on 4+ – so get those assaults in and look to force your opponent off the objective!  HQ has better stats of course, so you want the HQ close by for the assaults.

The battalion HQ comprises one tank for 6pts and can add an optional missile for +1pt.

Tank Company has a minimum of three tanks for 13pts and a maximum of ten tanks for 55pts.  Each tank beyond the minimum is an additional 6pts.   If you want the optional missile its +2pts for the whole company – a bargain when running a medium to large company of them.  Fit up to three tanks with a Mine Clearing Device for 1pt for the company.  If you run the minimum sized company of three tanks you get a massive discount.  You could run a battalion of HQ plus three companies of three for 45pts leaving plenty of options to support them including taking a company of either Shock T-80s or a large company of T-62Ms or T-55AMs.  In the past I tend to run a battalion of HQ plus two companies of five tanks (I find the companies of the right size for survivability).  One of those companies I arm with missiles.  Then I support them with BTR infantry plus the usual support options of AA, recon, artillery (and helicopters if points allow).


The T-72:

Next up is the T-72 tank.  This iconic tank whilst replaced with the T-64 (and now T-80) is still a useful tank (especially as a Warsaw pact player).  It still has a place in the soviet arsenal too.  It has FA16 SA8 TA2, BDD armour (side 13 against HEAT), tactical 10” move, 32” range AT22 gun with stabiliser.

The gun – AT22 with stabiliser means moving up to 10” and able to fire its main gun on the move with no penalty.  You can move up to 14” with a +1 penalty over 10”.  So effectively its range is up to 46” if you move and fire.  Brutal – hit dug in infantry with it and that infantry team is re-rolling its saves!  Laser rangefinder – No +1 to hit targets over 16”.

The armour – FA16 SA8 TA2.  SA8 with BDD (effective against some of the infantry HEAT weapons by increasing to SA13) – a better chance for assaulting.

The speed – 10” tactical speed means you will keep on the move, suffering no penalties for moving and firing.  With stabiliser this means you can increase your tactical speed to 14” with a +1 to hit over 10”.  3+ cross check which means you will pass them 67% of the time.  16” terrain dash and 24” cross country dash if you need it.

The stats – Skill 5+ so you will not be doing much blitzing or shooting and scooting.  Remount is 3+ so easier to get back in.  Morale 3+ to stay in the battle.  Assaults are 5+ but counterattack on 4+ – so get those assaults in and look to force your opponent off the objective!  HQ has better stats of course, so you want the HQ close by for the assaults.

The battalion HQ comprises one tank for 5pts.  Tank Company has a minimum of three tanks for 12pts and a maximum of ten tanks for 47pts.  Each tank beyond the minimum is an additional 5pts.  Fit up to three tanks with a Mine Clearing Device for 1pt for the company.  If you run the minimum sized company of three tanks you get a massive discount.  I tend to take T-72s as a support option for my BMP-2 Motor Rifle Battalion or Air Afgansty formation when I want more quality tanks but need to shave points where I cannot quite fit the number of T-64s in that I want.

The T-62M:

Finally, the T-62M tank – released when Oil Wars came out gave the Soviet player their first cheap spam list tank, with a missile!  It has FA14 SA9 TA2 with Bazooka Skirts, tactical 10” move, 32” range AT21 gun, optional AT21 missile with range out to 48”.

The gun – AT21 with NO slow firing rule means moving up to 10” and able to fire its main gun on the move with no penalty.  So effectively its range is up to 42” if you move and fire.  Brutal – hit dug in infantry with it and that infantry team is re-rolling its saves!  Laser rangefinder – No +1 to hit targets over 16”.

The armour – FA14 SA9 TA2.  Most modern tank guns and missiles will go right through the frontal armour but has enough to stave off attacks from other weapons.  Side armour is relatively decent and has Bazooka Skirts which means it goes to 10 vs HEAT weapons.   Against more modern infantry anti-tank armed units, it is still not going to stop it but against older weapons you have a chance.

The speed – 10” tactical speed means you will keep on the move, suffering no penalties for moving and firing.  4+ cross check which means you will pass them 50% of the time.  14” terrain dash and 20” cross country dash if you need it.

The stats – Skill 5+ so you will not be doing much blitzing or shooting and scooting.  Remount is 3+ so easier to get back in.  Morale 3+ to stay in the battle.  Assaults are 5+ but counterattack on 4+ – so get those assaults in and look to force your opponent off the objective!  HQ has better stats of course, so you want the HQ close by for the assaults.

The battalion HQ comprises one tank for 4pts and can add an optional missile for +1pt.

Tank Company has a minimum of three tanks for 5pts and a maximum of ten tanks for 29pts.  Beyond the minimum three tanks it is an additional 2pts for the 4th tank, 3pts for the 5th and 6th tanks each, then an additional 4pts per tank thereafter.  A massive discount if you are running three or four tank companies.  You could easily run a dual formation of HQ plus three companies of four tanks for 32pts a formation and running two of them costs 64pts. That is 26 tanks running amuck with lots of points for support.  I would run a single formation of HQ plus three companies of seven with one company armed with the AT-10 stabber missile for 60pts leaving me options to take an BTR infantry formation as well plus artillery, recon, and helicopters. Seven to eight tanks are large enough to have a chance of surviving and not as inflexible as trying to manoeuvre nine or ten.


Looking to compare the Tanks now directly, we can compare armour, weapons, and movement.

Armour stats:

Tank Front Side Top Notes
T-64 17 9 2 BDD
T-72 16 8 2 BDD
T-62M 14 9 2 Bazooka Skirts


Weapon stats:

Tank Weapon Range ROF

Halted

ROF

Moving

Anti-Tank Fire

Power

Notes
T-64 125mm 2A46 gun 32”/80cm 1 1 22 2+ Advanced Stabiliser, Brutal, Laser Rangefinder
T-72 125mm 2A46 gun 32”/80cm 1 1 22 2+ Stabiliser, Brutal, Laser Rangefinder
T-62M 115mm 2A20 gun 32”/80cm 1 1 21 2+ Brutal, Laser Rangefinder

Missile stats:

Missle Range ROF

Halted

ROF

Moving

Anti-Tank Fire

Power

Notes
AT-8 Songster (T-64) 16”/40cm – 48”/120cm 1 1 21 3+ Guided, HEAT
AT-10 Stabber (T-62M) 16”/40cm – 48”/120cm 1 21 3+ Guided, HEAT


Movement Stats:

Tank Tactical Terrain Dash Cross Country Dash Road Dash Cross
T-64 14”/35cm 16”/40cm 24”/60cm 28”/70cm 3+
T-72 10”/25cm 16”/40cm 24”/60cm 28”/70cm 3+
T-62M 10”/25cm 14”/35cm 20”/50cm 24”/60cm 4+


The T-64 has the best overall stats in terms of protection, gun, missile able to fire on the move and the fastest tank, especially at tactical (where it counts the most).  From a cost perspective, the T-62M is probably the best overall.  Its gun is quite good with AT21 and an optional missile means you have options with your force build giving you flexibility to run a decent armed tank in either spam mode or paired with an infantry formation, giving more a balanced approached but lots of firepower.  The downside is that it has a worse cross check.  The T-72 is the poor man’s T-64 really.  It is used where missiles on the tank are not required for your playstyle and for me its best used a formation support option for an infantry formation where you need a good tank but not quite enough points for T-64s or T-80s.  The best use for T-72s is in the Warsaw pact formations.  I run a Czech T-72M formation and it works well.

There you have it, there is still a place for the existing tanks in your arsenal, even with the new T-80 and T-55AM out.  Happy list building!

Casey’s T-64’s Ride again

Every year members of the New Zealand Studio travel down to sunny(ish) Palmerston North for the worlds longest running Flames Of War / WWIII: Team Yankee tournament. Last year it was a 140 point doubles tournament for WWIII: Team Yankee.

At that point I had been slack and had never painted a WWIII army for myself, so I had to rush to paint one.  I only just realised that I haven’t actually taken any decent photos for the army yet, so this live launch seemed like a good opportunity to show it off.

For the tournament I teamed up with Chris who was taking Czechoslovakians. Chris’ boys were so cheap that I ended up taking 105 of the available 140 points. Despite this, Chris still had more painting to do than me.

The core of my list was 15 T-64s with two companies of seven T-64s (one was given missiles) and a Battalion HQ tank. Supporting this were some BRDM-2’s for Spearhead, some Gophers for AA, Storms for some cheap Anti-tank, and Mi-24 Hind helicopters because they look cool.

– Casey

Building a T-55AM Formation

With John Lee

A nice surprise for this release is the T-55AM formation.  Now finally the Soviets have access to the T-55 at last.  You do not have to rely on allied formations to run the T-55 horde!  Not only that, but the Soviet T-55AM is better than the Warsaw Pact T-55AM2.  As a Soviet player, I can now run all the different tank options from T-55AM up to the T-80!

What does the T-55AM bring to the table over the T-55AM2?  No slow firing in the Soviet variant, main gun with higher AT and an optional gun tube fired missile!

The gun – 32” range AT18 with NO Slow Firing means moving up to 10” and able to fire its main gun on the move with no penalty.  So effectively its range is up to 42” if you move and fire.  Brutal – hit dug in infantry with it and that infantry is re-rolling its saves!  Laser rangefinder – No +1 to hit targets over 16”.  Infrared – roll two dice and choose the highest die roll for shooting range at night.

The missile – AT21 with a 16” – 48” range provides an option to take out most vehicles at range.  Guided – no +1 to hit over 16”.  HEAT – no +1 to armour save for over 16” range.

The armour – FA14 SA9 TA2 with Bazooka Skirts.  Most modern tank guns and missiles will go right through the frontal armour but has enough to stave off attacks from other weapons. Side armour is relatively decent and has Bazooka Skirts which means it goes to 10 vs HEAT weapons.   Against more modern infantry anti-tank armed units, it is still not going to stop it but against older weapons you have a chance.

The speed – 10” tactical speed means you will keep moving suffering no penalties for moving and firing.  4+ cross check which means you will pass them 50% of the time – so best not to rely on it.  14” terrain dash and 20” cross country dash if you need it – not as fast as the more modern tanks.

The stats – Skill 5+ so blitzing and shooting and scooting are not reliable orders.  Remount is a 3+ so easier to get back in.  Morale 3+ to stay in the battle.  Assaults are 5+ and counterattack on 4+ – so only assault if you really need to!  HQ has better stats of course so you want the HQ close by for the assaults.

Before looking at the formation and composing some lists, I want to see what the size and cost of the T-55AM Tank Companies are.  Minimum in a company is five tanks for 7pts.  Maximum is ten tanks for 16pts.  Each tank beyond the minimum is an additional 2pts.  The tenth tank is only 1pt extra.  So, if you are looking to run a horde army, you gain a point running maximum points.  If you want the optional missile its +2pts for the whole company – a bargain when running a large company of them.

Let us have a look at what comprises the formation:

  • 1 T-55AM Tank Company HQ
  • 2-3 T-55AM Tank Company
  • 0-1 BMP-1 Motor Rifle Company or BTR-60 Motor Rifle Company
  • 0-1 BMP-2 Recon Platoon or BMP-1 Recon Platoon or BRDM-2 Motor Recon Platoon
  • 0-1 ZSU-23-4 Shilka AA Platoon
  • 0-1 SA-9 Gaskin SAM Platoon or SA-13 Gopher SAM Platoon
  • 0-1 2S1 Carnation SP Howitzer Battery

With the low points for the volume of tanks you can take, you have a number of options for taking two formations of T-55AM or one formation with a secondary formation of say Air Assault Afgansty or BTR-60 infantry or even an allied formation, such as Iranian Chieftains.  With V2 of the rules, we can now take black box options as formation support – Shock T-80 Tank Platoon anyone?  Of course, you could just stack it with lots of support options, such as the new artillery (BM-27 Hurricanes, TOS-1), full complement of Hinds, Frogfoots – lots of combinations depending on your playstyle and budget.

We will look at various options for 120pts, 100pts and 75pts for running one or more formations.  Starting off with 120pts first let us see how this may play out:

Dual T-55AM formations stacked with missile firing tanks, infantry with upgraded RPGs that can stand up to Tanks with AT19 against advanced armour in assaults!  Each formation is relatively strong with six units in each, two infantry companies to dig in on both objectives and if required, drive the enemy infantry off theirs.  Two artillery templates including the new BM-27 rocket launchers that can launch minelets to wreck the enemy’s backline.  Spearhead and AA coverage to go with your 44 tanks.  40 x AT21 missiles with your tanks will cause your opponent headaches.  You have some room to modify the list here – remove either some tanks from the companies and or missiles if you want additional AA coverage or another artillery template.  You could also make one of the infantry companies smaller and or downgrade all the RPG-7VRs to standard RPG-7s.

Let us see how it looks if we pair the formation with an Air Afgansty formation:

Running with 31 x T-55AMs (10 with missiles) you have seven units in the formation – very durable with AA and spearhead.  You get two companies of the best infantry (outside of Shock Motor Rifle Infantry) equipped with the enhanced RPG-7s along with eight Hinds with AT24 missiles!  BM-27s to fire salvos and minelets.

How could this formation work with black box units – let us have a look:

Running with 31 x T-55AMs (10 with missiles) you have eight units in the formation – hard to break and has AA and spearhead.  You have intrinsic infantry with the formation plus one company of Air Afgansty infantry for assaulting or defending the key objective.  Platoon of shock T-80s – hit on 4s – oh yeah!

Want more of the support options for a more surgical strike force – here is an option :

Your T-55AM formation will hold the field with eight in the formation with one infantry company to anchor it.  The TOS-1 is there to wreck infantry formations with its brutal salvo and auto firepower.  The six hinds with AT24 and six Frogfoots with AT27 are your surgical strike instruments.  Use your T-55AMS to bum rush your opponents AA so your air assets can rip apart the enemy armour whilst the TOS-1s suppress enemy infantry.

Looking to 100pts now, we could remove the Frogfoots, swap out the TOS-1 for BM-27s and add some Storms:

The Storms add more AT24 goodness.  Storms and Hinds are you surgical instruments for taking on high end tanks.   You could also change out the BM-27s for 2S1 Carnations or 2S3 Acacias to add missiles to one of the T-55AM companies to bolster your missile count.

For me, I find that running 10 tank companies are difficult to manoeuvre, so I prefer running them in units of 7-8 tanks.  This allows more tweaking of points to get other units I want for my force.  Here is an option that suits my playstyle:

This list has two small infantry units, the formation still has eight units, and I can incorporate the new BMP-3 with its firing on the move AT21 missile! 6 x AT24 and 28 x AT21 missiles!  As you can see, you can tweak the T-55AM list to suit your playstyle at 100pts and 120pts.

Having played at NukeCon here in Auckland a number of weeks ago, I thought I would see if I could get a T-55AM Tank Battalion list together that I could have taken if it was available then (I took an Iraqi T-72M force – which was fun to play):

Still have 4 x AT24 take on the heavy tanks with back up of 8 x AT21 missiles.  Formation is strong with seven units.  AA in the form of Shilkas and Gremlin.  Smaller infantry unit but has the upgraded RPG-7VR so can hold off tanks in assault.  Use the remaining T-55AMs to bum rush the enemy (from reserve if required) or from spearhead.

So, there you have it – this formation gives plenty of options depending on your play style and the points you are playing to.  I love all the options you can add from either black box formation support or the support options.  The horde rides again!

~John Lee

Casey’s T-80 Tank Battalion

Like most of the Big Four Of Late War I was super-jazzed with the T-80 arriving in the WWIII: Soviet book, and decided to join in the fun and paint up a new army for the launch (evil glares at Chris for not participating).

Now I’m a bit of a perfectionist when it comes to painting which means I’m normally a slow painter, so I thought I would just this as an opportunity to challenge myself to pump out an army quickly.

Rather than noodling an army list to build my army around I decided to just paint some of the new models that I thought looked cool, points and army composition didn’t really make me decide what to paint.

The core of my force are some T-80s. I figure 10 should be enough to cover me for most situations. Next up are some BMP-3 Scouts, again because they are new plastic and look super cool.

One of my favourite new units in the book is the TOS-1. I have been badgering Wayne, Phil, Chris, Evan, and Pete to make the TOS-1 since the start of our WWIII journey, so now that we have it I thought it would be rude not to paint some. As well as looking cool, game-wise I think it will be a good choice to have available to my Soviets since I tend to run tank heavy armies and struggle to deal with infantry. Their Brutal bombardment will certainly help with that.

Lastly, I’m painting a platoon of 2S6 Tunguska AA tanks, mainly due to rule of cool, I just think they look awesome.

Plugging this into Forces it comes out to an inconvenient 101 points, so I’d probably have to drop a BMP-3 if I were to take it to a tournament.

Amongst the Big Four Of Late War we have been discussing playing big boy games of 150 points using the more modern equipment that has started appearing (T-80s, M1A1 Abrams, Challenger I’s, Leopard 2’s etc). Luckily I can make this a 150 point list just by making them Heroes and adding the Mi-24 Hinds that I have already painted, a few infantry stands, and a pair of Gophers for a bit more AA. The TOS-1s are probably a suboptimal option given that none of the guys are going to go particularly infantry heavy for these games, but sometimes you don’t always get given the tools that you need to do a job and just have to make do with what you have available.

As far as the fast paint challenge has gone, I’m about 3 weeks in and I’ve managed to finish the T-80s apart from the tracks and the rest of the army is not far behind. With another week I think I’ll have the army completely finished. The army is definitely not painted as well as I would usually paint, but I’m pretty happy with it, and I think looking at effort vs reward it’s pretty good. I’m just looking forward to putting it on the table for a few games.

– Casey

Panthers on the Prowl

With Joe Saunders

A number of years ago my family went to the Canadian War Museum in Ottawa where among the exhibits, I first saw a Panther tank in person. I was instantly wowed by this awesome machine. At 3 meters high with a high velocity 75mm cannon and lines that made it somehow superimposed between the armoured behemoths of World War II and modern battlefield predators, the Panther tank instantly became my favorite vehicle. Tracks, wheels, or wings, nothing beats the Panther for me!

Panthers in Flames Of War

Move ahead a few years to when I began to play Flames Of War . I was happy to use Panthers. I found they were great in defense where they could outrage the Allies with their whopping 40-inch range at AT 14. Using Stormtroopers to Blitz and then Shoot and Scoot, my Heer Panthers (from D-Day: Germans) worked in the role of long-range tank snipers. However, game after game here they stayed and it became a little predictable. For 1 point more, my Tigers got the other missions. With the same Front Armour, Side Armour 8, Top Armour 2 and a Last Stand and Remount of 2+ they were that much more flexible.  Despite this, I always wanted my Panthers to have the opportunity to fill other roles too, as was only fitting of this World War II titan. Fortunately, with the impending release of the D-Day: Waffen-SS book, that time has come….

New Stats Means New Options

So, what is different that breathes new life into the SS Panthers? It’s the stats. The SS used the same equipment as their army counterparts, but were trained differently with an aggressive, sometimes even fanatical approach. They tended to have higher losses and therefore did not accumulate the experience which is reflected in the stats for the SS Panther platoons. Because of this, on the down side, they are Hit On 3+, and count as Trained for skill. However, they trade this for a Fearless Motivation and most importantly a hefty decrease in points by almost 25% from their army counterparts.

These changes amount to the a very different playstyle. Let’s take a detailed look at just some of the possible differences:

The Panther Company

For regular army units, the Panther is just too expensive to have full Formations on the table at the 100-point limit. As a result, you often do not see them in games and certainly not in any great numbers. If they are there you can be certain that they will always be sitting back at a distance looking for long range pot shots. Now with the SS Panthers, 98 points will get you 11 Panthers on the table! (To field the same number of army Panthers from D-Day: Germans would cost a whopping 121 points.) With the SS you can reasonably have a horde of Front Armour 9, AT 14 panzers all bearing down on your opponent! Trading the Hit On 4+ for 3+ should not be too much of a disadvantage, because even though the hits are going to be made, the penetration rolls remain the same and you have a 3+ remount due to your Fearless Motivation. Moreover, though the Allies in Late War have plenty of 17 pounders, 3-inch guns and 76mm Shermans, all hitting with high AT ratings, chances are they will not have the numbers or range to go toe to toe with so many Panthers all at once.

Panthers in Assaults

Let’s face it even though the Panther is still better fighting at range you will occasionally need to engage in (or receive) assaults. Side Armour 5 can possibly repel a few bazookas or PIATS, but with a Motivation of 4+, army Panthers tend to run away when it is time to roll for Counter Attack. If your Panthers are defending an objective this is an even bigger issue as they will likely be pushed off it. The SS however changes this. Though they have a skill of 4+ making them less likely to cause casualties in an assault, they also are much less likely to be running from the fight with their Fearless Motivation. So, go ahead and sit your SS Panthers on an objective.  If they have to fight up close and personal, they are not the ones that will be running away.

Panthers in Defence

As mentioned above the Panther is best in defense. The SS version is not much different. Front Armour 10 at long range will go a long way to offset the Hit On of 3+ and the gun is still the AT 14, 3+ Fire Power marvel that the German long barrel 75mm always has been. But I hear you say the SS Panther loses out because with Skill 4+ your Blitz followed by Shoot and Scoot Stormtrooper special orders are less likely to succeed. Don’t worry though the Old Hand rule takes care of this.

With your Panthers skulking within 6 inches of their Formation HQ they now stand the same chances of Blitzing out of cover, taking their shots like they were stationary, and then Shoot and Scooting back to safety as their army counterparts.

Get Out and Play

Now that we have shed the light on the differences that are coming with the SS Panther it is time to get ready to put yours on the table. The new stats in the D-Day: Waffen SS book will not only give you a new host of fun options for how you can use these mighty hunters, but also usher in an age where the Panther can become a top carnivore on the Flames Of War battlefield. Now is the time to let your Panthers go on the Prowl!

~Joe


TOW Be or Not TOW-2 Be?

With Garry Wait

I have heard much confusion and discussion about the TOW missile and the new WWIII: American book. One of the most exciting things about the new book is not only the new toys but the options to get more mileage out of existing weapons systems. To my mind, the most fascinating upgrade is to TOW missile systems.

Let’s look briefly at what TOW actually is before discussing how to get the most out of your TOW system in World War III.

Initially produced by Hughes Helicopters and still produced to this day by US Company Raytheon, some fifty years after first produced.  The TOW system (which stands for “Tube-launched, Optically tracked, Wire Guided or TOW for short) was first produced in 1970, just in time to see trials in the tail end of the Vietnam War. The original BGM71A missile (to use it’s US designation) saw action in 1972 when it was used on 24 April against of all things, a captured US made M41 light tank.  The original use of TOW saw mainly helicopter firings used although a ground mount was also available initially. The armoured solutions you see in World War III came along much later.  This early version had a range of some 3,000 metres and reduced armour penetration.

During the Cold War the Improved TOW BGM71C came out with better range and better AT through a new warhead, with the BGM71B (known as TOW-ER or Extended Range) being identical to BGM7A except for having the improved range of 3,750m.  This Improved TOW BGM71C missile is what was sold to various NATO forces as well as Israel and Iran in the Oil Wars book and represents a hugely successful system. With the base sight being thermal imaging as standard using the AN/TAS-4, as an all-weather weapon it is unsurpassed for production levels (although there is debate about whether this night sight was supplied to Iran).

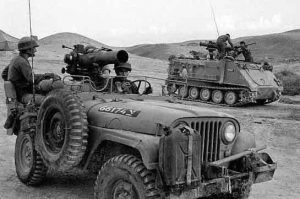
With AT21 and range 48”/120cm in game, the Improved TOW represents a threat to all but the most advanced tanks on the table and can account for anything up to Front Armour 18 reasonably in my experience.  The first outing for the Improved TOW was in Lebanon in 1982 where IDF General Peled’s TOW jeeps exploited the vulnerabilities of Syrian T72’s in spectacular fashion. This action saw up to nine T72’s destroyed for no tank losses on the Israeli side.

(Read more about Peled and his Special Manoeuvre Force here)

Apart from US forces, the Improved TOW system is also available in game to British (Lynx Helicopter), Canadians (M150 TOW tank destroyers), Netherlands (YPR765 PRAT), Iranians (on AH1 Cobra, M113 and Jeep), Israelis (AH1 Cobra, M113 and Jeep) and West Germans (Jaguar 2).

That makes it a very widespread system indeed. In all cases, apart from the Iranians, it provides a thermal imaging system for the firing post which incrementally improves the weapons performance.

Now, in the new United States World War III book, we see the new BGM71D system, also known colloquially as the TOW-2. This new weapon has the same range but a bigger enlarged warhead that provides significantly better hitting power. The Improved TOW missile warhead was 141 cm long while the newer TOW-2 adds an additional 10cm of length, all of which is heavy explosive filler although both have the same 152mm (6”) diameter warhead. This part is important as it means the TOW-2 is backwardly compatible with older launchers.

The new warhead offers AT23 which is a quantum leap forwards for democracy and freedom loving NATO forces and is introduced as standard on the M2 Bradley IFV (Infantry Fighting Vehicle) and M3 Bradley CFV (Cavalry Fighting Vehicle).  If you take any TOW-2, you must upgrade ALL other TOW launchers at a cost of one point extra per unit. So that means if you run AH-1 Cobras supporting a Bradley equipped Cavalry force, you need to up the cost by an additional one point per flight to accommodate the far more lethal TOW-2. Currently the TOW or TOW-2 system is available to the US Army in M2 and M3 Bradley, M901, HMMWV and AH-1 Cobra systems, while the USMC can use the same options in the HMMWV and the LAV-AT systems.

The only issue with the TOW system was the requirement to keep the seeker sight on the target to guide the weapon onto the unlucky focus of the operator. With a speed of 200 metres per second and two seconds to allow for the gyroscope stabilised warhead rocket to kick in, it is a nerve wracking 20 seconds to get to a target at maximum range, all the while with a heightened level of enemy attention upon the operator!

If you’re facing some serious frontline enemy – or are involved in a NATO training exercise versus Challengers or other US forces – where you will be facing front armour of 19 or more, I’d recommend this as a small price to pay to keep your grunts comfortable in their fox holes. A well-run US force can accommodate the best missile in the game and the TOW-2 is clearly this with excellent range, hitting power and night vision to suit.  Nothing will scare a T-64 commander more than facing TOW-2 missiles which can comfortably outrange their main gun rounds.

At a pinch, you can even use it to clear enemy out of bunkers OR engage helicopters although I only recommend this after you’ve cleaned up the enemy’s heavy armour.

If TOW-2 is so good, why wouldn’t you buy it, I hear you ask?

In many cases it will be overkill. Against most Oil Wars forces – apart from our good friends in the IDF – you won’t need the additional expense of the TOW-2. If facing T-72 or earlier model Soviet equipment, it’s a proven fact that the Improved TOW is more than sufficient to deal with 1960’s Soviet technology. Why waste a brand-new missile on an outdated ride?

When facing APC’s, even the much-vaunted British Warrior IFV won’t be any challenge for a US Improved TOW missile after all.

But much like the USSR in the Cold War, you need to balance the budget. TOW-2 is a lovely option to have available but may be a sledgehammer to smash open a walnut shell – capable but likely to leave a mess.

~Garry

Fire In The Skies – The M109 vs M270

With Chris Allen

With World War III: American being released there are a ton of new and exciting options available for players. From new Formations, to new variants and weapons players are spoiled for options and this definitely extends to the support options commanders can choose from. Few things are as connected to victory on the modern battlefield as artillery and so we’ll take a quick look at the new kid on the block the M270 MLRS and compare it to the workhorse of fire support the M109.

American players have had the supporting fire of M109s since the beginning of the game. It’s a tried and tested unit that provides a lot of flexibility for commanders. Its 155mm shells provide AT 4 artillery fire with a 2+ Firepower, it’s solid. It’s got pretty solid armour for a self-propelled artillery system, has smoke and the option for specialist rounds like DPICM, Minelets and copperhead rounds. Fully kitted out this unit is a high end swiss army knife, it can do it all, or be taken without upgrades to provide good old direct fire support to your combat teams.

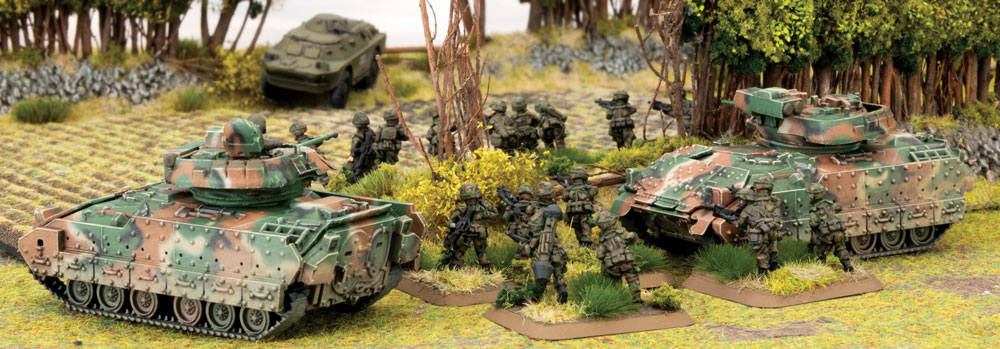
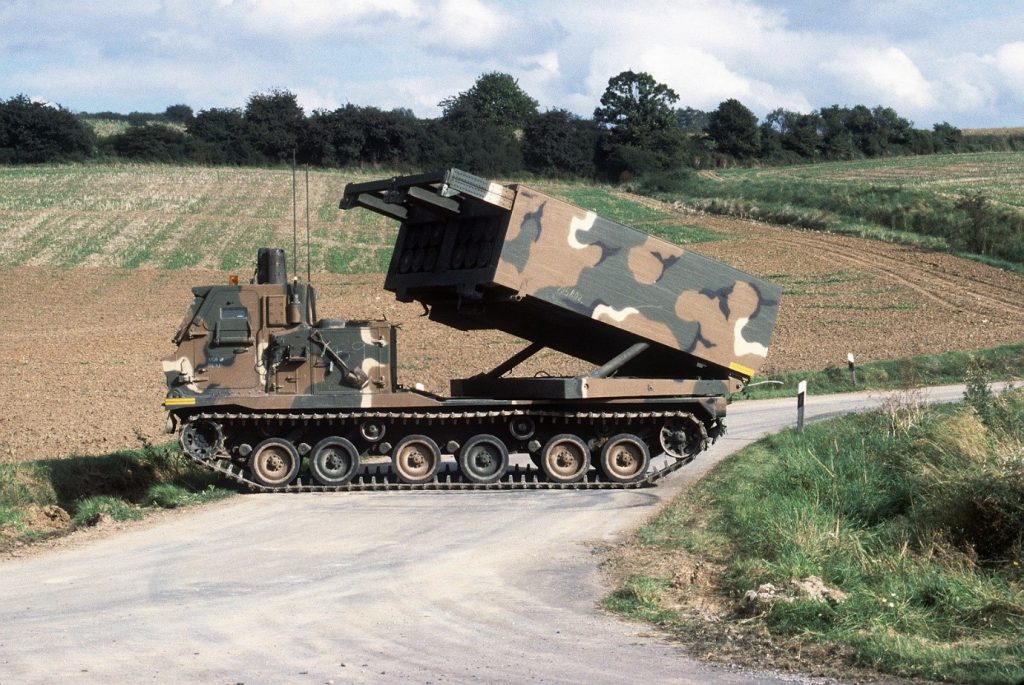
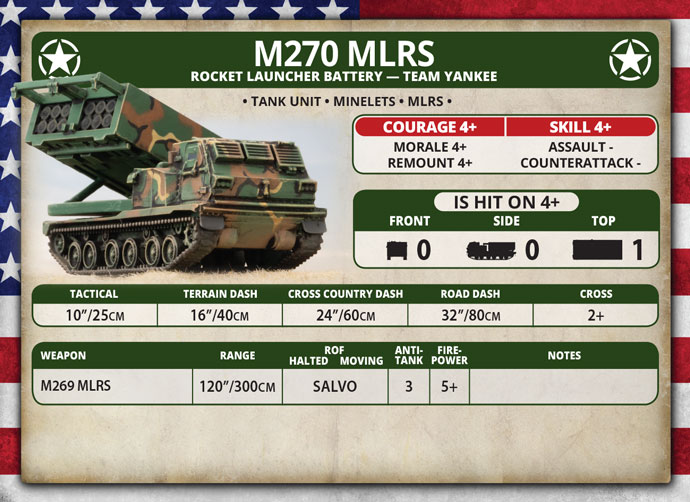
The M270 MLRS is the new big fire support option for U.S. forces. While it came out with Team Yankee British, the MLRS is going to be available for the British, American and German forces. This new artillery system provides a few things for the American forces in World War Three, not the least of which is a really sweet model. I’m a big fan of the look of MLRS systems and with the armoured cabin and huge rocket bank I was in from the moment it was released.

Looking at the M270 MLRS’ stats there’s nothing huge to immediately write home about. Lightly armoured it’s just beyond unarmoured with 0/0/1, it can take Minelets for 1 point and has a AT of 3 with a 5+ FP on it’s Salvo. This is where a lot of people write off this vehicle, but there is a lot more under the hood than most people see. In my opinion the largest negative is that the MLRS cannot provide a smokescreen and so loses some flexibility.

Another unit with mines is always amazing. The MLRS is about board control, plain and simple this unit helps you dominate table space more than anything else, and mines are a great way to do this. With the MLRS rule letting 3 teams count as 6 you can drop 2 minefield tokens and cover a key gap, or route forcing your opponent to make tough decisions.

Salvo fire is huge. People always forget just how big salvo fire is. An artillery template is 6”x 6” or 36 square inches, the Salvo template at 10”x 10” provides 100 square inches, or just under three times the area enabling it to hit a lot more targets. The downside to this is almost all of your shots will cover terrain features and as such will be harder to rang in. An MLRS battery really loves having an M113 FIST team to make sure it can range in on 4s if you’re planning on repositioning it or using the mines.

The MLRS rule makes each team firing count as 2 teams, so your three-team battery of MLRS for 9pts fires as six teams and rerolls all misses to hit. When you compare this to a similar pointed unit like the minimum M109 unit at 7pts you start to see how effective this system can be. Rerolling all misses in three times the area gives you dominating fires. This is especially effective against infantry and unarmoured tank teams that a single hit will also pin, but enough AT 3 against top armour will put dents in a lot of armoured units.

The firepower as we initially discussed is what commonly turns people off of the MLRS, at 5+ it looks like it’ll be ineffective but when you start to run the numbers the MLRS more than holds its own.

The table below describes the likelihood of any team under the respective artillery or salvo template being hit, infantry dying, dying to a repeat bombardment and the same for dug in against 3+ to hit and 4+ to hit infantry.

3+ to Hit
System To hit Inf Fail Repeat Dug in Repeat
MLRS X3 88.9% 29.6% 49.9% 9.9% 16.5%
M109 x3 66.7% 22.2% 37.0% 18.5% 30.9%
4+ to hit
System To hit Inf fail Repeat Dug in Repeat
MLRS X3 75% 25% 41.7% 8.3% 13.9%
M109 x3 50.0% 16.7% 27.8% 13.9% 23.1%

The MLRS rule drives your hit percentage up massively, and it provides a bigger advantage against harder to hit teams like 4+ infantry or teams out of line of sight. This translates to more infantry kills in the open, providing kills almost ⅓ of the time against Soviet and other 3+ to hit infantry and ¼ of the time against 4+ infantry. With the size advantage salvo brings, you are hitting almost 3 times as much area, letting you hit more teams, more often, potentially multiple units, and then killing more often.

Against dug in teams the 5+ fire power is a detriment, but hitting teams more often brings the numbers up and you find that the MLRS is roughly half as effective at killing dug in teams as the M109. When you remember that the system hits almost three times the area this evens out pretty nicely. The area advantage is where the MLRS shines, as it can almost completely cover the area where defenders can hold an objective from the start of the game. This lets you blanket the area and just bath the enemy in fires until they move or die. Few players will leave units to sit under a template all game, and those that do will regret it.

If an MLRS system is targeting an objective and given multiple turns to fire, there isn’t going to be much left to defend the objective and paired with robust reserves like the new M1A1 Abrams you can have a game winning combination that is very hard to deal with.

MLRS also excels as a cut-off for all of the above reasons. With 100 square inches of table space covered if you protect an objective or key terrain with the MLRS template and call a repeat, on average about 50% of Soviet teams are going to die. That is a crushing level of fire that few forces can accept to take, and being pinned under that template and having it continue basically spells death for anything that doesn’t make it out quickly. Making a no go zone for enemy infantry allows you to shape the battlefield and force players into a bad position.

The M270 MLRS is a gem of a unit that adds another key tool to the American arsenal. Does it replace the M109? Nope not even close. But what it does is give you another option for how you want to take apart your opponents. The M109 provides dominating specific fires and a toolbox of ways to assist your army with specialist munitions while the M270 MLRS provides board control, being a murder machine for troops in the open and can truly perform area denial on its own because of this. What does this mean for American commanders? There is the right system available to support your battle plan waiting to be called upon to hit the table.

~Chris

Every Anvil needs a Hammer: The M1A1HC

With Chris Allen

One of my absolute favorite things about WWIII: Team Yankee and Flames Of War is that with more missions not only can you play the force you want, but you can play the force you want how you want, most of the time. Bidding for mission types is an amazing dynamic to the game that lets you push tank armies aggressively, defend with hardened infantry, maneuver with mobile forces or try and catch people with their decisions.

All of the missions bring a lot of variety and complexity to the game, but the one thing almost all of them have in common is reserves. In some form, somebody, if not both players are starting with things off the table. Having a plan for these forces is key.

If you haven’t read The Art of Reserves by Jed Byrtus you probably should give it a review. Reserves are an integral and important part of the game and far too many people see it as a problem, a deficiency, rather than looking at the many advantages it offers. Jed walks players through the basics of reserves, and the advantages they bring to players as they come on to the table. It’s a great read and I really suggest it.

When I look at reserves I see two general styles of reserve forces

  • “Racing To The Rescue”
  • Counter Moves.

So what differentiates the two? Technically a reserve has no task, where a counter moves is a known tasked entity, but in game terms I would argue planning and number of units. Commonly with racing to the rescue, you’ll see reserves for a list that are a collection of smaller units adding up to 40% of the overall list. These are often but not always chosen immediately before the game and have minimal planning in terms of their employment or order to arrive. We’ve all done this, the excruciating finger math of what 40% is, and ‘I’ll figure it out later, I have to deal with my 60% now!” plan. Usually when you see units like anti-tank missile units, artillery or reconnaissance in reserve, you know they’re racing to the rescue. This type of reserve faces two major problems, first it comes on over a large period of time, with many units in reserve it just takes a long time to get that many 5s! The second issue is many haphazardly chosen units have difficulty contributing on the turn they arrive. Artillery and AT missiles can’t move and shoot (bombardments at least) and so will have to wait another turn to effectively contribute.

Counter moves on the other hand are commonly very few, sometimes only one unit, that is a known entity that has a plan (that may change as the enemy gets a vote). Counter moves forces are commonly a large consideration of a players list building process, picking the perfect tool to add the effect you want when your reserves arrive. Players commonly use these with defensive forces like infantry to bring tanks on to blunt enemy attacks or launch counter attacks of their own.

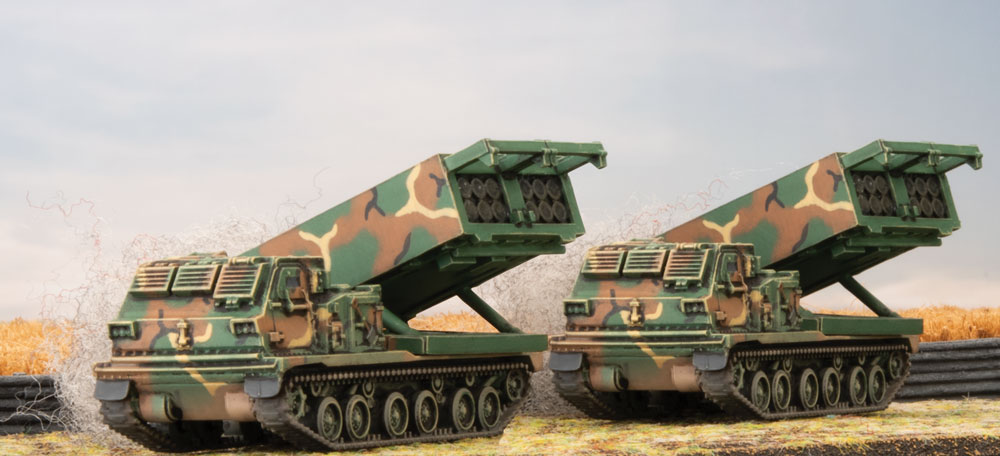
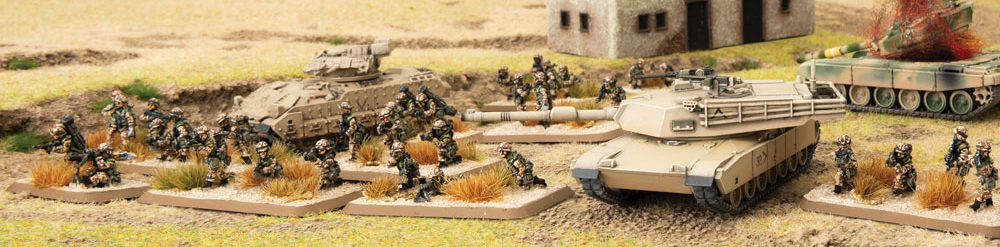
The World War III: American book brings us two new variants of the iconic Abrams tank, and I’m here to tell you it’s the apex predator of counter moves units. The finest reserve you can have, and a game winning unit. WWIII: Team Yankee has seen the game progress in terms of story and equipment. With the next generation of tanks joining the war we’ve seen a big progression in the protection and lethality that they can bring.

Strengths and Weaknesses: Few but perfectly formed.

At first glance many people are turned off by the cost of these vehicles, with the Challenger coming in at 11 points or 13 points for the ROMOR armour package, and the M1A1 at 14 points, 18 points for the M1A1HC. In a 100 point game 2 M1A1HC come in at 36 points, or the vast majority of your reserve. You have 4 points left over to take an extra unit, which if you’ve read The Art of the Reserve you know gives you a great opportunity to take a unit to control when your tanks come in and potentially provide them more protection, like taking a unit of VADS. This allows you as the player to come onto the table with purpose and more importantly you can set them up for success.

What you get in the next generation of Abrams that sets it apart from the Challenger is simple, speed and violence. The Challenger has a reduced rate of fire on the move, less AT but is better skilled for a Blitz or Assault. The Abrams on the other hand is fast and mean. With a tactical move of 14”, ROF 2 and AT 23, it epitomizes violence of action. With the HC package, the tank jumps to a Front Armour of AT 21 and so ignores most weapons on the battlefield, which combined with Chobham armour makes the tank is nearly impervious to damage in assaults. It’s the toughest nut to crack in the game and will be the central focus of your opponent in any game it takes to the field.

Threats: Not quite invincible

So what scares an armoured commander? Infantrymen would immediately answer dismounting, tankers might jest running out of gravy. But in reality it comes down to 3 things, shooting second, exposing  Side Armour and missiles.

You never want to shoot second, you want to be first, first to shoot, first to hit, first to kill. Shooting second for a tanker means you did something wrong. Tanks lurk in the shadows, and appear like the specter of death and lay waste to what lies in front of them before disappearing again to rearm, and refuel to do it all again. This is exactly what putting your tanks in reserve grants you, the chance to shoot first. To say there will be no threats to my tanks until they’ve at least done something. You can start behind terrain, but air, artillery or just aggressive play can see your tanks get caught up in things. In reserve they lay in wait to bring the pain.

Everything can’t be Front Armour. And anything that isn’t Front Armour you don’t want being shot at. Luckily for the Abrams there is Chobham armour that provides really improved protection vs HEAT rounds used by infantry and missiles, but there is little protection from even older anti-tank guns along the side of a modern battle tank. There are few things as morale crushing as having a super tank flanked and destroyed by a tank 20 years or more its senior. Leopard 1s and T-62Ms can flood the battle space and push for side armour and that can be scary. Numerous tanks with high rates of fire can push to flank and engage these big cats and so are a key target for reduction prior to the arrival of your big tanks. But tanks and infantry have to move, navigate terrain and the enemy, and this takes time. Aircraft can do this much faster, from the moment they arrive attack aircraft and some helicopters like the Hind can push straight to attack your side armour, and they will because attacking your frontal armour is a much less viable course of action. This means two things for an American list, first that the destruction of aircraft should be your focus, destroy the best flankers. Second it means that because they’ll go for side armour, how you provide your anti-air defence can be different. Instead of creating a forward zone of protection you can shape lobes around the side of the tanks. This forces players into going for it or taking the tank from the front.

Missiles are really scary. Being shot at by something you can’t see, from a range you can’t respond at by something that can destroy you with ease is in a word unsettling. Missiles come from the sky on strike aircraft and helicopters, from specialized tank hunters, even infantry are covered in missiles. I say again, missiles are scary. While most missiles can’t move and shoot from ground platforms (with some exceptions) they are commonly cheap and can provide blanket coverage across huge sections of the table as many have great ranges. Against most modern main battle tanks like the Abrams or the Leopard 2, AT 21 and the occasional 23 are pretty scary with ~10-20% kill rates per shot on tanks in the open. With how numerous these can be for their cost it can be a hard time to be a tanker.

Armour 21 is a game changer. With FA 21, Milans, Spandrels or TOW can’t touch you frontally, and the Spiral, HOT and TOW-2 have a lot of work to do with less than a 6% kill rate per shot. For those playing along at home that’s roughly a 1 in 18 chance of killing one of these tanks frontally with AT 23. As yourself what army has 18 AT 23 missiles sitting around? The hunter quickly becomes the hunted when a tank like the M1A1HC hits the table. And while the AT 21 systems had been exceptionally cheap, they are now totally ineffective and the more expensive AT 23 systems, are considerably more expensive but inadequate for the task at hand.

Targets without Cover Against Anti-Tank
Front Armour 20 21 22 23 24
18 vs FP3+ 5.56% 11.11% 16.67% 22.22% 27.78%
vs FP2+ 6.94% 13.89% 20.83% 27.78% 34.72%
19 vs FP3+ 0.00% 5.56% 11.11% 16.67% 22.22%
vs FP2+ 0.00% 6.94% 13.89% 20.83% 27.78%
20 vs FP3+ NA 0.00% 5.56% 11.11% 16.67%

The 0% chances were noted for the possibility of a bail (yes, a double bail destroys a tank but for ease of explanation I went with this)

So what does the survivability of the M1A1HC along with its lethality and mobility have to do with reserves? It’s changing the game. In the Art of the Reserve, Jed clearly pointed out that things in reserve can’t be killed until they arrive. They can’t be shot at, mined, assaulted. They are safe from the few systems that can threaten them, and in reserve they give you the opportunity to set conditions to do what tanks do best, exploit.

Setting the conditions is an absolute key to success with anything, but for huge investments like the M1A1HC it’s critical. Can these tanks do it without setup? Sure, sometimes, but you have the chance to really tip the odds in your favour and let these tanks do the work they were meant to do.

Reserves, like fortune favours the bold. The attacker usually picks their reserve units once they know what the defender has placed in reserve. This allows an attacker a lot of flexibility and options. While the major argument I’m making here is leaving your big tanks in reserve can pay big dividends, for the attacker you can flip the switch and go full tilt from turn one. If a defender chooses to place their big threats such as air or large units of high AT weapons in reserve, an attacker can change things up and give an objective the bums rush. As we’ve previously said, a lot of the time there is little that can stop an next gen Abrams once it starts rolling and should the scenario permit, taking an objective fast and dirty can really catch an opponent off guard with little to no rebuttal, exploiting their play for the late game.

If you are the defender or the defender puts considerable AT assets on the board, placing your Abrams in reserve is a great option and lets you spend vital turns degrading the units that can harm your tanks. Few players can resist leaving their heavy hitters like air support available or AT units like ADATs out of the game over the course of multiple turns. If a player has fast air they roll to see if they come in, this doesn’t force them to place it or attack but even the most steadfast player can be enticed to use their air if they see an opening, a chance to do something, people want to use what they have available. This is where you can begin to blunt the spear. A plane here, a helicopter there, a missile system or two in the wood line, it all adds up and quickly. As the number of key high AT units disappear, the lifespan of the Abrams skyrockets. Look at the numbers again, it takes a lot to kill a FA21 vehicle, every single HOT missile system, Storm or Hind that burns makes the Abrams that much bigger a threat.

Opportunities: What happens when an immovable objective meets an irresistible tank. Victory.

The M1A1HC as a counter moves force, a unit with a plan, isn’t showing up just to get drawn into a fight or to kill a unit here and there, it’s showing up to win the game. And WWIII: Team Yankee is all about objectives. Can you win by destroying the enemies army? Absolutely, but it takes a long time and the longer the game goes the more opportunities there are for something to go wrong. Taking objectives is fast and violent, like these tanks, it’s the better way to go. Once these tanks arrive on the table, the countdown to victory begins. It’s now just a matter of when, where and who. Infantry can’t destroy you and so can only resist you so long on the objective, especially after turns of bombardments prior (setting the conditions). Tanks can only hope to hide or flank you, and all the while, you’re hunting them, they’re for the most part, simply a delay. Air can’t hold objectives, they can only hope to get to you in time. There are only so many tools in the toolbox and this one unit seems to attract them all.

The Abrams family of tanks are fast. With a 14” tactical they can use terrain aggressively and push rapidly while putting down heavy fire, but the tank also has big numbers when it comes to dashing and this allows the Abrams to threaten objectives almost immediately after arriving. The Abrams does have to worry about being flanked by other tanks in reserve but this is where players have to make key decisions, how fast do you push based on the time line to their tanks arriving, or where their tanks arrive. In a game like Counter Attack the reserves will almost never be able to threaten your flanks for multiple turns unless they’re units like Hinds and can be ignored for a turn as even a Leopard 2 can’t bail you range, and missile systems like a Storm can’t fire the turn they arrive. All while you drive around with an AT 23 gun and 3 machine guns, like a boss.

Overall, the M1A1HC Abrams brings something new, and adding this to your lists is going to be way too much fun. It’s not just FA 21, the Challenger has FA 21. I’ll say it right here and right now, it’s not an Abrams, it can’t do what the Abrams can. It’s not as fast, has worse cross (at FA 21), has a worse gun both in ROF and AT. It just doesn’t add up. It’s made to sit an eat shots all day, but the Abrams is here to take objectives and to own the field. The Abrams in my opinion is made to show up fashionably late to the party. Launching when the commander has set conditions by degrading the threats to these beasts, the Abrams is a juggernaut. It is the apex predator of reserves, the perfect counter moves force.

~Chris