with Chris Allen
 Comrades, today we will be conducting an intelligence briefing to confirm and describe new equipment being fielded by the British army in the Northern Sector alongside German troops. As I’m sure you’ve all heard there has been a recent rearmament and push of military equipment in the British sector in what is believed to be preparations for a new offensive.
We will be discussing vehicles previously not fielded in the region, their capabilities and how to defeat them.
The British have continued to flood the sector with any and all equipment they can muster and have turned to the older Fox Scout car. While new to the hostilities it is an older vehicle that is armed with a 30mm cannon and is more than a match for our BMPs in a gun fight. The vehicle is less mobile and will restrict its movement to open ground and roads but is small and easily hidden so can be difficult to engage directly until it starts shooting which can be a problem for our lead forces.
The British continue to rely heavily on massed reconnaissance forces to
determine out axis of advance and attrit our lead forces. Make no mistake this vehicle is dangerous and is being seen conducting rehearsals in large number. Combined arms against these packs of cars is key. Artillery can easily scatter them or dissuade them from using terrain like urban areas for
cover and should be used more than liberally when these vehicles are engaged. Their crews across their entire vehicle fleet have fought on long after others would have left their vehicles behind, this is expected to be the case with the Fox so mass firepower and ensure their destruction. They have no ability to affect our tanks and small coys of tanks work well against them as they are similar to the Warrior IFV which we will discuss shortly.
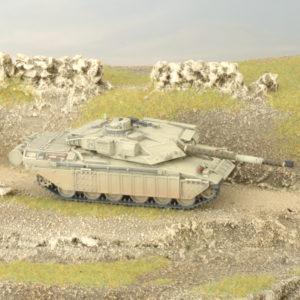
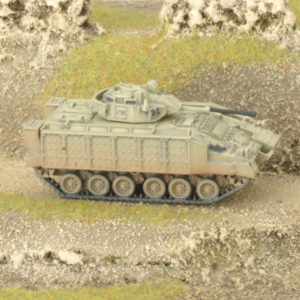 British defense scientists have developed a new armour technology ‘chobham’ which they have put into service on two new vehicles the Challenger tank and the Warrior Infantry fighting vehicle seen here.
What makes this armour interesting is that it has been specifically designed to defeat HEAT warheads. While this has an effect against all HEAT warheads it is of significant importance for smaller shoulder based weapons and smaller missiles such as the RPG-7 and the Spigot missile. These weapons become ineffective against chobham armour even against the side armour of the vehicle. What does this mean to you the commander on the ground?
Shoulder fired anti-tank weapons used by Infantry units can’t stop these monsters from assaulting. We are very used to having complete command of positions with our RPGs against vehicles and it is possible to bail a Challenger or a Warrior but is incredibly unlikely so you will need other nearby supporting units such as BMPs or tanks to make your defensive fire effective. Both of these units are incredibly effective at taking objectives in the late game so expect that they will hold back and attempt to attrit our forces before pushing forward.
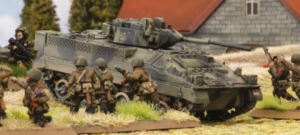 While BMP-2s can engage the Warrior they are at a disadvantage as the capitalists, copying our design but adding greater armour, have made engaging these with BMPs a losing affair. At long range the Spandrel missile is a good bet against the Warrior but due to their Chobham armour it is still possible for the vehicle to survive a direct hit. The Warrior is not as numerous as the BMP and few carry an anti-tank weapon, as such they are perfect targets for our tanks who with the capability of the 125mm gun will often see the passengers destroyed.
Brutal goes a long way. Even early model tanks like the T-62 are perfect at hunting these vehicles and pinning the infantry they support. For the Challenger, Chobham along with the frontal armour make it incredibly resilient against our ground-based weapons. Even powerful missile systems like the Storm will find it incredibly difficult to hurt these, our defense scientists suggest a hit from an AT-6 Spiral missile will only destroy an up- armoured Challenger 11% of the time. Flanking these vehicles is the only ground based solution, and is risky, but while the British Army is planning a great offensive spearheaded by these tanks we have a different opinion of the situation.
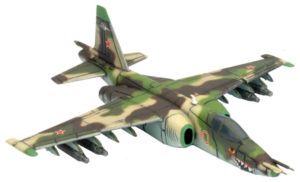 Gentlemen, the air force has reorganized its forces and will have flights of SU-25s on standby at all times. There is nowhere the Challenger can hide from the air force. Armed with the Kh-25 air to ground missile the SU-25 will destroy these tanks with ease. Even frontally, a hit from the Kh-25 will destroy a Challenger 80% of the time and more importantly, as we have seen with their Chieftain tank British forces are unwilling to commit their armour to battle while the SU-25 is in the air. This gives our ground forces the time and space to take up key positions and more importantly reduce their anti-air assets to be able to destroy their armour on arrival.
 That brings me to their new AAA system, the Chieftain Marksman. Re-purposed older tanks are having a turret similar to the German Gepard installed. Adding to the Blowpipe and the Rapier missile systems the British army now can provide air defence coverage similar to our own. As you all know their other systems are missile based and provide large coverage but lacked the ability to deal with large numbers of aircraft simultaneously. The Marksman solves this problem and will threaten full wings of MI-24s and
SU-25s with hundreds of 40mm rounds. With more armour than the Gepard this vehicle is more suited to supporting ground operations and can rapidly destroy light armoured vehicles and infantry formations, so expect it will be in a position to move forward. While it will be rare to see all three systems in an area at once, it is a possibility, but this will most likely come at the cost of other support. It is also very difficult in most of the European theatre to hide three large units like this against an entire attacking force.
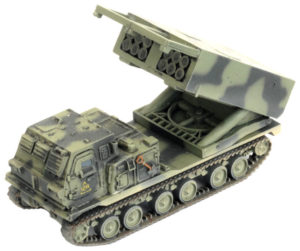
Using artillery and direct fire weapons to suppress or destroy these is key and destroying them will open the air for the air force to take apart the other elements of the enemy force. Remember enemy air defence systems can only fire on air or ground targets at a time so threatening them with both at once will force them to make tough decisions and provide you with options. The other main support vehicle being pushed up to the front is their version of the Grad, an MLRS system that primarily delivers scatterable munitions such as DPCIM and mines.
 Unlike the other howitzer and mortar based systems the MLRS can deliver munitions across huge areas and will be a huge threat to dug in companies. As with the air defence systems these will be a priority target and based on the threat using either tanks or aircraft is your best bet to deal with these. Should you be engaged by the MLRS staying in place is not a good option as repeated bombardments will quickly dig out our infantry. Leaving the position is unfortunately also a concern as the British are exceptional at directing artillery fires and the area hit with this system is so large that many teams will be leaving cover but unable to leave the blast area. If engaged, go to the source, either by destroying the spotting teams or the launchers themselves. Destroying the launchers is a task commonly best suited again to the air force and you can see this is a running task of dealing with their hardened and rear elements.
 Even with their advancements, the Soviet army along with the air force is prepared and more than capable of destroying the capitalist aggressors with ease. Our combined arms forces supported by the air force are the ire of our enemies who are scrambling to copy our structure. Using all of the tools at
your disposal will see you to victory.
Remember the following when planning for battle:
- Once your reconnaissance has determined the enemy force you face you need to understand it and its key elements so you can divide an destroy it, dividing and destroying is the key to victory.
- Identify what elements NEED to be destroyed by the air force
- Identify threats to the air force and plan their destruction if you don’t you will lose your air support and then have serious problems on the ground.
- The British want a war of small attrition, they fight like cockroaches always staying if you do not eradicate them, too much is never enough when it comes to the application of firepower, destroy units and move to the next or risk being delayed or even taking critical losses from the remnants of their force.
- Their artillery systems are now a threat to not only platoons, but entire companies. If you ignore the firepower of the British army you will not survive long enough for punishment by higher.
- The British army has the most numerous reconnaissance force on the front. They are more than capable of counter reconnaissance and attrition tasks.Combined arms is the way ahead as they cannot stand against the might of our armour. This ends the briefing for today. Happy hunting Comrades.
 One of the newest, most exciting weapons featured in the British Army book is the Marksman Self Propelled Anti Aircraft Gun (SPAAG). Following the Falklands War, Prime Minister Margaret Thatcher was livid at the losses sustained by the Royal Navy and the British Army, in part due to issues with the Rapier towed antiaircraft missile systems. Problems were experienced due to the need to “zero” the system and calibrate after each road move or unloading from a Naval landing craft. This meant valuable time of 15 minutes was wasted while cables were laid, stabilising of the sights and the calibration of the Blindfire radars was done.
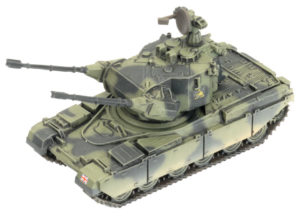 The Prime Minister jumped at the idea, especially when advised that 15 fire units of twin 35mm Oerlikon KDA guns that had been captured in perfect order from the Argentine Army and were still currently in use with RAF Regiment reservists of 1339 Royal Air Force Auxiliary Wing. These weapons were confiscated by Royal Ordinance Factory in short order and integrated with seven other sets of 35mm that were in testing along with the sole prototype unit. This gave the factory enough for seven batteries of three Marksman SPAAG’s as an initial production run. More guns would be forthcoming from Krauss Maffei who provided spares from their busy Gepard production lines.
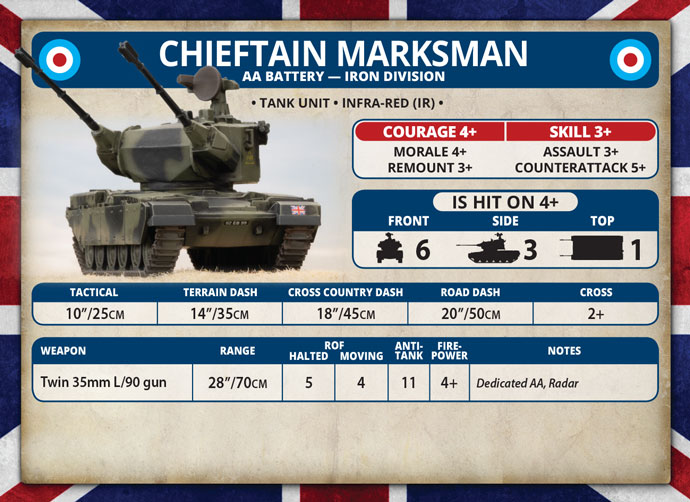
 A grid reference allows the FO to give a more accurate target indication when calling in a fire mission. The grids themselves, one grid square is 1000m x 1000m with a 4 figure reference, 6 figure increases it to within 100m x 100m, 8 figure to 10m x 10m, and 10 figure to 1m x 1m which allows for more accurate fire control. Most rounds land between 30 and 90 seconds from firing. This also depends on the rounds used, for example a normal HE round from a M109 155mm can be fired up 15km or an Excalibur round to 40km. So having a FO is mission critical as they can direct the fire support to help suppress or cover the axis of advance. Same can be said for JTAC’s
 Key to achieving this is one: by having good line of sight from available team leaders and FOs (remember the +1 as this helps against target in cover) so that you can position that marker where you need it, preferably at the back of the enemy platoon. The goal here is not to kill but to keep they heads down so that your infantry can benefit from the reduced fire while launching an assault. Also if you chose not to lunch an assault you can, with the added effect of repeat bombardments, force the infantry to re-roll their saves.
 Now for the last use arty the ranged in maker and there deployment. As for deploying your big guns, generally you want them somewhere you get great table coverage and out of line of sight to avoid counter battery fire from enemy arty. Unless your goal is to use the arty as a direct fire platform, I’d
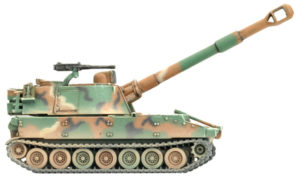 I hope you have enjoyed this rollercoaster ride with me today about artillery and FOs I wish you the best of luck in the future, so get out there play some games try new thing with your arty and remember it’s not just to pin infantry and that they are other ways out they that can give you the tactical edge in the fight.
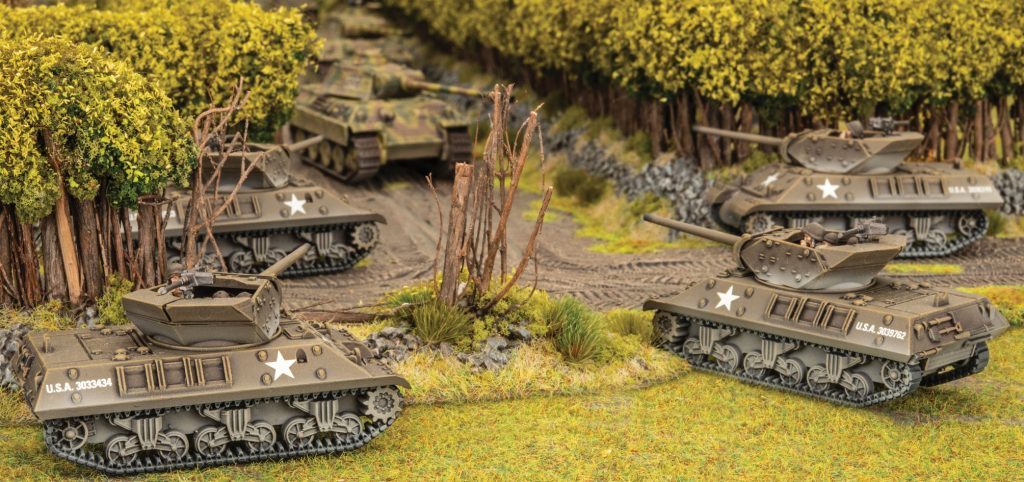
 So right now my army comes to 66 points and I have 10 units in my formation, so it looks pretty solid and I have enough artillery and machine guns to deal with most infantry lists I come across. I do feel that I am relying too heavily on my Bazookas to take care of all the tank threats that may be in the game. To cover this weakness I decided to look in the book and see what I could get for 34 points tank wise. I quickly landed on M10s, as those give me 8 AT 12 tanks, and the downside of not being able to deal with infantry is covered by the rest of my list. An HQ and two units of 4 M10s comes to 34 points exactly, giving me a full 100 point list with 13 units- seems good on paper.