If you want to field large Tankovy units in a hurry, chances are you won’t be interested in giving yourself any extra work. But if you have some spare time and you want to show off your modelling skills, you can give your new tanks that little something extra to make them stand out from the crowd.
Adding Wire Grab Bars
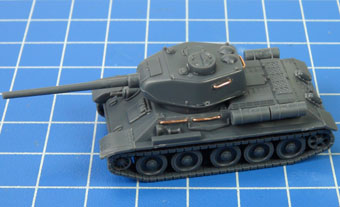
There’s nothing wrong with the moulded plastic grab rails – they paint up very nicely. But if you want to add a bit more realism, it’s actually a lot easier than it looks to replace them with wire.
You will need:
■ Hobby knife.
■ Wire.
■ A pin vice with a drill bit roughly the same diameter as the wire, but preferable slightly bigger.
■ Pliers – ideally two pairs: one with flat jaws and one with tapered, notched jaws.
■ Clippers/sprue cutters.
■ Superglue or green stuff epoxy putty.
First things first: choosing the right wire. It needs to be flexible enough that you can bend it into a crisp 90-degree angle, but rigid enough for the finished model to survive reasonable handling. I used .5mm copper wire, but slightly finer or heavier gauges will do fine, as long as you have a drill bit to suit.
Bending The Wire
A pair of tapered, serrated pliers is very helpful for getting a consistant size. Measure along the grip of the pliers until you find a notch 1.5mm narrower than the length of the grab bar you want to make, to allow for the extra width added by the curve of the wire at the bends; I found 1.5mm was perfect for the gauge of wire I used, but your results may vary, so you should experiment a bit, bending a few practice grab bars and carefully measuring them until you have identified the correct notch. Or I should say notches, because you will need two different lengths of grab bar:
5.5mm – 4 per tank (for the T-34/85 turret sides and rear, and the T-34/76 turret sides)
7mm – 6 per tank (for the T-34/76 turret rear, and the hull sides)
Mark the notches clearly with paint or a pencil, and voila – your pliers are now a precision wire-bending tool, letting you churn out dozens of nifty grab bars super-fast. OK, to be honest, it’s going to take a while, but probably not as long as you think.
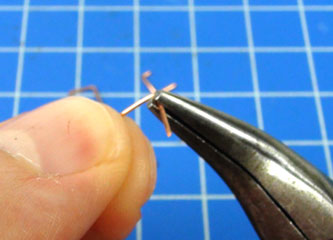
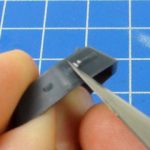
The method is simple. Grip a short piece of of wire between the pliers at the marked notch. Bend down the ends with your fingers. If you have another pair of pliers, use them to crimp the ends down tightly, to give as sharp a bend as possible. Or you can press the ends firmly against a hard surface.
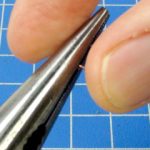
After removing the wire from the ridged pliers, you can further sharpen up the bend by squeezing tightly on either side of the bend, refining that 90-degree angle.
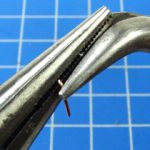
Clip off the excess wire with clippers or sprue cutters, leaving a few millimetres to stick into the tank.
Drilling The Holes
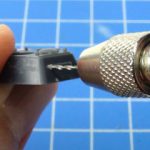
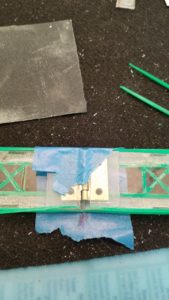
Drill a hole at each end of the moulded plastic grab bars. I recommend using the tip of your hobby knife to bore a small hole first. This makes it a little easier to hit the exact point where you want each hole, and the drill bit will naturally centre itself there.
Be careful with the placement of your holes. Try to ensure they are at the same height, or your grab bars will end up on a crazy angle.
Drill all the way through the plastic to the other side.
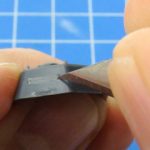
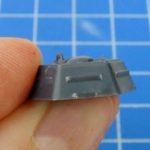
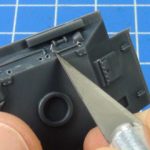
Once you have drilled the holes, carefully shave off the plastic grab bars with a sharp hobby knife. Take care not to cut any of the detail on the hull when removing those grab bars
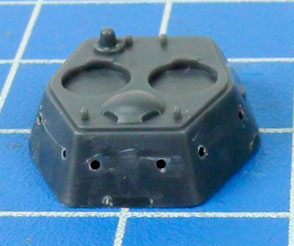
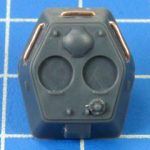
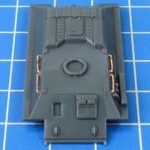
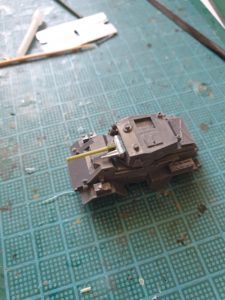
The 76mm turret with holes drilled, ready to insert the wire grab bars
Adding The Grab Bars
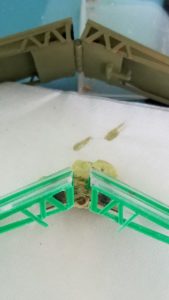
Insert your grab bars into the holes. How closely you want them to sit against the surface of the tank is a matter of taste. To strictly match correct scale, they should be pressed right up against the surface. But you’ll probably prefer to leave a small gap, just for the look of it.
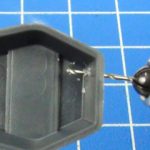
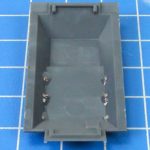
Once you have all of the grab bars positioned to your liking, you can fix them in place from the inside with either a drop of superglue or a small blob of epoxy modelling putty (ie green stuff or similar). Obviously this means you need to add them before attaching the bottom parts of the turrets and hull.
Bending Mudguards
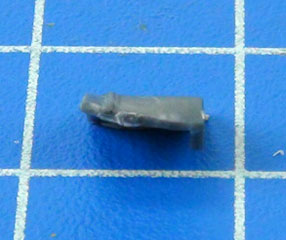
Looking at historical photos of T-34s, you’ll quickly notice that the mudguards – made of relatively thin sheet metal – were prone to bending and crumpling. They could also be quite easily removed, so the easiest customisation option is to simply leave them off.
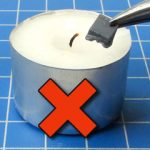
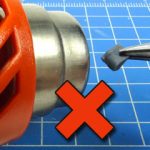
Heating up the plastic until it becomes soft and pliable seems like it would be a good idea. But there is a very specific temperature window where the plastic is soft enough to bend but not so hot that it melts completely. An open flame is not much use – hold the part even slightly too close and it will instantly melt into a vague blob. A heat gun (if you haven’t used one of these, it’s essentially a juiced-up hair dryer) gives you more control, but you can still easily ruin the plastic part if you’re not extremely careful.
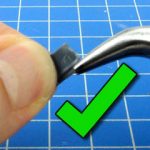
After quite a lot of experimentation with different heat sources, I have come to the conclusion that it’s not worth the effort. By all means give it a try if you’re feeling brave – you can get some very effective-looking results if everything goes right. But I think the best option is the simplest: just grip the mudguard firmly with your pliers and bend it by brute force.
Unditching Logs
Also crude but effective – you can clip the ends off toothpicks to simulate the improvised unditching beams (ie. logs) which were often carried on Soviet tanks. Toothpicks already have a suitably woody texture, which you can enhance by scratching up the surface a little with your hobby knife. Either simply glue the ‘log’ in place, or else wind around a few coils of heavy sewing thread or fine fuse wire, to simulate rope securing the log in place.
I’m sure these detailing techniques won’t be for everyone, but for those creative types who feel like adding a little something extra to their tanks, good luck, and I look forward to seeing your work in person or on the Facebook Groups.
“Sergeant Ferris!” Lieutenant Armstrong bellowed as he walked up to his platoon for the first time, just having arrived with the reinforcements.
“Sir”
“I know I’m new here but we’ve got to police up these tanks.”
“Sir?”
“Sergeant if you look at anyone else’s tanks they’re bare hulls, maybe a little kit in the bustle but our tanks, Sergeant there’s more kit on theses tanks than in the quartermasters shop, look at that one, does that tank have a DShK on it?
Sergeant Ferris blinked, looked up at the sun and looked back down, blinked again, “Sir, we could have left it for the commies to pick back up, but in all honesty it’s kinda a good luck charm. Plus you should have seen how confused they were when we opened up on them with it one time, the Int guys said there was comms chatter for days about friendly fire”
“Fine, but sergeant you can’t tell me we need that many Jerry’s on a tank, I’ve been assured we’ll receive nightly resupply, in my experience on course…”
“Lieutenant, I’m happy you’ve been assured, but in my experience in battle”, he let his word hang “when resup’ doesn’t show for two days because things get hot and we get caught behind the lines, those jerry’s keep us killing Ivan and get us back home.”
The Lt looked down, and then back at the tanks. “Sergeant, is that a case of beer on the back of that tank?”
A head popped up from the back of the tank, the young man stared down from the tank “Sir, you ever tasted a beer after killing commies?”
“No”
A wry and knowing smile crossed the sergeant’s lips as the Lt looked back down “You will”
With some social distancing going on it’s a great time to not only start something new but spend a little extra time making it something special, something of your own. I’ve been playing Soviets since the introduction of the game, but after moving across the country I wanted to start a second force to help introduce the game to new players. There was no more appropriate or iconic force to pit against the Soviet threat than the might of the American military. So picking up a box of Bannons Boys I wanted to make something that really showed the differences in the two forces.
My Soviet force is a monument of simplicity, uniformity and application of conscript forces. So what better way to make the opposition stand out and show the divide of culture and doctrine than to make each vehicle individual. With this as the concept there was only one option, the M1A1 Abrams main battle tank.
With the new Team Yankee Americans book coming out, we all knew that the M1A1 Abrams was about to appear in the game, so what better opportunity to jump in ahead of the release to have built a model we all have access to but isn’t yet on the table!
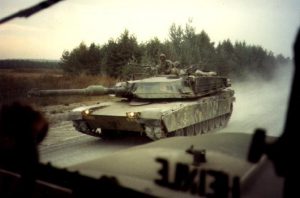
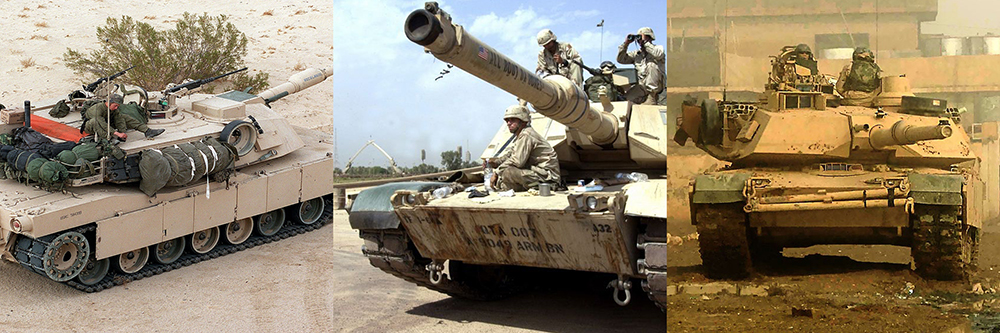
All you need to do is type in Abrams in google and you’ll find pages upon pages of pictures of Abrams tanks through the years, and every single one looks different. But the pictures give great inspiration for stowage, paintjobs and just getting the models on the table. I tried to find pictures from Operation Reforger and other major exercises but also looked for inspiration in the conflicts in Iraq. While I didn’t want to put on all the really modern pieces like recognition panels and such there were tons of examples of how to stow kit on a high speed tank.
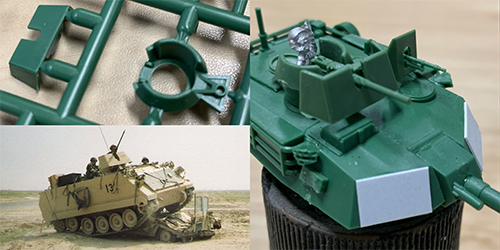
I didn’t have too look far to find what I needed to accomplish this. Battlefront is amazing at providing us with extra pieces of kit to customize our forces and make them not simply markers on the table but our own private armies to command. Looking at most sprues you’ll find extra pieces, boxes, road wheels, guns and such, all ripe for the picking and enabling us to make our toy tanks individual and our own.
For my Abrams I found some of the parts in the following places:
The Abrams sprue itself: Road wheels, jerry cans, tool boxes, even extra machine guns are all there.
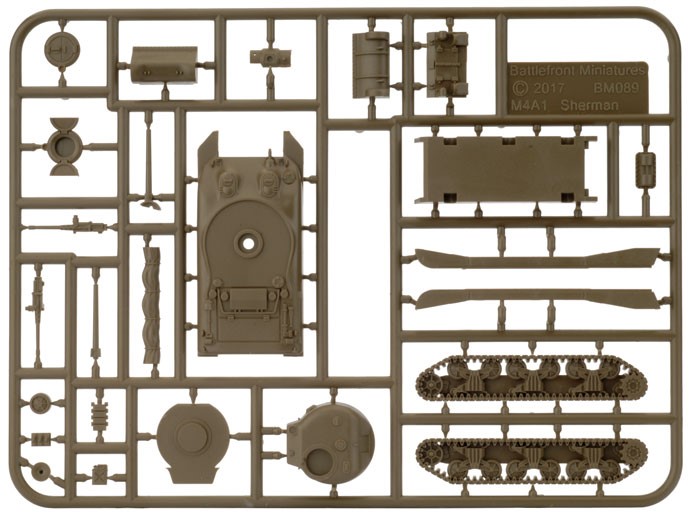
The Sherman Sprue out of hit the beach: tarps, jerry cans, oil cans.
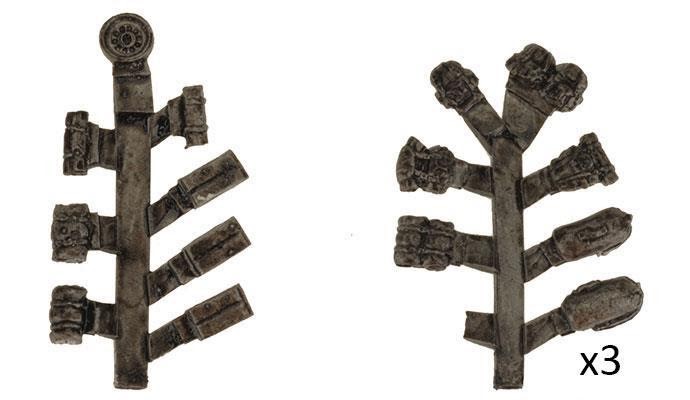
TUSO10 US Vehicle Stowage (below): This blister is life. With rucksacks, kit bags, ammo crates, road wheels, tarps and wrapped kit, this has a lot of everything you want. I need to order more to customize up my Americans as I expand the force.
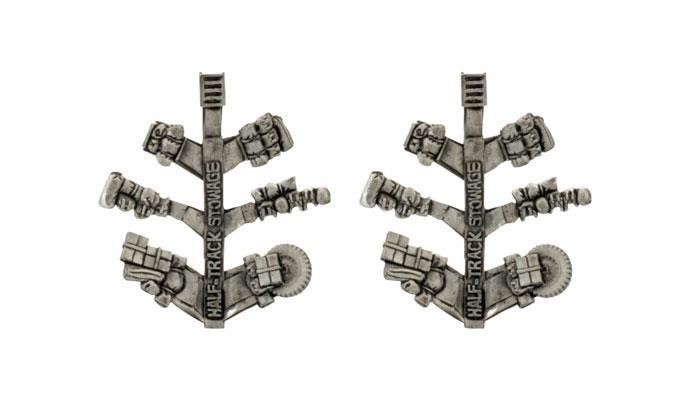
USO212 Half-Track Stowage (above): This is full of wrapped kit and equipment and is pure gold for adding strapped down equipment to vehicles in any era and if you have it for your Mid or Late War Americans, you can use it to give a little love to your Team Yankee Americans.
These made up the mainstay of my bits, but I scrounged weapons like machine guns off of M113 and T-62 Sprues, there are literally great bits on almost every sprue that can work and add to your force being unique and your own.
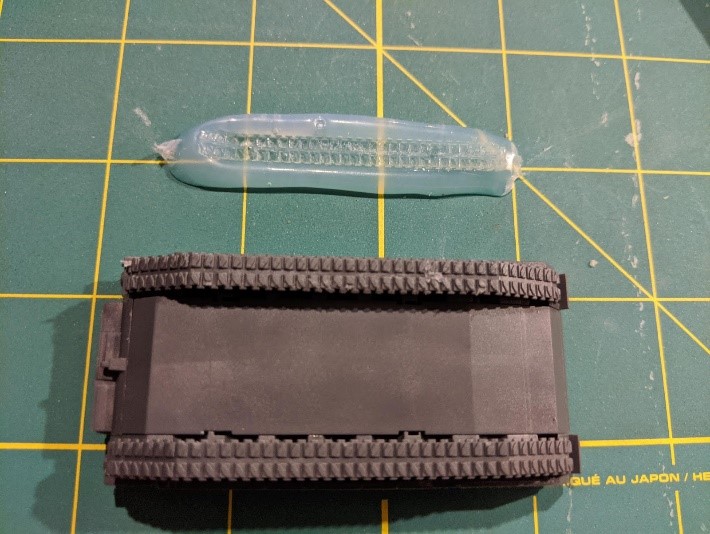
The one bit I wanted but couldn’t get was spare tracks. There is spare track on the Leopard-2 sprue but it’s not quite right for the Abrams. So what’s a guy to do? Improvise, adapt, overcome.
To be honest I didn’t know if this was going to work, but it did.
I laid down a thick bead of hot glue onto my cutting mat and let it cool down to where it was starting to get that white colour back and I pushed the Abrams track down into it and let it fully cool. I carefully pulled the Abrams off of it and voila a push mold for an Abrams track.
I mixed up some GF9 green stuff and poured some water into the push mold (poor mans release agent) and in a few minutes I had more track than I knew what to do with. If I was to do it again (Which I did) I’d of put the hot glue on a large Popsicle stick so I could reuse it and move it easily.
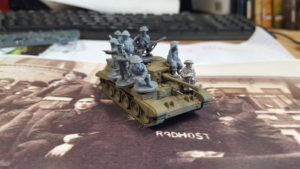
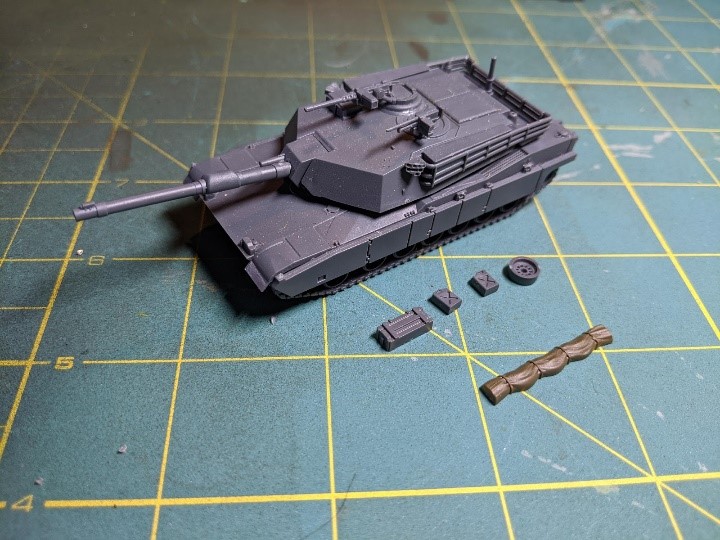
This is the mindset a modeler needs, everything can be a bit, or become one. I cut up and shaped sprues and squared them to become boxes of rations, and a case of beer.
Now came the fun part, adding it all together.
If you’re a Sergeants Major or First Sergeant, skip ahead a paragraph, you won’t care to follow where I’m about to lead you. Uniformity only goes so far. Every armoured vehicle I’ve ever lived out of was different. There were some key things in some key places, stretchers, admin boxes, tools. After that it was up to the vehicle commander, and each had their likes, wants and needs. This for an army on the table means variety but commonality and can make a cohesive army of individuals.
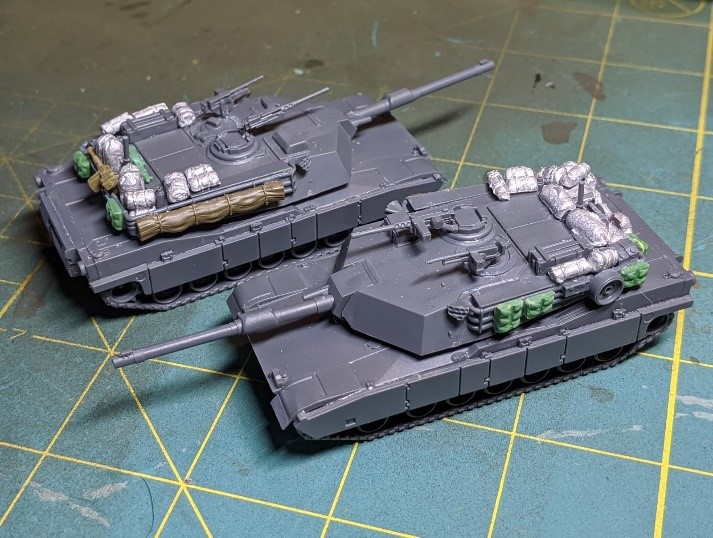
I started my Abrams platoon by picking what my key essential kit would be. For my vehicles it was an ammo box made into an admin box, two jerry cans, a road wheel and the vital sleeping tarp. I picked where these were going to go by test fitting with blue tac and glued them down on the four tanks. This gave me a base to work from and individualize further.
With that I was open to do what I like but I ensured to keep the blow out doors of the protected ammunition and the antenna mounting points free and clear of stowage. It’s a safety thing. And knowing is half the battle.
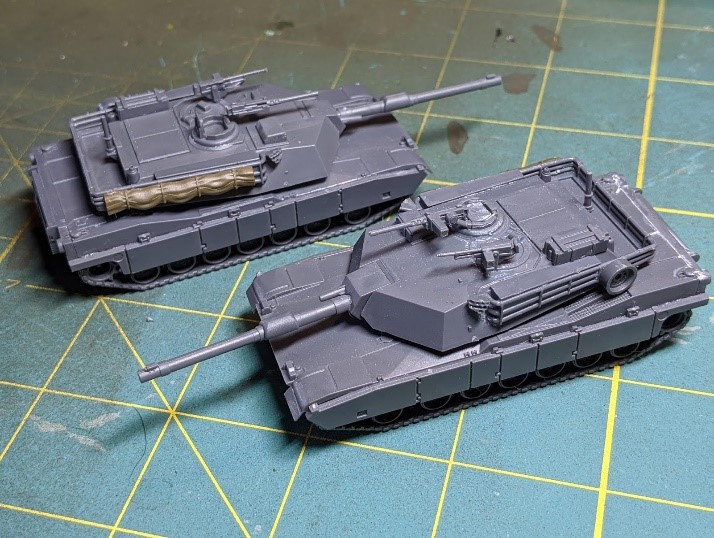
I wanted these tanks to be really lived in and so I made sure that each crew member would have not only a ruck but a kit bag, a bit much sure but the tanks doing all the lifting so who cares, might as well bring everything you might need.
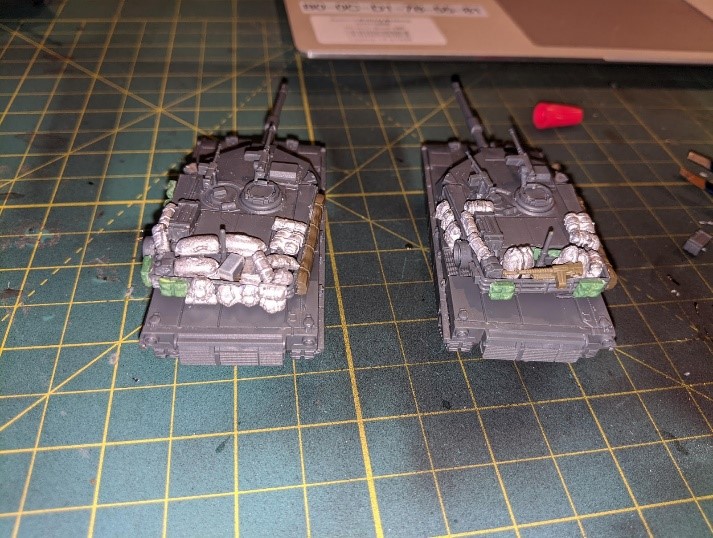
I tested and moved around stowage to make each vehicle individual, but the common items and open space of the blowout panels made the platoon cohesive. They looked not uniform, but common.
Things really started to come together and each story started to tell its own story of the crew manning it. In the field I’ve seen no end to crazy things strapped to tanks by the crew so the machine guns, boxes of MREs or even a case of beer started to come together.
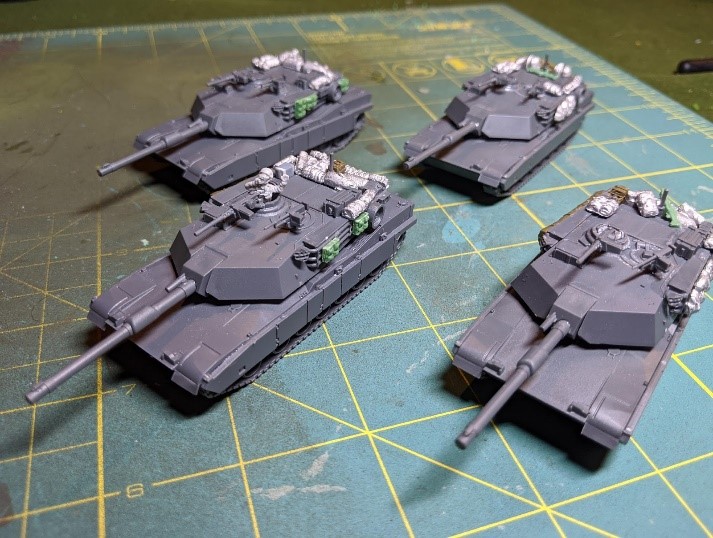
One thing I will note is that if you plan on putting this much stuff on your Abrams I suggest magnetizing the turrets. I didn’t. And then once I had more than doubled the weight of the model, all on the rear of the turret, I had to dig out the pins and insert magnets. They work amazingly well and I have no issue with the turrets tipping now. Learn from my pain.
In the end I’m really happy with how the platoon turned out. It’s my first American unit for Team Yankee and I think it’s going to set a trend for my force.
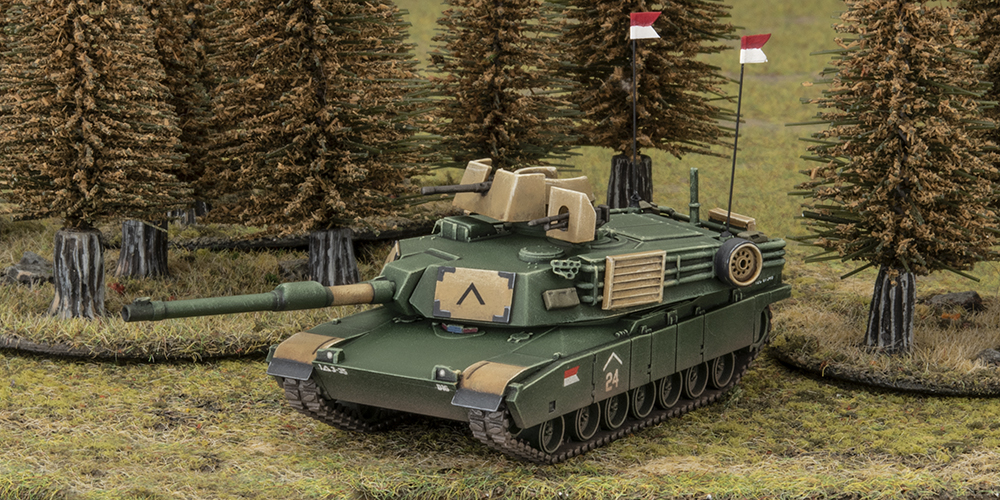
Now I just need to figure out if I’m adding camouflage nets and find a paint scheme I like. I’m thinking NATO 3 Colour so they can blend in with the allies.
The new Team Yankee American book is going to add a lot of fun and flavour to the game and I for one can’t wait to see the iconic M1A1s hitting the table. Some people love the look of stock tanks, stripped down to the essentials, ready to fight light and fast, I know I do with my Soviets. For my Americans I want a lived in tank that nobody is going to confuse as anyones but mine, and the M1A1 has the stowage capacity and cool factor to help make this happen.
WWIII: American has been on my desk for a while, and I’d seen the awesome new Bradley sprue around the office, but with plenty of other projects to work on, I didn’t think I’d be starting another army.
Then Tuesday rolled around, Chris reminded me the launch was this weekend, and I found myself flipping through the book and hunting for sprues!
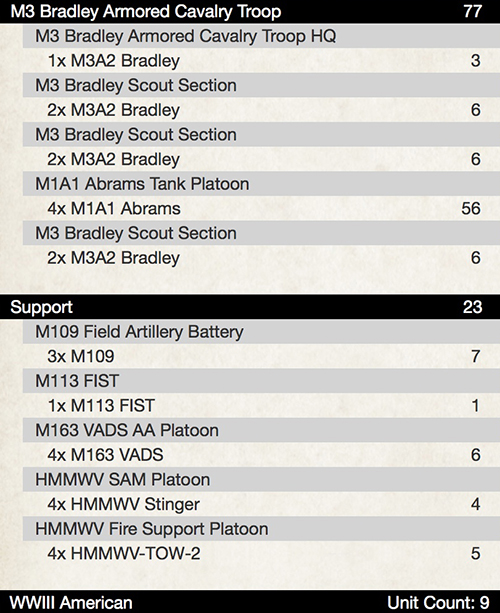
I decided on an M3 Bradley Armored Cavalry Troop.
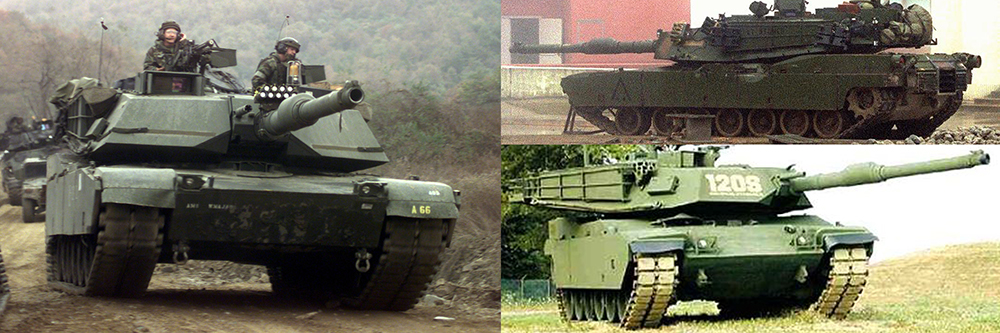
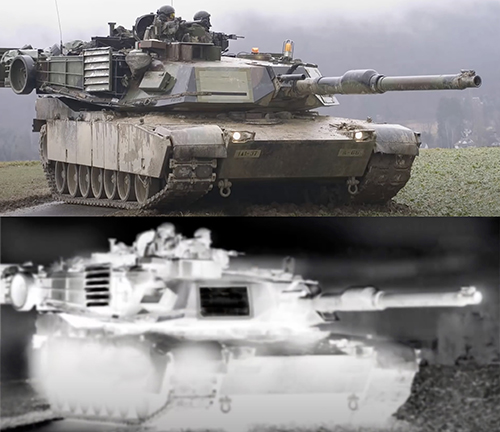
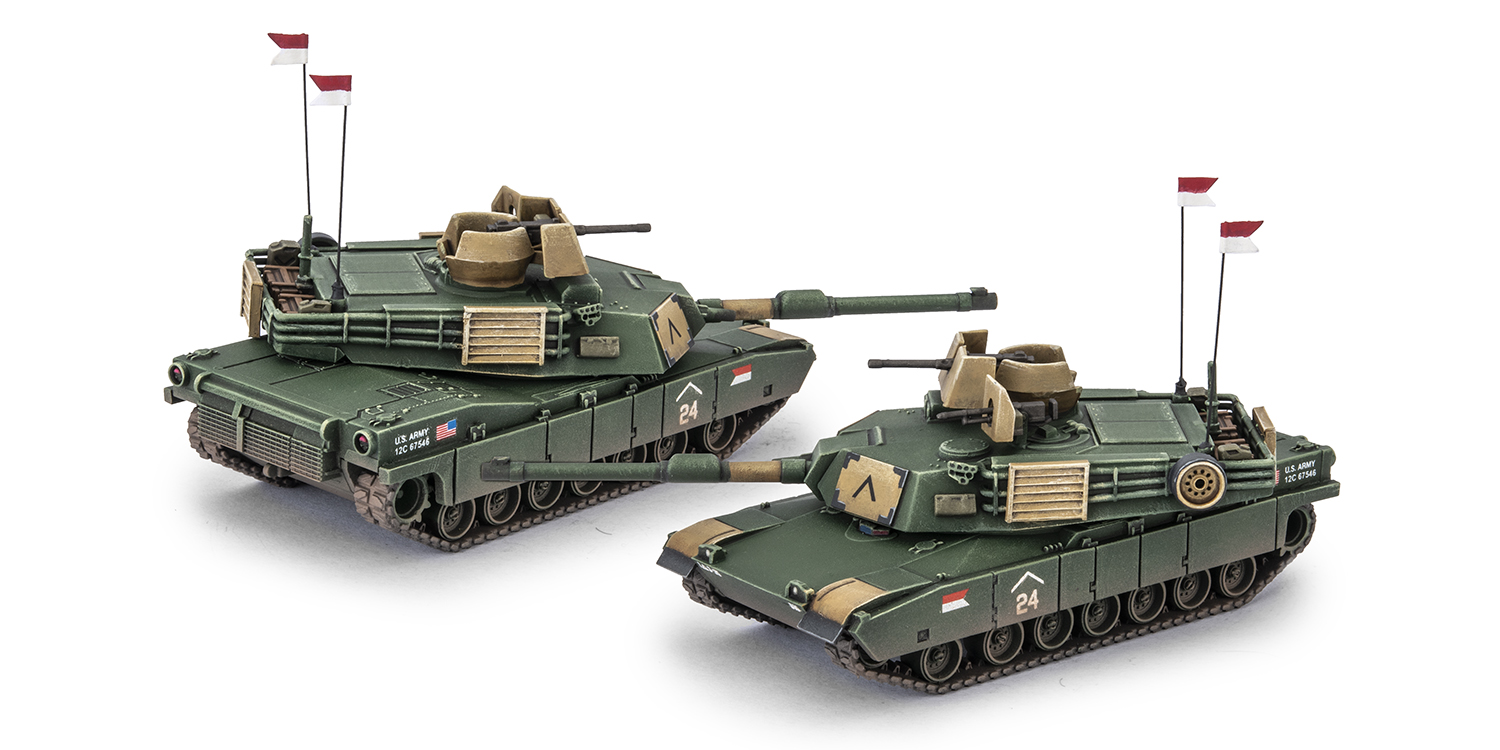
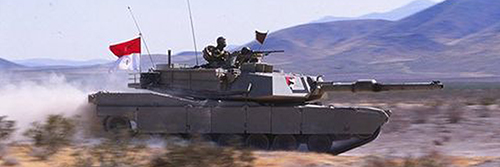
My first hobby step as always is to hunt through google and books for reference images, and maybe something interesting I can do. I’m doing Gulf War British, so I was pretty set on doing something green.
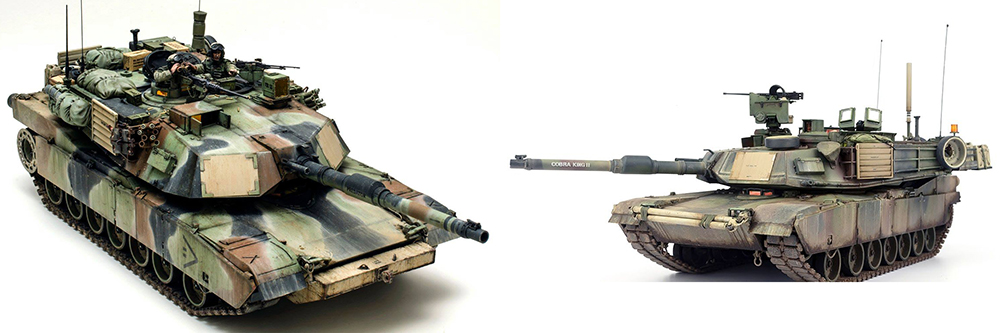
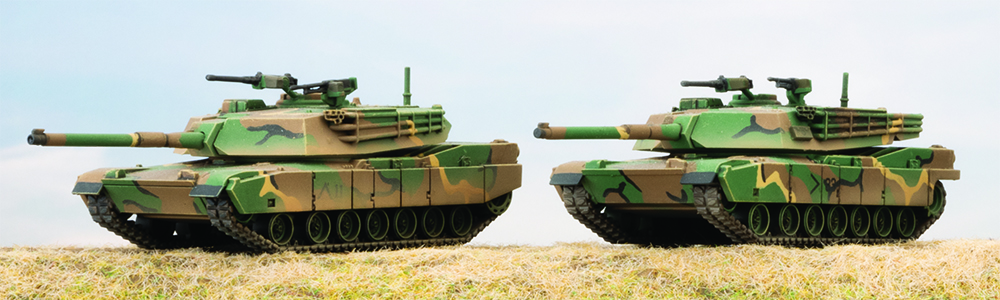
Scale modellers are also good inspiration. The below examples are M1A2’s, but they capture the look I want.
What stood out to me was desert yellow vehicles with forest green replacement parts.
So I’ve decided to apply the same logic to forces fighting in Europe. It’s 1991, the first Gulf War has just ended, but the Soviets are still causing problems along Iron Curtain. Equipment and replacement parts that were destined for the desert are now being shipped hastily to a more lush climate. There are some picture of this, but it’s usually on later M1A2 tanks.
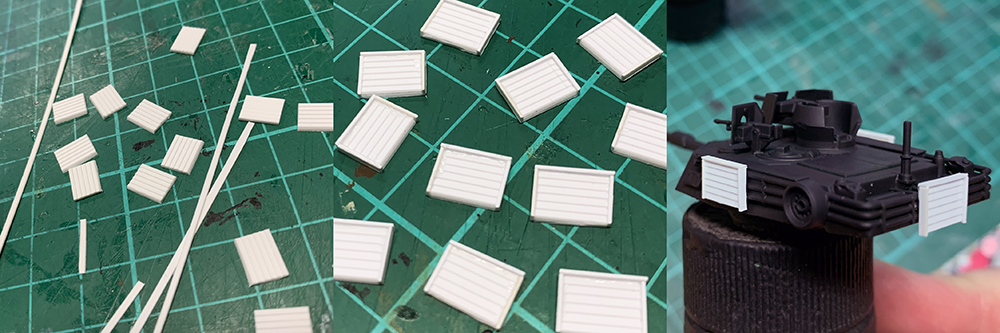
Being a Cavalry force, I took some liberties and added MG shields usually found on Vietnam ACAV M113’s. I have a few spare from building VADs.
Combat Identification Panels (CIP) were developed after the Gulf War, so again I’m using a bit of “what-if” logic and assuming they got these ready for the theoretical fighting in Europe.
To make these, I used some plasticard sheets (1mm spaced Clapboard, and 0.5 thick plain). The cutting was fiddly, but with a sharp knife and plastic glue it was surprisingly quick and easy.
The painting was pretty straight forward, as I’m aiming to get the army done daily quick.
Here’s the main colours:
FOREST GREEN
– Tamiya Field Grey (Airbrush)
– Army Painter Army Green dry brush
– Citadel Biel Tan Green shade
– Citadel Nuln Oil recess shade
– Army Painter Army Green dry brush
DESERT YELLOW
– Vallejo Green Ochre
– Vallejo Buff dry brush
– Vallejo Pale sand dry brush
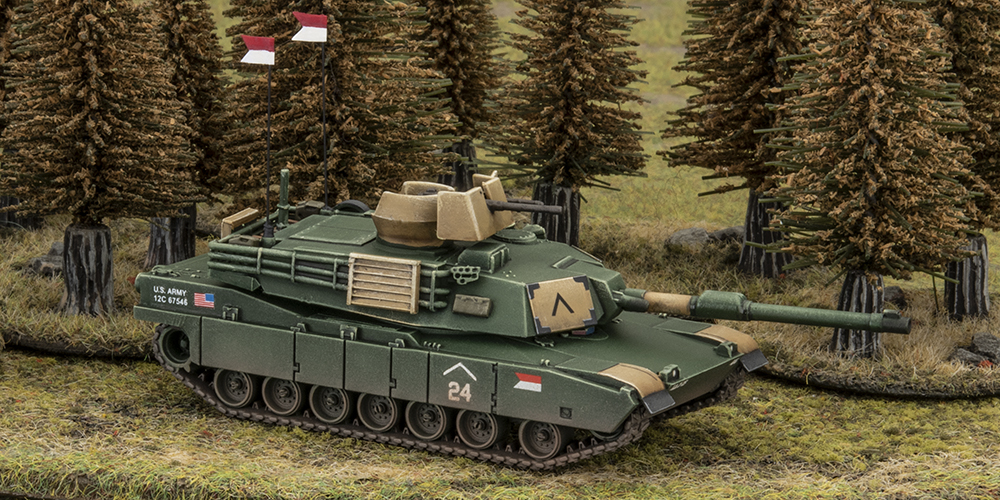
To continue the cavalry theme, I used some decals from the Vietnam M113 kit, and also added some matching penants on the aerials, made with folded paper, PVA glue, and paint.
Overall it’s a pretty quick and rough paint job, but with hopefully some interesting elements to make the army stand out. Now I’m looking forward to seeing this scheme on Bradleys, Humvees, and the rest of the support vehicles. I’ll look into adding stowage at a later date to the whole force.
Not everyone will love this paint job, but I think one of the great things about WWIII: Team Yankee is the “what-if” nature of it. It allows for some cool modelling opportunities.
It may not be historically accurate, but lets call it “historically plausible”.
Earlier this week I found myself building some Abrams so I could figure out and test my paint scheme. It has been a while since I built one and they were the original M1 Abrams versions for my “Bannon’s Team Yankee” force, straight out the novel.
Fast forward a few years and I was staring at the Abrams frame and thinking to myself, “there are some bits here I have never used….”. Between the assembly guide in the box and the very useful step-by-step guide on the website I managed to get my test models built and ready for a visit to the spray booth. But I thought it may be worth a quick primer for those of you that are about to embark on the assembly journey
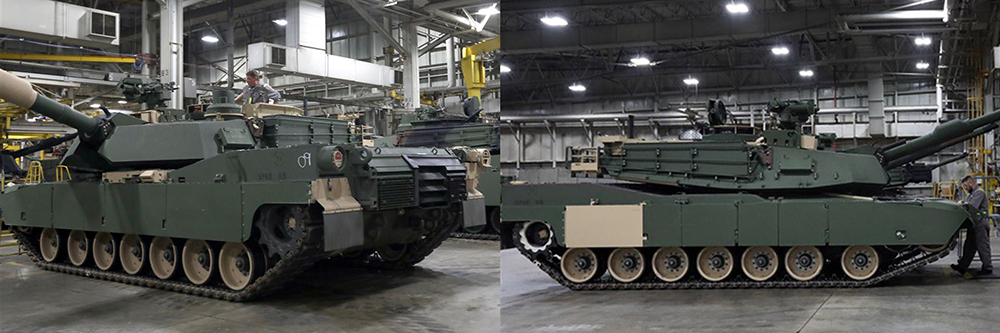
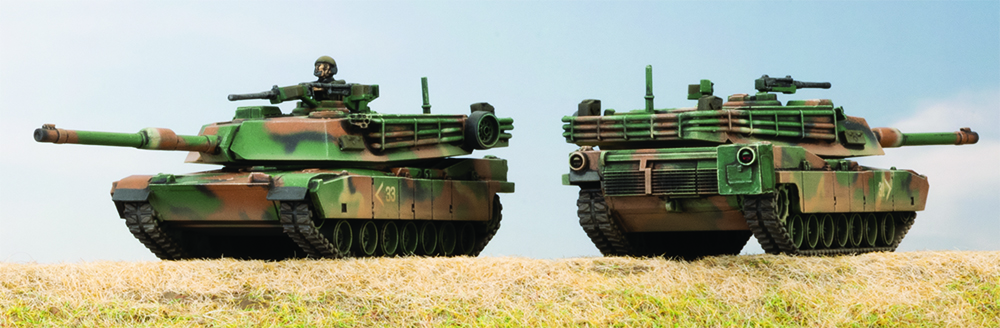
The M1 Abrams and IPM1 Abrams Personally, I feel that these two versions have the most obvious differences that you can see at a glance, thanks to the change in the stowage bins.
The M1 Abrams (below left) has:
• 105mm gun
• Short stowage bins on turret side
• Full length bazooka skirts
• Three part blow-out panel on the top of the turret
The IPM1 Abrams (above right) has:
• 105mm gun
• Long stowage bin on turret side
• Large stowage bustle on back of turret
• Bazooka skirt cut-out in front of rear drive wheel
• Smoke Discharger reload boxes below the dischargers • Three part blow-out panel on the top of the turret
The M1A1 Abrams and M1A1HC Abrams These two tend to look a lot like the IPM1 at glance, especially if you are staring across the table at them, however there are a few key differences that once you know, will stand out.
The M1A1 Abrams (below left) has:
• 120mm gun • Long stowage bin on turret side • Large stowage bustle on back of turret • Bazooka skirt cut-out in front of rear drive wheel • Smoke Discharger reload boxes below the dischargers
• Two part blow-out panel on the top of the turret
• Circular cover (for where the Commanders CTIV would be installed on later models) on the top of the turret
The M1A1HC Abrams (above right) has:
• 120mm gun • Long stowage bin on turret side • Large stowage bustle on back of turret • Bazooka skirt cut-out in front of rear drive wheel • Smoke Discharger reload boxes below the dischargers • Two part blow-out panel on the top of the turret • Circular cover (for where the Commanders CTIV would be install on later models) on the top of the turret • APU (Auxiliary Power Unit) box on back right hand corner of hull
Hopefully this will help you spot the differences on the battlefield, but if you are looking for a little more help you can check out this handy guide that comes with the new Abrams box.
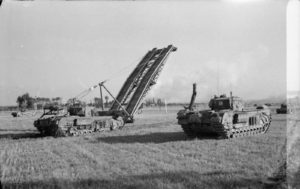
Some would say the British Small Box Girder (SBG) bridge is descended from the famous Bailey Bridge.
“I take it you mean that glorious, precision-made, British-built bridge which is the envy of the civilized world?”
That’s the one.
Hello chaps and ladies, let’s talk AVRE Small Box Girder (SBG Assault) bridges and how to make your own to help liberate Northern Europe from Jerry.
About a dozen years ago while visiting family, I found Flames Of War through a dear friend and shipmate who had an FLGS in Augusta, Georgia (Norman Schwartz at Arsenal Games – now closed.). But at the time the game really didn’t catch my fancy, I’m a Navy guy. About the same time, after a close call with cancer, my bride found an FLGS (Texas Toy Soldier (TTS) in Dallas) and she strongly encouraged me to pick up a hobby to rejoin the human race. A group of great guys at TTS play Flames Of War and I got hooked.
I chose the British Forces as virtually no one else here played them as a primary army. A few months later, the group at TTS were planning to do their annual D-Day game. I was intrigued, and being a student of WWII history for decades, I wanted to play using General Sir Hobart’s “Funnies”, particularly the AVRE and its assault bridge. I wonder often if General Sir Hobart’s funnies were used as he was General Bernard Montgomery’s brother in law. Hmm? Nevermind. Alas, I was told I would need an SBG mini. “No mini, no bridge on table”. At the time, no one here knew of a commercial source for a model so I decided to make my own. Heck, I served in two Seabee units for several years, how hard can it be? Two notes. There is a bit of fiddliness to this process and those with OCD (CDO) will either hate or love the process.
Right. So the Small Box Girder (SBG) assault bridge was a British project which in short order was copied with different tweaks by other nations. But in essence a SBG is mostly a metal bridge carried/mounted on an armored vehicle to cross obstacles – either man made or a feature of terrain, to be deployed under fire. SBGs can either be solid/fixed or fold in half. I chose to recreate the kind that fold, both for more drama (eye candy), utility (such as seawalls of different height) and it’s more dynamic.
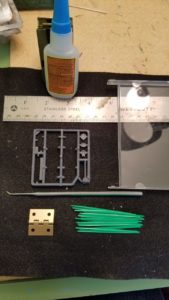
Note, these bridges are not going to be something slapped together quickly. These are the items I use, but various substitutes should be generally available most places in hardware, hobby stores, and many are likely in your work area.
Hobby Knife
Safety Razor
Some medium (hobby) sandpaper
Tweezers
2-4 Clothespins (the wooden ones with springs)
A metal ruler
Something to cut plastic, with precision and control. I use a scribing tool but, there are other options including some power tools. A scribing tool is super sharp and when drawn with pressure against plastic it cuts a fine narrow groove by removing a thin line of plastic.
Small metal hinges (1 per bridge) {1″ x 1″ / 2.5 x 2.5 cm}
Plastic toothpicks (TPs)[18 per bridge]. Flat wooden ones can be substituted, but have drawbacks. My preferred are called pic-a-pic plastic toothpics. * One curious thing about these, is at certain angles they have a resemblance to girders/I-beams.
Some small bits of plastic rod or sprue (4x 5mm long)
polystyrene cement and/or a super glue.
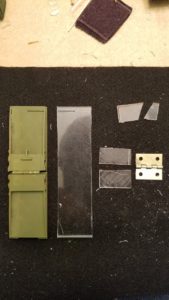
and the secret critical component, surprisingly, is the top cover of a CD case: one per bridge. You need the relatively older thicker kinds where the top cover side have grooved sides.
In many of the accompanying figures, I use a previously made SBG as a visual reference. Let us begin.
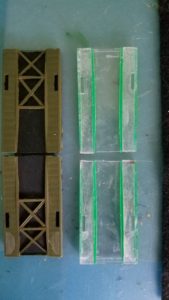
First cut the sides from the CD case cover. I cut from the inside, first removing the annoying small half-circle discs. You want to preserve the smooth outside edges of the case. These are what I will call side rails. Do not throw away the CD case yet.
Second, parallel to one side where the side was removed, cut of a full length piece of the case,1 and 5/16 inches wide (33mm). This will be the primary span. This measurement was calculated based on:
scale to historical example
the width of minis that would be using the bridge
size of the hinges I chose.
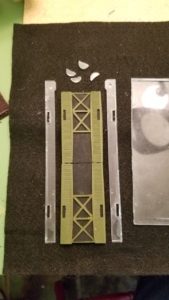
Next, on the other side of the CD case lid, cut out a small 1.5″ square. (The more proper square the better, but some slight variance can be accommodated during construction.) Then cut the square in half, but it must be (or close enough) 1 4/16″ wide (31mm) – just a wee less narrow than the main span (by the width of two toothpicks). This will become a shelf below the bridge on which the hinge will be super glued. Score (scratch up) one side of these shelf pieces with sandpaper.
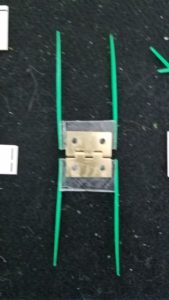
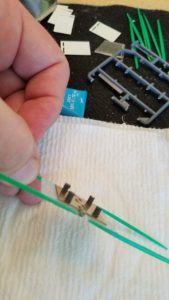
Shelf Hinge sub-assembly. Now score (I use an old screw driver) the sides of the hinge that fold towards themselves. Centering them, glue the small shelf pieces with the wide parts butted against the hinge but avoid getting superglue in the hinge. After the hinge has dried, glue 5mm long bits of plastic rod/sprue (to be pylons between the hinge shelf and spans) on the opposite side of the hinge, in the holes which screws would be used in normal use. Then glue toothpicks parallel to the sides. One end flush with the shelf edge.
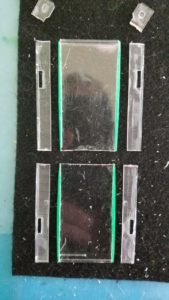
Next, let’s sort out the main spans. Mark off the ends (with the CD case hinges) with a marker- the same length as the main span. Cut off the ends of the sides of the CD case. On the bottom of the CD case/center span there may be an angled ridge which helped to keep the CD case close. I preserve that to help bridge placement during gameplay. That ridge will also help as a reference as it faces down. Measure the half way points of the side rails and main span. They should be the length of a toothpick (TP). Mark and cut them. Glue a toothpick to the outboard side on the underneath sides under the smooth edge.
Score up the sides on the main spans, where the side rails will go, with sandpaper. Also score up the side rails on the smooth side. Then glue/cement the side rails (ridge sides up) on the sides of the main span, smooth sides outboard, flush with the toothpicks. You may want to gently apply clothespins/clips in lieu of squeezing with fingers until set. But too much pressure can damage your work. Now, glue a toothpick lengthwise on the inboard side of the side rails
Next you are going to make two Xs on each span on the ends away from the hinge.
Start by cutting and taking the middle third of toothpicks and glue down ‘girders’ at the halfway and quarter points. You can use the other thirds to make the diagonal girders.
When all parts are set, temporarily tape the two main spans back together lengthwise with painters tape or similar easy removable tape. Mark the tape on the bottom side to show where the hinge barrel is
Now comes the trickiest bit of assembly.
You are going to glue/cement the 4 (styrene/sprue rods) pylons to the underneath of the main span(s). Score patches on the bottom side of the spans. Apply glue/cement to the rods, then carefully center the shelf sub-assembly so each pair of ‘pylons’ will be glued to the span pieces. I find p/s glue is more forgiving in this step while centering on the multiple X and Y axes. Hold in place with gentle pressure. After 30 seconds or so, you can gently wrap the painter’s tape around to the hinge area to hold pressure.
Set aside to get a good bond. (I usually let this set overnight.) When set, glue the trailing toothpicks down to the corners of the main span. Important – Rushing this step can unset the pylons.
Right. Last bit of assembly. One last toothpick per bridge side. Cut a toothpick in half. Start at one bridge half. Glue the thicker side of the toothpick to the bottom edge of the span near the hinge, gluing it down to the out side of the bottom toothpick on the hinge shelf. When dry, cut the toothpick off flush with bottom of shelf. Next take the same piece, dry fit, then snip off a tiny corner as necessary, and glue it from the top back to the shelf to make a W.
Repeat. WW Now do the same for the other side. You may of course make more Ws, but the party is in 3 months and you want 2, maybe 4 of these beasties. Tidy up by trimming off excess bits.
Ok. Done. Well, one last OPTIONAL step. Find a bit of sprue or similar to make a hook on your bridge.
Glue it to one of the down facing sides of shelf hinge.
You can field your AVsREs with their SBG’ tee-pee’d on their decks or you can do something a bit more dynamic. The idea is to use a loop of thread or dental floss around your tank hooked on the bridge. You’re an engineer now, you can sort that out. For your officers, tell them to make a loop of dental tape, thread, hobby ‘cable’, etc 9 and 1/2″ long. Loop your ‘cable’ around the hook, through the hinge/pylons, around your tank lengthwise, go under, over the bow and hook the cable back on the hook of the bridge.
Now, it is just a matter of priming, painting and detailing your bridges. I use a rattlecan of green to prime, then base coat with whatever I use on my Brit armour – usually Russian uniform. Then I use flat black on the insert areas. A bit of a wash will enhance the ridge bits on the side rails. Now, for me, a big X to denote this is my 10th bridge I’ve made. I guarantee your mounted SBGs will be the belles of the beaches. Remember, the bridge is deployed during the shooting step after movement. Good Luck!If you’re after more Funnies inspiration, you can of course check out Adcock’s Funnies…
The 8th Armoured Brigade were one of the most experienced British Armoured Brigades in WW2. They had initially been formed in July 1941, from parts of the 6th Cavalry Brigade in Iraq and Syria and began training with Honey tanks. In 1942 they were brought up to strength with more Honey Tanks and Grants, only to have then taken away just before the Battle of Mersa Matruh in June 1942, and given as replacements to more experienced units. They were joined by the 3 rd RTR Lt Col “Pip” Roberts, and then in August sent to join XXX Corps as part of the 10th Armoured Division.
Their first action came at the end of August, at the at Bir Ridge in the Battle of Alam El Hafa, against Rommels abortive attack on the right flank in the prelude to the Second Battle of El Alamein. They took part in this battle as part of the 10 th Armoured Division and in Operation Supercharge, and had at the time 24 Crusaders, 57 Grants and 37 Shermans. They also were involved in the Allied push into Tunisia and the Mareth Line in early 1943 with XXX Corps as part of the British 8th Army. The Order of Battle in October 1942 was as follows:
3rd Royal Tank Regiment Nottinghamshire (Sherwood Rangers) Yeomanry Staffordshire Yeomanry (Queens Own Royal Regiment) 1 st Battalion Buffs (Royal East Kent Regiment) – Infantry 1 st Regiment, Royal Horse Artillery 97th (Kent Yeomanry) Field Regiment, Royal Artillery
They fought the remainder of the Axis forces in Africa until they surrendered on the 13th May 1943. Interestingly they were involved in some of the first battles against the Tiger I, in the Battle of Wadi Akarit, around the 6th and 7th of April. They had been fighting almost constantly for almost a year and at the end of the fighting in Africa, they were one of the
most experienced Brigades in the British Army.
The Brigade then made their way back to England in December of 1943, and after a period of extended leave, they were told they were going to be involved in the Invasion of Normandy, soon after the New Year. The high level of experience that they had gained during their Africa fighting, contrasted with many of the other units that were earmarked to be involved in the Normandy Invasion, many of which, had not seen any fighting since the Battle of France in 1940.
To spread the experienced units out to the other Armoured Divisions and Brigades, two armour Regiments from the Brigade were exchanged out. The 3rd RTR was exchanged with the 24th Lancers from the 29th Armoured Brigade in the 11 th Armoured Division, and the Staffordshire Yeomanry was exchanged with the 4th / 7th Royal Dragoon Guards from the 27th Armoured Brigade, another Independent Armour Brigade. There was also a new support regiment of artillery with the new self propelled 25pdrs (Sextons) and an attached Motor Rifle Battalion of the Kings Royal Rifle Corps.
Sexton self-propelled gun of 147th (Essex Yeomanry) Field Regiment
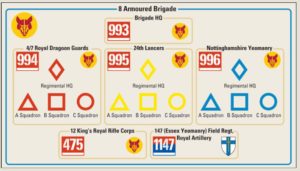
The Order of Battle for D-Day 6 June 1944 was: 4th / 7th Royal Dragoon Guards 24th Lancers Nottinghamshire (Sherwood Rangers) Yeomanry 12th Battalion – Kings Royal Rifle Corps 147th (Essex Yeomanry) Field Regiment, Royal Artillery
They were once again under XXX Corps on D-Day and would be involved in the assault on Gold Beach, an 8km stretch of beach between the Omaha and Juno Beaches. Gold Beach was defended by elements of the 716th Static Infantry Division and the 352nd Infantry Division. The assault on Gold Beach was made the by 50th Northumbrian Division (TTs), the 56th Independent Infantry Brigade, and was to be supported by the 8th Armoured Brigade.
The 8th Armoured Brigade had worked closely with the 50th Northumbrian Division in Africa, so it made sense they would help them in the assault here. Two Regiments of the 8th Armoured Brigade had been training with special DD Sherman (Duplex Drive), amphibious tanks, with the tanks designed to lead the assault onto the beaches and to provide cover and support fire for the assaulting infantry. Unfortunately there was not enough Sherman DD tanks available in time for D-Day, for the whole Brigade, and the 24th Lancers had standard Sherman tanks issued. As such, they could not join the battle until the beaches had been secured.
The Primary Objectives on D-Day for Gold Beach was to seize the town of Bayeux, the Caen-Bayeux road, and the Port of Arromanches; the Secondary Objectives were to make contact with the Americans landing at Omaha Beach to the West and the Canadians landing at Juno Beach to the East.
The DD tanks of the Nottinghamshire Yeomanry (Sherwood Rangers) supported the assault on the Jig Green section of Gold Beach with the 231st Infantry Brigade and followed by the 56th Infantry Brigade. While on the King section of Gold Beach the 4/7 Royal Dragoons helped support the attacks of the 69th and 151st Infantry Brigades.
As the water was very rough and choppy on D-Day, the Sherman DD tanks were released only a few hundred yards out of the shore, instead of the 2 miles out as first planned. This turned out to be very lucky for both Regiments involved, as even that close to shore, tanks were lost to the rough seas. The 4/7 Royal Dragoons lost 5 tanks, and the Sherwood Rangers
lost 8. If they had been released 2 miles out to sea as planned, it is very likely most would not have made it onto the beach.
This unexpected armoured assault on the beach surprised the German defenders, as they had not expected any Allied armour on the beaches until at least 5 hours into the invasion. Throughout the day both Regiments had all three squadrons committed continuously, and all objectives were obtained by the end of the day.
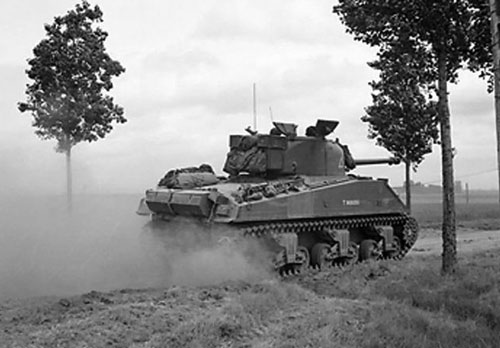
Sherman VC Firefly of 24th Lancers near Saint-Léger, 11 June 1944
On the 7th of June (D-Day +1), the 3 rd Regiment of the Brigade landed, the 24th Lancers, as well as their other supporting units. For the next 25 days the Brigade was involved in supporting many infantry divisions (50th and 49th ), in successful assaults on German positions around Bayeux, Tilly-sur-Seulles, and Villers Bocage. But the fighting was very heavy, with
the British facing the majority of German armour in Normandy, as well as hand held anti tank weapons like the Panzerfaust, and anti tank guns like the Pak 40. Over 25 days, 146 tanks were lost or put out of action, while claiming 86 German tanks and self propelled guns knocked out over the same period.
The 8 th Armoured Brigade would continue fighting through France and into the Netherlands and Belgium and finally into Germany in 1945 until the German surrender on the 4th May 1945. Having fought from one end of Africa to the other, and then chased the Germans from France and all the way back to Germany, and were involved in almost all of the major
battles along the way.
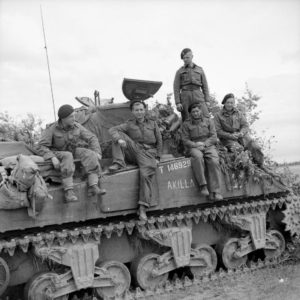
The crew of a Sherman tank named ‘Akilla’ of 1st Nottinghamshire Yeomanry, 8th Armoured Brigade, after having destroyed five German tanks in a day, Rauray, Normandy, 30 June 1944.
So how am I going to represent this on the tabletop? Well as this is for the British D-Day book release, I should probably start there! So it would seem picking a Formation would be the first step. As this Brigade was involved with the Landings on D-Day, picking a Sherman DD Armoured Squadron Company would seems apt. As in the early days of the D-Day battles this was exactly how this Brigade was organised, and it was not until July 1944 they moved back to standard organisation. Also, I need to be a bit different, so I chose the 24th Lancers, that is because they were a bit different too ……
The squadron had a strange unit organisation, as there was not enough available Sherman DD tanks, they had standard Sherman III and Firefly tanks, but still had the Sherman DD tank organisation. So they had as standard troops of 3 Shermans, but kept their Fireflies as a separate Troop of 3 Firefly tanks. This was different to how most other standard Sherman equipped units would operate, as they would typically attach one or even two Fireflies per troop (later in 1944) in case they ran into heavy German armour that their normal 75mm guns could not penetrate. They also had a Firefly attached to each Squadron HQ unit, so a full HQ for the 27 th Lancers would have 3 Shermans and a Firefly (12 pts + 5 pts) for 17 pts.
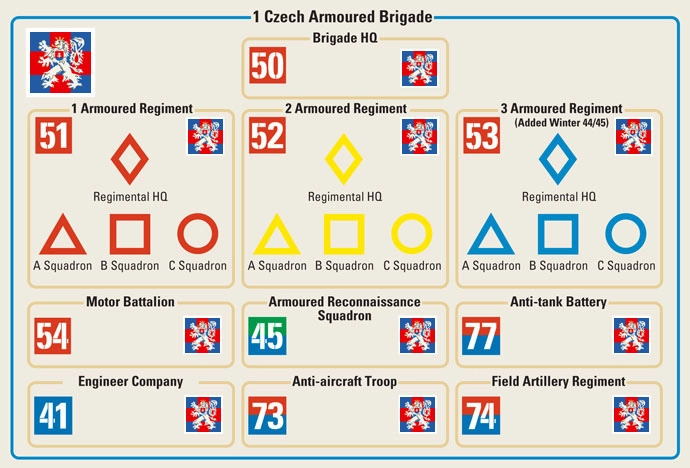
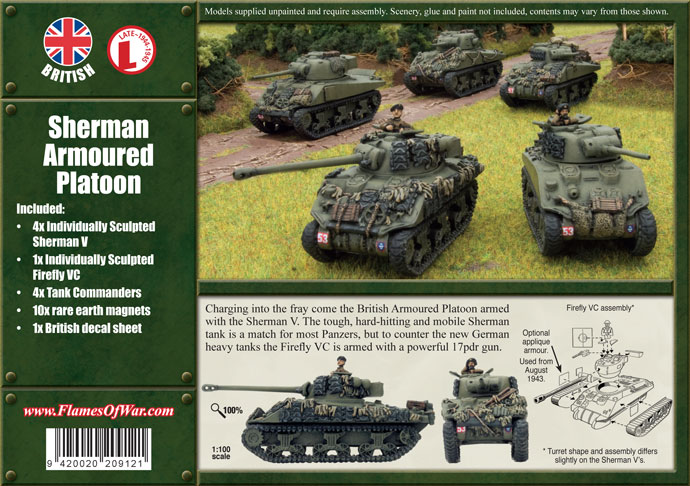
Also I thought I could take this opportunity to use up some old models from the metal/resin British Sherman kit (BBX08) that had the wonderful stowage and other things like track lengths modelled onto it, and to make them even more different, I was going to get special decals made up to match their historical markings. I think I’ve mentioned this before, but I really love building a force like this, as I then have to do extra research to find out what markings the Formation and support tanks have. Luckily as you can see above, in a previous article, they have done a lot of the hard work for me. So if I chose B Squadron, of the 27th Lancers they would have a yellow square, on the side of their turrets, a red and white 995, for their
arm of service flash, and the yellow and red Fox Mask for their unit symbol. Similarly it has the information for any attached Motor Platoons (475) and the Sextons (1147) that historically supported the 8 th Armoured Brigade. See below the Command Cards for using Sextons and M5 half tracks that the Motor Platoons of the Kings Royal Rifles would have used to keep up with the Shermans.
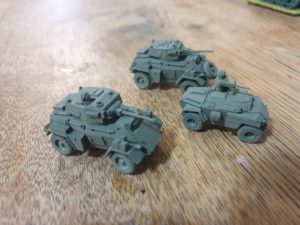
Also in another attempt to be different, I really felt that I “needed” Humber IV armoured cars, and Humber scout cars in my Force. As the Brigade did have Humber Scout cars as communication vehicles between the Scout Stuart tanks and the Squadron HQs. I mean don’t we all “need” these…… In game the Humber scout car and Dingo scout car would almost the same, stat wise, and the same for the Humber IV and the Daimler. So I converted
up some Humber IVs by using the Mid War Humber kit and cutting off the 15mm Besa MG, and adding a bit of plastic and the spare 2pdr gun barrels from the MW Valentine kit, and viola! A Humber IV armoured car! Add a Humber Scout Car, and you have a Humber Armoured Car Patrol, for 2 pts.
So let’s have a look at a 100 point list using this force…. I will say that the HQ is not strictly legal, but I’m sure in friendly games with reasonable opponent, if you explain what you are trying to do, most will let you re-create an historical force like this. Especially if you have gone to the effort of researching and modelling everything, just don’t expect to be able to take something like this to a tournament.
Sherman DD Armoured Squadron
Sherman DD Armoured Squadron HQ – 3 x Sherman (75mm), 1 x Firefly – 17 pts
Sherman DD Armoured Troop – 3 x Sherman (75mm) – 12 pts
Sherman DD Armoured Troop – 3 x Sherman (75mm) – 12 pts
Firefly Armoured Troop – 3 x Firefly (17 pdr) – 16 pts
Stuart Recce Armoured Troop – 3 x Stuart (37mm) – 6 pts
Crusader AA Platoon – 2 x Crusader A/A – 3 pts
Support
Humber (Daimler) Armoured Car Troop – 2 x Humber IV, 1 x Humber Scout Card – 2 pts
Humber (Daimler) Armoured Car Troop – 2 x Humber IV, 1 x Humber Scout Card – 2 pts
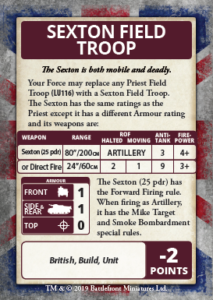
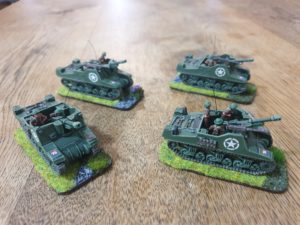
Sexton Field Troop – 4 x Sexton (25 pdrs) – 14 pts
Motor Platoon – 4 x Bren Gun Teams, 1 x PIAT, 1 x 2” mortar – 7 pts
Typhoon Fighter-Bomber Flight – 2 x Typhoons – 8 pts
Command Cards
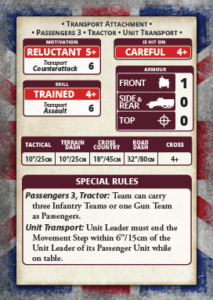
M5 Half Track Transport – 1 pt
Sexton Field Troop
So from the list above, I have plenty of points in my Formation, with some versatile 75mm Shermans and also some Fireflies to take out any really tough armoured targets. Some of the lovely new plastic Stuarts to spearhead and harass light armour, and some Crusader AA tanks, to just hoon around and look cool! I am really looking forward to the new plastic Crusader AA Troop, I think it will be a blast to make and also to use on the field. I really do like self propelled AA for some reason……
We have the Motor Platoon to either quickly hold or take an objective, and two units of my new favourite Humber Scout cars to either block off/limit an opponents spearhead, and generally just harass enemy light units, and make infantry think twice about getting out of their foxholes and advancing.
I also have the Sextons, which with their 25 pdrs can be a reasonable anti tank unit in a pinch, but also give me mobile artillery and smoke options, and the cheaper cost compared to the Priest, allowed me an extra Armoured Car Troop. Also another of my favourites is the Typhoons! I am also really looking forward to the new plastic kits that Battlefront will be bringing out for their planes.
I have painted up a test Sherman, to see how the custom decals went, and also how I like the paint scheme I “borrowed” from Chris and his Big 4 of Late War British- Pretty happy with it …. now to paint the extra 20 or so models…
I hope to have an update for you soon with some more units painted and also some info on the other units the 8th Armoured Brigade would have had in support!
Over the last few months I have been learning to speak Czech with the only guy in Auckland who responded to my email blast looking for tutors, and who gives up his Sundays to teach me. It’s been really great.
Coming from a Czech family, but having never been taught the language, it has been something I’ve been wanting to do for a long time and I’m thoroughly enjoying the process. Of course, on top of fulfilling a decade-long aspiration of mine to give learning Czech a proper swing, the last few months of reading, listening, and speaking has inspired my hobbying as well.
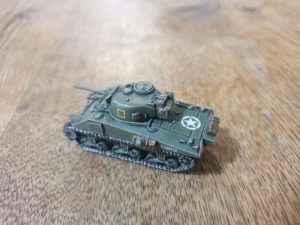
I’m currently working on a D-Day: British force based on the Czechoslovak Independent Armoured Brigade, and part of that is building an objective.
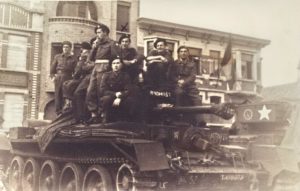
Through my research on images to inform my modelling decision, I came across a picture of a CIAB Cromwell named after the Czech mountain Radhošt. This is the perfect image for re creation as an objective piece.
The crew on top have proven to be something of an issue in finding guys who match, but a little jiggery pokery and some creative license and I think I can capture the general look and feel of the photograph.
Mock-up pictured above. I’ll need to snip off bases, weapons, and webbing, and replace the helmets with berets, but overall I’m looking forward to giving this project a crack.
Might have to run an objective competition on the Flames Of War Facebook page so I have somewhere to enter this bad boy…
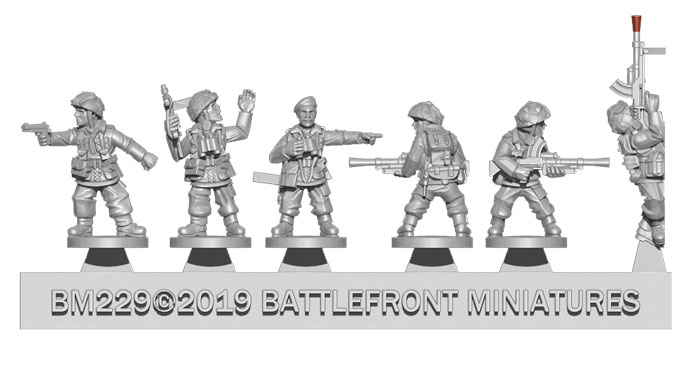
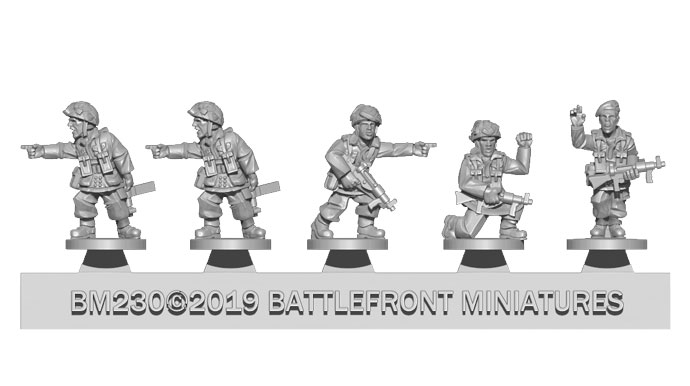
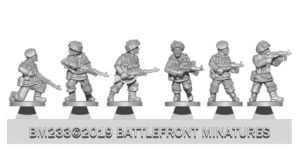
With the release of D-Day: British comes the first of our Thermoplastic figures, the British Airborne.
Since Thermoplastic is a relatively new technology, and as working with it is slightly different to any of our other plastic figures, it’s worth taking you through a few primers on how Thermoplastic behaves and how you can get the most out of our new figures.
The process through which the new figures are cast is similar to other casting methods for the plastics we offer- injection moulding of heated plastic. The point of difference with the new Thermoplastic technology is that the figures are cast in flexible moulds. The flexible moulds allow for undercuts, which means more detail on the figures can be cast, and that detail is much truer to the original design. Flexible moulds also allow us to broaden the number of poses we can deliver with the range of figures, meaning our infantry forces are about to get more dynamic than ever before.
None of these technical details are truly that relevant to us as modellers, but it is important to know that this casting method holds the fine detail we’ve all come to expect from Battlefront figures
Thermoplastic is a lightweight plastic with a medium amount of flex. Thermoplastic figures come on a sprue similar to the flexible plastic infantry, with eight or so figures on a single strip of Thermoplastic. Before you get started on your infantry, there are a few key differences between Thermoplastic figures and other infantry materials
Prep
As is the case with all miniature casting processes, Thermoplastic casting can occasionally leave a little flash or sometimes lines where the two halves of the mould join together. To clean these up you need to run a sharp hobby blade along the mould lines to slice them off flush with the actual figure. Filing or scraping the figure isn’t recommended and will leave a feathery residue behind. The Thermoplastic material can be cut or drilled out the same as any other infantry figure, so if you want to do head swaps or any other conversions, you will be able to as usual.
Gluing
Thermoplastic isn’t quite the same plastic as the stuff our hard plastic figures or vehicle kits are made of, and as such won’t weld with plastic cement. We recommend you use superglue to fix figures to their bases. You will also need to use super glue if you are doing any sorts of conversions on the figures themselves.
Painting
As always, it’s recommended to prime your figures before you paint them. Just like the flexible plastic figures, no paint will flake off the miniature with regular day-to-day flexing, however that doesn’t mean you shouldn’t prime the figures anyway to ensure paint adhesion. In any case, painting the new Thermoplastic figures offers no new difficulties or differences from your regular painting routine.
We are excited to get the first of our new figures out and in your hands for D-Day: British, and we are really looking forward to getting the most out of this new material as we refine and improve the process.
As the release of the new World War III British book approached Alex mentioned to me that while effective, the green and black scheme used by the British forces in Europe looked a little plain and is there a way to enhance the look … challenge accepted.
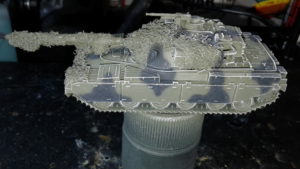
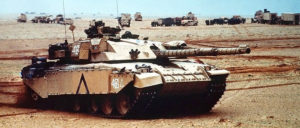
The new Challenger 1 MBT looks amazing, however I didn’t have access to one of the models at the time, so the next best thing to a Challenger is a Chieftain, so that was the model I chose to use for the purposes of this attempt to make this basic scheme look a little more of a visual feast.
The first step was to look at a few pictures of the vehicle in the field in order to get a sense of how it looks in service and anything that crews commonly did to aid in concealment while in combat (or on exercise in this case).
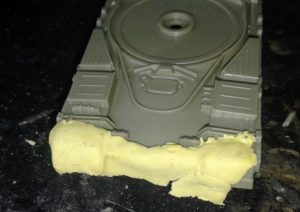
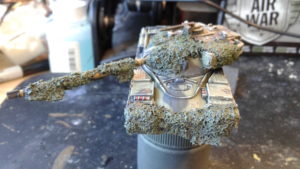
The first thing that is easily noted from photographic records is the preponderance of crews draping their vehicles with camouflage netting in order to break up the outline when in trying to remain undetected in prepared fighting positions peppered throughout the treelines of West Germany, so I began by adding ‘netting’ around the turret, hull front and gun tube. This was achieved by first making shapes out of Muliput modelling putty on the model, these would form the base of the ‘net’. To make this netting appear more realistic when applied you should do your best to avoid covering up optics and access points.
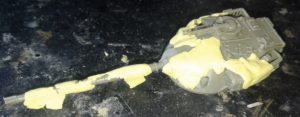
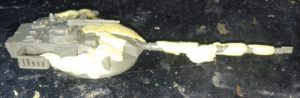
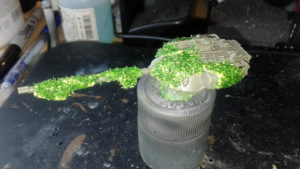
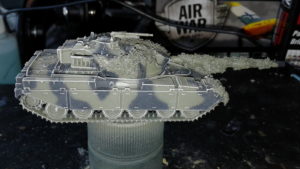
Once the Miliput was set, I then thinned down white glue with water and coated the putty with this mixture. I then liberally sprinkled Noch brand model railway scenery ground clutter material over the puttied areas, then tamped down the ‘net’ with further watered down white glue, then I waited for this to set. The following photo is what the end result looks like.
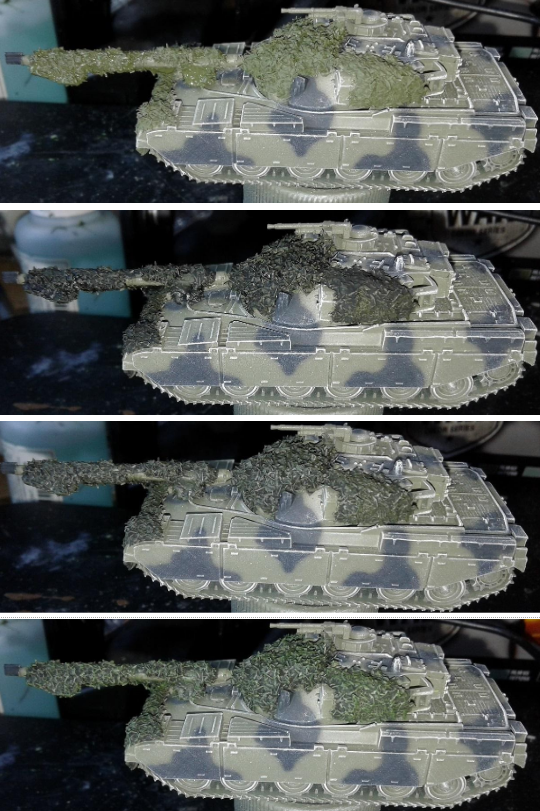
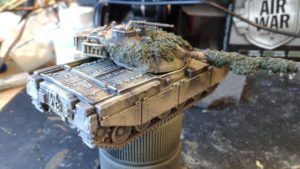
When the ‘net’ was dry, I gave the model an all over coat of Vallejo surface primer. This helps to fully secure the net to the model, homogenise the colour of the model before painting, as well as giving the following paint coat something to ‘bite’ into. With the undercoat dry I moved on to painting the green and black camouflage scheme on to model. I started with a basecoat of the old Team Yankee ‘Chieftain Green’ as this would allow the best comparison between this model and one that I had painted for ‘Iron Maiden’.
I then used my 0.15mm airbrush to spray on a random pattern of black shapes using Vallejo Model Air NATO Black, to form the camouflage pattern.
Then drybrushed the edges and raised details of the model with Vallejo Model Color Pale Sand, as a way of making these features more distinct.
Following the edge highlight I proceeded to paint the ‘net’ with the green side out. I started by painting it with Vallejo Model Color Camouflage Olive Green. Once this coat was dry I applied a black wash to the net in order to it some ‘depth’. When the wash dried I moved on to giving the net covered areas of the model a heavy drybrush with Camouflage Olive Green so that only the deepest recesses remained stained with the black wash. The net colour was finished off with a light drybrush of Vallejo Model Color Medium Olive on the highest parts of the net, to simulate light catching these parts of the net.
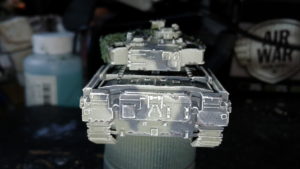
The net colour is now in pretty shape so I moved on to adding a few paint chips and scrapes over the camouflage paint. This helps to make the vehicle look a little less factory fresh. I started by identifying parts of the Tank were paint would be chipped or worn off, around track guards, hatches, corners and stowage baskets are excellent places for this treatment. I started off by painting small random shapes of Vallejo Model Color Green Grey (over green parts) and Vallejo Model Color Grey Green (over the black parts) to simulate the slightly lighter colour of the worn and chipped edges of the paint.
I then used small amounts of Vallejo Model Color German Camouflage Black Brown in the centre of the wear marks to simulate chips and scrapes that had gone all the way down to the primer paint. One of the keys to using this technique is to add the amount of paint wear that is appropriate to the subject, so in the case of this Chieftain it is supposed to be a vehicle in current service but as yet to be involved in battle, therefore some paint damage is realistic, but not too much.
Satisfied with the amount of paint wear I moved on to painting all the small details like optics, Machine Guns, fire extinguishes etc.
After painting the details I sprayed the model with an all over gloss varnish.
Once this was set and dry I used a black enamel wash, when mostly set I cleaned this up with white spirits, leaving only the most indented details black.
I then used my precision airbrush to spray on a coat of a dusty colour on the lower surfaces of the model to simulate a dust layer building up as the vehicle moves.
The final step for completing this model was to add some streaks of grime that has run down vertical and near vertical surface of the vehicle as moisture has picked up the grime. For this step I used Vallejo Environment Streaking grime.
When work started on WWIII British and we were seeing early prototypes of the Challenger model, it didn’t take much convincing to decide to do a new British force.
The idea of doing a desert force appealed to me as I’ve already been painting a lot of green with black camo on my WW2 Americans, so I chose to theme the army for the Gulf War, or Operation Granby.
I came up with these forces trying to maximise Challengers, while also getting some cool new Warriors in there, and useful recon.
A few of us in the office are planning to do some fun “big boy” games at 150 points, and that will allow me to field a more complete company of Challengers, while only having to paint three extra tanks and some aircraft.
(The British were using Panavia Tornados in the Gulf, so I’ll use those models with Harrier stats)
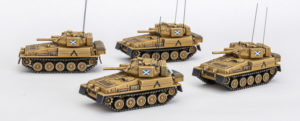
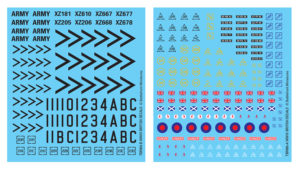
I worked together with Casey on updating the British decals, and I was keen to get the markings for Gulf War forces in there. We’ve got the Chevrons and large numbers, as well as the little Desert Rat symbols. I also found a few pictures of tanks with Scottish flags, and that is what I’ve chosen to use on my force.
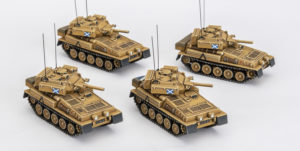
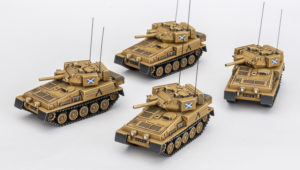
The Scorpions were the first platoon I decided to work on while we awaited the arrival of the new plastics. They’re a great little kit and are a good way to test a new scheme quickly since they’re so small.
Painting for these was pretty straight forward, and I’ve kept them clean. I can go back an add pigments/dusting later but I’ll wait and see how the Challengers turn out first.
The yellow base colour has possibly turned out a bit darker and more saturated than the real thing, but I think it’s in the ball park.
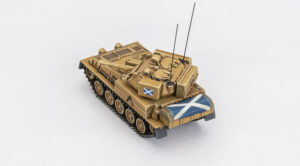
I put a large Scottish flag on the back of the platoon commander, which I will probably implement on the Challengers too.
I’m looking forward to getting the new toys as much as you all are I’m sure, and this army will be a joy to paint.

 With James Brown
 Bending The Wire
 Bending The Wire
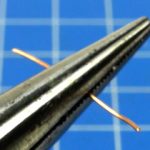

 After quite a lot of experimentation with different heat sources, I have come to the conclusion that it’s not worth the effort. By all means give it a try if you’re feeling brave – you can get some very effective-looking results if everything goes right. But I think the best option is the simplest: just grip the mudguard firmly with your pliers and bend it by brute force.
 Unditching Logs
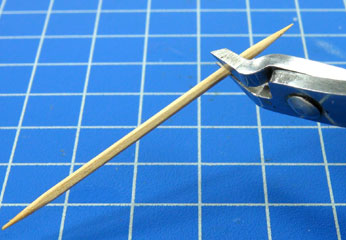 Unditching Logs
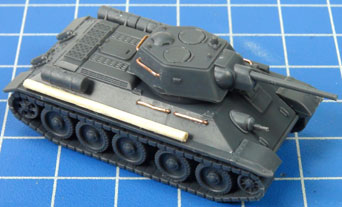
 “Sergeant if you look at anyone else’s tanks they’re bare hulls, maybe a little kit in the bustle but our tanks, Sergeant there’s more kit on theses tanks than in the quartermasters shop, look at that one, does that tank have a DShK on it?
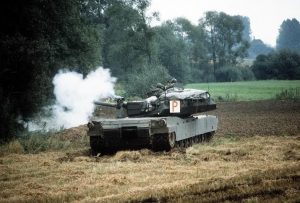 The Lt looked down, and then back at the tanks. “Sergeant, is that a case of beer on the back of that tank?”
 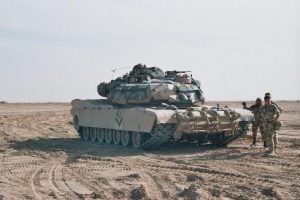 All you need to do is type in Abrams in google and you’ll find pages upon pages of pictures of Abrams tanks through the years, and every single one looks different. But the pictures give great inspiration for stowage, paintjobs and just getting the models on the table. I tried to find pictures from Operation Reforger and other major exercises but also looked for inspiration in the conflicts in Iraq. While I didn’t want to put on all the really modern pieces like recognition panels and such there were tons of examples of how to stow kit on a high speed tank.
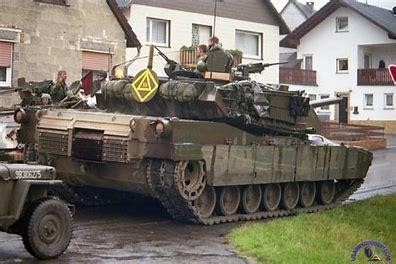 I didn’t have too look far to find what I needed to accomplish this. Battlefront is amazing at providing us with extra pieces of kit to customize our forces and make them not simply markers on the table but our own private armies to command. Looking at most sprues you’ll find extra pieces, boxes, road wheels, guns and such, all ripe for the picking and enabling us to make our toy tanks individual and our own.
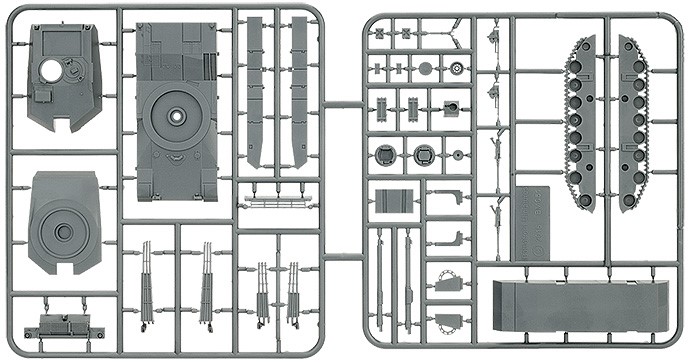


 Score up the sides on the main spans, where the side rails will go, with sandpaper. Also score up the side rails on the smooth side. Then glue/cement the side rails (ridge sides up) on the sides of the main span, smooth sides outboard, flush with the toothpicks. You may want to gently apply clothespins/clips in lieu of squeezing with fingers until set. But too much pressure can damage your work. Now, glue a toothpick lengthwise on the inboard side of the side rails
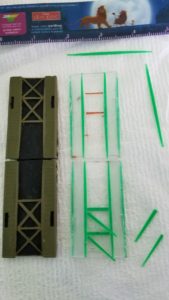 Next you are going to make two Xs on each span on the ends away from the hinge.
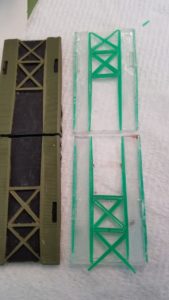 Start by cutting and taking the middle third of toothpicks and glue down ‘girders’ at the halfway and quarter points. You can use the other thirds to make the diagonal girders.
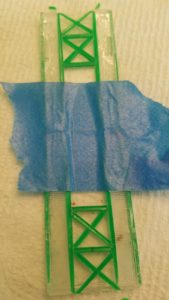 When all parts are set, temporarily tape the two main spans back together lengthwise with painters tape or similar easy removable tape. Mark the tape on the bottom side to show where the hinge barrel is
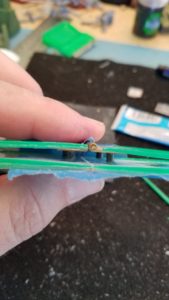

 Repeat. WW Now do the same for the other side. You may of course make more Ws, but the party is in 3 months and you want 2, maybe 4 of these beasties. Tidy up by trimming off excess bits.
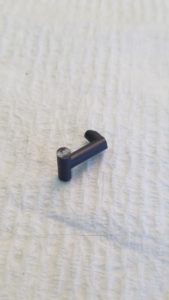 Ok. Done. Well, one last OPTIONAL step. Find a bit of sprue or similar to make a hook on your bridge.
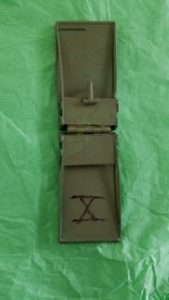 Glue it to one of the down facing sides of shelf hinge.
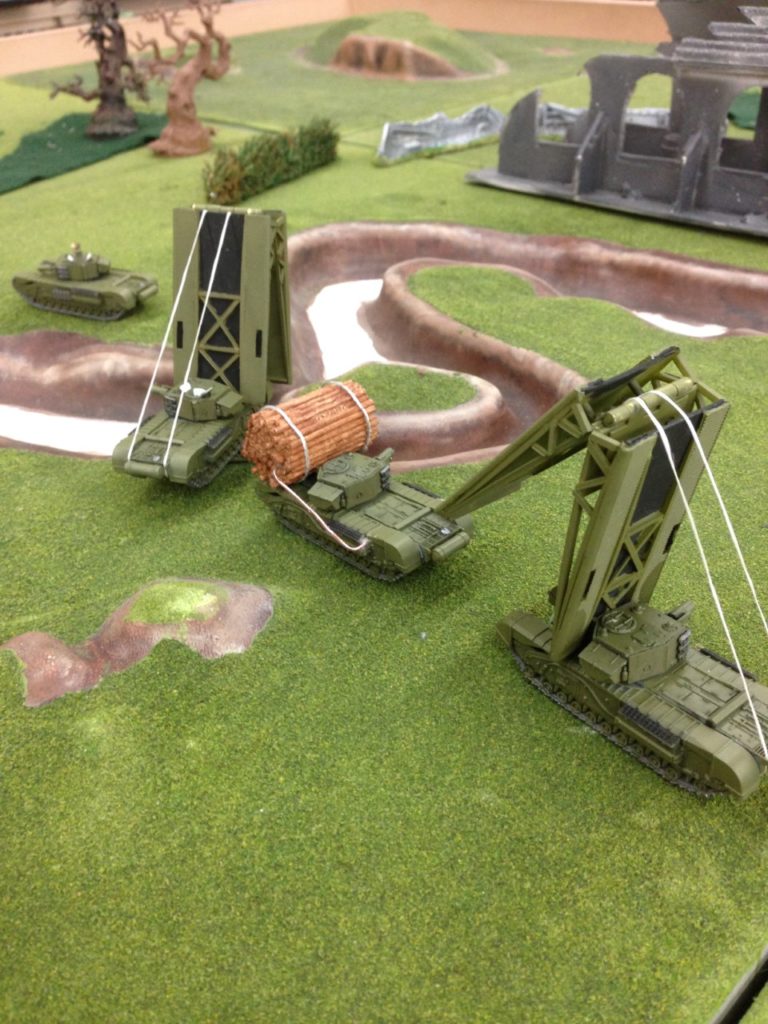 If you’re after more Funnies inspiration, you can of course check out
  The 8th Armoured Brigade were one of the most experienced British Armoured Brigades in WW2. They had initially been formed in July 1941, from parts of the 6th Cavalry Brigade in Iraq and Syria and began training with Honey tanks. In 1942 they were brought up to strength with more Honey Tanks and Grants, only to have then taken away just before the Battle of Mersa Matruh in June 1942, and given as replacements to more experienced units. They were joined by the 3 rd RTR Lt Col “Pip” Roberts, and then in August sent to join XXX Corps as part of the 10th Armoured Division.
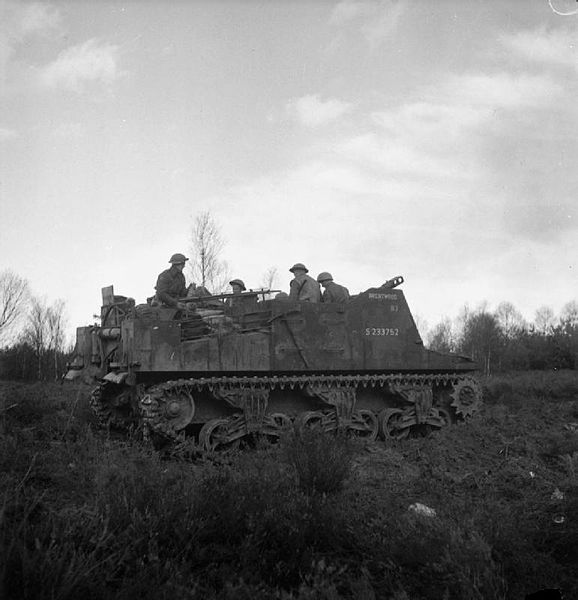
 Also another of my favourites is the Typhoons! I am also really looking forward to the new plastic kits that Battlefront will be bringing out for their planes.
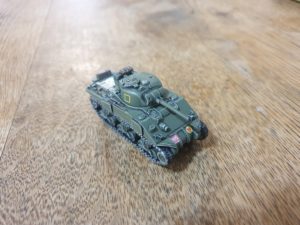 I have painted up a test Sherman, to see how the custom decals went, and also how I like the paint scheme I “borrowed” from Chris and his Big 4 of Late War British- Pretty happy with it …. now to paint the extra 20 or so models…