with Aaron Te-Hira Mathie, Battlefront NZ
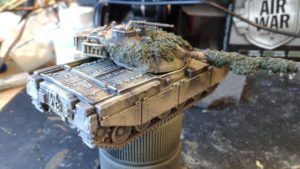
As the release of the new World War III British book approached Alex mentioned to me that while effective, the green and black scheme used by the British forces in Europe looked a little plain and is there a way to enhance the look … challenge accepted.
The new Challenger 1 MBT looks amazing, however I didn’t have access to one of the models at the time, so the next best thing to a Challenger is a Chieftain, so that was the model I chose to use for the purposes of this attempt to make this basic scheme look a little more of a visual feast.
The first step was to look at a few pictures of the vehicle in the field in order to get a sense of how it looks in service and anything that crews commonly did to aid in concealment while in combat (or on exercise in this case).
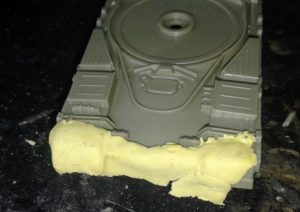
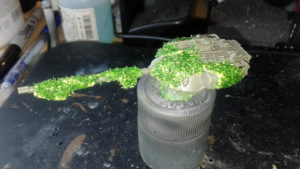
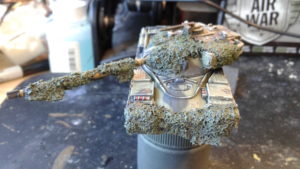
The first thing that is easily noted from photographic records is the preponderance of crews draping their vehicles with camouflage netting in order to break up the outline when in trying to remain undetected in prepared fighting positions peppered throughout the treelines of West Germany, so I began by adding ‘netting’ around the turret, hull front and gun tube. This was achieved by first making shapes out of Muliput modelling putty on the model, these would form the base of the ‘net’. To make this netting appear more realistic when applied you should do your best to avoid covering up optics and access points.
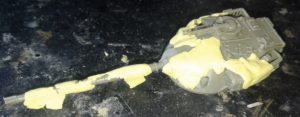
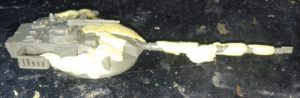
Once the Miliput was set, I then thinned down white glue with water and coated the putty with this mixture. I then liberally sprinkled Noch brand model railway scenery ground clutter material over the puttied areas, then tamped down the ‘net’ with further watered down white glue, then I waited for this to set. The following photo is what the end result looks like.
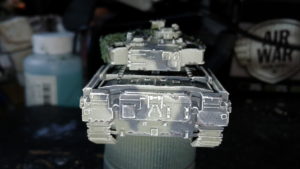
When the ‘net’ was dry, I gave the model an all over coat of Vallejo surface primer. This helps to fully secure the net to the model, homogenise the colour of the model before painting, as well as giving the following paint coat something to ‘bite’ into. With the undercoat dry I moved on to painting the green and black camouflage scheme on to model. I started with a basecoat of the old Team Yankee ‘Chieftain Green’ as this would allow the best comparison between this model and one that I had painted for ‘Iron Maiden’.
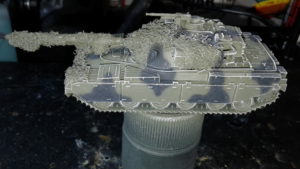
I then used my 0.15mm airbrush to spray on a random pattern of black shapes using Vallejo Model Air NATO Black, to form the camouflage pattern.
Then drybrushed the edges and raised details of the model with Vallejo Model Color Pale Sand, as a way of making these features more distinct.
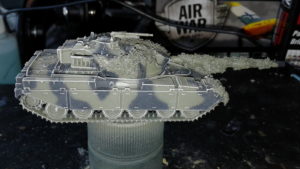
Following the edge highlight I proceeded to paint the ‘net’ with the green side out. I started by painting it with Vallejo Model Color Camouflage Olive Green. Once this coat was dry I applied a black wash to the net in order to it some ‘depth’. When the wash dried I moved on to giving the net covered areas of the model a heavy drybrush with Camouflage Olive Green so that only the deepest recesses remained stained with the black wash. The net colour was finished off with a light drybrush of Vallejo Model Color Medium Olive on the highest parts of the net, to simulate light catching these parts of the net.
The net colour is now in pretty shape so I moved on to adding a few paint chips and scrapes over the camouflage paint. This helps to make the vehicle look a little less factory fresh. I started by identifying parts of the Tank were paint would be chipped or worn off, around track guards, hatches, corners and stowage baskets are excellent places for this treatment. I started off by painting small random shapes of Vallejo Model Color Green Grey (over green parts) and Vallejo Model Color Grey Green (over the black parts) to simulate the slightly lighter colour of the worn and chipped edges of the paint.
I then used small amounts of Vallejo Model Color German Camouflage Black Brown in the centre of the wear marks to simulate chips and scrapes that had gone all the way down to the primer paint. One of the keys to using this technique is to add the amount of paint wear that is appropriate to the subject, so in the case of this Chieftain it is supposed to be a vehicle in current service but as yet to be involved in battle, therefore some paint damage is realistic, but not too much.
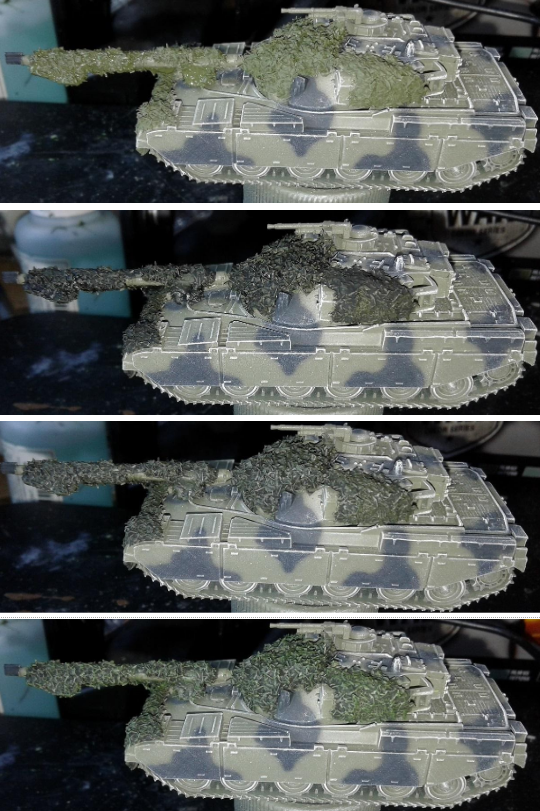
Satisfied with the amount of paint wear I moved on to painting all the small details like optics, Machine Guns, fire extinguishes etc.
After painting the details I sprayed the model with an all over gloss varnish.
Once this was set and dry I used a black enamel wash, when mostly set I cleaned this up with white spirits, leaving only the most indented details black.
I then used my precision airbrush to spray on a coat of a dusty colour on the lower surfaces of the model to simulate a dust layer building up as the vehicle moves.
The final step for completing this model was to add some streaks of grime that has run down vertical and near vertical surface of the vehicle as moisture has picked up the grime. For this step I used Vallejo Environment Streaking grime.