Shock Therapy: Hurting People With The Shock Tank Company

With Chris Allen

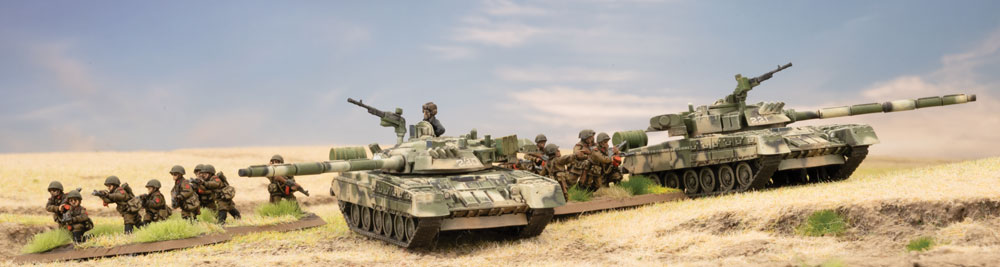
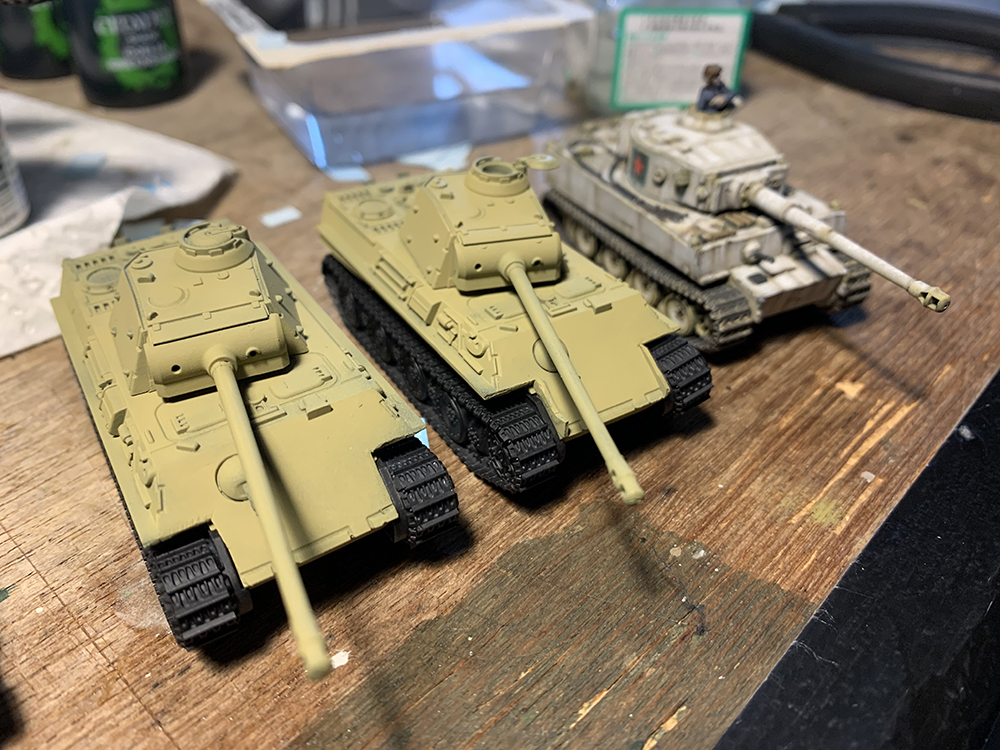
The WWIII: Soviet book is bringing all sorts of new toys and ways to play a Soviet force to the table. The most dramatic change and divergent force is without a doubt the T-80 Shock Tank Company. Formed from the 26th Guards Training Tank Division utilizing the most advanced equipment with the T-80U, BMP-3 and Tunguska, along with the most experienced officers and top second year conscripts the Shock Battalion is a whole different situation for NATO forces.

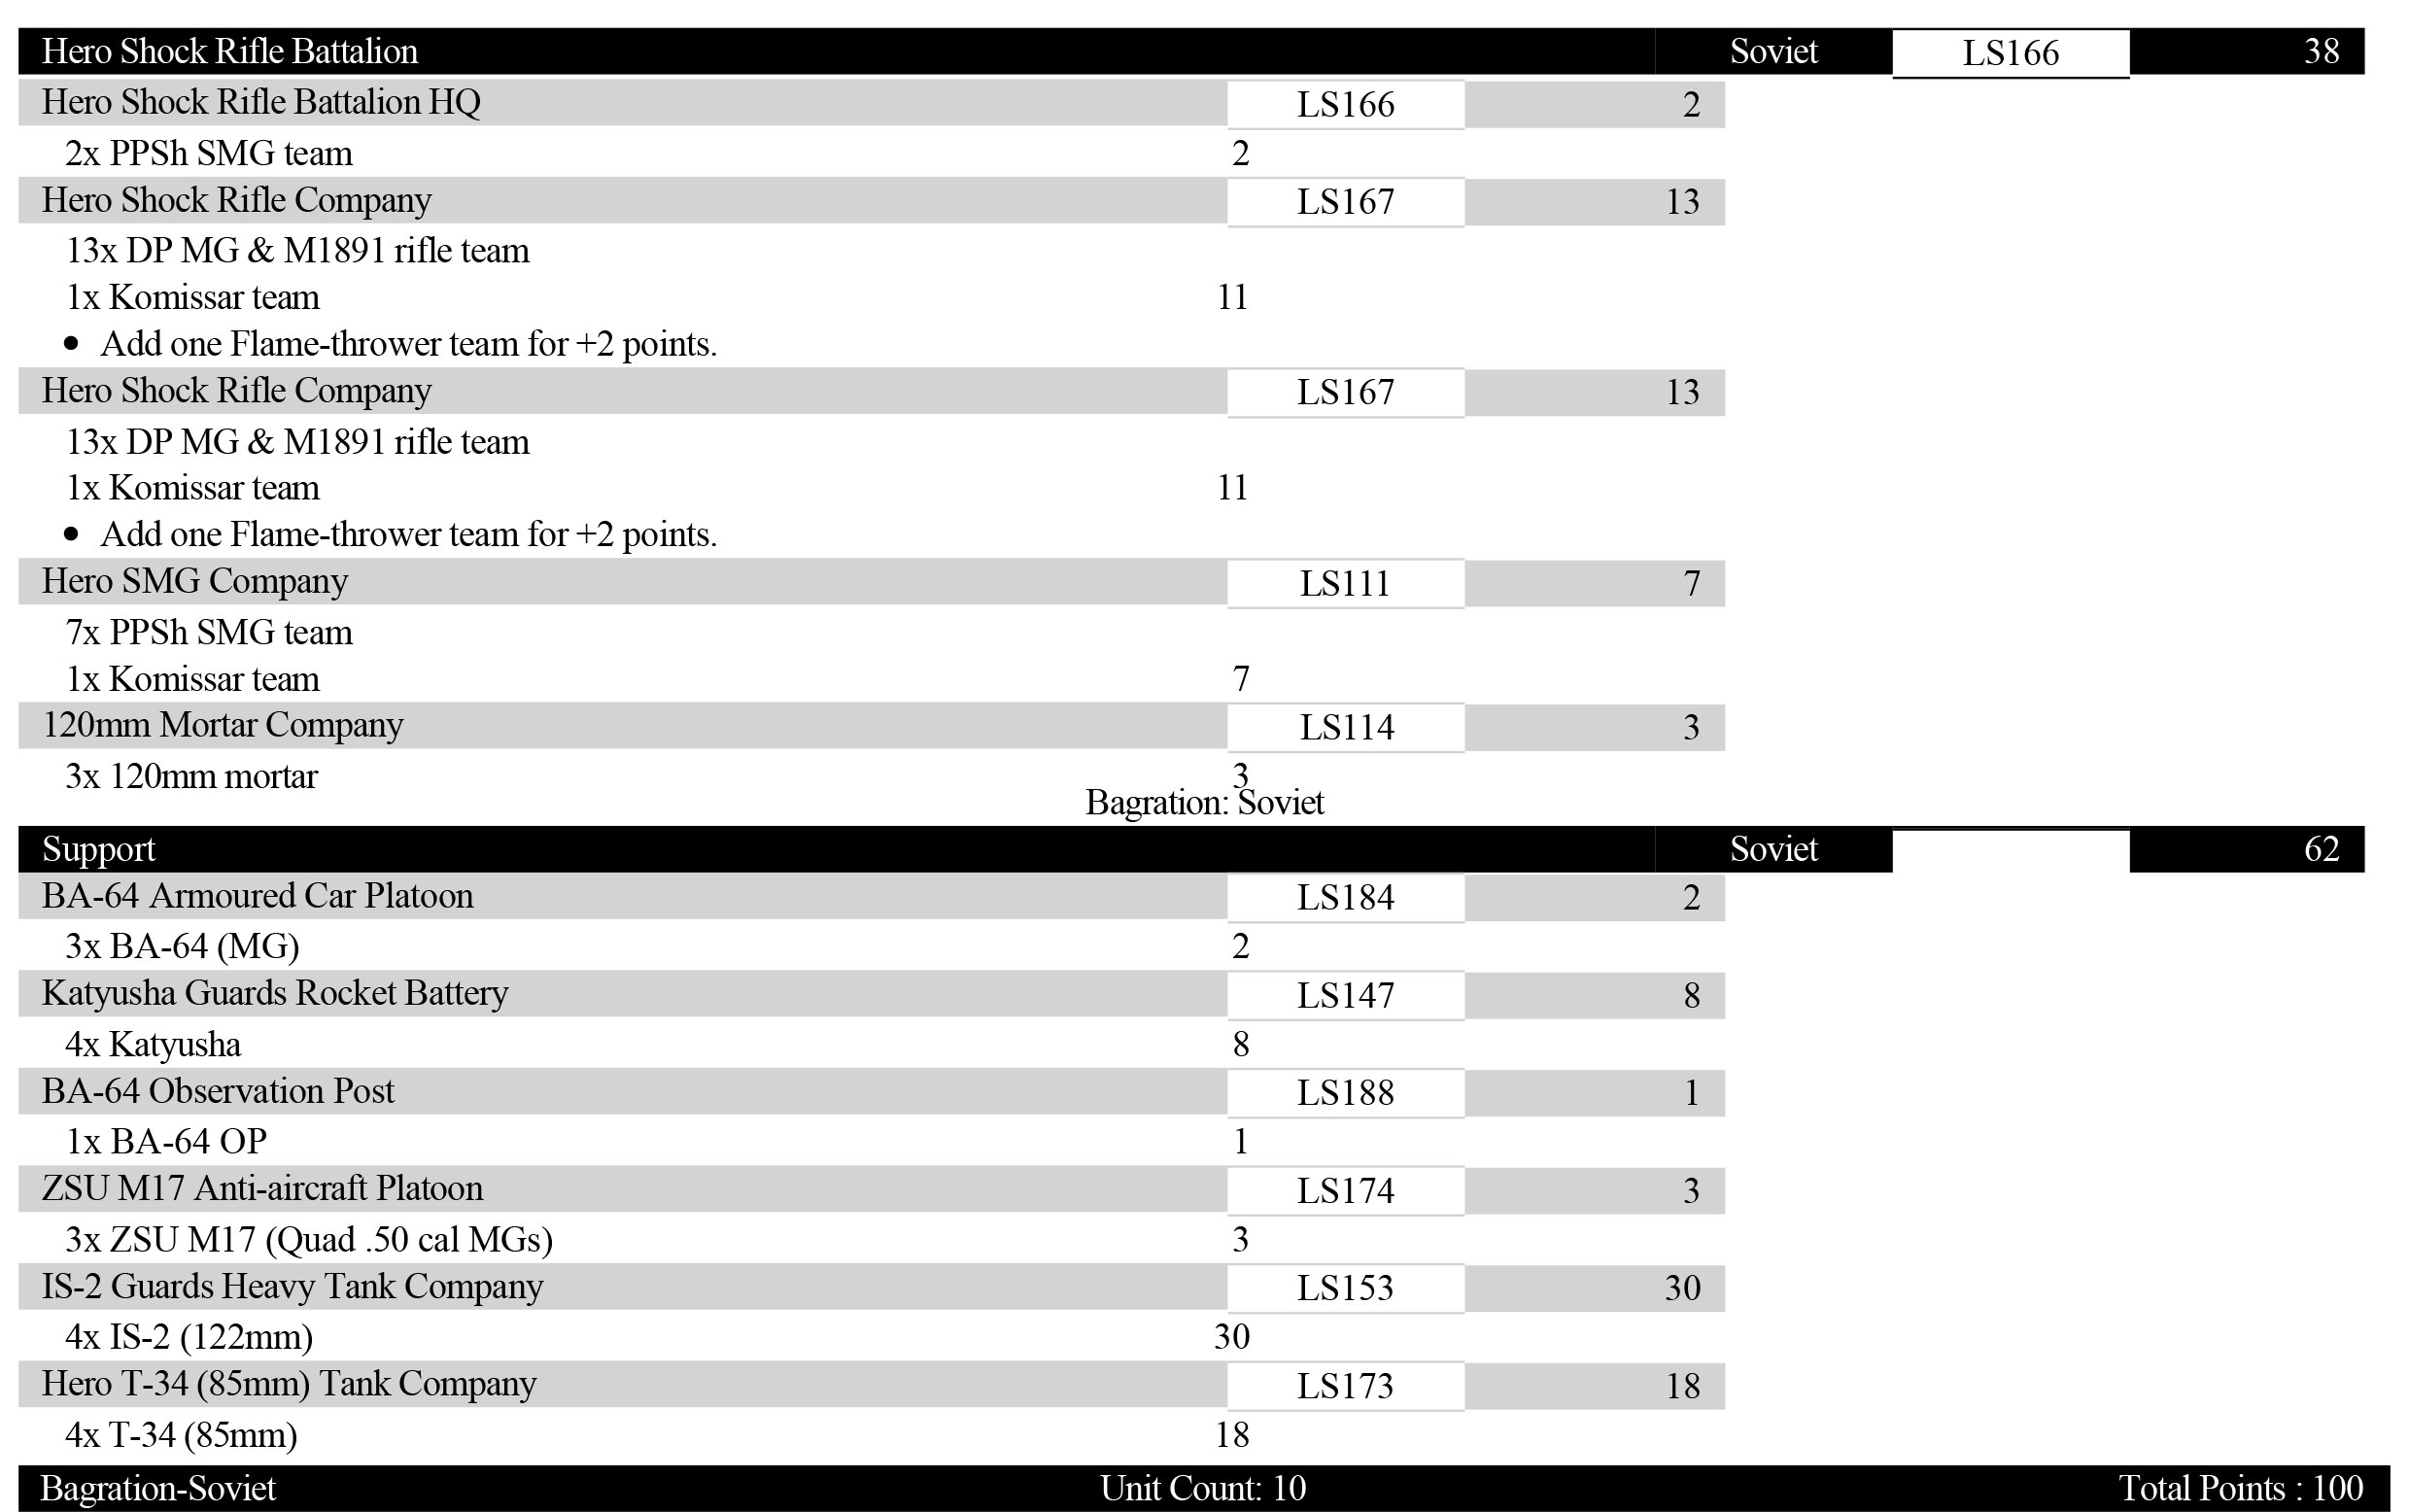
The Company is largely organized the way any Soviet Battalion would be, holding a support company of infantry, and platoon artillery, anti-air and reconnaissance support

Organization – tank platoons in a coy. But where you would normally have 2-3 companies of tanks, here you find 2-3 platoons of tanks.

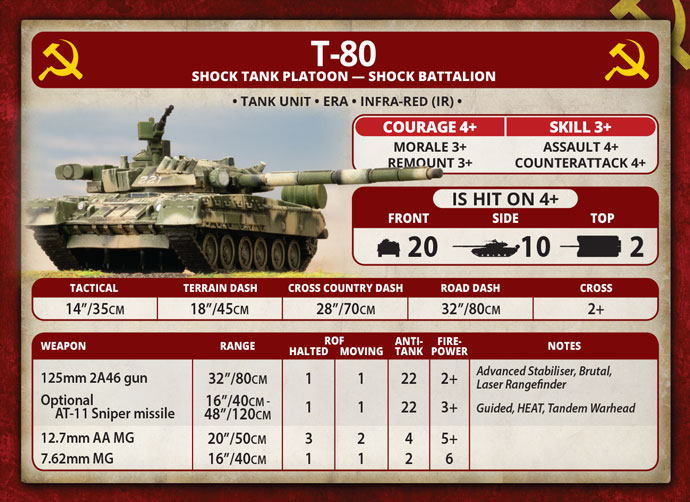
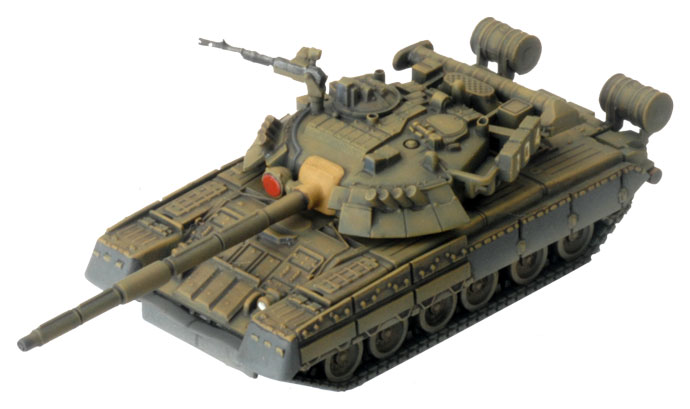
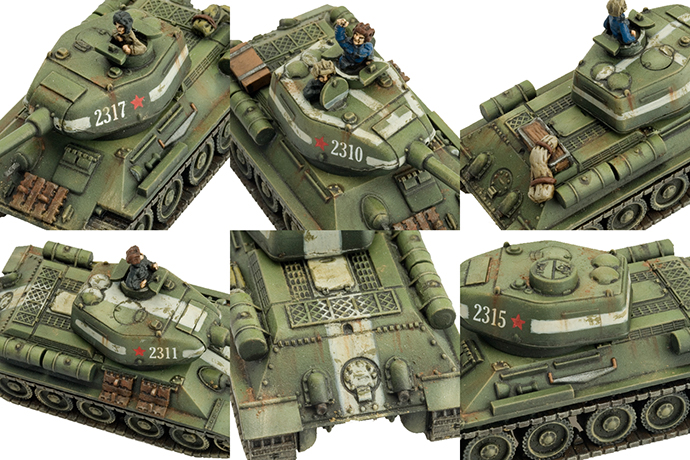
So the core of the formation is the T-80 tank. This newly introduced monster is a beast. Sporting front armour of 20 the T-80 can take a beating. M1 Abrams or M60 Pattons an issue? Not any more. Milans a problem? Not really for the T-80, as at best you’re bailed on a 1. The Side armour of 10 keeps autocannons at bay and with ERA you count as side armour 16 against HEAT weapons so if Carl Gustavs are a problem for you, they also can only bail if you roll a 1. The tank isn’t invincible as AT-23 has become a lot more prevalent but it’s a pretty tough nut to crack for most weapons.

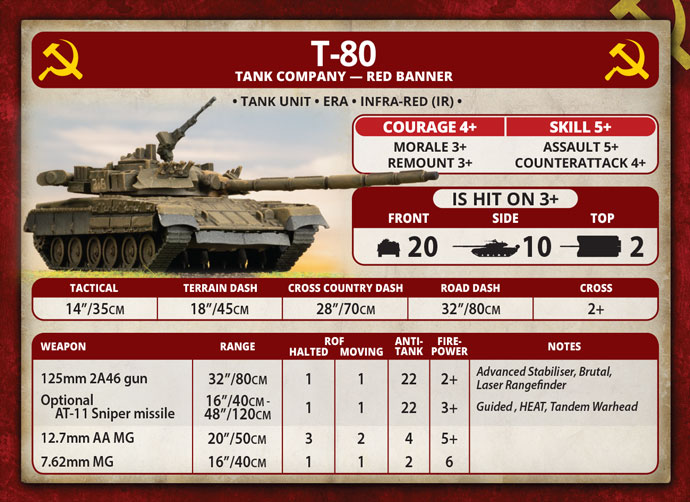
Besides being the most armoured, the T-80 is also the fastest Soviet tank with a tactical move of 14” like the T-64 due to advanced stabilizers but sports a 2+ cross check making it ridiculously maneuverable on the battlefield. The same exceptional 125mm 2A46 gun with a AT of 22 is present but where the change sits is it can also take the AT-11 Sniper missile which unlike its predecessors has an AT of 22 and can fire on the move out to 48”, giving it a threat range of 62 inches before blitzing. Again, it’s a beast.

But where the shock T-80 becomes truly scary isn’t it’s armour or the gun, not even it’s mobility. The difference is the crew. Not being hit is the best armour, and this tank is harder to hit. At 4+ to hit the Shock tank platoon is a real tough nut to crack, fighting at range and against defensive fire. Add in cover and suddenly you’re sporting a near uncrackable tank that’s hit on 5’s while moving rapidly across the field. But there’s more, the crew also have 3+ skill and 4+ assault, meaning blitzes and other movement orders become likely rather than the exception and assaults get results. The T-80 is the Marshal Lynch (American football reference) of the Soviet Force, it’s beast mode.

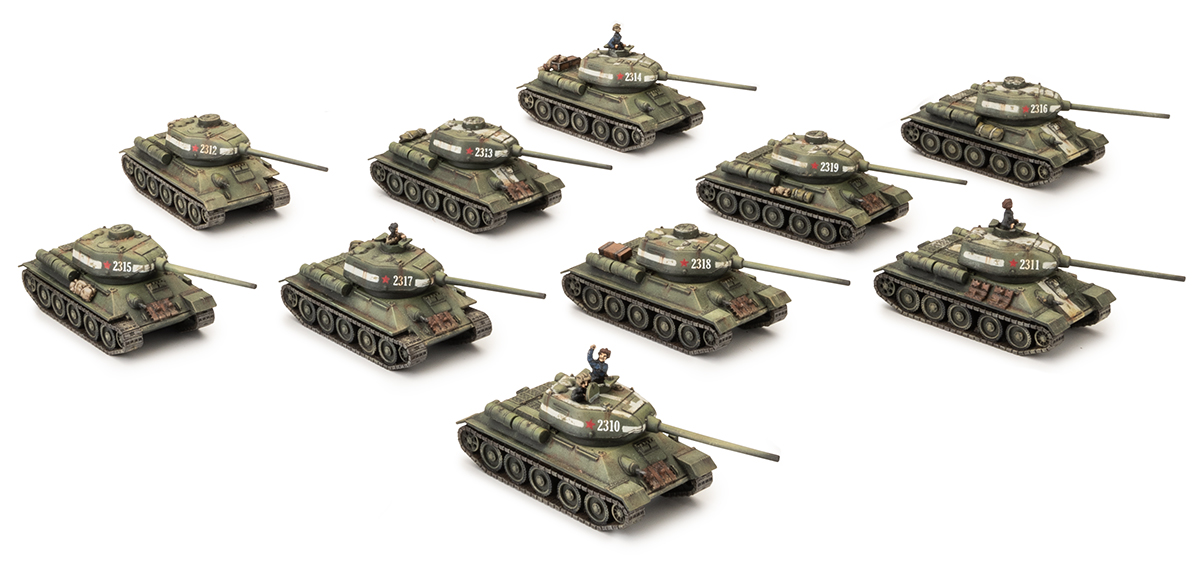
Some people say with great power comes great responsibility, but I often find the more relevant consideration is cost. The Shock T-80 is 9 points a piece, for either the HQ or the platoons which consist of 2 or 3 tanks making platoons between 18 and 27 points a piece before you add on options like missiles or mine clearing ploughs.

With an HQ tank and two platoons you use up a minimum of 45 points in a force which comprises only 5 tanks. More likely you’ll want at least one platoon with 3 tanks so your base force will commonly comprise around 50-60 points of T-80s.

The big question I find people have difficulty with is answering the question “what are my T-80s here to do?” In fairness this question is often hard for many Soviet players to answer with their tanks. But if you’re spending half or more of your points on a handful of tanks you should probably have an answer for this question. With this list I feel like the answer is much clearer than with others, it’s there to bully people. The T-80U as described is a beast, but with only ROF 1 and AT 22 it isn’t going to gun down your opponents army, and in a gunfight at range with the more modern tanks you can expect a bun fight to ensue. So if not gunning down other big tanks what makes you want to take the Shock T-80U?

The T-80U is amazing at getting stuck in and staying there. The sumo wrestler of WWIII it can push people around and off of objectives while absorbing fire like almost no other tank can, and all for a very reasonable price. -see earlier “the T-80U is a beast”.

The Shock T-80U can get you through minefields, either by just driving clear through them with their skill of 3+ or by removing them with mine ploughs, reliably entering them the previous turn. Arguably there usually isn’t much in the army coming through after the T-80Us in a Shock Company so commonly you can save the points on ploughs and only take them if you’re going to guide through the Shock Infantry company. This alleviates one of the key problems Soviet forces have, being cut off in the offense. This opens up literal avenues that were formerly closed or at best uncomfortable.

After breaching, the T-80s are amazing at assaulting people off of objectives (not necessarily killing people but removing them from objectives). It’s not their 4+ assault that makes them great, but rather their durability. With 4+ to hit and ERA they are immune to most infantry AT assets and with a 3+ morale and 2+ cross, you’re racing killing off your opponent vs them breaking away. Because of this, the T-80U platoon with an HQ tank is a game winning group of tanks on the table and their ability for speed and violence cannot be overlooked. For these reasons, missions with early win conditions and defenders having reserves, or even deep reserves are this list’s wheelhouse.

So with roughly half of a 100 point list invested in a few tanks to start the game, this doesn’t leave a lot of points for support, or more important the only thing that properly takes and holds ground, Infantry. But this list does have a really cool option for them.

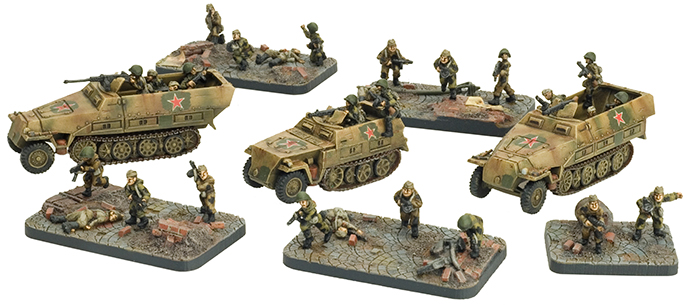
The Shock Tank Company comes with some very special support for your T-80s, highly trained infantry with the same skill and assault capability, the BMP Shock Motor Rifle Company. Possibly the most interesting inclusion in WWII: Soviets is the Shock Battalion infantry coy, if only because they can only be taken in a Shock T-80 company. They are not a black box choice but are a formation option for the T-80 Shock company and so bring you not only staying power but the ability to take and hold ground, in this regard, I’d say heavy on the former, less so on the later.

The T-80 Coy is not a subtle build, it’s not here to sit and wait, it’s purpose is to break lines, to push deep and turn the enemy, to make them run, and then run them down. Purpose built to support this is their infantry. While not as numerous as a standard infantry company you get in a word, ‘enough’. With an option for either a platoon sized element or company minus group, the shock infantry brings a ton of flexibility to the force.

The unit is equipped with the BMP-3s as the Shock Infantry’s transports, and these are a threat from the get go. While they can be downgraded to BMP-2s the BMP-3 gives them the mobility, firepower and survivability the unit needs. They can be placed aggressively in most missions and flaunt their ability to other players. In games where you may have the meeting engagement rules the BMP-3 can still move and fire its missile, making it the perfect piece to standoff against other missile systems, either you go first and fire first or they go first and don’t fire at all. With the 3+ skill they can also reliably use movement orders like blitz and shoot and scoot letting them be a constant thorn in the side of opponents. Simply put, these transports let you dictate the tempo and the opening of an engagement even more so than the T-80s do alone.  Holding a flank or simply threatening tanks side armour from across the table these vehicles give your T-80s freedom of movement and force players to hold back.

The infantry are what you’d expect, hard chargers. 4+ to hit infantry with 3+ skill, 4+ assault and AK-74s, they’ll start and finish the party in the trench lines. They are also armed with the new RPG-7VR, with AT 19 and FP 2+, this makes them a threat to any tank on the field of battle, being able to penetrate even the side armour of Chobham vehicles. Even the mighty M1A1 HCs and Challenger tanks have to respect this unit.

Against a pinned unit they can reliably get into assaults (smoke definitely helps) and once in they are hard to dislodge. What the Shock infantry can’t do is hold ground for long. Yes they are harder to hit, but they are much less numerous and can’t sit and take a beating for very long. They are meant to take an objective and win, or to assist the tanks in doing so, taking infantry out of buildings or covering their flanks as you advance.

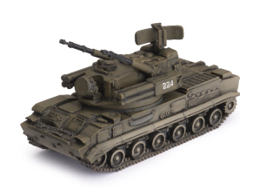
With the tanks and the infantry sorted you have the usual suspects for formation support, artillery, reconnaissance and air defence assets but with two notable changes. First off the 2S6 Tunguska air defence system that provides you with a swiss army knife of support. The Tunguska has both missiles and 30mm cannons making it highly effective at providing anti-air support and as a counter to light armoured vehicles with it’s ROF 7 cannons. Players will have to think about the cost though as for the same price of 4 Tunguska you can take 8 Shilkas to provide more pockets of air defence on the table to your expensive tanks. Secondly the only reconnaissance option in the formation is the BMP-3 Shock Recon platoon. At 3 points a piece the recce cars are expensive, they bring a lot with all the same skill and to hit benefits as the rest of the Shock Battalion, but to save points taking divisional support options can get you BMP Recon Platoons of any variety.

There are a lot of options for support and T-80 Shock Battalion has far too few points to spend on all of them! Out of them all the one thing I always look for to support my T-80s is smoke. With so few tanks (albeit awesome tanks) I look to minimize my opponents ability to affect them. Smoke is huge, it’ll cover your breaching minefields, taking objectives or just cover a flank as you engage targets. Taking artillery has the added benefit of being exceptional against infantry in buildings, something that this list struggles with due to having so little infantry.

After smoke, I find that some air is always a big help. Hinds are an amazing option to bring a large number of shots for a very reasonable price. With their high AT and ability to relocate anywhere on the table they are a near perfect counter to enemy armour or a first choice to arrive from reserve. Lastly if you haven’t taken the Shock Motor Rifle Company, you may want to take a support company of infantry. This gives you a dramatic amount of options but as they are support they don’t help your formation stay on the table. A full company of Afghantsy are an excellent stand in, or you could swap in a mid size BMP-3 company for nearly the same points as the Shock company, trading skill for firepower and numbers. However you do it, you want to take at least a little infantry.

One last consideration should be tanks. But I already took the best tanks the Soviet army can provide, why do I need more tanks? Shots and distractions. It’s easy for someone to focus on your T-80s but something like a company of 10 T-55AM2s can distract an opponent from your T-80s and provide you with a lot more shots to help you disrupt your opponent while your T-80s do their work. Are they necessary? Nope. But more tanks are often fun tanks.

The Shock Battalion is a force that wants to attack, it was conceived, designed and built to attack. With that said, it can’t win a war of attrition, there just isn’t enough there to last. This list is about winning fast and going home. Let it do what it was made to do. Players using the more missions packages should really consider carefully any time they look at options other than Attack. The main reason for this is reserves, the Shock battalion hates reserves. With an elite Soviet force you have very little comparatively on the table and a huge number of points invested in ROF 1 tanks and any reduction in that makes victory that much more difficult. The Attack vs Defend missions are the perfect situation for this list, normally granting the attacker a solid position to press against a smaller footprint of enemy on the table. Speed and violence is what this list uses to win, setting that up in the pre game fight is key.

Remember you have a heavily armoured, hard to hit tank,  that can bypass mines regularly. It’s pretty much the road map of how to win with these.

The T-80Us of the Shock company make for an amazingly different but fun force on the table but they can also be added to other forces as a support choice. In all honesty, this is how I like using the T-80U shock platoon, as support. This makes a box of T-80s or the two player starter ideal for any Soviet player, even one not thinking of fielding a T-80 force. What the Shock T-80 platoon brings to play for normal Soviet lists that nothing else does is reliable breaching. Often Soviet players can be derailed by minefields in missions, being fairly unreliable to remove them, tanks and infantry commonly are shot up or die in the minefields. With the speed of the T-80U they can get to the minefields ahead of the assault force, with 3+ skill T-80s can reliably enter minefields without taking damage. they can use their FA 20 to withstand the fire thrown at them and remove the minefields opening the gap assumed closed by most NATO players.

The Shock T-80U platoon with missiles also pairs amazingly well with a platoon of Hinds to make a perfect reserve force. Why the missiles? They extend your range so coming in from reserve you’re pretty much guaranteed to be in range and a threat from the get go. By keeping these in reserve you have the time and space to hunt down high AT threats and air defence assets making the arrival of your reserve that much more successful.

As a Soviet player, let’s face the fact that we are all about to buy T-80s if we haven’t already.

It looks cool, it’s a beast on the table and it scares NATO players. With that out of the way, realize that WWIII:Soviets is bringing us a bunch of great ways to play these beasts. The Shock T-80U as either a formation or as support choice is a blast to play and is going to bring a whole new threat to a battlefield near you. The Shock Tank Platoon is the All Blacks of Soviet tanks, a huge machine specializing in pushing people around. In a game about objectives, It’s an offensive powerhouse and winning machine.

Casey’s Soviet Reconnaissance

With Casey

A Soviet Reconnaissance company, or Rota Razvedki in the old days, is a list that I’ve always wanted to build but never got around to doing. Our Big Four Of Late War project and the release of Bagration: Soviet book is giving me the chance to finally start it.

The core of my force is going to be built around an HQ and 2 Armoured Reconnaissance platoons in captured Sd Kfz 251 half-tracks. The M3 scout car is probably a more gamey choice because it has an .50 cal rather than a standard MG, but I’m a sucker for captured equipment. I’ve chosen to model the platoons with a mix of plastic Sd Kfz 251/1Cs and our new plastic Sd Kfz 250s. I’ve made a couple of modifications to make the look more ‘Soviet’ like replacing one of the mgs with a DSHK. The commanders half-track I’ve modelled as a 250/9 2cm, just to make it stand out on the table.

The next unit is where the list really shines. The Armoured Reconnaissance Company has a BA-64 platoon as part of its Formation, but I’m going to use the Decoy Tank Company Command Card to replace it with a platoon of two Panthers and a Tiger for 22 points. Note that these now count towards Morale now! See my previous article talking about captured tanks.

Next up I’m going to add a Hero T-34/85 platoon for 18 points. T-34s are useful in any army and are there to add to Formation morale and deal with enemy medium tanks.

Finally, inside the Formation I’m going to add a platoon of six mortars for 4 points for a bit of cheap artillery.

On to support.

The first platoon I’m going to add is an IS-2 Company. Their massive armour makes these tanks assault beasts. They are in the list to push the enemy off their objective, or at least soften the enemy position up enough that the infantry can get in there and finish the job. The fact that they have a brutal AT14 gun is a bonus, but their primary role is not to engage tanks.

To help soften up the objective, through both direct and indirect fire, is a platoon of 5 SU-76’s. I never rated the SU-76 under previous editions of the game as they were a single role vehicle that I though was a bit over pointed. Now that they are multi-role and relatively cheap I think they will find their way into a lot of my forces, however I’m not as crazy as Chris and probably won’t paint a full regiment of them. Click here to see Chris’s article…

With 3 points left I’m going to add a support platoon of BA-64s. There are probably better options to spend the points on as I don’t really need any more Spearhead options in the army, since I already have three, but it is in theme to add more reconnaissance.

The last point will be spent on the Make Your Own Luck, which allows you to automatically roll a 4 on a dice roll. This I will hold onto till late game for either a critical firepower roll to destroy a tank or motivation roll during an assault to hopefully turn the tide of the game.

~Casey

Wayne’s Hero Shock Rifle Battalion

With Wayne

Back in 2015 I made a Hero Rifle Battalion for Berlin, so with the release of Bagration: Soviet I thought it was time to dust it off and see what can be made of it using the new book. The force that I had made had a core of 2x Hero Rifle Company and a 120mm Mortar Company. In addition I had painted 2x IS-2 heavy tanks, 2x Flame-thrower teams and a Guards Katyusha Rocket Launcher Battery.

Click to see my original force here…

Since then I had painted 4x T-34 (85mm) tanks for a Hero Tank Company.

To bring I up to 100 points under Flames Of War 4th edition I have added a few things.

Let me explain these units. I’ve decided I need a spearhead to get my infantry forward if they attack, for this I’ve decided to use the BA-64 Armoured Car Platoon. These are cheap at 2 points for three, so are not a big points sink.

I also thought an observer would be handy for the Katyushas and 120mm mortars. This will be another BA-64 Armoured Car, which is small and easy to conceal.

Lastly some anti-aircraft is always useful. For this I’ve gone with the new ZSU M17 Anti-aircraft Platoon. These lend-lease American half-tracks mount four .50cal machine-guns, giving them a high RoF against attacking aircraft as well as ground targets.

Painting List

Though I’ve got a lot painted already, there are a few things I need to paint.

Komissars: I’ve only got one Komissar painted so I need to paint two more, which is only four miniatures.

Hero SMG Company: These I do have to paint, another 7x PPSh SMG teams to add to the Komissars above (though I may be able to recycle my Katyusha command team).

IS-2: Four Plastic IS-2 heavy tanks need to be assembled and painted.

BA-64: Four BA-64 armoured cars also need to be ordered, assembled and painted.

ZSU M17: Three of these half-tracks need to be ordered, assembled and painted.

Between painting new Germans and these I should be busy for a while.

~Wayne

IS-2s, The Anvil

With Casey

The other list that I’m really excited about from the Bagration: Soviet book is the IS-2s.

IS-2s were okay under Version 3, however by the time you put enough IS-2s in the list you didn’t have any points left over for much else. Under Version 4 the IS-2s perform a similar rule and the stats don’t change much, but they are pointed much more competitively so you can give your heavy tanks the tools they need to get the job done.

I’m planning on painting 10x IS-2s and 3x IS-85s to give me some flexibility for force creation.

The core of the IS-2 list is 1x IS-2 and 2 platoons of 3x IS-2s, for a total of 7 tanks. This is the main assault force. The main drawback of the IS-2 is its ROF 1 main gun, so to add more shots down range I’ve added a platoon of IS-85s.

To bulk out the formation I’ve added a Hero SMG platoon. These will either sit on an objective or ride up to the front on some IS-2s, depending on how aggressive I’m feeling on the day.

With the Formation complete I have added a Hero T-34 (85mm) platoon to the force for a bit more medium anti-tank. and some BA-64s.

The theory is that the BA-64s will Spearhead the IS-2s up the centre of the battlefield while the IS-85s and T-34s will protect the flanks, and the IS-2s will break towards an objective after the enemy forces are fully committed.

~Casey

Victor’s Heroes Ride Again

With Victor

About 5 years ago I painted a small hero T-34 company for a doubles tournament. You can find my original article here…

With the launch of Bagration: Soviet I wanted to look at updating this force to a full 100 point Version 4 army, and I came up with this list:

The army had quite a lot of steps when painting it, and unfortunately it was done before I got religious about documenting my painting methods!

The logical choice would be to paint 3 more T-34/85’s to make the platoons 4 strong, but I’m not confident I can recreate the scheme exactly. Instead I chose things to add that will be ok to look a bit different.

I’m a sucker for captured equipment so the Panthers were an easy choice. For these I’m going to try and recreate the iconic photo as best I can, with Dunkelgelb hulls and green turrets, and large hand applied numbers.

The new plastic ZSU M17 that is coming also has me excited, so 3 of those in lend-lease olive drab will also give me a different look.

Who doesn’t like IS-2’s? I’ll add 3 of them and these are where I’ll try get close to matching the T-34 paint scheme and white markings, but since they’re a separate platoon it’ll be ok when they turn out a little different.

The OCD in me kinda likes that the army is mostly all 3-strong platoons.

The last thing I’ll have to add is one more base of Spetznaz as so I can run them as Armoured Reconnaissance.

I’m looking forward to revamping this army as it has been one of my favourites, and it deserves to see the table again.

As side note: You may spot my T-34s on the back of our awesome new box; T-34! The best way to start your own Soviet tank horde!

-Victor

Big Games For Big Gamers

with Chris Townley

A year ago, the Big Four (of Late War) were driving back from Panzerschreck 2019, where we had spent the weekend playing 150 point doubles games of Team Yankee. Like any post event road trip, we found ourselves talking about two things:

  1. The event – what were the games like, did you see that army, did you play well, and so on, and,
  2. What are we painting next…

We found ourselves discussing the future (now the present) of World War III: Team Yankee and the effect that T-80, M1A1HC, Leopard 2A5 and Challenger tanks were going to have on army building. Suddenly you can roll out tanks costing as much as 18 points each that are essentially an army in their own right once you put a full-strength platoon on the table.

This led us to the next logical point in the discussion, we wanted to play with a company of tanks and supporting equipment, not a platoon. For Flames Of War players it is one of the things that the three periods (Early, Mid and Late) solve. In Mid War a Panther tank is the king of the battlefield, but I can realistically only fit a few in the average force, but roll over to Late War and there are much nastier cats, so I can field an (understrength) company in 100 points.

Returning back to World War III: Team Yankee and there is no way to sandwich 8-10 Abrams, a platoon of infantry in Bradleys, some artillery and Apaches in 100 points without making some serious compromises and at the end of the day we wanted to play with the models we wanted to play with.

This was when we started discussing Big Games For Big Gamers – the idea of going up to 150-200 points but with a little peer based pressure on what was a “Big Games” army. Now you have to remember that I had just finished a weekend of pushing round 35 points of Czechoslovakians that still had 48 models and I wanted something a little faster to game with. With this in mind we agreed to keep our Black Platoon selections “points heavy” – so no army building with Czechoslovakian T-55 Tank Battalions (31 tanks for 40 points) but instead focusing on T-64s and T-80s, M1A1s, Leopard 2s, Merkavas and Challengers. Our support units could be whatever we wanted, but once again this was a chance to play with full strength batteries of M109s, adding in minelet and bomblet, rather than focusing on maximising the value of every last point.

I am the last person to tell you that building a horde of anything in World War III: Team Yankee is wrong. I still have a fantasy to build an Iranian force with a pile of infantry, Chieftains and M60s, and my Czechoslovakians still have another 20-30 T-55s and T-72s to paint, not to mention the extra supporting units like RM-70s and Hinds. Instead it was about creating an environment where we could play games that we thought would be fun, not too asymmetric (6 tanks vs 60), and let us put all of our cool toys on the table.

The focus of this is having fun, so I’d encourage you to talk to your gaming group about trying something similar. You don’t need a hard and fast set of dos and don’ts, just do what feels right and start off with a company of whatever tank you have been wanting to field, but couldn’t do in a 100 points, and then add in the other stuff to make it an interesting force.

You can find a link to my “Big Games For Big Gamers” Eagle Troop Force here…

As you can see it is not exactly loaded with options, but other than some Chaparral SAM Launchers, I have everything that I want, and once I get this pile painted I can start substituting out some of the M3 Bradley Scout Sections for a few more support units like Chaparrals, Humvees, VADS or infantry.

~Chris

WWIII: American Starter Force and Where To Next!

With John Lee

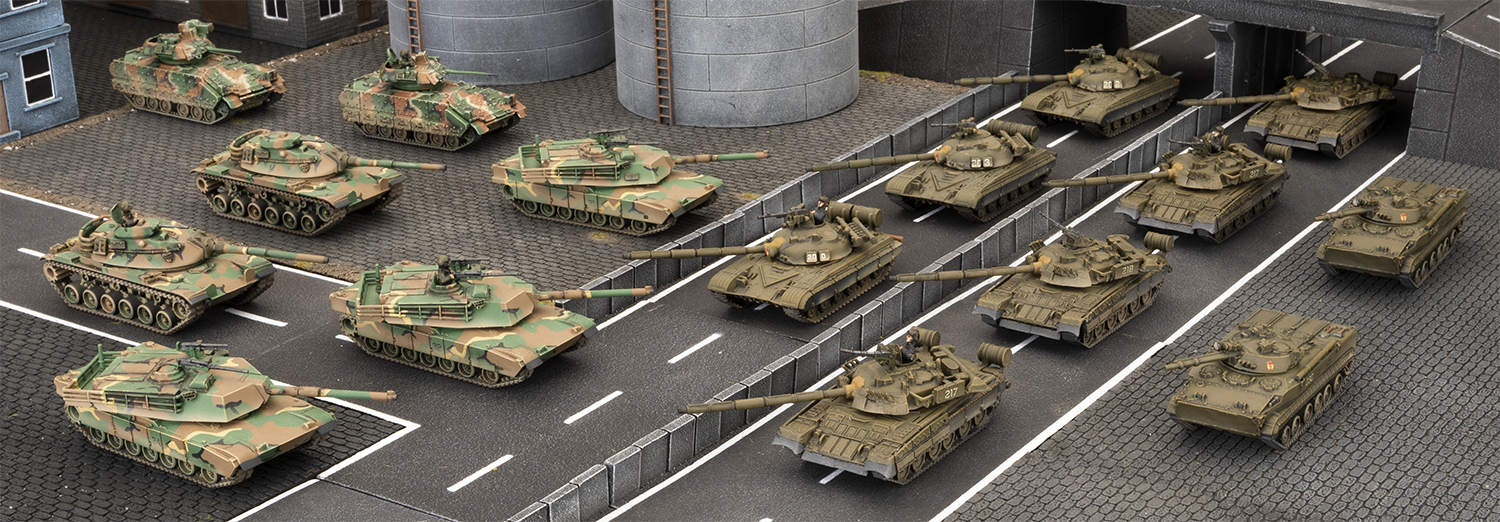
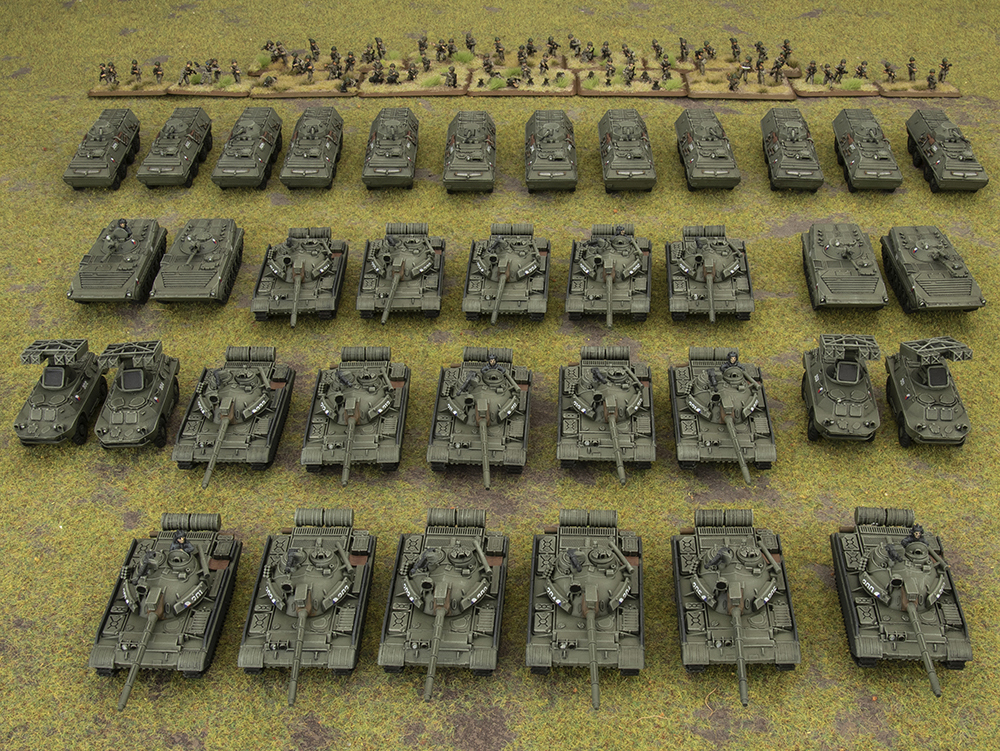
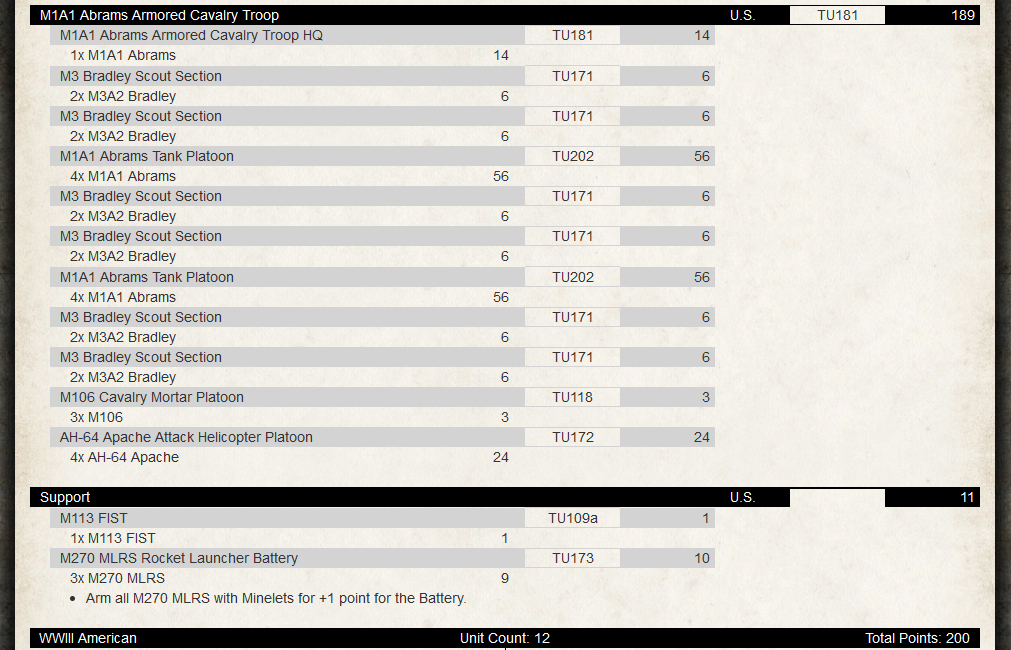
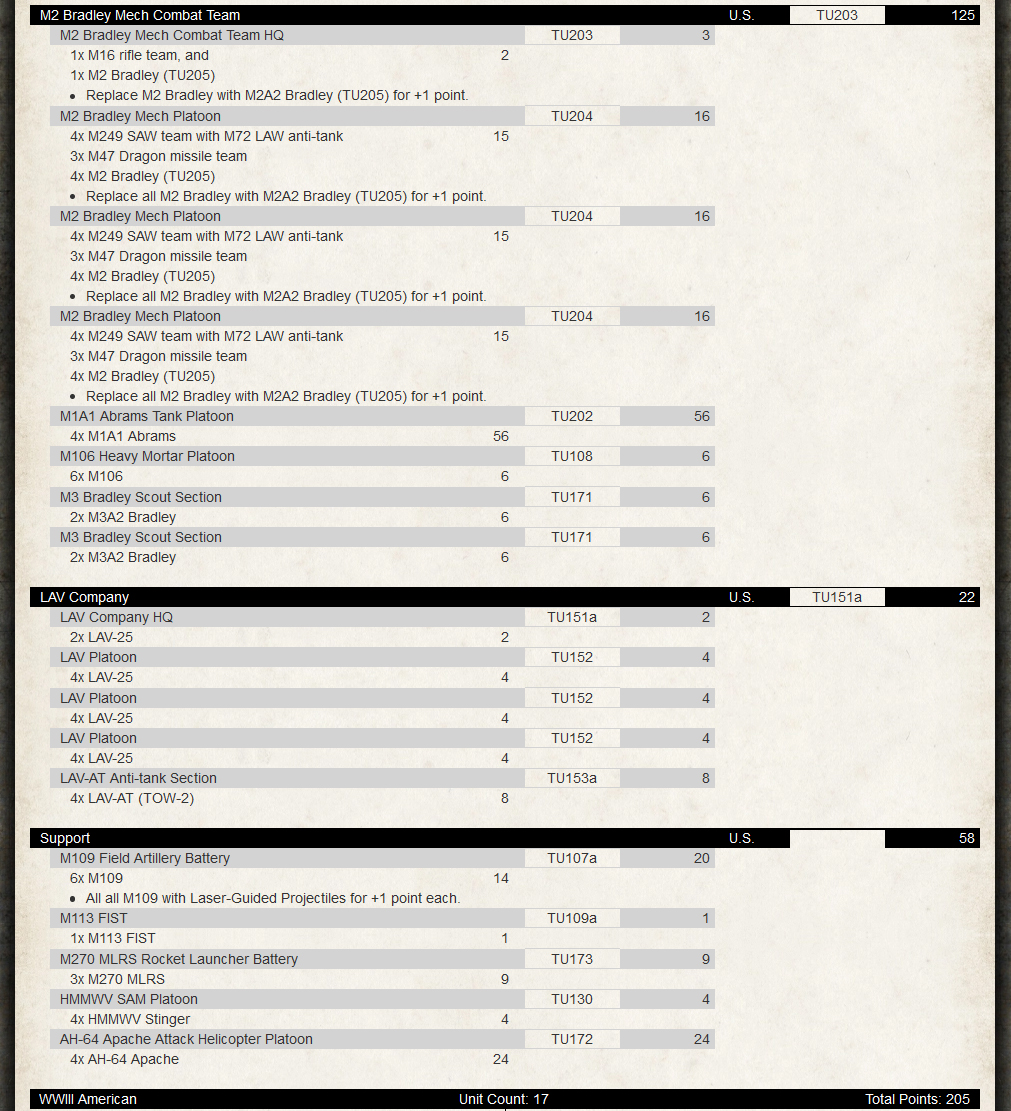
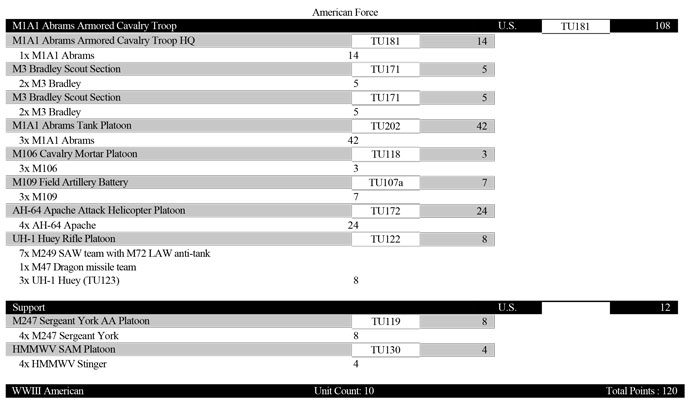
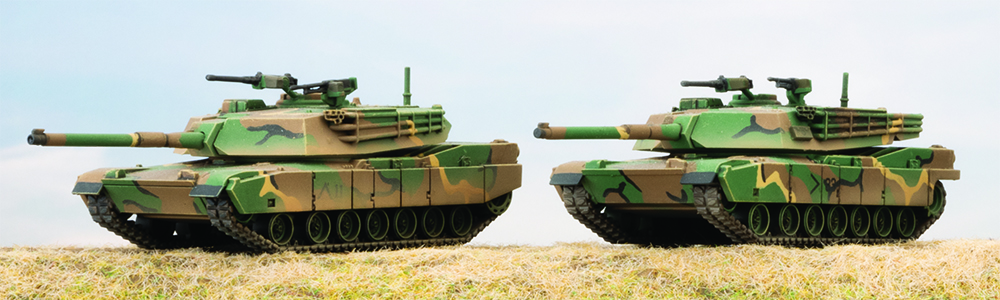
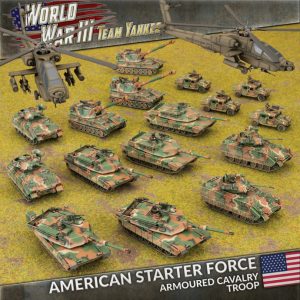
With the launch of the WW3 American, I thought I would take a look at how could a new player or someone on a budget, get a force on the table that would be competitive or at least hold its own with such iconic equipment as the Abrams, Bradley and Apache helicopter.  For the new player, it opens the door to playing WW3 without needing to buy, assemble or paint too much and get into playing the game quicker.

So, if we look at what we get in the excellent value starter set, that might help decide what formation to run.  The starter set contains the following:

  • Complete A5 Rulebook
  • American “Start Here” booklet
  • 5 x Abrams Tanks
  • 4 x Bradley IFVs
  • 3 x M109 155mm Self Propelled Guns
  • 4 x HMMWV
  • 2 x AH-64 Apache Helicopters with rare earth magnets and flight stands
  • 4 x Decal Sheets
  • 14 x Unit Cards

The bonus here is that the rulebook is included in the box – so the new player makes a saving right away.  Now if we look at what formations are in the WW3: American book, we can see what we can maximize from what we get in the starter box.  The best formation to maximize this is the M3 Bradley Armored Cavalry Troop.  Let us look at what units comprise this formation:

  • 1 HQ (Either M3 Bradley, M1 Abrams, M1A1 Abrams)
  • 2-6 M3 Bradley Scout Section
  • 1-3 Tank Platoon (M1 Abrams or M1A1 Abrams)
  • 0-1 M106 Cavalry Mortar Platoon
  • 0-1 M109 Field Artillery Battery
  • 0-1 Attack Helicopter Platoon (AH-64 Apache or AH-1 Cobra)
  • 0-1 UH-1 Huey Rifle Platoon

I like this formation a lot – combined arms – even includes helicopters!  Looking at the formation and what we get in the starter box, we can use everything for the formation except for the Humvees.  That is an amazing start.  I do have a plan for the Humvees though as we explore later in the support part of building two lists – one at the standard 100pts and one at the 2020 US 120pts (exactly the same list but using our smarts to change out the type of Abrams between the two).

OK – lets build a rounded out 120pt list to start with.

The UH-1 Huey’s are optional as you will only really use them if you plan to transport the infantry across from one side of the board to the other – so is a consideration for not purchasing right away.

Adding in the AA options in the support section you now have used the Humvees from the starter box.  To run the list at 100pts just run the M1A1 Abrams as IPM1 Abrams.  5pts less each and with four in the formation equals 20pts.  Done.  You can use the M1A1s to represent IPM1s and just let your opponent know – should not be a problem.

Looking at the composition of the force we have several units that are multi or dual role.  M3 Bradley’s can take out helicopters, light vehicles, infantry with its Bushmaster 25mm AT8, and tanks with its AT23 missile and can spearhead and has scout!  M247 Sergeant York can take on aircraft and light vehicles, infantry with its ROF5/4 AT7 40mm gun.  The apache is a beast with its AT25 hellfire missiles, ROF 6/3 AT8 30mm chain gun and is hard to shoot down.  Two artillery options to dig out infantry.  M1A1 or IPM1 Abrams to duke it out with other tanks and/or assaults.

With reserves at 48pts for 120pt army you would put the M1A1 Abrams platoon and either the M109 Artillery Battery, UH-1 Huey Rifle Platoon or M247 Sergeant York AA Platoon depending on the mission. For the 100pt army probably the IPM1 Abrams and AH-64 Apaches.

To buy this army you need to only purchase the following for under $300:

1 x TUSAB04 Starter Box 100
1 x TUBX03 M113 Platoon 36
1 x TUBX10 M247 Sergeant York AA Platoon 54
1 x TUBX13 Rifle Platoon 30
1 x TUBX21 AH-64 Apache Helicopter 35
1 x WW3-03 World War III: American Book 20
Total 275

An easy option and versatile option to get into WW3 that is great on the budget and gives you the most bang for your buck starting a new force.  Its also easy from here to expand on what you have already to play other formations.  Enjoy!

~John

Eagle Troop Rides Again

With Chris Townley

Like many gamers I found the Battle of 73 Easting to be a very interesting, if rather one-sided affair, almost an analogy for the entire Desert Storm operation. It reiterated the concept of violence of action and the unrestricted use of speed, strength, surprise, and aggression to achieve total dominance against your enemy.

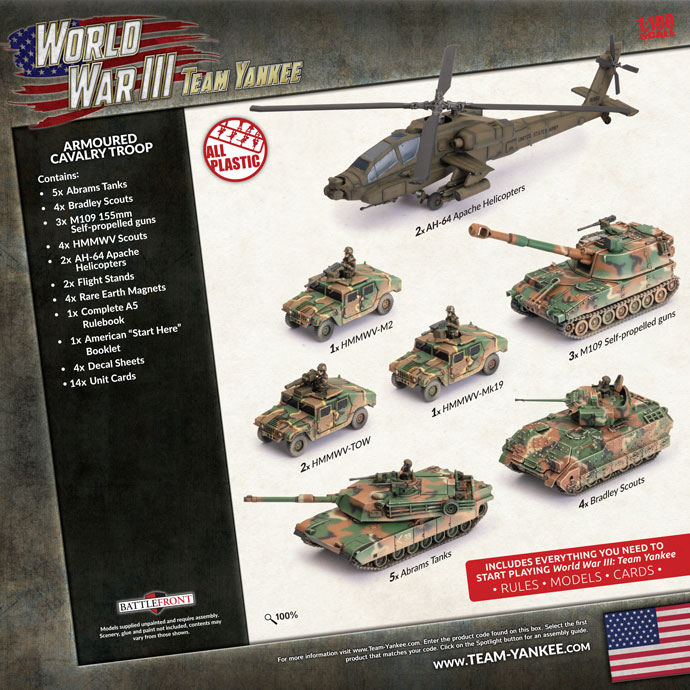
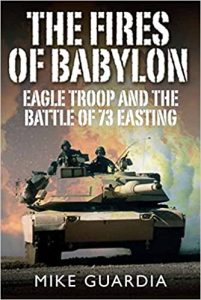
The battle itself has been covered in a variety of places, but for an interesting read about not just the day in question, but also the men involved I can recommend The Fires of Babylon: Eagle Troop and the Battle of 73 Easting.

The release of WWIII: American finally gives me the chance to take Captain McMaster and Eagle Troop, and put it on the tabletop. Plus, it gives me a great reason to build and paint some Bradleys!

The Army List:

Click on the image for a bigger version

As you can see, I have managed to cram in an entire Armoured Cavalry Troop, with some supporting elements in to only 200 points…

Next step is the building and painting. If you keep an eye on the Big Four Of Late War Instagram account  you may have seen Victor and I starting to build our armies, as well as working on some test models to figure out how we are going to paint them.

I’ve decided to copy Evan’s method, which you may have seen in our Facebook Groups, which involves airbrushing the model Buff, then some panel fading with a Buff/White mix (in my test model this has not really shown up well so may need some work), then apply a filter over the whole model, pin wash, and finally give the model an overall drybrush with Iraqi Sand (and/or Pale Sand… to be confirmed after more testing). Finally, I’ll add some stowage and decals to give the model a slightly less “one colour” look.

As you can see from the real world photo below, and my initial test model the sand colour is fairly pale, but once I add some stowage items painted in Woodland, it should perk up the model. Unfortunately (for me) the troopers of Eagle Troop disposed of their European green camo nets as soon as they could so you won’t be seeing any of those on my models. Likewise, their vehicles were freshly painted not long after their arrival in Saudi Arabia so no funky looking green bits where panels or trackguards have been replaced.

We’ve already started discussing the next event on the New Zealand gaming calendar (FlamesCon) in October and it is very tempting to knuckle down and get enough of the army completed so I can take it along. Lets see how that works out….

~Chris

Bradleys. Lots of Bradleys

With Lonnie Mullins

From its first incarnation in the first Team Yankee book, to Stripes, and now to World War III: American, I’ve wanted to do an American army but we were missing one key component: Bradleys, which put me off even starting them. In the meantime, I’ve made do with my West Germans and a smattering of British but now, after seeing the new American army book…

I’ve cleaned my hobby files, replaced the hobby knife blade, checked the plastic clippers, bought new glue, and am getting ready to fire up the old airbrush in anticipation of the upcoming American release for World War III: Team Yankee.  And I’m building my force around an M2A2 Bradley Mech Combat Team backed up by a small contingent of Marines in an LAV Company.  My force will consist of:

Click on the image for a bigger version.

I know it’s a lot but it gives me the variety to play 25-point skirmishes to 200-point mega-battles.  We’re waiting for most of the new product to get in but I’ve got my MLRS built and am working on my M109s, and can probably scrounge together some M106s and FIST to get me started before our shiny new Americans hit our dock.

I’ve gone artillery heavy in anticipation of loads of Soviet troops in their BMPs and the SPAM tactics that I’ve encountered, along with the ability to smoke up the battlefield for my own protection.  Everything I have can put enough steel down-field to shred BMPs by the dozen and turn Soviet infantry into bloody wet smears and nearly all of my (army) vehicles have the ability to take out even the heaviest Soviet Armor and/or helicopters.

~Lonnie