Since the army had taken me such a long time to get started (around a year) I thought I would prioritise it on the hobby table and get it properly finished and ready for battle. I still need to paint the other units but I feel like I have made a good start.
And of course with the launch of the Bagration: Soviet book they might find themselves facing off against some of the many IS-2s lurking around the Studio team!
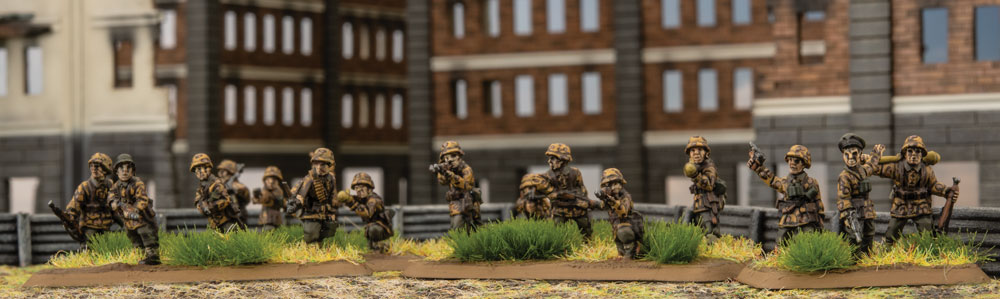
Usually I’m the class Sovietophile, however when I’m not painting Soviets I’m painting Waffen-SS. They have the coolest camouflage uniforms and are very rewarding to paint. I have been looking forward to the Late-War release as a chance to dust them off.
This has been an on and off again project for me that started as a staff 600 point challenge. You can find out more here…
I have been adding units here and there to this army over the last 10-12 years as tournaments have come up or new, interesting, units have been added. Out of morbid curiosity I made a list in Forces of War to see how much I actually had.
I was actually surprised at how few points it came out to, but that is mainly because I have no big points sinks other than the Tigers and Hummels, the rest is all infantry and half-tracks.
I never painted many tanks for the force because I always found it difficult to fit them into a force because they used to be Fearless Veteran under previous versions, which made them way to expensive. With the latest book I can see myself gearing up to finally add some more turrets to my army.
Panthers, I’m looking at you.
Since its close to 200 points I may have to have a large throw-down against the Big Four allies.
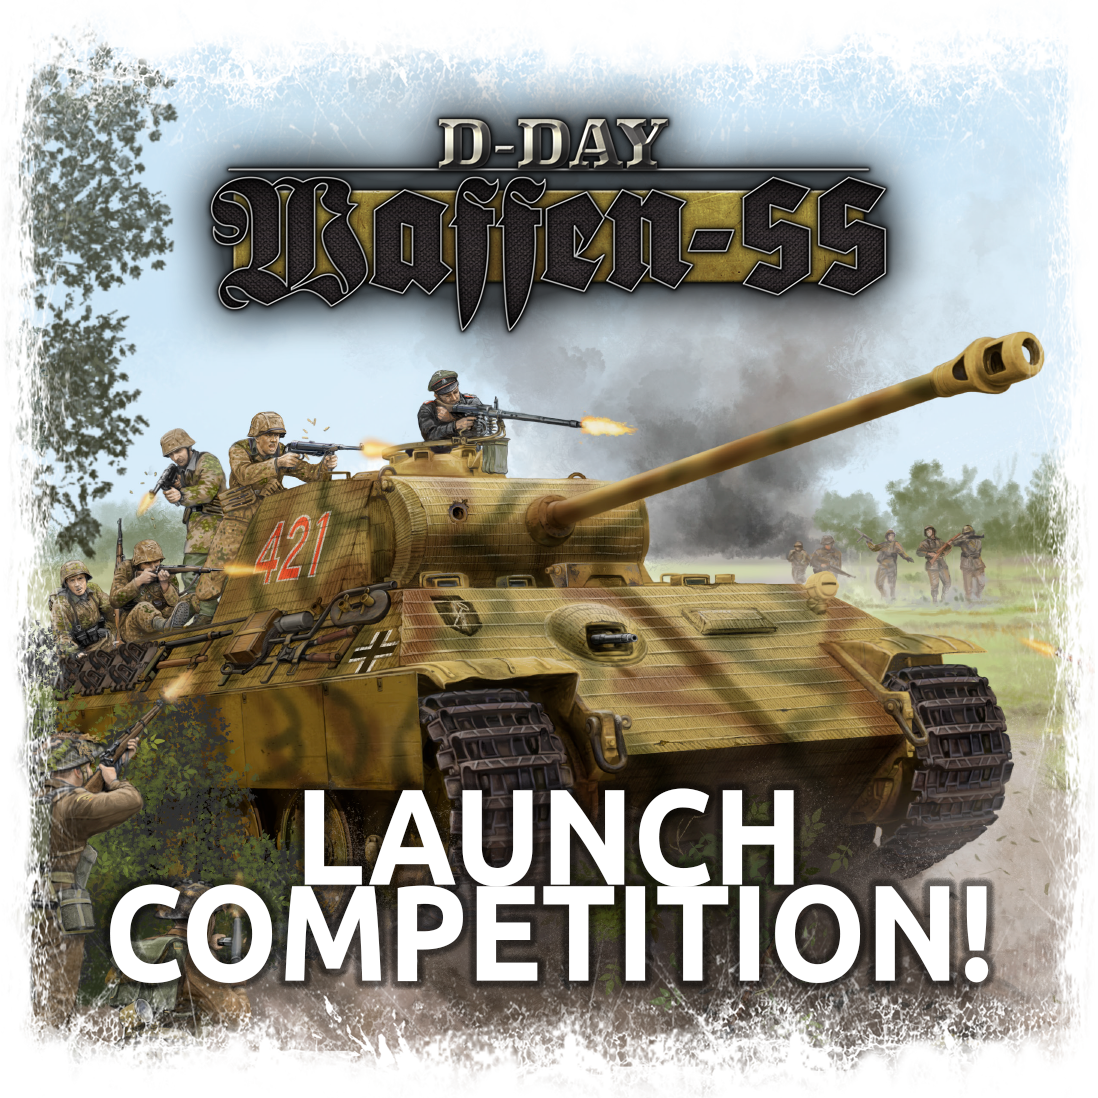
We’ve enjoyed putting together today’s Live Launch but we would really like to hear from you about what content you have enjoyed the most, and what you would like to see us do in the future!
Head over to our Instagram or Twitter (or both if you want to double your chances), follow and post your comment, and we will pick a random reply to win a copy of the D-Day: Waffen-SS book and Army Deal! How easy is that?
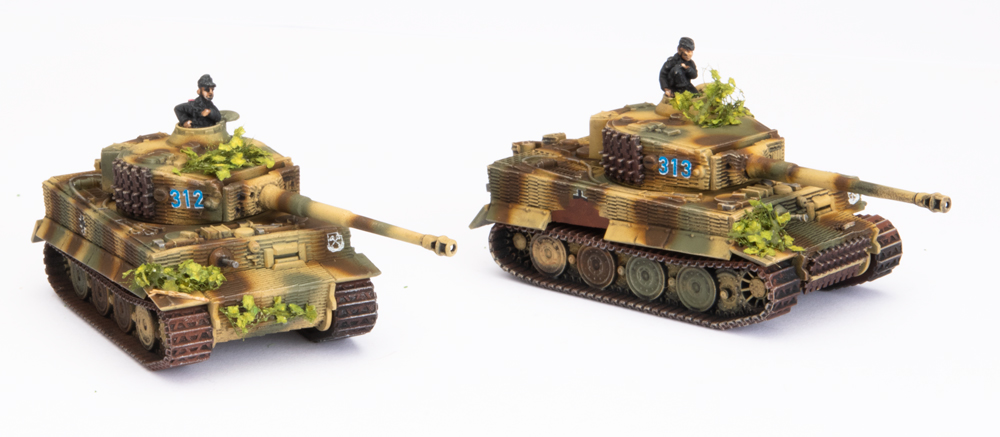
This time I’m going to be looking at a fun list for me. Ever since I’ve seen the D-Day: German books came out, I have been really tempted to start an Armoured Panzergrenadier list. I just really like the models, an almost entirely mechanised force, and its fast aggressive play style. Because it is essentially light armour, you will need to find a weak spot in opponents’ line to exploit. You do this by using your excellent mobility to manoeuvre around defences or focus your firepower to blast through it. To do this you will need tanks. Now Tigers may be ideal for this, but Tigers are easy and everyone takes them, I like a challenge, and I’ve never been one for doing what everyone else is doing!!
I really enjoy playing fast maneuverable lists with, good attacking power (glass cannons), using the terrain and movement orders to get the best from your forces. But it is a hard list to play, you may lose a few battles until you really perfect your list and the play style, but it is ALWAYS FUN!! Which is why most of us play right!!??
So I’ve gone with Panthers, they are a bit faster and a bit cheaper compared to Tigers, and you just have to watch their flanks, but they do have great frontal armour and excellent guns!! But they are vulnerable to getting shot in the side in defensive fire when assaulting, and against anything with high AT weapons in assault, so they have their limitations. But they are not there to do the assaulting, they are there mostly for blowing shit up and looking awesome!!
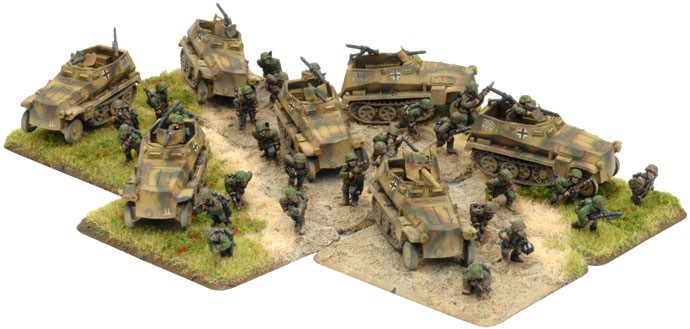
Assaulting is what the HQ, Armoured Panzergrenadiers, and Flame Thrower Halftracks are for!! But you will need to soften the enemy up first, as you don’t have the numbers to have a slog-fest of attrition. This list is very much about picking a target, focusing it, destroying it (or making it combat ineffective) and then moving onto the next target. You will need to have a plan here for your target selection, both for what units you want to attack and what enemy attacking units you want to take out first.
The idea here is that your aggressive unit placement and movement will put your opponent off balance. He will probably have a plan against the objective you are going to defend, but will need to pull more and more forces away to deal with your attacking units.
Also, an easy option for Reserves is the Panthers and Jagdpanzer IV, a quick 40 points if you do have to put forces in Reserve. Although you are lacking the normal Lucky card I take to try to make sure your Reserves turn up when you need them to.
So let’s talk about the units….
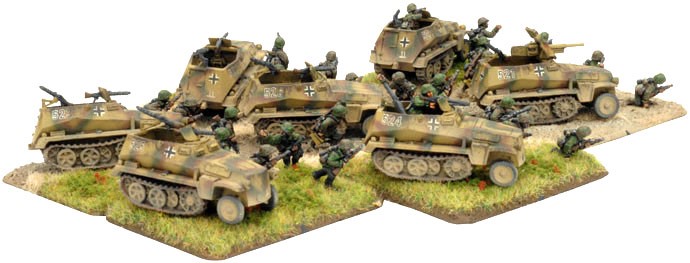
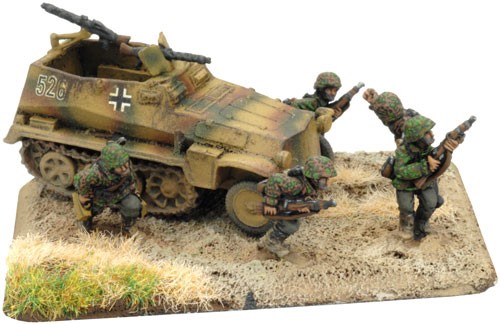
One different unit here I don’t normally take is the Flame Halftracks. The Armoured SS Flame-Thrower platoon is very cheap for the amount of devastation they can cause. Normally flame tanks cost almost as much as normal tanks, but don’t have the large main gun, but a very short ranged flamethrower. But at 6 points for 4 Half-tracks, capable of spitting out 16 shots a turn (at 4” range), that require the enemy infantry to re-roll any saves they make, and auto destroys any dug in infantry or gun teams, I’m prepared to see how it works out! Now admittedly they cannot charge into combat, but they can shoot in defensive fire if an infantry unit is dumb enough to charge you.
But what they can do is roll up to the defended position and unleash hellfire all over it, pinning the unit automatically and hopefully significantly reducing the defenders. These are the perfect unit to soften up the enemy before your main assault, the auto pin is especially useful. The only thing to be careful of is protecting them as they advance as they have very little armour.
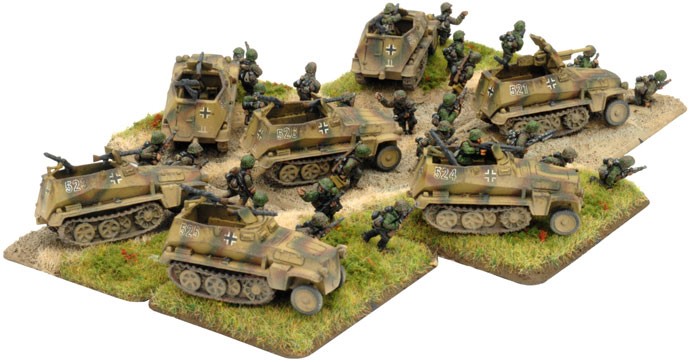
The defending units for you will be the Panzergrenadier platoon, the mortars and Wespes, the 7.5cm anti-tank guns. You should have a solid base with those units to defend one objective. Units like the Jagdpanzer IV and 7.5cm Armoured Gun Platoon can be used as either in an offensive or defensive way, and once the enemy attacking units are blunted, can be quickly repositioned in attack.
Also the great thing about your artillery units, the mortars and Wespe, is that they are mobile, so if they do try to counter battery you, you can easily move once they have ranged in on you. If you are lucky you can even attempt a blitz to move, and still fire or bombard in the same phase.
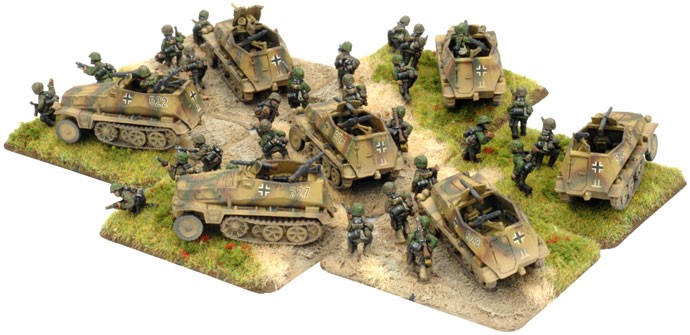
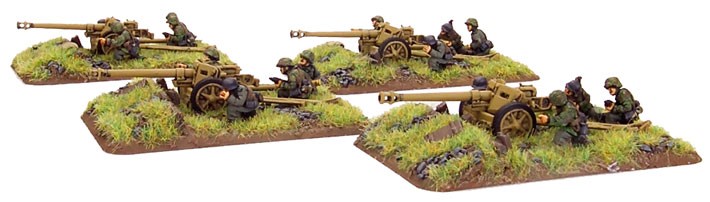
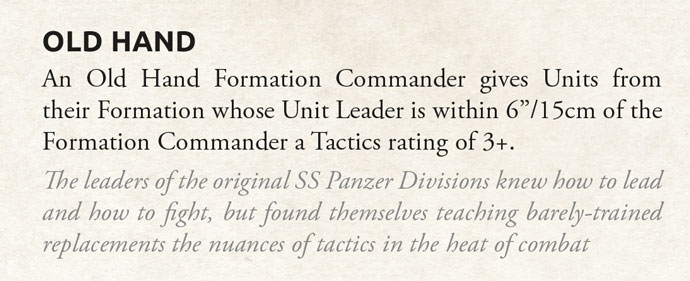
I do have to let you know how much I really like the 7.5cm Armoured Gun Platoon, and that it’s one of my favourite units of this list. It pretty much exemplifies the ‘Glass Cannon’ unit type. They have almost no armour, reasonable manoeuvrability, and a good cross check. Strapped to the half-track is an AT9 HEAT cannon with 24” range and 3+ Firepower check, and 6 of them can SPAM 12 shots a round with a good Blitz roll. Put them behind a hill, and a quick Blitz, a salvo and a Scoot and Shoot will give a lot of tank lists headaches. Also as they are part of your formation, they can be affected by the Old Hand rule, so a 3+ Tactics check instead of 4+ as long as your HQ is within 6”.
I also want to add how much I like the Old Hand rule for the SS in Late War. The improved 3+ Tactics roll, as long as the Formation HQ is within 6” of the Formation Unit Leader, is a great mechanic. It has a lot of character, with the core veteran SS officers having to pass on years of hard won combat experience, not in the practice fields with time and patience, but having to pass it on to barely trained replacements in the crucible of battle. It really represents how many veteran SS Divisions from the Eastern Front had been bled dry or had troops re-assigned from veteran units to form new ones (eg. 17th SS or 10th SS Divisions, and 1st SS replacements). It also shows how the Germans were really struggling for both man-power and experienced troops at this point of the war. They were reaching their limits, and it was starting to show, and this simple rule illustrates it well,
So your Formation HQ unit is very important in SS Formations, and to me it suggests using them aggressively, to keep them moving around the battlefield, so your formation units can get the best out of their movement orders and tactics rolls, as well as the normal HQ benefits of re-rolls.
I will say this list will not be easy for a beginner to use, it requires you to know not only the strengths and weaknesses of your own list, but your opponents as well. But…. once you get the hang of it, I find these kinds of lists immensely fun to play.
So if you want to play a different sort of list, with a bit of a challenge, I suggest you give it a go. But most importantly always have fun!
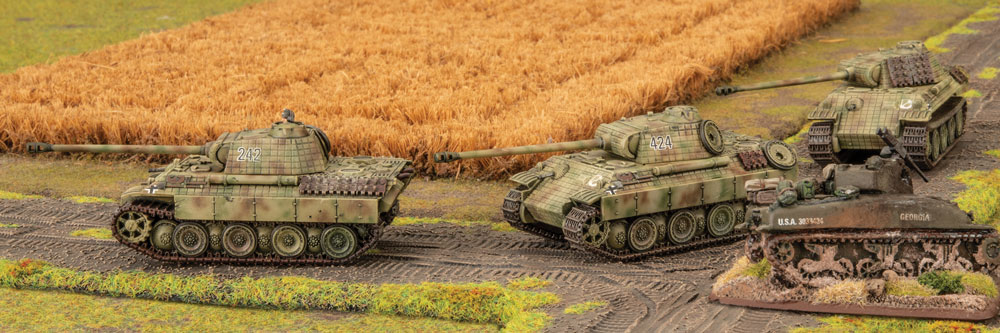
A number of years ago my family went to the Canadian War Museum in Ottawa where among the exhibits, I first saw a Panther tank in person. I was instantly wowed by this awesome machine. At 3 meters high with a high velocity 75mm cannon and lines that made it somehow superimposed between the armoured behemoths of World War II and modern battlefield predators, the Panther tank instantly became my favorite vehicle. Tracks, wheels, or wings, nothing beats the Panther for me!
Panthers in Flames Of War
Move ahead a few years to when I began to play Flames Of War . I was happy to use Panthers. I found they were great in defense where they could outrage the Allies with their whopping 40-inch range at AT 14. Using Stormtroopers to Blitz and then Shoot and Scoot, my Heer Panthers (from D-Day: Germans) worked in the role of long-range tank snipers. However, game after game here they stayed and it became a little predictable. For 1 point more, my Tigers got the other missions. With the same Front Armour, Side Armour 8, Top Armour 2 and a Last Stand and Remount of 2+ they were that much more flexible. Despite this, I always wanted my Panthers to have the opportunity to fill other roles too, as was only fitting of this World War II titan. Fortunately, with the impending release of the D-Day: Waffen-SS book, that time has come….
New Stats Means New Options
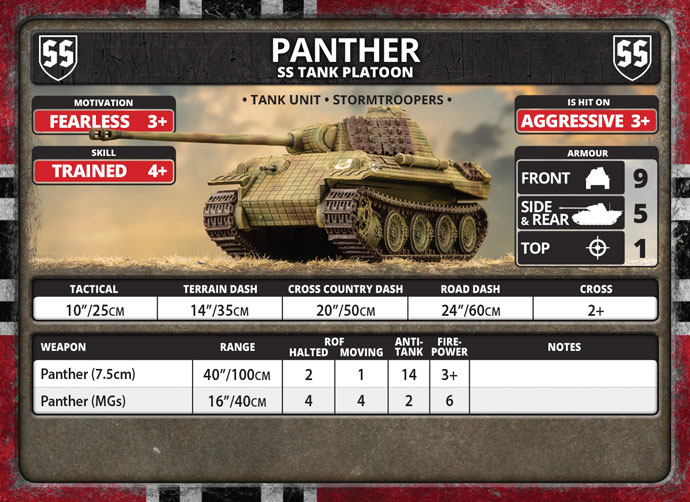
So, what is different that breathes new life into the SS Panthers? It’s the stats. The SS used the same equipment as their army counterparts, but were trained differently with an aggressive, sometimes even fanatical approach. They tended to have higher losses and therefore did not accumulate the experience which is reflected in the stats for the SS Panther platoons. Because of this, on the down side, they are Hit On 3+, and count as Trained for skill. However, they trade this for a Fearless Motivation and most importantly a hefty decrease in points by almost 25% from their army counterparts.
These changes amount to the a very different playstyle. Let’s take a detailed look at just some of the possible differences:
The Panther Company
For regular army units, the Panther is just too expensive to have full Formations on the table at the 100-point limit. As a result, you often do not see them in games and certainly not in any great numbers. If they are there you can be certain that they will always be sitting back at a distance looking for long range pot shots. Now with the SS Panthers, 98 points will get you 11 Panthers on the table! (To field the same number of army Panthers from D-Day: Germans would cost a whopping 121 points.) With the SS you can reasonably have a horde of Front Armour 9, AT 14 panzers all bearing down on your opponent! Trading the Hit On 4+ for 3+ should not be too much of a disadvantage, because even though the hits are going to be made, the penetration rolls remain the same and you have a 3+ remount due to your Fearless Motivation. Moreover, though the Allies in Late War have plenty of 17 pounders, 3-inch guns and 76mm Shermans, all hitting with high AT ratings, chances are they will not have the numbers or range to go toe to toe with so many Panthers all at once.
Panthers in Assaults
Let’s face it even though the Panther is still better fighting at range you will occasionally need to engage in (or receive) assaults. Side Armour 5 can possibly repel a few bazookas or PIATS, but with a Motivation of 4+, army Panthers tend to run away when it is time to roll for Counter Attack. If your Panthers are defending an objective this is an even bigger issue as they will likely be pushed off it. The SS however changes this. Though they have a skill of 4+ making them less likely to cause casualties in an assault, they also are much less likely to be running from the fight with their Fearless Motivation. So, go ahead and sit your SS Panthers on an objective. If they have to fight up close and personal, they are not the ones that will be running away.
Panthers in Defence
As mentioned above the Panther is best in defense. The SS version is not much different. Front Armour 10 at long range will go a long way to offset the Hit On of 3+ and the gun is still the AT 14, 3+ Fire Power marvel that the German long barrel 75mm always has been. But I hear you say the SS Panther loses out because with Skill 4+ your Blitz followed by Shoot and Scoot Stormtrooper special orders are less likely to succeed. Don’t worry though the Old Hand rule takes care of this.
With your Panthers skulking within 6 inches of their Formation HQ they now stand the same chances of Blitzing out of cover, taking their shots like they were stationary, and then Shoot and Scooting back to safety as their army counterparts.
Get Out and Play
Now that we have shed the light on the differences that are coming with the SS Panther it is time to get ready to put yours on the table. The new stats in the D-Day:Waffen SS book will not only give you a new host of fun options for how you can use these mighty hunters, but also usher in an age where the Panther can become a top carnivore on the Flames Of War battlefield. Now is the time to let your Panthers go on the Prowl!
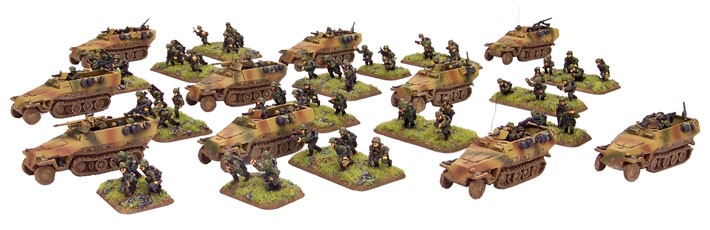
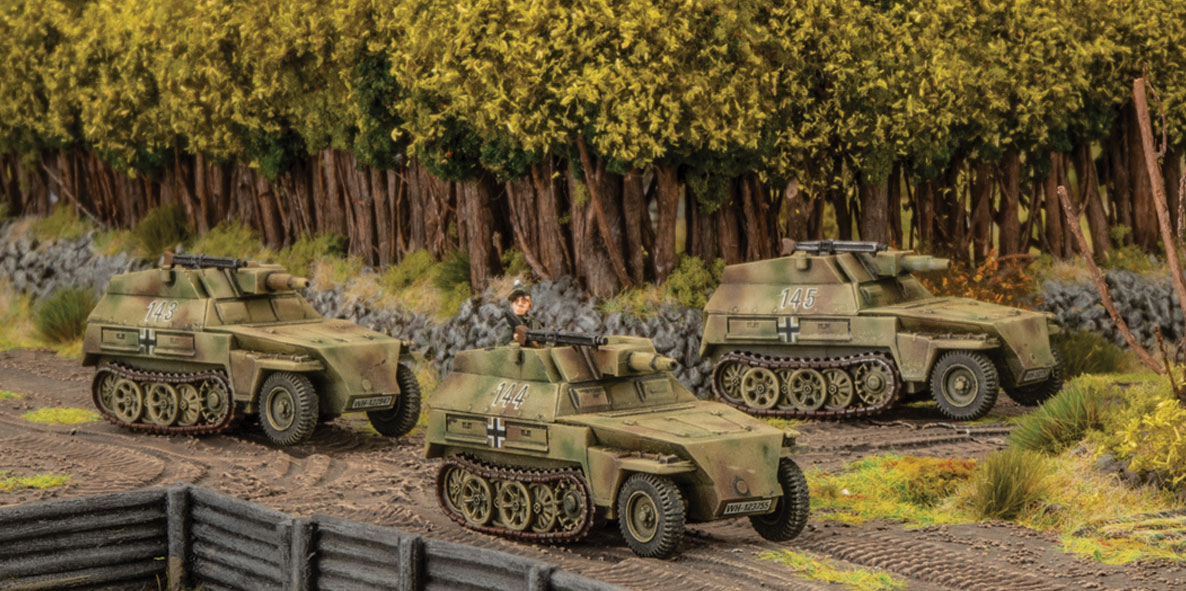
I love building recon Formations and with the release of D-Day: Waffen-SS, I was pleasantly surprised to see one of my favorites from Mid War – the Armored Car Company. So, I was excited to see how I could build a list for Late War.
The formation comprises the following:
1 HQ Unit
2-6 Sd Kfz 221 & 222 SS Scout Troops
1-3 Sd Kfz 231 SS Scout Troops
0-1 SS Reconnaissance Platoon
We end up with a relatively strong formation with a minimum of four units and a maximum of eleven units! So, if we max out the light scout troops and take the infantry platoon, we should end up with a unit count of nine – difficult to break especially if we take some command card upgrades. The light scout troops have three vehicles in each platoon as per Mid War.
Now bear in mind that everything in the Formation will be Fearless, Trained, Aggressive. Fearless means they are more likely to stick around however they are easier to be hit on 3+ so you want to optimize the Scout attribute with the armored cars as much as you can so they are hit on 5s or 6s.
This is how I would look at building the base Formation (which you can tailor depending on points required):
This comes in at 32pts and has nine units in the Formation and seven units capable of Spearhead. Giving the infantry the “Best Infantry” Command Card upgrade, they are now Fearless, Veteran, Careful. This unit is now harder to hit, can Blitz and Stormtrooper on 3+ and being Fearless make them dangerous.
With the core formation done, we now need to look at what support options could be taken. With the ability to choose from either D-Day: Waffen-SS or D-Day: German black box units, you can mix and match what you want to suit your playstyle – especially when choosing between either Fearless and Confident and/or Aggressive and Careful. Support options need to be taken from the D-Day: Waffen-SS chart.
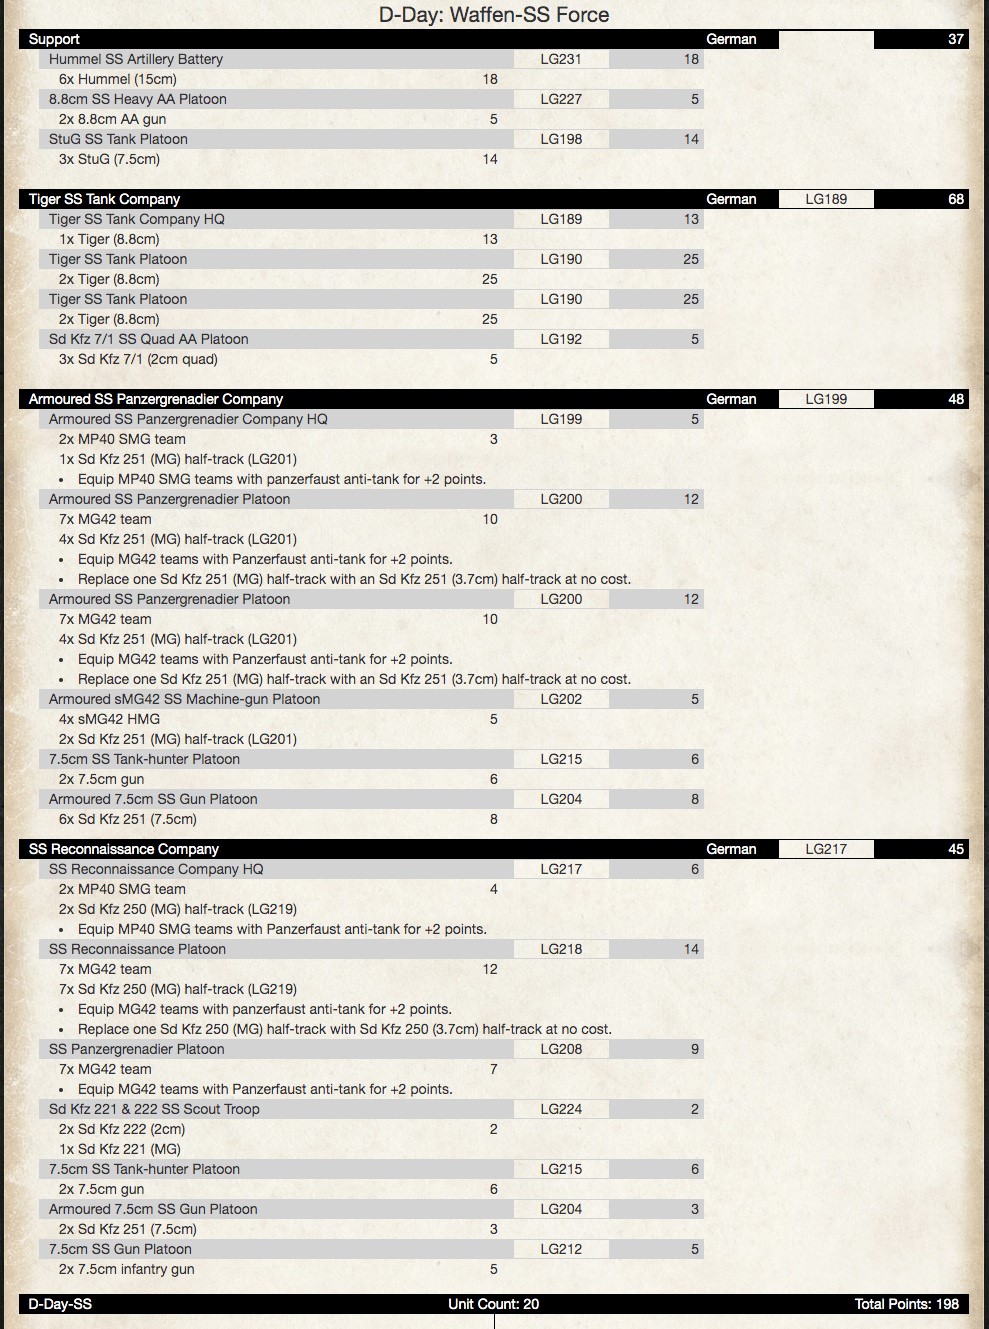
So, let us look at what we need to consider from a support perspective for this list. They should be supported by tanks, high end AT, artillery and what we need to cater for around reserves. Most games are 100pts, but several tournaments are smaller in points – some one-day games have even gone to 50-60pt games to get four or five quicker fast paced games. This is where Armored Car lists shine – more flexibility with smaller points than other formations. Looking at a standard 100pt game we have 68 points left to play with.
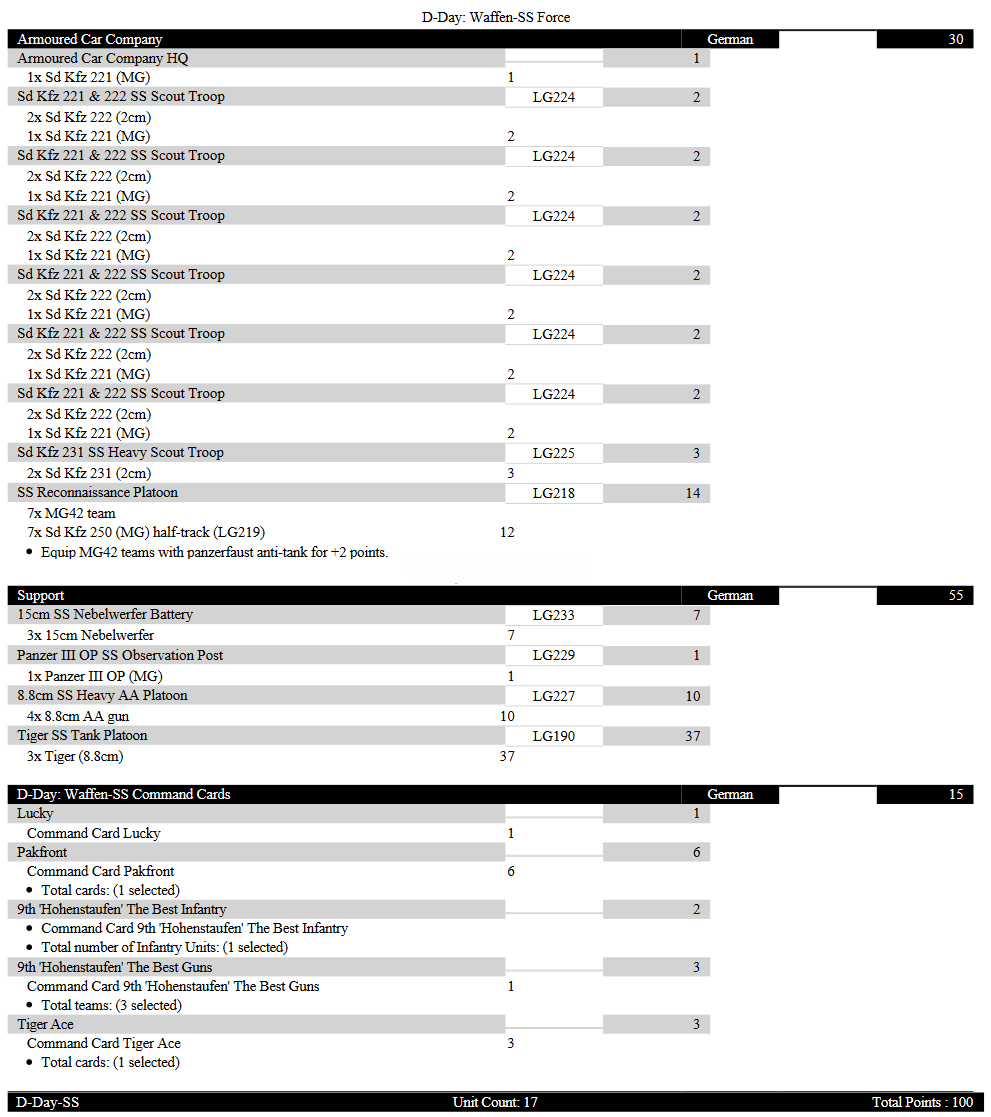
I like to look at combining a high-end AT unit as close to 40pts as possible to have one unit in reserve. The Tiger SS Tank Platoon is awesome – 2+ Morale, Veteran, Careful, 2+ cross checks, FA9, SA8, TA2, and AT14 with 40” range. This iconic monster tick’s multiple boxes for me. High-end AT, Assault beast, moves easily through difficult terrain and range of the gun is 40”. A platoon of three comes in at 37pts. Add the “Tiger Ace” command card for 3pts and you now have your single reserve unit.
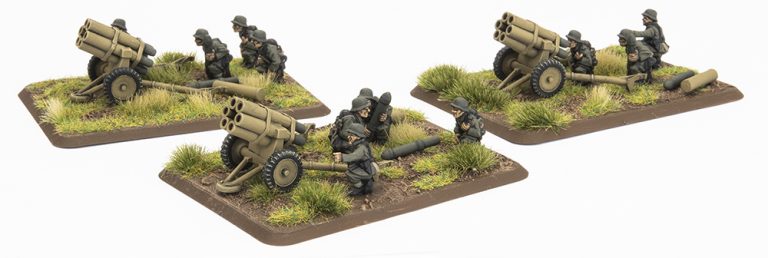
Artillery next and I am looking at the 15cm SS Nebelwerfer Battery of three for 7pts with the Command Card Upgrade of “Best Guns” to make then Careful hit on 4+ for an additional 1pt per gun.
We should add an observer for 1pt – take your pick here of the Panzer III OP or Sd Kfz 250 OP.
We need to keep our opponent honest if our Tigers are in delayed reserve so let’s take a 8.8cm SS Heavy AA Platoon for 10pts and add the “PAK Front” Command Card for 6pts to give us the ability to spread them out across our deployment area. Being Nests means that your opponent needs to re-roll Firepower tests to take them out. You can control and deny areas of the board with these and with multiple spearhead units in certain missions, expand your kill zones.
That makes 100pts – Here is the full list:
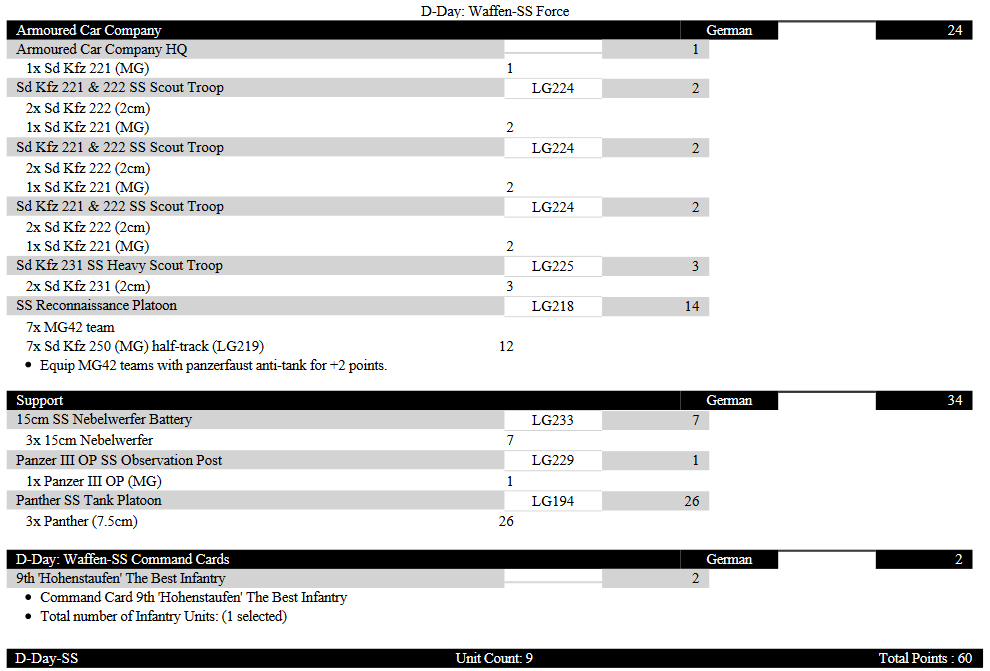
For a smaller sided game or tournament, you can change out some of the formation units, remove some of the command card upgrades, change the Tigers for Panthers or Panzer IVs or StuGs.
Here is an example list for a 60pt game:
This command card formation can provide some interesting options and can take on the British and American recon formations with similar numbers. I hope this has given you some food for thought. Happy list building!
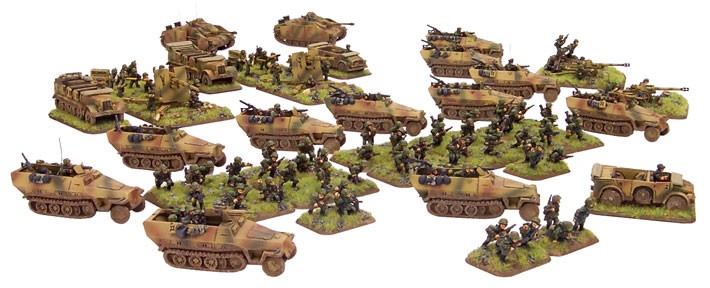
Chris challenged me to put together a Waffen-SS force from the models I had already painted for my D-Day: German force. As I had already painted well over 100 points this might give me an opportunity to get more of my painted models on the table.
The rating of the Waffen-SS troops are different than those of the Heer Panzer troops featured in D-Day: German, with lower Skill rating of Trained 4+, and Aggressive Hit On 3+, but higher Motivation with Fearless 3+. However, their commanders are Skill Veteran and have the Old Hands rule that gives units in 6”/15cm Tactics 3+.
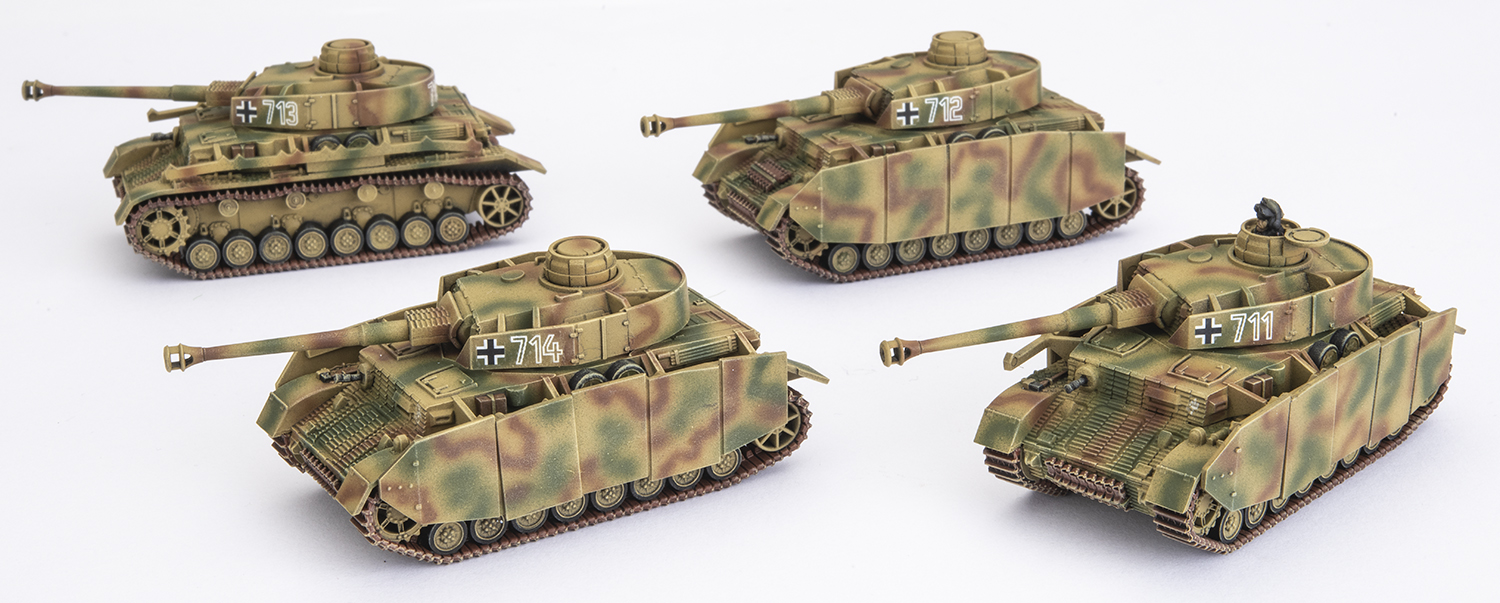
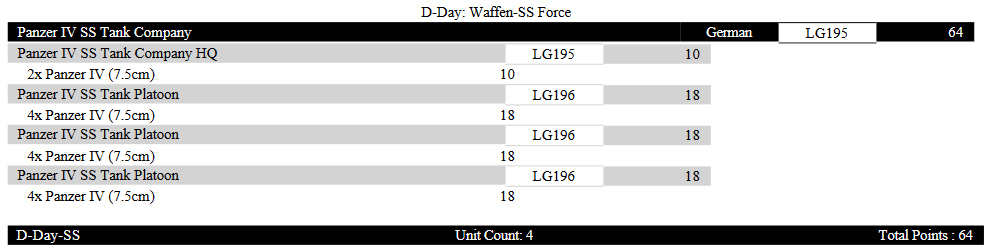
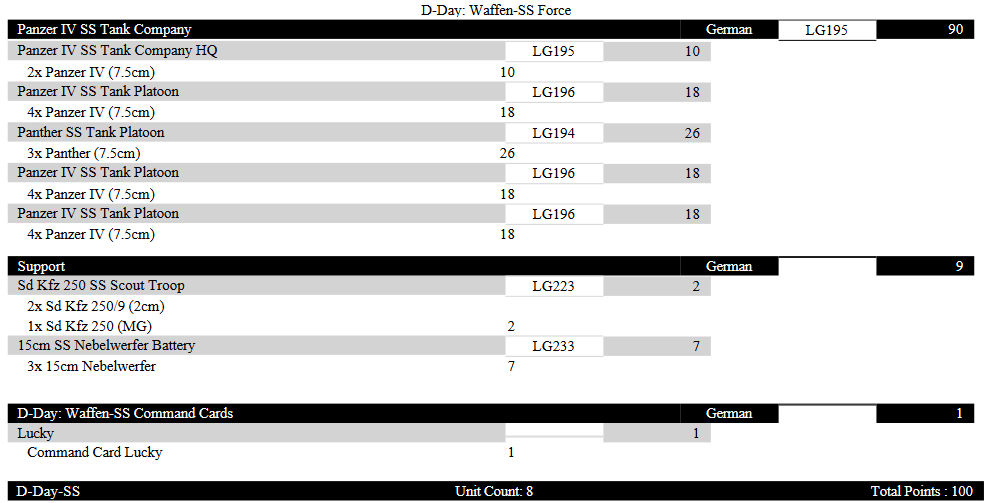
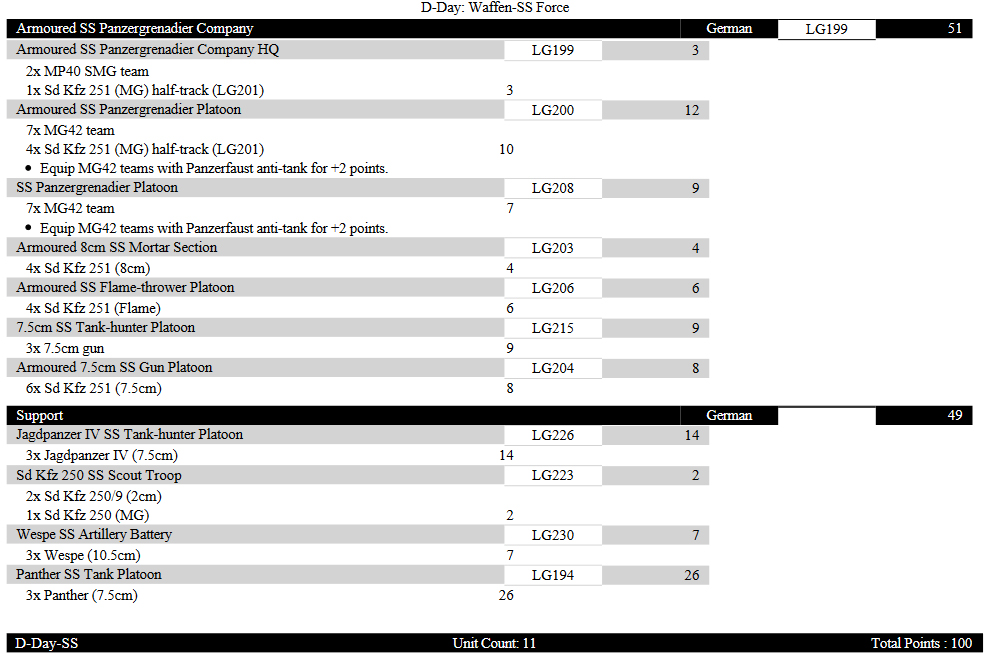
The bulk of my collection so far is made up of Panzer IVs, so the starting with the Panzer IV SS Tank Company is a good starting point. How many Panzer IVs can I stuff in this force.
That’s uses all 14 of my Panzer IV tanks for just 64 points (compared to 77 points from D-Day: German). Adding my Panthers to this will cost 26 points bringing the total to 90 points.
So what to spend the last 10 points on? I have Sd Kfz 250/9 Scouts, 8.8cm Heavy AA, Nebelwerfers, or Panzergrenadiers.
Some artillery seems like a good idea and with the last points, Three more points to spend, so how about some reconnaissance.
To get me to 100 points I’ll add the Lucky Command Card. I still had Tigers, 88s, or Panzergrenadiers I could have added.


 Assaulting is what the HQ, Armoured Panzergrenadiers, and Flame Thrower Halftracks are for!! But you will need to soften the enemy up first, as you don’t have the numbers to have a slog-fest of attrition. This list is very much about picking a target, focusing it, destroying it (or making it combat ineffective) and then moving onto the next target. You will need to have a plan here for your target selection, both for what units you want to attack and what enemy attacking units you want to take out first.
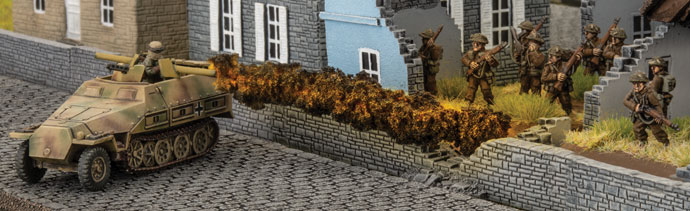
 The defending units for you will be the Panzergrenadier platoon, the mortars and Wespes, the 7.5cm anti-tank guns. You should have a solid base with those units to defend one objective. Units like the Jagdpanzer IV and 7.5cm Armoured Gun Platoon can be used as either in an offensive or defensive way, and once the enemy attacking units are blunted, can be quickly repositioned in attack.
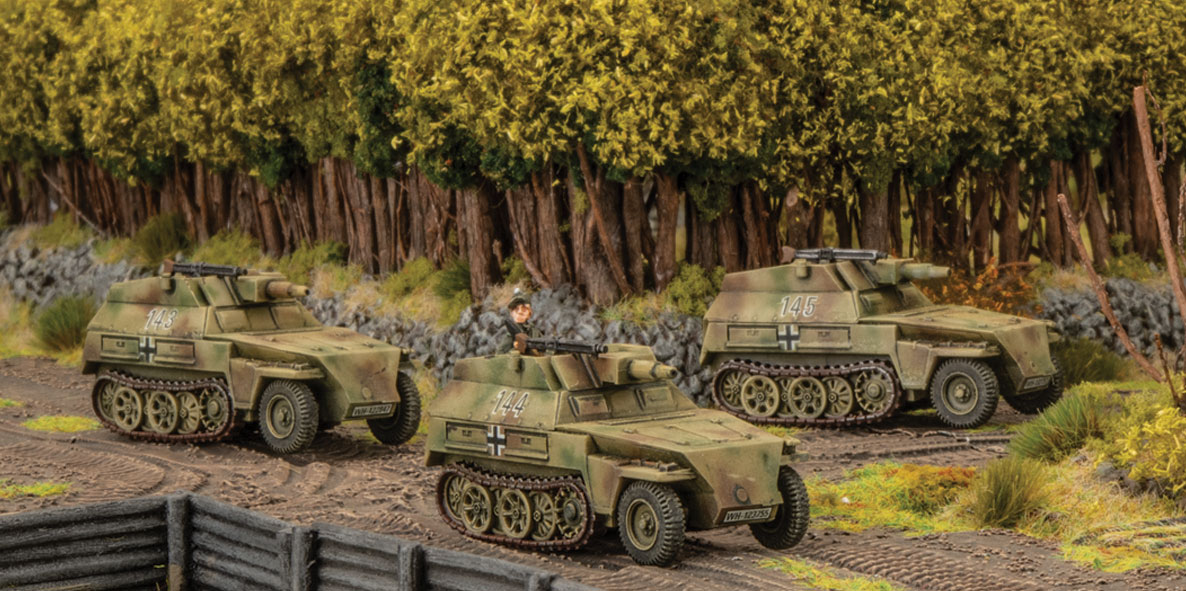
 I also want to add how much I like the Old Hand rule for the SS in Late War. The improved 3+ Tactics roll, as long as the Formation HQ is within 6” of the Formation Unit Leader, is a great mechanic. It has a lot of character, with the core veteran SS officers having to pass on years of hard won combat experience, not in the practice fields with time and patience, but having to pass it on to barely trained replacements in the crucible of battle. It really represents how many veteran SS Divisions from the Eastern Front had been bled dry or had troops re-assigned from veteran units to form new ones (eg. 17th SS or 10th SS Divisions, and 1st SS replacements). It also shows how the Germans were really struggling for both man-power and experienced troops at this point of the war. They were reaching their limits, and it was starting to show, and this simple rule illustrates it well,
 We end up with a relatively strong formation with a minimum of four units and a maximum of eleven units! So, if we max out the light scout troops and take the infantry platoon, we should end up with a unit count of nine – difficult to break especially if we take some command card upgrades. The light scout troops have three vehicles in each platoon as per Mid War.
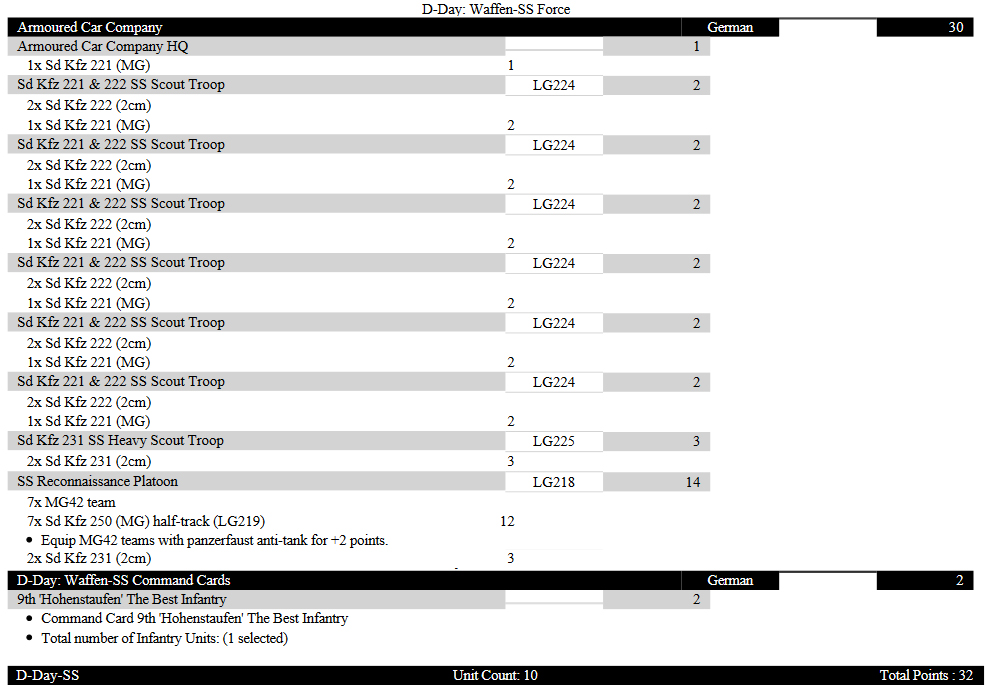
 We need to keep our opponent honest if our Tigers are in delayed reserve so let’s take a 8.8cm SS Heavy AA Platoon for 10pts and add the “PAK Front” Command Card for 6pts to give us the ability to spread them out across our deployment area. Being Nests means that your opponent needs to re-roll Firepower tests to take them out. You can control and deny areas of the board with these and with multiple spearhead units in certain missions, expand your kill zones.