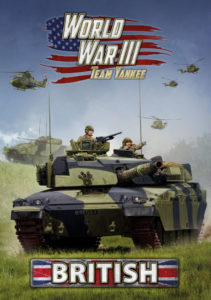
Thanks for joining us for the launch of WWIII: British! We’ve had a great time putting it together, and you’ll have a great time fielding these high-tech war machines!
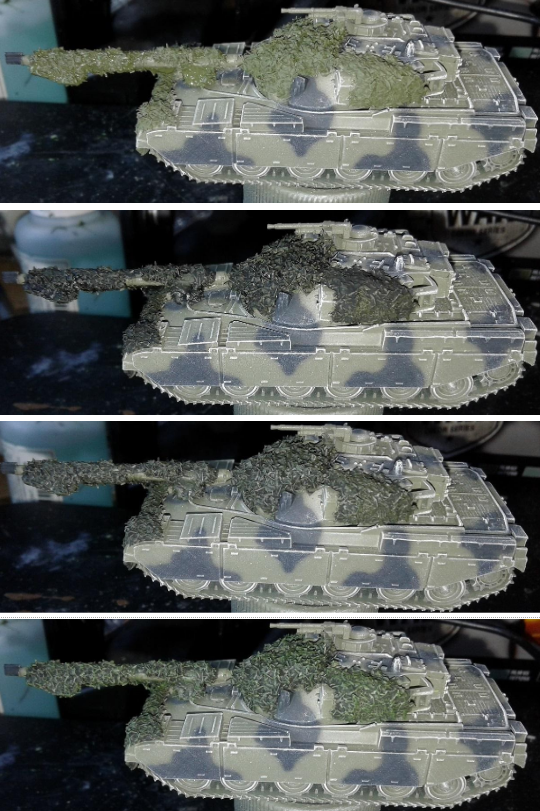
As the release of the new World War III British book approached Alex mentioned to me that while effective, the green and black scheme used by the British forces in Europe looked a little plain and is there a way to enhance the look … challenge accepted.
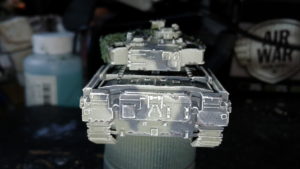
The new Challenger 1 MBT looks amazing, however I didn’t have access to one of the models at the time, so the next best thing to a Challenger is a Chieftain, so that was the model I chose to use for the purposes of this attempt to make this basic scheme look a little more of a visual feast.
The first step was to look at a few pictures of the vehicle in the field in order to get a sense of how it looks in service and anything that crews commonly did to aid in concealment while in combat (or on exercise in this case).
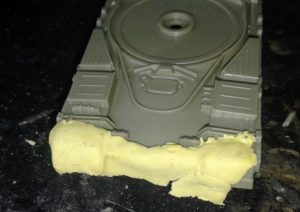
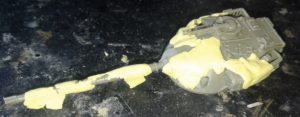
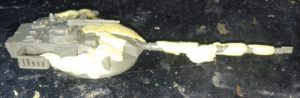
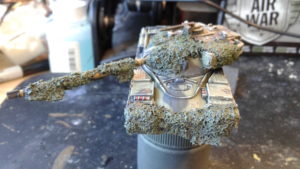
The first thing that is easily noted from photographic records is the preponderance of crews draping their vehicles with camouflage netting in order to break up the outline when in trying to remain undetected in prepared fighting positions peppered throughout the treelines of West Germany, so I began by adding ‘netting’ around the turret, hull front and gun tube. This was achieved by first making shapes out of Muliput modelling putty on the model, these would form the base of the ‘net’. To make this netting appear more realistic when applied you should do your best to avoid covering up optics and access points.
Once the Miliput was set, I then thinned down white glue with water and coated the putty with this mixture. I then liberally sprinkled Noch brand model railway scenery ground clutter material over the puttied areas, then tamped down the ‘net’ with further watered down white glue, then I waited for this to set. The following photo is what the end result looks like.
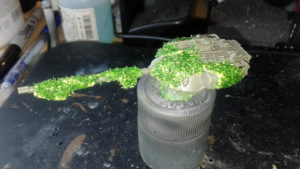
When the ‘net’ was dry, I gave the model an all over coat of Vallejo surface primer. This helps to fully secure the net to the model, homogenise the colour of the model before painting, as well as giving the following paint coat something to ‘bite’ into. With the undercoat dry I moved on to painting the green and black camouflage scheme on to model. I started with a basecoat of the old Team Yankee ‘Chieftain Green’ as this would allow the best comparison between this model and one that I had painted for ‘Iron Maiden’.
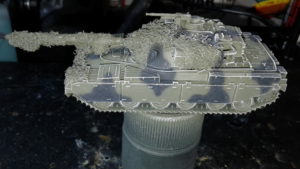
I then used my 0.15mm airbrush to spray on a random pattern of black shapes using Vallejo Model Air NATO Black, to form the camouflage pattern.
Then drybrushed the edges and raised details of the model with Vallejo Model Color Pale Sand, as a way of making these features more distinct.
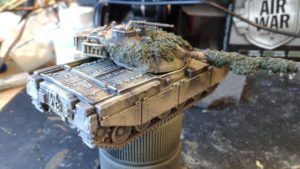
Following the edge highlight I proceeded to paint the ‘net’ with the green side out. I started by painting it with Vallejo Model Color Camouflage Olive Green. Once this coat was dry I applied a black wash to the net in order to it some ‘depth’. When the wash dried I moved on to giving the net covered areas of the model a heavy drybrush with Camouflage Olive Green so that only the deepest recesses remained stained with the black wash. The net colour was finished off with a light drybrush of Vallejo Model Color Medium Olive on the highest parts of the net, to simulate light catching these parts of the net.
The net colour is now in pretty shape so I moved on to adding a few paint chips and scrapes over the camouflage paint. This helps to make the vehicle look a little less factory fresh. I started by identifying parts of the Tank were paint would be chipped or worn off, around track guards, hatches, corners and stowage baskets are excellent places for this treatment. I started off by painting small random shapes of Vallejo Model Color Green Grey (over green parts) and Vallejo Model Color Grey Green (over the black parts) to simulate the slightly lighter colour of the worn and chipped edges of the paint.
I then used small amounts of Vallejo Model Color German Camouflage Black Brown in the centre of the wear marks to simulate chips and scrapes that had gone all the way down to the primer paint. One of the keys to using this technique is to add the amount of paint wear that is appropriate to the subject, so in the case of this Chieftain it is supposed to be a vehicle in current service but as yet to be involved in battle, therefore some paint damage is realistic, but not too much.
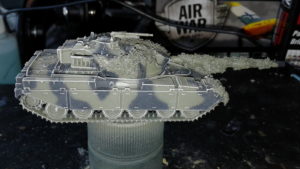
Satisfied with the amount of paint wear I moved on to painting all the small details like optics, Machine Guns, fire extinguishes etc.
After painting the details I sprayed the model with an all over gloss varnish.
Once this was set and dry I used a black enamel wash, when mostly set I cleaned this up with white spirits, leaving only the most indented details black.
I then used my precision airbrush to spray on a coat of a dusty colour on the lower surfaces of the model to simulate a dust layer building up as the vehicle moves.
The final step for completing this model was to add some streaks of grime that has run down vertical and near vertical surface of the vehicle as moisture has picked up the grime. For this step I used Vallejo Environment Streaking grime.
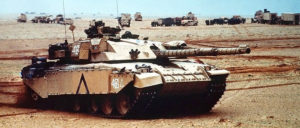
When work started on WWIII British and we were seeing early prototypes of the Challenger model, it didn’t take much convincing to decide to do a new British force.
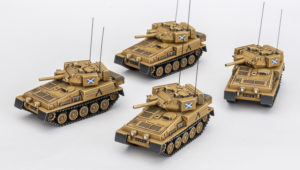
The idea of doing a desert force appealed to me as I’ve already been painting a lot of green with black camo on my WW2 Americans, so I chose to theme the army for the Gulf War, or Operation Granby.
I came up with these forces trying to maximise Challengers, while also getting some cool new Warriors in there, and useful recon.
A few of us in the office are planning to do some fun “big boy” games at 150 points, and that will allow me to field a more complete company of Challengers, while only having to paint three extra tanks and some aircraft.
(The British were using Panavia Tornados in the Gulf, so I’ll use those models with Harrier stats)
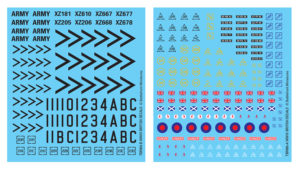
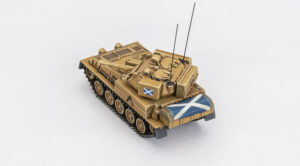
I worked together with Casey on updating the British decals, and I was keen to get the markings for Gulf War forces in there. We’ve got the Chevrons and large numbers, as well as the little Desert Rat symbols. I also found a few pictures of tanks with Scottish flags, and that is what I’ve chosen to use on my force.
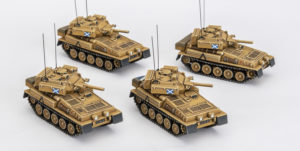
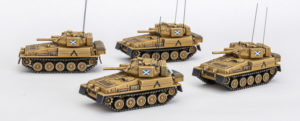
The Scorpions were the first platoon I decided to work on while we awaited the arrival of the new plastics. They’re a great little kit and are a good way to test a new scheme quickly since they’re so small.
Painting for these was pretty straight forward, and I’ve kept them clean. I can go back an add pigments/dusting later but I’ll wait and see how the Challengers turn out first.
The yellow base colour has possibly turned out a bit darker and more saturated than the real thing, but I think it’s in the ball park.
I put a large Scottish flag on the back of the platoon commander, which I will probably implement on the Challengers too.
I’m looking forward to getting the new toys as much as you all are I’m sure, and this army will be a joy to paint.
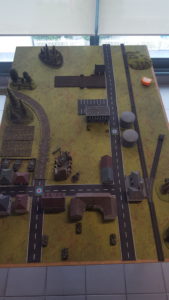
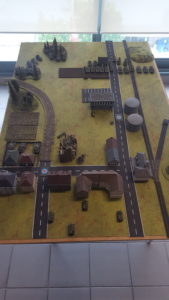
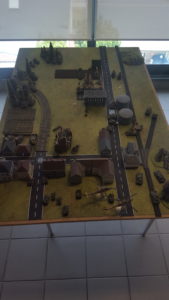
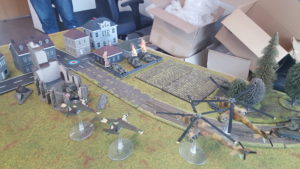
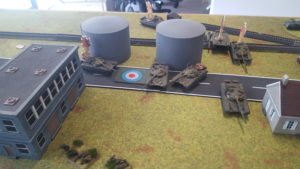
To celebrate launch day, Phil and Wayne had a little scuffle with the Studio army collection. The scenario was the classic Defence of Shellerton, with Phil playing British (of course) and Wayne taking the lead elements of the Soviet invasion force.
Phil
When I was ordered to hold Shellerton against the lead Soviet element, I was moderately surprised as I’d wargamed exactly that situation in training. So it was with a sense of deja vu that I deployed my forces. I put my attached platoon from the Irish Guards forward in the factory by the fuel tanks as a bastion to slow the enemy advance down the main road, placing hasty minefields on their flanks to delay any attempt to bypass them. With only one troop of Chieftains immediately available, I placed them in the farm on the left flank where they had an excellent field of fire while blocking any advance down the side road. I was surprised to find the church wrecked by an apparently random bomb, but pleased to take advantage of the cover that game me for my own tank. The artillery deployed behind the town and my Swingfires remained in reserve.
The plan was pretty simple: hold the factory and fuel tanks at all costs while delaying any advance into the town long enough for whatever reserves regiment could spare. Lacking any air defence, I’d begged for some Blowpipe missiles, and been promised them shortly, but had to rely on good camouflage discipline in the meanwhile.
The battle opened pretty much to plan. The Soviet forces deployed and advanced, and immediately ran into trouble. As my earlier battlefield reconnaissance had predicted, the woods on my left flank proved tough going for the Soviet tanks, breaking up their advance and presenting them as targets in ones and twos as they pushed their way clear. This delay would prove vital in holding the bastion on the right flank.
In front of the factory bastion, the killing ground was perfectly executed. The pre-planned artillery bombardment cut down the advancing infantry and destroyed half-a-dozen BMPs, while my Chieftain troop finished off the rest. The infantry even scored a couple of T-72s with their Charlie-Gs and Milans. After that, the Soviet infantry was unable to make a credible threat, although they did launch one charge under cover of massed machine-gun and self-propelled AA fire.
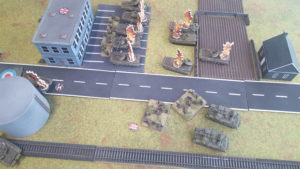
Unfortunately, the lack of air defence resulted in the rapid destruction of my Chieftain troop, leaving me holding the centre and right flank on my own until the Swingfire troop leader radioed me asking for instructions. It’s so easy to get focussed on the small picture in combat and forget the big plan. My church was taking a pounding from tank fire, artillery fire, and both helicopter and aircraft-launched missiles, but aside from a brief period spent clearing debris from the optics and replacing an aerial, no harm was done.
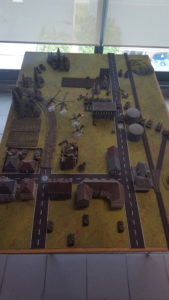
It was perhaps fortuitous that I had left my Swingfires in reserve as long as I did. When they moved up into firing positions at the rear of the town, their ambush was ineffective and quickly attracted most of the fire that had been directed at me. I lost one of the lightly-armoured vehicles to a strafing run by aircraft, and the other two were damaged, but remained in action.
Around this time, the battle started to swing. The long awaited Blowpipes arrived, promptly shooting down one of the aircraft harassing me and driving them off, and one of my reserve Chieftain troops showed up to reinforce the right flank where the Soviet tanks had finally broken through my minefields, flanking both my position and the infantry bastion. Their accurate fire quickly destroyed several Soviet tanks. With relatively few Soviet tanks still moving and their infantry digging in on their start line, things looked good at this point. Unfortunately, appearances were to prove deceiving in several ways. While I thought the battle was in its final stages as my third Chieftain troop reported their imminent arrival, and the last few Soviet tanks seemed about to be knocked out or driven off, the battle appeared quite different to Guardsmen in the factory.
The sustained heavy fire had knocked out radio communications with the Irish Guards early in the battle, but as they were holding out well, that seemed like a minor problem, However, with the loss of every visible tank and my position being covered in a pall of dust and running low on anti-tank ammunition, it appears that the Guardsmen thought themselves the lone survivors, so when the Soviet tanks passed through their minefields with minor losses and overran their flanking anti-tank position, while the fire from the front had not abated as the SP AA guns had moved to close range, it appears that they felt they had little option but to surrender after a hard-fought battle.
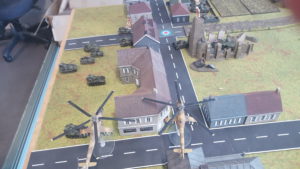
Having lost my forward bastion and with the Soviet tanks advancing into Shellerton itself, my own position was overrun, and a fighting withdrawal to the next line of defence was ordered. The Battle for Shellerton was over.
The good news is that I hear that the replacements for the Chieftains we lost are likely to be the new Challengers. With their much improved front armour and engines, I doubt that I would have lost the battle. Even the heavy aircraft missiles would have had trouble penetrating them!
Wayne
Even though I worked on adding the new material to World War III: British, the original book, Iron Maiden, is really Phil’s baby, as are the scenarios. It seemed right and proper that Phil should command the British, while I took the dastardly Soviets.
As luck would have it the Soviet forces from the scenario is similar to what I have run in the past with my own Soviet force, so I had a good idea how it would handle.
I simply planned to push hard, down one flank while tying up resources on the other flank. The forward of the two objectives was on the sealed road running parallel to the railway line on my left, while the approaches to the further objective on the right provided more concealment, but was well protected by four Chieftains. On the left flank Phil had placed his dismounted Mech Platoon in a factory building and a string of minefields on the open ground around it.
My BMP-2 Motor Rifle Company and seven of my T-72s would attack the Mech Platoon and take the building and the objective behind it. On the right my other six T-72s would tie up the Chieftains, keeping them from interfering in the left-hand attack. I’d use my Hinds and SU-25 to also concentrate on the Chieftains and any reserves that may arrive.
What happened? I started the battle as planned pushing up on the right to attack the factory building, dismounted my Motor Rifles and moving the BMPs forward to shoot up the Mech Platoon. That first round of shooting did not go well. I ended up rolling over 30 dice for just two hits. I didn’t kill a single team, let alone pin them down. On the other flank half of my T-72s failed cross checks and I wasn’t able to engage the Chieftains heavily. My Hinds failed to kill a tank and my SU-25 didn’t even turn up.
As the game when on my dice continued to betray me, but on the second turn I did take out a Chieftain Troop, although it took a lot of firepower. The Hinds, the SU-25s, and the right-hand T-72s each took out one tank to eliminate the platoon. However, the British Chieftain formation commander remained to cause much trouble, nestled in the ruins of a church.
Phil’s firepower continued to prove effective, knocking out all nine of my BMP-2s in the first turn, and grinding down my Motor Rifles in the subsequent turns with his Mech Platoon and Abbot artillery. When he finally got his Swingfire anti-tank missile carriers in turn three the T-72s on the right began to suffer.
Meanwhile on my left, I pushed into the minefields with my mine plough tanks in an attempt to clear them. I lost one tank and had two bailed in the process. I eventually cleared a gap for my tanks in turn 4, but not before I had lost a T-72 to close-range Carl Gustav anti-tank fire from the factory.
Phil had brought on his Blowpipes and I lost SU-25 to them during an anti-tank missile run on the Chieftain formation commander. In turn five Phil got another Chieftain Troop which shot up two more of my left-hand T-72s just as they were lining up to knock out his Chieftain commander. However, one survived to assault the Milan missile team on the objective. I had a couple of T-72s contesting the objective, most of Phil’s Mech Platoon were still hold it in the factory building, but the Milan’s were in a foxhole in the open. Only one of T-72s made it in to assault as Charlie G fire bailed out the other. I failed to kill the Milan, but Phil failed his Counterattack roll, forcing his Mech Platoon to move 6”/15cm away from my victorious tank. The result of this was his Mech Platoon were no longer within 4”/10cm of the Objective and as I had had my T-72s on the Objective at the start of the turn and ended it with no enemy team within 4”/10cm of it, I had won the game!
Conclusion Considering how the game was panning out to that point, it was an unexpected result. However, it does show if you keep at your plan, it can still sometimes work in spite of your terrible dice. I feel another turn and Phil’s fresh Chieftain Troop would have cleaned things up, but pushing hard won the game before that could happen.
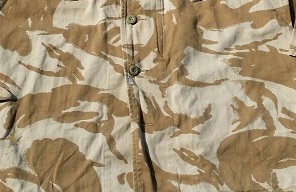
DDPM 4 Colour
Desert Disruptive Pattern Material (DDPM) comes in three flavours. The first version was introduced in 1985. This version simply replaced the four colours of the temperate/tropical DPM with browns and tans. At the time this variant was introduced there was no real requirement for the UK’s MoD to acquire very many uniforms in this colourway. It was therefore sold directly or through licensing agreements to various nations in the Middle East, including (but not restricted to) Iraq and Saudi Arabia.
‘Dense’ DDPM
The second variant was heavily used by the UK forces during operation Granby (the first Gulf War). The primary reason for this version coming into being was the realisation that British troops might be mistaken for enemy troops if deployed to the Gulf wearing the four colour Desert DPM.
A three coloured type was trialled, however it was deemed to be too close to the four colour type, so a two coloured version was rapidly developed.
This version is often described as ‘dense’ pattern as three of the four standard DPM colours were replaced with a medium brown over a tan base, causing the darker shapes to cover a large amount of the light colour.
While this was a quick expedient to get into production, an important factor as the troop build up during ‘Desert Shield’ gathered pace (therefore a pressing need for an appropriate uniform existed), it was considered too dark to be properly effective in the sun soaked sands of the Middle East.
Ironically enough a variant of this colourway was chosen for the later ‘Soldier 95 and Soldier 2000’ type desert camouflage uniforms.
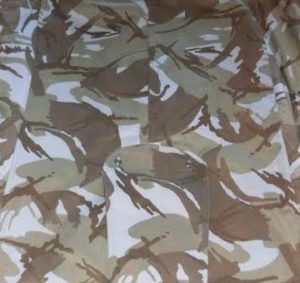
‘Sparse’ DDPM
Toward to end of the first Gulf War the British stared to deploy a variant considered to be more effective in the theatre of operations. This version referred to as ‘sparse’ DDPM is quite similar to the type described above, however the pattern essentially does away with replacing the shapes of the two minor colours in temperate DPM with dark brown in favour of those shapes being the same light tan as the base colour of the uniform. This has the effect of creating a more sparse type of camouflage pattern. This variant was fairly short lived, existing only between late 1991 and the introduction of the ‘Soldier 95’ uniforms (both temperate and desert) during 1995/96.
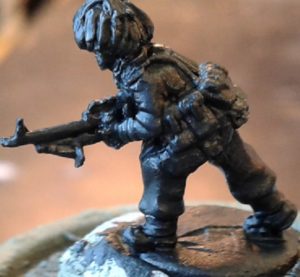
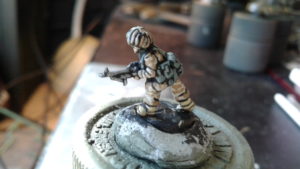
For the figure below I chose to go for the most common variant, ‘dense DDPM’. For the purposes of our fictional conflict any of the versions would be appropriate, with the four colour type being the least anachronistic for 1985, but also far more complicated to replicate in the 15mm scale. However in a case of art imitating life I don’t consider it to be particularly far fetched for one (or both) of the two colour types to be quickly developed for exactly the same reasons that they were in the real world.
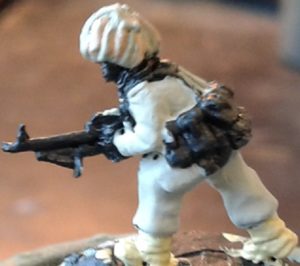
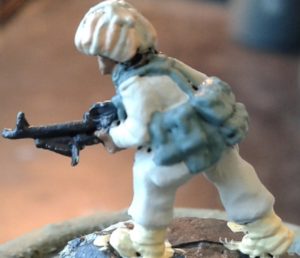
Step 1: The figure is uncoated with black Vallejo Surface Primer to give the follow on paint something to ‘bite’ into.
Step 2: Next I paint the uniform base colour of Vallejo Model Color 70.884 (Stone Grey).
Step 3:
Then I paint Vallejo Model Color 70.821 (German Camo Beige WWII) as the main colour for the Hessian strips on the Helmet.
Step 4:
Following the main color of the Helmet strips I paint a random selection of the hessian strips with Vallejo Model Color 70.843 (Cork Brown).
Step 5:
Then I give the Boots a coat of Vallejo Model Color 70.976 (Buff).
Step 6:
With the desert tans in place I next colour the ’58 Pattern Web Gear and Scrim netting scarf with Vallejo Model Color 70.920 (German Uniform).
Step 7:
I start with Vallejo Model Color 70.875 Beige Brown as the base colour for the flesh.
Step 8:
I paint the plastic furniture of the weapon with Vallejo Model Color 70.862 (Black Grey).
Step 9:
I move onto metallics, starting with Vallejo Model Color 70.863 (Gunmetal Grey) on the metal parts of the figure’s L7 GPMG.
Step 10:
I complete the initial block painting of the figure using Vallejo Model Color 70.801 (Brass) for the belt of rounds hanging off the left side of the GPMG.
Step 11:
With the block painting done, I then cover the figure with an all over coat of Vallejo Game Color 73.201 (Black Wash).
Step 12:
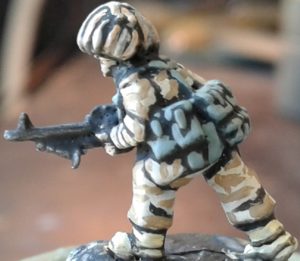
Once the Wash is dry, I go back over the uniform with Vallejo Model Color 70.884 (Stone Grey), careful to leave creases and recesses black. Then I add the DPM pattern by painting a series of swirls and stripes using Vallejo Model Color 70.873 (US Field Drab).
Step 13:
I then recolour the light Hessian strips with Vallejo Model Color 70.821 (German Camo Beige WWII), and the dark strips with 70.843 (Cork Brown).
At the same time I use Vallejo Model Color 70.976 (Buff) on the Boots, careful to leave the recesses black in all cases, to add shadow depth to the figure.
Step 14:
The various desert tan parts of the figure complete, I then use Vallejo Model Color 70.920 (German Uniform) to define the Web Gear and scrim scarf. I also start to define the figure’s flesh by applying a 50/50 mix of Vallejo Model Color 70.875 (Beige Brown) and 70.955 (Flat Flesh) to all but the deepest face and hand details.
Step 15: I complete the skin by painting the highest parts of the flesh (for instance Hose, Cheek bones etc) with a highlight of Vallejo Model Color 70.955 (Flat Flesh).
Step 16:
Before finishing the metallic colours, I go back over the GPMG’s plastic furniture with Vallejo Model Color 70.826 (Black Grey).
Step 17:
The metallics are then re-defined using Vallejo Model Color 70.863 (Gunmetal Grey) for the metal parts of the weapon and 70.801 (Brass) for the ammunition belt.
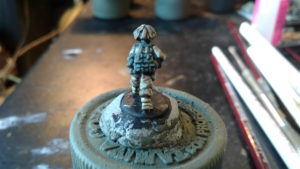
And the finished product after a coat of matte varnish:
Comrades, today we will be conducting an intelligence briefing to confirm and describe new equipment being fielded by the British army in the Northern Sector alongside German troops. As I’m sure you’ve all heard there has been a recent rearmament and push of military equipment in the British sector in what is believed to be preparations for a new offensive.
We will be discussing vehicles previously not fielded in the region, their capabilities and how to defeat them.
The British have continued to flood the sector with any and all equipment they can muster and have turned to the older Fox Scout car. While new to the hostilities it is an older vehicle that is armed with a 30mm cannon and is more than a match for our BMPs in a gun fight. The vehicle is less mobile and will restrict its movement to open ground and roads but is small and easily hidden so can be difficult to engage directly until it starts shooting which can be a problem for our lead forces.
The British continue to rely heavily on massed reconnaissance forces to
determine out axis of advance and attrit our lead forces. Make no mistake this vehicle is dangerous and is being seen conducting rehearsals in large number. Combined arms against these packs of cars is key. Artillery can easily scatter them or dissuade them from using terrain like urban areas for
cover and should be used more than liberally when these vehicles are engaged. Their crews across their entire vehicle fleet have fought on long after others would have left their vehicles behind, this is expected to be the case with the Fox so mass firepower and ensure their destruction. They have no ability to affect our tanks and small coys of tanks work well against them as they are similar to the Warrior IFV which we will discuss shortly.
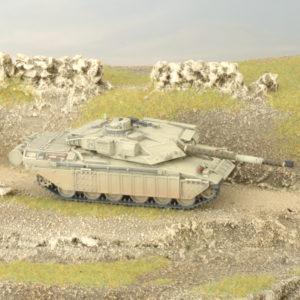
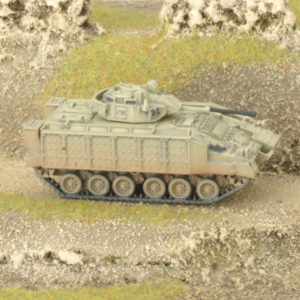
British defense scientists have developed a new armour technology ‘chobham’ which they have put into service on two new vehicles the Challenger tank and the Warrior Infantry fighting vehicle seen here.
What makes this armour interesting is that it has been specifically designed to defeat HEAT warheads. While this has an effect against all HEAT warheads it is of significant importance for smaller shoulder based weapons and smaller missiles such as the RPG-7 and the Spigot missile. These weapons become ineffective against chobham armour even against the side armour of the vehicle. What does this mean to you the commander on the ground?
Shoulder fired anti-tank weapons used by Infantry units can’t stop these monsters from assaulting. We are very used to having complete command of positions with our RPGs against vehicles and it is possible to bail a Challenger or a Warrior but is incredibly unlikely so you will need other nearby supporting units such as BMPs or tanks to make your defensive fire effective. Both of these units are incredibly effective at taking objectives in the late game so expect that they will hold back and attempt to attrit our forces before pushing forward. While BMP-2s can engage the Warrior they are at a disadvantage as the capitalists, copying our design but adding greater armour, have made engaging these with BMPs a losing affair. At long range the Spandrel missile is a good bet against the Warrior but due to their Chobham armour it is still possible for the vehicle to survive a direct hit. The Warrior is not as numerous as the BMP and few carry an anti-tank weapon, as such they are perfect targets for our tanks who with the capability of the 125mm gun will often see the passengers destroyed.
Brutal goes a long way. Even early model tanks like the T-62 are perfect at hunting these vehicles and pinning the infantry they support. For the Challenger, Chobham along with the frontal armour make it incredibly resilient against our ground-based weapons. Even powerful missile systems like the Storm will find it incredibly difficult to hurt these, our defense scientists suggest a hit from an AT-6 Spiral missile will only destroy an up- armoured Challenger 11% of the time. Flanking these vehicles is the only ground based solution, and is risky, but while the British Army is planning a great offensive spearheaded by these tanks we have a different opinion of the situation.
Gentlemen, the air force has reorganized its forces and will have flights of SU-25s on standby at all times. There is nowhere the Challenger can hide from the air force. Armed with the Kh-25 air to ground missile the SU-25 will destroy these tanks with ease. Even frontally, a hit from the Kh-25 will destroy a Challenger 80% of the time and more importantly, as we have seen with their Chieftain tank British forces are unwilling to commit their armour to battle while the SU-25 is in the air. This gives our ground forces the time and space to take up key positions and more importantly reduce their anti-air assets to be able to destroy their armour on arrival.
That brings me to their new AAA system, the Chieftain Marksman. Re-purposed older tanks are having a turret similar to the German Gepard installed. Adding to the Blowpipe and the Rapier missile systems the British army now can provide air defence coverage similar to our own. As you all know their other systems are missile based and provide large coverage but lacked the ability to deal with large numbers of aircraft simultaneously. The Marksman solves this problem and will threaten full wings of MI-24s and
SU-25s with hundreds of 40mm rounds. With more armour than the Gepard this vehicle is more suited to supporting ground operations and can rapidly destroy light armoured vehicles and infantry formations, so expect it will be in a position to move forward. While it will be rare to see all three systems in an area at once, it is a possibility, but this will most likely come at the cost of other support. It is also very difficult in most of the European theatre to hide three large units like this against an entire attacking force.
Using artillery and direct fire weapons to suppress or destroy these is key and destroying them will open the air for the air force to take apart the other elements of the enemy force. Remember enemy air defence systems can only fire on air or ground targets at a time so threatening them with both at once will force them to make tough decisions and provide you with options. The other main support vehicle being pushed up to the front is their version of the Grad, an MLRS system that primarily delivers scatterable munitions such as DPCIM and mines.
Unlike the other howitzer and mortar based systems the MLRS can deliver munitions across huge areas and will be a huge threat to dug in companies. As with the air defence systems these will be a priority target and based on the threat using either tanks or aircraft is your best bet to deal with these. Should you be engaged by the MLRS staying in place is not a good option as repeated bombardments will quickly dig out our infantry. Leaving the position is unfortunately also a concern as the British are exceptional at directing artillery fires and the area hit with this system is so large that many teams will be leaving cover but unable to leave the blast area. If engaged, go to the source, either by destroying the spotting teams or the launchers themselves. Destroying the launchers is a task commonly best suited again to the air force and you can see this is a running task of dealing with their hardened and rear elements.
Even with their advancements, the Soviet army along with the air force is prepared and more than capable of destroying the capitalist aggressors with ease. Our combined arms forces supported by the air force are the ire of our enemies who are scrambling to copy our structure. Using all of the tools at
your disposal will see you to victory.
Remember the following when planning for battle:
Once your reconnaissance has determined the enemy force you face you need to understand it and its key elements so you can divide an destroy it, dividing and destroying is the key to victory.
Identify what elements NEED to be destroyed by the air force
Identify threats to the air force and plan their destruction if you don’t you will lose your air support and then have serious problems on the ground.
The British want a war of small attrition, they fight like cockroaches always staying if you do not eradicate them, too much is never enough when it comes to the application of firepower, destroy units and move to the next or risk being delayed or even taking critical losses from the remnants of their force.
Their artillery systems are now a threat to not only platoons, but entire companies. If you ignore the firepower of the British army you will not survive long enough for punishment by higher.
The British army has the most numerous reconnaissance force on the front. They are more than capable of counter reconnaissance and attrition tasks.Combined arms is the way ahead as they cannot stand against the might of our armour. This ends the briefing for today. Happy hunting Comrades.

 Thanks for joining us for the WWIII: British Live Launch. You can find all the content from the weekend here:
 The plan was pretty simple: hold the factory and fuel tanks at all costs while delaying any advance into the town long enough for whatever reserves regiment could spare. Lacking any air defence, I’d begged for some Blowpipe missiles, and been promised them shortly, but had to rely on good camouflage discipline in the meanwhile.
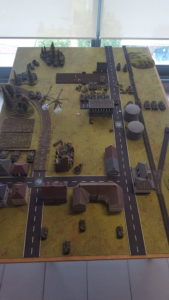 The battle opened pretty much to plan. The Soviet forces deployed and advanced, and immediately ran into trouble. As my earlier battlefield reconnaissance had predicted, the woods on my left flank proved tough going for the Soviet tanks, breaking up their advance and presenting them as targets in ones and twos as they pushed their way clear. This delay would prove vital in holding the bastion on the right flank.
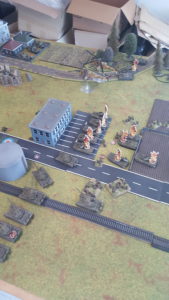
 Gs and Milans. After that, the Soviet infantry was unable to make a credible threat, although they did launch one charge under cover of massed machine-gun and self-propelled AA fire.
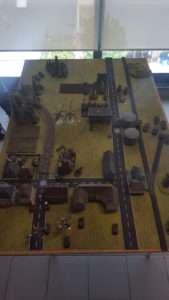 Unfortunately, the lack of air defence resulted in the rapid destruction of my Chieftain troop, leaving me holding the centre and right flank on my own until the Swingfire troop leader radioed me asking for instructions. It’s so easy to get focussed on the small picture in combat and forget the big plan. My church was taking a pounding from tank fire, artillery fire, and both helicopter and aircraft-launched missiles, but aside from a brief period spent clearing debris from the optics and replacing an aerial, no harm was done.
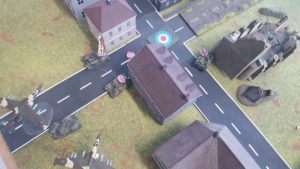
 As the game when on my dice continued to betray me, but on the second turn I did take out a Chieftain Troop, although it took a lot of firepower. The Hinds, the SU-25s, and the right-hand T-72s each took out one tank to eliminate the platoon. However, the British Chieftain formation commander remained to cause much trouble, nestled in the ruins of a church.
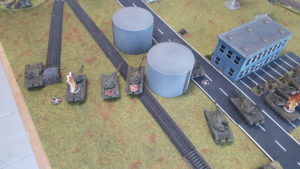
 In turn five Phil got another Chieftain Troop which shot up two more of my left-hand T-72s just as they were lining up to knock out his Chieftain commander. However, one survived to assault the Milan missile team on the objective. I had a couple of T-72s contesting the objective, most of Phil’s Mech Platoon were still hold it in the factory building, but the Milan’s were in a foxhole in the open. Only one of T-72s made it in to assault as Charlie G fire bailed out the other. I failed to kill the Milan, but Phil failed his Counterattack roll, forcing his Mech Platoon to move 6”/15cm away from my victorious tank. The result of this was his Mech Platoon were no longer within 4”/10cm of the Objective and as I had had my T-72s on the Objective at the start of the turn and ended it with no enemy team within 4”/10cm of it, I had won the game!
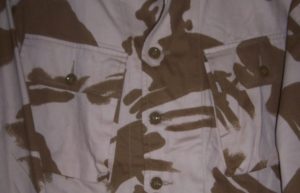
 Step 1:
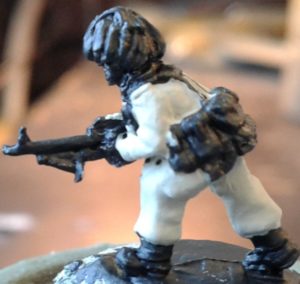 Step 2: Next I paint the uniform base colour of Vallejo Model Color 70.884 (Stone Grey).
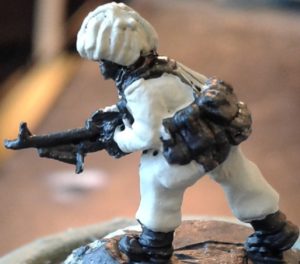 Step 3:
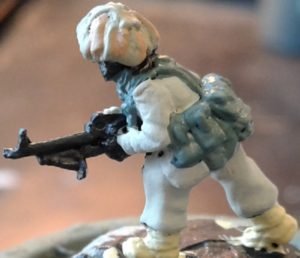 Step 6:
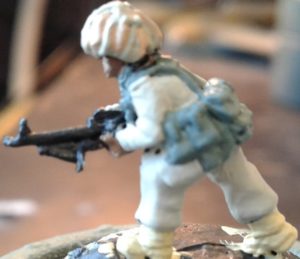
 Step 8:
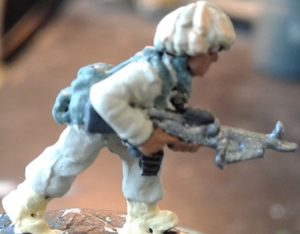 Step 9:
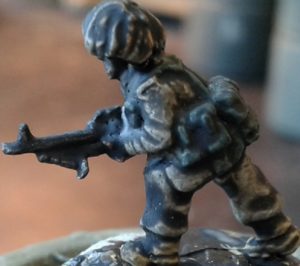 Step 11:
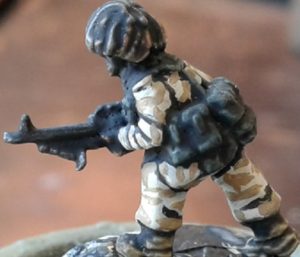 Step 12:
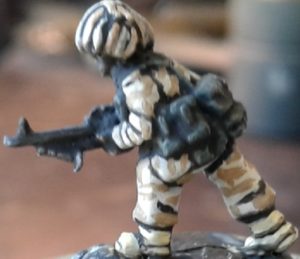
 Step 14:
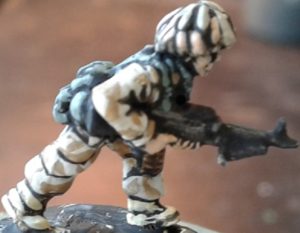 painting the highest parts of the flesh (for instance Hose, Cheek bones etc) with a highlight of Vallejo Model Color 70.955 (Flat Flesh).
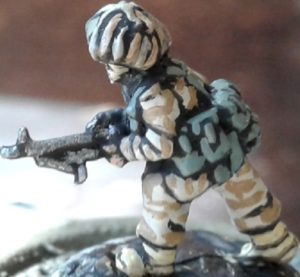 Step 17:
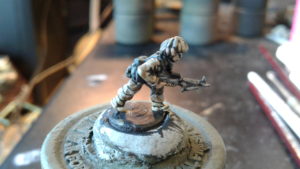
 Comrades, today we will be conducting an intelligence briefing to confirm and describe new equipment being fielded by the British army in the Northern Sector alongside German troops. As I’m sure you’ve all heard there has been a recent rearmament and push of military equipment in the British sector in what is believed to be preparations for a new offensive.
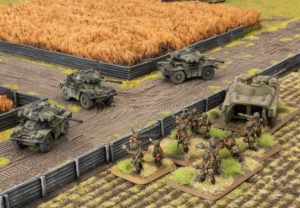
 British defense scientists have developed a new armour technology ‘chobham’ which they have put into service on two new vehicles the Challenger tank and the Warrior Infantry fighting vehicle seen here.
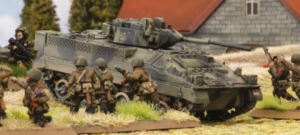 While BMP-2s can engage the Warrior they are at a disadvantage as the capitalists, copying our design but adding greater armour, have made engaging these with BMPs a losing affair. At long range the Spandrel missile is a good bet against the Warrior but due to their Chobham armour it is still possible for the vehicle to survive a direct hit. The Warrior is not as numerous as the BMP and few carry an anti-tank weapon, as such they are perfect targets for our tanks who with the capability of the 125mm gun will often see the passengers destroyed.
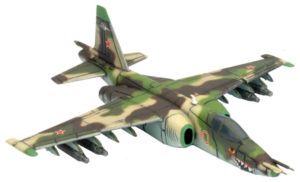 Gentlemen, the air force has reorganized its forces and will have flights of SU-25s on standby at all times. There is nowhere the Challenger can hide from the air force. Armed with the Kh-25 air to ground missile the SU-25 will destroy these tanks with ease. Even frontally, a hit from the Kh-25 will destroy a Challenger 80% of the time and more importantly, as we have seen with their Chieftain tank British forces are unwilling to commit their armour to battle while the SU-25 is in the air. This gives our ground forces the time and space to take up key positions and more importantly reduce their anti-air assets to be able to destroy their armour on arrival.
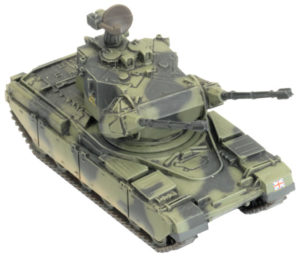 That brings me to their new AAA system, the Chieftain Marksman. Re-purposed older tanks are having a turret similar to the German Gepard installed. Adding to the Blowpipe and the Rapier missile systems the British army now can provide air defence coverage similar to our own. As you all know their other systems are missile based and provide large coverage but lacked the ability to deal with large numbers of aircraft simultaneously. The Marksman solves this problem and will threaten full wings of MI-24s and
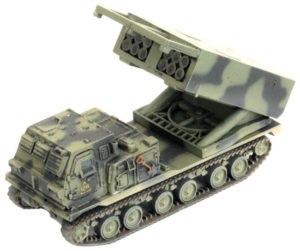 Unlike the other howitzer and mortar based systems the MLRS can deliver munitions across huge areas and will be a huge threat to dug in companies. As with the air defence systems these will be a priority target and based on the threat using either tanks or aircraft is your best bet to deal with these. Should you be engaged by the MLRS staying in place is not a good option as repeated bombardments will quickly dig out our infantry. Leaving the position is unfortunately also a concern as the British are exceptional at directing artillery fires and the area hit with this system is so large that many teams will be leaving cover but unable to leave the blast area. If engaged, go to the source, either by destroying the spotting teams or the launchers themselves. Destroying the launchers is a task commonly best suited again to the air force and you can see this is a running task of dealing with their hardened and rear elements.
 Even with their advancements, the Soviet army along with the air force is prepared and more than capable of destroying the capitalist aggressors with ease. Our combined arms forces supported by the air force are the ire of our enemies who are scrambling to copy our structure. Using all of the tools at