with Garry Wait
 One of the newest, most exciting weapons featured in the British Army book is the Marksman Self Propelled Anti Aircraft Gun (SPAAG). Following the Falklands War, Prime Minister Margaret Thatcher was livid at the losses sustained by the Royal Navy and the British Army, in part due to issues with the Rapier towed antiaircraft missile systems. Problems were experienced due to the need to “zero” the system and calibrate after each road move or unloading from a Naval landing craft. This meant valuable time of 15 minutes was wasted while cables were laid, stabilising of the sights and the calibration of the Blindfire radars was done.
It was acknowledged that the British Army’s reliance on missile systems was overoptimistic and a few within the Ministry of Defence noted that the Argentines had been pleased to have available Swiss Oerlikon twin 35mm Antiaircraft weapons on ground mounts for the Falkland Island defences.
Some of these weapons had even been captured and pressed into use with the RAF Regiment, who were delighted to have a solid backup to the longer ranged but troubled Rapier system.
Thatcher met with Minister of Defence Michael Heseltine in 1985 to discuss options as tensions had historygrown extremely hot with the Soviets. When the Iron Lady asked about options, Heseltine’s private secretary had a brainstorm. He pointed out that the Finns had expressed interest in a Marconi systems private development, the Marksman. This was a modular turret that could be mated to almost any Main Battle Tank. The Finns had in fact ordered a prototype system to be tested and put onto a modified Polish made T55. Although the testing was in the preliminary stages, the weapon
had shown promise.
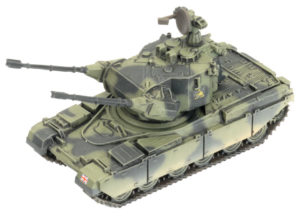 The Prime Minister jumped at the idea, especially when advised that 15 fire units of twin 35mm Oerlikon KDA guns that had been captured in perfect order from the Argentine Army and were still currently in use with RAF Regiment reservists of 1339 Royal Air Force Auxiliary Wing. These weapons were confiscated by Royal Ordinance Factory in short order and integrated with seven other sets of 35mm that were in testing along with the sole prototype unit. This gave the factory enough for seven batteries of three Marksman SPAAG’s as an initial production run. More guns would be forthcoming from Krauss Maffei who provided spares from their busy Gepard production lines.
With the Challenger tank coming on line and taking over from existing MBT regiments, two squadrons of recently replaced Chieftains were stripped of their turrets and assigned to the fledgling project. For the first time since the Crusader SPAAG of World War II, the British Army had access to a world
class self propelled anti aircraft gun. Done in complete secrecy, this weapon would even surprise the average “squaddie” who expressed their shock and admiration at the exciting new designs when displayed for the first time on Salisbury Plain.
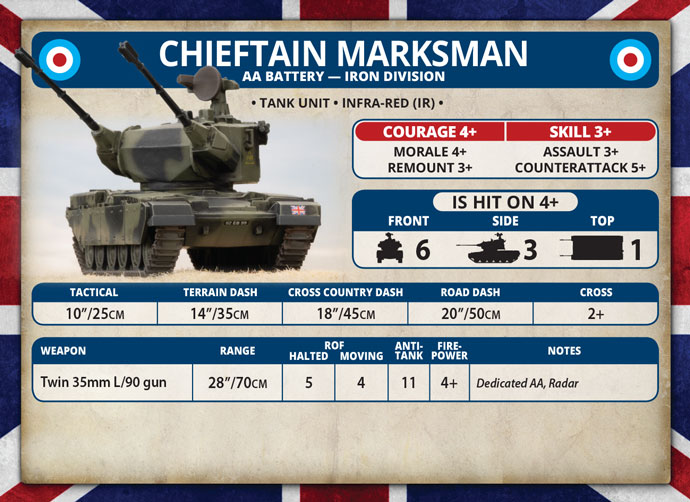
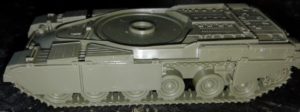
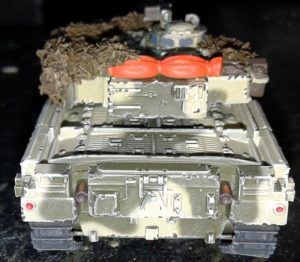
The Marksman provide an outstanding gun platform and was noted to be even more stable than the T55 the Finns had provided for testing, as the Chieftain was larger and more robust for the heavy recoil of the twin cannons. Some wag tried to describe it as a Brit Gepard, which was shouted down by indignant Royal Ordinance Factory staff. One superintendent pointed out that not only was it better armoured than the Gepard, it also had a laser rangefinder for engaging ground targets out to 8 kilometres, Marconi radar enabling air targets to be engaged out to 12 kilometres and fully stabilised gun sights for the commander and gunner. British technology had actually improved on the work of the Bundeswehr’s prized SPAAG.
More than a few officers bemoaned the fact that it had taken the Cold War turning hot to get the stingy taps of the Treasury to open a little more to provide funds for this superb weapon. Having access to ammunition kindly provided by the Argentine Army had proved helpful in getting reluctant bean counters to sign off on the process.
Initially, as the British Army was already heavily committed with the British Army of the Rhine, operators from the Royal Air Force Auxilary Regiment were integrated with British Army Chieftain crews to provide composite teams to operate the new equipment. This ensured a clever mix of
experienced gunners to operate the expensive new electronics and qualified drivers to maintain the frustrating Leyland engines of the Chieftain tanks. As Corps assets within British Army of the Rhine, the new vehicles were extremely popular and the seven batteries tended to see lots of action in the
Third World War. It was a particularly innovative weapon that took the battlefields in World War III as the Marksman. British troops soon found that the Marksman worked very well as a “backstop” support to the highly
successful Tracked Rapier. Occasionally ground commanders got overconfident and put the Marksman in the front line as a fire support weapon. Even with the thick hull armour of the Chieftain chassis, the vehicles didn’t stand up long against infantry RPG fire and cases are known of local commanders being castigated for such waste of scarce resources for inappropriate missions.
In game terms, you will find the system works very well as a complement to the existing missile systems as a mobile and well armoured platform capable of medium range effective AA support. As summarised to the troops on issue originally :

DO :
- Keep the Marksman at range, behind the front line armoured forces it’s designed to protect.
- Prioritise against air targets which are the bread and butter of the Marksman system.
- Protect the Marksman with combined dismounted and armoured forces, ensuring it’s not swamped by enemy infantry.
- Team up the Marksman with Tracked Rapier and if possible Blowpipe to ensure the full range of Air Defence assets are used appropriately. The key is to have Rapiers at the back, Blowpipe in concealing terrain scanning the skies while the Marksman keeps up with the armoured thrust forward.
- Plan the use of the Marksman carefully, using it’s excellent rate of fire and mobility to provide an umbrella of firepower over your vulnerable armoured spearhead.
DON’T :
- Risk the Marksman unit as a solo asset, remember you’re part of a larger team.
- Assume that the Marksman is a dedicated armour killer. You only carry 20 rounds per gun of APFSDS ammunition. Make them count. Your primary mission must be air defence, the anti vehicle ammunition is not there for use as a primary choice.
- Overestimate the range of the guns. Unlike the missile systems of the Rapier and Blowpipe that you’ve become used to, the Marksman is lethal – except at shorter ranges. Use the mobility of the vehicle to make the enemy pay. You have exceptional firepower and mobility and this should be used carefully.
- Run the depleted formation, Marksman provide best support as a full unit.
- Expose the Marksman to enemy fire until you’ve cleared the way. This secret weapon is priceless and not to be squandered in small scale efforts.
In conclusion, the combination of the two forces used here – Royal Tank Regiment and Royal Artillery – bring to mind the two mottos, which are respectively “Fear Naught” and “Ubique” (which translates as “Everywhere”) The Marksman truly allows your armoured crews to Fear Naught, Everywhere.
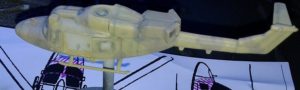
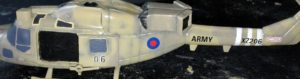
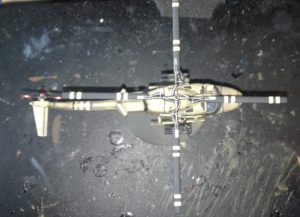
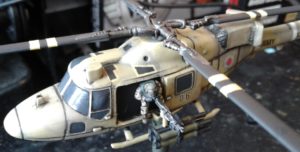 Because of that the colour scheme that I chose for the Lynx is the two tone yellow and tan camouflage pattern. I also wanted to add a few unique touches to this model, as you will see from the following step by step pictures and brief explanations.
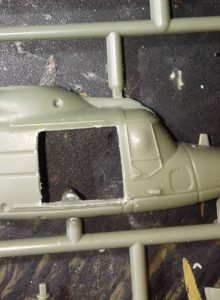 Step 1: The first unique touch that I conceived of was to have the sliding doors slid back. This required a bit of surgery using a very sharp scalpel and file.
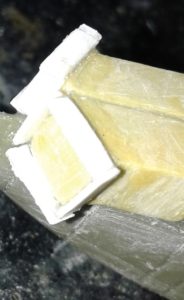
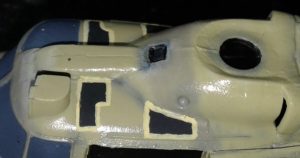
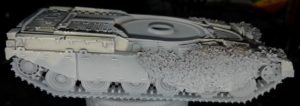
 Step 2: Once I had the doors suitably removed, I had to decide if I was going to build an interior or blank off the doorways. Whilst a detailed interior would look cool, and be an awesome modelling project, it would somewhat defeat the purpose, so I chose blank off the opened doorways. Therefore I used some 0.5mm plastic card and Muliput modelling putty.
 Step 4: With the model now assembled and suitably modified, the next step is to start painting the model. I first sprayed a light grey surface primer.
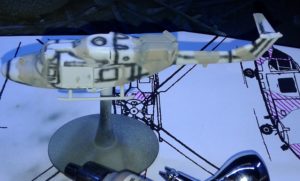
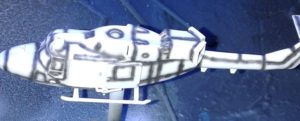
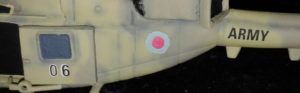
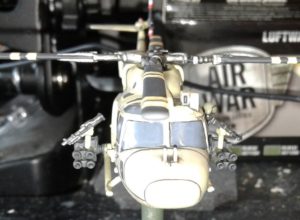
 Step 6: After the two primary colours of the model were dry, I sprayed a coat of gloss varnish over the top. Normally this stage would be thoroughly unnecessary, however I wanted to paint white ‘invasion’ stripes toward the rear of the tail, and the best way to do this would be to mask the area off, and I didn’t want to risk damaging the paint beneath.
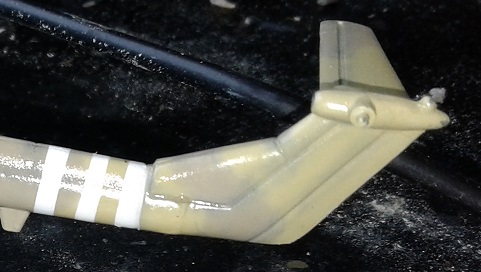 Once the area had been marked off with Tamiya masking tape, I sprayed Vallejo Model Air 71.279 (Insignia White).
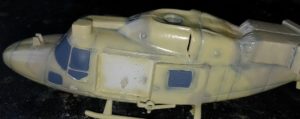 Step 7: Next up I decided to paint up the glass areas of the model using Vallejo Model Color 70.816 (Luftwaffe Uniform)
 Step 8: With the glass areas being more defined I decided to paint on the non-slip panels on the cabin roof of the aircraft. I painted to black portion using Vallejo Model Air 71.251 (NATO Black), and then I outlined these shapes using Vallejo Model Colour 70.916 (Sand Yellow).

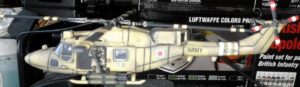
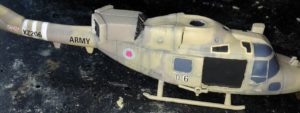 Step 11: Helicopters are dirty animals, so I added some random streaks of Vallejo Engine 73.817 (Petrol Spills) to simulate various types of grime running down the fuselage.
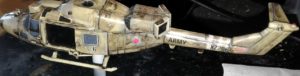
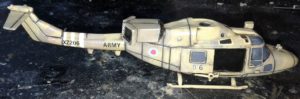 Step 12: I then applied a second all over gloss varnish, then coated the model with an enamel was, in this case Tamiya Panel Line Accent Color (Dark Brown). After allowing the enamel to set for around 24 hours I whiped most of the enamel off with white spirits, an old paint brush and cotton buds, leaving only recessed details on the model dark brown, to add depth paint.
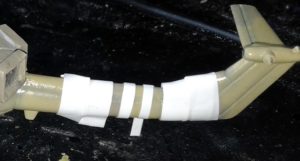
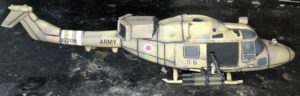 Step 13: I then started to add the final touches to the model. I started with the BGM 71 TOW ATGM launchers, which I painted Vallejo Model Air 71.251 (NATO Black) on the launcher racks, and Vallejo Model Color 70.887 (US Olive Drab) on the missile tubes. At this point I departed from the inspiration photos that I had been using, by adding a crew chief figure and M60D door mounted MGs from the UH-1 Iroquois (Huey) kit. Being as this aircraft is supposed to represent one taking part in the notional 1985 conflict I decided that the crew had scrounged a couple of MGs and pintles from ‘in-theatre’ then mounted them to the already existing weapon fairings in order to provide some local defensive firepower against light ground threats. I then painted the crew chief in ‘desert DPM’, using the following colours.
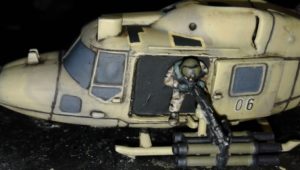
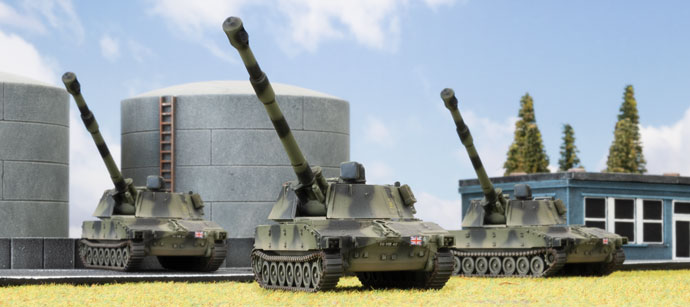
 A grid reference allows the FO to give a more accurate target indication when calling in a fire mission. The grids themselves, one grid square is 1000m x 1000m with a 4 figure reference, 6 figure increases it to within 100m x 100m, 8 figure to 10m x 10m, and 10 figure to 1m x 1m which allows for more accurate fire control. Most rounds land between 30 and 90 seconds from firing. This also depends on the rounds used, for example a normal HE round from a M109 155mm can be fired up 15km or an Excalibur round to 40km. So having a FO is mission critical as they can direct the fire support to help suppress or cover the axis of advance. Same can be said for JTAC’s
 Key to achieving this is one: by having good line of sight from available team leaders and FOs (remember the +1 as this helps against target in cover) so that you can position that marker where you need it, preferably at the back of the enemy platoon. The goal here is not to kill but to keep they heads down so that your infantry can benefit from the reduced fire while launching an assault. Also if you chose not to lunch an assault you can, with the added effect of repeat bombardments, force the infantry to re-roll their saves.
 Now for the last use arty the ranged in maker and there deployment. As for deploying your big guns, generally you want them somewhere you get great table coverage and out of line of sight to avoid counter battery fire from enemy arty. Unless your goal is to use the arty as a direct fire platform, I’d
 I hope you have enjoyed this rollercoaster ride with me today about artillery and FOs I wish you the best of luck in the future, so get out there play some games try new thing with your arty and remember it’s not just to pin infantry and that they are other ways out they that can give you the tactical edge in the fight.
 The backstory that I developed was that this force would be part of a British task force sent to the Middle East as part of the NATO/Western contingent taking part in the battle to halt the Soviet juggernaut using Iran as an invasion corridor in order to seize vital Oil resources, denying them from western forces embattled on the battlefields of Germany.
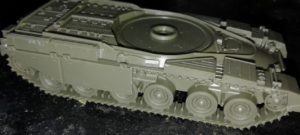
 Step 1:
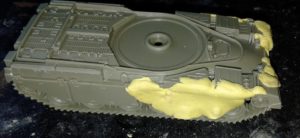
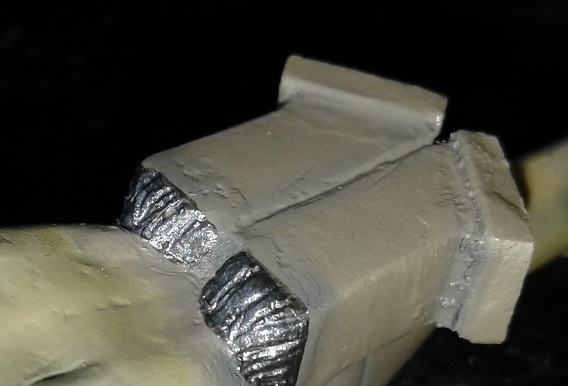
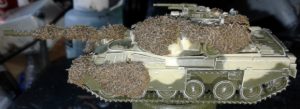
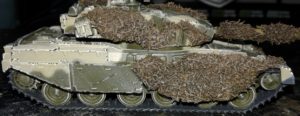
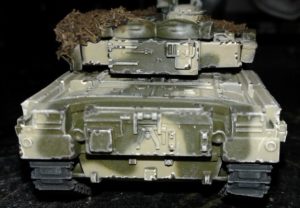
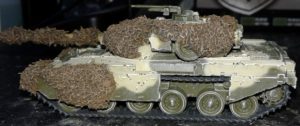
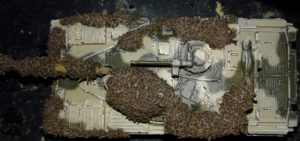
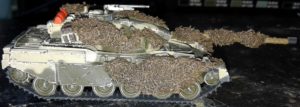
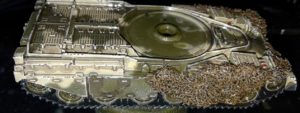
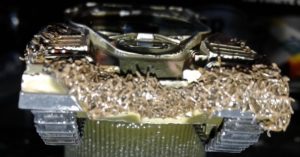
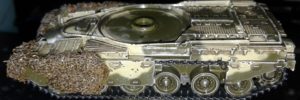
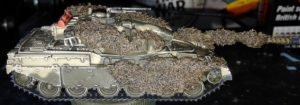
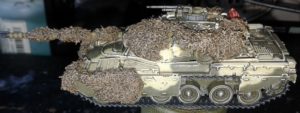
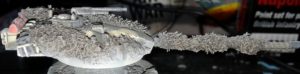
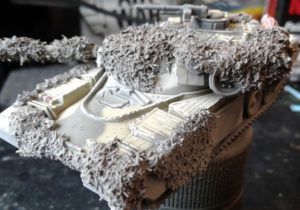
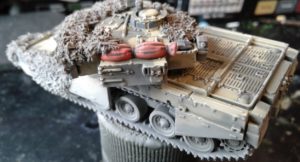
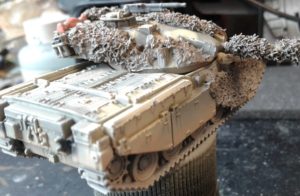
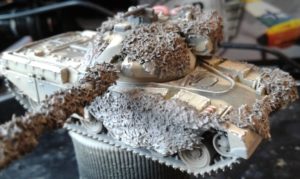
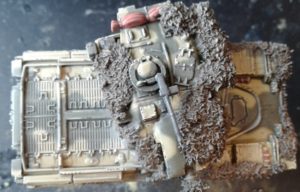
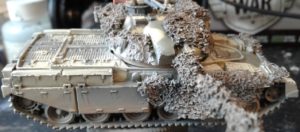
 Step 2: After building the base of the ‘canvas’ I decided that I wanted the vehicle to be liberally draped in ‘Barracuda’ type camouflage nets much like one sees pictures of British military vehicles on field exercises from the era. So I created the basic shapes of the nets with very thin pieces of Miliput modelling putty in various spots of the hull and turret as well as wrapped around the gun tube, being careful to try and avoid blocking optics or access hatches.
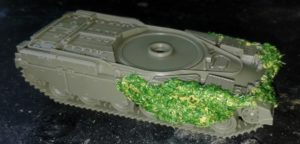 Step 3: With the basic shapes and locations of the camouflage nets in place, I then add the ‘leaf’ type texture of the net by brushing the dried Miliput with heavily watered down white glue. Then I cover these parts of the model with model railway ground clutter, and fix this in place by touching the ‘nets’ with a second coat of even more heavily watered down white glue, before leaving it to dry.
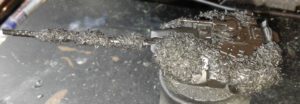
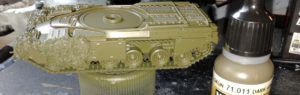 Step 5: Next I sprayed an all over coat of Vallejo Model Air 71.011 (Dark Green RLM83) as the base green for the camouflage pattern.
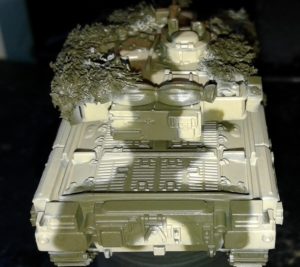
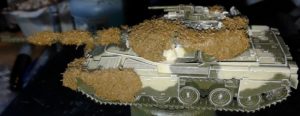
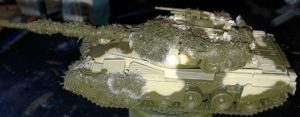 Step 6: After the base green dried I added the camouflage pattern using Vallejo Model Air 71.143 (UK Light Stone BS361). In keeping with photographic records the scheme is random, but applied in such a way as to ‘break up’ the shape of the vehicle when viewed from a distance. At this stage I also elected to keep one of the armour skirt sections in the base green to give the impression of a replacement plate having been added but not painted camouflage.
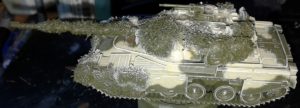 Step 7: After applying the camouflage pattern to the model I highlight the raised details and the edges of the model with an all over drybrush of Vallejo Model Color 70.837 (Pale Sand). While this is a very light colour to highlight the model with, it almost disappears on the finished product, but adds just a hint of definition. It also has the added benefit of slightly fading the two main colours.
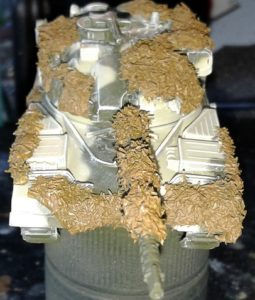
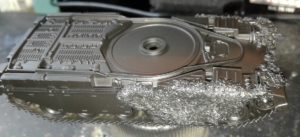
 Step 8: I start painting the colour of the netting. In this case I went for the brown side out due to the arid nature of the battlefield, so started with a
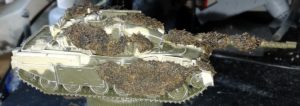
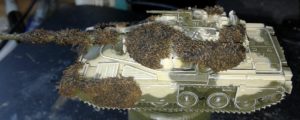
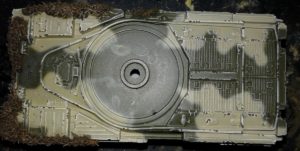
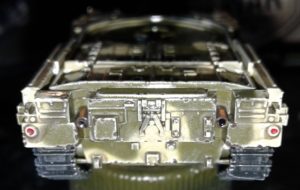
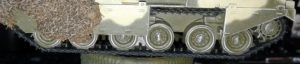 Step 12: Next I paint the tracks and main armament muzzle using Vallejo Model Air 71.251 (NATO Black).
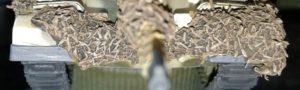
 Step 15: At this point I paint all the smaller details.
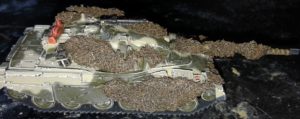

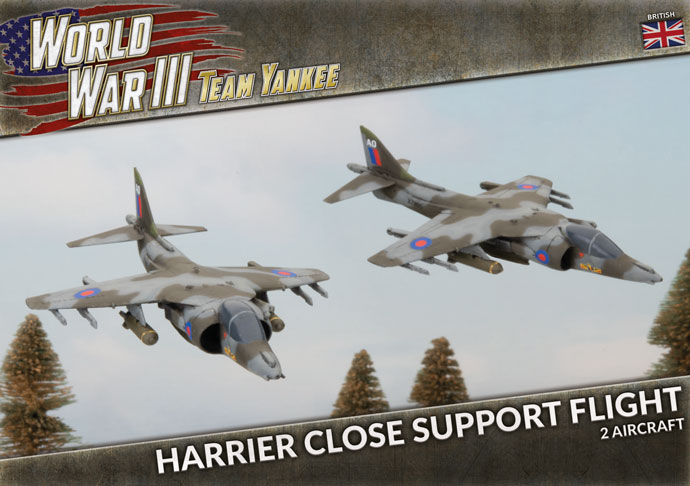
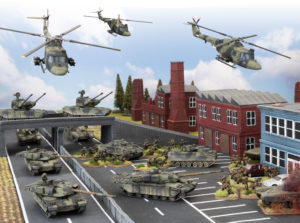
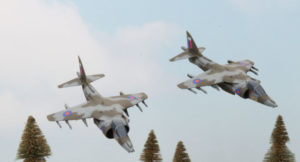
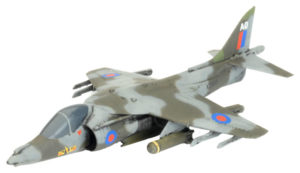 Being the first of the new WWIII: Team Yankee releases, the British are the first force to get their very own plastic aircraft, the Iron Division Harrier Close Air Support Flight. The famous ‘Jump Jet’ used by the British in World War III could swivel its exhaust nozzles down to allow it to take off vertically. As such, it was based out of supermarket car-parks, football fields, or other concealed locations close to the front line to reduce interference from Soviet intercepting aircraft, and to keep the rate of sorties higher than conventional aircraft.
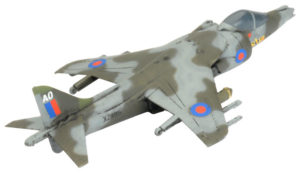 The Harrier Close Air Support Flight is an effective attack aircraft, boasting both the 30mm Aden gun and the BL-755 cluster bombs. The Harrier’s role in destroying lighter vehicles, helicopters, and dropping cluster bombs on infantry is a key support role, made all the more easy to model, paint, and field, with the new plastic kit.
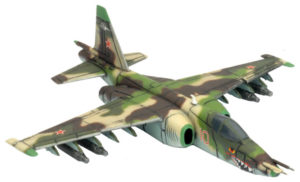 The SU-25 Frogfoot The Sukhoi Su-25 Frogfoot, known to its crew as the Grach (‘Rook’), is the modern-day equivalent of the legendary WWII Il-2 Shturmovik. It’s tough and sturdy, able to sustain multiple hits and still bring its pilot home. Flying low and slow, it can safely attack enemy troops in close proximity to its own. The SU-25 carries an impressive array of weaponry, including air-to-surface missiles and unguided rockets, on its ten under-wing hardpoints, as well as having a twin-barrelled GSh‑30-2 30mm cannon in the nose. The KH-25 Missiles come as a resin cast set of add-on pieces to make modelling your full kitted out Frogfoot easy.
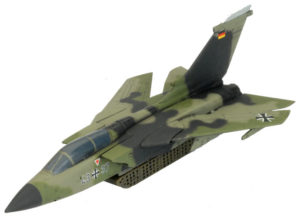 The Tornado is the third plastic kit being made available right off the bat for WWIII: Team Yankee. The Tornado is a two spruce plastic kit, with a plastic cockipit, and a resin MW-1 Submunition Dispenser cast by us to add to the kit. The main role of the Tornado is as an Interdictor Strike (IDS) aircraft. The Tornado is armed with two internally mounted 27mm Mauser BK-27 auto-cannons and two AIM-9 Sidewinder missiles for self-defence. It can carry a variety of conventional bombs, as well as the MW-1 submunition dispenser that drops a variety of munitions, including the KB44 anti tank bomblet.
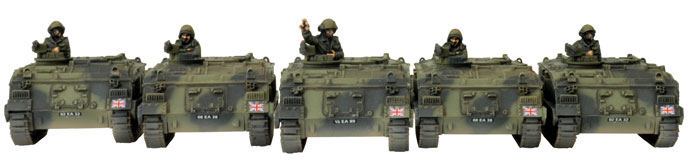 One of the biggest additions to the British WWIII book (in my own humble opinion), is the inclusion of the FV510 Warrior. A massive improvement over the FV432 in a whole whack of ways. With the addition of the Warrior the British army now have the personnel carriers to support their infantry
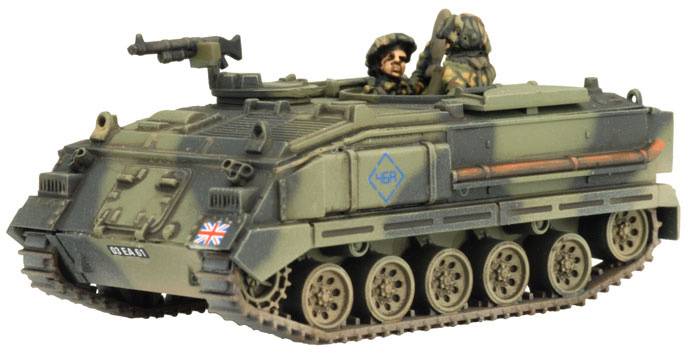
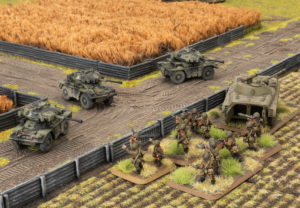
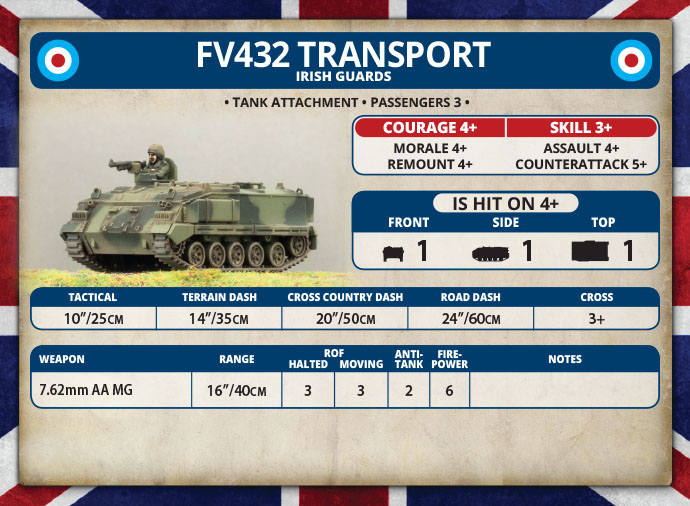 My go-to force for WWIII ever since the Brits were released; the British Mechanised Infantry force were rock-solid in defence, able to bring a number of Milan Missiles to bear against their opponent, backed up by the effective Carl Gustav recoilless launchers should any Warsaw Pact medium tanks get foolish enough to assault the dug-in positions. But what of the actual 432s themselves? Well, I will be perfectly honest here, my 432s almost never saw the table; the risk of the paper-thin armour, lack of armament (not even having the ability to mount a Milan), led to them being used as quick-dash taxis if needed. I would mount up, dash them as quickly and safely as I could, before dumping the infantry off next turn and getting the 432s as far away (usually off the table) as I could to prevent them being easy targets for enemy APCs/AFVs.
 Strengths: Larger units (by comparison), for less points, plenty of Milan support
 BMP-2, Marder, AMX-10P; Now the Warrior joins the ranks of decently armed IFVs. The effective 30mm Rarden gun gives the Warrior a fantastic amount of offensive power, combined with the anti- helicopter ability to keep pesky Hinds at bay.
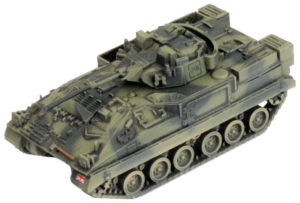 That’s the armament, but how is the armour? The regular Warrior is 5/3/1; a cut above the other IFVs in the bracket, and will remain one of the better armoured IFVs until the Yankees get the Bradley, and the Soviets get the BMP-3. But wait, ‘regular’? What do you mean ‘regular’? Well, the Warrior did come with an applique armour package, placing spaced armour round the sides. What is this going to do for the Warrior?
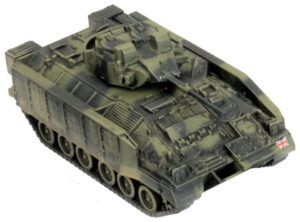 Strengths: 30mm Gun with anti-helicopter makes it a threat to most enemy forces, armour is effective against small arms, and infantry-carried anti-tank weapons
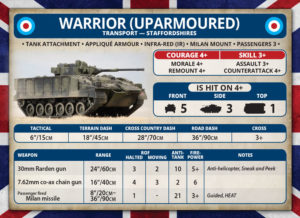 Okay, so maybe I haven’t done a complete comparison of the two forces, but I have slipped in some of the newer kit in the book to give them a run-out. As you can see the main formation for the Warrior Company is a lot smaller than the FV432 Formation (and I didn’t even give them the Uparmoured option!). Only two platoons of infantry, the mortars and MCTs are gone, as well as the anchors that were the Chieftains.
 Today I’d like to discuss one of the most radical changes of all – the Fox.
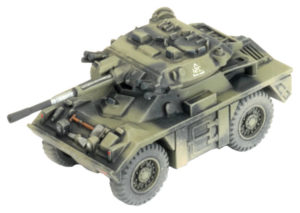 As a cost effective scout vehicle, the Fox hits hard.
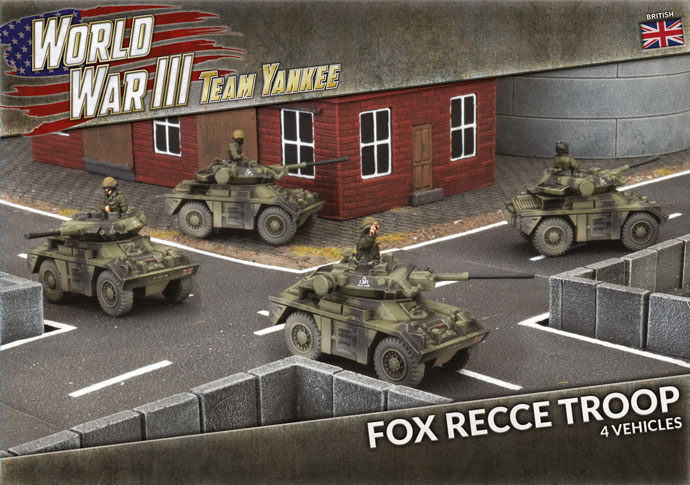 Where the Fox really shines is Road Dash of 48”/120cm compared to Scimitar 36”/90cm. With huge road networks in western Europe, this road dash is a fantastic improvement and really helps with the improved points level. There is no reason you should be going offroad as the road mobility
 One fun fact about the Fox is that small numbers were used for airmobile support of British airborne forces. You can do this by choosing the support box option as noted above and use in support of an Airmobile Formation. Historically the Fox could even be parachuted into an operational area, giving the British Army a lightweight and fast support vehicle for their light airmobile forces.
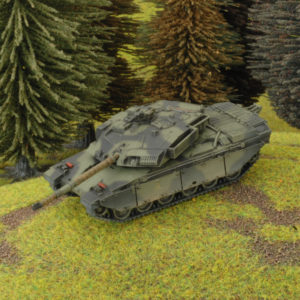 My current British army is based around a Chieftain squadron with a full 14 uparmoured Stillbrew Chieftains, some Swingfire missiles, a couple of Scorpions, a platoon of infantry and a little support. It’s a good little force, and I’m quite happy with its performance. However, my Chieftains have been usurped as the biggest tanks on the battlefield! The Challenger is even bigger!
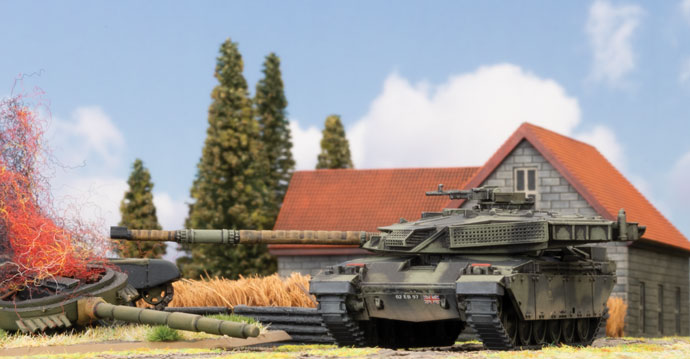
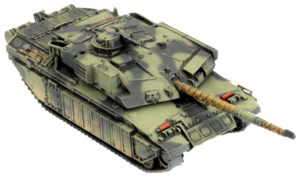
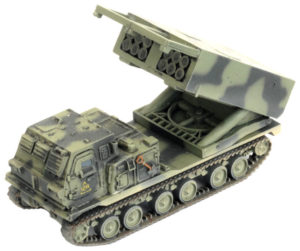
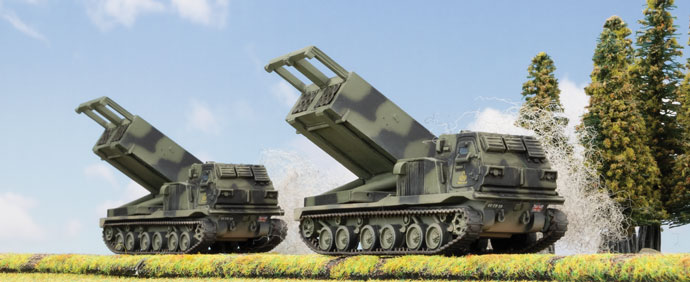
 I do think I’ll manage to resist the last two new plastic kits, the Fox armoured car and the MLRS rocket launcher. I’m tempted to get them to make into objectives, but they don’t really fit in the theme of my force. I already have a pair of Scorpions for reconnaissance, so the Fox, although cute, isn’t really needed, despite being a touch cheaper for four. The MLRS is pretty awesome for shutting down infantry with its big Salvo template and each launcher counting as two weapons, but I prefer to focus a little more, so my tanks don’t actually have any artillery support — although thinking about it, two MLRS for the price of another Chieftain might actually be a good idea…
 with Wayne Turner, Battlefront NZ
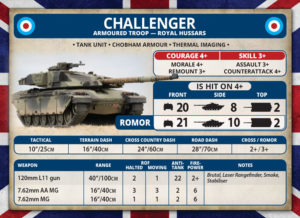
 We have also included the option for ROMOR armour, which consisted of explosive reactive armour added to the front hull armour, and Chobham composite skirts in place of the bazooka skirts. This is an armoured package that was developed to apply to the Challenger in times of war to give the tank further protection.
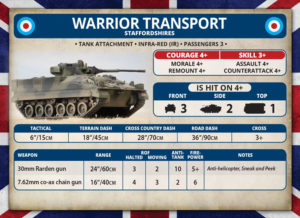 The Warrior was also used to carry the battalions Milan anti-tank guided missile teams. These two units either allow you to field the Warrior as a transport of the Milan missiles, or with the Milan mounted on the Warriors to be fired from the vehicle. The Warrior Anti-tank Section has the additional armour of the Up armoured version of the IFV as the Milan mounts were introduced with the additional armour package.
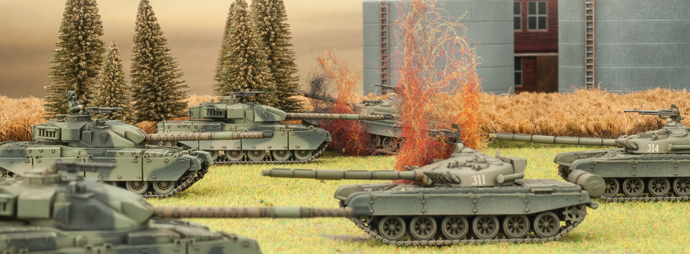
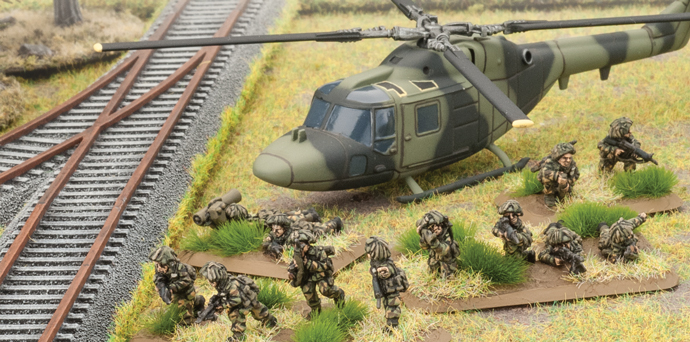 The formation comes with two Lynx Airmobile Platoons and a Lynx Milan Platoon for anti-tank support. The Lynx Airmobile Platoons have the same composition as the Mechanised Platoon, replacing the armoured transports with Lynx Transport Helicopters.
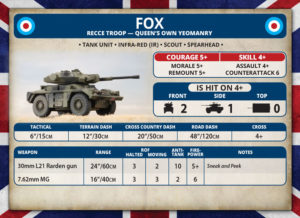
 To destroy tanks from the air the British also employ the TOW Lynx HELARM Flight. The Lynx HELARM is armed with the American TOW anti-tank guided missile with an HEAT anti-tank rating of 21. The Lynx HELARM uses the Hunter-killer rule that allows it to use terrain for concealment and remain Gone to Ground unless it shoots.