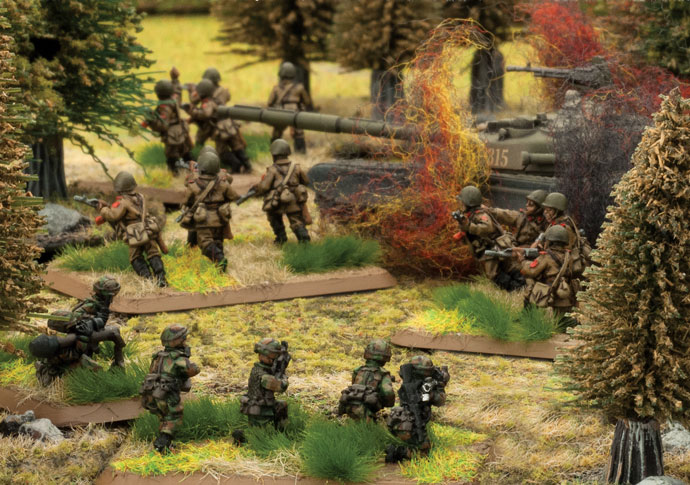
Thanks for watching, reading and of course interacting over on social media. Wayne and Chris really enjoyed the battle report live feedback and hope that we can arrange another one of these for a future Live Launch event.
Hopefully you have picked up some great ideas on how you can build a new WWIII: Soviet army, or if nothing else have a few ideas on how to counter them on the tabletop.
This was our last Live Launch before Christmas so make sure you take care of yourselves, have a large pile of Flames Of War and WWIII Team Yankee models on your Christmas list and we will see you in the New Year for the Bagration: German Live Launch.
I am new to WWIII:Team Yankee but have a few years of experience with Flames Of War. During this time, I have really come to love how artillery works. The idea that you can use it to exert your willpower across the table to make your opponent react to your plans is very cool and I think it adds a level of realism to the game. The big guns can be a surgical instrument, a shield for your advancing units, or any other of a host of tactical options limited by your imagination, terrain and the opponent’s army composition. So, when I was introduced to Team Yankee and saw the artillery weapons that are available in the system, I got pretty excited! Now with the launch of World War III: Soviet we have a range of brand-new, excellent artillery options to consider.
In this article I would like to take a closer look at the mighty Soviet artillery Battlefront is about to unleash on the WWIII:Team Yankee battlefield. The Soviets have a lot of units vying for the points allotment in a normal game and I am sure the lion’s share will be directed towards tanks. Because of this, we should shed some light on these units so you can pick and choose which weapons are right for you and still come up with a flexible army list.
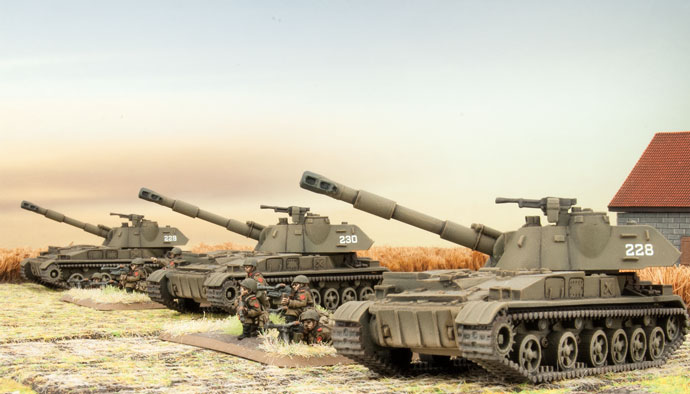
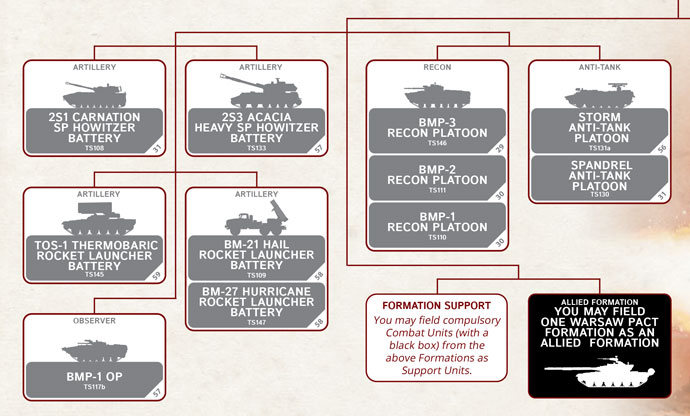
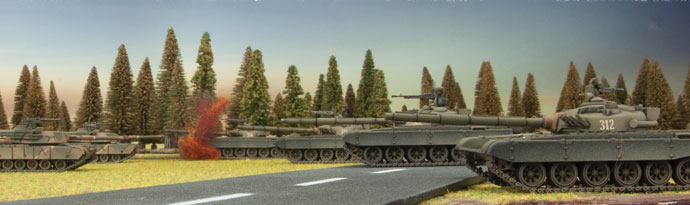
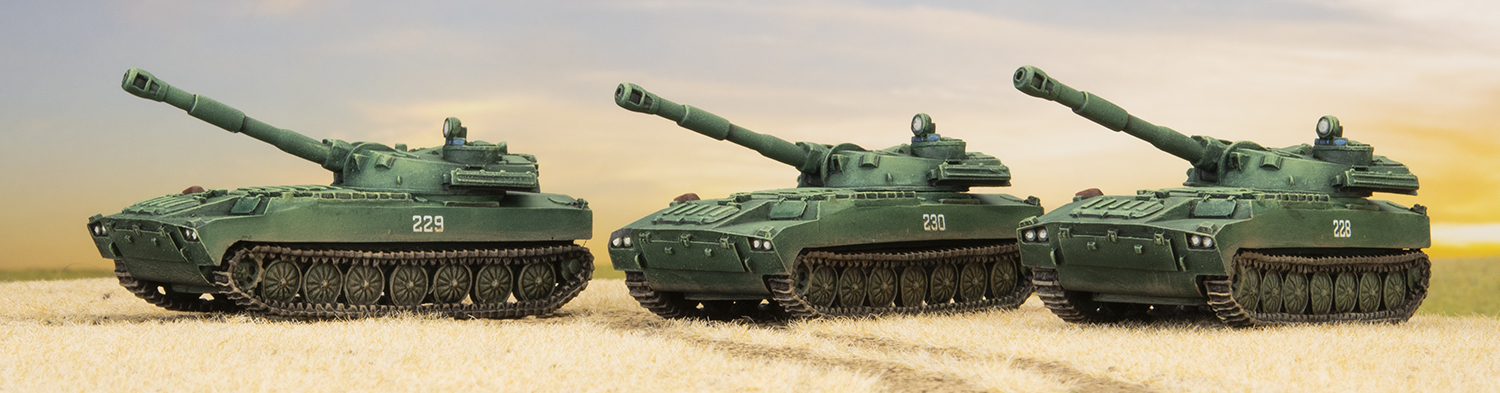
2S1 Carnation
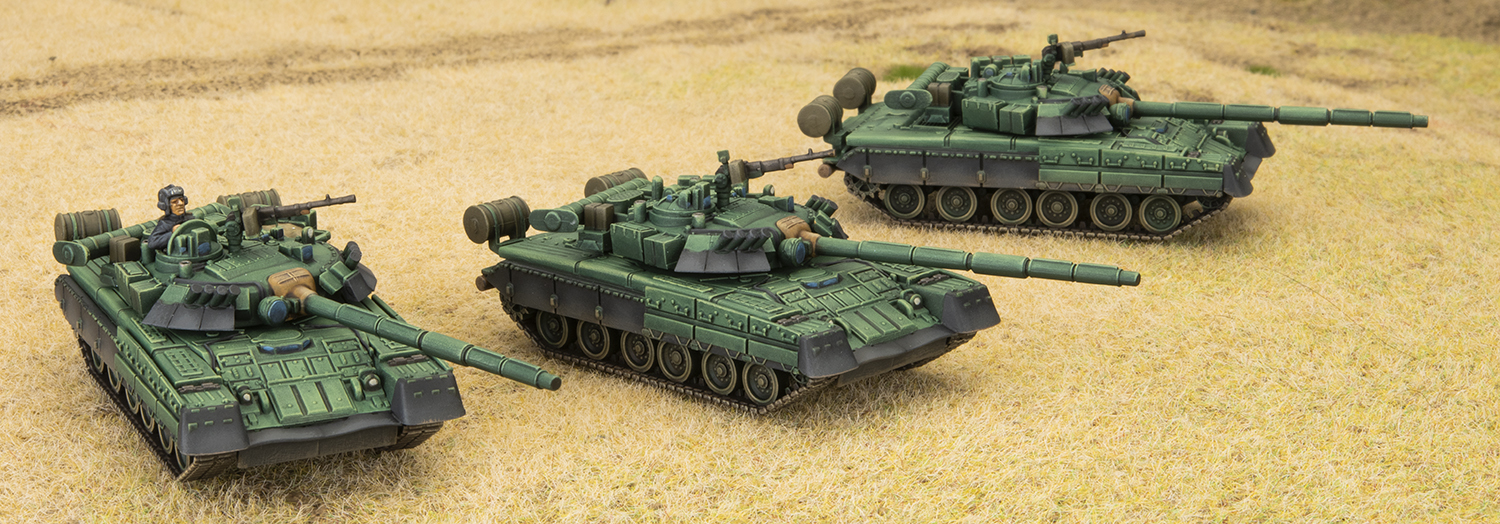
The Carnation is a good general option for Soviet Artillery. In terms of special rules, it is pretty typical with an artillery template, Antitank 4, 3+ Firepower and Smoke. In direct fire it is range 24 and AT 21, Brutal, HEAT, Slow Firing. These stats mean it is a decent option for bombardments and its direct fire (if you can get close enough) is good enough to do double duty shooting tanks if there are no other options. Despite this, at first glance, you may want to consider other heavier hitting options like the Acacia or TOS-1, but this might be a mistake. The carnation is cost effective with 3 vehicles being 5 points, but most importantly it is a formation choice for all of the formations in the book, except the for (unsurprisingly) the Air Assault Company. This makes it really easy to slot into your force. If you are afraid you have too low of a break point for your formation(s) in your army, the Carnation can boost your chances of staying on the field, while providing a decent, flexible weapon.
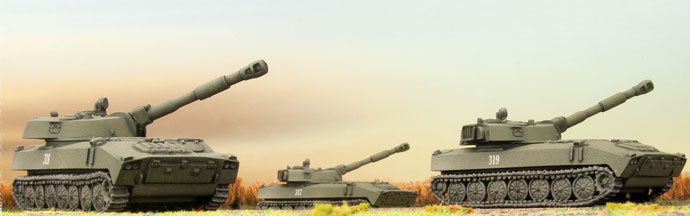
2S3 Acacia Heavy SP Howitzer
This is the heavy gun option for the Soviets. The Acacia is similar to the smaller Carnation but you add a Firepower of 2+. Direct fire against tanks with the Acacia is not much of an option with an AT of only 14, but its Firepower is Auto! If you need to direct fire on dug in infantry or those sheltering in buildings though, this gun is very potent. The really interesting option with this gun is the Kransopol projectile. This is a laser guided howitzer shell with a minimum range of 16 and a maximum of 88 inches. It does not suffer penalties for being used at long range and is guided by an observer. Also, it hits tank top armour at AT 4. But what is truly scary is if the Kransopol is used against lighter targets. This is because it has the Brutal rule so infantry hit by it re-roll successful saves (then the Firepower test succeeds automatically). Additionally, the Kransopol projectile is not an artillery template, but an individual shot for each gun, so you can potentially get several shots on the target in the shooting step. When you absolutely need to destroy your target, a battery of Acacias with the Krasnopol upgrade is the choice for you. You get flexibility with regular artillery and direct fire and the terrifying surgical precision from the special ammunition all from 1 weapon!
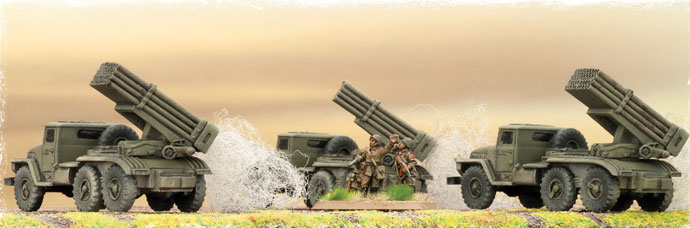
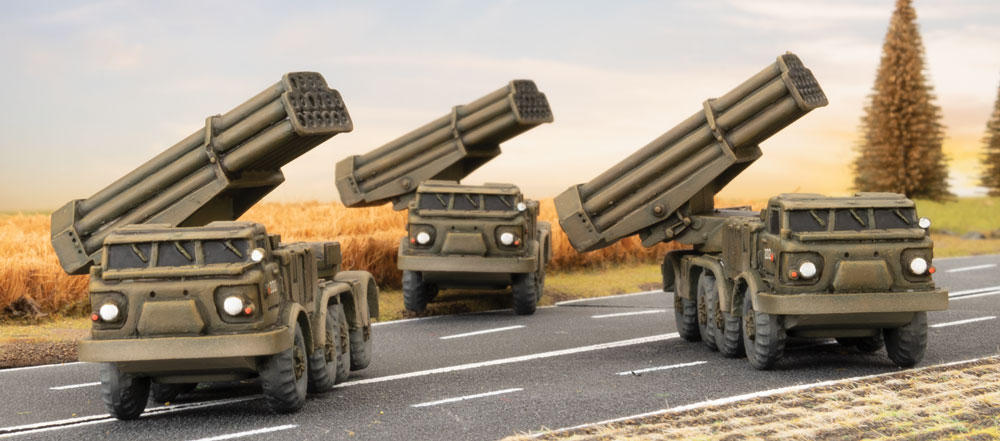
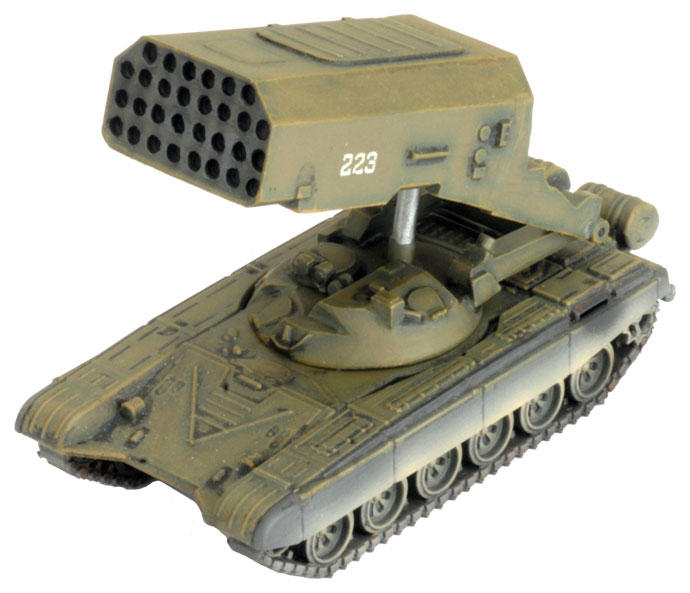
BM-21 Hail Rocket Launcher
This is a tried and true option for Soviet artillery. The BM-21 Hail is a comparatively light weapon at AT 3, Firepower 4+, but it uses the salvo template to cover a wide area. It is also very cheap in terms of points, running at 4 points for 3 launchers. Being a salvo rocket launcher, it does not have a direct fire option but can launch Smoke. The BM-21 Hail is your choice if you are looking for a simple and cheap option to take on infantry or provide counter battery fire against other artillery. It is not devastatingly powerful but will allow you to slide a salvo template into your army list without devouring too many points which you can save for tanks or aircraft!
BM-27 Hurricane Rocket Launcher
This is the BM-21 but on steroids! The launcher is similar but gets a boost in range and has a better Firepower and Antitank rating. The big difference here is these launchers also have the Minelets rule so they provide some are denial effects. Overall the Hurricane is still more of an anti-troop option than anything else, but considering that it does have an AT of 4 and a 3+ Firepower, it can still destroy the odd tank with top armour hits making this option more flexible than the BM-21 Hail.
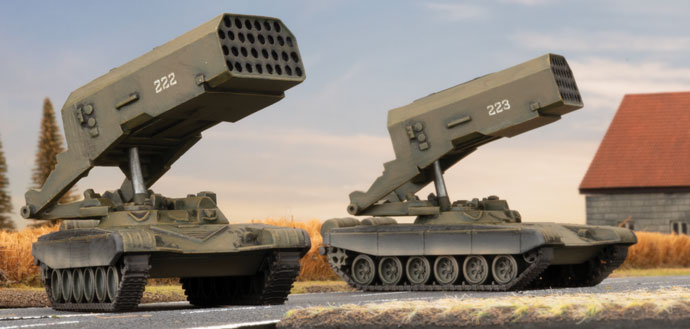
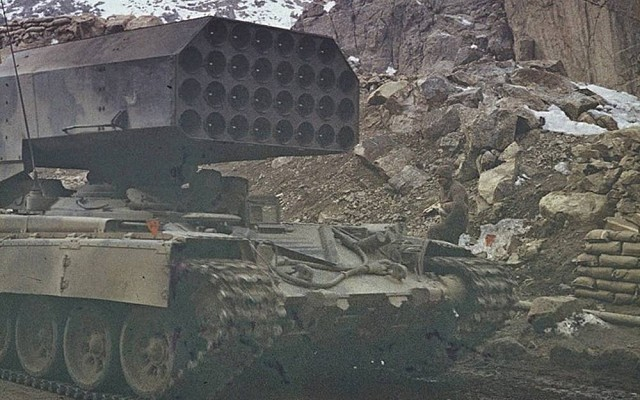
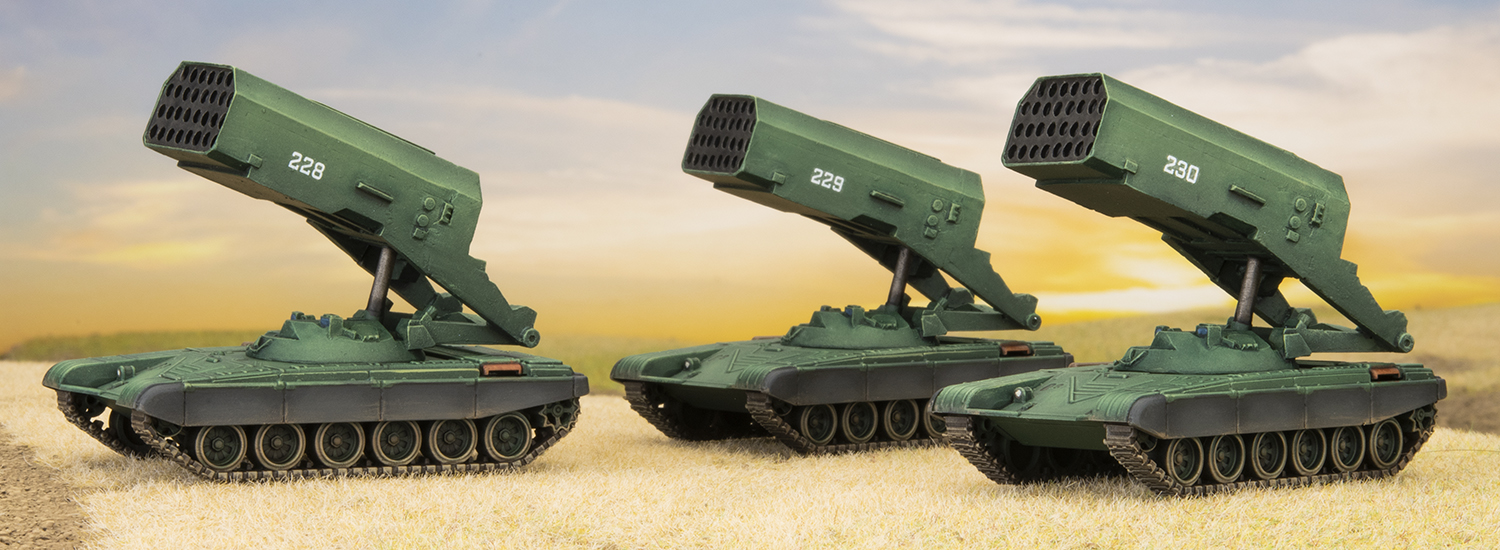
TOS-1 Thermobaric Rocket Launcher
When I saw this unit, I did a double take…basically it is a flame thrower that uses a salvo template! Mercifully the AT value is only 2, so as an antitank weapon it does not have much going for it. But that is where this weapon’s limitations stop. With the large template, a Firepower of Auto and the Brutal rating this means that when you hit the opponent’s infantry they must re-roll successful saves. Foxholes or buildings which provide bulletproof cover are of no value because of the Auto Firepower. 3 launchers are 10 points so these are expensive to take (justifiably so), but this weapon will simply erase opposing infantry off the board. If your opponent uses a lot of troops on foot this is the option you have been waiting for…and what they have always dreaded.
BMP-1 Observer Post
Do you have an extra BMP-1? If not go get one. Though the BMP-1 Observer is not technically artillery, this unit goes hand in hand with the Soviet artillery assets. The reason you need it is because the Soviet forces get a dismal skill of 5+. On the WWIII:Team Yankee battlefield this is not that big a deal when missiles and 100+ mm guns are doing most of the work, but trying to roll a 5+ (or 6 if the template overlaps terrain) will burn up your Range In Rolls fast. Since the BMP-1 Observer has the Observer special rule it can lower your range in attempts to 4+. This is still not the best in the game, but for 1 point it is essential if you are spending any of your precious points on artillery.
Let the Fire Rain Down
If you were considering ignoring the artillery options when making army lists from WWIII: Soviet, I hope this article has helped change your mind. The amazing array of tanks, IFVS and aircraft this book introduces to the game could understandably distract you from humble long-range fire support. But as we have seen, the options for the big guns and rocket launchers have what it takes to not only obliterate your opponent’s forces but also dictate the course of the battle through laying Smoke and Minelets. If your opponent thinks their infantry is safe in a building, introduce them to the TOS-1 and burn them out! If he or she hides their tanks out of sight, send in a laser guided Kransopol shell after them! With some careful and imaginative use of the awesome new Soviet artillery there will be nowhere to hide as you project the wrath of the Red Banner across the battlefield.
When most Western armies conduct warfare they support movement with fires, providing artillery support and other fires to assist manoeuvre. The Soviet Army has always seen things differently and supports fires with manoeuvre. Utilizing massed artillery and the devastating effects that they can deliver to an enemy force they reinforce artillery success with unit movement. Simply put, the Soviet army doesn’t go anywhere without artillery. Lots of artillery. I’ve said it before and I’ll say it again, this is especially true in WWIII:Team Yankee.
When Red Thunder I was released I was excited to get to put down even more artillery for my Soviet force with the release of the 2S3 Acacia. Now with WWIII: Soviets dropping I’m even more excited by the addition of two new artillery units. I’m a huge fan of MLRS systems and have long advocated for the humble BM-21 as an amazing sleeper unit in Soviet forces. Many people write it and other MLRS off due to their low firepower. But with about 2.8 times the area coverage of an artillery template, they can cover a shocking number of stands. With the release of WWIII: Soviets players are offered the opportunity to include both the BM-27 Uragan and the TOS-1 Buratino MLRS systems, and the sky is about to fall.
All Soviet Formations with the exception of the Air Assault Battalion have the option to take a 2S1 battery. This gives players an amazing base artillery system that can also act as an assault gun with a direct fire AT 21 gun. The 2S1 is the artillery equivalent of a Swiss Army knife. It can do it all.
From here Soviet players have the most diverse and numerous artillery support options in the game. There are four boxes of artillery support available to Soviet commanders, an additional 2S1 battery, a 2S3 battery, an MLRS battery of either BM-21s or BM-27s and the option to take a TOS-1 battery in addition to the ubiquitous BMP-1 OP. A single formation has 5 artillery platoons available to it: fires supported by manoeuvre.
So what do these two new systems bring us? As you can see from the support chart above, you get an extra salvo option, allowing players to drop two salvos a turn on the enemy with either a BM-21 or BM-27 salvo, and a TOS-1 salvo going down range at the enemy. The second thing it brings players is more firepower. The BM-27 is the BM-21s big brother and brings with it AT 4, enabling it to bail and damage vehicles regularly, and FP 3+ to dig out infantry teams more reliably. The BM-27 also has minelets which give Soviet players a fantastic board control option. The TOS-1 brings the heat. With its thermobaric warheads the TOS-1 has a FP of AUTO and with brutal forces all teams hit to reroll saves. It is an infantry deletion machine, and it’s armoured so ignores pinning and can consistently survive small arms fire.
So what is all of this artillery here to do? I would argue there are two basic tasks for artillery in a Soviet list: they dig out infantry, and they cover your force.
Digging out infantry is nothing new to players and is the common reason to take artillery. But while many other armies will take artillery to pin infantry so that they can be assaulted, this commonly isn’t the case for Soviet infantry or tanks. Facing facts, Soviet forces aren’t great at assaulting generally speaking. But they don’t need to be. Here Soviet doctrine calls for the use of “Posledovatel’ Noye Sosredotocheniy Ognya” or successive fire concentrations to neutralise, by artillery fire,the enemy in proximity to motor rifle and tank units.
Soviet doctrine is clear that the breakthrough is the least preferred situation, and that the meeting engagement or pursuit is dramatically more advantageous to Soviet forces. So what does this have to do with artillery? Manoeuvre supports fires. Soviet artillery is there to force people to move or die in place. With the quantity and quality of artillery and salvo fire you can put down on a position, there is no infantry force in the game that can simply sit and take it. This forces your opponent to move, changing the situation to a pursuit, something tanks and the Motor Rifle companies excel at exploiting.
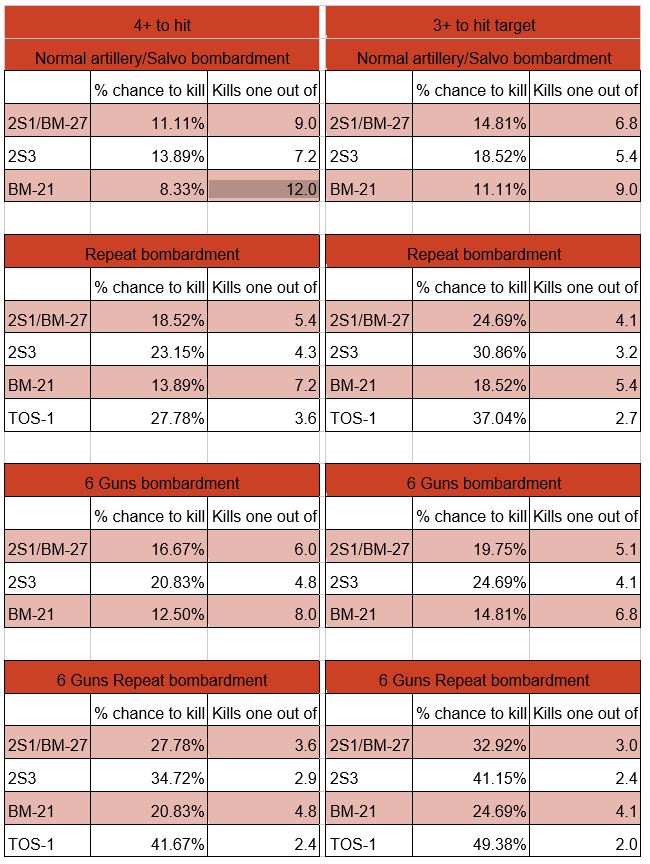
So how good is Soviet artillery at digging out infantry? The simple answer is with the new MLRS systems, it just got better. Soviet players can trust that military scientists have applied great efforts to compile the following algorithm table.
The above table gives you % chance to kill a given dug in team under a template, along with the average number of teams required under a template to destroy a dug in team. The TOS-1 doesn’t have stats for normal or 6 gun bombardments because teams hit by it always reroll saves.
So how can you use a table like this? You can use it both in designing your list and during a game when faced with an enemy position. When you’re designing your list you can use.
these tables to help you prepare for situations you think are likely. Take every player’s nightmare, the British Infantry platoon. With 9 teams it’s hefty, it’s skilled and it’s covered in weapons. Even if you manage to assault them, they’ll more than likely assault back and kill more of you than you did of them. So instead of going in, burn them out. With a six gun battery of 2S3s and 3 TOS-1s hitting the position, how long does a platoon last? If you sited the TOS-1 on the objective to start and the Brits dug in there, you can expect to kill just under 1 out of 3 teams. The 2S3s wiill kill around 1 out of 5 teams as you range it in and then subsequent turns will kill 1 out of 3. This would average killing 4 teams on the first turn, and while the number drops each turn, so does the number of survivors. This essentially removes the platoon in 3 turns. So either they sit and take it or they move, at which point your vehicles move in and gun them down (the pursuit), or just take the objective. Either way, artillery wins you the day.
The thing to note about artillery is that against any given target it provides diminishing results. Unlike a tank’s main gun or a machine gun, artillery has no rate of fire but instead has a template. This means that unless an opponent feeds your artillery more units to drop bombs on, a battery firing at any point should kill fewer and fewer each turn. Killing fewer of the enemy can seem like a bad thing, but when it’s because there are fewer alive to kill, it can be forgiven. Again, artillery makes someone die in place, or move to be gunned down on the run. Let them make that choice.
Covering a Soviet force in the advance is critical to success. NATO and other opposing forces need to attrite a Soviet force prior to it becoming decisively engaged. Soviet forces need the cover that only their artillery can provide in the advance, the defence and while on the objective. It is possible to cover a Soviet force in three ways, through concealment to fire, by fires and by providing counter mobility. You can fire smoke to cut off the enemy from shooting you; you can lay down fires where the enemy wants to go to force them to go somewhere else; or, you can drop mines on them and have them stay a while, and think about what they’ve gotten themselves into.
While terrain can assist in the concealment of a force, there is seldom a situation where it alone can provide the cover that is provided. Where the ground may fail you, artillery will not. A 3 or 6 gun battery can provide you with between 12 and 24 inches of smoke. A single battery can block off between half and a third of the table. Two batteries can basically block off the enemy’s line of sight. Smoke should reside in and be used by all Soviet forces. It helps a Soviet player shape the battlefield, and the enemy, pushing them with fear and metal from their defensive positions to new locations.
Smoke can be used to cut off fires, commonly by placing it close to your force in order to ensure that units don’t come within 6 inches to be able to fire on you. You can however use this to bait aggressive enemies into coming out of cover to shoot. By placing the smoke bombardment close to the enemy positions you can dare them to come out of cover to shoot at your forces. This can often allow you to shoot back at targets now in the open and closer to you. Smoke forces your opponent to choose between bad options and for this reason alone should be employed where possible.
While smoke cuts an enemy’s shooting off from affecting Soviet forces, there are other ways you can cover your advance. Soviet doctrine calls for the use of “nepodvizhnyy zagraditel’nyy ogon’”, or standing barrages to obstruct the movement of the enemy. Salvo fires are amazing in that they take up a huge amount of space. 100 square inches of coverage allows a player to block off routes to objectives with salvo fire. Few infantry unitswant to risk running through the fire to help an objective in danger, and now with the BM-27 bringing AT 4, few vehicles will join in that risk. If your cutoff fires are ranged in before the enemy arrives, you’ll have the added benefit of using repeat bombardments and any infantry teams hit will be rerolling saves. Artillery and Salvo cutoffs are rarely thought about as we often try and range in on where something is and not where it will be or where it needs
to go. Using this cunningly will again shape the enemy and make their destruction that much easier.
The BM-27 Uragan now adds the options to drop mines on the enemies of Socialism, forcing enemy vehicles to either hold in place, risk moving or wait for infantry or specialist vehicles to extract them from the minefield. Few of these options end both well and quickly. Usually players have the choice between the two. In every situation Soviet artillery forces the enemies of Socialism to make choices that expose them and enable your manoeuvre forces to exploit.
Overall the new artillery available to Soviet players is exciting. First off it just looks cool. A T-72 driving around with a bank of 30 220mm rockets on top? Yes please. Secondly it just fits the army, its huge, numerous and brutal. And thirdly it’s fun to play. It all comes together in a scary amount of firepower that can now be wielded with careful planning and consideration to ensure Soviet objectives are reduced prior to arrival or protected from the scourge of capitalism.
Chris has already told us how much he likes the Czechoslovakian OT-64, if you want something similar but a heck of a lot lighter, in plastic, and cheaper for your wallet then the BTR-60 is exactly what you need.
Check out another video from our archive and find out what a dream this model is to assemble!
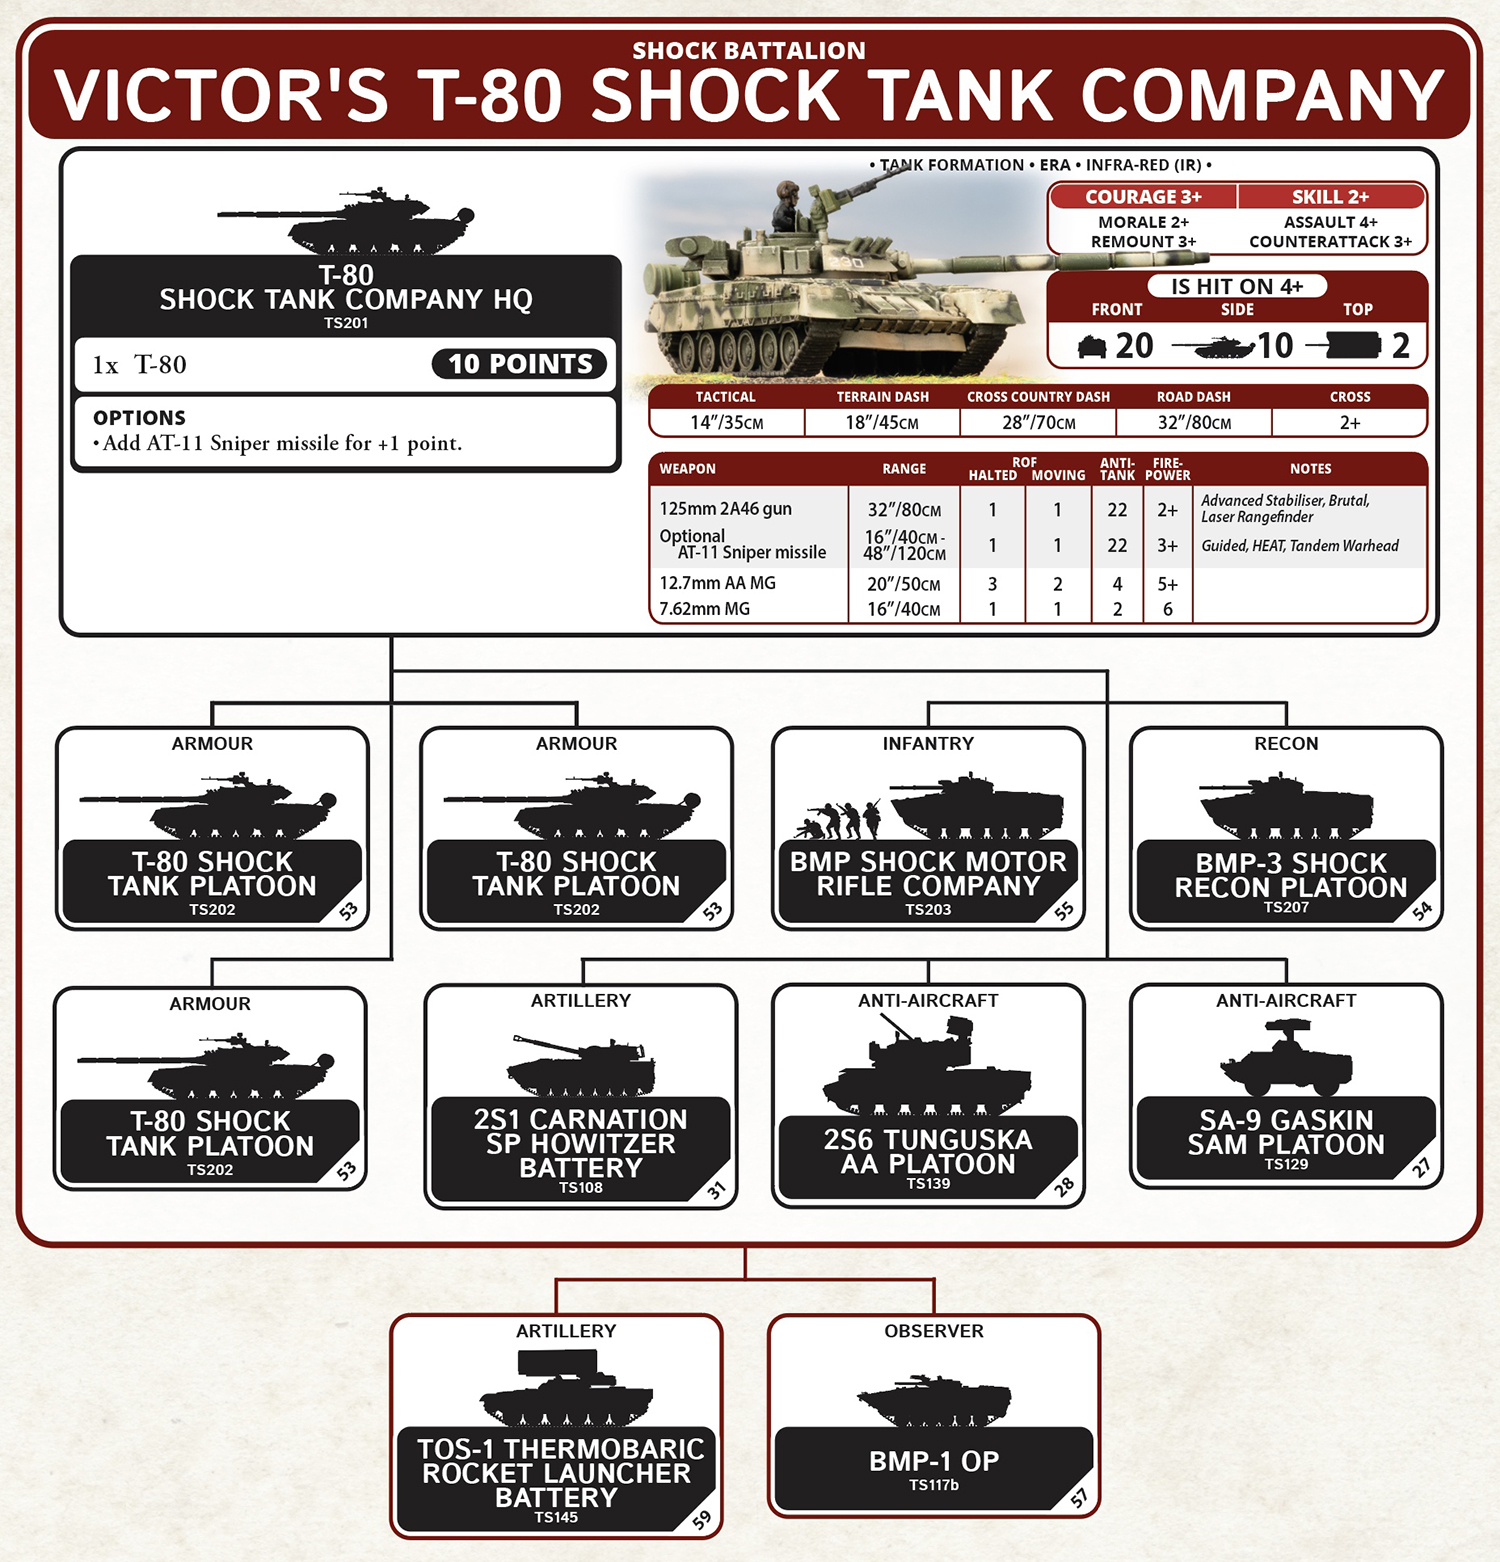
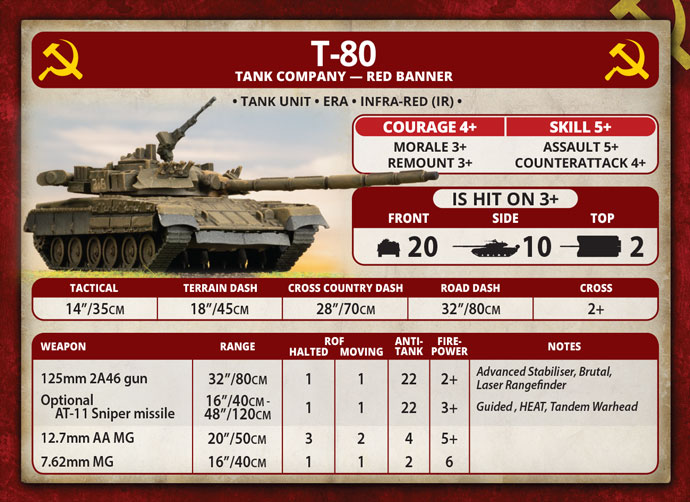
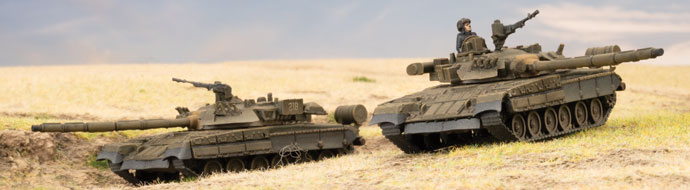
Until the release of the T-80 the T-64 was the baddest boy on the block for the Soviets, but whilst the T-80 is newer, that doesn’t necessarily mean it is better, at least that is what the team at the Kharkiv transport machine-building factory No. 75 would have said when they were developing it!
Join Chris as he shows how easy the T-64 is to build.
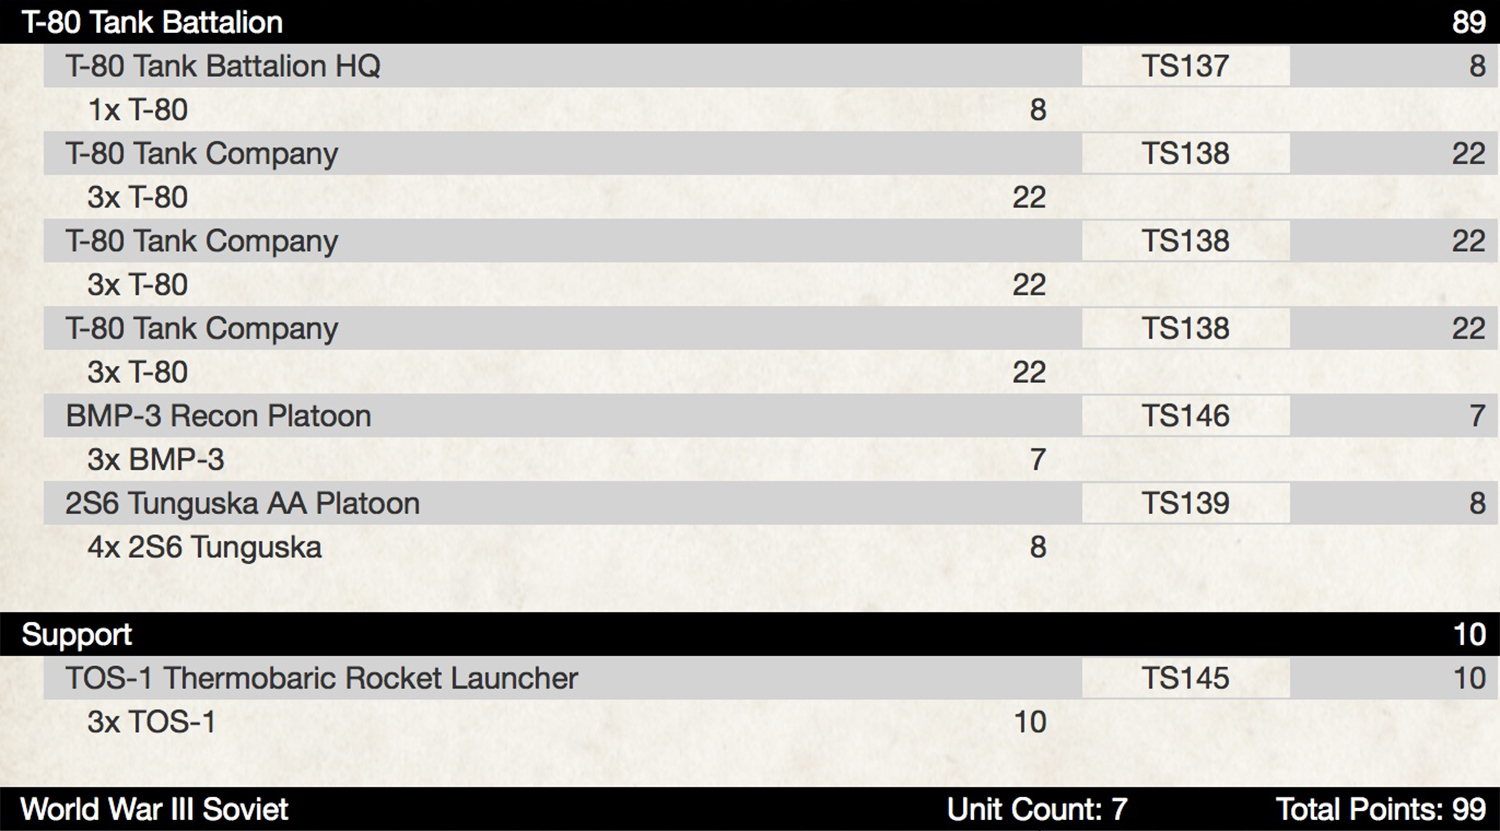
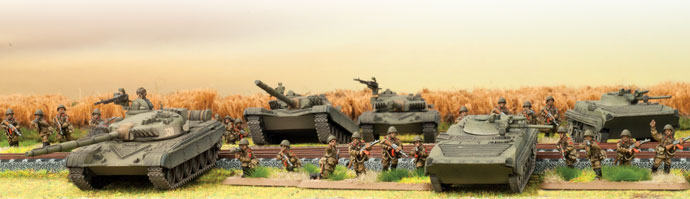
The new releases for the Soviets in World War III: Team Yankee offer so many cool new options. When the new kits like the T-80, BMP-3, TOS-1, and Tunguska started appearing in the studio, I started noodling lists to try and include all of them.
Soviet armies get stereotyped as large hordes of questionable quality units, relying on sheer numbers to overwhelm the enemy. This is often true, but with modern equipment, and the new T-80 Shock Tank Company, I saw an opportunity here to find a middle ground between quantity and quality.
Here is the first list a came up with:
This is the type of list I normally gravitate to; max out on expensive tanks, and fill the rest with something cool. Unfortunately on the table it doesn’t have a combined arms approach and is easily countered, so I evolved it to this:
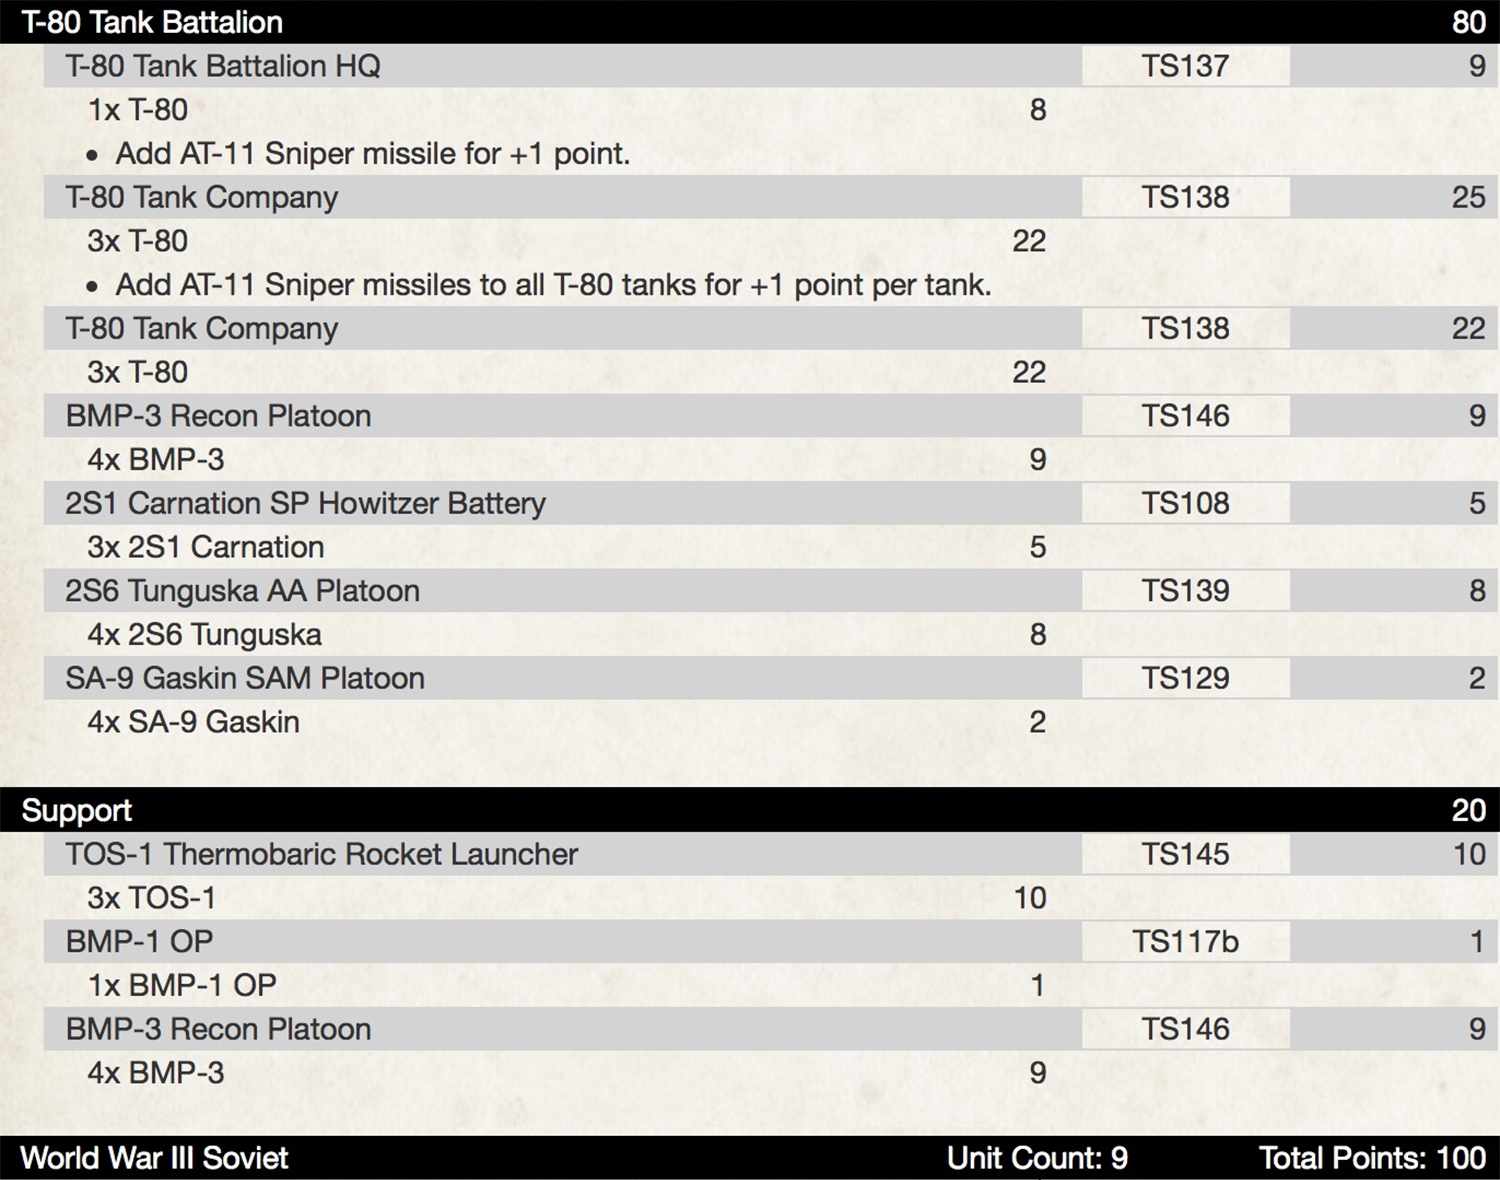
Now here I feel like I’ve got a little bit of everything, and most of it is in formation. I dropped a T-80 company which made room for Carnations and an OP, Gaskins, more recon, and some missiles. The two platoons of BMP-3’s are maybe a little redundant, but the end goal is to have 8 painted so I can run 3 as recon, and 5 to carry infantry as you’ll see below…
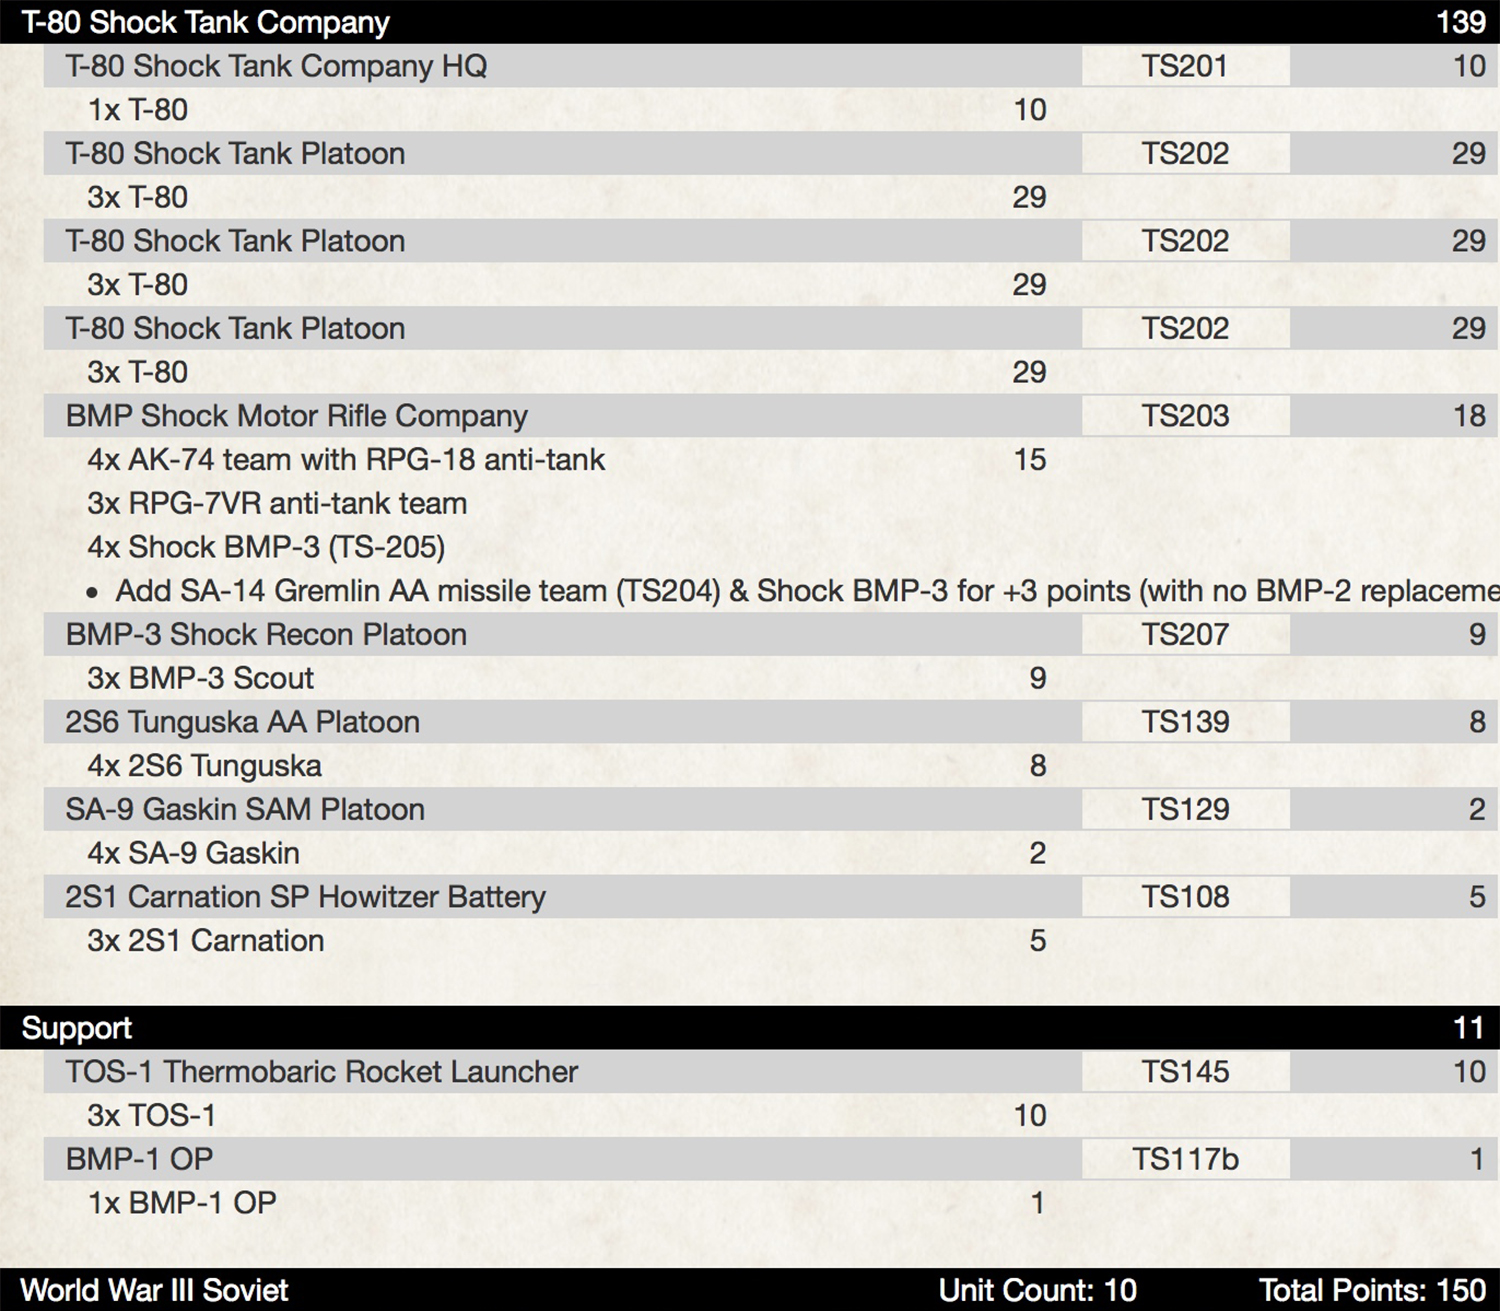
A few of us in the studio have been talking about playing some larger 150 point games, focusing on more modern equipment, so I wanted to see if I could easily make the army work at both 100 and 150 points with minimal extra painting. Here is how the above list grows:
I put the third company of T-80’s back in, and upgraded the formation to the Shock Company. The biggest addition is the Motor Rifle Company, but I think these improve the list greatly, and will be a fun painting project later down the line.
I’m excited to have two lists to throw down whether it’s at a 100 point tournament, or a friendly game with one of the Big Four at 150 points, without a huge change in model count. It’s mostly thanks to the new Shock Tank Company offering the option to have Soviets hit on 4+ for a bit more points, and I’m eager to try out both.
On the World War III: Team Yankee battlefield the undisputed top predator is the M1 Abrams and its variants. With a front armour value of 18 ranging to 21 and a main gun AT rating of 20 for the 105mm, or 23 for the 120mm, the Abrams hits hard and can soak up massive amounts of punishment. This is made even better by a Hit On rating of 4+ and an amazing remount of 2+. But this battlefield titan is not unstoppable.
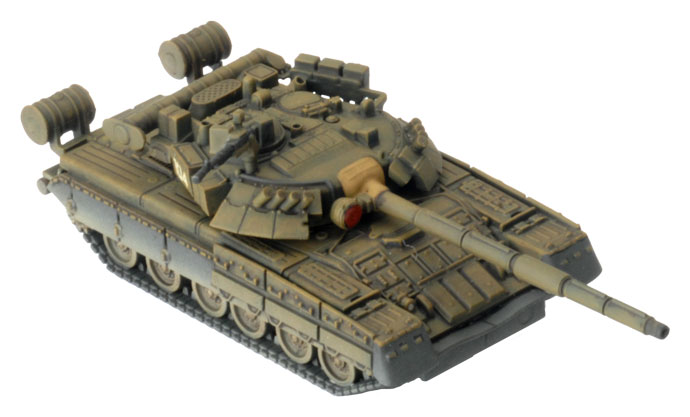
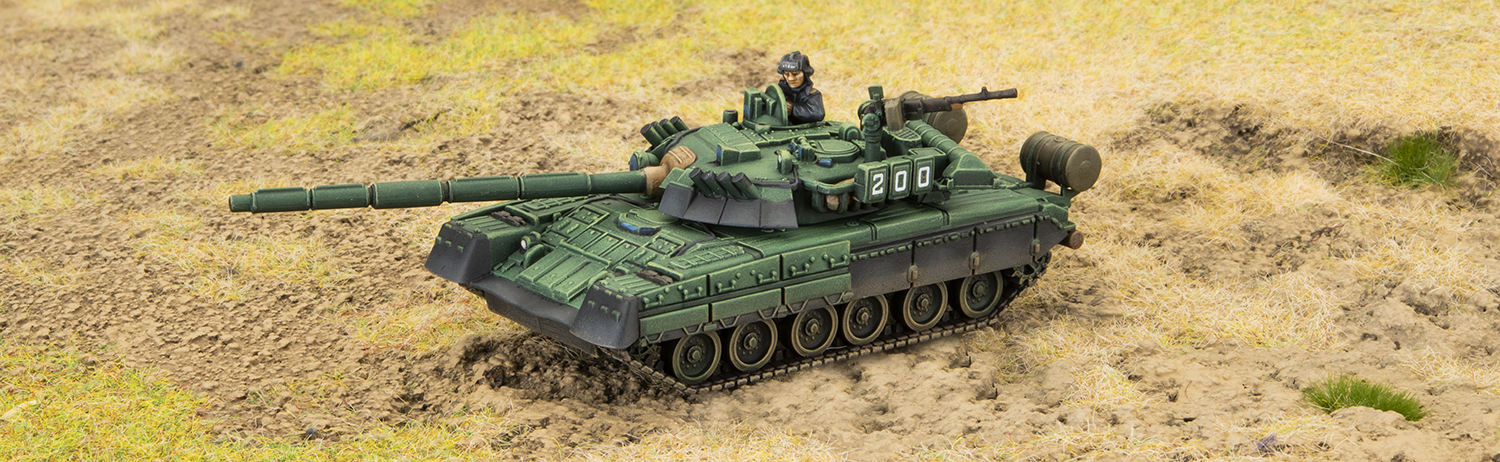
The main tactic for Warsaw Pact and Soviet players to take these machines down was always to go with quality over quantity. An M1A1HC for instance costs 18 points compared to a T-64 which costs 4.3 points. This means that the Warsaw Pact can put at least 4 T-64s on the table to every one M1A1HC. This solution however is imperfect for World War III players. Sometimes you want to play a small elite force, or the wallet just won’t let you buy the 20 T-55AMs (and the paint) you would need to begin to equal the points your opponent would spend on 4 M1 Abrams (the basic model). This has traditionally left the gamers who want to play forces of the more communist variety at a loss…until now. With the new core set and the World War III: Soviet book you can get your hands on the T-80. This marvelous tank, while remaining most definitely Soviet in design and application, has what it takes to go toe to toe with the M1 Abrams. Let’s take a closer look.
Background
The Warsaw Pact forces of the 70s and 80s were set on a very specific type of battlefield doctrine that caused the form of their tanks to follow the function of their strategy. This resulted in lighter, smaller, though heavily armed main battle tanks that did not match the size of western behemoths like the M1 or Leopard 2. Part of this was the recognition that the communist forces would maintain the edge in terms of numbers through vast armies of conscript troops. This necessitated simple designs that were faster and cheaper to make and more easily crewed by troops with less training. Moreover, these tanks such as the T-72, were intended for widescale export so they skimped on technology in favour of ease of maintenance as they could be put in service in remote locations ranging from the desert to the artic, far from technical support. The T-80 however was a partial divergence from this trend. Initially, not intended for export, the T-80 was loaded with the current innovations in armoured warfare, while still staying true to the Soviet strategy of having smaller more numerous tanks. The T-80, though it looks superficially like other Soviet tanks of the time, has better armour (supplemented be Explosive Reactive Armour- ERA) and a gas turbine engine that gave it outstanding speed. For armament it had the same autoloaded 125mm gun of its less technical T-64 and T-72 brothers, but it had the option for using the latest generation of gun barrel launched anti-tank missiles.
The Stats
The T-80 has the stats to contend with the other NATO tanks. The front armour of 20 outclasses all iterations of the M1 except the M1A1HC which only edges it out by 1 point. Because of this, it can definitely take a punch! (The Abrams, only has one point better in side armour too.) The T-80’s side armour has ERA making it side armour 16 against HEAT weapons. This puts it neck in neck with the M1’s Chobham armour which also has a side armour rating of 16 against HEAT weapons (Though passengers can’t ride on tanks with ERA, because they would be blown up when the ERA goes off!)
In terms of mobility both tanks are the same in all respects and both sport advanced stabilizers for 14-inch tactical moves and have a cross of 2+. I imagine that this similarity is due to the fact that both have gas turbine engines and represent the pinnacle of tank automotives for both major super powers in the mid 80s.
This brings us to firepower, which is where these tanks diverge. The M1’s main gun can be a 105mm or 120mm canon depending on the variant and both are very good guns. They have 2 dice of shooting whether they are stationary or not, have a high AT, a range of 40 inches, and 2+ firepower. The 120mm in particular has a whopping AT of 23 due to it having cutting edge, fin stabilized depleted uranium long rod penetrator rounds! But this canon is very much maximized for anti-tank work. On the anti-troop side, the M1 comes in a little light at 5 dice of machine guns. The T-80 is different in the weapons department with a much more diverse armament. The 125mm Soviet gun has a range of 32”, rate of fire of one (whether moving or not) the brutal rating, and is AT 22 and a firepower of 2+. This makes it equally deadly against both infantry and armoured vehicles. The lower rate of fire makes the T-80 maybe slightly less competent in destroying armour… but wait, there is also the barrel launched Sniper missile! This AT 22, fire power 3+, Guided, HEAT weapon can reach out to 48 inches (with a minimum range of 16 inches) actually giving the T-80 a longer reach than the Abrams. Being the pinnacle of anti-tank weapons for the Soviets, this missile has the Tandem Warhead rule. This means that thought the Sniper Missile is a HEAT weapon, armours such as Chobham, Bazooka skirts etc. do not cause a boost in side armour ratings. So, go ahead and shoot an M1A1HC or Leopard 2 in the side armour with this missile and you can have that satisfaction of going straight to the firepower test!
Training
So far, we have seen that the technical details make the T-80 pretty close to the other NATO MBTS but there is a difference and that boils down to training. As we discussed earlier in the article, the Warsaw Pact doctrine in the 80s was to rely on large numbers of conscript troops and use numbers to overwhelm their adversaries. The values on the T-80’s unit card represent this. The Hit on Number is 3+, Skill is 5+. These numbers are not so favourable compared to the typical NATO ratings. The American tanks for instance are hit on a 4+ and have a skill of 4+. The difference is represented in the points values with the T-80 running at about 7.3 points each where the comparable NATO tanks cost more. Because of this the Warsaw Pact forces will always have a slight edge in numbers because of the decrease in training. The lower Hit On value may also not be such a serious issue. With the armour ratings on the T-80 being up there with the NATO MBTS, you can compensate for the lower hit on number by keeping your opponents to the front and relying on the tank’s considerable manoeuvrability.
There is also another option to adjust for the T-80’s decreased stats… you can go elite. The T-80 Shock Company in the new Team Yankee: Soviet book represents the best Soviet Tankers of the time and this brings both the statistics and points costs into line with most NATO armies. The Hit On number goes to a respectable 4+ and the skill goes to an excellent 3+. (This opens up a lot of new options, but since the T-80 Shock Company is fairly different from other Soviet Formations and will be covered in a separate article.)
Other Considerations
So far, we have looked at the statistics, but there is another, real world, consideration with the T-80. By Soviet standards it is worth a lot of points! This means that for a World War III Team Yankee player that is either new to the hobby or who is on a budget, they can get to the 100-point limit fairly quickly by purchasing or painting fewer tanks. 10 T-80s is 79 points. (89 points if you give them missile upgrades.) That is just 2 boxes of models. Previously Soviet players would have to have relied on T-64s which would require at least another whole box with maxed out upgrades to get into the same ballpark points wise. So, if you are new to the game or just getting up to speed with a Soviet force, T-80s are your first choice to get not only modern options to take on NATO players, but also to get a bunch of points on the table with fewer (but seriously cool looking) models.
Time to Unleash The T-80
In this brief tour of the T-80 and how it stacks up to the M1 Abrams we have touched on the similarities and differences between these mighty machines. Now you should have a clear picture of just what the T-80, as a new battlefield predator, can offer the Soviet player in Team Yankee. All that remains is to get your Warsaw Pact Forces together and go forth to destroy the decadent and corrupt capitalists!
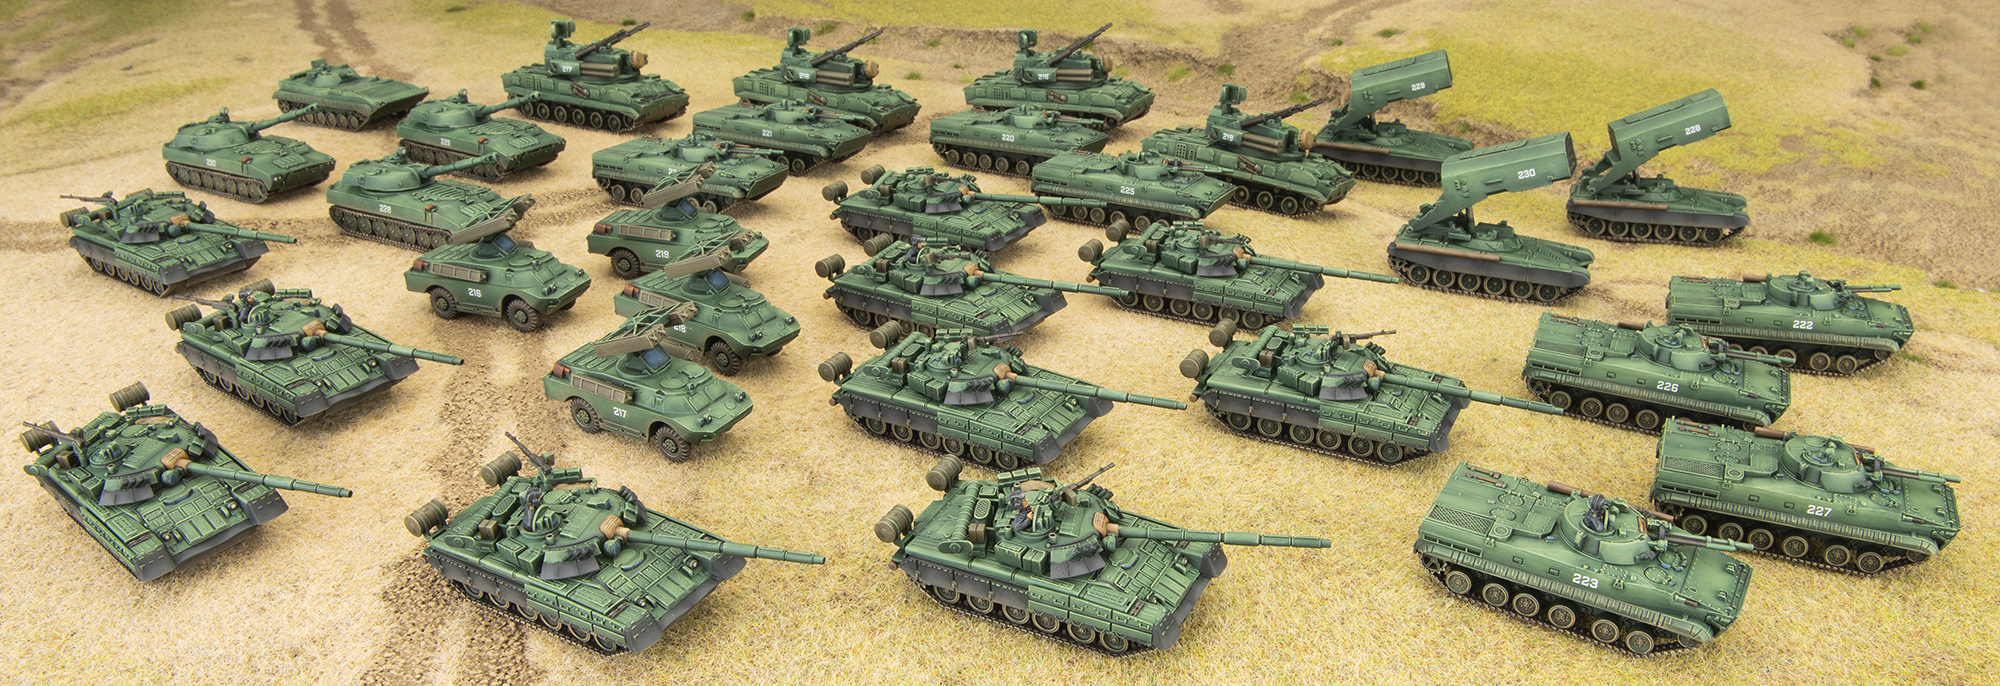
With this force I toiled for a while about whether or not to do camouflage or plain green. There are some really cool camo schemes out there for Soviet tanks, and it was very tempting. However when my army lists started to contain more and more vehicles (tune in for Victors WWIII Soviet list at 3pm) , I settled on plain green to ensure I’d get them all finished in the time frame. But what shade of green?
As you will have seen in Chris and Evan’s article (What is soviet green?) there no one green to rule them all. I’ve painted plenty of drab olive greens before, so I aimed for something more vibrant.
I started by airbrushing a dark green, and then panel fading with a pale green, intentionally going quite light. Next was a dry-brush and a wash to tone it all down, followed by a second dry-brush to bring back the edges. This is a really quick way to get a lot of tonal depth on your tanks quickly.
The result is quite an intense green, more towards blue than yellow. It won’t be for everyone tastes, but I’m quite happy with it and it pops on the table.
I chose to paint the rubber parts to add another colour to break up the green. In reality they would likely be painted the same time as the tank, but there are examples with bare rubber. Same goes for the wooden un-ditching logs, tools, and exhausts where paint might have come off and rusted over time.
Another additional colour I used was an olive drab, which I used for anything consumable (MG ammo tins, fuel drums, missile canisters, etc).
So even with a “green horde” I’ve managed to get some other colours in there which hopefully add some visual interest without looking too patch work.
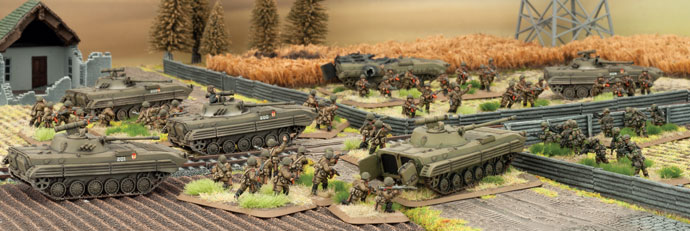
That’s 34 vehicles completed in 18 evenings, the largest army I’ve ever painted, and the fastest. Time for a break before I work on the infantry to ride in the BMP-3’s. I’m looking forward to using these all in a game soon!
I grew up in the 80s. When we played outside we were always pretending to be the Canadian military battling the hordes of Soviet Russia invading from the north. This meant that nameless and faceless Soviet Infantry were always the enemy. Then I was introduced to the movie Red Dawn (I choose to ignore the remake). In this Patrick Swayze movie I got a better look at the infantry of the Soviets (or what they were thought to be like). Now in my mid 40s I find myself reminiscing on that movie and wishing I could take control of those forces. I would like to try my hand against the superior military skills of Charlie Sheen’s ragtag assortment of high school students and the armies of the corrupt American capitalists…. Now, thanks to the new WWIII:Team Yankee book World War III: Soviet I can stop reminiscing, the time has finally come to dive in and take command of the legions of the red banner.
In this article I will take you on a guided tour of the infantry of the Soviet Union (in distinctly game terms) so we can investigate the nuances and capabilities of these cold war bad guys in WWIII: Team Yankee.
Background
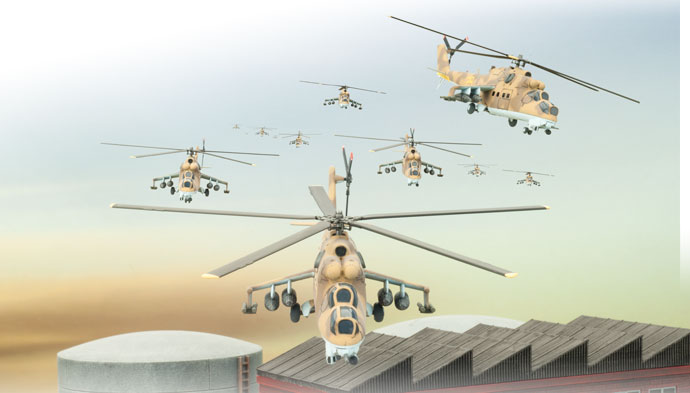
The Soviet doctrine for fighting World War III always relied on the idea that numbers would be on their side. The Warsaw Pact was mostly composed of conscript soldiers, equipped with simple yet effective equipment that could operate in rugged conditions. although their strategy also called for aggression. Fast moving penetration into the heart of NATO forces was perceived as the best option to take on the less numerous but better trained foes. This required a large amount of mobility and the Soviets were the first to take the concept of the infantry transport and blur it with armed vehicles to provide them with integrated heavy weapons support. On the ground this took the form of the various BMP Infantry Fighting vehicles (IFVs) and in the air the Hind Gunship (which if you grew up in the 80s… and excuse the Dirty Dancing/Red Dawn comment, will know definitely put Baby in a corner). Because of this, looking at the Soviet infantry of the era will also require a close look at their transportation.
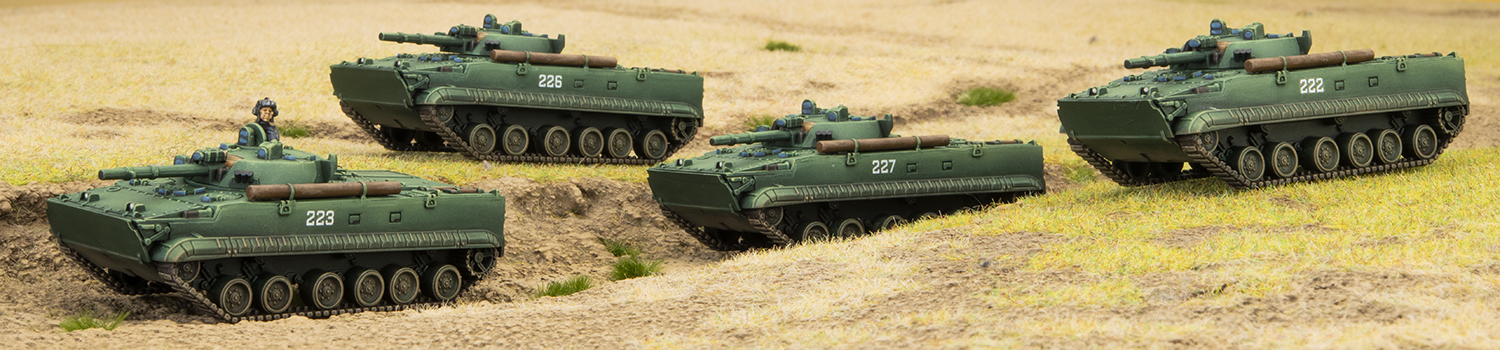
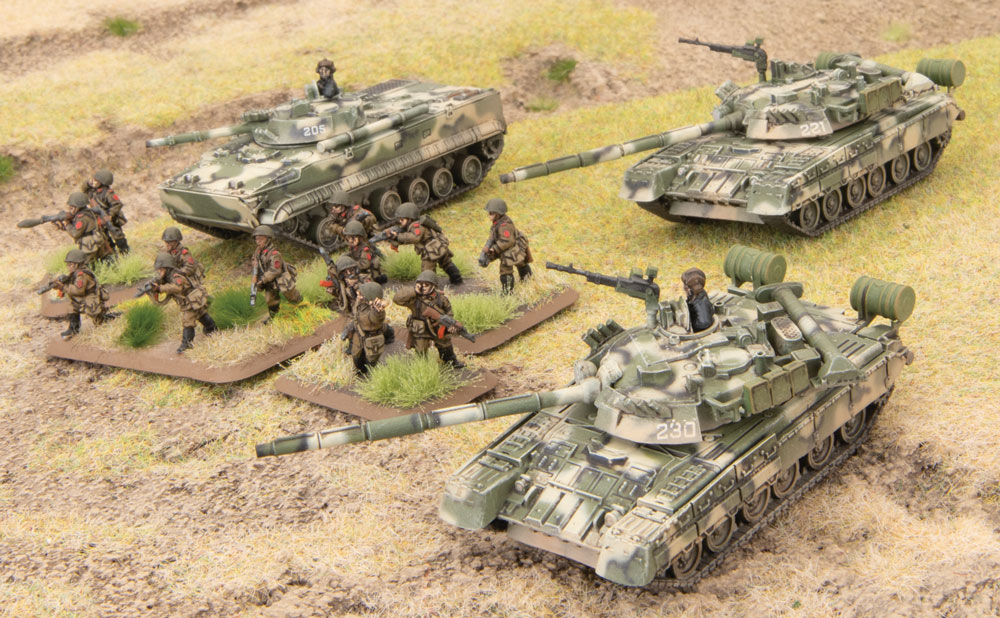
BMP Motor Rifle Battalion
This is the basic building block of the Soviet Infantry. If your army is composed of tank formations you will usually find that a company of BMP Infantry can be added on as part of the formation. This is handy as infantry is a good option for guarding objectives or fighting where terrain is dense.
The choices for the BMP Company come in 3 varieties, varying by the type of BMP taken. Otherwise the infantry themselves have the same stats and weapon options. Here we see the effect of the conscript army approach to warfare. Courage is 4+ (with 3+ Morale and Rally) and Skill is 5+ (Counterattack 3+) and their Hit On value is 3+. These stats are decidedly lack lustre. They could be worse, but definitely are not top tier. But this brings us to points cost…They are cheap and come in large numbers. 5 stands of troops in 3 Bradley IFVs cost American players 10 points, but 7 Stands of Soviets and 4 BMP- 2s cost the Soviets 8 points. With these troops you can keep numbers on your side.
Weapon options are very flexible with the ability to arm grenade launchers, AA missiles and improved RPGs for unit level upgrades. This allow you to tweak your squads for their purpose in your force. If you want to sit back and guard objectives take a Gremlin AA missile to ward off airstrikes. If you are attacking then go with an AGS-17 grenade launcher, or mix both for flexibility. This brings us to the BMPs themselves. Here you can also choose the vehicle for the task. If you want to keep the cost down, but still have some decent weapon options, the BMP-1 is a good choice. The BMP-2 splits the difference and gives you pretty good options for taking on NATO MBTs, while the BMP-3 gives you weapons that rival some Tanks (thanks to the Sniper missile). Which you choose will depend on the roles you want your infantry to fill, with the BMP-2 probably being the choice of a player looking for a general composition.
BTR-60 Motor Rifle Company
If being economical with your points is your objective, the BTR-60 Motor Rifle Company is for you! Let’s face it, sometimes you want to go with the big guns and max your army composition out with tanks (especially the awesome T-80). However, infantry is almost always a necessity for guarding objectives or going where armour can’t. The BTR-60 Motor Rifle Company will not break the bank for points while still fitting the bill.
The stats and weapon options for this unit are the same for BMP mounted troops, but the BTR-60 is armed only with machineguns and very light armour which brings the expense down. Because of this, you can get 7 stands of infantry and 4 BTR-60s for only 5 points. Though the BTR-60 is not likely to go toe to toe with anything other than opposing Infantry, it is a good way to leave room for other unit choices.
Rather than use the value of the BTR-60 Company to slide a few infantry stands into our army, you could go in the other direction and maximize your infantry. 23 points gets you a maxed-out squad complete with all of the heavy weapon options. That’s 25 stands and 16 BTRs per unit! Go ahead and use the BTR-60 Motor Rifle formation and fill up the infantry slots! You can have 76 infantry stands and 49 transport vehicles for 70 points! This would certainly be interesting to play and you would definitely outnumber your opponent, though you may not have enough paint….
Afgantsy Air Assault Company
These veterans of the war in Afghanistan have statistics that reflect their hard-earned experience. Though they have the same weapon options and unit sizes as the other Soviet units, they have a Courage of 3+ and a Skill of 4+. Though these stats are not outstanding, they are an improvement over the regular Soviet infantry stats and are still quite reasonable in terms of points. 7 stands will run 4 points. The main difference however is the Afgantsy don’t have transports as a basic option. Instead they are transported by Hind MI-24 Helicopters that are also a black box choice in the formation.
Obviously having helicopter gunships as their transport gives the Afgantsy Air Assault Company a massive boost in firepower. Spiral missiles provide AT ratings of up to 24, and they also bring Gatling guns and a one-shot salvo template weapon to the fight too! This makes this unit about a flexible as you can get for fighting all types of opponents.
In terms of tactics the Afgantsy Air Assault Company adds extreme maneuverability to the Soviet player’s list of options. Because the Hinds can both transport troops and provide devastating firepower, they can deliver the Afganstsy infantry to almost any point on the battlefield (game table) then either fly off on other missions, or stay near their infantry and defend them from armour and other serious threats.
BMP Shock Recon Platoon
The final infantry option in WWIII: Soviet is a bit different from the others. Where all of the other Infantry options can come with a full formation dedicated to them, the BMP Shock Recon Platoon does not. Instead this unit is a single choice in the T-80 BMP Shock Tank Company, which is the pinnacle of elite troops in the book. For this reason, this platoon has great stats, with a Skill of 3+ and a Hit on number of 4+. As far as Soviet Infantry goes, these guys are the best quality and also very expensive. The same 7 stands and 4 IFVS you would pay 8 points for in regular BMP units costs a lot more. You pay a whopping 15 points with the BMP Shock Recon Platoon!
In terms of firepower the BMP Shock Rifle Platoon is the same as the regular BMP motor rifle troops. This still means they have a ton of options for weapons, suitable for many different battlefield roles. On top of this they can have the BMP-3 or BMP-2s for transport and fire support. This unit can have a lot of firepower in a small package, that fights more like a NATO infantry squad!
In terms of tactics the BMP Shock Platoon is pretty limited because it is not a black box choice, so it will only ever be deployed in support of the Shock Tank Company’s equally elite tanks. This means their role will likely be guarding objectives or attacking in dense or urban terrain. In distinctly real-world terms, the high points cost allows for a low model count. Since the rest of the T-80 Shock Rifle Company is similar, with very expensive elite tank units (in the black box choices) this formation and its accompanying infantry is a good option for new players who have not painted a lot of models or who don’t want to break the bank on model kits.
The Soviets are Coming!
As we have seen the Soviet infantry options in World War III Team Yankee are fairly varied yet highly adaptable with upgrades and transport options to strike hard and tackle different missions. We have also explored the interesting way in which the lower quality, yet more numerous unit sizes embody the unique aspect of how the Soviets planned to fight should the Cold War escalate to World War III. With this new-found knowledge now is the time to gather your forces under the red banner and conquer the corrupt capitalists. Patrick Swayze, Charlie Sheen and those pesky high school students won’t stand a chance against the might of Soviets this time!