
with Phil Yates and Wayne Turner, Battlefront NZ
To celebrate launch day, Phil and Wayne had a little scuffle with the Studio army collection. The scenario was the classic Defence of Shellerton, with Phil playing British (of course) and Wayne taking the lead elements of the Soviet invasion force.
Phil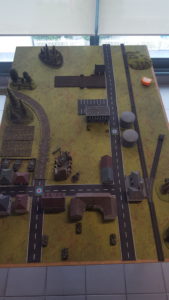
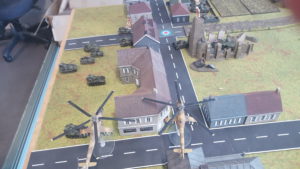
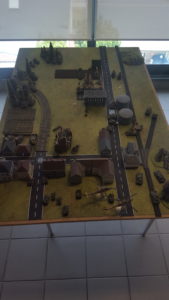
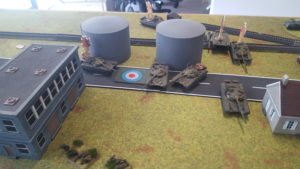
When I was ordered to hold Shellerton against the lead Soviet element, I was moderately surprised as I’d wargamed exactly that situation in training. So it was with a sense of deja vu that I deployed my forces. I put my attached platoon from the Irish Guards forward in the factory by the fuel tanks as a bastion to slow the enemy advance down the main road, placing hasty minefields on their flanks to delay any attempt to bypass them. With only one troop of Chieftains immediately available, I placed them in the farm on the left flank where they had an excellent field of fire while blocking any advance down the side road. I was surprised to find the church wrecked by an apparently random bomb, but pleased to take advantage of the cover that game me for my own tank. The artillery deployed behind the town and my Swingfires remained in reserve.
 The plan was pretty simple: hold the factory and fuel tanks at all costs while delaying any advance into the town long enough for whatever reserves regiment could spare. Lacking any air defence, I’d begged for some Blowpipe missiles, and been promised them shortly, but had to rely on good camouflage discipline in the meanwhile.
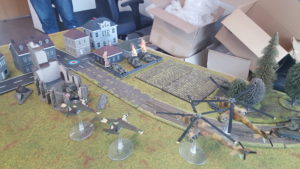
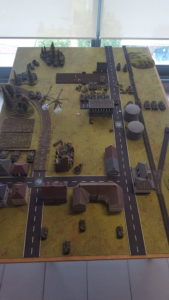 The battle opened pretty much to plan. The Soviet forces deployed and advanced, and immediately ran into trouble. As my earlier battlefield reconnaissance had predicted, the woods on my left flank proved tough going for the Soviet tanks, breaking up their advance and presenting them as targets in ones and twos as they pushed their way clear. This delay would prove vital in holding the bastion on the right flank.
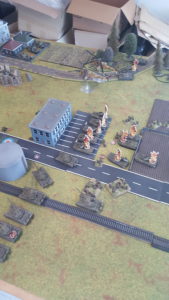
In front of the factory bastion, the killing ground was perfectly executed. The pre-planned artillery bombardment cut down the advancing infantry and destroyed half-a-dozen BMPs, while my Chieftain troop finished off the rest. The infantry even scored a couple of T-72s with their Charlie-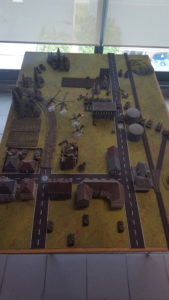 Gs and Milans. After that, the Soviet infantry was unable to make a credible threat, although they did launch one charge under cover of massed machine-gun and self-propelled AA fire.
 Unfortunately, the lack of air defence resulted in the rapid destruction of my Chieftain troop, leaving me holding the centre and right flank on my own until the Swingfire troop leader radioed me asking for instructions. It’s so easy to get focussed on the small picture in combat and forget the big plan. My church was taking a pounding from tank fire, artillery fire, and both helicopter and aircraft-launched missiles, but aside from a brief period spent clearing debris from the optics and replacing an aerial, no harm was done.
It was perhaps fortuitous that I had left my Swingfires in reserve as long as I did. When they moved up into firing positions at the rear of the town, their ambush was ineffective and quickly attracted most of the fire that had been directed at me. I lost one of the lightly-armoured vehicles to a strafing run by aircraft, and the other two were damaged, but remained in action.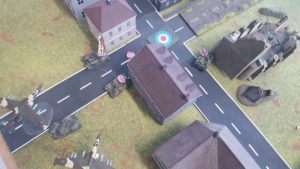
Around this time, the battle started to swing. The long awaited Blowpipes arrived, promptly shooting down one of the aircraft harassing me and driving them off, and one of my reserve Chieftain troops showed up to reinforce the right flank where the Soviet tanks had finally broken through my minefields, flanking both my position and the infantry bastion. Their accurate fire quickly destroyed several Soviet tanks.
 With relatively few Soviet tanks still moving and their infantry digging in on their start line, things looked good at this point. Unfortunately, appearances were to prove deceiving in several ways. While I thought the battle was in its final stages as my third Chieftain troop reported their imminent arrival, and the last few Soviet tanks seemed about to be knocked out or driven off, the battle appeared quite different to Guardsmen in the factory.
The sustained heavy fire had knocked out radio communications with the Irish Guards early in the battle, but as they were holding out well, that seemed like a minor problem, However, with the loss of every visible tank and my position being covered in a pall of dust and running low on anti-tank ammunition, it appears that the Guardsmen thought themselves the lone survivors, so when the Soviet tanks passed through their minefields with minor losses and overran their flanking anti-tank position, while the fire from the front had not abated as the SP AA guns had moved to close range, it appears that they felt they had little option but to surrender after a hard-fought battle.
Having lost my forward bastion and with the Soviet tanks advancing into Shellerton itself, my own position was overrun, and a fighting withdrawal to the next line of defence was ordered. The Battle for Shellerton was over.
The good news is that I hear that the replacements for the Chieftains we lost are likely to be the new Challengers. With their much improved front armour and engines, I doubt that I would have lost the battle. Even the heavy aircraft missiles would have had trouble penetrating them!
Wayne
Even though I worked on adding the new material to World War III: British, the original book, Iron Maiden, is really Phil’s baby, as are the scenarios. It seemed right and proper that Phil should command the British, while I took the dastardly Soviets.
As luck would have it the Soviet forces from the scenario is similar to what I have run in the past with my own Soviet force, so I had a good idea how it would handle.
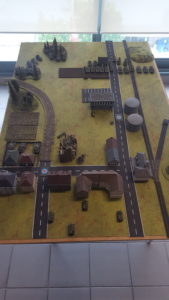
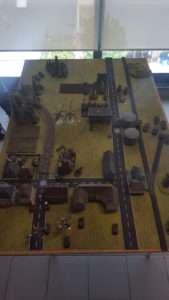
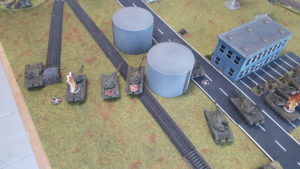
I simply planned to push hard, down one flank while tying up resources on the other flank. The forward of the two objectives was on the sealed road running parallel to the railway line on my left, while the approaches to the further objective on the right provided more concealment, but was well protected by four Chieftains. On the left flank Phil had placed his dismounted Mech Platoon in a factory building and a string of minefields on the open ground around it.
My BMP-2 Motor Rifle Company and seven of my T-72s would attack the Mech Platoon and take the building and the objective behind it. On the right my other six T-72s would tie up the Chieftains, keeping them from interfering in the left-hand attack. I’d use my Hinds and SU-25 to also concentrate on the Chieftains and any reserves that may arrive.
What happened?
I started the battle as planned pushing up on the right to attack the factory building, dismounted my Motor Rifles and moving the BMPs forward to shoot up the Mech Platoon. That first round of shooting did not go well. I ended up rolling over 30 dice for just two hits. I didn’t kill a single team, let alone pin them down. On the other flank half of my T-72s failed cross checks and I wasn’t able to engage the Chieftains heavily. My Hinds failed to kill a tank and my SU-25 didn’t even turn up.
 As the game when on my dice continued to betray me, but on the second turn I did take out a Chieftain Troop, although it took a lot of firepower. The Hinds, the SU-25s, and the right-hand T-72s each took out one tank to eliminate the platoon. However, the British Chieftain formation commander remained to cause much trouble, nestled in the ruins of a church.
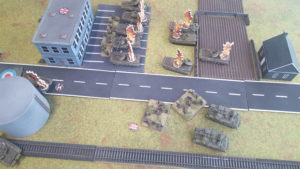
Phil’s firepower continued to prove effective, knocking out all nine of my BMP-2s in the first turn, and grinding down my Motor Rifles in the subsequent turns with his Mech Platoon and Abbot artillery. When he finally got his Swingfire anti-tank missile carriers in turn three the T-72s on the right began to suffer.
Meanwhile on my left, I pushed into the minefields with my mine plough tanks in an attempt to clear them. I lost one tank and had two bailed in the process. I eventually cleared a gap for my tanks in turn 4, but not before I had lost a T-72 to close-range Carl Gustav anti-tank fire from the factory.
Phil had brought on his Blowpipes and I lost SU-25 to them during an anti-tank missile run on the Chieftain formation commander.
 In turn five Phil got another Chieftain Troop which shot up two more of my left-hand T-72s just as they were lining up to knock out his Chieftain commander. However, one survived to assault the Milan missile team on the objective. I had a couple of T-72s contesting the objective, most of Phil’s Mech Platoon were still hold it in the factory building, but the Milan’s were in a foxhole in the open. Only one of T-72s made it in to assault as Charlie G fire bailed out the other. I failed to kill the Milan, but Phil failed his Counterattack roll, forcing his Mech Platoon to move 6”/15cm away from my victorious tank. The result of this was his Mech Platoon were no longer within 4”/10cm of the Objective and as I had had my T-72s on the Objective at the start of the turn and ended it with no enemy team within 4”/10cm of it, I had won the game!
Conclusion
Considering how the game was panning out to that point, it was an unexpected result. However, it does show if you keep at your plan, it can still sometimes work in spite of your terrible dice. I feel another turn and Phil’s fresh Chieftain Troop would have cleaned things up, but pushing hard won the game before that could happen.