From dense forests, small villages and farmlands criss-crossed with rivers to marshes and large cities, the Eastern Front battles of 1944 were fought over all kinds of terrain.
With a little helping hand from some pre-painted Battlefield in a Box terrain, we’re going to set up two types of Eastern Front tables – one rural village and one for a battle in the inner city.
The very first step (apart from the blank canvas of a 6’ x 4’ table) is the double-sided city/eastern steppe neoprene gaming mat (BB956). With a city layout on one side and on the reverse an all-over green grass pattern, it makes an excellent base for either kind of eastern front table.
To create a rural table, you’re going to need a few basic pieces before we add some extra spice:
BB117 Rural Roads
BB560 Streams
BB510 Small Pine Wood
BB138 Rural Fields & Fences
BB137 Rural Farm Buildings
BB241 Large Hill
BB241 Train Tracks
A box or two of these are a great start to your collection and will really add to your Eastern Front experience.
However, to completely flesh out your wargaming table (and to recreate our rural village), these are also great pieces of terrain:
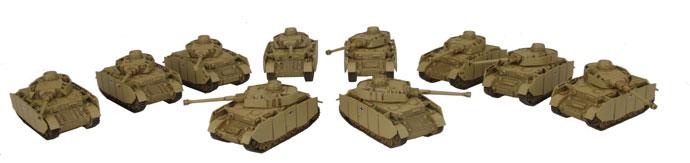
A long time ago and in an office on the other side of Auckland, the very, very first Flames Of War army I ever got to paint was a Panzer IV company. I originally picked this up as a whole half to the annual trip the studio makes down to Panzerschreck in NZ which is usually a doubles tournament. I paired up with Andrew and he pledged to take the infantry side of things while I’d be bringing the tanks. The one that called to me, which gave me the flexibility and relative punching power was the Panzer IV. I was handed ten and off I went!
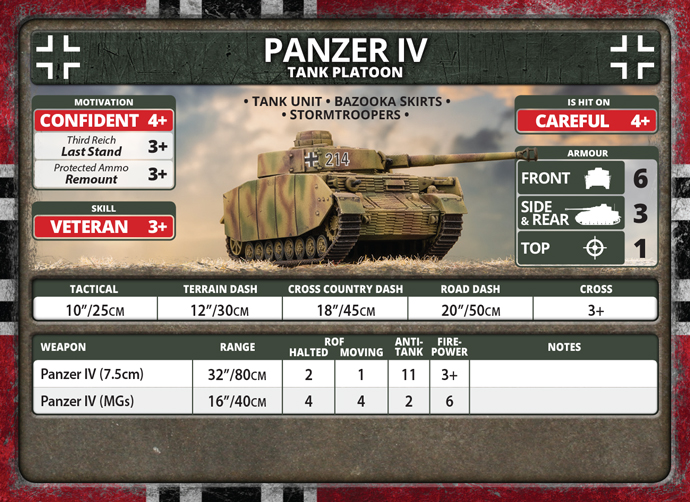
The Panzer IV in Late War
With the introduction of the Hetzer to Late War, the Panzer IV has lost its title of the cheapest tank formation (from the books) that Germans can bring but pound for pound, this tank still punching above its weight. 4+ to hit, Veteran skill, Stormtroopers, a 3+ Remount rating, and an MG. There is a lot of quality and you can still bring more than some might expect or prepare for. And of course, we have the 7.5cm gun with an Anti-tank of 11 giving it fantastic results against tanks of comparable weight while still threatening some of the heavier tanks out there with only the biggest and most expensive truly stopping it reliably. Even then you’ll have options! The Panzer IV to me is still a stand-out choice even as the bigger guns and bigger tanks come out.
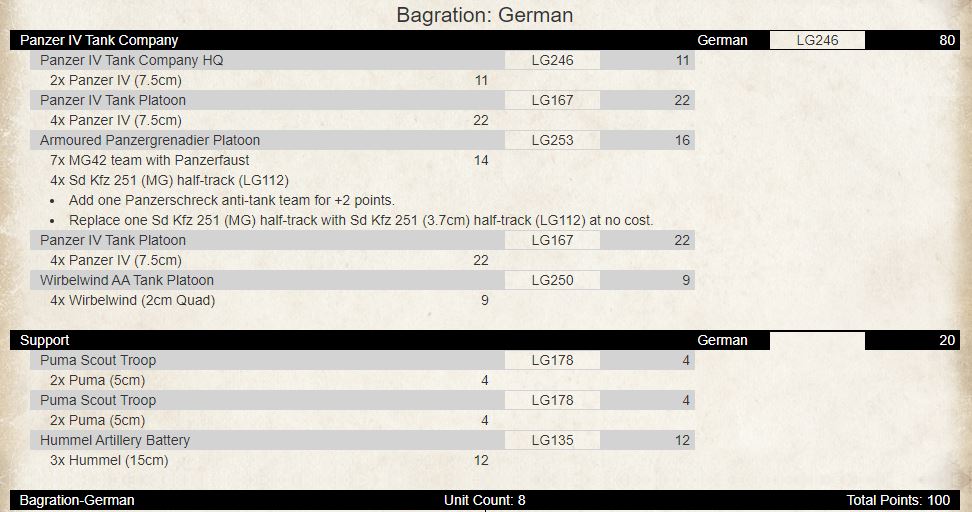
The Panzer IV Tank Company Formation
The Bagration: German Panzer IV Formation has a couple of changes. We have our HQ and two mandatory Black Box choices one of which will have to be a Panzer IV Platoon. The second black box gives us a lot of flexibility and while you can certainly double down on Panzer IVs there are some options to consider here.
The STuG makes for a comparable unit Choice to the Panzer IV, while only ever so slightly more expensive for an extra point of front armour, lower assault, and counter-attack ratings, and a fearless motivation while still keeping the same gun, you get a more stand-off choice of a tank that will want to be a bit further from infantry and lean harder into dealing with armour.
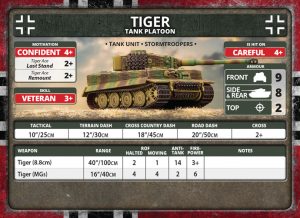
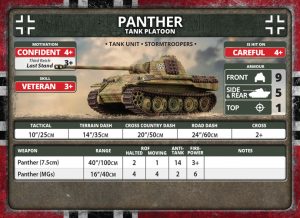
The Tiger and the Panther are our two other choices. It’s hard not to gush about the big cats, with comparable front armour and main guns that can punch through almost any tank in the game with AT14 with the Panther being the more vulnerable to side shots of the two and the Tiger Tank having 2+ Last Stand and Remount though this certainly means the Tiger Tank is more expensive points-wise. Role wise you would want to use these carefully to threaten heavy armour and hopefully deal with the major armour threats early. Even just one platoon of these can really define who an opponent will deploy to deal with you so it’s critical not to lose too many too early.
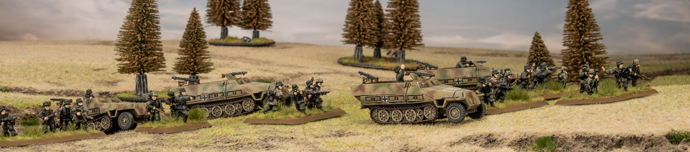
Lastly and our latest addition is the introduction of an Armoured Panzergrenadier Platoon. This is honestly fantastic and it’s something that shows up in a lot of the returning Formations for Bagration: German. Being able to bring infantry to a tank list that is part of your formation makes you tougher to break (something which sadly lost us our games back in Panzerschreck) and give you a solid defence or even assault unit to deal with other infantry and thanks to their Sd Kfz 251 transports they keep up while being kept safe from machine-gun fire.
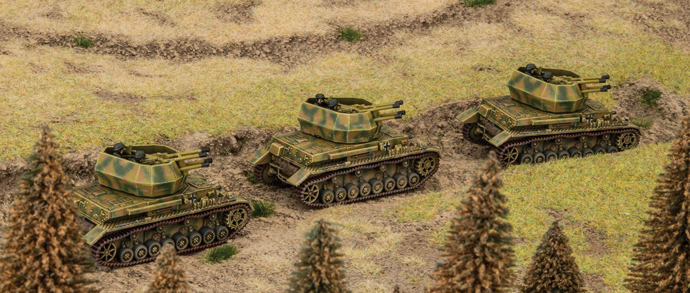
Also, how could we forget some of our newest models which while keeping the Sd Kfz 7/1 Quad AA Platoon and Möbelwagen AA Tank Platoon, we also got two new options both made entirely out of plastic with the Ostwind and Wirblewind. Both are great for fending off-air support attacks but the big question is what do you want them to do when there aren’t any annoying planes to swat at? The Wirblewind brings a pile of machine-gun shots that can shred unprepared infantry and the Ostwind brings some light anti-tank with a decent number of shots. Either bring something great to a Panzer IV formation or any tank formation for that matter!
Planning a list
So currently a total of ten panzer IVs fully painted and ready to hit the table so I’ll start there. This takes me to 55 points so I have lots of room to work with and a total of 45 points to play with for a 100 point list. With a bit of shuffling, I’ll put the second Panzer IV platoon into a gray box and take an Armoured Panzergrenadier Platoon as my second black box choice and max it out. This nicely covers the biggest weakness I found with my Panzer IV formation being broken a little too easily and I’ll chuck a full Wirblewind Platoon in too. For support, I’ll be using a Hummel unit I’ve had built (but not painted) and I’ll add two Puma Scout Troops in because John Lee ended up selling me on the idea of Puma Scout today and this might end up being my next army list.
My biggest concern with this list is going to be big heavy angry tanks but hopefully, I’ll have the mobility to avoid or flank them. But comparable Medium tanks or even infantry heavy lists? I think this will be a great match-up since I’ll have most of the tools to deal with them. I imagine a tide of Soviet infantry might be a struggle. Also, this list will be a great match-up for a British Army that I’ve fully painted. I’ve been wanting to get at least two fully painted relatively well-rounded forces that can fight each other and the match-up between these two will actually lead to some pretty balanced games, I hope! It’s something I’ll be experimenting with as I’ll be using them to help me recruit some more people to Flames Of War! The Painting and building are also pretty manageable too with me only needing a box of Pumas and an Armoured Panzergrenadier platoon to be built and the Hemmels somewhat already underway. Time to get started on this now!
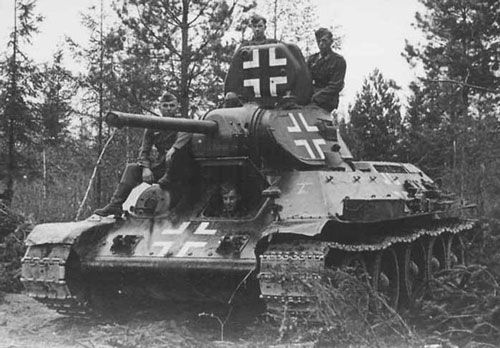
With each release, I look forward to seeing what looted vehicles might be available, where I could add some flair or flavour to my armies by adding these captured vehicles to my arsenal. I have added a captured Sherman Firefly to my German Beach Defenders list, and, an absolute no brainer with my Soviet forces taking the Decoy Tank Company with either Tiger and two Panthers or just all Panthers. With this release, we have some captured Soviet tanks that we can include in our force via three command cards. If you have some spare points, consider taking one of these command cards:
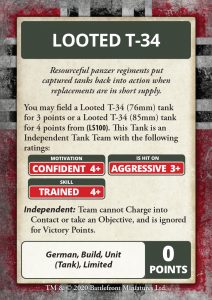
Looted T-34
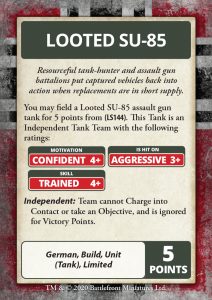
Looted SU-85
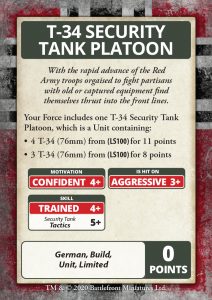
T-34 Security Tank Platoon
Looking at the looted T-34 command card first, we can take a single tank and we have a choice of either a T-34 (76mm) for 3pts or a T-34 (85mm) for 4pts. This tank is an independent tank team and is Confident, Aggressive, Trained. For me, it is a no brainer to take the T-34 (85mm). A single fast tank running around with FA6 AT12 for 4pts can be quite handy depending on what type of list you like to run. I think it could work well with either an infantry or recon list to provide some mobile teeth. We will explore a list later in the article.
The looted SU-85 command card allows you to take a single SU-85 assault gun for 5pts. This tank is an independent tank team and is Confident, Aggressive, Trained. Being an Assault Gun and hull mounted, it is probably more suited to a defensive list as it has a useful AT12. In fact, if you wanted, you could combine the two cards for 9pts to give your force a couple of mobile AT12 platforms that could help secure both flanks whilst waiting for the bulk of your heavy tanks to arrive from reserve.
The final command card, the T-34 Security Tank Platoon, gives you an option to field three T-34 (76mm) for 8pts or four for 11pts. Again, the ratings are Confident, Aggressive, Trained (with tactics 5+). This gives you a cheap mobile AT9 unit that can serve as a second tank platoon if you only have one of the heavy tanks. Useful to have a mobile on-board reserve to protect against any recon or light/medium tank forays into your backfield or use them as bait whilst you maneuver your other mobile forces into position for the flank shots or assault.
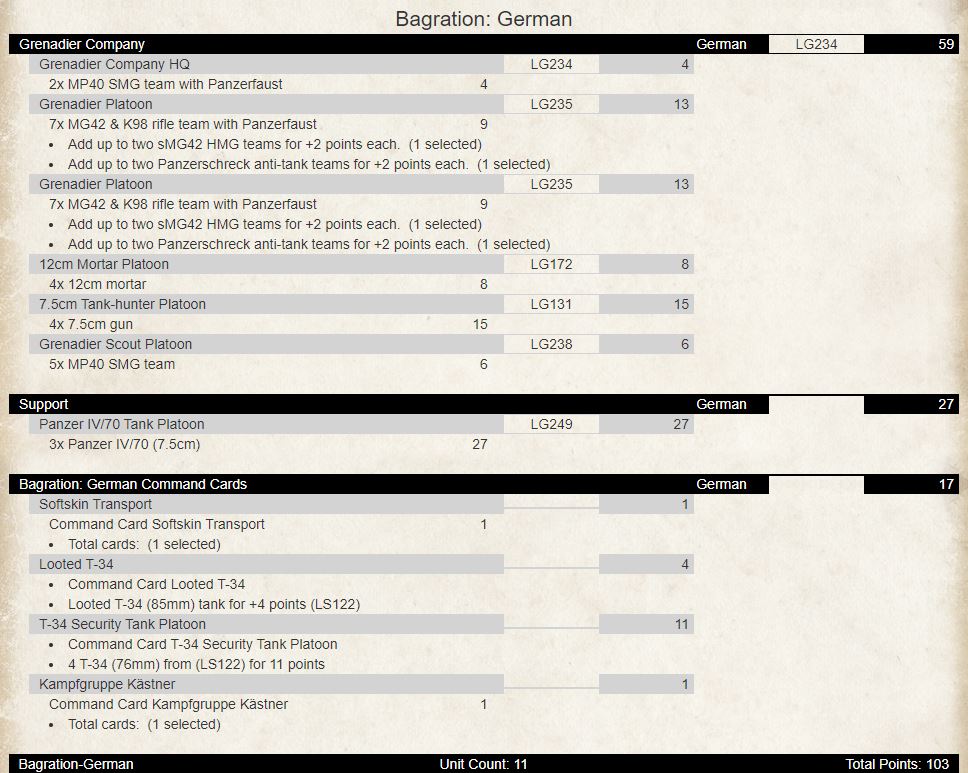
So, let us look at how we could create a list where you can add these into your force. For this article, I am going to look at the humble Grenadier Company. It has the least of formation options compared to the other infantry formations, so I think the looted cards will fit in nicely here. The formation consists of:
1 Grenadier Company HQ
2-3 Grenadier Platoon
0-1 sMG345 Machine-Gun Platoon
0-1 8cm Mortar Platoon or 12cm Mortar Platoon
0-1 5cm Tank-Hunter Platoon or 7.5cm Tank-Hunter Platoon
0-1 7.5cm Gun Platoon
0-1 15cm Gun Platoon
0-1 2cm Light AA Platoon
0-1 Grenadier Scout Platoon
Looking at 105pts I would look at taking as many units as possible for the formation break and adding some heavy firepower in the form of Panzer IV/70s and rounding out with looted tanks.
This may look like a compact infantry force but is relatively strong with six units for the formation break. The core for this formation is the two Grenadier platoons. They can hold your objectives defensively or use them to support the Scout platoon, who with the Scout and Spearhead ability, sneak into positions to assault the enemy off the objective. The 12cm mortars provide the ability to pin or remove enemy infantry and gun teams and support your attacks. The anti-tank guns can be put in ambush or with the Soft Skin Transport Command Card, be brought on from reserve if required. Panzer IV/70s are your heavy AT to deal with those pesky IS-2s. The T-34(85mm) provides some AT cover on the other flank to the Pak 40s and the T-34 Security Platoon can be used to plug gaps, provide support for your grenadier assaults, or last-ditch attempt to assault infantry off the objectives. The Kampgruppe Kastner Command Card gives you the ability to use the Night Fighting rules if you are the attacker in a mission where the defender has minefields. This means the units in your formation get to move freely out of their deployment areas whilst night. This gives you the advantage to get your infantry into a position to assault early in the game under darkness!
With painting these tanks, you can either paint them green with German markings and have them stand out in your force of camo German gear or you can also have fun painting them in the same (or different!) German camo schemes for late war.
There is a place for taking looted tanks depending on your playstyle or list – have fun adding them to any of the lists in the release. I love the T-34 Security Platoon and will be painting some up in German Camo for my Bagration forces. You never know – they could give me that edge in my next game!
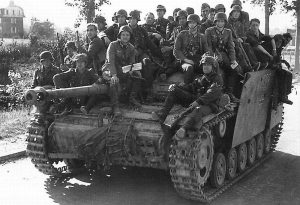
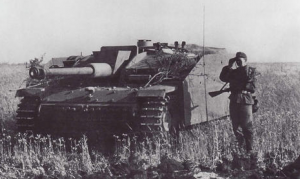
The StuG Battery or Assault Gun Battery was one of my favorite lists from the previous German Eastern Front Late War book, Grey Wolf. I’m very glad that it has been carried forward into the V4 German Bagration book as a dedicated formation rather than a Command Card formation. I thought it was a unique German Force, with dedicated infantry to escort the Assault Guns and would often ride the StuGs to the battlefield and even launch assaults from them!! I will admit I am a follower of Stug Lyfe, and do love assault guns from all different lists, like the Russian SU-152, Italian Semovente, and the like.
Two formations from this book are very closely linked, the Storm Grenadier Company Formation and the StuG Assault Gun Battery Formation. In game they represent companies from the 78. Sturmdivison (78th Stormdivision) and the 189. Sturmgeschütz-abteilung (189th Assault Gun Battalion). Both are Eastern Front veteran Divisions, who had been through the meat grinder at Kursk together and survived and also the battles leading up to it. Before Kursk in 1942 the 189th was made an organic support to the (at the time) 78th Infantry Division, and they fought hard there in July of 43 as part of XXIII Corps of the 9th Army, and the fighting at Ponyri, before having to eventually pull back as the Wehrmacht retreated.
As an aside, if you want to represent the 189th Assault Gun Battalion at Kursk using the MW Ghost Panzers book, you can use 189th StuG Batterie Command Card, which does have a Grenadier platoon included in the formation, to represent the integration with the 78th Stormdivision. This card also gives rules for your infantry and assault guns to cross minefields more easily. The great thing here is that you can use the models from your late war force to represent this MW force as well. Additionally, they are re-releasing the specific assault rifle carrying Escort Platoons (GE788), which are excellent models and I recommend getting some!
So after Kursk, they rebuilt over the winter of 1943, and during that time, with the hard lessons learned in assaulting prepared positions in Operation Citadel, the 189th Assault Gun Battalion was given its own escort troops or tank escorts (Begleit) to protect the assault guns from infantry counter-attacks and to help them to spot and take out ambushing anti-tank guns. In fact, by the middle of 1944, while most German Divisions were a shadow of their former strength, the 78th Stormdivision was easily double the strength of any other division with a trench strength of 5700 fighting troops, compared to around 2500 in other Divisions at the time.
The 189th Assault Gun Battalion itself had a strength of 31 StuG III’s as well as the dedicated Assault Gun Escort Battery (Sturmgeschütz-Begleit-Batterie) of 208 men (1 Officer, 30 NCO, and 177 enlisted). The Escort Battery was made up of 3 escort platoons to escort the 31 assault guns. Every escort platoon was to escort 10 assault guns ( a Stug Company), a Begleitzug was made up of 61 men. A squad of 5 men would escort each assault gun, and the escort platoon had 3 escort groups each of 3 squads, to escort 9 assault guns, with the 10th assault gun being escorted by the larger commanders escort group (16 men including the commanding NCO).
To help with this task, giving them firepower in assault and also to help in defending the assault guns against close assaults by the enemy, they were one of the first units fully equipped with the STG 44 Assault Rifle. This new weapon has the rate of fire of a lighter submachine gun, but with a heavier bullet (from the K98 rifle), so more powerful, also in single fire mode, it had the accuracy of a rifle at medium ranges. Additionally, they carry a 30 round magazine, so a substantially better weapon than the lighter MP40 machine pistols they were using previously for close assaults. It is said that this weapon is what influenced the design and introduction of the AK-47 by soviet engineers, some three years after the war.
Unfortunately for the Germans they never got to use these units how they were designed to be employed; in assaults against Soviet positions. The Soviet Bagration Summer Offensive in June of 1944, stopped any further German offensive operations on a large scale. These assault gun companies were used instead as a mobile fire brigade to try to stop or slow localised Soviet assaults, to either allow time for reinforcements to arrive or to buy time for German forces to retreat to new positions.
This unit was fighting alongside the 78th Stormdivision in Byelorussia at the outbreak of Bagration, from the 22nd of June 1944 and into July. They held the line at Festerplatz Orsha alongside the 501st Heavy Tank Battalion, against the Soviet 11th Guards Army. Initially, they stalled the offensive, they were in strongly held prepared positions, with large networks of trenches and strong points. The Germans had expected to be assaulted by the Soviets in the summer and had been preparing during the winter and spring.
The Soviets then brought up heavily armed engineer units as well as the 2nd Guards Tank Corps to break through the German lines. The breakthrough was made by the 1st Guards Rifle Division in a thinly held marshy area, north of the city, held by the 78th Sturmdivision on the 24th. They pulled back to the city and a German counter-attack failed. This allowed a mixed cavalry and mechanised exploitation force to push through, and with the German forces to the North at Vitebsk collapsing this made their position exposed to being encircled. The 2nd Guards Tank Corps then began pushing a force through, and German defences could not stop them, this fast armoured force continued on to Minsk, leaving some troops to complete the encirclement. By the 26th of June, the Germans retreated, with some of the 78th Sturmdivision holding on at the railway station to allow a train of wounded men to be evacuated and to buy time for the other German forces to retreat. There was intense city fighting, by the German remnants, with the city finally falling early on the morning of the 27th. With the rest of the 78th Stormdivision, the surviving units of the 189th Assault Gun Battalion withdrew westward and continued to fight. The 189th was finally withdrawn on the 29th of July to rebuild.
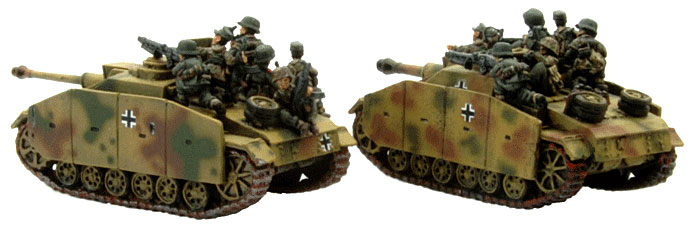
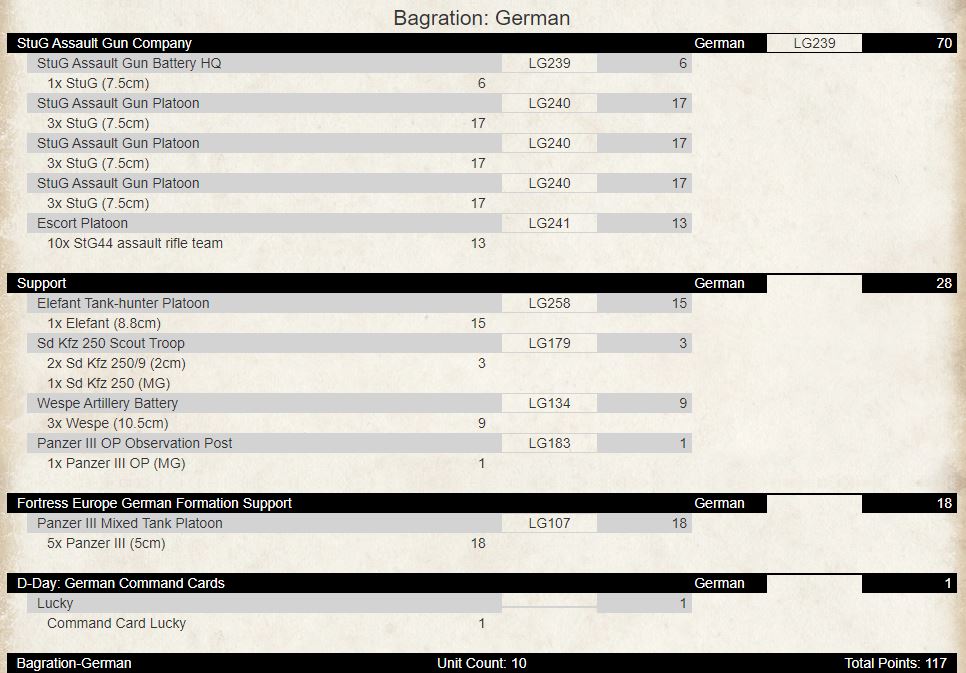
So how can we field these assault guns in German Bagration? It’s actually a pretty simple formation, you have an HQ of a single StuG, and up to three platoons (zugs) of 3 StuGs (either 3 x StuG 7.5cm, or 2 x StuG 7.5cm and 1 x StuH 10.5cm). Additionally, you can add an Escort (Begleit) Platoon, of up to 10 stands of assault rifle-wielding Grenadiers. This is a small formation, which at a minimum will come to around 40 points, which will allow you plenty of points for support units, but if you max it out, it can come to 70 points.
So like most German lists you need to have a careful plan for your force and how it works. All your units have a specific purpose and need to work together to get the job done. You just don’t have the points for luxuries in a German list.
So, why would you choose the 2 x StuG 7.5cm and 1 x StuH 10.5cm option, over the 3 x StuG 7.5cm option? Firstly it’s a point cheaper, so that can help you find that extra point for a unit upgrade or Lucky Command Card, and also you can mistaken target enemy fire onto it, to lose that tank first if you don’t feel you need the 10.5cm gun in that particular battle. Also even though the 10.5cm gun has drawbacks from moving and shooting (it is Slow Firing) and only has a stationary RoF of 1, it is Brutal and has a 2+ Firepower. So it is a good gun for taking out gun teams, as they need to re-roll any passed saves, and you’re very likely to pass your firepower test.
I did like the option of taking the StuH platoon in the German D-Day book, which had up to 4 of these in the platoon and allowed an artillery bombardment as well, but that option is not available here.
But taking the 10.5cm StuH if your planning to assault dug in enemy positions can help, and the FA7 of the StuG has helped me in many battles, especially if at long range and in concealment.
For me I would take one unit of 3 x StuG who would be primarily an overwatch anti-tank unit, in support of your assault element, while your HQ and assault StuG’s get stuck in. You could use either option for your assault element.
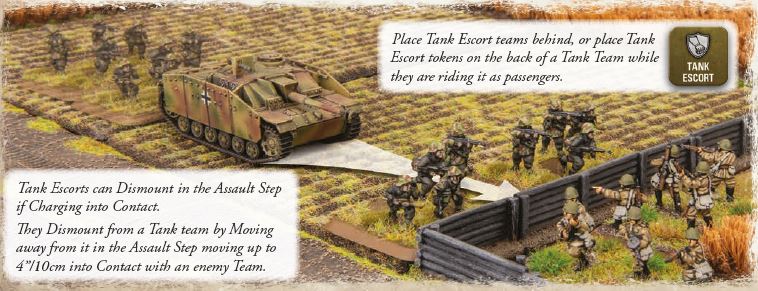
Now using the Begleit or Escort Platoon can be a bit tricky. As noted these guys would ride the assault guns until they got into position, and would then dismount to assist in the assault or defend against infantry counter-attack. They also have a good gun for assaulting, with a stationary and moving RoF of 3 (only 1 when pinned), but a shortish range of 8”.
You could use them the same way, they could start the battle mounted on the StuGs, and using the StuGs greater movement, get them into a good assault position, dismount them and use the StuGs to suppress the enemy while you assault. I would also combine this with an artillery template to make sure the enemy is pinned before you assault, just make sure your template is not in the danger close range of friendly troops, 4” for an Artillery template or 6” for a Salvo template, as that will stymie your assault.
Also, they have the Tank Escorts rule – which allows them to dismount from the StuG while charging into contact in the assault phase, and also they can shoot while mounted from armoured tank teams (Stug or any tank), but only one team per tank (so max RoF of 3 shots at 8”). Which can be very useful!
So that sounds great! just mount them on tanks, dakka dakka dakka, then assault, game over right??? Not quite, you have to be aware of the limitations. They get no cover riding on tanks, so anytime a tank with passengers on it takes a hit, the passengers are hit as well, and have to make a save (3+ infantry save in this case). Page 44 and 45 of the rule book explains it, but basically up to 3 infantry teams can be passengers on armoured tank teams, and every time a tank is hit (either normally or bombarded), all the passengers take a save and they can also be pinned. So if you are hit by a single shot, not only does the tank need to save, so does each passenger team, if you have 3 passenger teams that a tank saves and 3 infantry saves. A 3+ save is pretty good, but a large amount of fire can really hurt them.
I’m not saying don’t try it, it can work very well against anti-tank gun teams (esp if pinned), or artillery that cannot defensive fire, or low RoF units that are pinned. But just be aware of the limitations, but it is very satisfying when you do get the rare Tank Escort dismount assault to work!!
Also, there is nothing in the rules saying they have to be mounted on a StuG, you could put them on something a little more suited to assaulting…
So as you can see I have the HQ and 2 StuG 7.5cm Platoons, and a full Escort platoon. I would use these to push up on the objective and make the enemy have to deal with them.
Additionally, I have 3 Wespe to provide me with a smoke bombardment to cover my troops or to soften up my assault target. I have taken a single Elefant to take out any enemy heavy armour or take out anti-tank gun teams without any fear of return fire, and it can also hang back and help hold an objective.
The scout Sd Kfz 250s are there to spearhead and get my assault element closer to the enemy from the get go. That is it, they really have no other purpose other than to annoy.
I have included the Panzer III as they have decent FA (6), and a decent AT of 9, and 4 MG’s each, as well as being reasonably cheap at less than 4 points a tank. They can take care of armoured cars and other light armour without much fear of return fire and even take on most medium tanks like a Sherman, and 20 MG shots are not what an attacking infantry force wants to walk into.
Additionally, they can be used to carry the Escort Platoon as well, and are even better in assaults than the StuG’s. StuGs have a penalty in assaults for being self-propelled guns, so only have a 4+ Skill to hit in assaults, and a bad 5+ counter-attack, which is why they are generally not suited to assaulting but are good to support assaults. The Panzer III can actually assist in the assaults if the escort platoon is going to struggle by itself.
To me, this is a reasonably balanced and fun list, of course, if you are going against an all IS-2 list your going to struggle, but it should do well vs most lists if played well.
A few things I wanted to put into this list but I just could not find the points was the new Panzerwerfer 42 Battery, which is basically a Nebelwerfer put into a half-track, which is great, as it can’t be pinned, but only has the option of 2 or 4, so with the smaller platoon, you will have to re-roll your hits (but with a 3+ to hit it’s not that bad). Another was the Brummbar Assault tank platoon, which would suit this list well, as they can just roll up with their FA of 10 and blast away, but were just too expensive to fit. The last was the Stuka Zu Fuss Command card, which gives a unit of Pioneer Sd Kfz 251 half-tracks a one off heavy Nebelwerfer bombardment (AT 3, Firepower 2+), but I just could not find the points, but that certainly would have been fun!!
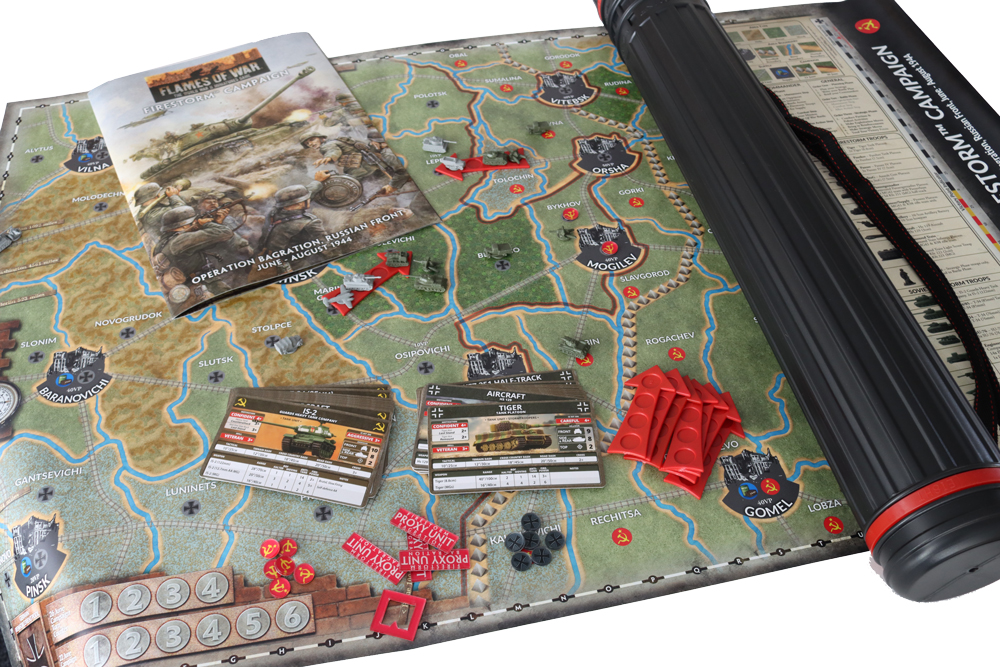
With the release of the Bagration German Forces on the Eastern Front, 1944 as a follow up on the Bagration: Soviet we have all the army lists and models to recreate one of histories deadliest campaigns. To support these releases Battlefront is re-releasing an old friend of mine, Firestorm Bagration.
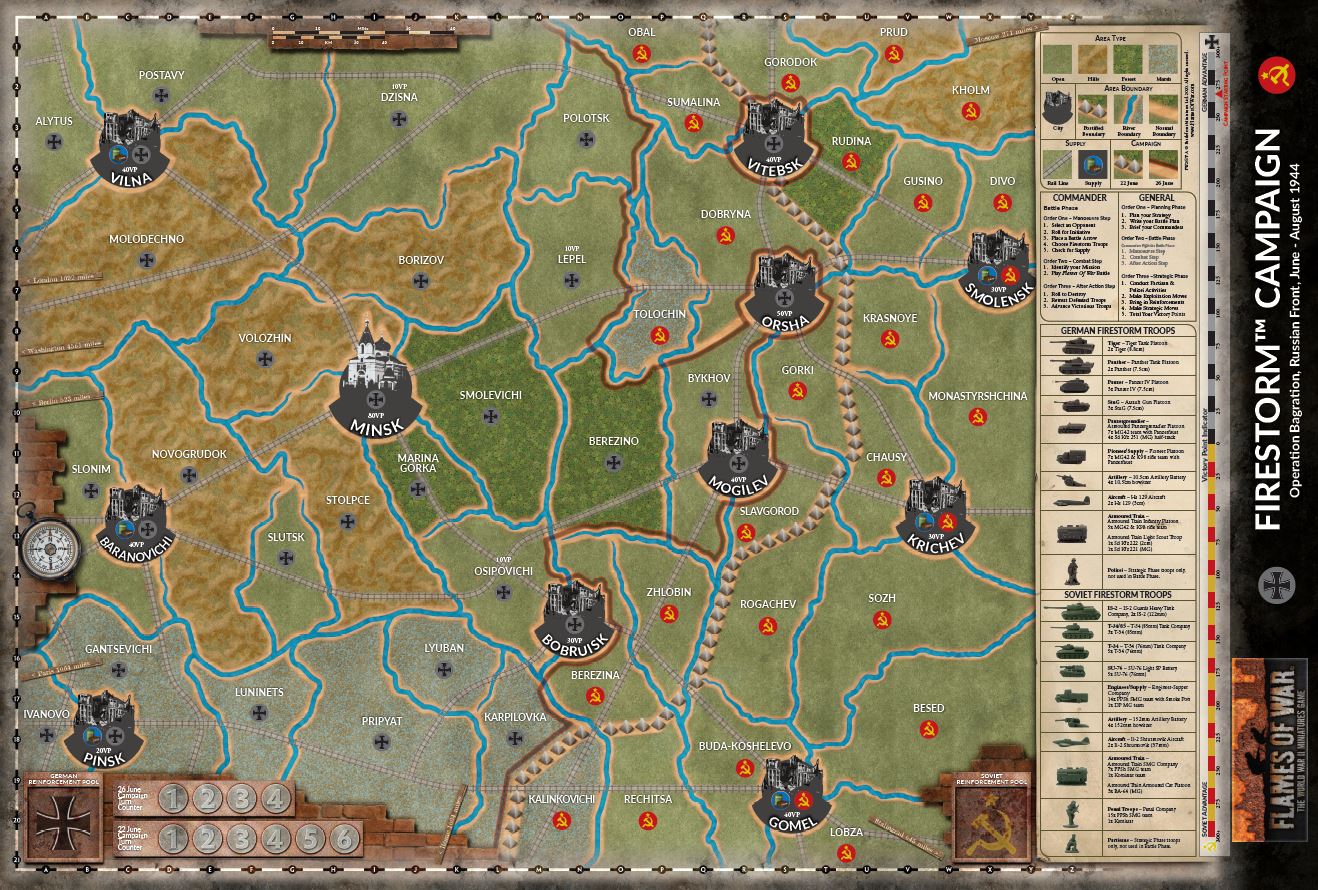
For me this is the best way to play Flames of War. To play your battles as part of a larger campaign in a narrative setting. Normal Flames of War games are fun by themselves but when the battle plays a great part of a whole this becomes more exciting. Firestorm: Bagration allows you to re-fight the battles of Operation Bagration on a grand scale. The map will allow you to fight for the historical cities of Minsk, Orsha, Vitebsk and Smolensk.
This is the vinyl map is where you will represent the push and pull of the battlefield, placing markers and tokens as you launch offensives and take or hold territory all while maintaining your supply lines.
For a player like me, historical setting is important and to be given a chance to fight the campaign in a larger context is rewarding. Your main games will of course be regular Flames of War games. The Firestorm system allows you to play these games as part of a larger campaign. The key element are the Firestorm Troops.
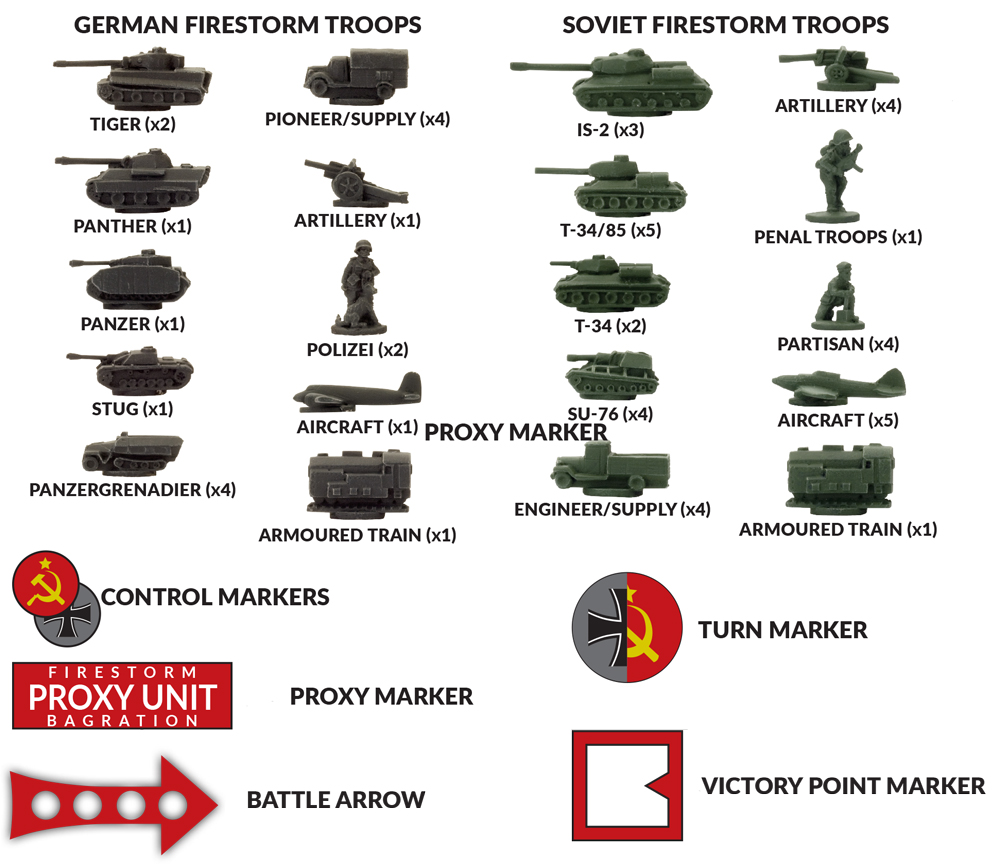
These are extra troops you add to your battles. They are limited resources but are in addition to your selected army. Here you can concentrate your effort and use your most powerful units for your main attack or defence. These Firestorm Troops represent your main divisions and corps:
These Firestorm Troops add a lot of flavour to the games and may also give one side a slight advantage as their Firestorm Troops give one side an numerical advantage without being too overpowering. Unlike normal games where both sides are selected to a fixed points system, these units are then in addition to the selected forces. The smaller the game, the more effect they have. The Firestorm units take some getting used to, but are an essential part of the campaign. If you always play with equal forces then the front lines are not going to change much during the campaign. The advantage the Firestorm Troops give you in you battles can be crucial. It also means both sides must husband these valuable resources and use them wisely.
On the Firestorm map there are also other considerations, you must keep your lines of supply open and at the same time cut of the enemy and isolate his forward units. Team work is encouraged and the more work you put into the campaign the more fun it is.
The rules are straight forward and simple. Each turn has three phases. A Planning Phase, where you prepare each turn and plan your battles. A Battle Phase where you play your Flames of War battles according to what is happening on the map. Then finally a Strategic phase where you work out the end of each turn. Firestorm: Bagration is designed to work with your Flames of War games and has turned out to be a successful medium for campaigns.
While the German defence will be desperate the Soviet forces are under pressure to press on swiftly and capture key locations or else the Germans will win on victory points. So even if historically Operation Bagration shattered Army Group Centre the Firestorm Campaign gives the German players a chance to reverse the outcome.
Tips on playing Firestorm Campaigns
I have some experience with Firestorm Campaigns having written six that can be found on the Flames of War homepage. (Did I mention I think the historical aspect is important?). And I have run a few campaigns.
Tip 1. Decide on how long you intend to play each turn. A week per turn seems to be about right. Firestorm: Bagration has two game lengths, 4 turn version and a 6 turn version. I would recommend that newcomers to Firestorms start with the shorter game. You can replay the game later in the longer version once you have become more familiar with how the system works.
Tip 2. Have a fixed total period for the campaign. One of the biggest dangers of campaigns is that they become to long and players start to lose enthusiasm for the campaign and it peters out. By having a set time-frame it is easier to maintain interest.
Tip 3. Have two clear chiefs in command for both sides. These will need to put in a little extra work and also an opportunity to shape the larger strategy. I would strongly recommend that you allow everyone to take part in the decision making, but it is also important that they take the initiative as required and these are also the players that make sure that the campaign map is updated as needed.
Tip 4. Remember that you should have fun. I find it helps to think of Firestorm games more like narrative gaming that a straight win-loss scenario. The campaign should be fun the whole time. Like war it isn’t fair, but fighting a desperate battle is a rewarding gaming experience.
I am excited to see Firestorm: Bagration re-released and updated with the newest version of Flames of War. For me it is like meeting an old friend and is, in my humble opinion, easily one of the best ways to play Flames of War.
To newcomers I say, try this. Firestorm: Bagration adds historical depth to your games and is a great way of expanding your gaming experience to include the historical aspect. Seeing you armies move around the map, the names of far away locations will have a reference and maybe encourage you to learn a little history while you play.
Generals, prepare your forces. Draw your plans. Enjoy!


 dedicated formation rather than a Command Card formation. I thought it was a unique German Force, with dedicated infantry to escort the Assault Guns and would often ride the StuGs to the battlefield and even launch assaults from them!! I will admit I am a follower of Stug Lyfe, and do love assault guns from all different lists, like the Russian SU-152, Italian Semovente, and the like.

 I did like the option of taking the StuH platoon in the German D-Day book, which had up to 4 of these in the platoon and allowed an artillery bombardment as well, but that option is not available here.
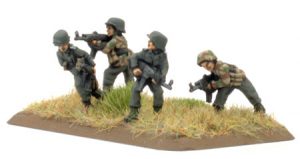
 With Jokull Gislason