We originally published this article during the Enemy At The Gates Live Launch, but it is still relevant today with the launch of the Bagration: Soviet book. Whenever Mike talks about Stalingrad you think of the cities throughout Poland that were fortified and turned into defensive positions by the retreating German army as Operation Bagration relentlessly marched on…
From the very start of the Eastern Front projects we knew that urban combat was an essential part of the story of Stalingrad and wanted to include some city fighting rules. We also knew that city fighting generally comes with some barriers to entry, so we carefully marked out some design considerations to make city fighting accessible and fun.
We wanted to make sure the rules played fast and focused on the action.
We wanted the narrative to focus the action on one or two key buildings.
We wanted urban table set ups to be achievable for the average player
We wanted to give players the ability to play city fighting games practically anywhere.
Streamlined Rules
Often city fighting rules games can take a lot of time and effort to use and detract from the fun. The terrain causes strange situations, raises questions, and generally adds a lot of administration time when you’d rather be just throwing grenades into rooms before storming it with flame-throwers and submachine-guns. So we wanted to focus on what matters in city fighting and tried a lot of things out.
The breakthrough came when we freed ourselves from the burden of measured movement inside buildings. Getting tape measures into buildings to measure movement from room to room, up and down levels, and checking weapon ranges was simply taking up time and actually causing a lot of disruption by hitting models and tipping over the buildings. What really mattered about fighting in buildings were the rooms themselves. Everything happens between rooms and the position of teams in the rooms doesn’t matter. It’s a lot easier and more narrative to just point to a room and say “I’m going to assault that room from this one.” and then just start rolling dice. It cuts straight to the action and lets you start throwing grenades, rather than measuring to see if that team in the corner could reach the doorway.
Key Buildings
When you read about Stalingrad, the stories you see are about key buildings like the Grain Elevator, the Red October Factory, or Pavlov’s House. The buildings were as much a character in these fights as the soldiers themselves, shaping the fight as well as the battle’s final outcome. We included four special missions in the Stalingrad books that let you recreate these fights. While they draw inspiration from actual fights for Stalingrad buildings, the missions are intentionally designed so that you can use them at any point in the war so you can use them for battles set in places like Leningrad, Arnhem, Cologne, Berlin, or even more remote urban areas like Tobruk.
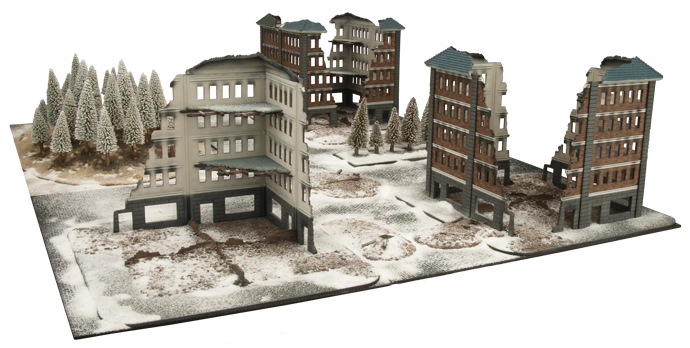
Achievable Tables The common temptation or expectation is to always try and cover a whole table in buildings. While tables full of city terrain can certainly be done and look amazing, for many of us gamers, this creates a huge barrier to trying city fights. Having a full table of building terrain, is typically unattainable and often impractical for the normal gamer. So we wanted a solution that would work for both types of players. The terrain goal for playing the city fighting missions in the book is achievable and reusable. We limited the essential buildings for these missions to at least two complete buildings so you can get two building boxes and be ready to play. Of course you can add more to your table and play larger urban games if you’d like.
Kitchen Table Gaming
The nature of city fighting is that it takes a lot of troops fighting in a small area to get the job done. Every level in a building effectively doubles the gameplay space below it, so you can fit a lot more troops in a square foot than you would on other tables. This means that you can still use a normal sized force on a much smaller table, which opens up an interesting possibility. The urban fighting missions are designed for a 2’x3’ (60x90cm) table, so you can play a game of Flames Of War wherever you have a table that size. For me, that includes my coffee table in my lounge or my dining room table. (Pro tip, make sure 19 month old children are properly stowed before using this product within 24”/60cm of the floor.) So if you’ve got that friend that you want to introduce the game to, here’s a set of missions that you can use at your home to push them over the edge.
So that’s it! If you’ve never tried urban fighting in Flames Of War, now’s your chance. The rules are streamlined and narrative-focused, the terrain goal is achievable, and you don’t need a lot of space to play. It’s time to grab that bag of grenades and go clear that building!
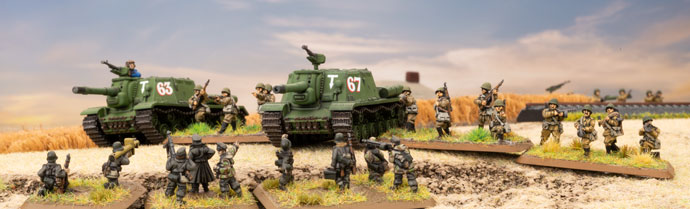
So usually I am fighting off the Red hordes with my Germans or pushing from the other Fronts with my British, so I have hardly ever fielded the glorious People’s Army on the field and then usually with a borrowed army. But… even in the old Red Bear book the units that really used to turn my head were the Assault Gun units, like the ISU-122, ISU-152, SU-76 and SU-122. Luckily, or unluckily for my back-log of painted minis, I recently found a lot of Soviet LW items on sale at a recent convention. I was suddenly overcome with the zeal of the Peoples Forces and was compelled by the ghost of Stalin to procure them…. suddenly I had then found myself with 15 ISU-122/152 and 10 IS-2/85s, a bucket full of T-34s, plus a few SU-85s and SU-122s, with the goal of making a assault gun lists for both Mid War and Late War.
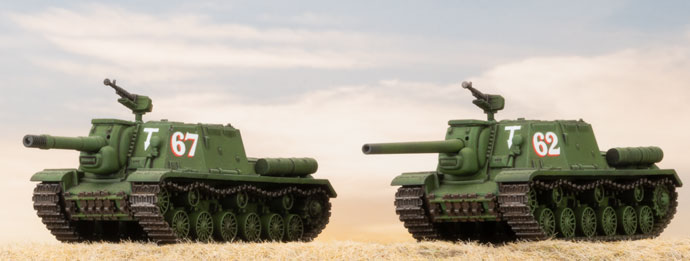
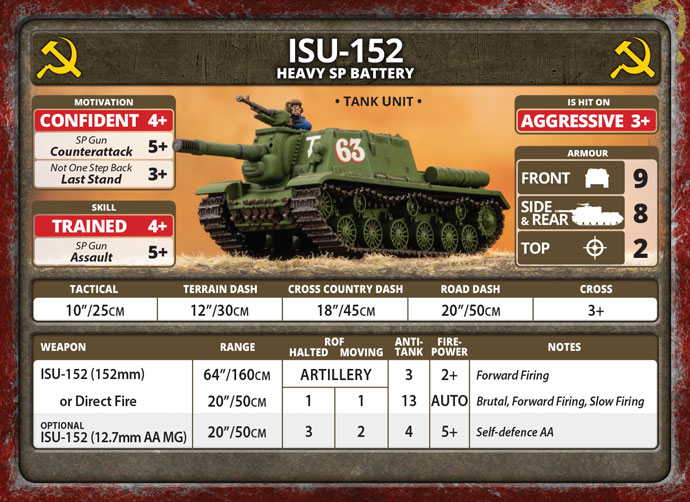
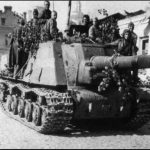
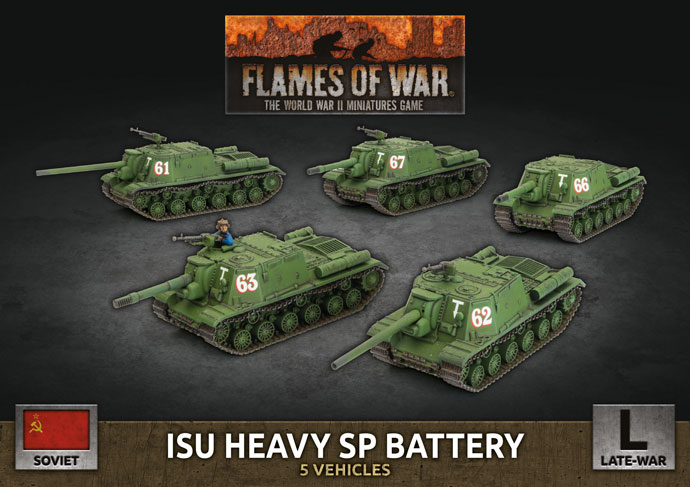
With the release of the new Soviet Bagration Book, it looks like this is the perfect time to put these beasts together. I must say that the ISU-152 assault gun is the type of vehicle that really seems to display the Soviet design philosophy of slap the biggest gun you can on the biggest piece of metal that you can! It just looks brutal, and certainly not something I would like to try to face as a German infantryman in a trench in WW2.
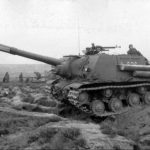
These huge BEASTS came about as a direct result of the Tigers and Elefants the Germans were producing, and the need for a Heavy Tank Destroyer, using a KV-1s as a base for the vehicle, they slapped a 152mm monster gun on it. This was initially designed as a heavy self-propelled artillery piece against fortified positions, but in its first battles at Kursk it worked well as an impromptu tank destroyer when used in ambush. Despite only having HE shells and no AP shells, it was able to work well enough as the huge HE shells either disabled the tanks in one shot, or disabled the crew inside, and in many cases literally blew the turrets off the tanks. The only real limitation was the lack of turret and because of the limited gun traverse due to the tight-fitting breach block of the huge gun, the gun literally had to be aimed by moving the assault gun.
When the older SU chassis was going to be stopped in favour of the newer IS designs in 1943, they then made plans to mount the same gun on the IS chassis. Although this still had the same limitation of not being able to traverse the gun without moving the tank, it did gain significant armour protection.
It was also noted that the SU-152 has worked well as an impromptu tank destroyer previously, so two variants were made, the Object 249 with an A19 122m gun (the same gun as the IS-2 tank) which became the ISU-122, and the Object 241 with the ML-20S 152mm gun which became the ISU-152. The ISU-152 was given the affectionate nickname the BEAST KILLER or KILLER of BEASTS, which it inherited from the SU-152, which had the same weapon. Presumably because it killed all the Beasts the Germans called their tanks eg. Panthers, Tigers, and Elefants.
During the Bagration Offensive, these Heavy Self-Propelled Artillery Regiments were used to spearhead the assaults against the German lines, with either the ISU-122s providing overwatch fire on the flanks supporting the assaulting infantry, or the ISU-152s advancing with the infantry to directly assault the fortified positions or entrenched infantry.
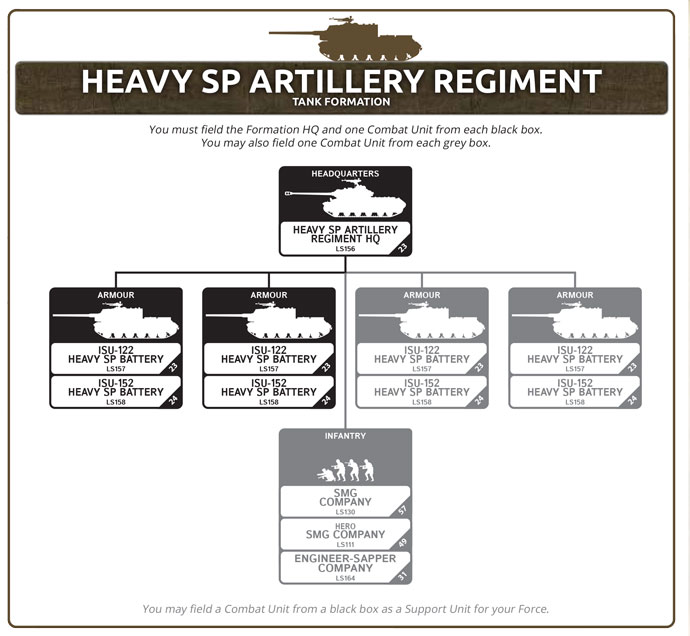
Well now we know why these beasts existed, now let’s have a little look at the Formation in the new book. It’s pretty simple, an IS-2 tank as a HQ and 2-4 Batteries of ISU-152/ISU-122, plus the option of taking some attached infantry, so an SMG Company/Hero SMG/ or Engineer Sappers. Also it should be noted that these are also a Guards Company, so they do have the better stats associated with the IS-2 and IS-85 Guards, and access to the more elite Engineer/Sapper troops. This is a very limited Formation, but given the point cost of the assault guns it really needs to be. In an average game you would be hard pressed to fill out this formation. To me this will not be a typical Soviet force from MW or Fortress Europe, this is a high point cost, elite force, so very much like playing a German list, but being hit on a 3+.
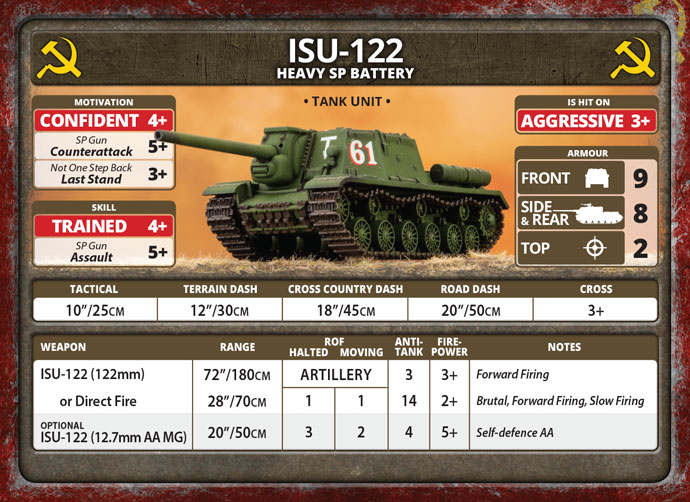
The ISU-122 is very much a tank destroyer, with a formidable AT of 14, 2+ Firepower and a decent range of 28”, this gun will rip massive holes in any German or Allied armour. It is also Brutal, so can be used to also knock out dug in anti-tank gun teams or infantry. But it does have a low ROF of 1 and Slow Firing (-1 to hit if you move), so you either take your chances with a 50/50 blitz roll, or try to find a good firing position at the start with good fields of fire and blaze away.
I will say this has its challenges, as you are 3+ to hit, if you are facing any AT 12 or greater weapons, you will want to be either in concealment or hull down with a good field of view, so you can still take your shots, but be harder to hit in return, or also gamble on a 50/50 scoot and shoot. But if there is only AT 10 or less facing you, then just advance to short range and blast away, as they really can’t hurt you with your Front Armour of 9 (they may at best bail you). Just be wary of being flanked, your Side Armour is still 8 which is very good, but just that bit less, which you can fail with some bad rolls.
The ISU-152 is very similar in all respects, except its gun has a bombardment option and a slightly lower AT of 13, but has an AUTO for firepower, meaning anything that it hits and penetrates is dead, DED dead. This does come at the extra cost of 1 point per model compared to the ISU-122, which depending on your force, may or may not be worth it. As 3 or 4 points in a Soviet Army can be a unit of AA half-tracks, or some scouts, or even a few T-70s. I will say I do like the versatility of having the bombardment option ( 64”, AT 3, 2+ Firepower), it is no small thing, and usually you get a few opportunities in a game to drop a few templates. I would not like to be under a repeat bombardment from these guns, and the Reconnaissance by Combat card, which allows you to re-position a pre-game ranged-in marker, would work well here to dig out enemy anti-tank guns or infantry early.
Also don’t forget to grab the AA gun upgrade for each battery at 1 point, not only is it great value, but it allows you to have a chance at shooting down any planes your opponent sends against you, but more importantly also gives you something to ward off infantry assaults, as you have no hull MGs fitted, there was simply no room.
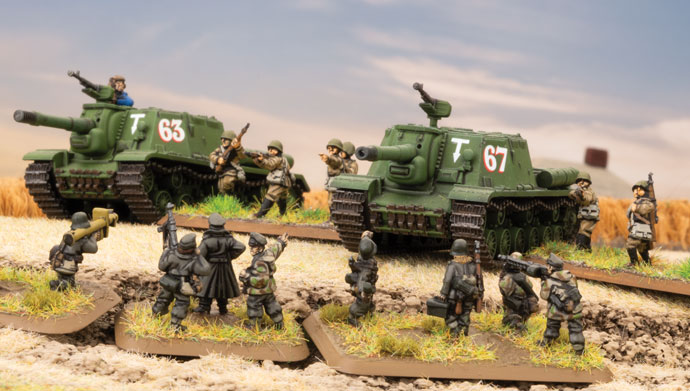
Also as for the infantry unit that is included in this formation, I think the best pick is the Engineer-Sapper Company, and then behind it is the Hero SMG Company, as it is cheap at 7 points and can hold an objective for you.
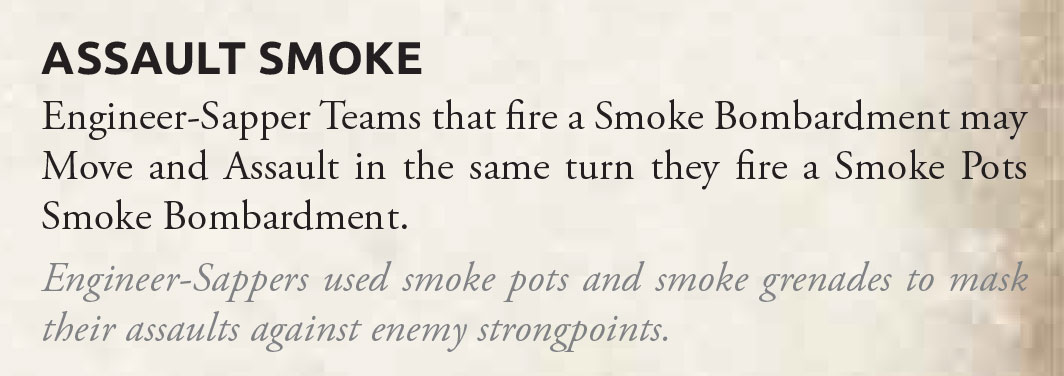
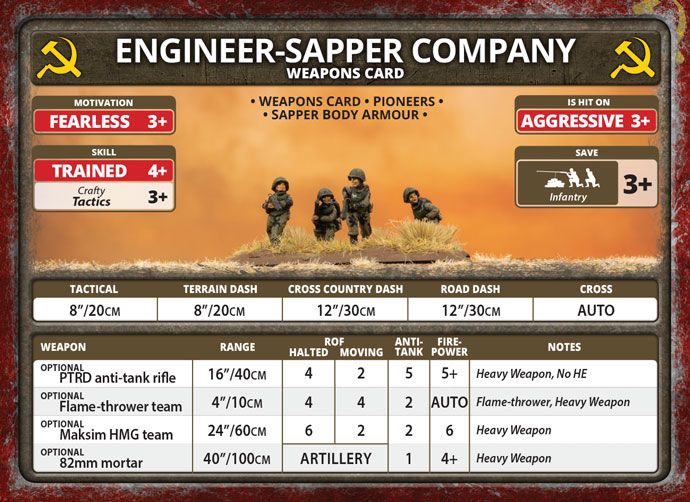
Although the Engineer-Sapper Company is expensive as far as Soviet troops cost, the benefits are worth it. They have Sapper Body Armour, Assault Smoke pots, and the Pioneer special rules, which in combination make an excellent assault unit. Sapper Body Armour means when in assault, if they are hit by the enemy, instead of just dying, on a roll of a 6 they are unharmed. Assault Smoke Pots allow 2 stands, instead of firing, to generate a smoke template to cover their assault, making it harder for the enemy to shoot them in defensive fire, and Pioneer allows you to cross minefields on a 2+ and can clear the minefields automatically next turn if they are still inside it. They also can have a variety of heavy weapons including HMGs, flamethrowers, and 2 captured panzerfausts in each unit. With a 3+ Assault value, and as well as being fearless, this makes both a potent attacking unit, and quite a resilient one when it has taken or holding an objective. Give them the RPG 6 Card as well and they have plenty of AT to deal with any tanks foolish enough to try to assault them.
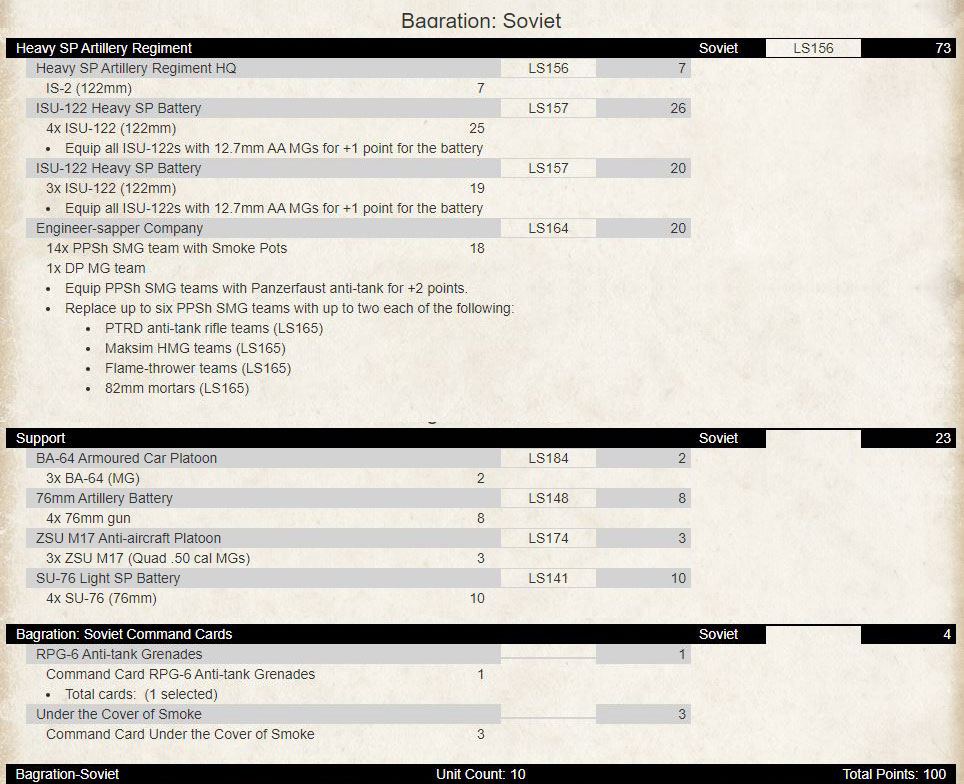
So here is the first list I came up with, as you can see it focuses on the ISU-122 providing the bulk of my anti-tank weapons, but I have included a large unit of Engineer-Sappers as my Assault element. For artillery Support I have brought some 76mm artillery, mostly for smoke…. , and as anti-tank in a pinch to protect my objective, and some SU-76 assault guns. The SU-76 is a great, versatile unit, with a decent AT of 9 and it can also bombard, for 10 points I think it’s a great buy.
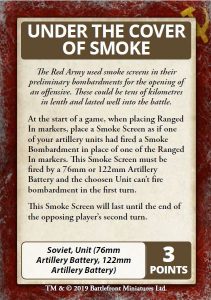
The plan is for the Engineer Sappers and IS-2 HQ to move forward with help of spearhead from the BA-64s, and to advance under the smoke provided from the Under Cover of Smoke Card (lasts until the end of the opposing players 2nd turn), which is also why I need the 76mm artillery. The ISU-122s will also advance on the flanks to help knock out any tanks or other units that threaten the main advance. While the rest of my force holds the objective. Not the easiest list to play, as it requires good timing and some good luck, but I think if you move fast enough, especially with spearhead, and the extended smoke screen that the Under Cover of Smoke Card provides, you can catch your opponent unawares. He may not be able to provide enough forces quickly enough to stop your assault.
The other list I looked at using focuses on the ISU-152 and an armoured assault element of IS-85s. Now this is a very compact list, what I call a Sledgehammer list, and it means that you will really have to focus on one point and smash it, assault it quickly to put your opponent off balance. The 2 units of ISU-152s can be used either in direct fire or in bombardment, these can be devastating to soften up the target of the IS-85s assault, or to knock out any flanking anti-tank guns that can possibly fire at them. The IS-85s have the advantage that they can still move and shoot without the usual Slow Firing penalty of the IS-2s, and their AT12 guns can take care of most enemy tanks. Also they are an easy 40 points if you have to put forces in reserve.
Once again, the only real point of the BA-64s is to put your assault unit in the best position and give them the shortest or safest route to their assault. I do like this list for its simplicity, and also I think it will be a barrel of laughs, you will either win quickly, or lose quickly, but either way you should have fun. The HQ and IS-85s move up in assault, the ISU-152s covering, while the BA-64 and ZSU half-tracks sit back and try to defend your objective (a thin hope really…lol).
What you need to be careful of in this list, is losing due to your formation breaking, as you only have 3 units, the HQ and 2 units of ISU-152s. It would be nice if I could find some more points for some Hero SMGs. You could maybe lose a IS-85 and add a small unit of them, but all they would be doing is saving you from a formation break. I think its better if you keep your ISU-152s moving and out of fields of fire of most of the enemy. Also watch out for swarm lists, it will probably require you to keep your ISU-152s back to defend your objectives, but always make sure you are using your IS-85s to threaten theirs.
Additionally, just because they are called assault guns, doesn’t mean they are great in assault in this version. As they are classed as self-propelled guns, and not tanks, they have poor ratings for assault and counter-attack, as that is not really their role, they are not designed for this and have poor fields of view. Both the ISU-122 and ISU-152 only have a 5+ for counter attack and assault values, so if you do assault, they will probably not hit anything, and will probably not hang around very long in an assault. So taking the AA MGs upgrade is crucial to give you something to try to stop an infantry assault against them. Please keep that in mind.
Historically the crews were given 2 PPsh submachine guns and 20 or so grenades to fight off infantry assault, but to use them they would have to unbutton the hatches, so it would leave them vulnerable.
Additionally I can see the ISU-152 being a great support unit for a lot of Soviet armies, especially with its versatility with such a great anti-tank weapon and a devastating artillery bombardment as well. Four of these monsters assisting another list would be excellent at 30pts, either blowing up tanks or using their huge guns to dig out infantry and dug in gun teams. They would also be a good distraction, while they are focusing on how to kill these, you advance with everything else.
Well I hope this has given a few of you some ideas on how to use these huge Brutes, and you will learn to appreciate these heavy assault guns as much as the Soviet Infantry did that they supported. They used to say of them “Nekrasivo, no spasibo!” (Not Pretty, but Thanks!”), they are certainly not the prettiest of vehicles, but they did their job well!
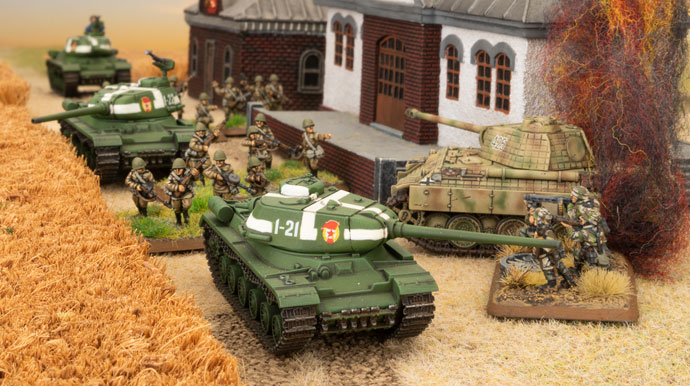
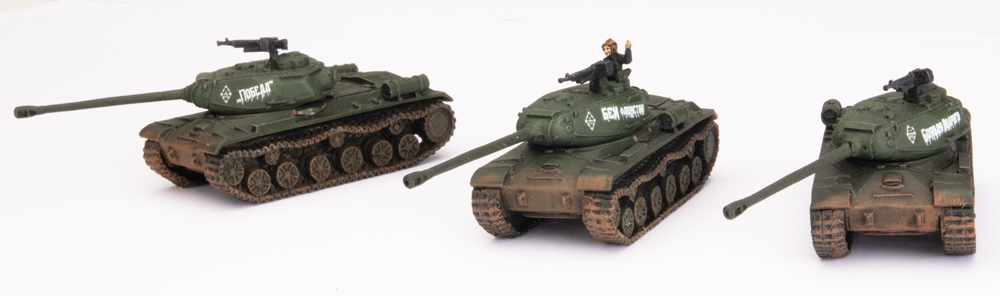
The other list that I’m really excited about from the Bagration: Soviet book is the IS-2s.
IS-2s were okay under Version 3, however by the time you put enough IS-2s in the list you didn’t have any points left over for much else. Under Version 4 the IS-2s perform a similar rule and the stats don’t change much, but they are pointed much more competitively so you can give your heavy tanks the tools they need to get the job done.
I’m planning on painting 10x IS-2s and 3x IS-85s to give me some flexibility for force creation.
The core of the IS-2 list is 1x IS-2 and 2 platoons of 3x IS-2s, for a total of 7 tanks. This is the main assault force. The main drawback of the IS-2 is its ROF 1 main gun, so to add more shots down range I’ve added a platoon of IS-85s.
To bulk out the formation I’ve added a Hero SMG platoon. These will either sit on an objective or ride up to the front on some IS-2s, depending on how aggressive I’m feeling on the day.
With the Formation complete I have added a Hero T-34 (85mm) platoon to the force for a bit more medium anti-tank. and some BA-64s.
The theory is that the BA-64s will Spearhead the IS-2s up the centre of the battlefield while the IS-85s and T-34s will protect the flanks, and the IS-2s will break towards an objective after the enemy forces are fully committed.
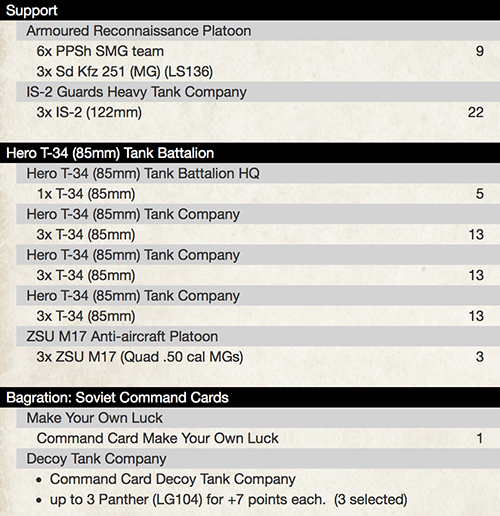
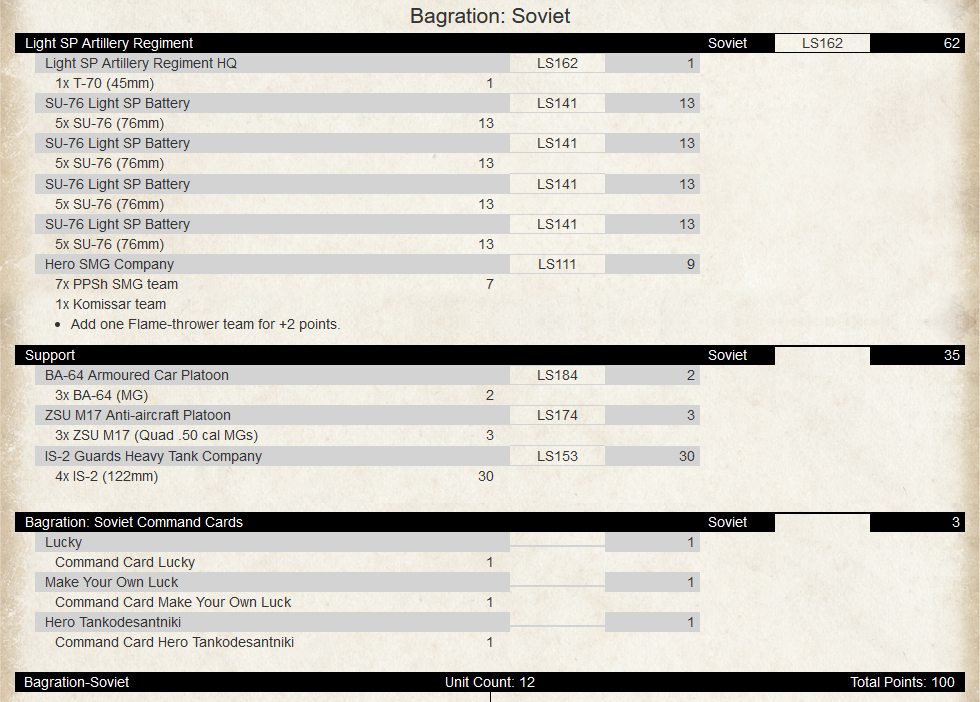
With the launch of Bagration: Soviet I wanted to look at updating this force to a full 100 point Version 4 army, and I came up with this list:
The army had quite a lot of steps when painting it, and unfortunately it was done before I got religious about documenting my painting methods!
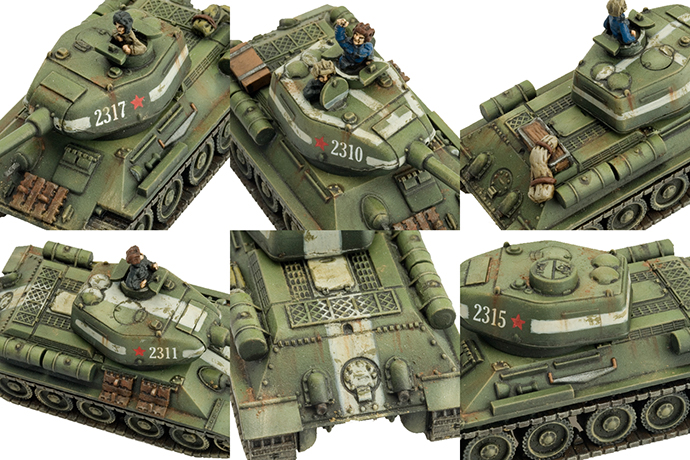
The logical choice would be to paint 3 more T-34/85’s to make the platoons 4 strong, but I’m not confident I can recreate the scheme exactly. Instead I chose things to add that will be ok to look a bit different.
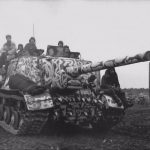
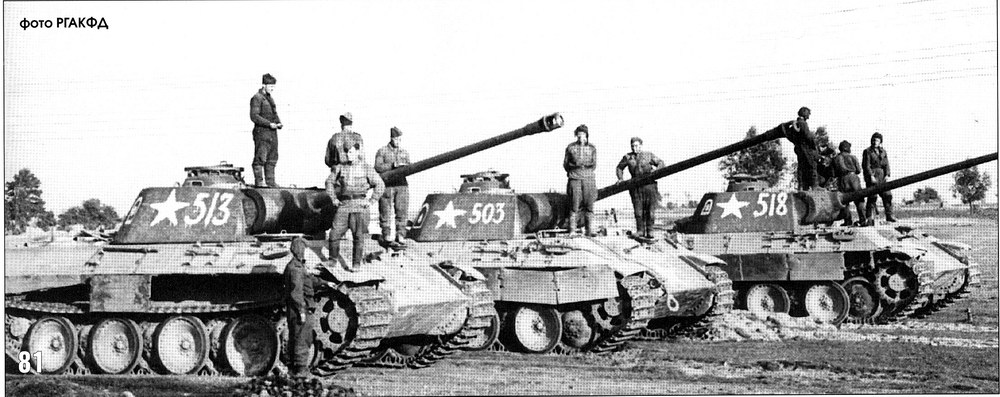
I’m a sucker for captured equipment so the Panthers were an easy choice. For these I’m going to try and recreate the iconic photo as best I can, with Dunkelgelb hulls and green turrets, and large hand applied numbers.
The new plastic ZSU M17 that is coming also has me excited, so 3 of those in lend-lease olive drab will also give me a different look.
Who doesn’t like IS-2’s? I’ll add 3 of them and these are where I’ll try get close to matching the T-34 paint scheme and white markings, but since they’re a separate platoon it’ll be ok when they turn out a little different.
The OCD in me kinda likes that the army is mostly all 3-strong platoons.
The last thing I’ll have to add is one more base of Spetznaz as so I can run them as Armoured Reconnaissance.
I’m looking forward to revamping this army as it has been one of my favourites, and it deserves to see the table again.
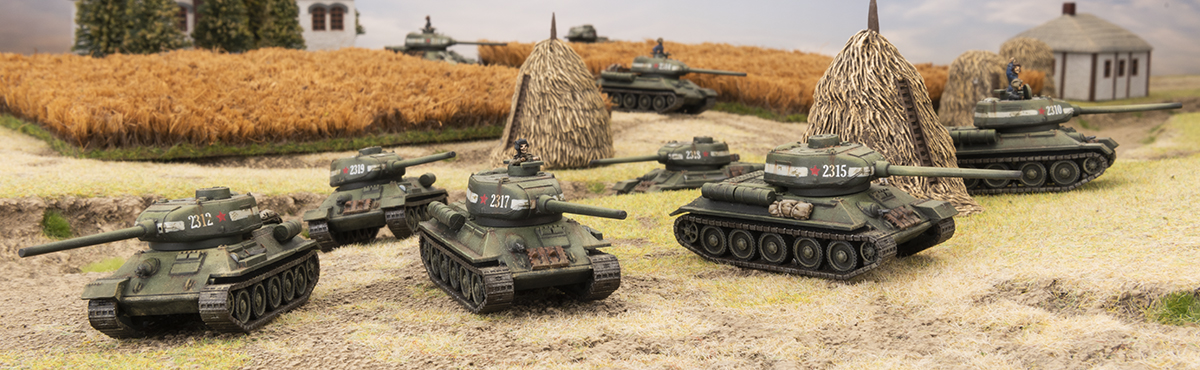
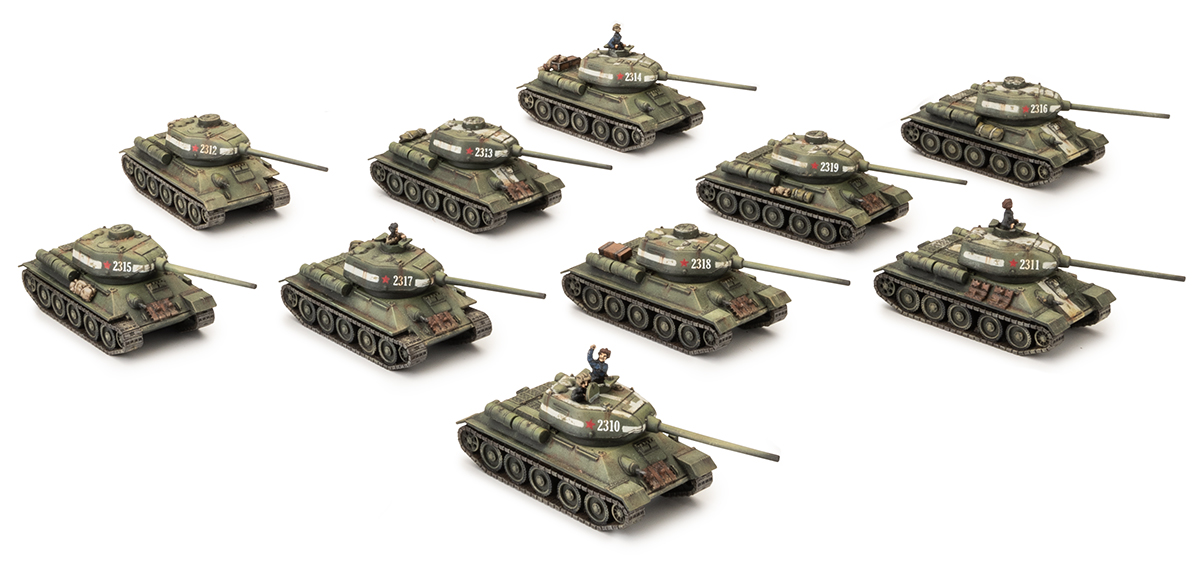
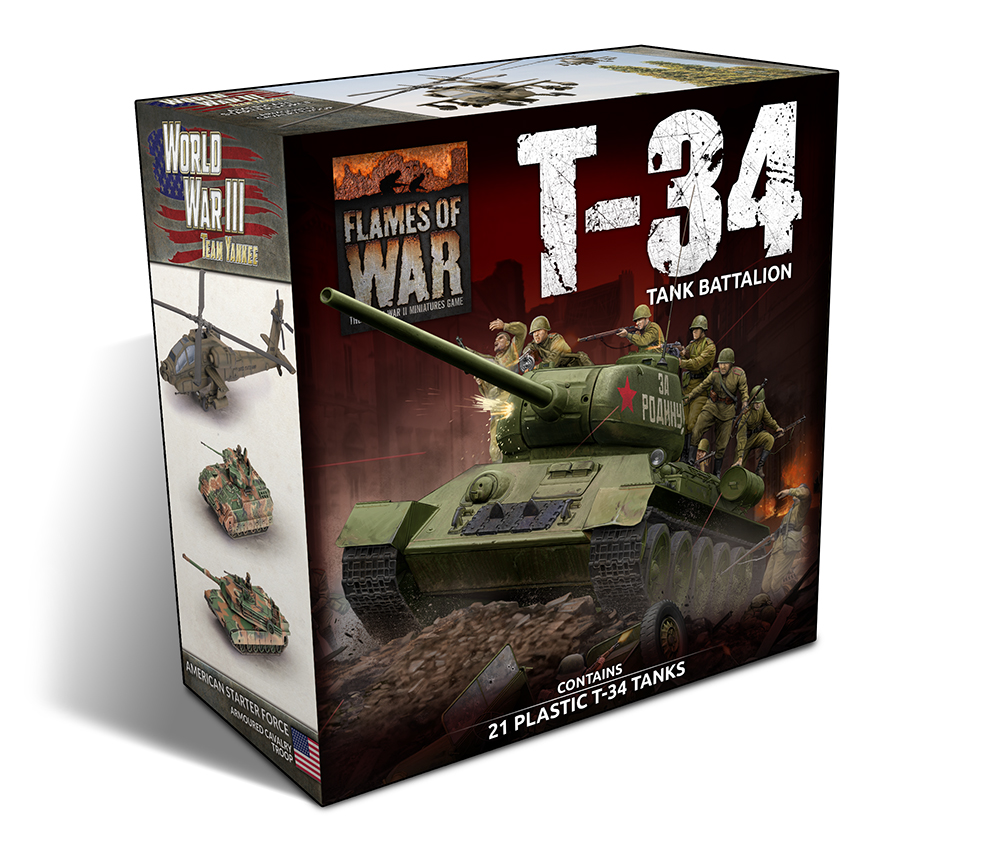
As side note: You may spot my T-34s on the back of our awesome new box; T-34! The best way to start your own Soviet tank horde!
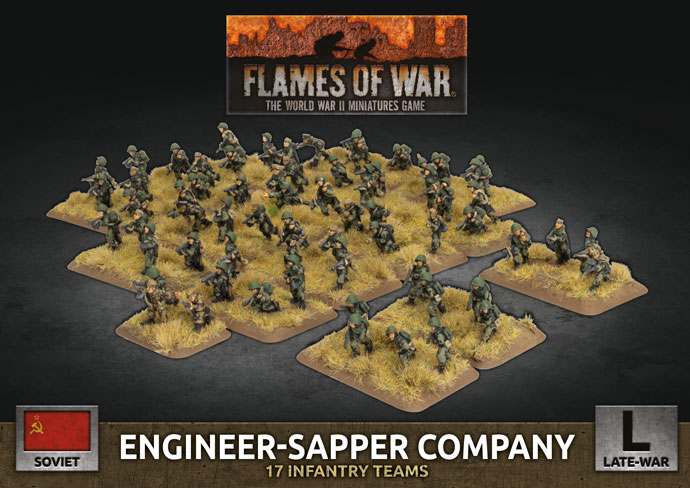
When building army lists in Flames Of War we are often faced with tough decisions, do you pick offensive troops or defensive troops, heavy armour or light armour? As is only proper, there is rarely a military unit available that is appropriate for all missions. With the release of Bagration: Soviets though, there is an answer to this age-old gaming conundrum; The Engineer-Sapper Company!
The Engineer-Sapper troops of the Red Army arose from the need to have specialists in constructing fortifications and other engineering tasks such as laying bridges on the battlefield. Over time these specialized troops became distinguished not only for their construction abilities but also for the knowledge of how to destroy the enemy’s defenses. The result was a well trained and equipped unit of specialists that could both defend and attack. Now that we are revisiting the Eastern Front in Late-War Flames Of War, these specialized troops are available as a fantastic new option. Let’s take a closer look!
The Stats
The Engineer Sapper Company is well appointed with a very solid stat line. Like virtually all Soviet infantry they are Aggressive, being hit on a 3+ with a Skill of 4+. However, they have boosts in their Assault rating to 3+ and Tactics of 3+. This makes them very adaptable with good chances of passing any special movement orders and provides an assault ability that matches most elite troops. Most importantly though they have a motivation of Fearless 3+, which makes them a real contender in close combat. We all know that it is the counterattack roll that really makes or breaks the assault phase and a 3+ is about as good as you can get to ensure that your units are going to keep on slugging.
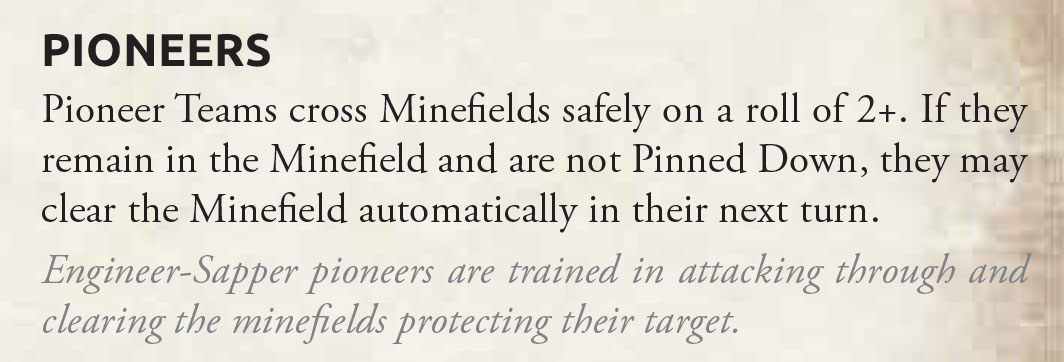
Pioneers
Another thing that should not be overlooked in the stats is the Pioneers rule.
Minefields, when placed well, can be a real pain for attacking armies in scenarios such as Bridgehead…but with the Pioneers rule, they will be much less of a threat to Engineer-Sappers, allowing them to preserve the momentum of the attack!
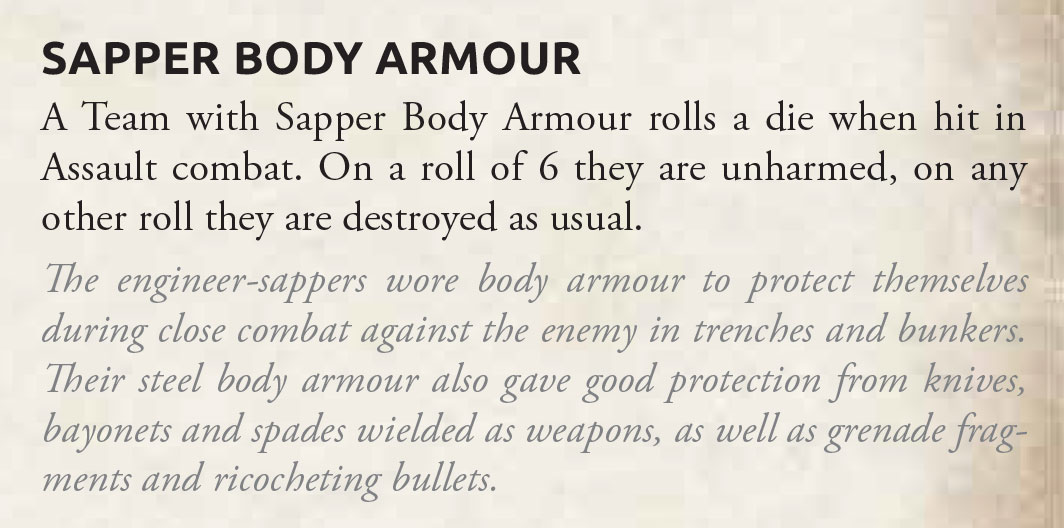
Sapper Body Armour
This special rule requires its own section because it is so unique. In Flames Of War the Assault step is always the most decisive, because there are no saving throws against your opponent’s skill-based attacks! Until now.
Smoke Pots
Another first for the rules…the Engineer-Sappers are infantry that can launch a smoke barrage but still move and assault. It counts as a 2-gun barrage so this means that each company of Engineer -Sappers can lay down an 8-inch smoke screen once per game. Because of this, if you need cover for an assault you are good, or if you want to mask your movement through open spaces now you have an option.
Weapons
Though the large number of special rules makes the Engineer-Sappers impressive, we have not even got to the weapon options yet. Options that take up no less than 2 full unit cards! The base weapons include the smoke pots, PPSh submachine guns and for units of 15 or more stands, a DP MG team. This provides plenty of firepower to start with. You can add to this panzerfausts (that they have captured) with the Limited 2 rule, which means they can have 2 panzerfaust shots when shooting or in assault! From here you can continue to customize your unit by replacing up to 6 teams with 2 of all of the traditional Soviet upgrade weapons such as the PTRD, flame throwers, mortars and heavy machineguns. This lets you mix and match to prepare your company for any battlefield role. Best of all, with the exception of the panzerfaust upgrade, the additional weapon options do not cost more points!
Engineer-Sapper Battalion
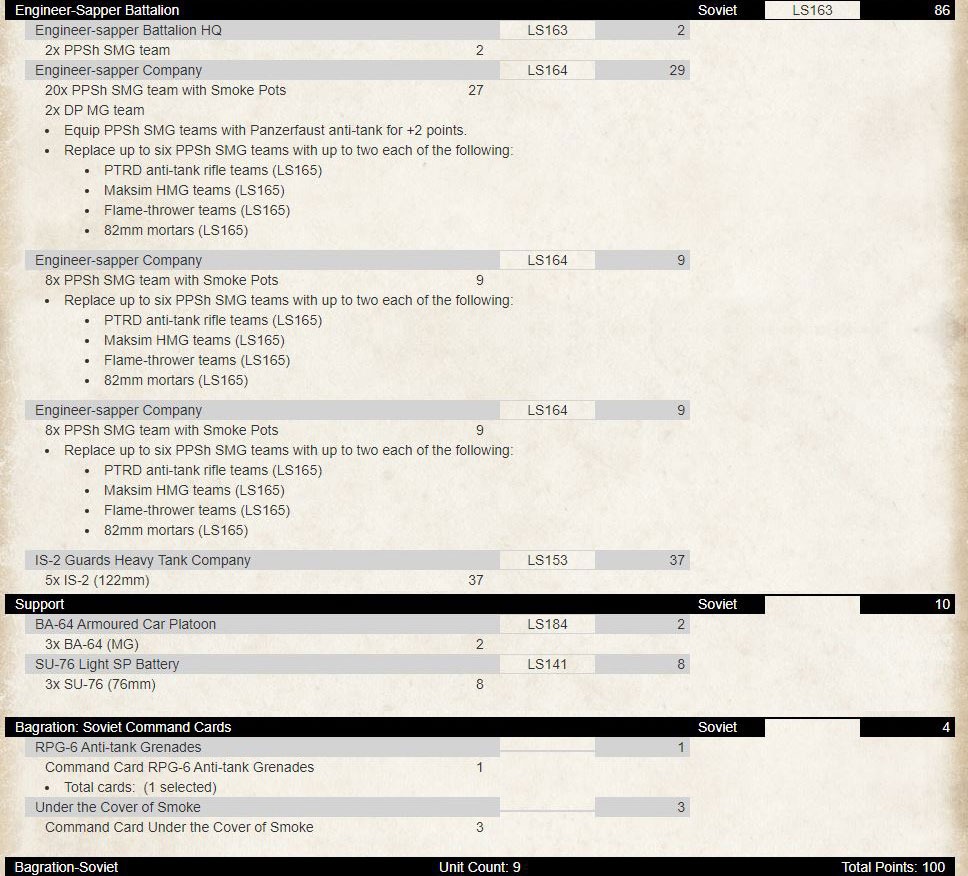
The Engineer-Sappers have their own force organisation chart and formation so they won’t have to be relegated to just support if you don’t want. With the Engineer-Sapper Battalion formation you can make these tough flexible warriors the star of your army list. Let’s face it, with the huge number of options on top of their solid stats, this makes Engineer-Sappers a very fun, if somewhat elite force, that EVERYONE will want to put on the table. Let’s take a look at a 100-point example army list that can showcase the Engineer-Sappers and which will work flexibly for most scenarios.
Engineer-Sapper Battalion Army List
Using the List
This list is designed to capitalize on the various abilities of the Engineer-Sappers. On the attack the large squad with IS-2 Support can attack directly and possibly get a boost from the BA-64’s Spearhead. Using the Cover of Smoke command card will make this more secure and you can cover your flanks from pesky supporting fire with smoke pots. If the opponent has deployed mines to limit your progress, you can rely on the Pioneers rule and go straight through them! The smaller units of Engineer-Sappers and the SU-76s can hang back and defend objectives. Don’t be afraid to go after assaults with the big company, as with 22 stands, 2 flame throwers, Assault and Motivation 3+, the Body Armour rule and 4 antitank attacks each turn, nothing should be able to contend with these troops when the fighting get in close!
If you need to defend with this list, the infantry units, once dug in, will be hard to move off of objectives. Using smoke pots and the Cover of Smoke command card will force your opponent to close for assaults (where you are likely better) or seriously limit their lines of site forcing them to maneuver where you can counter attack with the IS-2s.
Time to Fight!
As we have just discussed, the Engineer-Sappers come pretty close to having it all in Flames Of War. In fact, they are pretty unique in having almost no specific weaknesses, being customizable for any mission and they have plenty of special rules to function in both defence and attack. The main limiting factor that you will have as a Soviet player (besides points limits) is going to be your imagination (and remembering all of the cool special rules)! So, get your Engineer-Sappers ready for your next game and see just how flexible and fun to play they can be. Onward to victory for the Motherland!
For some time, Tiger and Panther tanks were the top predators on the World War II Eastern Front. Designed to readdress the technological gulf between the medium panzers (III and IV) and the T-34 and KV-1, the “Big Cats” made up for Germany’s shortcomings and then quickly surpassed them. Where Tigers and Panthers went, kill ratios for tanks skyrocketed with the Third Reich’s innovations in armoured technology coming out on top. Or at least that was the case until late 1943 when the IS (Iosef Stalin) series of armoured vehicles started to appear on the battlefields of the Eastern Front. Capitalizing on lessons learned in tank automotives, armour design and firepower, the IS turned the tables on Hitler’s prized tanks. The battlefield hunters quickly found out that they could become the hunted!
In Flames Of War the IS series of tanks, featured in the new book Bagration: Soviet, provides the Soviet player with some serious tools to fight back against the Tiger and Panther tanks that dominate the game table (and it also works quite flexibly in support of infantry too). Do not let this fool you though, while the IS tanks can outfight the German predators, they are not the same. The IS vehicles require a different approach on the games table, which we will discuss here.
The IS -2 Tank
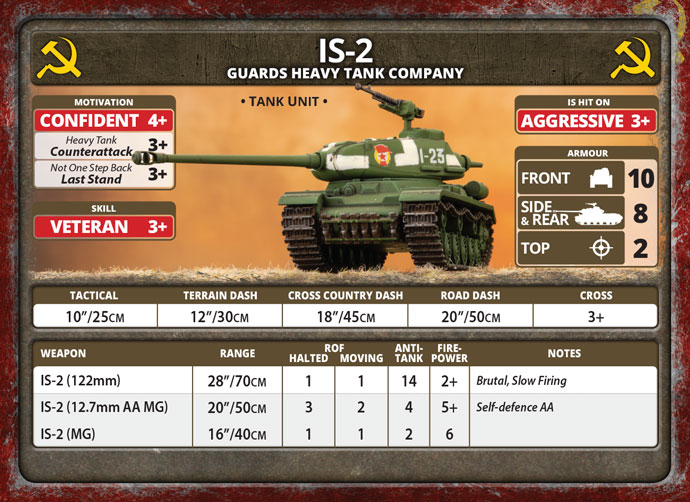
The IS-2 is a real monster! Front Armour 10, Side Armour 8 and Top Armour 2 makes it one of the most heavily armoured vehicles in the game. If opponents shoot it out at long range, the IS2 will be immune to medium tanks like the Panzer IV. It will also stand a pretty good chance of shrugging off 7.5 cm and 8.8cm shots from Panthers and Tigers. When you consider it will be Front Armour 11 (for range) and the German “cats” have AT 14, IS tanks will be bouncing their shots 50% of the time. Other than the later marks of Churchill, no other allied tanks in the game have similar armour to even stand a chance against these big German guns! The IS-2 also has a Last Stand of 3+ and Veteran Skill so it can make Blitz moves or Shoot and Scoot fairly reliably. In a straight comparison with a Tiger, the IS-2 is hit on a 3+ instead of a 4+, but it also has Front Armour 10 while the Tiger has a value of 9!
Despite these stats though, the big difference with the IS-2 is the gun. Compared to the Tiger and Panther the IS-2’s 122mm canon range is only 28” while the German tanks both have a range of 40” and they all have the same AT rating of 14. Additionally, the 122mm is rate of fire 1 and is Slow Firing. Because of this the IS-2 is not the mobile long-range anti-armour sniper that the German tanks are. Sitting back and taking pot shots is not really an option for the Russian heavies! But when you hit your target this is when the IS-2 shines. A penetrating hit from the 122mm canon out classes even the German 88! The AT is a fearsome 14, and more importantly the IS-2 has an amazing Firepower of 2+. If you can Hit with the IS-2 you are going to break something. Moreover, it also has the Brutal rule so the 122mm has quite a lot of flexibility which the German guns do not have. If you want to take on dug in infantry instead of tanks it should be no issue. The rerolls for saves caused by Brutal guns combined with the Firepower of 2+ will outperform the Tiger and Panther all day long (who lack the Brutal Rule and are only Firepower 3+).
The IS-85
Though the IS-2 is impressive, its predecessor the IS-85 also bears some separate consideration. The IS-85 was used as an interim design mounting the plentiful 85mm gun used on T-34s and SU-85 Self Propelled Guns. This was necessary as a stop gap measure while the 122mm canon was produced in enough numbers to catch up to the Russian heavy tank program which had already turned out hulls for the IS-2. Rather than having the tank sit idle, the lighter gun was used to get the tanks on the battlefield. Because of this, The IS-85 is in all ways the same as the IS-2 except, unsurprisingly, for its’ gun’s performance (and it costs 1 point more). The 85 mm canon is range 28” with a Rate of Fire of 2, AT 12 and Firepower 3+. This means that when it comes to performance it splits the difference between the 122mm and the 88cm or 7.5cm guns of the German “Cats”. The Anti-Tank value of 12 is not as high but is respectable and it shoots twice when stationary (or Blitzing). Also, unlike the IS-2, it does not take the slow firing penalty. So, if you think that the lower chances of hitting with the 122mm canon, in exchange for the impressive 2+ Firepower, are too big of a risk for you to take, then the IS-85 might suit you. Or better yet, you can use both IS series tanks in combination!
Putting it Into Practice:
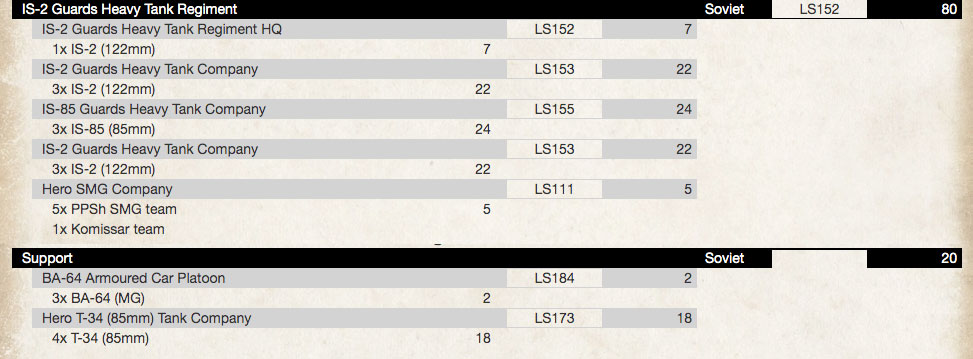
To create a 100-point army list that gets the most out of your IS series tanks you should start with (unsurprisingly) the IS-2 Heavy Tank Regiment from the book Bagration: Soviet. I would suggest the following composition as an example
Tactics
On the table you will want to rely on your (likely) superior numbers of heavy tanks and their Front Armour of 10 to get in close to any Tigers, Panthers or other tanks to take them out. Fortunately, you can do this fairly easily. The IS-2 is only around 7 points where the Tiger costs 13 points (for the SS version) so quantity should be on your side. The key here is to be aggressive with the IS-2s moving quickly relying on cover, speed and good armour to put the pressure on the opponent’s line! The IS-85 Company can advance to moderate ranges then take pot shots with their 85mm guns at the enemy to provide covering fire while the IS-2s dash into position to attack (then Blitz in subsequent turns to bring the enemy into the sights of their 122mm canons). The Hero SMG Company can increase the numbers in your formation offsetting its break point while staying close to the advancing tanks to ward off infantry, or commit a timely assault on anti-tank guns or bailed out tanks. Lastly, the Hero Rifle Company and the 76mm Artillery can provide a base of fire to back up your advancing units and guard objectives. For reserves you can leave the 2 IS-2 Companies off the board and dash them forward when they arrive, or they can surprise opponents that have pushed forward into your deployment area by moving onto the board and quickly lining up an assault.
Put Your Tanks on The Table
As we have seen in this article, the IS series of tanks from the new Bagration: Soviet book should be more than a match for any Panther or Tiger Tank that you may face on the Flames Of War battlefield. But to be victorious you will need to keep in mind the details peculiar to these tanks and play both aggressively and smart. Front Armour 10 and the powerful 122mm (or 85mm) gun in the hands of a good player makes an effective combination that any German player is soon going to learn to fear. So, grab your heavy tanks, paint on the red star and unleash the unstoppable might of Mother Russia on the Hitlerite Invaders!
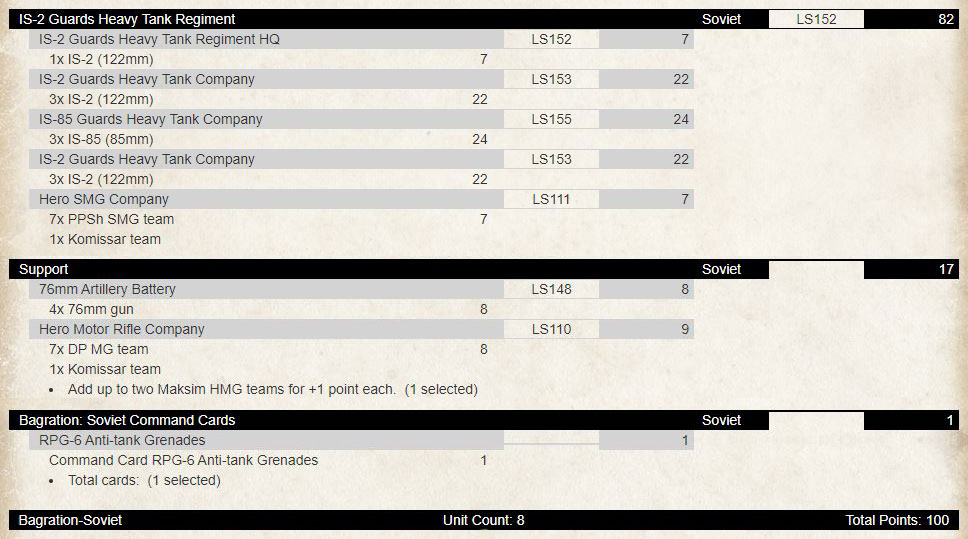
One of the fun things about a new book hitting the shelves is taking a look at the armies you previously built but have since been eclipsed by something newer and therefore shinier. One of the unloved boxes in my cabinet just happens to be a Light SP Artillery Regiment and having a reason just to pull it off the shelf and check out the models has been a source of joy this week!
The original army was built to a fairly straight forward specification, how many SU-76s can I put in the list. After all more tanks is a good thing when it comes to a Soviet list. I was under no illusions though and I certainly understood that SU-76s were not going to get the job done by themselves so I remember painting up some IS-2 tanks for a little extra firepower and to have something with some armour in my force. BA-64s were (of course) included as you always needed recon under V3. It is too long ago to remember what else was in there but I can recall the one major tournament that I took it too and let me tell you, it was a FUN list. There was something about having 20 pairs of 76mm guns, each more than capable of knocking out a Sherman or Panzer IV. Having so many of them also meant that I could afford to be a little reckless – they even assaulted some infantry off an objective, or maybe they tried… It is my story so I am going to say it ended well, the commanders were presented medals and they were not wiped out by the defending troops (which is more likely!)…
Taking a look at the SU-76 under the Bagration: Soviet book and they are really interesting having gone through a stat overhaul in some areas. They are still a moving piece of tissue paper with armour 4 and top armour 0. They are relatively skilled (4+) so whilst they cannot be counted on to do anything too tricky it is worth trusting the dice for a Blitz or Shoot and Scoot (especially if you have the Make Your Own Luck Command Card!). Their 76mm gun has gained an Artillery stat line which means that the days of having to drive up to gun lines and duel it out are gone, instead it is raining HE all day! Best of all they are only 13 points for a platoon!
My plan for V4 remains largely unchanged from V3, mainly because it is completely hypothetical at this stage. Start with a full force of SU-76 “tanks”. I have all of these painted so it seems like a waste to not use them, and I really love the little things. Add in a Hero SMG Company with my favourite Command Card, Hero Tankodesantniki, so they can jump on board some tanks and ride into the teeth of the enemy and deliver close range SMG fire and grenades. Speaking of tanks… you know what is coming next… IS-2 platoon! I originally painted seven but only have the points spare for four right now. That still gives me an awesome little threat unit and with the Hero SMG unit on top comes out to an even 40 points – hello Reserve unit.
Rounding out the force are a couple of old friends, the ZSU platoon with their meat chopping .50cals and a unit of BA-64 armoured cars. With armour like a damp sock the SU-76s need to be in an optimal position as soon as possible so a quick Spearhead up with the BA-64s should help considerably.
Rounding out the force is the Lucky Command Card. Or as I call it, the first point that I spend in most of my lists.
Is this a tournament winning force? Unlikely, and certainly not in my hands. Is it fun, filled with interesting models and has the ability to throw a wrench in someone else’s plans? Absolutely!
The country of Russia is vast, and to go with it comes an equally vast army with manpower and a staggering variety of unit types. This gives the Flames Of War player a lot of choice when customizing the infantry in their army to suit their play style, or complement their other unit choices.
Despite this, infantry tends to be overlooked. At first this is understandable because of the amazing selection of tanks and artillery available to the Late War Soviet player, but when you consider that historically the humble ground pounding foot soldier was the backbone of the Red Army, it bears repeating that the Soviet infantry in its many and varied forms, deserves a closer look. With that in mind let’s go over the details about the basic infantry choices in the awesome new Bagration: Soviet book. (Please note that the Engineer-Sapper Company, being very specialized, are explored in their own separate article.)
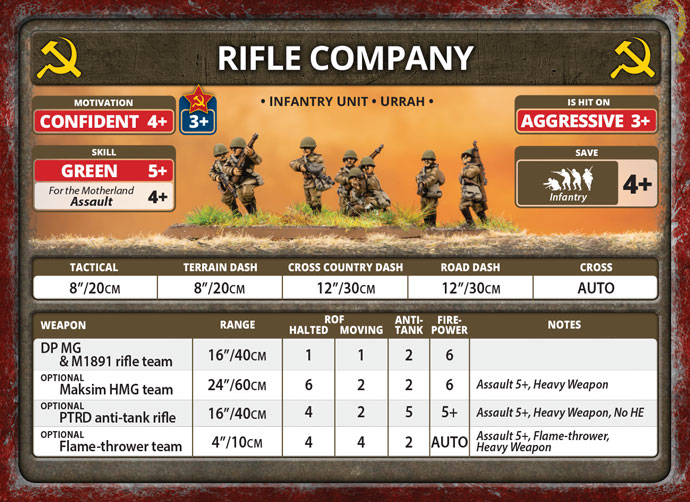
Rifle Company
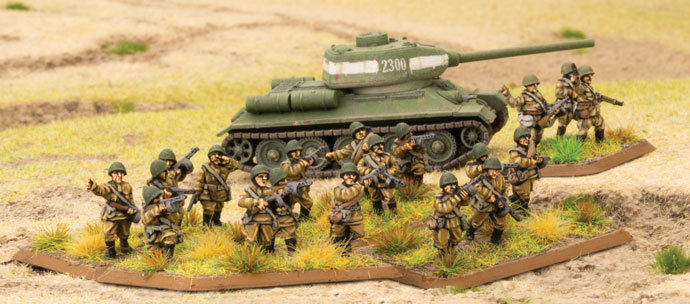
This is the classic choice for the Soviets. The Rifle Company is characterized by fairly mediocre troops. They have a Skill of 5+ with a 4+ Assault and have a worse save value than most infantry at 4+. They have a 1 die rate of fire for being Halted or Moving and all of the regular options for equipment upgrades (including machine guns, PTRDs and flame throwers). This may not seem very impressive, and on the whole it is a little sub-par for other armies in Flames Of War …then you see the unit size! The Rifle Company comes in units of 15 stands plus a Kommissar, or 22 stands plus a Kommissar and all of these only costs 0.8 points per stand (before Upgrades)! Moreover, as long as the Kommissar is alive, the unit has a motivation of 3+ making them effectively Fearless. So, though this unit is not stellar at any one role, it is not going to be easy to dispatch with a round or two of regular shooting, artillery or assaults. If you are looking for a cheap way to tie up your opponent while you maneuver your more specialized units to seize an objective, the Rifle Company is a good option. Additionally, if you want to play the defensive game you could not have it much better than a 3+ Motivation, 23 stand unit that is dug in and gone to ground. Even with the 4+ save, your opponent is likely to run out of bullets before they can shift the unit off the objective!
Penal Company
If swamping your opponent beneath a tidal wave of assaulting infantry sounds like fun to you, then the Penal Company is the unit for you. This unit is similar to the Rifle Company in stats, being fairly mediocre, but with an improved assault of 3+ and an amazing motivation of 2+ (while the Kommissar is alive). This specializes the unit for assaults where the 2+ Motivation rating will keep you in the fight (while making Counterattack rolls) and the 3+ rating will let you go toe to toe with most enemies. The Penal Company comes armed with submachine guns, so this unit does not want to be used for defense, and combined with the Redemption rule will be able to make a free move towards their opponents (victims!) before the first round of the game. Lastly, with the Urrah special rule, the Penal Company can charge 6 inches instead of the regular 4 inches of almost every other unit in the game. If you want to get in close to tie up enemy units or overwhelm the defenders on an objective, the Penal Company is what you want. Just remember that due to the Redemption rule they can’t take objectives (but can contest them) and they can never claim bullet proof cover.
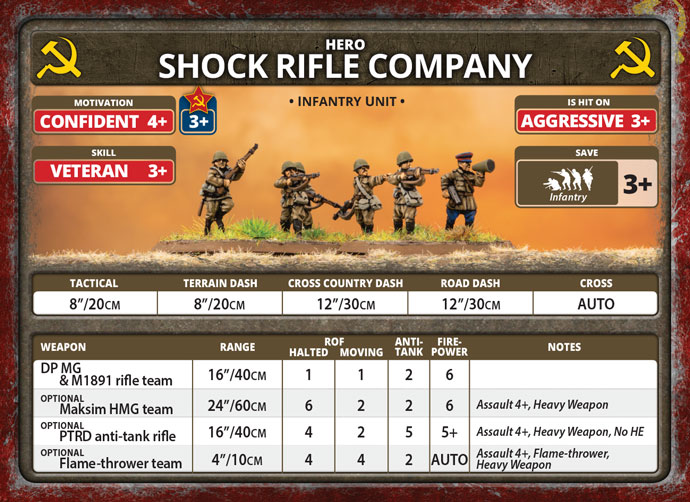
Hero Shock Rifle Company
The Hero Shock Rifle Company is a well-rounded infantry choice that splits the difference of quantity with quality. Though not elite compared to other armies, they have very good stats with a motivation of 4+ (3+ with the Kommissar) and Veteran Skill of 3+. They also come in a decent unit size of up to 14 stands and have the whole range of machine guns, PTRDs and flame throwers to choose from for a reasonable point cost of 11 points (before upgrades). This adds up to make the Hero Shock Rifle Company a great choice if you want infantry that is adaptable. They should be solid in both defense and attack.
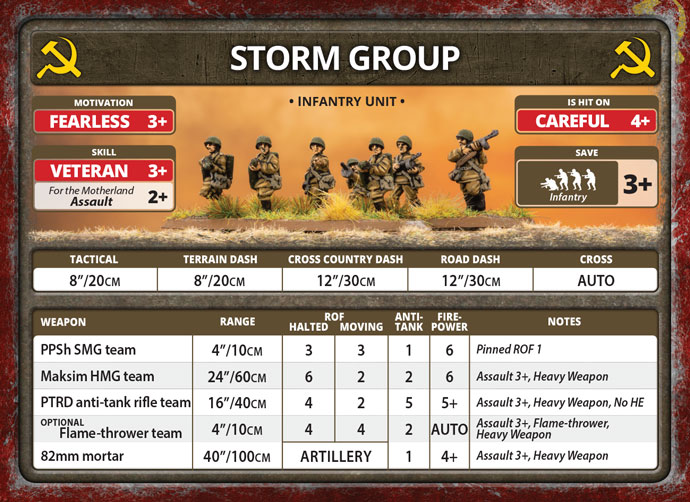
Storm Group
The Storm Group is a choice in the Hero Shock Rifle Battalion Formation, and complements the Hero Shock Rifle Company with a close combat punch. With small unit sizes and a wide range of weapons options, this unit can be tailored to any mission and are more resilient being one of the few Soviet units hit on a 4+ with a 3+ Fearless Motivation. But what really sets them apart is that they have the best assault in the game, hitting on a 2+! Though this unit does not have the numbers to swamp your opponent like a Penal or Rifle Company, they can make surgical attacks and fight in close combat against the most determined opponents. If you want to use a small elite force, the Storm Group is an awesome option. Plus, unlike a lot of the other Soviet infantry choices, the Storm Group can be quite maneuverable on the battlefield as the small numbers of moving troops are much less likely to restrict your avenues of attack and block friendly lines of sight.
SMG Company
The SMG Company comes in 2 versions Hero and “Regular”. Effectively both versions fill the same role. Both have submachine guns (lots of them) and the option to add flame throwers. The difference is the “Regular” SMG Company uses large numbers (of up to 23 Stands) to make up for their mediocre stats. (They have an Assault of 3+ otherwise they are same as the Rifle Company.) While the Hero SMG Company stresses quality over quantity with stats on par with the Hero Motor Rifle Company (including the 2+ Assault value and Motivation of 3+ due to the Kommissar in the unit) and a unit size of up to 8 stands. In terms of battlefield roles, both types of SMG company provide decent assault troops. Most Formation options allow you to add an SMG Company whether they are infantry or tank based. This makes SMG Companies handy for increasing your Formation break point when you have smaller numbers of tanks in the same Formation and can stay close to your armour providing support against other tank hunting infantry. They are also really useful for assaulting the odd isolated or bailed out tank to finish it off, allowing you to avoid redirecting your precious higher AT weapons off of more pressing threats.
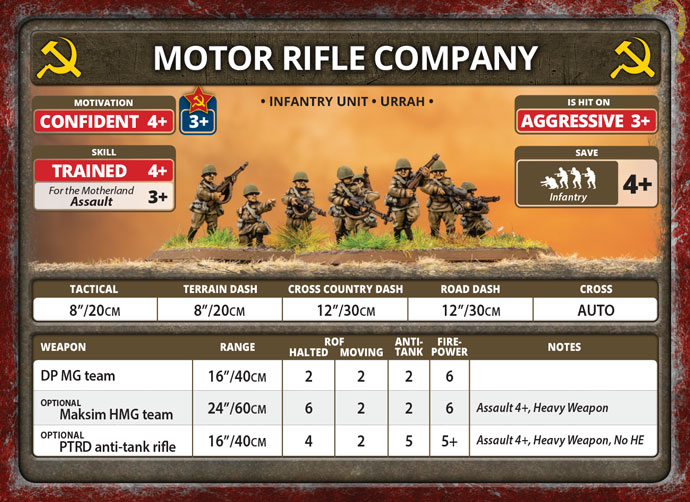
Motor Rifle Company
Like the SMG Company, the Motor Rifle Company comes in “Regular” and ‘Hero” varieties. They also compare in that the Hero version is more elite with better stats and a 2+ assault rating compared to the “Regular” version of the Motor Rifle Company. Also like the SMG Companies the Hero version has a smaller number of stands relying on quality over quantity while the “Regular” version definitely goes with the quantity route having a unit size of up to 29 stands! In terms of battlefield roles, the Motor Rifle Company is an excellent ranged fighting option (though the hero 2+ assault makes them more flexible). This is because the unit has 2 dice of shooting either Moving or Halted in addition to being able to take PTRDs and heavy machine guns for upgrades. If you want to throw a mountain of dice in the shooting step, the Motor Rifle Companies are a wonderful option. If you want to be defensive sit a platoon of 29 stands of infantry around your objective and dig them in…. chances are they won’t be pushed off the objective by even the most determined attacker.
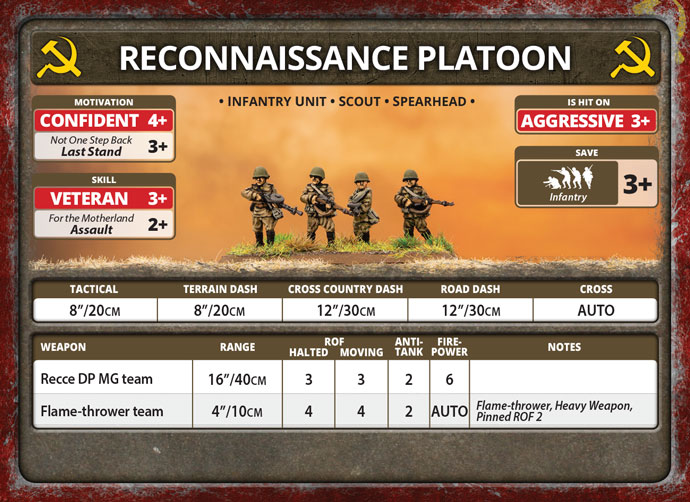
Reconnaissance Platoon
The Reconnaissance Platoon is a very specialized Infantry option. Their stats are the same as hero SMG teams, making them good at assaults, but they can come mounted in a halftrack with accompanying machineguns (. 50cal or regular) and they all have the spearhead rule. (The non-armoured kind also has the Scout rule too.). To make up for these specialized abilities unit sizes are very small with the largest armoured Reconnaissance Platoon coming in at only 6 stands and 3 vehicles total, while the foot slogging version maxing out at only 5 stands! This means these troops though powerful, need to maximize the use of their good stats along with their special rules and transports to attack aggressively and get close enough to do any damage. However, armed with plenty of SMGs, a 2+ Assault and the odd flame thrower this rather specialized unit should be able to hit quite hard and is the ideal choice for creeping up on objectives held by artillery, AT guns or other small units and capturing them with a decisive assault.
Time to Put Your Infantry on The Game Table
In this brief overview of the staggering number of infantry options in Bagration: Soviet it should be obvious that there is an infantry choice for every tactical challenge you can face. If you want to outnumber your opponents (and enjoy painting troops) then you should consider the Rifle Company, Penal Company or Motor Rifle Companies. On the other hand, if you want an elite or aggressive force, the Reconnaissance Platoon, SMG Companies or Storm Group offers options that can fight in close with almost any enemy. Lastly, if you want a generalist choice that can do some of everything, then you can’t go wrong with the Hero Motor Rifle Company.
Beyond these great options, remember that you can always further refine your choices for your army with Command Cards. By adding these to your force composition you can create an almost limitless variety of refinements from these basic infantry choices. Use your imagination and see what interesting combinations you can create, then go out and show you opponents the true might of the Red Army!
There is a wealth of content on our YouTube channel, as well as those of some of the great community contributors that can help you build and paint your armies. Some of it may be for previous books, but are still a great resource today. For example…
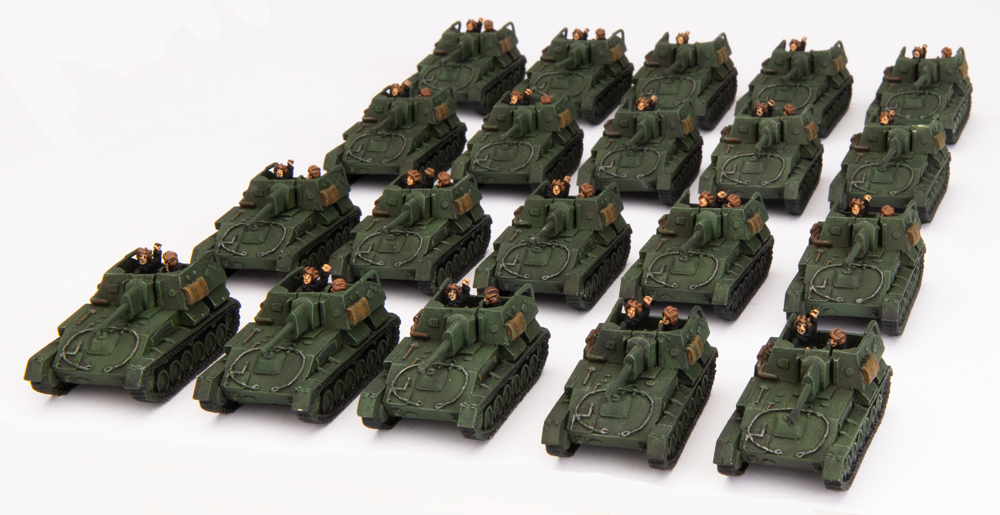
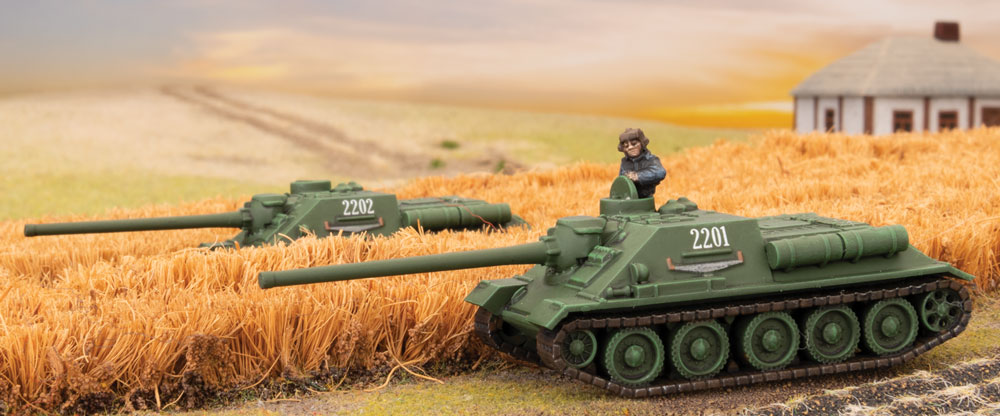
I have eagerly been waiting for the launch of Bagration: Soviet for some time as one of my favourite organisations is the Soviet Medium SP Artillery Regiment. I played this formation in V3 with some considerable success and my opponents tended to underestimate how well it played. With V4 there have been some changes to the how this medium assault gun plays out in the game.
The biggest change for all three assault gun variants (SU-85, SU-85M, SU-100) is that they are now Fearless Veteran Careful. This is one of the few careful units in the Soviet army. Now they are harder to hit on 4+. Veteran skill means you have a better chance of pulling off tactics such as Blitz or Shoot and Scoot. Fearless makes it easier to remount when bailed out and for last stand checks. The other change for SU-85M and SU-100 is they lose FA9 down to FA7. FA7 is still better than FA5 in the SU-85 but with being careful now means they should have a better chance to take less hits anyway. The SU-85 and SU-85M have a 4+ cross check and the SU-100 has a 5+ cross check – so watch out trying to ambush from the woods! Fortunately, there is a new command card called “Unditching Logs” that for 1pt allows you to reroll failed cross checks for that unit until the end of the turn. This will help improve your chances of moving in or out of woods. Now if we look at firepower now, the SU-85 and SU-85M have ROF 2 AT12 with a range of 28” and the SU-100 have ROF 1 AT15 with a range of 32” but also the slow firing rule.
Let us have a look at the formation:
1 Medium SP Artillery Regiment HQ
2-4 SU-85 Tank-Killer Battery or SU-85M Tank-Killer Battery or SU-100 Tank-Killer Battery
0-1 SMG Company or Hero SMG Company
As you can see, we can have mixed assault gun batteries in the same formation along with an intrinsic infantry unit as well to help balance the formation and make it more robust. The HQ is a single T-34 but it is also Fearless Veteran Careful – very useful to have.
So, in my mind there are two ways to build this list – have a mixed regiment of SU-85M and SU-100 or just either SU-85 or SU-85M and get you high end AT from other units such as IS-2, ISU-122, 100mm AT guns or using the “Decoy Tank Company” command card. The decisions will normally come down to what points you will be playing and your playstyle. For the purpose of this article, we will use the standard 100pts list.
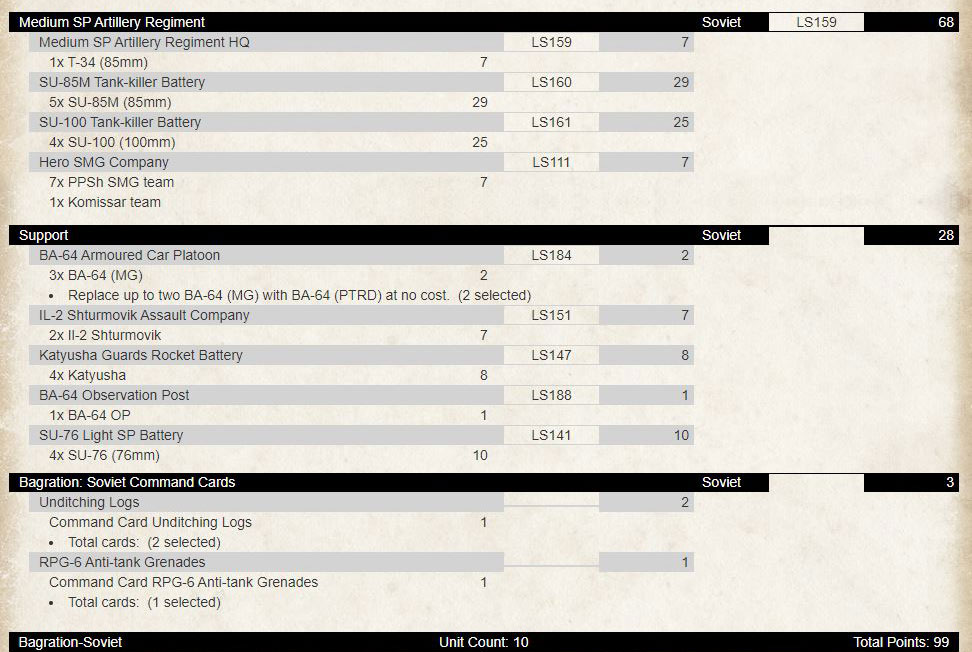
First, we will look at the mixed battery option:
The formation comes in at 71 pts leaving us 29 pts to add some support options to bolster your force. I like to run a balanced force so I would want to add some artillery options – ideally two if I can plus some recon. Equipping your infantry with the “RPG-6 Anti-tank grenades” command card gives them some intrinsic AT capability – especially for assaults where the Hero SMG company assaults on 2+!
So far, the formation has high end AT with the SU-100 battery and decent ROF2 AT12 for everything else. I like to have five in the SU-85M battery if possible as it gives me 10 stationary AT12 shots.
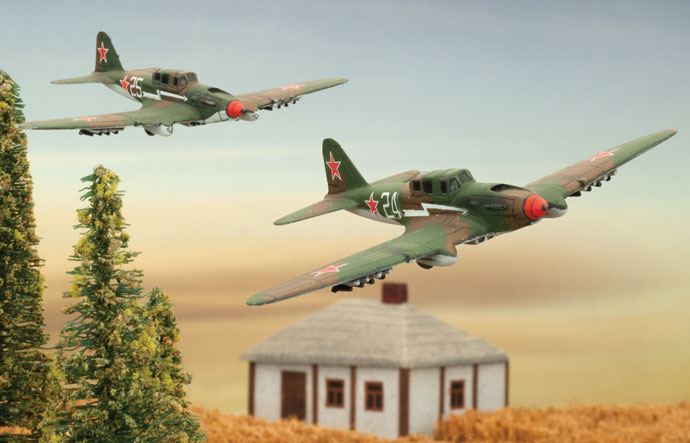
We have a range of artillery options for the Soviets. We can take a SU-76 light SP battery in formation support plus we have the options from support to take up to SIX units of artillery ranging from 76mm, 122mm, 152mm batteries and the mighty Katyusha! Not only that, but we also now get an option to take an observer as well. One other multi-purpose unit we could also consider is the Flying Tank, the IL-2 Shturmovik which has a AT5 against top armour template to take care of everything, from infantry and guns to the heavy tanks such as the Tiger and Elephant.
With recon we have three options available to us. Armoured Reconnaissance Platoon or Reconnaissance Infantry Platoon as formation support from the Reconnaissance Company formation, BA-64 Armoured Car platoon from support, and “Decoy Tank Company” command card.
So, lets add a couple units of artillery, air support and some recon to round out the force:
Adding in these options gives you the ability to have 3 templates plus a secondary AT option with the Shturmoviks, an OP to range in everything and recon to spearhead you in those missions that allow it to get into a great attack position.
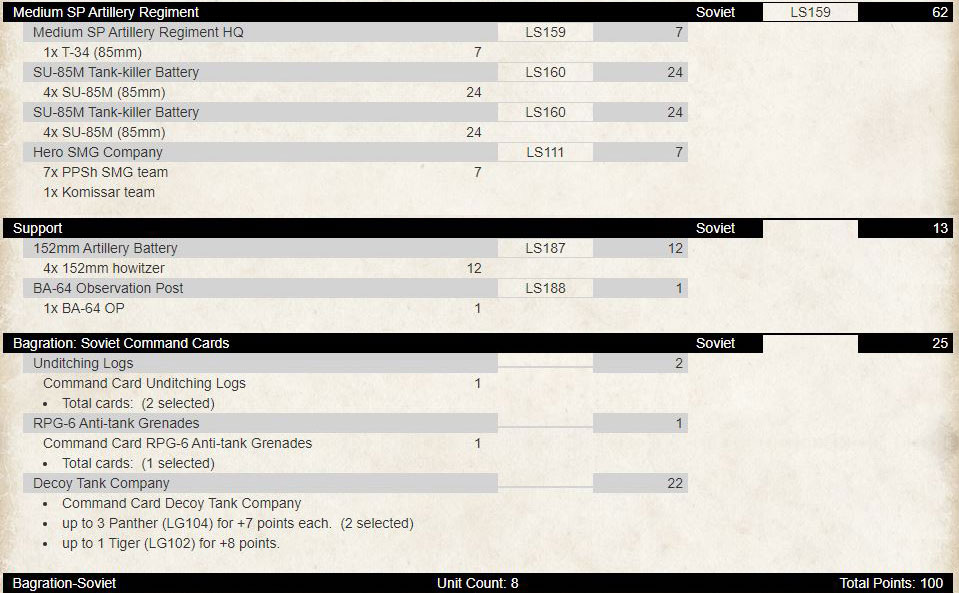
Now our second option is to look at taking just SU-85Ms and getting our support options to provide the high-end AT, artillery and recon. The “Decoy Tank Company” command card provides us with the ability to have some captured German tanks with spearhead. This company replaces the BA-64 slot in support or in the Reconnaissance Company. A maximum of three tanks and you can select from a single Tiger and up to three of Panther, StuG and Panzer IV in whatever mix you like, and adds some flavour to your force and a change from soviet green!
So, you get Spearhead with the Decoy Tank Company and pulls doubles duty as your high end AT along with some heavy artillery to defend an objective with AT12 and FP 2+ in bombardment to dig out enemy guns and infantry teams. With 35pts left over in support you could also swap out the heavy artillery, decoy tank company with 3 x IS-2s for 22 pts, 122mm artillery battery for 8pts, observer BA-64 for 1pt and BA-64 armoured car platoon with 7 for 4 pts. Another option is to use the 100mm Tank Killer Company for your high-end AT. Fearless Veteran Careful with AT15 for 11 pts. This opens the options to take two artillery batteries for 16 pts (you choose your combo), Shturmoviks for 7 pts and an observer. Lots of mixing and matching support options with this formation.
I have 10 SU-85Ms and 5 SU-100s that are ready to be dusted off the shelf now that Bagration: Soviet has been launched that I plan to terrorise my opponents with. Happy list building!
~John

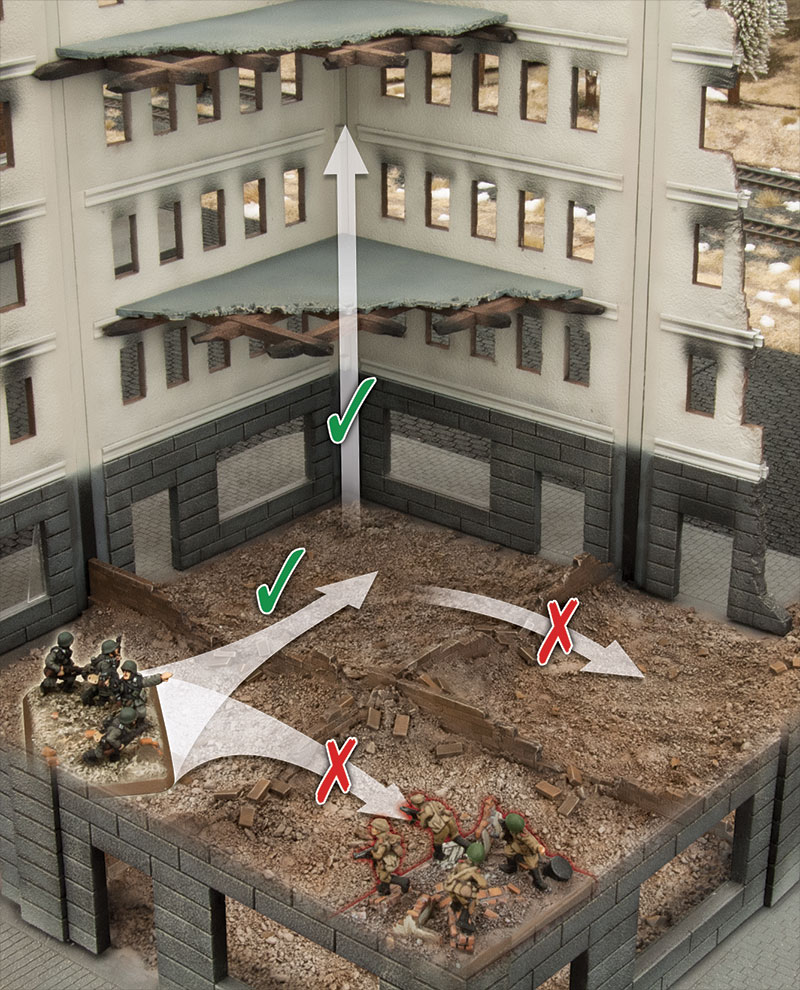 The breakthrough came when we freed ourselves from the burden of measured movement inside buildings. Getting tape measures into buildings to measure movement from room to room, up and down levels, and checking weapon ranges was simply taking up time and actually causing a lot of disruption by hitting models and tipping over the buildings. What really mattered about fighting in buildings were the rooms themselves. Everything happens between rooms and the position of teams in the rooms doesn’t matter. It’s a lot easier and more narrative to just point to a room and say “I’m going to assault that room from this one.” and then just start rolling dice. It cuts straight to the action and lets you start throwing grenades, rather than measuring to see if that team in the corner could reach the doorway.
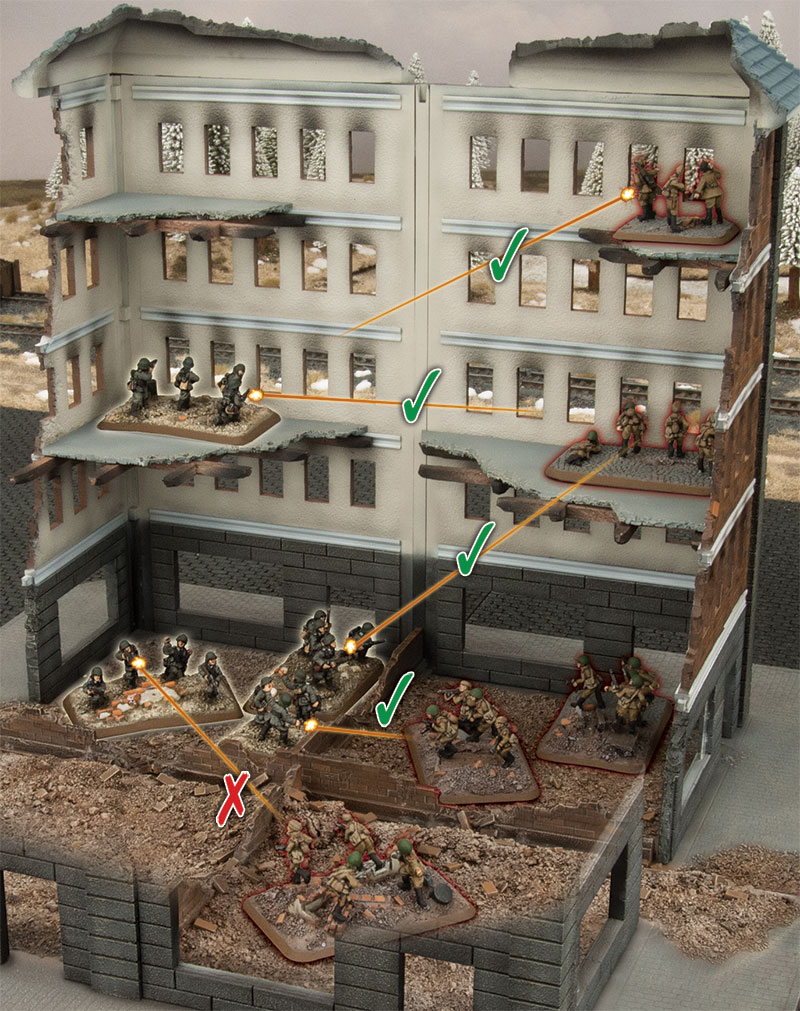 The common temptation or expectation is to always try and cover a whole table in buildings. While tables full of city terrain can certainly be done and look amazing, for many of us gamers, this creates a huge barrier to trying city fights. Having a full table of building terrain, is typically unattainable and often impractical for the normal gamer. So we wanted a solution that would work for both types of players. The terrain goal for playing the city fighting missions in the book is achievable and reusable. We limited the essential buildings for these missions to at least two complete buildings so you can get two building boxes and be ready to play. Of course you can add more to your table and play larger urban games if you’d like.
 So that’s it! If you’ve never tried urban fighting in Flames Of War, now’s your chance. The rules are streamlined and narrative-focused, the terrain goal is achievable, and you don’t need a lot of space to play. It’s time to grab that bag of grenades and go clear that building!