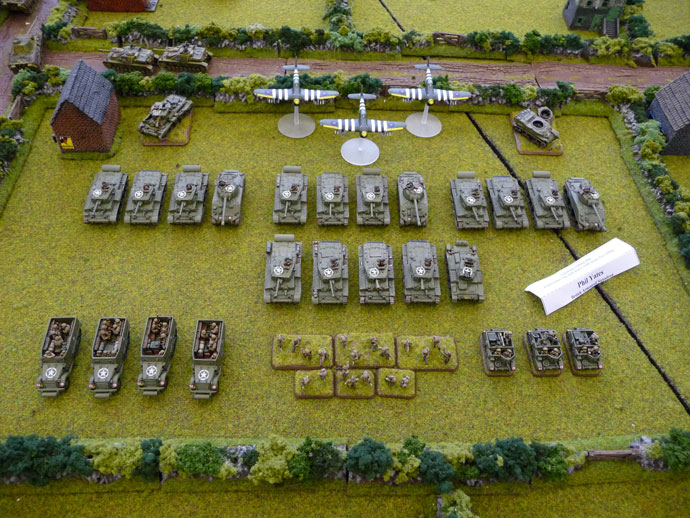
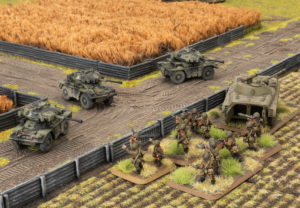
As those who’ve been reading my articles over the years will know, I have had a fascination for the 7th Armoured Division, the ‘Desert Rats’ in Normandy since I was a kid. My Late War Desert Rats force is easily the biggest part of my collection, so the obvious question is: what difference does the latest version of the rules make? I’ll look at my two formations: a Cromwell Armoured Squadron and a Motor Company, separately.
My Desert Rats force back when we first switched to V4
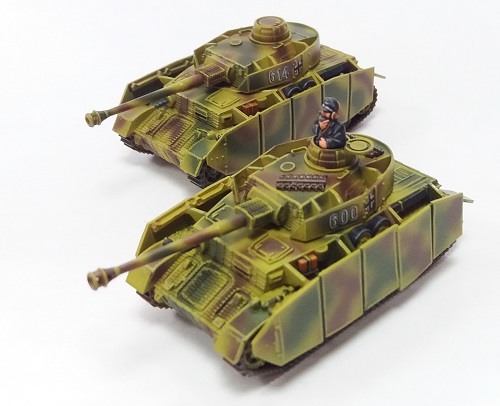
Cromwell Armoured Squadron
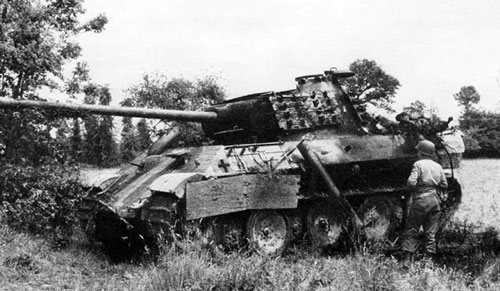
There are two ways to build a Cromwell Armoured Squadron in D-Day: British: the Desert Rats Cromwell Armoured Squadron and the Cromwell Armoured Recce Squadron. Since the 7th Armoured Division had both types, I could go either way, but my tanks are marked as 1st Royal Tank Regiment, I’ll go with the Desert Rats Cromwell Armoured Squadron. The main tanks in the formation are the Cromwell and the Firefly, so let’s see what’s changed.
Cromwell Tanks
The Cromwell has the same speed and cross capability, and the same armour that it used to have, so it’s still blazingly fast and has about the same armour as a Sherman or T-34. The gun is the same as the Sherman’s 75mm, so no surprises there. The 95mm in the close-support tanks of the HQ gain a little with better Firepower and better Anti-tank and Brutal for direct-fire. The artillery Firepower improvement from 5+ to 3+ should make them a lot more lethal, especially when combined with the re-rolled saves for repeat bombardments. I’m looking forward to seeing them rip enemy anti-tank guns to pieces! Gamewise, I think the biggest difference is the ability to use their dash speed without the risk inherent in moving fast in the earlier versions of the game.
Firefly Tanks
The Firefly’s speed and armour is also the same, as is the 17 pdr gun apart from gaining an extra 4”/10cm range, which may be useful when covering a fast dash onto the flank by the Cromwells. The ratings of both types of tank are much the same. They are still Reluctant, although the Remount is now a straight 3+ rather than having the old Cautious not Stupid rule. They are Careful, so are still hit on 4+. Their Skill rating is Trained, so like most they are OK at Movement Orders like Blitz Move and Shoot and Scoot, a welcome addition in the latest version that should give me more options to do clever things.
The old British tank rule of Semi-Indirect Fire (giving a re-roll for long-range shooting) is gone, so I’ll need to be a little more circumspect in my initial shooting before the charge to close range, but I doubt that it will make that much difference.
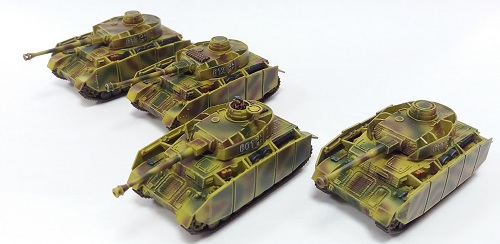
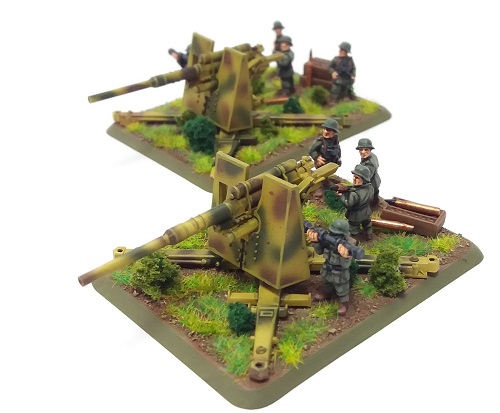
Stuarts and Crusader A/A Tanks
My force also has Stuart light tanks and Crusader A/A tanks. The Stuart is virtually unchanged, and is still a great little Spearhead unit to help with deployment, and a sneaky unit to keep the enemy on their toes later in the game — enemy armoured cars beware, my scouts bite! The Crusader A/A has improved considerably. It’s lost a point of ROF, now ‘only’ 4, but is faster and better armoured, and most importantly has 4”/10cm of extra range making it easier to keep my tanks under its umbrella. Most importantly, it’s halved in price relative to my Cromwells, so it is much easier to include in the force!
The Verdict
A full squadron with Stuarts and Crusader A/A is now 98 points compared with 1935 points under the old version. That’s a significant reduction allowing me to field the whole squadron in a normal game! I’ve lost the Semi-Indirect Fire, but I’ve gained a whole extra troop of tanks, so I think they will perform very well thank you! I’m a happy camper so far.
Motor Company
For those who are confused by British terminology, a Motor Company is a rifle company optimised for transport in light trucks or half-tracks. Other armies might have called it a motorised or armoured rifle company or something similar, but not the British!
Like my armoured squadron, my Desert Rats Motor Company has the works as far as the formation is concerned. It’s got three small infantry platoons, three universal carrier scout patrols, two 6 pdr anti-tank platoons, a Vickers MMG platoon, and a pair of 3-inch mortars, backed up with two platoons of M10 (17 pdr) SP anti-tank guns. The most noticeable change up front is that the armoured transports aren’t in the D-Day: British book. Instead, they are available through command cards. While I appreciate the flexibility of not having to take the transports, I have found them so useful in the past that I probably will continue to take them.
What’s Changed
So what else has changed? Well the most noticeable change (and the fact that it’s so minor shows how little has changed) is an extra 4”/10cm range on my 6 pdr anti-tank guns. This could be useful on occasion, but as I use the M10 SPs for long range shooting and position the 6 pdr guns for survivability and to protect the infantry, I doubt it’ll make that much difference.
Another change is that the choice of how my Vickers MMGs deploy is now part of building my force. I have to choose whether they will be mounted on their carriers or on foot and that’s how they stay. I’m going to have to experiment to see which works better for me. At the moment, I’m tempted to keep them mounted.
My M10 (17 pdr) SP anti-tank guns have picked up an extra point of front armour and 4”/10cm more range, and like all SP guns, lost a bit in assault capability — something I won’t miss!
The pair of 3-inch mortars gain from the new artillery rules, particularly the re-rolled saves from repeat bombardments, so that makes me happy. Oh wow! I just realised that their Firepower went up from 6 to 4+, making them three times as deadly — watchout enemy anti-tank guns and machine-guns!
The last time I got to take this force out for a spin.
The Verdict
A company with the M10s and transports is now 88 points compared with 1850 points under the old version. Once again, that’s a significant reduction. Combined with a few performance boosts. I’m happy there as well.
Support
The only support I have so far are a flight of Typhoons and some unpainted Sexton SP artillery. The Typhoons haven’t changed much aside from a little extra range on their rocket bombardment (and fortunately I have a spare painted from earlier versions, so I’m set for the change from one to two aircraft models in the unit). That extra range might be useful at times for avoiding anti-aircraft fire. The Sextons are a command card that modifies the Priest Field Troop in the book, and like all artillery, they gain a bit of extra effectiveness. I think I might finally have to get them painted to support my motor company!
In Closing
I’ve placed or won in tournaments with both formations, and I look forward to a lot more gaming using them in the new version. I don’t think they’ll play particularly differently, but I look forward to finding out! Whatever the differences, it’ll be good to get them back on the table again.
With not much change needed to my existing force, I’m tempted to start a force of Churchill tanks and modify my motor company into a rifle company. Hmmm, the new Wasp flame-throwers look good. Hey, I could add Crocodile flame tanks as well… hey Chris, can I place an order!
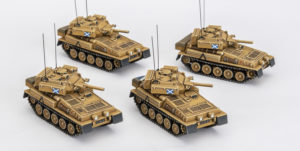
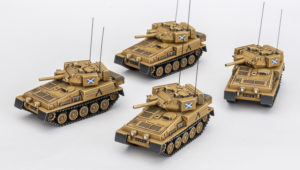
When work started on WWIII British and we were seeing early prototypes of the Challenger model, it didn’t take much convincing to decide to do a new British force.
The idea of doing a desert force appealed to me as I’ve already been painting a lot of green with black camo on my WW2 Americans, so I chose to theme the army for the Gulf War, or Operation Granby.
I came up with these forces trying to maximise Challengers, while also getting some cool new Warriors in there, and useful recon.
A few of us in the office are planning to do some fun “big boy” games at 150 points, and that will allow me to field a more complete company of Challengers, while only having to paint three extra tanks and some aircraft.
(The British were using Panavia Tornados in the Gulf, so I’ll use those models with Harrier stats)
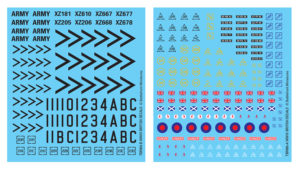
I worked together with Casey on updating the British decals, and I was keen to get the markings for Gulf War forces in there. We’ve got the Chevrons and large numbers, as well as the little Desert Rat symbols. I also found a few pictures of tanks with Scottish flags, and that is what I’ve chosen to use on my force.
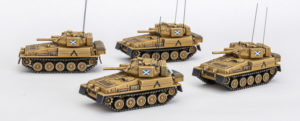
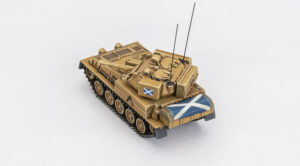
The Scorpions were the first platoon I decided to work on while we awaited the arrival of the new plastics. They’re a great little kit and are a good way to test a new scheme quickly since they’re so small.
Painting for these was pretty straight forward, and I’ve kept them clean. I can go back an add pigments/dusting later but I’ll wait and see how the Challengers turn out first.
The yellow base colour has possibly turned out a bit darker and more saturated than the real thing, but I think it’s in the ball park.
I put a large Scottish flag on the back of the platoon commander, which I will probably implement on the Challengers too.
I’m looking forward to getting the new toys as much as you all are I’m sure, and this army will be a joy to paint.
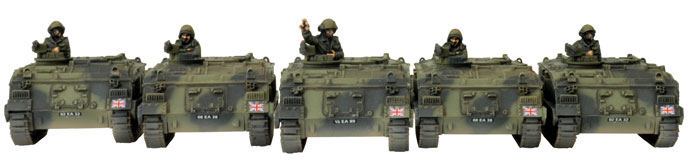
One of the biggest additions to the British WWIII book (in my own humble opinion), is the inclusion of the FV510 Warrior. A massive improvement over the FV432 in a whole whack of ways. With the addition of the Warrior the British army now have the personnel carriers to support their infantry
that the Warsaw Pact, West Germans, French and others have been enjoying for the longest time. So, how would my play style change if I were to field similar (but not identical, due to the points disparity between the two formations) forces?
The Trusty Old Battle Taxi My go-to force for WWIII ever since the Brits were released; the British Mechanised Infantry force were rock-solid in defence, able to bring a number of Milan Missiles to bear against their opponent, backed up by the effective Carl Gustav recoilless launchers should any Warsaw Pact medium tanks get foolish enough to assault the dug-in positions. But what of the actual 432s themselves? Well, I will be perfectly honest here, my 432s almost never saw the table; the risk of the paper-thin armour, lack of armament (not even having the ability to mount a Milan), led to them being used as quick-dash taxis if needed. I would mount up, dash them as quickly and safely as I could, before dumping the infantry off next turn and getting the 432s as far away (usually off the table) as I could to prevent them being easy targets for enemy APCs/AFVs.
Strengths: Larger units (by comparison), for less points, plenty of Milan support Weaknesses: Paper-thin armour, no Milan mount for dual-role ability.
The New, Hot Battle Bus BMP-2, Marder, AMX-10P; Now the Warrior joins the ranks of decently armed IFVs. The effective 30mm Rarden gun gives the Warrior a fantastic amount of offensive power, combined with the anti- helicopter ability to keep pesky Hinds at bay.
That’s the armament, but how is the armour? The regular Warrior is 5/3/1; a cut above the other IFVs in the bracket, and will remain one of the better armoured IFVs until the Yankees get the Bradley, and the Soviets get the BMP-3. But wait, ‘regular’? What do you mean ‘regular’? Well, the Warrior did come with an applique armour package, placing spaced armour round the sides. What is this going to do for the Warrior?
[Insert box-out for Applique Armour Rule]
Yes, you read that right, against HEAT weapons Applique Armour gives the Warrior Front and Side Armour of 13! That essentially makes the Warrior almost immune to BMP-1s, RPG-18s, and gives them a fighting chance against RPG-7s. The Applique Armour does come at a premium though, so
your already small Formation will get even smaller.
Strengths: 30mm Gun with anti-helicopter makes it a threat to most enemy forces, armour is effective against small arms, and infantry-carried anti-tank weapons
Weaknesses: A Warrior unit costs as much as much as an FV432 Formation once fully upgraded!
[Insert FV432 Mechanised Company Formation diagram?]
Formation Comparisons
A very quick look at how many points a Formation of each will cost on the table. I’m going to consider 100pt forces, as this points value is regarded as being the standard.
FV432 Formation
FV432 Mechanised Company
FV432 Mechanised Company HQ – 1x SLR rifle team, 1x FV432, Add up to two GPMG SF teams – 3pts
FV432 Mechanised Platoon – 4x GPMG team with 66mm anti-tank, 3x Carl Gustav anti-tank team, 1x
2" mortar team, 5x FV432, 2x Milan missile teams – 9pts
FV432 Mechanised Platoon – 4x GPMG team with 66mm anti-tank, 3x Carl Gustav anti-tank team, 1x
2" mortar team, 5x FV432, 2x Milan missile teams – 9pts
FV432 Mechanised Platoon – 4x GPMG team with 66mm anti-tank, 3x Carl Gustav anti-tank team, 1x
2" mortar team, 5x FV432, 2x Milan missile teams – 9pts
FV432 Mortar Platoon – 4x FV432 mortar carrier – 2pts
Spartan Mobile Milan Section – 4x Spartan MCT – 4pts
FV432 Milan Section – 4x Milan missile team, 2x FV432 – 4pts
Abbot Field Battery – 4x Abbot – 6pts
Chieftain Armoured Troop -3x Chieftain – 18
Medium Recce Squadron
Spartan Recce Squadron HQ – 2x Spartan – 1pt
Scimitar Recce Troop – 4x Scimitar – 4pts
Scorpion Recce Troop – 4x Scorpion – 4pts
Striker Guided Weapons Troop – 4x Striker – 10pts
Support
FV432 – 1x FV432 FOO – 1pt
Tracked Rapier SAM Section – 4x Tracked Rapier – 6pts
Harrier Close Support Flight – 4x Harrier – 10pts
An absolutely rock-solid formation with three large infantry units, and a whack of anti-tank support. I’ve had so many successes with this force in the past, with the majority of Warsaw Pact forces being unable to deal with the sheer amount of anti-tank assets spewing forth from the dug-in Tommies.
And as a little extra, having the Recce Squadron in support to spearhead forth and deal with enemy scouts and artillery.
Warrior Mechanised Company
Warrior Mechanised Company HQ – 1x SLR rifle team, 1x Warrior – 1pt
Warrior Mechanised Platoon – 4x GPMG team with 66mm anti-tank, 3x Carl Gustav anti-tank team,
1x 2" mortar team, 5x Warrior, 2x Milan missile teams – 20pts
Warrior Mechanised Platoon – 4x GPMG team with 66mm anti-tank, 3x Carl Gustav anti-tank team,
1x 2" mortar team, 5x Warrior, 2x Milan missile teams – 20pts
Warrior Milan Section – 4x Milan missile team, 2x Warrior – 7pts
Abbot Field Battery – 4x Abbot – 6pts
Medium Recce Squadron
Spartan Recce Squadron HQ – 2x Spartan – 1pt
Scimitar Recce Troop – 4x Scimitar – 4pts
Scorpion Recce Troop – 4x Scorpion – 4pts
Striker Guided Weapons Troop – 4x Striker – 10pts
Support
FV432 – 1x FV432 FOO – 1pt
Chieftain Marksman AA Section – 3x Chieftain Marksman – 6pts
MLRS Medium Rocket battery – 3x MLRS, + minelets – 10pts
Harrier Close Support Flight – 4x Harrier – 10pts
Okay, so maybe I haven’t done a complete comparison of the two forces, but I have slipped in some of the newer kit in the book to give them a run-out. As you can see the main formation for the Warrior Company is a lot smaller than the FV432 Formation (and I didn’t even give them the Uparmoured option!). Only two platoons of infantry, the mortars and MCTs are gone, as well as the anchors that were the Chieftains.
What else could I possibly do to the Warrior List to improve it?
Drop the Recce Squadron, integrating the Scimitar Troop directly into the Warrior Formation and
use the other points to round out the formation
Drop the Harriers or MLRS to bulk up the Warrior Formation.
To sum up; would I field the Warrior Company? Damn right I would, the new pretty models, the effectiveness of the IFVs and of course the old ‘rule of cool’ over function all factoring into my choice here. Can’t wait to get them on the table and give Ivan a right good going-over.
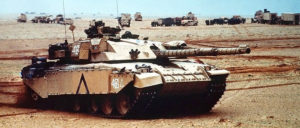
My current British army is based around a Chieftain squadron with a full 14 uparmoured Stillbrew Chieftains, some Swingfire missiles, a couple of Scorpions, a platoon of infantry and a little support. It’s a good little force, and I’m quite happy with its performance. However, my Chieftains have been usurped as the biggest tanks on the battlefield! The Challenger is even bigger!
I know it’s a weird reason to want a new tank, but really any reason will do, and I do want them. At present I’m not looking to totally replace my Chieftains, but I’m quite excited about the idea of adding a troop of three Challengers to my force.
The Challenger is essentially an uparmoured and re-engined Chieftain, so the interesting question is what will I do with them once I have them? The interesting differences are increased frontal armour and increased dash speed. While even my uparmoured Chieftains are still unfortunately vulnerable to Soviet 125mm and NATO 120mm guns, the Challenger shrugs them off with ease. That makes it ideal for holding a flank or occupying an exposed position securing the centre of my line. They still need to worry about being flanked or hit with massive missiles like the A10’s Maverick, but those problems can be mitigated, and meanwhile they can sit there using their big guns at long range without having to worry much about return fire.
Since the kit comes with two variants, I have a choice between the basic model and the version uparmoured with the ROMOR kit as seen in Operation Desert Storm (for those who are curious like me, ROMOR stands for Royal Ordnance Military Operational Requirement, rather prosaic really). I’m really torn here. I like the ROMOR kit because it’s such an ugly bodge –- a big box of extra armour to protect the really thin nose that doctrine said would never be exposed because they’d always be fighting hull down, but at the same time I’m also drawn to the (relatively) clean lines of the basic model. In the end, I think the decision for me comes down to the basic model already having an armour rating of 20 which is enough in most situations, so I’ll save the extra two points a tank.
At nearly twice the price of my Chieftains, the Challengers are going to be interesting to squeeze in to the force. I’m inclined to swap out one Chieftain troop for a Challenger troop from Formation Support, and either play games with a few more points or cut back elsewhere in the force. With Challengers in my force, another exciting new kit, the Warrior armoured personnel carrier, starts to attract my attention. The Warrior would be a straight one-for one swap for my FV432 armoured personnel carriers. The Warrior is faster, better armoured, and most importantly, has the same 30mm gun as the Scimitar light tank. The upgrade doubles the cost of the platoon, reducing my tank strength by a Chieftain, but having the infantry more able to look after themselves with the Warriors to deal with light enemy armour and their Milan missiles for medium armour, it might be worth it. I think I’d have to try them out to see how the extra capability works for me, but that won’t stop me from adding a platoon to my force.
Hmmm, my painting list is starting to grow, especially with the Chieftain Marksman AA tank coming out as well. It’s a Chieftain hull with a honking big AA turret on top, and with my bigger is better theme, I can’t resist it! I’m not sure whether my force needs the Marksman (although now that i think about it, I recall getting slaughtered by Soviet helicopters), but three AA tanks for the cost of a Chieftain sounds good – I’m definitely going to have to play bigger points games, otherwise I won’t have enough Chieftains to actually kill the enemy!
I do think I’ll manage to resist the last two new plastic kits, the Fox armoured car and the MLRS rocket launcher. I’m tempted to get them to make into objectives, but they don’t really fit in the theme of my force. I already have a pair of Scorpions for reconnaissance, so the Fox, although cute, isn’t really needed, despite being a touch cheaper for four. The MLRS is pretty awesome for shutting down infantry with its big Salvo template and each launcher counting as two weapons, but I prefer to focus a little more, so my tanks don’t actually have any artillery support — although thinking about it, two MLRS for the price of another Chieftain might actually be a good idea…
“ Fast as a greyhound, Tough as leather, Hard as Kruppsteel, Greyhound forward!”
– 116 th Panzer (Windhund) Division – Motto
After the successful Normandy D-Day landings, and the hard fighting at
Caen and lower Normandy to hold tha Allies in check, the Germans were taking massive losses. Just from the D-Day landings on the 6th June until the 18th June – the German 7 th Army had lost 97,000 men, including 5 Generals. On the 28th of June the 7 th Army Commander General Dollmann died of a heart attack. The pressure on the German forces was enormous, and they were slowly being forced back through the Normandy bocage, until they finally broke with the Allied Breakout in Operation Cobra in late July. Finally with the German forces retreating towards the Falaise Gap (from Sept to Aug) to try to withdraw safely into Germany, both the 9th Panzer Divison and the 116th Panzer Division played roles in trying to slow down the Allies and allow the other German forces to retreat.
9. Panzer
The 9th Panzer Division had been fighting the Russians on the Eastern Front up until April 1944, and had been sent to France to rebuild in May 44, like many other Divisions that had been mauled on the Eastern Front were doing. It took replacements of 31 Panzer IIIs, 74 Panzer IVs, 20 Assault guns and 15 Panthers and 200 other vehicles.By the time the Allies invaded in D-Day with had a strength of around 150 tanks and 12,800 men, but they had not had time enough to sufficiently train up to their previous standard, but still in better conditon than other Divisions. They were not really deployed in strength until after the breakout of Cobra, to try to halt the Allied advance, and as it was committed in only bits and peices as units arrived at their start points, they never really gathered enough strength to stop the Allies. Instead they should have been committed in one cohesive counter attack.They did escape the rout of Falaise, but had lost most of its vehicles.
In the D-Day German Command Card pack, you can take a Formation that represents this division. To represent their lack of time to rebuild and give the new recruits sufficient training, they have the Rebuilding rule, which gives them a reduced Skill value of 4+ on any Tactics roll. So all units in your Tank or Panzergrenadier Company Formation must take this, for -1 point per unit.
While this may seem like a bad thing, depending on what you take, this
may not be so detrimental and the extra points you get can get you some extra units. I have made up a Panzergrenadier Company below to show how this can be used. So using the 9th Panzer Division Command Card, I have managed to get
an extra 8 points, which I used to get two extra scout troops, or give both of
my Panzergrenadier Platoons Panzerfausts and Panzershrecks, depending how you look at it. Also in a lot of the cases the units I gained the points from, don’t use a tactics movement order very often(eg. Gun teams would only use it for digging in) so there is really no huge penalty for them having the Rebuilding rule. Also I have managed to use units that would represent fairly well a historical force of the 9th Panzer Division, as it would have fought at the time.
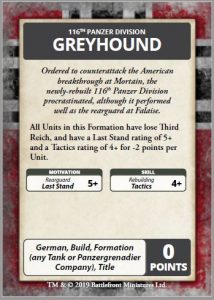
116. Panzer
The 116th Panzer Division, also known as the Windhund or ‘Greyhound’
Division was made from the remnants of two different divisons in March 44 in Western Germany. The 16 th Panzergrenadier Division ( that had been mauled on the Eastern Front near Stalingrad) and the 179th Reserve Panzer Division, a second line formation that had been on occupation duty in France since 1943, were combined to form the ‘Greyhound’ Division. They were still training in northern France after the D-Day landing, and were not committed to fighting until the 28th July, and saw heavy fighting against the US 2 nd Armoured Division around the 29th and 30th July. They were then used in a defensive role from then on, in trying to slow the Allied advance and allow the retreat through Falaise. It was given the task with the 2nd SS Panzer Division of holding the Pocket open to allow the other forces to withdraw. Finally they did manage to retreat through the Gap, but had only 600 infantry and 12 tanks left.
The D-Day: German Command Card that represents the 116th Windhund
Division, has not only the Rebuilding rule, but also Rearguard. Rearguard
means they lose the Third Reich rule that German forces usually have, and
instead have a Last Stand of 5+. To make up for this you -2 points from every unit in the Formation. This will make your units very brittle as they start to take casualties, so it would be a good idea to take larger units to make up for this, if you can. I feel to get the best out of this card, it should be taken with a Panzergrenadier Company, which can afford to take losses. Taking it with a Tank Company does not provide much benefit, and it takes away the traits German armour usually needs to succeed. So by using the 116th Command Card I saved 18 points, and I have tried
to maximise every unit in the formation. This force can pump out a huge
amount of firepower vs infantry, and has Pak 40s and Jagdpanzers for taking out Allied armour. The light AA platoon can also be useful for denying a flank against light armour and infantry, as well as giving the Jabos second thoughts.I think this would be a fun list to play, just make sure you move your HQ
around to where he may be needed for last stand rolls.
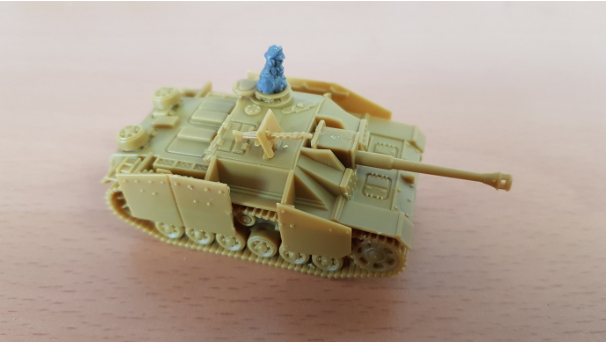
Having completed my first Hobby League army and played a couple of games, found I was missing building and painting an army. So back to D-Day: German it was last gaming night. With others in the club discussing Panthers and Tiger lists and their merits, I found the Stug Assault Gun Company calling out to me. So working on a 100 point limit I drafted up my first list. I have gone all out complete sections of StuGs and StuHs. I am planning on
using the StuHs as an anvil in the centre of my army and using the StuG
platoons as the hammers on the flanks. The StuHs also have some other great benefits on the table: Artillery for when they have no direct fire options and with Anti-Tank 3 they have a good chance of taking out enemy tanks or at least a bail. Adding in Brutal, HEAT and Smoke these are going to form the solid core of my force.
In my recent games I have found my infantry to be invaluable, I was tempted by a platoon of Fallschirmjaeger but points wise just could not fit them in, so I took Beach Defence Grenadier Platoon. I am not expecting great things from these troops. But They are going to sit on any objectives I have and dig themselves in and hopefully be a tiny thorn against my opponent. To round out the list I dropped in 6 Nebelwerfers as I want to try out the salvo template and have another smoke option on the table. So to ensure that both the StuHs and Nebs can fire have added in a Panzer III OP.
I’m really looking forward to playing with this list and seeing how it fairs on the table.
So with the list completed I got on to building some models. Over the last
couple of lunch breaks I have managed to assembly the following models:
With most of the army complete I need to build one more StuH and then the 2 HQ StuGs and 3 more Nebs, the infantry are already primed so I will start work on those over the course of this week.
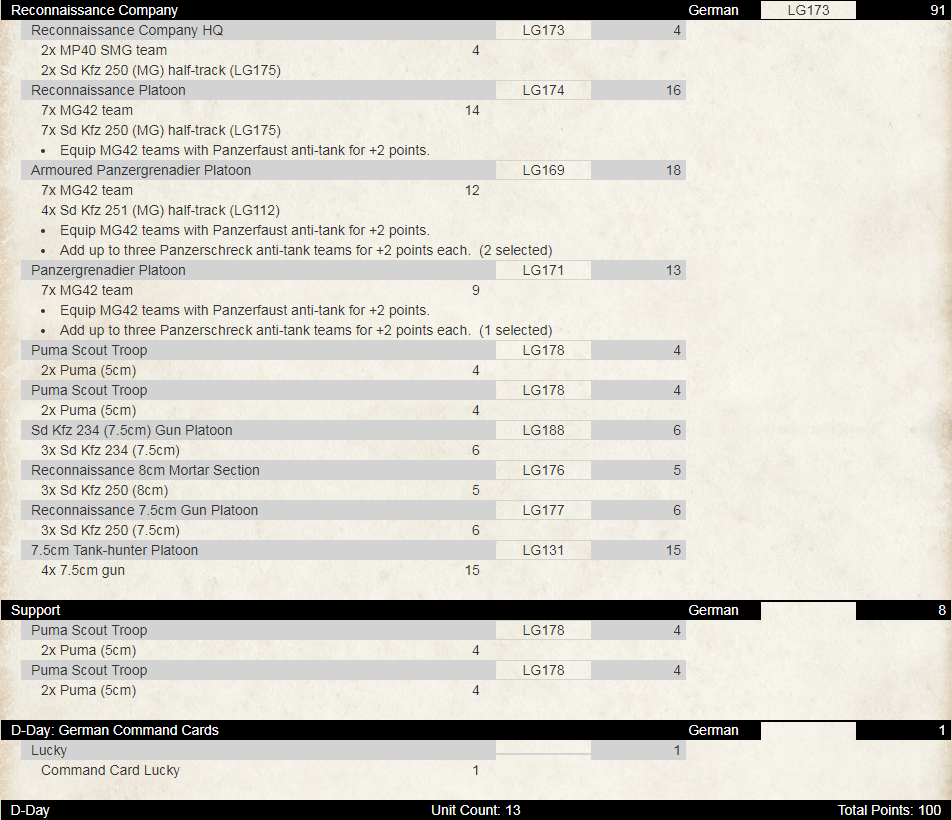
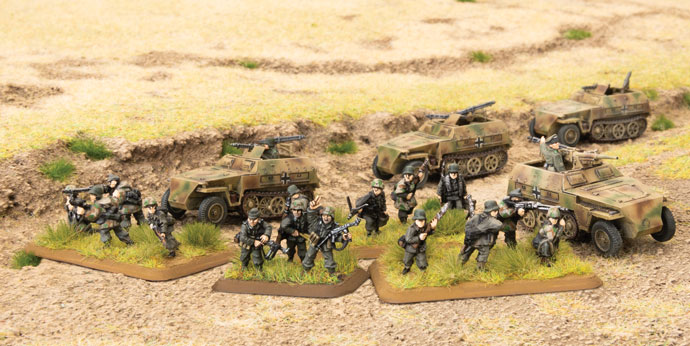
My favorite list from V3 was the Panzerspahkompany from Grey Wolf, so when D-Day: Germans hit my desk and I saw the Reconnaissance Company in the Forces list I rushed to page 59 and looked at what I knew I would be building. Being a Recon force for the Panzer divisions, mobility is a key element to this force, so I started with 2 platoons of Pumas with the 5cm and added a SD Kfz 234/3 (7.5 cm) Gun platoon for better Firepower, and HEAT bonus. Here is where the TANKS line of products also benefit a Flames Player as you can flesh out the extra vehicles needed with TANKS Pumas (TANKS27)…
Filling the Core requirements, I choose one Reconnaissance Platoon, and a full Armored PanzerGrenadier Platoon to get a couple of Panzerschreks in for assaulting tanks off objectives, or holding off an assaulting tank force.
Then I filled out more core slots because this force is fragile, and can’t hold up to large losses. So, a Recon 8cm Mortar, and Armored 7.5 Gun Platoon were added in. Having a template weapon to help pin and a smoke bombardment for screening, yes please. Lastly the 7.5cm Pak 40 Tank Hunters help with board denial, and having higher than AT 9. These will probably hold an objective with the 3rd infantry platoon of Panzergrenadiers on foot.
I was really debating adding in an artillery, as Wespes, or the Command Card that allows swapping my Jagdpanzer IV with a Brummbar. While that is a more balanced option it didn’t feel like a fit with this mostly mobile force. Thus, I beefed up the infantry with Panzerfausts, and additional Panzerschrecks, and added 2 additional 5cm Puma platoons. Most of the force has scout/spearhead which means you can really open up deployment options to put things where you want.
This gives me a mobile force with plenty of AT when flanking shots can be had. The multiple pairs Vet Pumas serves as a shiny distraction (because they won’t survive long) but they tie up enemy fire long enough for the infantry to move up, punch a hole, and hold on long enough to secure the victory.
Not being your typical German force also allows you to paint something different. As such this force will get the less often seen ‘Octopus’ pattern rather than the typical 3 color ‘Ambush’ seen.
I chose 2nd Panzer partially for the Token set, partially because before I cracked the book my thoughts were Panthers, and partially because the Sd Kfz 250s won’t release til early October, I can simulate being refit in France, and not making the front lines until Operation Luttich. Now to get this force assembled, painted and head West to Normandy.
When I first saw the units available in this box I just knew I had to paint it up.
5 Panzer IVs, 2 Tigers, 3 StuGs, an Armoured Panzergrenadier platoon, 2 8.8 guns and a Nebelwefer battery. Did I mention 2 Tigers… This box has a good mix of everything, the best Late War Starter Force in my opinion.
I decided to try something different when painting this force. I wanted it to immediately catch attention by using brighter colours, less emphasis on realism but more on a cartoony effect. I wanted it to pop when it’s on the table waiting to annihilate my opponents with style.
To achieve this I decided not to use any washes on the vehicles. And to brighten the models I carefully painted lines on surface edges. I Am very happy with how everything turned up.
I present to you Kampfgruppe Khairul!
Panzer IV Tank Company HQ
X 2 Panzer IV
Panzer IV Tank Platoon
X 4 Panzer IV.
The Starter Box comes with only 3 panzer IVs. I added another one to complete a 50 points list.
HQ of 2 panzer IVs, a platoon of 4 panzer IVs and 3 StuGs 7.5cm completes a 50 points list of nine teams shooting at AT9 and FP 3+. Show me those Shermans!!
StuG Assault Gun Platoon
X 3 Stug (7.5cm)
Tiger Tank Platoon
X 2 Tiger
Support unit – 8.8cm Heavy AA Platoon
X 2 8.8cm AA gun
Support unit – 15cm Nebelwerfer Battery
X 3 15cm Nebelwerfer
The force so far.
All that’s left is to paint the 10 infantry teams and 4 half-tracks.
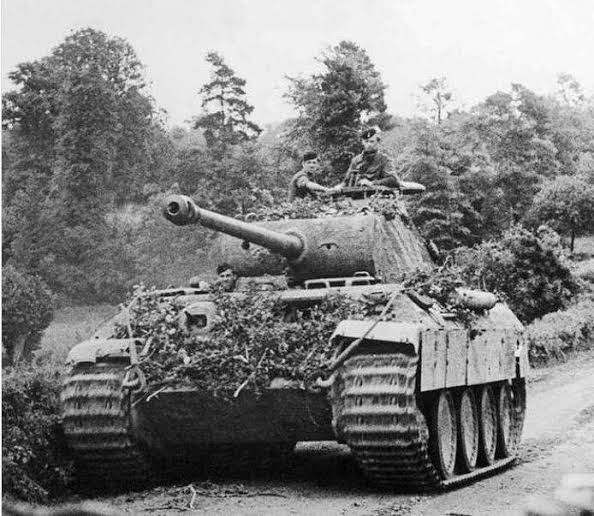
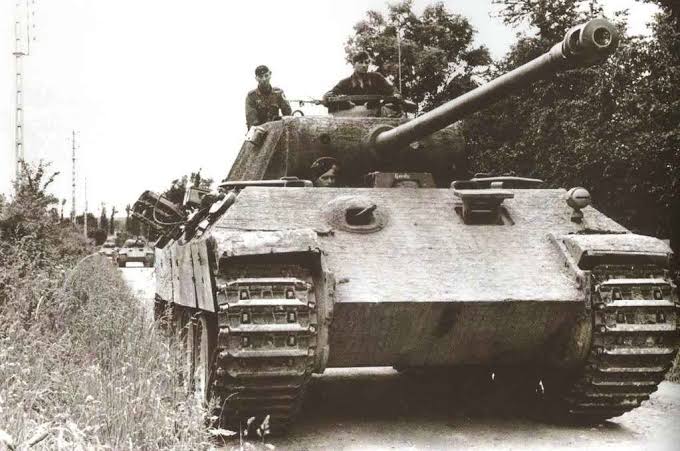
With the release of D-Day: German, which details the forces available to the Wehrmacht in Normandy 1944, the two Big Cats on the table are Tiger and the Panther. Now it may seem at first glance that the Tiger at 12 points a model, with the same FA (9) as the Panther and a better side armour is a no-brainer. the Panther has the same gun, is slightly faster and normally 1 point cheaper. When you start taking a few of them, the extra points add up and can allow you a few extra goodies. I don’t know about you, but I find in German lists I am always scraping for extra points, and the points you can save by taking Panthers instead of Tigers can buy you some extra Recce units, an interesting Command Card, or an upgrade for a infantry platoon. Also it comes down to what you are using them for. Tigers are more of an assault tank, going forwards, taking the hits and assaulting a strong-point or objective. Panthers are better used at range, to reduce the risk of them being flanked, and using the excellent 40” range of their guns to knock out enemy armour at a distance. You should really only get close up with your Panthers when you are very sure there is little risk of being flanked, as the low side armour of 5 compared to 8 of the Tiger means that any decent tank or anti-tank gun that flanks you has a very good chance of taking you out. At long range, you are totally immune to Sherman 75mm guns (AT10), and the 76mm Shermans and 3” M10 guns (both AT12), only penetrate you on a roll of 1 for your armour save. Only the AT 14 of the British 17 pounder has an easy time penetrating you at range, or heaven forbid any German 8.8cm gun in a friendly fire incident.
Panthers were a significant portion of the German panzer strength available to the Wehrmacht in Normandy. Initially there were only two Panther equipped Panzer Regiments at the Western Front at the start of the Normandy D-Day campaign with 156 Panthers between them. From June through to August of 1944, an additional seven Panther Panzer regiments were sent to France, and they reached a maximum strength of 432 Panthers at one point on 30th July 1944. So they should be a common sight in German lists from the German D-Day book, and could represent Wehrmacht forces from Panzer Lehr Division, 2. Panzer Division, 9. Panzer Divison, and 116. Panzer Division. There was also some SS Panzer Divisions that had Panthers (1. SS, 2. SS,12. SS) but these will be represented in the upcoming German D-Day SS book. The easiest way that you can include them in your force, is as a support option of 4 Panthers, at 44 points. This is an easy choice if your mission requires Reserves, and they are a significant threat to your opponent. Also as a large unit, you will need to have lost/bailed 3 Panthers before you need to worry about last stand checks, which you will pass on a 3+. This unit will definitely be a focus for your opponent when it arrives, and you can use this to distract him from other units in your list that may be a bigger threat to an objective.
The basic tactics you should be using to get the best out of your expensive felines, is the same you should be using for all your expensive German armour. Your high to hit of 4+, high skill or tactics of 3+, small platoon size and excellent 2+ cross value in the case of the Panther, give you all the tools you need to defeat your opponent. You should be using hills from a hull-down concealed position or short/long terrain at long range, which combined will make any return fire need a 6 to hit you. Also weaken your opponent, who will usually have a numerical advantage, using your excellent 40” range to either force them to advance towards you under fire, or weaken them enough that it is unlikely they can flank you. Importantly you should also be using your movement orders to give you the advantage, I mean, you are paying for the 3+ skill and the stormtrooper rule, so Blitz and Shoot and Scoot should be an integral part of your gameplay. Also as noted before, the FA of 9 can mean in a lot of cases, you are invulnerable at range from enemy fire of AT10 or less, so keep that in mind.
Fielding Panthers as a full Formation in a standard 100 point list will be very expensive, at a minimum 77 points for 7 Tanks, only leaving you 23 points for some support troops. It is not impossible to use and will do very well vs Allied armour lists, but it may struggle to defend two objectives and can easily be swamped by a more numerous opponent.Your best bet would be to try to break the enemy formation, and use your range, and movement orders to pick out enemy units and destroy them one by one. I would also make sure to invest in some AA, as the ‘Jabos’ are now very dangerous, and can easily make your Panthers kaput with their damn rockets and bombs! Even worse they seem to have gotten better at hitting things in 44.… For me I’m getting my hands on 4 Mobelwagens, and putting out 12 AT7, 4+ firepower shots should make them think twice. They also make mincemeat of light vehicles! To round it out, I would take either 3 Wespe Self-Propelled Artillery vehicles or 3 Nebelwerfer rocket launchers. Both cost the same, but personally I like the ability of the Wespe to be able to reposition- but it does have a smaller template. Lastly I would take some kind of scouting/spearhead unit, so some Sd Kfz 250 half tracks, or 2 Pumas/Sd Kfz 234 (2cm). To give you that little bit extra deployment forwards if you need it, and to stop your opponent doing the same thing in an area. I will take 2 x Sd Kfz 234 (2cm), and the Lucky Card. In this way you are not tempted to use the Puma as a tank, and I can use the Lucky card to re-roll my first failed Reserves roll. As you have a significant portion of your army in Reserves in a lot of missions, you want them on the table and earning their points back as soon as possible.
Now this may not be the most competitive list, but it is fun to play, quick to play (and paint up), and if you can do well with this list, you have gone a long way to mastering the use of terrain and movement orders to get the best from your Panzers! So give the Panthers a go, I know all the Fraulines love a Tiger Ace, but a real Barkmann knows how to get the best from a Panther!
D-Day: German offers Flames Of War players all they need to field any of the Heer Panzer Division of Normandy. This article has everything you’d want to know before sinking your teeth into one of these colourful and storied unit miniature form.
The Normandy Campaign is well known for many battles and engagements in which the Wehrmacht was on both ends of the offensive onslaught that would mark the battle for northern France and the eventual breakout in late August. The early morning hours of 6 June 1944 would find the Germans mounting a determined resistance that would soon be forced back on it’s heels by the overwhelming material superiority that the Allied armies brought to bear.
Key to Hitler’s strategy of pushing the “little fish back into the pond” was the ability of the Panzer divisions to halt the Allied offensive at the beachhead. However, because of the Fuhrer’s own belief that a larger invasion was imminent at Pas de Calais, several key Panzer divisions were held from the Normandy campaign until it was too late while Generalfeldmarschall Rommel had to make do with only four divisions under his command.
Many of the panzer divisions that would see action in the two months of the Normandy campaign were Waffen SS and not necessarily under the command of the standard Heer army generals. However, the 2., 9. and 116. Heer Panzer divisions would all see action in northern France alongside the 21. and 130. Panzer Lehr Panzer divisions.
Playing the 2., 9. or 116. Panzer divisions in Flames Of War can be done with the D-Day: German book and Command Cards.
2. Panzerdivision
The 2. Panzerdivision was already a veteran force by 1944, having fought in almost every theatre up to that point including Poland in 1939, Western France in 1940, the Balkans in 1941, the Eastern Front from 1941 to 1943 before being transferred to the West in 1944. The experience paid off as its Allied opponents considered it an equal to the Waffen SS divisions. However, that experience would not be able to save the 2. Panzerdivision from the onslaught that shook Northern France in the summer of 1944.
Commanded by aristocratic Heinrich von Luttwitz, it was stationed at Amiens for refitting from January of 1944 as part of 15. Armee. On the eve of the invasion, the 2. Panzerdivision was several hundred men over strength and reported 94 operational Panzer IVs and 73 Panthers; a very strong division. In preparation for the invasion, the 2. Panzerdivision was put under direct command of Generalfeldmarschall Erwin Rommel. Only four divisions (2., 21., 116. and 130. Panzer Lehr Panzer divisions) were given to Rommel who suggested that the key to counterattacking the invasion, no matter where it came, was to have Panzer divisions rolling onto the Allied positions before they could establish a strong beachhead.
The rest of the Panzerwaffe would be held under Hitler’s direct command, to counterattack a possible second invasion site.
However, Rommel’s control would still not be enough to get the 2. Panzerdivision into position until 13 June. The division was forced to detour approximately 160 miles through the French countryside due to bridges destroyed by Allied air strikes and Allied air superiority, which made panzers moving during the day the equivalent of a suicide mission. Lead elements supported Panzer Lehr and SS Schwere Panzerabteilung 101 in the attack on Villers-Bocage. Several of the 2. Panzerdivision’s tanks were lost, but the village was recovered from the British 7th Armoured Division under the onslaught of the three tank forces coming from its north, south and east sides. That evening, elements of the 2. Panzerdivision were used at a gap in the German lines near Caumont, with preparations to launch an attack the following morning. However, the attack was never launched as a bombardment of Allied air, artillery and naval guns opened on their start positions. Oberfeldwebel Hans Erich Braun, with the 38. Panzerjägerabteilung attached to the 2. Panzerdivision, described it as “a hurricane of fire” which “raged through the countryside, wrapping everything in grey smoke and dirt.” (Hargreaves, pg.81)
After being stymied at Caumont, the rest of the division finally caught up to its forward positions a week later. The 2. Panzerdivision was finally able to form a coherent fighting force. For the rest of June, the 2. Panzerdivision operated in and around Caumont. The Panther battalion was detached to help stop the British Operation Epsom. Division reports indicate that the Panthers alone were responsible for 53 destroyed British tanks and 15 anti-tank weapons in a single day.
In the third week of July, the 352. Infanteriedivision relieved 2. Panzerdivision, but the rest was short lived. Strength reports indicate it was rated “Kampfwert I”, which indicates the ability to take on any offensive mission. Operation Cobra began on 25 July and the tanks of the 2. Panzerdivision were too valuable to let sit idle while the Americans broke through the German lines. On 28 July Fieldmarschall Guenther Hans von Kluge ordered the 2. Panzerdivision into action against the Americans from its position near Caen. Crossing the Vire River, the 2. Panzerdivision took a position at Tessy-sur-Vire, flanking the American breakout. They helped stop the US XIX Corps near Troisgots, but soon had to withdraw because of the threat of envelopment by American infantry.
The Normandy campaign gave the Panzerwaffe little time to rest between engagements, between the constant press of the enemy and Hitler’s frantic attempts to stem the tide. Perhaps most famous of his costly counterattacks was Operation Luttich, or “Liege”, named for a battle in World War I. The operation was to feature a three pronged assault to open a ten mile wide thrust behind the American armoured spearhead during Cobra, effectively isolating the attacking elements from their supply depots, as well as aiming to have the German lines reach the sea at Avranches. The divisions involved were to be the 2. and 116. Panzer divisions, the 1. and 2. SS-Panzer divisions as well as the 17. SS-Panzergrenadierdivision on the southernmost flank of the attack.
The original jump off date was 6 August, but due to too many of the units involved not being ready, Kluge delayed for 24 hours. Kluge would receive the harshest of criticism for not starting the operation on time, but the fact was that any mass of German armoured divisions was likely to attract Allied air power, which hampered the movement of tanks to their start points.
Despite of delays, the attack was launched on a foggy morning on 7 August. The fog allowed 2. Panzerdivision to penetrate 7 miles into Allied lines before being stopped by Combat Command B of the US 3rd Armored division. The Panther battalion had reached St. Barthelemy, just north of Mortain, an American strongpoint. As the Panzer V tanks inched through the village, the American ambush began a stretch of intense fighting. The Panthers did not retreat, Luttwitz was determined to bludgeon his way through the town. In spite of the anti-tank guns and bazookas arrayed before the Panther battalion, they reached the other side of St. Bathelemy two intense hours later. Advancing out into clear terrain, it was not long before a flight of approximately 20 Typhoon fighter-bombers spied the concentration of German armour and pounced, sending them back into the relative safety of the village. American counterattacks were vicious and strong, and by 9 August, 2. Panzerdivision found itself back at its start positions.
With the failure of Operation Luttich, it became quite clear to most German forces in Normandy that the best plan of action was to retreat to the east, away from the encircling American, British and Canadian armies. In fact, by the second week of August, the Allies were working to encircle the German 7th Army in and around Falaise, birthplace of William the Conqueror. Many rear echelon units of the panzer divisions were already streaming east with whatever they could carry.
In fact, many vehicles of all types, including armoured fighting vehicles were being abandoned on the roadways. The risk was simply too great that a moving German vehicle would be attacked by the Allied air forces.
The 2. Panzerdivision was no different in this regard and after being forced back past Mortain, the division did an about face and attempted to breakout from Falaise and then to the Seine River where a new defence could be mounted. From 14 August on, elements of the 2. Panzerdivision would try to get to the small village of St. Lambert where the last remaining bridge over the Dives River still stood. The Dives was small as far as rivers go, but a bridge would enable some of the armoured vehicles to cross expediently without fear of bogging in the thick mud. The bottleneck at the bridge would be a site of horrible carnage that many soldiers on both sides would soon wish to forget.
By 21 August, the 2. Panzerdivision had in fact escaped from the Falaise pocket with little more than an infantry battalion left. It didn’t have a single surviving tank.
After Falaise, the division was once again went through a period of refitting and rest and would see action during the Wacht Am Rhein (Watch on the Rhein) offensive in December of 1944 where it suffered heavy losses. Near the end of World War II, the 2. Panzerdivision fought in the Mosel region and later in Fulda as part of the Thuringen Panzer Brigade before finally surrendering to American forces in May 1945.
Order of Battle – 2. Panzerdivision
Commanding Officer Heinrich von Luttwitz
2. Panzergrenadier Regiment
Panzergrenadier Bataillon I
Panzergrenadier Bataillon II
304. Panzergrenadier Regiment
Panzergrenadier Bataillon I
Panzergrenadier Bataillon II
3. Panzer Regiment
Panzer Abteilung I
Panzer Abteilung II
74. Artillerie Regiment
Panzer Artillerie Abteilung I
Panzer Artillerie Abteilung II
Panzer Artillerie Abteilung III
2. Panzer Aufklarungs Abteilung
273. Heeres Flak Abteilung
38. Panzerjager Abteilung
38. Panzer Pionier Bataillon
38. Panzer Nachrichten Abteilung
38. Divisional Support Units
9. Panzerdivision
The 9. Panzerdivision was another veteran division of various theatres before the Normandy Invasion. The 9. Panzerdivision saw action in the Western Campaign, notably in Belgium in 1940, the Balkans in 1941 for a brief period of time.
They then spent 1941 through early 1944 on the Eastern Front in various engagements including Kursk and the River Dnieper where it suffered heavy losses. Finally, the 9. Panzerdivision was transferred to northern France for rest and refitting in April of 1944 where it absorbed the 155. Panzer Reserve Division to get back to full strength.
The division would not be ready for action during the Cobra breakout by American Armored divisions, but it would be used to try and halt the advance shortly before the general collapse and attempts to escape through Falaise. Without its Panther battalion, the 9. Panzerdivision was set to oppose the advance of the Allied XV Corps composed of the U.S. 5th Armored Division and the French 2nd Armored Division. Unfortunately, the 9. Panzerdivision barely slowed the American offensive due to it being committed in bits and pieces as units arrived at their start points, as opposed to in one cohesive counterattack. With their backs against the Alecon supply dumps, there was little to fall back to. In fact, after a series of intense tank battles from 10 to 12 August, the supply dump itself was little more than an empty inferno. The division itself found itself surrounded and unable to fight, having lost approximately 100 panzers. Escaping through Falaise, it again had to rebuild and would later see action at Aachen and in the Ardennes campaign before it finally surrendered to the Allies in the Ruhr pocket.
Order of Battle – 9. Panzerdivision
-Commanding Officer Oberst Max Sperling
33. Panzer Regiment
Panzer Bataillon I
10. Panzergrenadier Regiment
Panzergrenadier Bataillon I (half-track)
Panzergrenadier Bataillon II (motorized)
11. Panzergrenadier Regiment
Panzergrenadier Bataillon I (motorized)
Panzergrenadier Bataillon II (motorized)
50. Panzerjager Abteillung
9. Panzer Aufklarungs Abteilung
76. Panzer Artillerie Regiment
86. Panzer Pionier Bataillon
287. Heeres Flak Abteilung
116. Panzerdivision – Greyhound Division
The 116. Panzerdivision, the “Greyhound Division”, was formed in March of 1944 in France. It was comprised of the 16. Panzergrenadierdivision and the 179. Panzer Reserve Division and was sent to Pas de Calais, north of the Seine River, in preparation for the Allied invasion.
Initially assigned to Generalfeldmarschal Erwin Rommel’s Armee Group “B”, it had the ability to respond without Hitler’s authorization when the invasion occurred, unlike many of the other panzer divisions in the region. It was considered veteran due to the 16. Panzergrenadierdivision’s experience on the Soviet front and was rated as “Kampfwert I”, indicating it was ready for any and all duties.
The Greyhounds did not join the battle for Normandy until late in July. They were still conducting training exercises and were held in reserve should a British breakthrough at Caen occur. When the Americans captured St. Lo they were called up and sent into action on 28 July in the Vire River area. Heinz Guther Guderian, the 116. Panzerdivision Operations Officer and son of the famous tank commander, would later write that “fate did not smile on the 116. Panzerdivision” when describing the action of 29 July. A panzer battalion commander was immediately killed on their advance towards the American lines, halting the panzer columns and sending the supporting panzergrenadiers into hiding in the surrounding woods. Allied fighter-bombers pinned them down and force them to hold position, as breaking cover would invite further attacks. By 30 July, they saw heavy fighting against VII Corps, preventing the US 2nd Armored Division from advancing past Villebaudon and Percy. However, the combination of the Jabos (jagerbomber, American fighter bombers) and stiff resistance on the ground stopped the 116. Panzerdivision from getting further than they did the day before. The Greyhound division changed to a defensive role along the Vire River to hold the key road junction at Pontfarcy until 3 August. Their counterattacks were all but ignored by the surging US 2nd Armored Division. The 116. Panzerdivision, which up until that point had seen little but defeat, got its chance on 7 August as part of the 3 pronged attack of Operation Luttich. Initially successful due to heavy ground fog, the 116. Panzerdivision found itself being sent back to its jump off position within two days. When ordered to remount the attack, aristocratic commanding officer Generaleutnant Graf von Schwerin refused to send his men and tanks into battle, well aware of the danger to the German army as the Allies began to encircle their positions. Corps commander Freiherr von Funck who accepted no excuses, even ones that made sense, sacked Von Schwerin.
Rumour has it that Von Schwerin then circulated a note to his troops telling them privately that they should head east at the earliest opportunity and attempt to escape from the pocket that was forming around Falaise.
Heading east fitted into high command’s plans. There was an attempt to have Panzer Group Eberbach, then comprised of parts of 1. SS-Panzer, 2. Panzer and 116. Panzer divisions, to stop Patton’s drive on Avranches. The plans for the attack were changed to a drive north in an attempt to stop the spearhead of US 5th Armored and French 2nd Armored divisions, hopefully destroying both. The attack was held until 14 August in Argentan when cooler heads prevailed. Perhaps it was the fact that the three panzer divisions could muster only 70 tanks between them convinced the German generals that it was time to head east out of the Falaise area.
Generalfeldmarschall Guenther Hans von Kluge, Army Group B commander asked for permission to withdraw on 16 August, got no response from OKW, so he then ordered a fighting withdraw of all units at 2pm on that same day. Hitler finally responded two hours later with the same idea, but added that 2. SS-Panzer and 116. Panzer divisions should strike forward in an attempt to widen the German exit for more German troops to escape in the hopeful confusion. The attempt was somewhat successful with the US 90th Infantry Division’s roadblocks at Le Bourg-St. Leonard being the primary target. The American riflemen controlled a ridge that had views of several of the escape routes just to the north of their position. The 90th was pushed off, but counterattacked and reclaimed the ridge that evening.
The next 24 hours saw intense fighting for control of the area, culminating in the US troops taking it permanently. After that attack, the men of the 116. Panzerdivision joined the general chaos of the attempts to escape the Falaise pocket.
By 21 August, the Greyhound division only had 12 functioning tanks when they reached the north bank of the Seine River, where they had begun less than a month earlier. In September 1944 the 116. Panzerdivision as the only unit garrisoning Aachen when the attack by US 3rd Armored Division began. Having little time to rest, the 116. Panzerdivision also saw action in Dusseldorf and most famously in the Battle of Hurtgen Forest in November. December saw them attacking near St. Vith as part of the Ardennes offensive and in February 1945 they defended the Roer River against First Canadian Army and British XXX Corps. They saw another month of aggressive defensive combat against the Allies and surrender when hostilities in the Ruhr pocket ceased in April 1945.
Order of Battle – 116. Panzerdivision
-Commanding Officer – Generaleutnant Graf von Schwerin
60. Panzergrenadier Regiment
Panzergrenadier Bataillon I
Panzergrenadier Bataillon II
156. Panzergrenadier Regiment
Panzergrenadier Bataillon I
Panzergrenadier Bataillon II
16. Panzer Regiment
Panzer Abteilung I
Panzer Abteilung II
146. Panzer Artillerie Regiment
Panzer Artillerie Regiment I
Panzer Artillerie Regiment II
Panzer Artillerie Regiment III
116. Panzer Aufklarungs Abteilung
281. Heeres Flak Artillerie Abteilung
228. Panzerjager Abteilung
675. Panzer Pionier Bataillon
228. Panzer Nachrichten Abteilung
By the end of the Normandy Campaign, the Wehrmacht’s panzer forces in the west had lost nearly all of their armoured units. Between the devastation of such places as Roncey, Falaise, the Seine River, as well as the Allied superiority in both the air as well as artillery, the Panzerwaffe suffered an insurmountable daily toll in the cost of both vehicles and men. The Germans were facing a materialschlact, a battle of attrition that cost the panzer divisions too much compared to their opponents. The Allies could afford to lose tanks as the massive material build up at the coast quickly replaced them, whereas the Germans felt every tank they lost and rarely received replacements. Instead vehicles were abandon in many cases when they could have been repaired if recovered. “The truth was that the Panzerwaffe, designed by its architects as a weapon of mobile strategic offence, was being steadily battered to pieces while performing a static tactical defence. Such counterattacks as it was able to make… were quickly halted and smashed up.” (Perrett, pg. 209). The cost would be astounding in both men and material.
By the time the Falaise Gap was closed, several divisions, including Panzer Lehr, 2. Panzer, and the 10. SS-Panzer divisions had no tanks at all and the five remaining divisions (9., 116., 21., 12. SS, 2. SS) had only about 60 tanks between them.” (Zaloga, pg. 89)

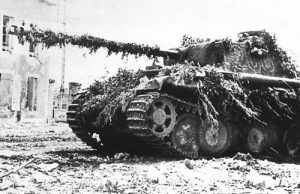
 Cromwell Tanks

 One of the biggest additions to the British WWIII book (in my own humble opinion), is the inclusion of the FV510 Warrior. A massive improvement over the FV432 in a whole whack of ways. With the addition of the Warrior the British army now have the personnel carriers to support their infantry
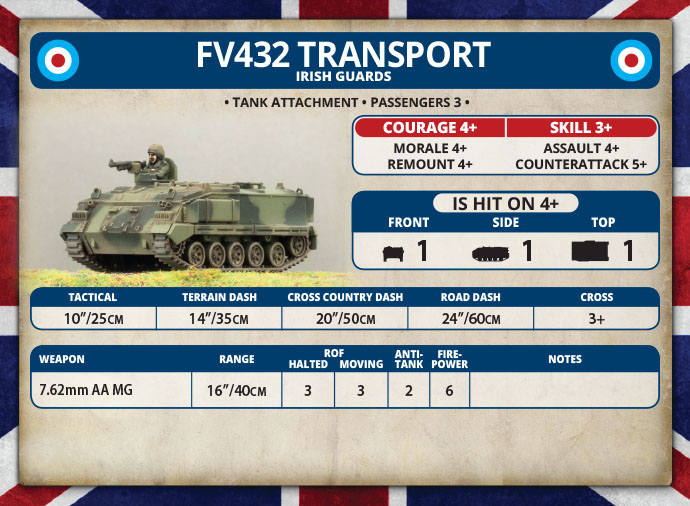 My go-to force for WWIII ever since the Brits were released; the British Mechanised Infantry force were rock-solid in defence, able to bring a number of Milan Missiles to bear against their opponent, backed up by the effective Carl Gustav recoilless launchers should any Warsaw Pact medium tanks get foolish enough to assault the dug-in positions. But what of the actual 432s themselves? Well, I will be perfectly honest here, my 432s almost never saw the table; the risk of the paper-thin armour, lack of armament (not even having the ability to mount a Milan), led to them being used as quick-dash taxis if needed. I would mount up, dash them as quickly and safely as I could, before dumping the infantry off next turn and getting the 432s as far away (usually off the table) as I could to prevent them being easy targets for enemy APCs/AFVs.
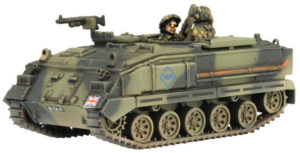 Strengths: Larger units (by comparison), for less points, plenty of Milan support
 BMP-2, Marder, AMX-10P; Now the Warrior joins the ranks of decently armed IFVs. The effective 30mm Rarden gun gives the Warrior a fantastic amount of offensive power, combined with the anti- helicopter ability to keep pesky Hinds at bay.
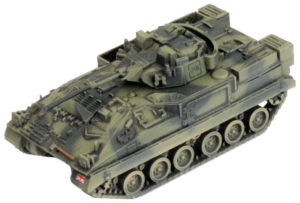 That’s the armament, but how is the armour? The regular Warrior is 5/3/1; a cut above the other IFVs in the bracket, and will remain one of the better armoured IFVs until the Yankees get the Bradley, and the Soviets get the BMP-3. But wait, ‘regular’? What do you mean ‘regular’? Well, the Warrior did come with an applique armour package, placing spaced armour round the sides. What is this going to do for the Warrior?
 Strengths: 30mm Gun with anti-helicopter makes it a threat to most enemy forces, armour is effective against small arms, and infantry-carried anti-tank weapons
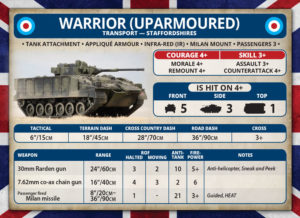 Okay, so maybe I haven’t done a complete comparison of the two forces, but I have slipped in some of the newer kit in the book to give them a run-out. As you can see the main formation for the Warrior Company is a lot smaller than the FV432 Formation (and I didn’t even give them the Uparmoured option!). Only two platoons of infantry, the mortars and MCTs are gone, as well as the anchors that were the Chieftains.
 My current British army is based around a Chieftain squadron with a full 14 uparmoured Stillbrew Chieftains, some Swingfire missiles, a couple of Scorpions, a platoon of infantry and a little support. It’s a good little force, and I’m quite happy with its performance. However, my Chieftains have been usurped as the biggest tanks on the battlefield! The Challenger is even bigger!
 I do think I’ll manage to resist the last two new plastic kits, the Fox armoured car and the MLRS rocket launcher. I’m tempted to get them to make into objectives, but they don’t really fit in the theme of my force. I already have a pair of Scorpions for reconnaissance, so the Fox, although cute, isn’t really needed, despite being a touch cheaper for four. The MLRS is pretty awesome for shutting down infantry with its big Salvo template and each launcher counting as two weapons, but I prefer to focus a little more, so my tanks don’t actually have any artillery support — although thinking about it, two MLRS for the price of another Chieftain might actually be a good idea…
 The pressure on the German forces was enormous, and they were slowly being forced back through the Normandy bocage, until they finally broke with the Allied Breakout in Operation Cobra in late July. Finally with the German forces retreating towards the Falaise Gap (from Sept to Aug) to try to withdraw safely into Germany, both the 9th Panzer Divison and the 116th Panzer Division played roles in trying to slow down the Allies and allow the other German forces to retreat.
 9. Panzer
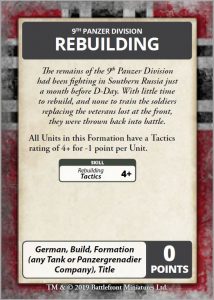 In the D-Day German Command Card pack, you can take a Formation that represents this division. To represent their lack of time to rebuild and give the new recruits sufficient training, they have the Rebuilding rule, which gives them a reduced Skill value of 4+ on any Tactics roll. So all units in your Tank or Panzergrenadier Company Formation must take this, for -1 point per unit.
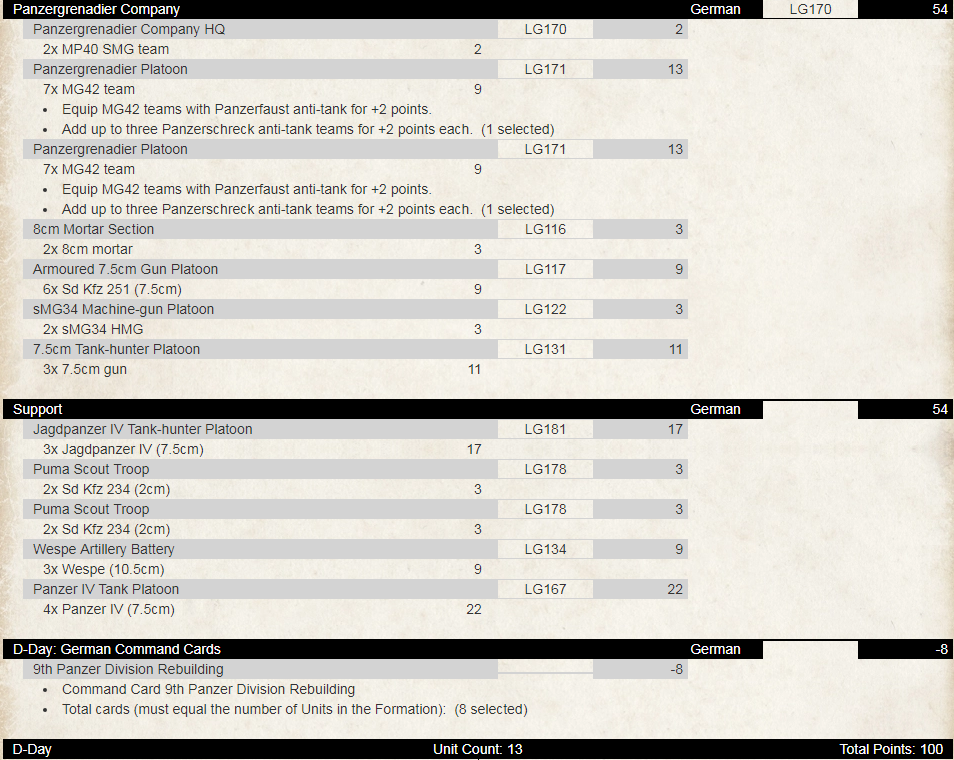
 The D-Day: German Command Card that represents the 116th Windhund
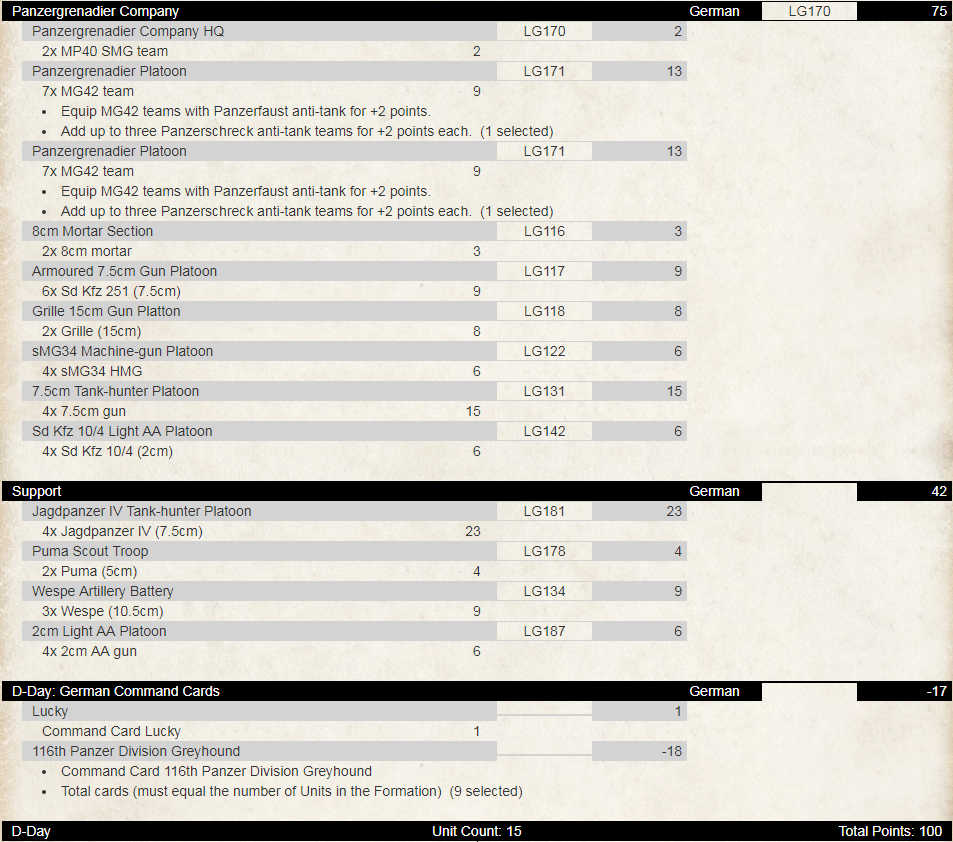
 I think this would be a fun list to play, just make sure you move your HQ
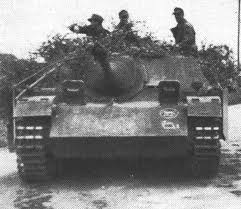
 With others in the club discussing Panthers and Tiger lists and their merits, I found the Stug Assault Gun Company calling out to me. So working on a 100 point limit I drafted up my first list.
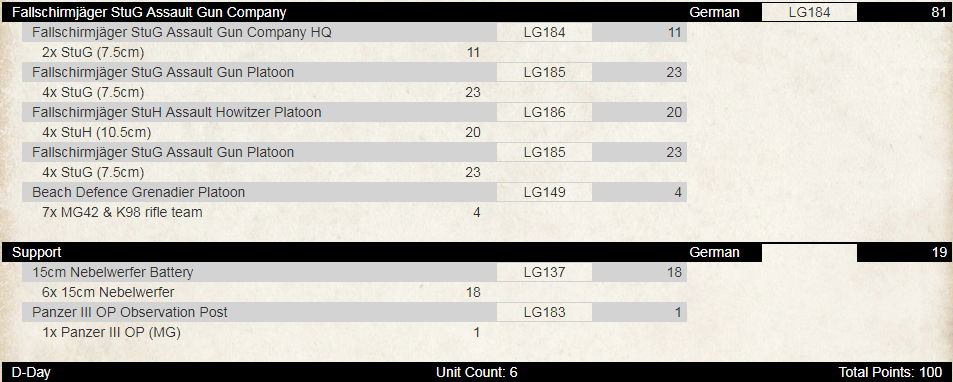
 The StuHs also have some other great benefits on the table: Artillery for when they have no direct fire options and with Anti-Tank 3 they have a good chance of taking out enemy tanks or at least a bail. Adding in Brutal, HEAT and Smoke these are going to form the solid core of my force.
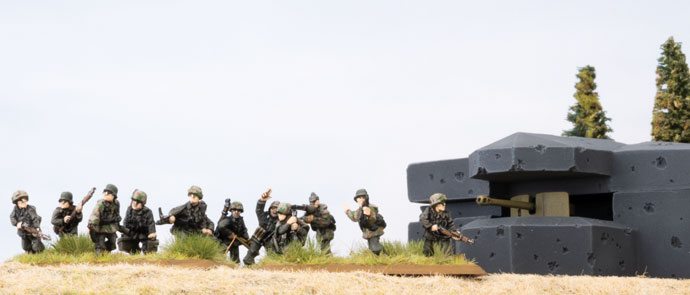 To round out the list I dropped in 6 Nebelwerfers as I want to try out the salvo template and have another smoke option on the table. So to ensure that both the StuHs and Nebs can fire have added in a Panzer III OP.
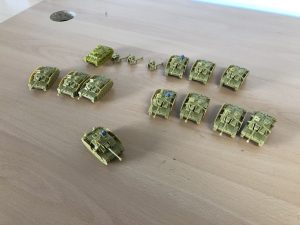

 With the release of D-Day: German, which details the forces available to the Wehrmacht in Normandy 1944, the two Big Cats on the table are Tiger and the Panther. Now it may seem at first glance that the Tiger at 12 points a model, with the same FA (9) as the Panther and a better side armour is a no-brainer. the Panther has the same gun, is slightly faster and normally 1 point cheaper. When you start taking a few of them, the extra points add up and can allow you a few extra goodies. I don’t know about you, but I find in German lists I am always scraping for extra points, and the points you can save by taking Panthers instead of Tigers can buy you some extra Recce units, an interesting Command Card, or an upgrade for a infantry platoon.
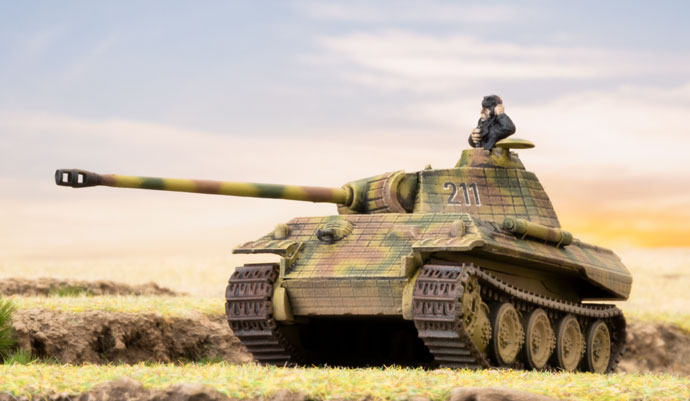 Also it comes down to what you are using them for. Tigers are more of an assault tank, going forwards, taking the hits and assaulting a strong-point or objective. Panthers are better used at range, to reduce the risk of them being flanked, and using the excellent 40” range of their guns to knock out enemy armour at a distance. You should really only get close up with your Panthers when you are very sure there is little risk of being flanked, as the low side armour of
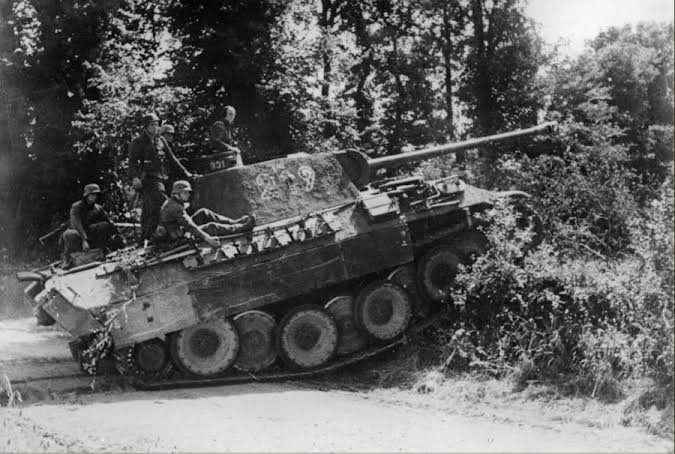
 Fielding Panthers as a full Formation in a standard 100 point list will be very expensive, at a minimum 77 points for 7 Tanks, only leaving you 23 points for some support troops. It is not impossible to use and will do very well vs Allied armour lists, but it may struggle to defend two objectives and can easily be swamped by a more numerous opponent.Your best bet would be to try to break the enemy formation, and use your range, and movement orders to pick out enemy units and destroy them one by one.
 The Normandy Campaign is well known for many battles and engagements in which the Wehrmacht was on both ends of the offensive onslaught that would mark the battle for northern France and the eventual breakout in late August. The early morning hours of 6 June 1944 would find the Germans mounting a determined resistance that would soon be forced back on it’s heels by the overwhelming material superiority that the Allied armies brought to bear.
 2. Panzerdivision
 Commanded by aristocratic Heinrich von Luttwitz, it was stationed at Amiens for refitting from January of 1944 as part of 15. Armee. On the eve of the invasion, the 2. Panzerdivision was several hundred men over strength and reported 94 operational Panzer IVs and 73 Panthers; a very strong division. In preparation for the invasion, the 2. Panzerdivision was put under direct command of Generalfeldmarschall Erwin Rommel. Only four divisions (2., 21., 116. and 130. Panzer Lehr Panzer divisions) were given to Rommel who suggested that the key to counterattacking the invasion, no matter where it came, was to have Panzer divisions rolling onto the Allied positions before they could establish a strong beachhead.
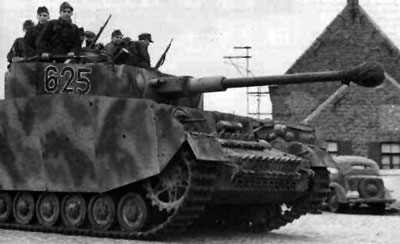 Panzerjägerabteilung attached to the 2. Panzerdivision, described it as “a hurricane of fire” which “raged through the countryside, wrapping everything in grey smoke and dirt.” (Hargreaves, pg.81)
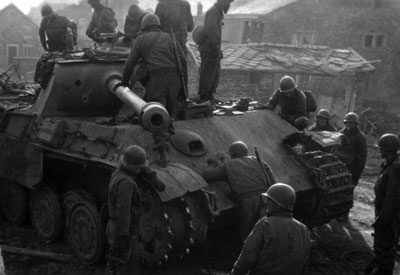 The Normandy campaign gave the Panzerwaffe little time to rest between engagements, between the constant press of the enemy and Hitler’s frantic attempts to stem the tide. Perhaps most famous of his costly counterattacks was Operation Luttich, or “Liege”, named for a battle in World War I. The operation was to feature a three pronged assault to open a ten mile wide thrust behind the American armoured spearhead during Cobra, effectively isolating the attacking elements from their supply depots, as well as aiming to have the German lines reach the sea at Avranches. The divisions involved were to be the 2. and 116. Panzer divisions, the 1. and 2. SS-Panzer divisions as well as the 17. SS-Panzergrenadierdivision on the southernmost flank of the attack.
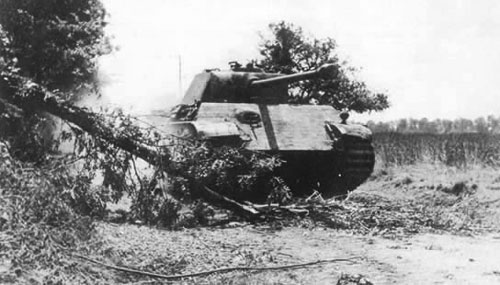
 Escaping through Falaise, it again had to rebuild and would later see action at Aachen and in the Ardennes campaign before it finally surrendered to the Allies in the Ruhr pocket.
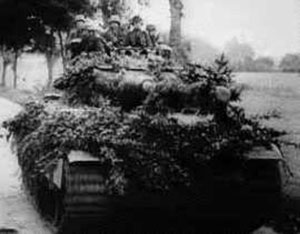 The Greyhound division changed to a defensive role along the Vire River to hold the key road junction at Pontfarcy until 3 August. Their counterattacks were all but ignored by the surging US 2nd Armored Division. The 116. Panzerdivision, which up until that point had seen little but defeat, got its chance on 7 August as part of the 3 pronged attack of Operation Luttich. Initially successful due to heavy ground fog, the 116. Panzerdivision found itself being sent back to its jump off position within two days. When ordered to remount the attack, aristocratic commanding officer Generaleutnant Graf von Schwerin refused to send his men and tanks into battle, well aware of the danger to the German army as the Allies began to encircle their positions. Corps commander Freiherr von Funck who accepted no excuses, even ones that made sense, sacked Von Schwerin.
 By the end of the Normandy Campaign, the Wehrmacht’s panzer forces in the west had lost nearly all of their armoured units. Between the devastation of such places as Roncey, Falaise, the Seine River, as well as the Allied superiority in both the air as well as artillery, the Panzerwaffe suffered an insurmountable daily toll in the cost of both vehicles and men. The Germans were facing a materialschlact, a battle of attrition that cost the panzer divisions too much compared to their opponents. The Allies could afford to lose tanks as the massive material build up at the coast quickly replaced them, whereas the Germans felt every tank they lost and rarely received replacements. Instead vehicles were abandon in many cases when they could have been repaired if recovered. “The truth was that the Panzerwaffe, designed by its architects as a weapon of mobile strategic offence, was being steadily battered to pieces while performing a static tactical defence. Such counterattacks as it was able to make… were quickly halted and smashed up.” (Perrett, pg. 209). The cost would be astounding in both men and material.