Panzerjäger I Unit Card

with Mark Nisbet

Germans are not my first army, being on the receiving end of their effective weapons, especially the fearsome Marder, I have a profound respect (and mild fear) of their tank hunters. The Panzerjäger I is one of the few tank-hunters that I can happily roll my Churchills, Shermans, and even Grants forwards with minimal worry. However, put up against the more evenly matched Stuarts, and Crusaders and the Panzerjäger I suddenly becomes a weapon to be reckoned with.

Even with the dated, and ramshackle look of the vehicle, it was very popular amongst German players, which is why today we’re doing another ‘Unofficial’ card for players to field them in your Afrika Korps force.

Brief History
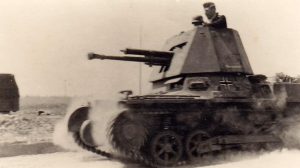
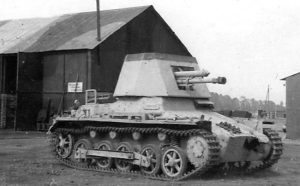
Even at the start of the war, the Wehrmacht recognised that the Panzer I was obsolete, even for a scouting role. With this in mind, they devised a project to take the chassis of these light tanks and mount usually static anti-tank guns, giving the weapons greater versatility, and to keep up with the Blitzkrieg. With the capitulation of Czechoslovakia in 1938, the Germans found themselves with a surplus of light to medium anti-tank guns of Czech origin. The Škoda 4.7cm, was chosen for this task due to its reliability and lightweight frame.

The gun was originally mounted in place of the turret in its original form; gun shield, with wheels and trail removed. This was soon improved upon with a fighting compartment comprised of sheet metal, a marked improvement over the original design.

The vehicle originally served in France, before twenty-seven of them were equipped to the Afrika Korps in 1941. During Operation Crusader almost half of these vehicles were lost, with only four replacements arriving for the Battle of Gazala, and a further three later in 1942. By the time of the Second Battle of El Alamein, the Anti-Tank Battalion (605) only had eleven working vehicles.

The Panzerjäger I saw more action on the Eastern Front, during Operation Barbarossa, but that’s for another time.

Making a Unit Card
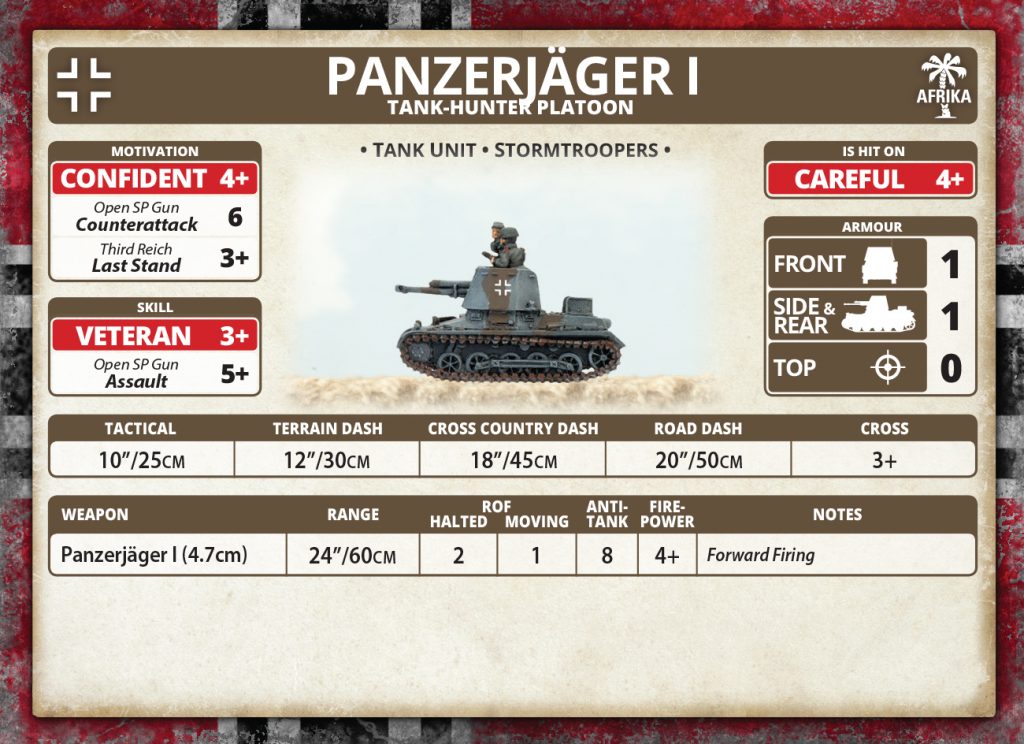
To stat up the Panzerjäger I, it’s natural to look to its successor; the Marder (7.62cm). Much like the successor, the Panzerjäger I had very little armour; only the thin steel fighting compartment, and the thin Panzer I armour, combine this with the open-topped nature of the vehicle, and it results in a 1-1-0 armour rating.

In terms of rating, these Tank-hunters were crewed by the same Veterans of France, and so retain the 3+ Skill rating, and with similarities to the Marder, the Motivation remains unchanged.

The armament of the Panzerjäger I is where the biggest difference lies. The 4.7cm (t) [For Tscheschisch, or Czech], was a larger round than the 2pdr, or American 37mm, with slightly higher armour penetration, but with a similar amount of firepower once the target was hit. This gives the gun an Anti-tank rating of 8, with a good Firepower of 4+.

Finally, the movement of the Panzerjäger has an identical mobility line to the Marder, given the lighter frame, chassis, and gun; but with a less powerful engine under the hood.

In terms of points, the Panzerjäger I is a tank-hunter for players on a points budget. With the loss of effective armour, and a major drop in penetrating power, it’s no surprise that the tank comes in at half the points of the bigger Marder.

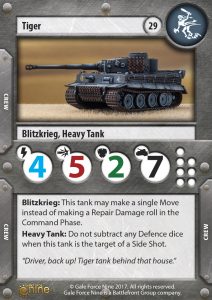
 With the ability to field the Panzerjäger in the place of the Tiger, Marder, and even the Diana, this light tank-hunter will be a must-have for supporting the usually expensive German Companies, who don’t feel the need to have anything as powerful as a Tiger or Marder in their battle line.

Though it may be older, and ramshackle, the Panzerjäger I remains a favourite for German players, and will continue putting the fear into Crusaders, Stuarts and pesky US armored rifle platoons.

New Mid War Unit Cards

Over the course of Version 4, the Flames of War community has been very enthusiastic about particular units that did not make the cut for the new books. Units with significant fan clubs have found their fans sending us unit cards to allow those units to be fielded in your V4 forces.

During the launch, and in the future, we will share some of these cards with you. The launch day cards will be available on the Flames of War Website next week for download here…

These cards are neither ‘official’ nor ‘unofficial’, but have been researched and tested, so it’s up to you, your opponent, or your TO as to whether or not you can field them.

We know you’ll enjoy seeing some of these old friends on the battlefield again.

Grey Panzers Follow-Up

with Victor Pesch

As part of the last Live Launch for Iron Cross and Enemy At The Gates, I started some grey Panzers. Here’s the previous article…

I’ve since finished them off and am happy with how they turned out. The colour is a bit light and fantastical compared to standard Panzer Grey, but it stands out on the table and it was a fun experiment pushing contrast to the extremes.

Tomorrow I’ll be seeing how they perform in a TANKS! battle with Andrew, so I decided to make some custom cards.


Human Waves to Storm Groups (Part 2)

with Alexander Nebesky

Following on from Chris’ handy article during the Enemy at the Gates launch (which you can find here), we’ve put together an addendum article to help with the new Soviet infantry units from Red Banner. Red Banner brings with it three new Soviet infantry battalions for players to field, bringing the number of mid-war Soviet infantry formations up to five. This addendum to ‘Human Waves to Storm Groups. What to Buy’ will cover what box or blister you’ll need to put together the infantry formations in Red Banner.

SBX50 contains 18x DP MG & M1891 rifle teams, 4x Command teams, 2x Komissar teams, 2x PTRD teams, 2x 50mm Mortar teams, 5x Maksim HMG teams, 2x Flame-thrower teams, 16x Unit Cards—all the things you need to put together the following units:

Motor Rifle Company
The Motor Rifle Company is much like the ubiquitous Rifle Company apart from the fact that a motorised battalion had no horses and anything not carried by the soldiers themselves was moved by trucks. On the table the Motor Rifle Company has a higher skill rating than the Rifle Company, but carries a more streamlined selection of weapons.

Hero Motor Rifle Company
Hero Motor Rifle Companies are made up of those men who survived long combat long enough to learn the hard lessons of war. As such, the Hero Motor Rifle Companies were afforded more machine-guns than their greener compatriots to match their comparatively higher level of tactical skill.

Reconnaissance Platoon
Reconnaissance Platoons were employed by the Soviets to advance until they crashed headlong into the enemy. At that point, they would overcome and destroy the enemy and allow the advancing columns behind them to continue uninterrupted. Reconnaissance Platoons use rifles and machine-guns, with the option of a flamethrower for urban combat.

SBX51 contains 21x PPSh SMG teams, 2x Command teams, 2x Flamethrower teams, and 8X unit cards. SBX51 is used to make the following units from Red Banner:

Hero SMG Company
The Hero SMG Company, like the Hero Motor Rifle Company, has seen enough action to be whittled down to a battle-hardened core. Armed with the impressive PPSh SMG, the Hero SMG Company is called on for fearsome hand-to-hand combat.

Armoured Reconnaissance Platoon
Mounted in lend-lease armoured cars or half-tracks, the Armoured Reconnaissance Platoon is the main assault element of a Soviet Reconnaissance Company. The Armoured Reconnaissance Platoon is Tasked with closing the ground and assaulting the enemy ahead of the main Soviet forces.

These options make up all the new infantry additions from Red Banner, and hopefully this additional piece will help make choosing your infantry purchases straightforward and simple.

Victor’s ‘Das Reich’ T-34s

with Victor Pesch

Shortly after I joined the Battlefront team back in 2009, fellow Graphic Designer Casey was finishing off his Das Reich T-34s. I thought they were really interesting and I put it on a mental list of armies I would like to build one day. With the release of Ghost Panzers, and the command cards, now is the time.

As with most of my projects, the first step is research. Between quizzing colleagues, scanning books, and of course, Google, I collected all the images and info I could to see what conversions I’d need to do. J.C Von Winterbach’s article was also a good source…

I’m lucky to have access to spare sprues, but lots of the conversions can be done with spare parts you may already have if you’ve built other German tanks. For example, the Panzer III kit comes with both open and closed cupolas, so you’ll have spares of those. You may have also built some Panzer IIIs without the turret stowage bin, or Panthers without the side skirts, so you’ll have those to use for captured T-34s.

Next I made my V4 Flames Of War list using Ghost Panzers and the command cards.

Captured T-34 Company:

-2pts Captured T-34 Company Card
13pts Mixed Panzer Company HQ, 1x Panzer IV (late 7.5cm):
30pts Captured T-34 Platoon, 3x T-34 (76mm)
29pts Tiger Heavy Tank Platoon, 1x Tiger (8.8cm)

Total: 100 points

With the list planned out, I started gathering bits for the T-34s. Here’s a list of all the items I used.
– 6x Plastic T-34s
– 2x T-34 early turrets
– Plastic Panzer IIIs (turret stowage bins, cupolas, aerials, Notek lights)
– Panther side skirts
– Various bits of old metal stowage
– Plasticard
– Tin foil

Stowage Bins
From looking at photos it seemed quite common for the Germans to add extra stowage bins in various places on the T-34s.
The rear turret stowage bins from the Panzer IIIs fits quite easily onto the back of the T-34 turrets.
To create the angled bins on the sides, I used a section of Panther side skirt, glued it at an angle, and the filled the side with sculpting putty.
Cupolas
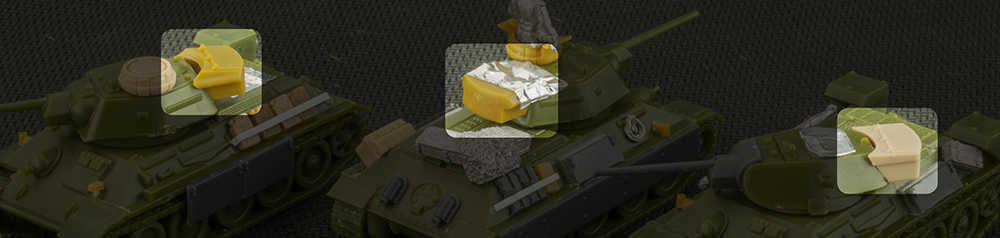
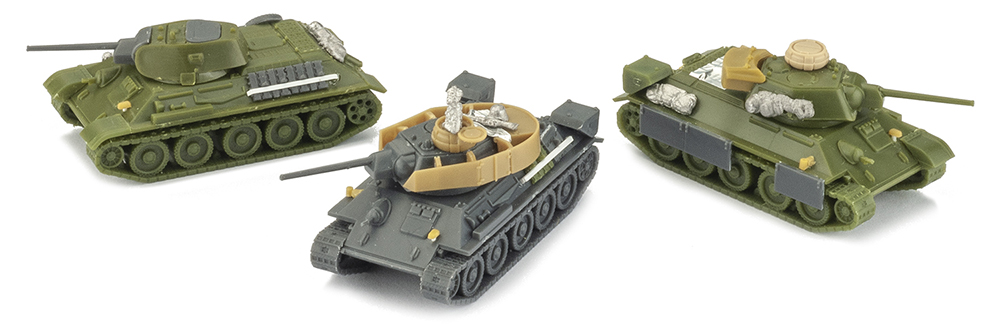
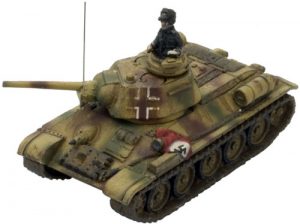
The Germans often upgraded their T-34s with Cupolas from Panzer IIIs. Simply remove the locator pin from the bottom of the cupola and glue in place.
Extra Armour
Less common than some of the other modifications, but too cool to not include, was extra armour around the turret and side skirts.
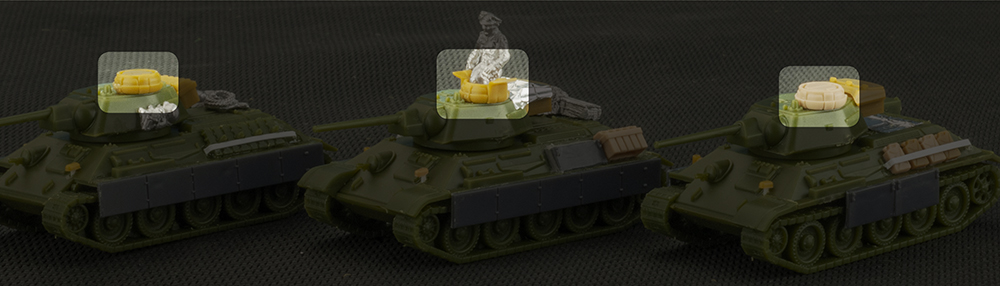
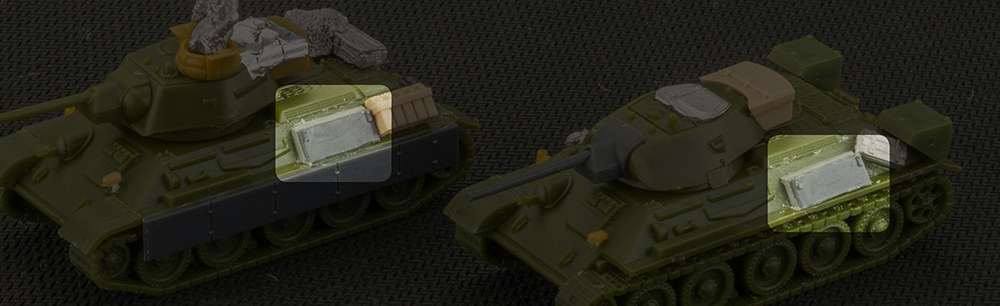
The side skirts from the Panther kit glue nicely to the sides of the T-34 hull. You’ll just need to remove one section to make them the correct length.
For the turret armour I chose to use the late Panzer IV kit, but in the photos it looks to be custom made.
Aerials and Notek Lights
These were carefully sliced off the Panzer III kit and applied to each T-34. For the Notek lights I used some thin plasticard rod to create the stalk.
Spare Tracks and Jerry Cans
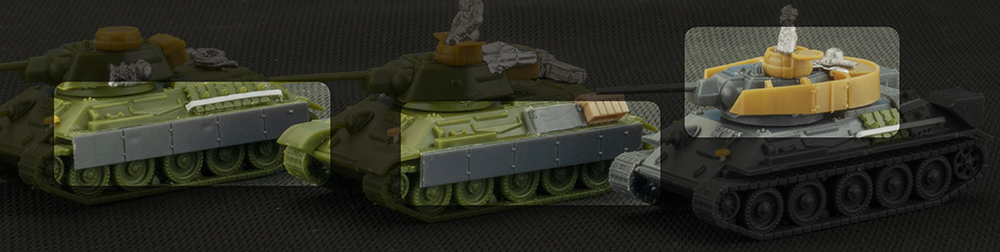
The Panzer III and IV kits come with spare cans which are great for any German AFV. I made holding brackets by cutting plasticard into strips about 1mm wide using a sharp blade and a steel rule. I then cut them down to the appropriate length and bent the ends with tweezers, before glueing them on with plastic glue.
Flags and Stowage
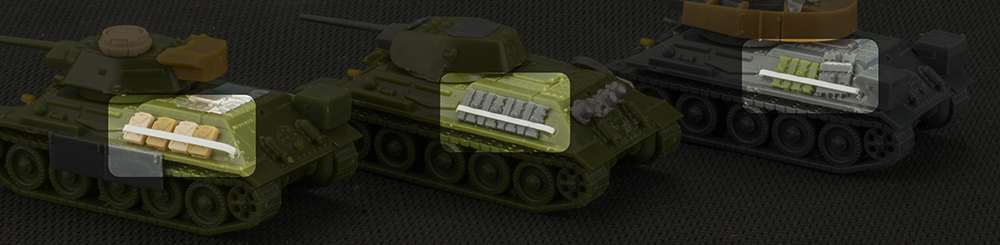
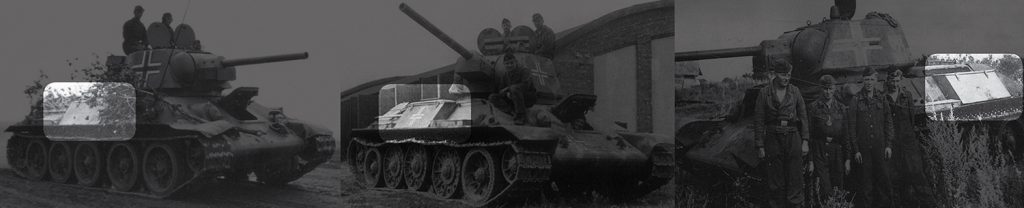
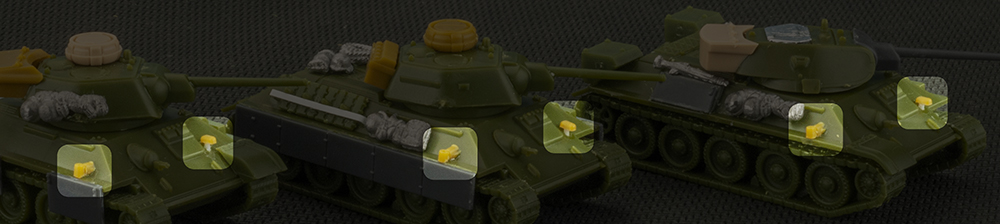
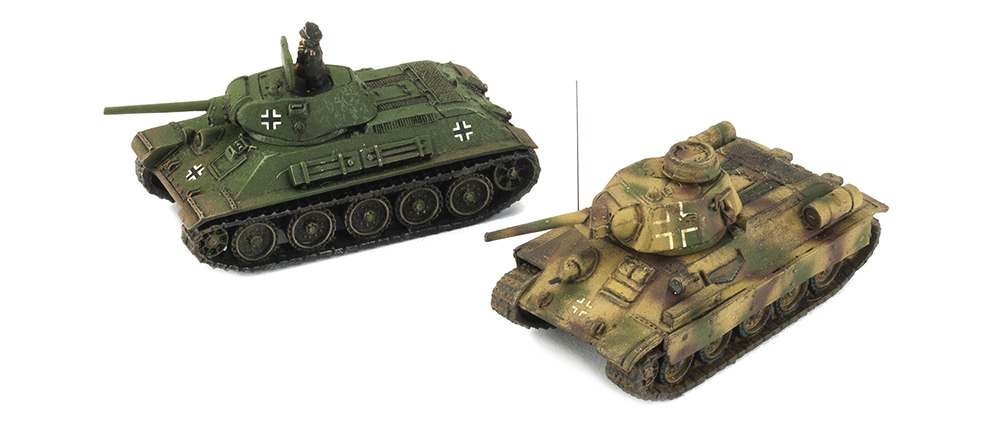
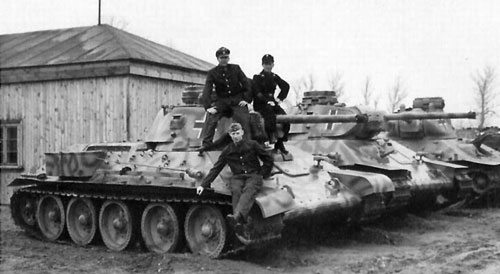
When using captured equipment there’s always the increased risk of friendly fire, especially from aircraft, so crews often used flags for easy identification.
I made my flags by cutting tin foil into rectangles, and then pressing them onto the tanks. I used superglue to fix them. The good thing about using tin foil is that it hold its shape and doesn’t spring back like paper can.
The finishing touch was to add some metal stowage from the special order range to make it look like the Germans had really made these tanks their own, and of course some German tank commanders.
With the core of the force built all that’s missing is my HQ tank and supporting Tiger which I’ll work on later.
Hopefully this has inspired you to work on some captured T-34s of your own. Remember you don’t have to use all of the conversion ideas here. You can get a convincing captured look with just paint and decals. Here’s an example using just German crosses, and also one of Casey’s with 3 colour camo.

Building a Battlefield—Prokhorovka

with Alexander Nebesky

Both Red Banner and Ghost Panzers contain stories of great battles on the Eastern Front. One such battle, famously one of the largest and fiercest tank battles of the Eastern Front, took place outside the small town of Prokhorovka.

Using Battlefield in a Box terrain, you can recreate any number of historic battlefields for your Ghost Panzers and Red Banner armies to fight over. Knowing that I had a Live Launch to orchestrate, which would inevitably require battles needing to be fought, it seemed a fair opportunity to whip out some of the studio Battlefield in a Box terrain and put together my own representation of the Prokhorovka battlefield.

As an aside, it is probably prudent to mention that on a 6 x 4 table it is unlikely that one will be able to represent a full scale battlefield such as the one shown in the image above. As such, I settled on a particular section of the battlefield to represent. This gave me the chance to cover the battlefield in enough detail to make it recognisably Prokhorovka, without trying to condense hundreds of miles into a few feet. 

Perfectly illustrative of combat during the Battle of Kursk, fighting around Prokhorovka, especially in and around the October State Farm, took place place over expanses of Russian steppe punctuated by the occasional village and forest. Hill 252.2, captured by 1st SS Panzer Division Leibstandarte SS Adolf Hitler on July 11 offered a commanding position over the field of battle.

To recreate the battlefield around the October State Farm, I had to focus on some key features. Using Battlefield in a Box 2019 Premium Terrain Sale Rolling Hills, I was able to recreate the two hills on either end of the battlefield.


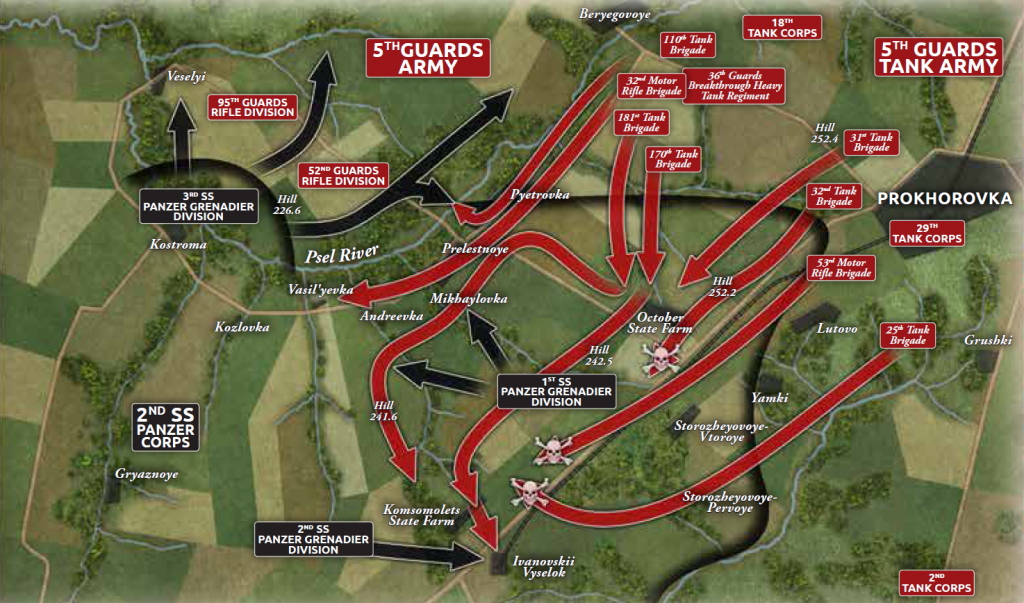
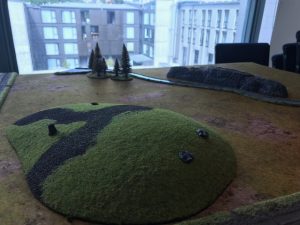
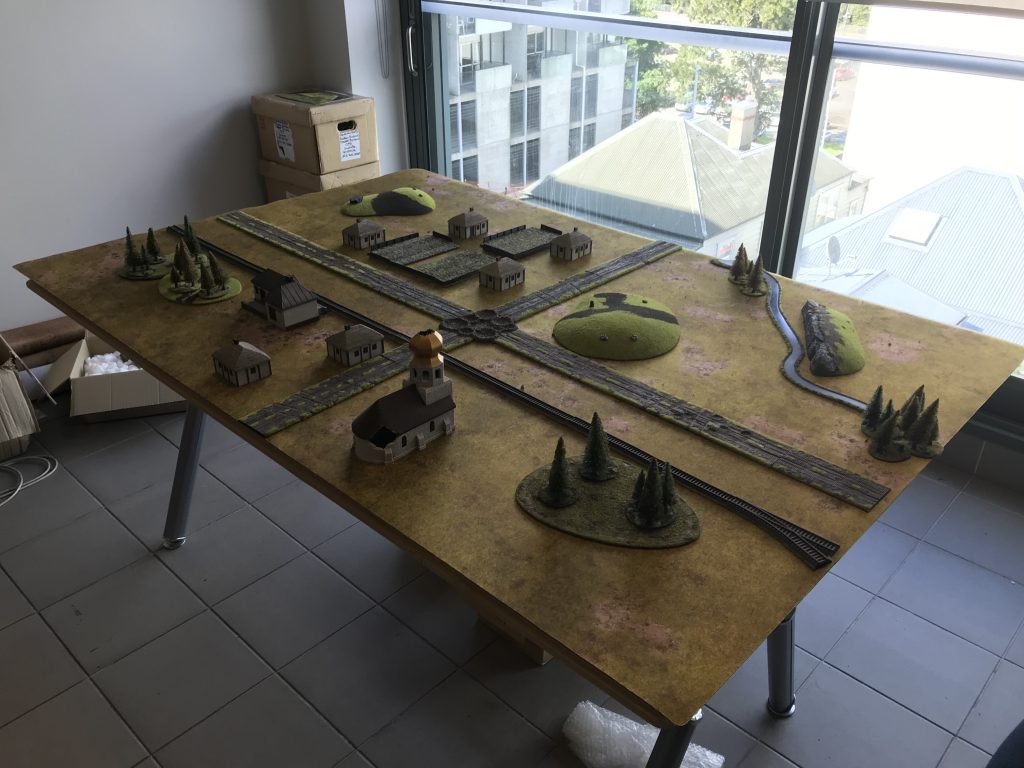
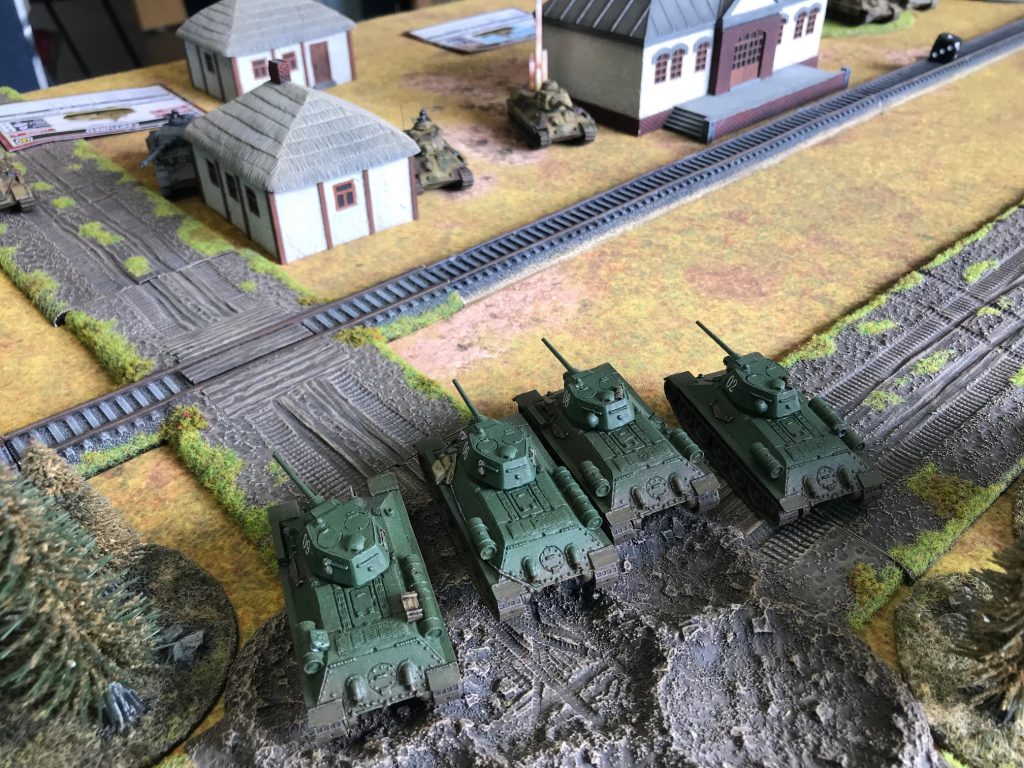
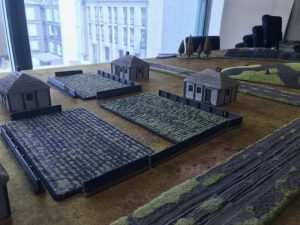
Rural Farm Buildings gave me what I needed to put together both the October State Farm and the small town just outside it.


Rural Roads and Rural Road Expansions, as well as Train Tracks criss cross the board.

Escarpments and Streams sit in one of the corners to represent the rocky streams the Red Army had so much trouble crossing.

Finally, a few woods dotted about provide concealment as well as representing the heavily forested areas outside the farm.

You will have already seen the battlefield in Chris and Casey’s Battle Report, and while it’s potentially a little too sparse for tournament play, the intention was always to evoke something of an ope Eastern Front feel.


Allies at War

with Chris Townley

Facing off with Casey is always a fun game and this was going to be no exception. Usually, we find ourselves on the same side but this time things were different. Facing off a large number of Soviet T-34s against a smaller number of German versions would be a real test to see who could handle them the best – the Soviets that built them, or the Germans that captured them.

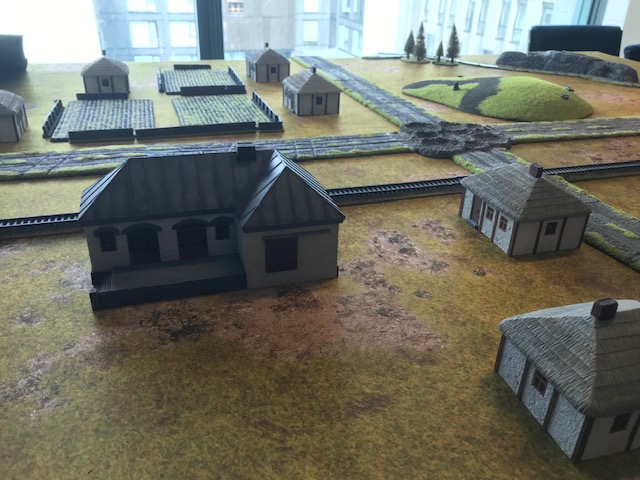
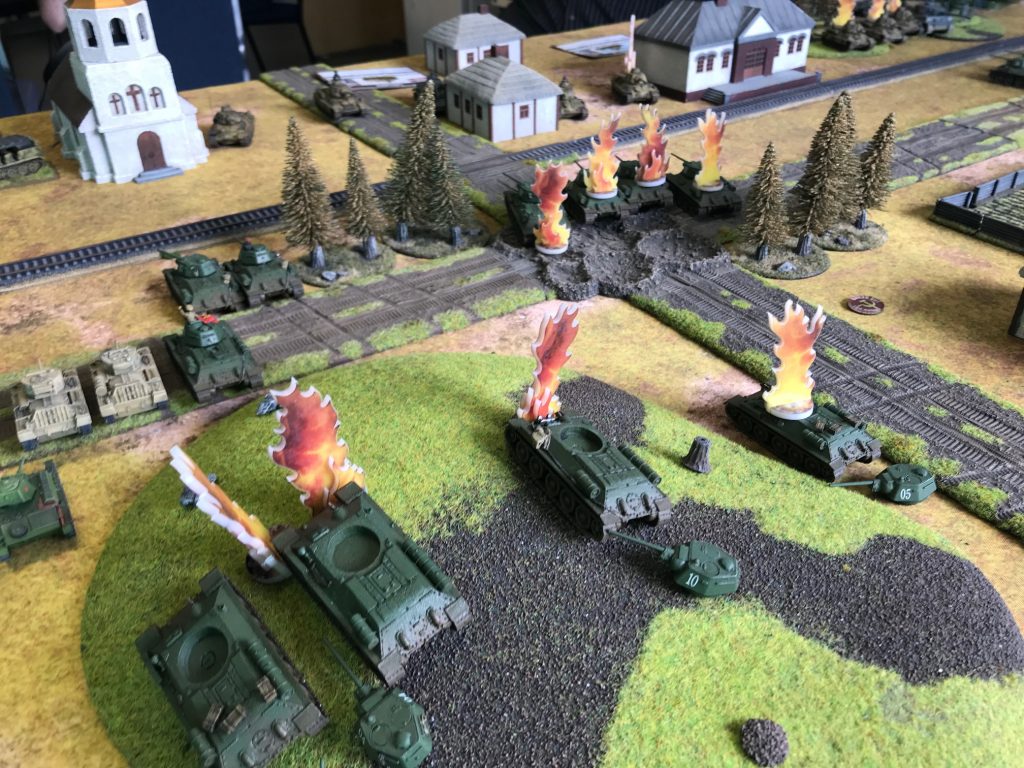
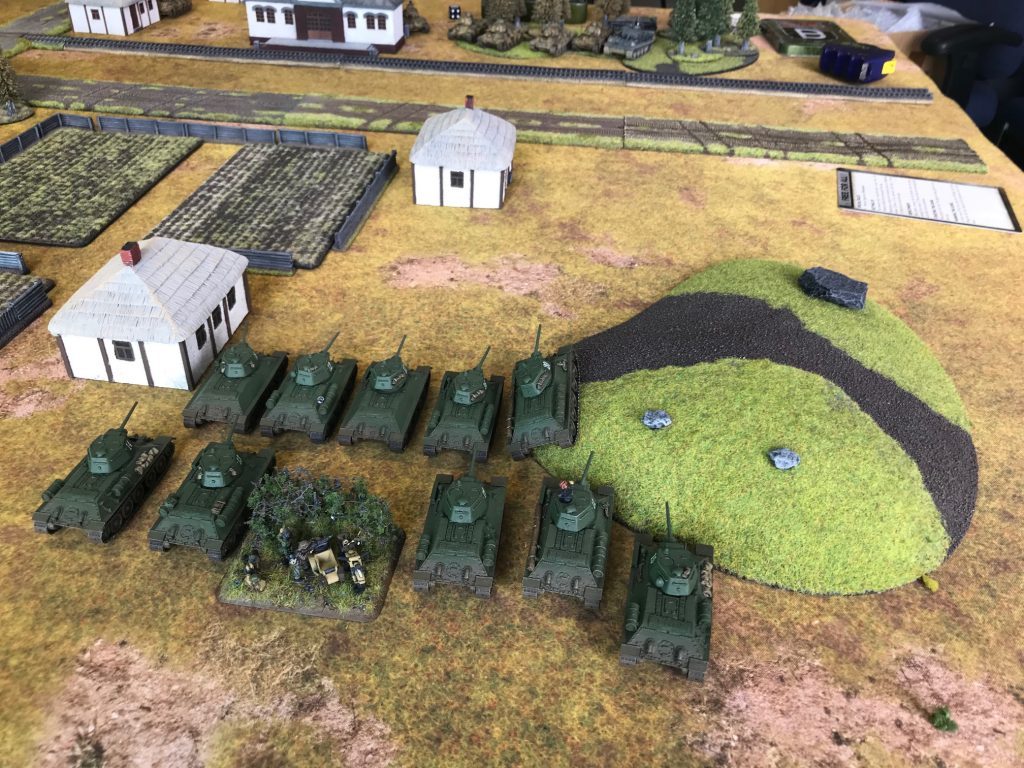
I deployed a line of tanks stretching across the table, confident I could manoeuvre as needed. Casey stuck to cover behind buildings and in forests. He knew I would be coming for him.

Rolling well (story of the first half of the game) I seized the initiative and surged forward. Over the next couple of turns I closed fast and hard, shooting where possible but focussing on position. Casey’s fire was inaccurate or just unlucky whilst mine accounted for some of his tanks with a string of lucky hits (or poor saves). This was especially lucky in the long term as it cut down the amount of incoming fire I would have to suffer.

Things started to change once we hit close range as Casey’s dice started to work their magic and his T-34s started hitting and killing their targets. The Tiger kept up a steady pace of fire knocking out 1 to 2 tanks a turn whilst his Company HQ Panzer IV proved to be deadly, constantly knocking targets off as they came into his sights.

Shockingly, my ram attack against a Tiger failed at the first roll.

However, my 3-1 tank advantage and outstanding luck with Valentine saves proved to be the difference. The almost untouched Valentine company overran the left-hand objective, whilst the right-hand T-34 company flanked Casey’s remaining tanks (ignoring the Tiger after their ramming effort failed on the first dice throw).

With the objective secured and Casey’s last T-34 running away the battlefield was mine.

Studio Projects Part I

While Chris and Casey battle it out over Prokhorovka, Wayne, Mike, and Andrew settle in for some modelling.

Wayne finishes assembling a StuG while Mike studies a KV-1s sprue.

Mike is putting together his KV-1s Company, and Wayne is working on a 7-gun StuG battery.

Andrew’s 76mm Artillery Battery in the works.

Andrews is working away at the support for his Reconnaissance Company.

Wayne and Mike comparing the finer details Eastern Front weapons of war.

Check back in later on to see how these projects come along!

Das Reich, Forward

with Casey Davies

When Chris and I were first talking about playing a big game I had the thought of taking a Tiger company to take on Chris’s Soviet T-34 horde, but thought that it probably wouldn’t be a fair match-up.

(I’m still planning on painting this army at some point as I love the Tiger and new Panzer III models)

Instead, I decided to brush off my Das 
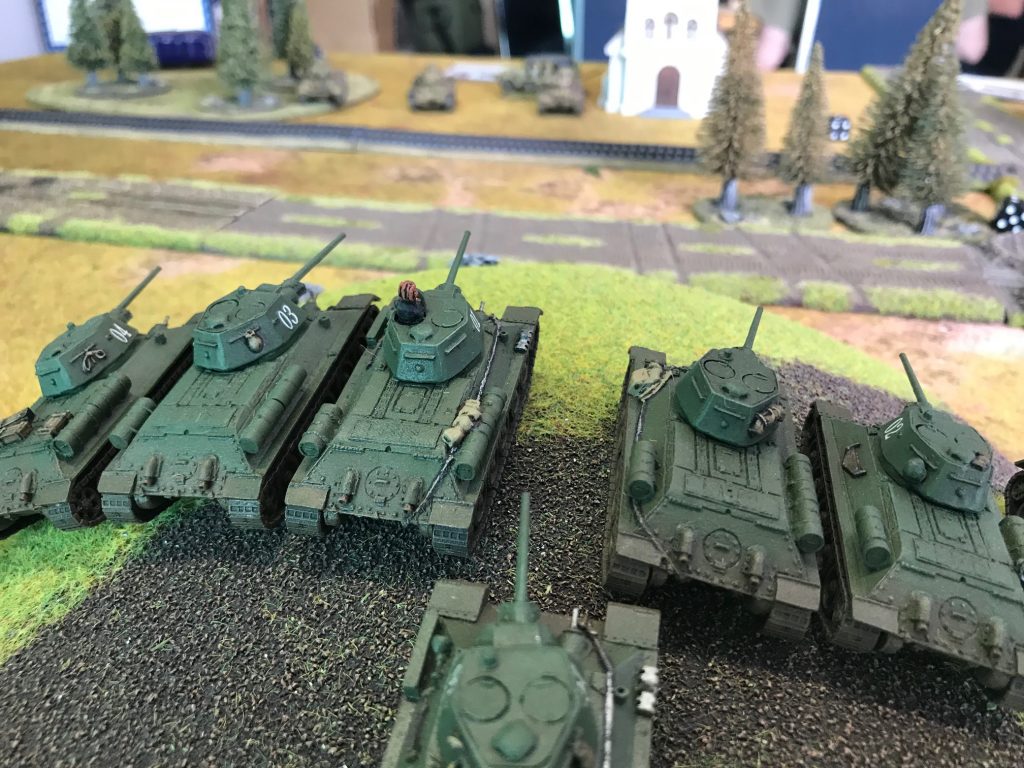
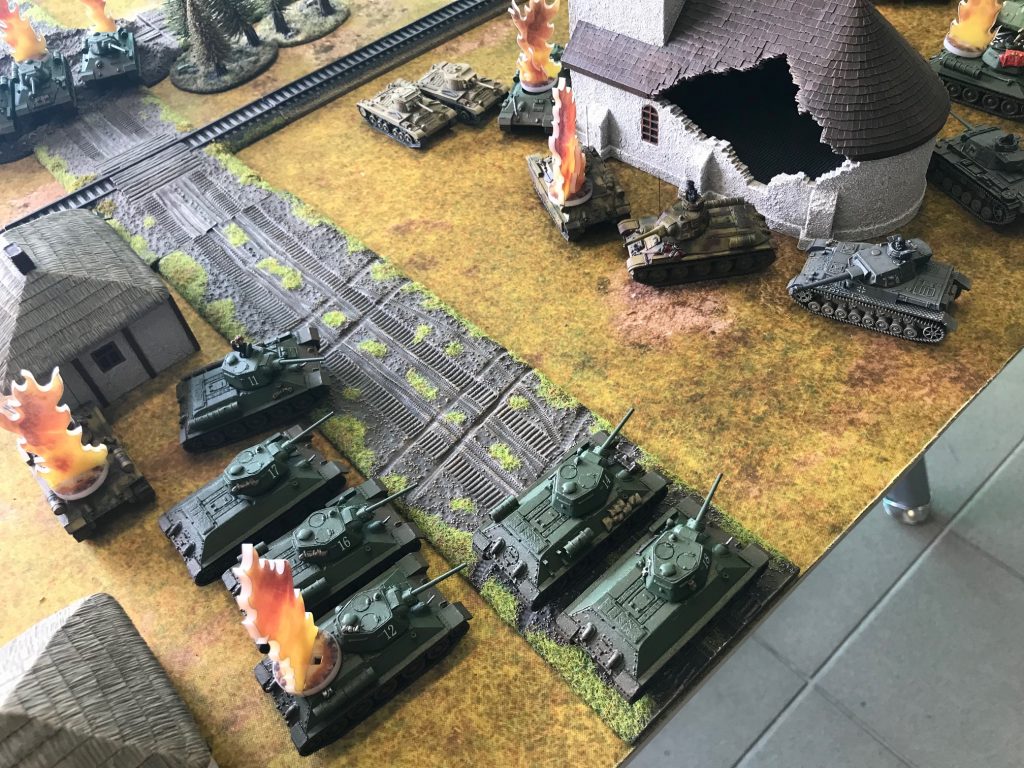
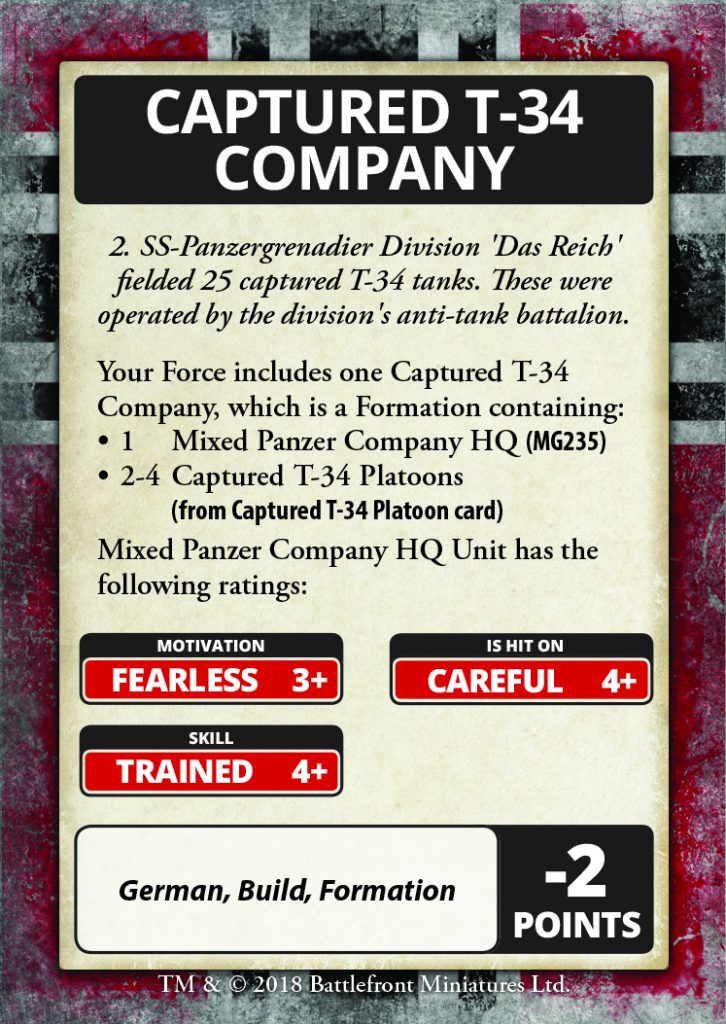
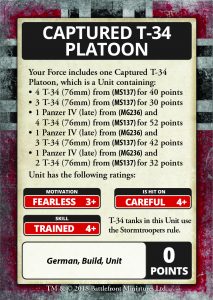
Reich T-34s and give Chris a rematch from a version 2 game we had, where my T-34 tanks were overwhelmed by the sheer number of T-34s that Chris was fielding.

My Army is based off the Captured T-34 Command Card. I won’t go into too much detail about the command cards here as Victor is going to write an article about this later.

I have 10 T-34s painted, so I decided to split these into 2x platoons of 3 tanks and a platoon of 4 tanks. These are led by a Panzer IV and a Panzer III. I’m just going to use my Grey Panzer III & IV tanks for the moment, until I get a chance to paint some new ones.

To back up the T-34s I’ve added a single Tiger, again mainly because I love the model.

I figure the Tiger will anchor one flank and my T-34s will deploy en-mass, strength in numbers.

T-34 Company HQ card I whipped up for my game against Chris.
and a Captured T-34 card for Das Reich.

Iron Crossover

or: Using an Iron Cross formation with Ghost Panzers Support Units
with Mike Haught

All four of the mid-war Eastern Front books were designed together. There was a lot of crossover between units in both books, so we wanted to make that cross support possible between books. For instance, in the German case, we wanted to make sure that you can take your Grenadier infantry forces from Iron Cross and back them up with Ferdinand and Brummbär heavy tanks from Ghost Panzers, just like what happened in Model’s 9th Army attack on the northern front of the operation. Of course the reverse is also true. You can field a Ghost Panzer formation with Iron Cross support, such as an Armoured Panzergrenadier Formation with your early panzers and StuGs to represent the half-track mounted troops involved in the 1942 summer offensive.

Let’s take my Grenadier company from Iron Cross as an example. Here’s the 100pt Grenadier Company I’ve been using:

Grenadier Formation
2pts Grenadier Company HQ
16pts Grenadier Platoon, 9x teams +2x MG34 HMGs
14pts Assault Pioneer Platoon

Support Units
14pts 10.5cm Artillery Battery (4x Guns)
2pts Panzer II OP
27pts StuG (early) Assault Gun Platoon (3x StuG long 7.5cm)
9pt Ju 87 Stuka Dive-bomber Flight

I originally modelled this force as an assault unit involved in the 1942 summer blitzkrieg attacks. It’s got some defensive power, but has an offensive footing with flame-throwers, submachine-guns, and Stukas.

I’m excited about the upcoming release of the Ferdinand, so I’m going to convert this force into a Citadel-themed one so that I can include them. However, I also want to retain as much of the tactical flexibility from Iron Cross as possible, such as artillery. I can achieve this by using my Iron Cross Formations with Ghost Panzer support units. I have to choose which book to draw support from, I can’t do both, so I need to drop my StuG assault guns because these early versions are not available as a Ghost Panzer support unit. On the other hand, my artillery and Stukas are both available in Ghost Panzers, which means I can bring them across.

Dropping the StuGs earns me back 27 points which goes a long way towards getting me a pair of Ferdinands. However, I still need to find another 7 points, which I can get from reducing my Grenadier platoons to 7 teams each and taking out an HMG somewhere. So in the end, my 99pt Citadel Grenadiers will look like this:

Grenadier Formation
2pts Grenadier Company HQ
13pts Grenadier Platoon, 7x teams +2x MG34 HMGs
11pts Grenadier Platoon, 7x teams +1x MG34 HMG
14pts Assault Pioneer Platoon

Support Units
14pts 10.5cm Artillery Battery (4x Guns)
2pts Panzer II OP
34pts Ferdinand Tank-hunter Platoon (2x Ferdinand)
9pt Ju 87 Stuka Dive-bomber Flight

So with just a few small modifications to my army I can field my tried and true Grenadier force in Operation Citadel battles using a pair of mighty Ferdinands.