
Category: WWIII: West German
Leopard 2 Assembling and Painting
Twitch Plays
We’re LIVE on twitch for the FIRST game of WWIII: Team Yankee where you’re in control! The Twitch chat is playing West German vs our Soviet underdog Luke from Battlefront! As a collective, Twitch chat must collaborate and strategise to come up with the best course of action against the Soviet forces.
HOW TO PLAY:
In your turn, you must decide what your troops are going to do alongside the rest of the viewers. Throughout the main phases of your turn, each unit you control will activate, giving you the opportunity to control it. Using the grid overlaid onto the table, type in chat where you think units should move, shoot, assault, etc. as required. The most suggested options in chat will be put into a poll, and the winning option in the poll is the strategy that will be employed!
Collaborate with your fellow viewers, debate the best strategy, and hope for good dice rolls to take the win in the first Battlefront Twitch Plays!
Watch the carnage below or go to our twitch channel to join in! www.twitch.tv/battlefrontminiatures
Robs West Germans
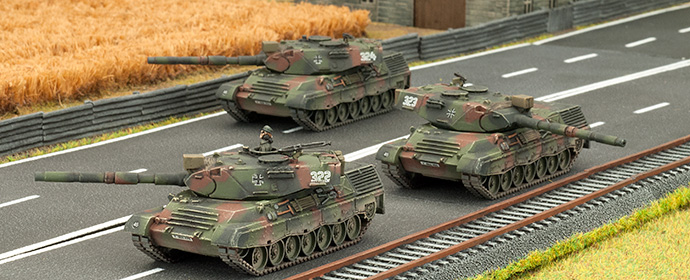
Rob is one of our resident rivet counters in the office, loving all things Bundeswehr. When developing Leopard he brought in a wealth of information for the team to read and review. He also brought in a rather impressive 1/6 scale remote control Leopard II that patrolled the office rolling over anything that got in its way. Although we have new models, missions and stats this original Leopard 1 Panzer Kompanie is still one of the coolest Kompanies we’ve seen!
| Leopard 1 Panzer Kompanie |
 |
 |
| Marder Panzergrenadier Zug |
 |
 |
| Fuchs Panzeraufklärungs Zug |
 |
| Scratch built M113 Green Archer and M113 Panzermorser |
 |
| M113 Panzermorser Zug |
 |
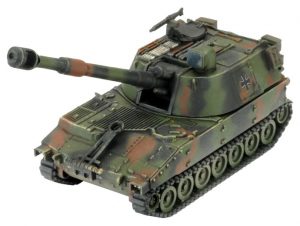
| M109G and Gepard |
 |
| M109G Panzerartillerie Batterie |
 |
| Gepard Flakpanzer Batterie |
 |
| LARS Raketenwefter Batterie |
 |
| M48 AVLB Bridgelayer |
 |
 |
| PAH Bo-105 “Giraffe” Helicopter |
 |
| Rob’s Growing West German Force |
 |
Ryan’s WWIII West German Army!
I have been a long-time lurker on the Flames of War and Team Yankee pages but being a poor student with no time (or money), the thought of one day building a collection of modern vehicles has always been on my mind. After discovering and promptly investing in Tanks: The Modern Age at the beginning of last year, I very quickly decided that I wanted to collect a small West German force out of a love of the Leopard 2 and the PAH. I bought the WWIII: Team Yankee rulebook a few weeks later deciding I would collect some small armies to play games over lockdowns with some of my mates.
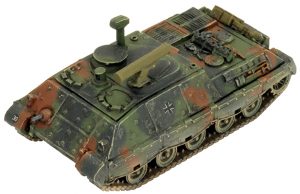
Fast forward a few months, one lockdown and one job interview later and I found myself in Auckland making videos for the D-Day: Waffen SS Live Launch! As an enthusiast in the hobby, the office was quick to discern that I was interested in West Germans, and a couple of boxes would find their way onto my desk along with a sneak peek at the new WWIII: West German book that was in the pipeline. Over the next few weeks, I began list noodling and deciding how I wanted to paint up my new toys. I was determined not to do the standard NATO three-tone, and was looking around for inspiration when I came across this image on the Tanks Encyclopedia:
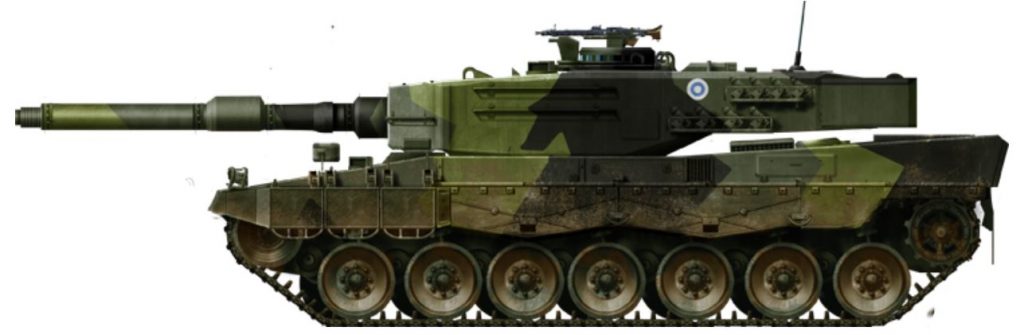
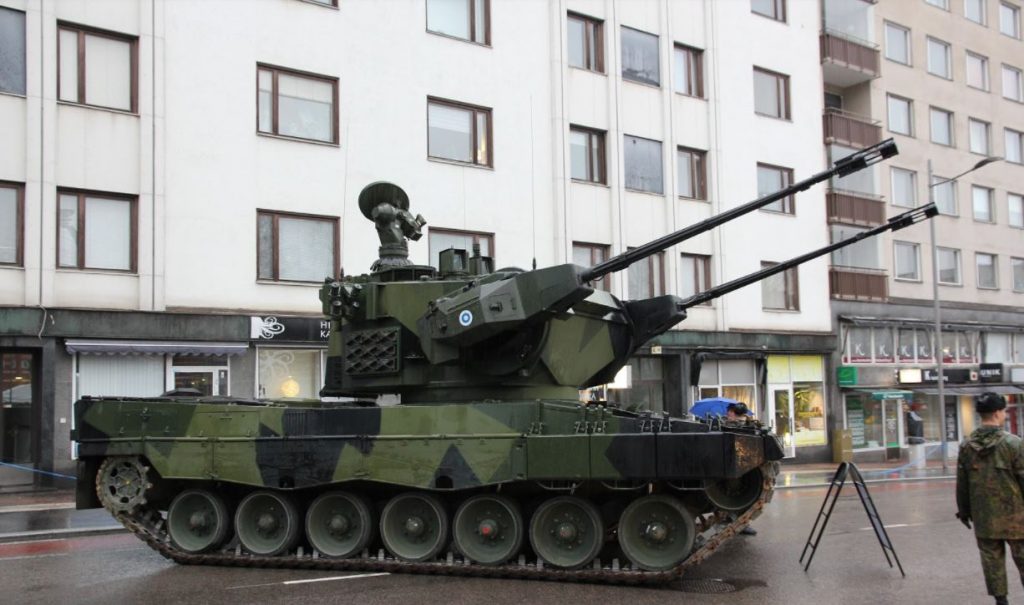
The Finnish Army purchased 124 Leopard 2A4s from surplus German stock in 2003, replacing the aging T-72 and T-55M. The camouflage pattern stood out as unique but not too difficult so I decided to have a dig around and see what else I could proxy into a Finnish army. The next big find had to do with Finnish AA. The Marksman AA system, currently an option for the British forces, was actually only purchased by the Finns and mounted on T-55AM chassis as the ITPSV 90, before recently being mounted on Leopard 2 chassis to provide a more mobile and stable firing platform. I can very easily proxy these as Gepards so I picked up a box of Chieftain Marksman and some spare Leo 2 and T-55 sprues from around the office.
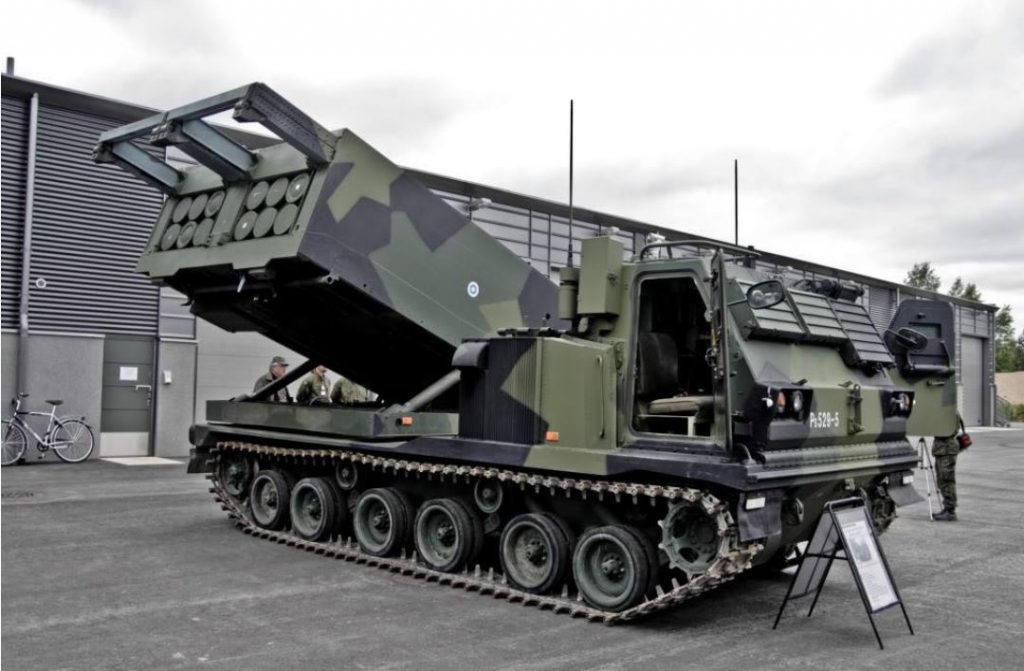
The Finns also currently deploy the 298 RSRAKH 06, the 227mm MLRS system. This has been upgraded to fire the ATACMS missile, and visually there are very few differences.
My last bit of research came in the form of Air units. The Finnish Airforce currently operates the F-18C and NH-90, neither of which easily fit my proxy range with the West German equipment on offer. Doing some digging, however, I discovered that during the 70s/80s the Finnish Airforce utilized the Swedish Saab 35, and a bit of digging later I found this image:
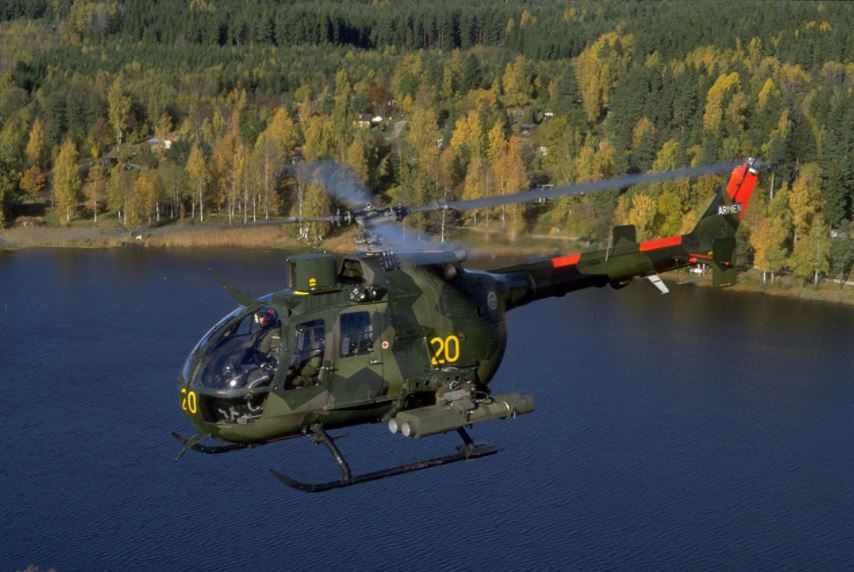
The Swedish Airforce deployed the HKP 9A, a TOW variant of the BO105 PAH. In the fictional scenario that WWIII: Team Yankee offers I’m happy to use Swedish air support to stop a Soviet advance through the Finnish wetlands. They were originally trialed with quad TOW pods similar to the Lynx, which sounds like enough of a hobby project for me to give it a nudge!
After discovering all of this, the last thing to do was to put it all together in a playable list. Armed with the new WWIII: West German book I set about deciding what force to construct.
The Panzerauflakrungs Kompanie is a very popular choice here at the office as a way to get both of the cool new plastics into one army without sinking all the points into the new tanks and also having a solid range of support options. Whilst the Finns did not upgrade to the 2A5 variant, they did purchase 100 Leopard 2A6s in 2014 from the Netherlands. Discovering that the longer L/55 gun is on the sprue made this a viable proxy option so this went straight into the list.
The other new unit is the Marder 2. The Finns recently took delivery of the Swedish-made CV9030FIN, which could very easily stand in for the new Marder. It might not look the same, but until I find a nice kit/file I’m more than happy to paint some Marder 2s up in the Finnish camo scheme!
Another bonus with taking the new Leo 2 Panzeraufklarungs Kompanie is that you can field a Fuchs Panzeraufklarungs Zug from the old book. I love the Fuchs model, and it is very close to the Patria Pasi XA-180 that the Finnish Army still uses so another one to paint up.
I’ll throw in some Tornados to fill out the Air support until a suitable Swedish replacement makes itself clear to me (Saab 37 perhaps?), a BMP-1 to stand in as an M113 OP, and some custom ‘little green men’ infantry sculpts to modernize my infantry’s armor and weapons, and I’ve ended up with this list: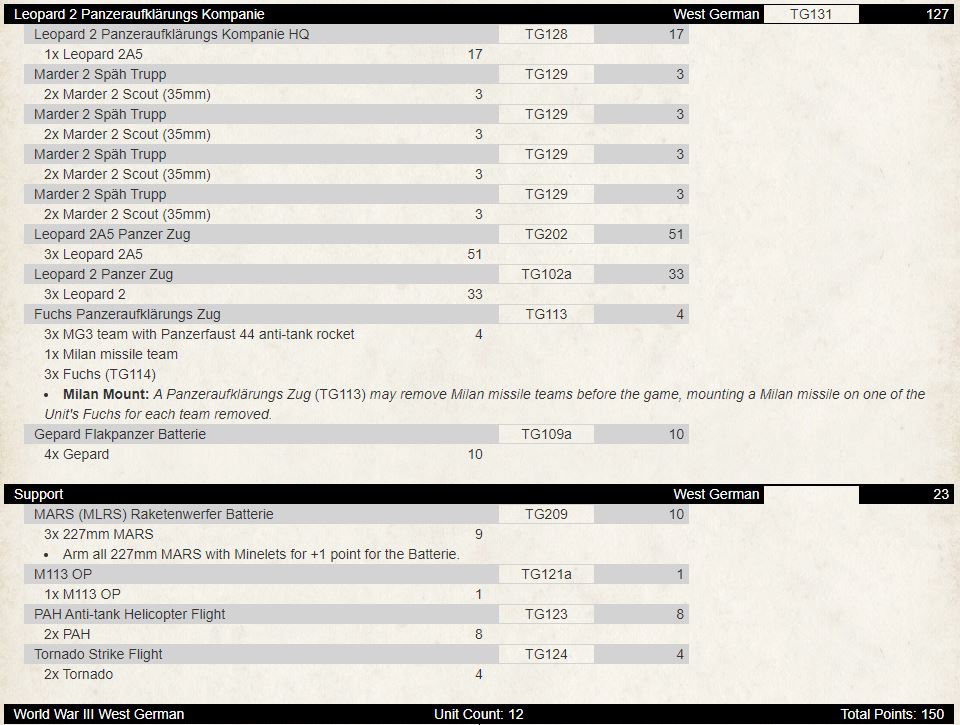
A pretty good attempt at a modern Finnish Defence Force, with some Swedish support to back them up! A lot of points for a relatively small amount of models – sounds like a perfect starter army for me! I’m looking forward to figuring out how I achieve the angular camouflage on the armor without an airbrush and have been testing some ideas already. The army is currently in the assembly stage as I still have a few new models to acquire and build (waiting on some more Marder 2s to arrive at the office), and I have a bit of learning to do with plasticard and milliput to modify some vehicles to achieve the look I’m going for, but I’ll be sure to keep photos coming in as they approach the table ready status.
Is it a competitively viable army? Definitely not. But here at the office, we’re all keen to play larger 150pt games to allow us to take some of the big vehicles, so for the purpose of throwing big tanks at big tanks this army will do nicely. I’m already thinking about dropping a 2A5 to allow me to fit some more PAHs, Tornados, and upgrade some Marder 2s to the 50mm cannon but I’ll get this force done and battle-tested first. I have a lot more thinking ahead of me if I want to bring this down to the 100-120pt tournament level, but that’s a problem for another day.
~Ryan
WWIII: West German Previews

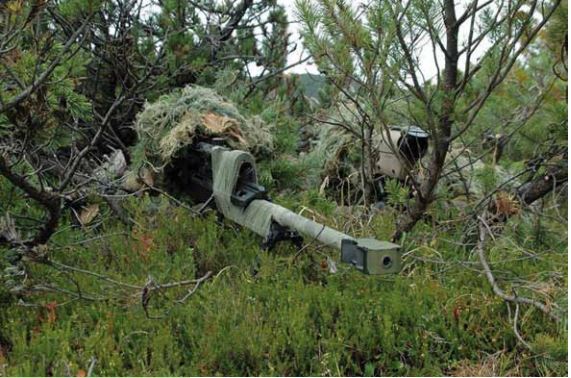
Gebirgsjägers in WW3 – Where others stop, we get going!
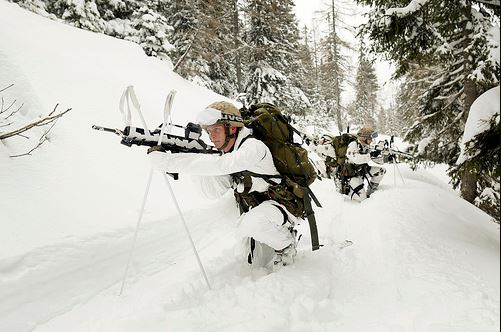
Modern Gebirgsjäger – note the stocks used to provide a stable firing position
One of my first and favourite Flames of War German units is the Gebirgsjäger or Mountain light infantry. Originally they were the various alpine troops from Germany, Austria, and Switzerland as part of the Austro-Hungarian Empire, but the German units were formed as the German Alpenkorps during WWI. After hard fighting against similar elite units from the French (Chasseurs Alpins) and the Italians (Alpini) during the Mountain fighting on the Alpine Front, between German, French and Italian forces, they were given their own insignia, the edelweiss, and was later made into a metal lapel pin.
The Gebirgsjäger often wore the storied edelwiess flower on their uniform, which only grew high in the Alps and it was said: “the possession of one is a proof of unusual daring”. It was so popular with troops from these units that they would often have a dried flower somewhere on their uniform or their cap, as a symbol of bravery in lonely peaks and pure mountain air. Their motto was “Wo andere Aufhoren, fangen wir erst an!” – or “Where others stop, we get going!”
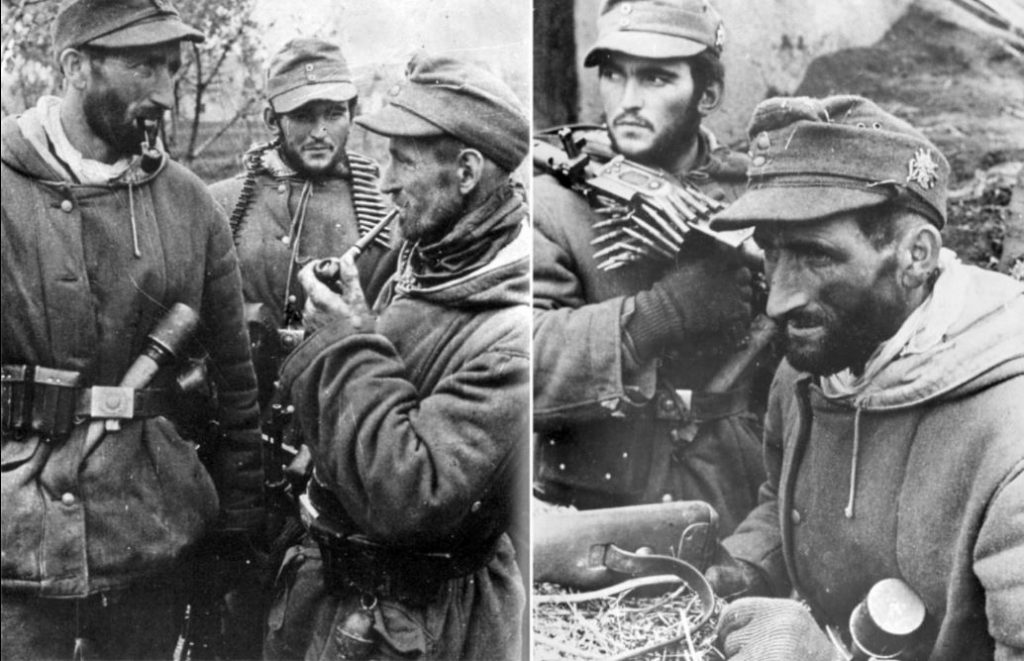
Gebirgsjäger in WWII – seems beards and pipes were mandatory
The incredibly tough fighting in high altitudes and freezing temperatures included drawn-out trench warfare, tunnelling through glacial ice and hard carbonate rock, as well as avalanches caused by shell fire. Casualties due to shellfire in this terrain were 70% higher than those in the soft mud of Belgium and France, due to rock shrapnel inflicting additional casualties. Also, the environment itself was hard on soldiers with frostbite and malnutrition generating even more casualties because of the difficulty re-supplying food, medical supplies, ammunition, and other provisions.
This type of mountain fighting also introduced new tactics and weapons, like the lightweight Gewehr 33/40 rifle in WWII, and many lightweight artillery pieces were introduced, called mountain guns, these typically were smaller or able to be broken up into many parts for easy transport via mules or as man-pack pieces. In WWII a German 10.5cm GebH 40 mountain howitzer was designed and produced, made with lightweight alloys, and able to be broken up into parts for mule transport. It was significant in that previously the largest mountain guns only had a barrel width of 75mm or less, and a larger 10.5cm calibre gun was not considered practical due to its weight and size. It was still in use until the 1960s and was considered one of the best mountain guns ever made, and it was used by multiple European countries.
The modern Gebirgsjäger was reformed in 1956 when the West German Bundeswehr was formed, where they were organized as the 1. Gebirgsdivision, and were mainly stationed to the south of West Germany, in the mountainous Bavarian region, to defend from Soviet attack through the Danube Valley or from the border shared with Austria if the Soviets ignored its neutrality. They are a specialist unit with their main tasks being, warfare in extreme conditions, winter warfare, warfare in urban terrain, and warfare in the arctic, mountain, and desert terrain. They also have traditionally a very close comradeship and a distinct esprit de corps, with a special perception of discipline which can be seen in a relatively informal relationship between officers and soldiers during normal day duty. For example, during WWII the Lieutenant General of the 5th Gebirgsdivision Julius Ringel (an Austrian), was called “Papa” Ringel by his men, showing the close relationship the officers had with their men.

Julius ‘Papa’ Ringel – was later promoted to General der Gebirgstruppe
In the 1985 period of Team Yankee, the Bundeswehr 1.Gebirgsdivision was part of 2 Korps in the South of West Germany (Bavaria) and consisted of, 23rd Gebirgsjäger Brigade, 22nd Panzergrenadier Brigade “Oberland”, 24th Panzer Brigade “Niederbayern”, 8th Gebirgsartillery Regiment and Heimatschützbrigade 56.
As far as equipment the 1.Gebirgsdivision had its own divisional Panzeraufklärungs Kompanie as well as Gepards and Fliegerfausts for anti-air capability, and the 8th Gebirgsartillery Regiment provided 227mm MARS and LARS Raketenwerfer batteries, as well as larger 203mm Sf M110 self-propelled artillery, and CL-89 rocket launched surveillance drones.
The equipment for the more mechanised parts of the Division, 22nd Panzergrenadier Brigade “Oberland” was equipped with Marders, Leopard 1s and M109G self-propelled artillery, and 24th Panzer Brigade “Niederbayern” was similar with Marders, Leopard 2s and M109G artillery. The Heimatschützbrigade 56 was the best equipped Heimatschützbrigade in the Bundeswehr, with Leopard 1’s, M109Gs, and a mix of Marder and M113 equipped Panzergrenadier Kompanies, and was really for all intents and purpose considered a line unit and not a reserve Heimatschützbrigade.
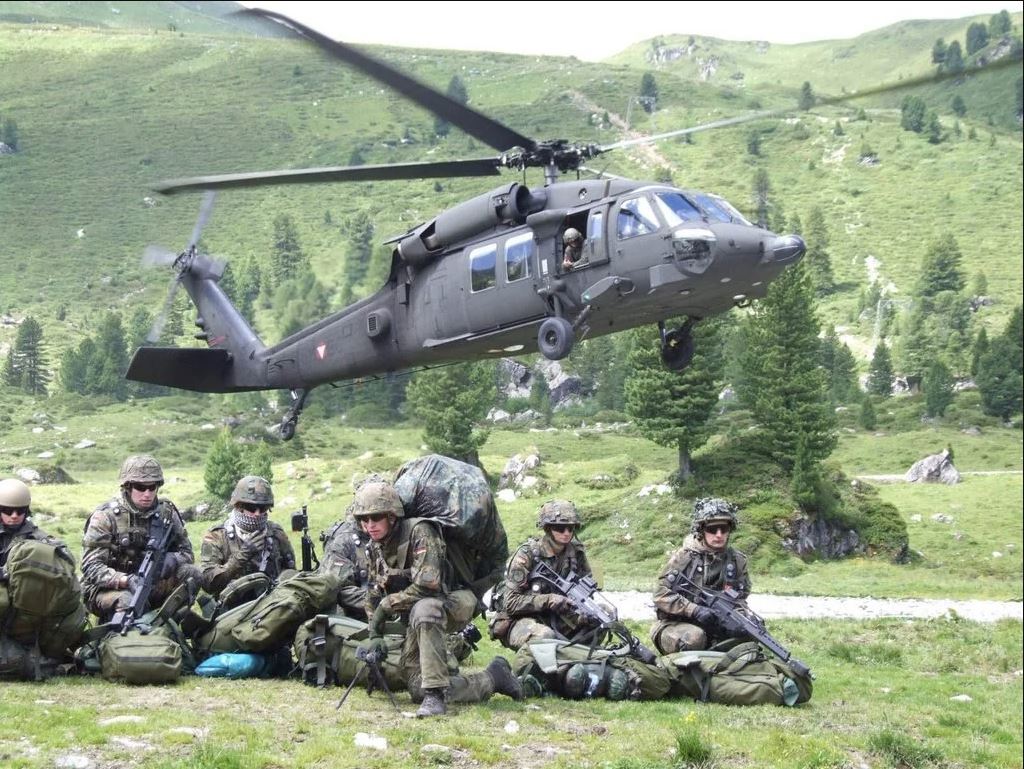
Troopers from the 23rd Gebirgsjäger Brigade – working with Austrian Jägerbrigade 6
The 23rd Gebirgsjäger Brigade, the actual unit carrying on the Gebirgsjäger tradition, was not mechanized like the other brigades in the 1.Gebirgsdivision, it was mainly a light infantry unit armed with Milan anti-tank missiles, but with larger platoon sizes than the smaller Panzer grenadier Zugs. It consisted in the 1980s of four standard Gebirgs Battalions and one Gebirgs Artillery Battalion, as well as its own Leopard 1 Panzer Kompanie and Pioneer Kompanie.
Each Battalion had a heavy support Kompanie with six M113 Panzermörsers, six twin-20mm Flak cannons, and a small Milan anti-tank Zug of six launchers. But interestingly they still use mules to help transport their heavy equipment in mountainous terrain, so another tradition that while old still works.
Another unique feature of the 23rd Gebirgsjäger Brigade was their Hochgebirgsjägerzüg, or High Mountain Jäger Zugs, an elite force inside the already specialized Gebirgsjäger Brigade. To qualify they must have excellent fitness, endurance, as well as alpine and skiing skills, with a range of tasks that go beyond even the usual tasks of the mountain troops. These included high-altitude reconnaissance, mountain rescue, and advanced mountaineering skills.
A Hochgebirgsjägerzüg sniper team
These high-altitude alpine Special Forces troops are trained to attack, defend, and survive in the harshest of terrain. They are also trained in ambushing, specialized sniper skills, surveillance, and hunter-killer groups, and there was only ever one Zug per Battalion, which was part of the HQ Kompanie. They were also to be used as a quick reaction blocking force and were allocated either CH-53G Sea Stallion or UH-1 Huey helicopters, to quickly deploy them high in the mountain passes. They would then set up in bottlenecks as an ambush force, or to report on enemy movements, they were even able to quickly and easily deploy Milan teams to help stop any heavy vehicles that did make it up to the alpine areas.
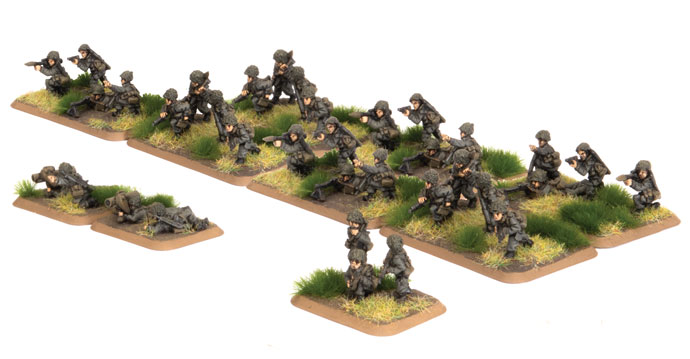
So how does all this translate into WWIII West German?? Well for me this force is one of the best, if not the best, West German infantry formations that you can get. It is excellent for a defensive stance, with each Gebirgsjäger Zug containing 9 stands: 7 – MG3 & G3 teams with panzerfaust 44 anti-tank weapons and 2 Milan missile teams. You can also take up to four Gebirgsjäger Zugs, rather than the three Zugs usually available to other West German infantry Kompanies, which makes it very durable due to its large platoon size and more Zugs.
Additionally, it is one of the larger West German infantry formations, with 10 units in the formation. A HQ, up to 4 Gebirgsjäger zugs, 2 Luchs Zugs, a Gebirgspanzerjäger Leopard 1 Zug, a panzermörser Zug and a Gepard AA Zug. The Leopard 1 Gebirgspanzerjäger Zug is unique in that instead of having the Jaguar 1 or 2 that other formations would have as their tank hunter platoons, the Gebirgsjäger had Kanonenjagdpanzers until 1984, when they were replaced with a Kompanie of 17 Leopard 1 tanks. It has an HQ of 2 tanks, and 3 Zugs of 5 Leopard 1 tanks each. So the Gebirgspanzerjager Zug has up to 5 Leopard 1 tanks instead of the normal 4 tanks Zug.
Another thing to not forget is their special Mountaineers rule, which allows them to cross previously impassable terrain like cliffs or embankments. Teams that start their movement turn adjacent to a cliff or mountainside (or other similar terrains) can roll a skill test, if passed they may move across the terrain with their terrain dash speed of 8”. This can be used to surprise an enemy which may have forgotten this, so keep that in mind when you need to assault an enemy position.
All of this makes the formation when fully fleshed out the largest in the West German book. At full strength, it can have, 37 infantry stands (including 8 Milan teams), 5 Leopard 1s, 4 Luchs, 6 Panzermörsers, 6 Gepards (not to mention another 6 Fliegerfaust Redeye teams if wanted), for a total of 41 infantry/weapons teams, and 21 vehicles. The infantry when dug in will be hard to dislodge, and has the numbers to take casualties.
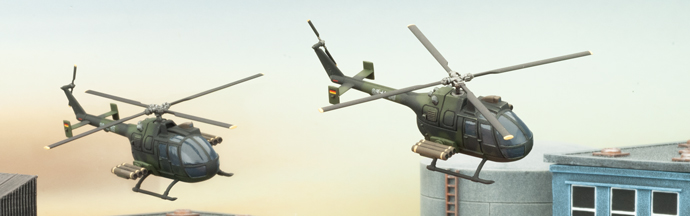
If you wanted to represent the Hochgebirgsjägerzüg ( I know I want to), you can either take it as a smaller Gebirgsjäger Zug ( 5 MG3 & G3 teams, 1 Milan) or take a Fallschirmjager Zug as a support option, which is the same size but allows you to take two helicopters for 2 extra points. Now the Gebirgsjäger used either CH-53G Sea Stallion helicopter or UH-1 Huey, the Sea Stallion is huge and would be impressive, but the BF UH-1 Huey is excellent and easier to obtain. I can see myself researching up paint scheme for West German helicopters now…… and most likely it’s a start on a Fallschirmjager list as well…..
So I have put together a 100 point list with the new Gebirgsjäger formation, it seems reasonably tanky, with 3 large Gebirgsjäger Zugs, totalling 6 Milans, to hold positions and should be able to take a beating. I have also taken a small Fuchs Panzeraufklärungs Kompanie for two reasons, one is it adds an extra formation, so more resilience for your force, and it was the same cost to get the units in this than to get another large Gebirgsjäger Zug. It adds 2 small Zugs with a Milan each and a Luchs troop to spearhead and harass artillery and AA.
The extra Milans always help, and splitting them into two platoons means it’s two targets the enemy needs to target and take out, and if they ignore them because they are small I win then too. This gives me 8 Milan teams in total, which does not compare to how many the British can pump out, but it is still significant. The Milan is a very good AT weapon and can take out most armour, but it will have trouble with more expensive NATO tanks like the M1a1, Challengers, and Soviet T80.
For this reason, I took a small PAH flight with the AT23 HOT missiles. Normally I find them overpriced for their use, but as I cannot take Jaguar 1s in this formation, and Leopard 2s of both types are too expensive for this formation, this is the only way I can get HOT missiles to try and attack high armour enemy tanks frontally. The best way to use these is as mobile flankers, using your Hunter killer pop-up attacks around terrain, but as you cannot move and shoot they often are only firing once every two turns unless you place them carefully at the start of the game. The only thing you need to be aware of is the AA umbrella of your enemy and enemy aircraft, so try to keep out of enemy AA range, and also make sure your AA can support you if enemy aircraft try to take them out.
For artillery support, you have the M113 Panzermörsers, great against dug-in infantry and low top armour units like AA and self-propelled artillery. Even if you range in, and have a low chance to do damage, it may make a WARSAW PACT artillery unit move to get out of under the template, so it will lose its range in marker, which can be hard for it to do again. You also have LARS which is similar but can also drop minelets to restrict or channel the movement of the enemy. I also always take 4 Tornados, which have excellent cluster munitions but are easy to kill being hit on 4+ and only a 5+ save, so try to destroy any AA before you bring them in, or you will take casualties…. but sometimes it is worth it, AT8 death from above is no joke!!
Lastly, we have one of my other favourites, the cheap and cheerful Leopard 1, with excellent mobility, a moving RoF of 2, and stabilizers. It is an excellent flanker, still able to punch holes in the sides of more expensive top tier tanks with its AT19 main gun. Also as it is not HEAT like many other similar tanks, the enemy tanks won’t get buffs to its side armour with Chobham, ERA, and bazooka skirts, so make sure you make use of your movement orders to get those flank shots in. Also when combined with a unit of Gepards, you will make short work of enemy IFVs if they let you.
This force will be a very different play style to most West German forces from the older Leopard book, so it will take a few games to get used to. But I think it offers some much-needed variety to a West German force, and I really look forward to playing with the new options it can give you. I do look forward to finally being able to hold a position against other enemy infantry, these guys will be a hard nut to crack, especially in defensive scenarios with extra minefields, you will be able to channel the enemy into your kill zones.
So have a look yourself and see what you can make of it, and hopefully, you can even use your Mountaineers special rule, I would be making that a gaming life goal for myself!! Remember – Where others stop, we get going!
~ Adam
New Support Options for WW3: West German Force
With all the new cool stuff being released for WW3: West German such as the Leopard 2A5, Marder 2, Wiesels, and new infantry formations, I thought I would look at the new support options available for the West Germans to complement the existing ones. We have two new artillery options – the 227mm MARS Raketenwerfer and M109A3G (ok not new to the game but are FINALLY available for the West Germans) and something a bit different and unique to this force – the Kanonenjagdpanzer!

The MLRS is finally able to be used in West German forces. The card has been available in the box for some time but now you can use it in anger. You can take this unit as an additional artillery slot – so you could potentially both the LARS and MARS if you want to have double salvo template options (treble if you count the salvo template available to the Tornadoes!). Each weapon counts as two when firing so if you take three of them, counts as six and means you will reroll misses. It has a range of 120” AT3 and FP 5+. A useful AT3 for hitting non tanks but not a great FP. Very useful though to pin enemy infantry or put enemy AA units out for your attack run with the Tornadoes. You can take two for 6pts, three for 9pts, four for 12pts. You can also fire minelets for an additional 1pt for the batterie.
 The M109A3G is basically the long-barrelled version of the M109G. Its not available as a support option per se but available only in the following formations:
- Leopard 2A5 Panzer Kompanie
- Leopard 2 Panzer Kompanie
- Marder 2 Panzergrenadier Kompanie
- Marder Panzergrenadier Kompanie
The differences that the M109A3G has over the M109G is it has AT15 direct fire, longer range of 112”. Still has the same AT4 FP2+ with indirect fire and can fire bomblets and a smoke bombardment, auto FP, brutal and smoke in direct fire. Three for 8pts, four for 11pts, five for 13pts, six for 16pts.
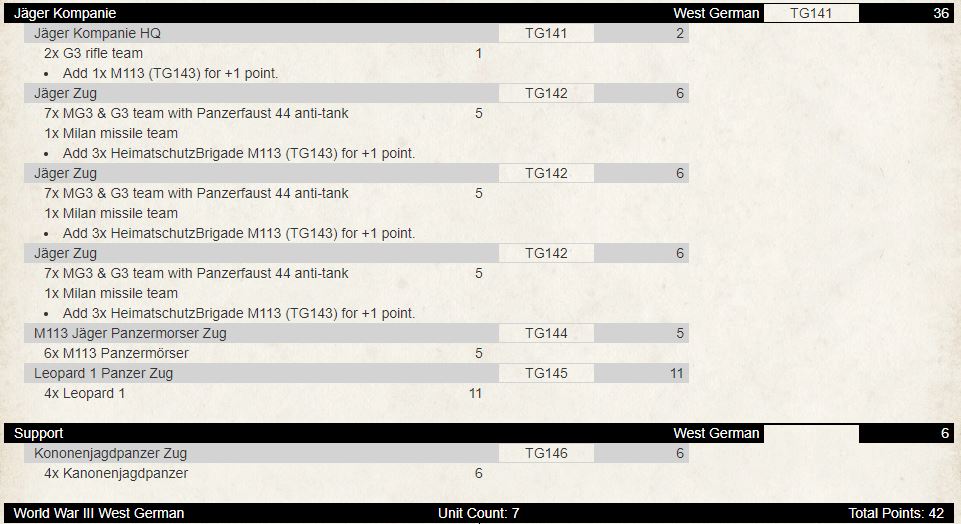
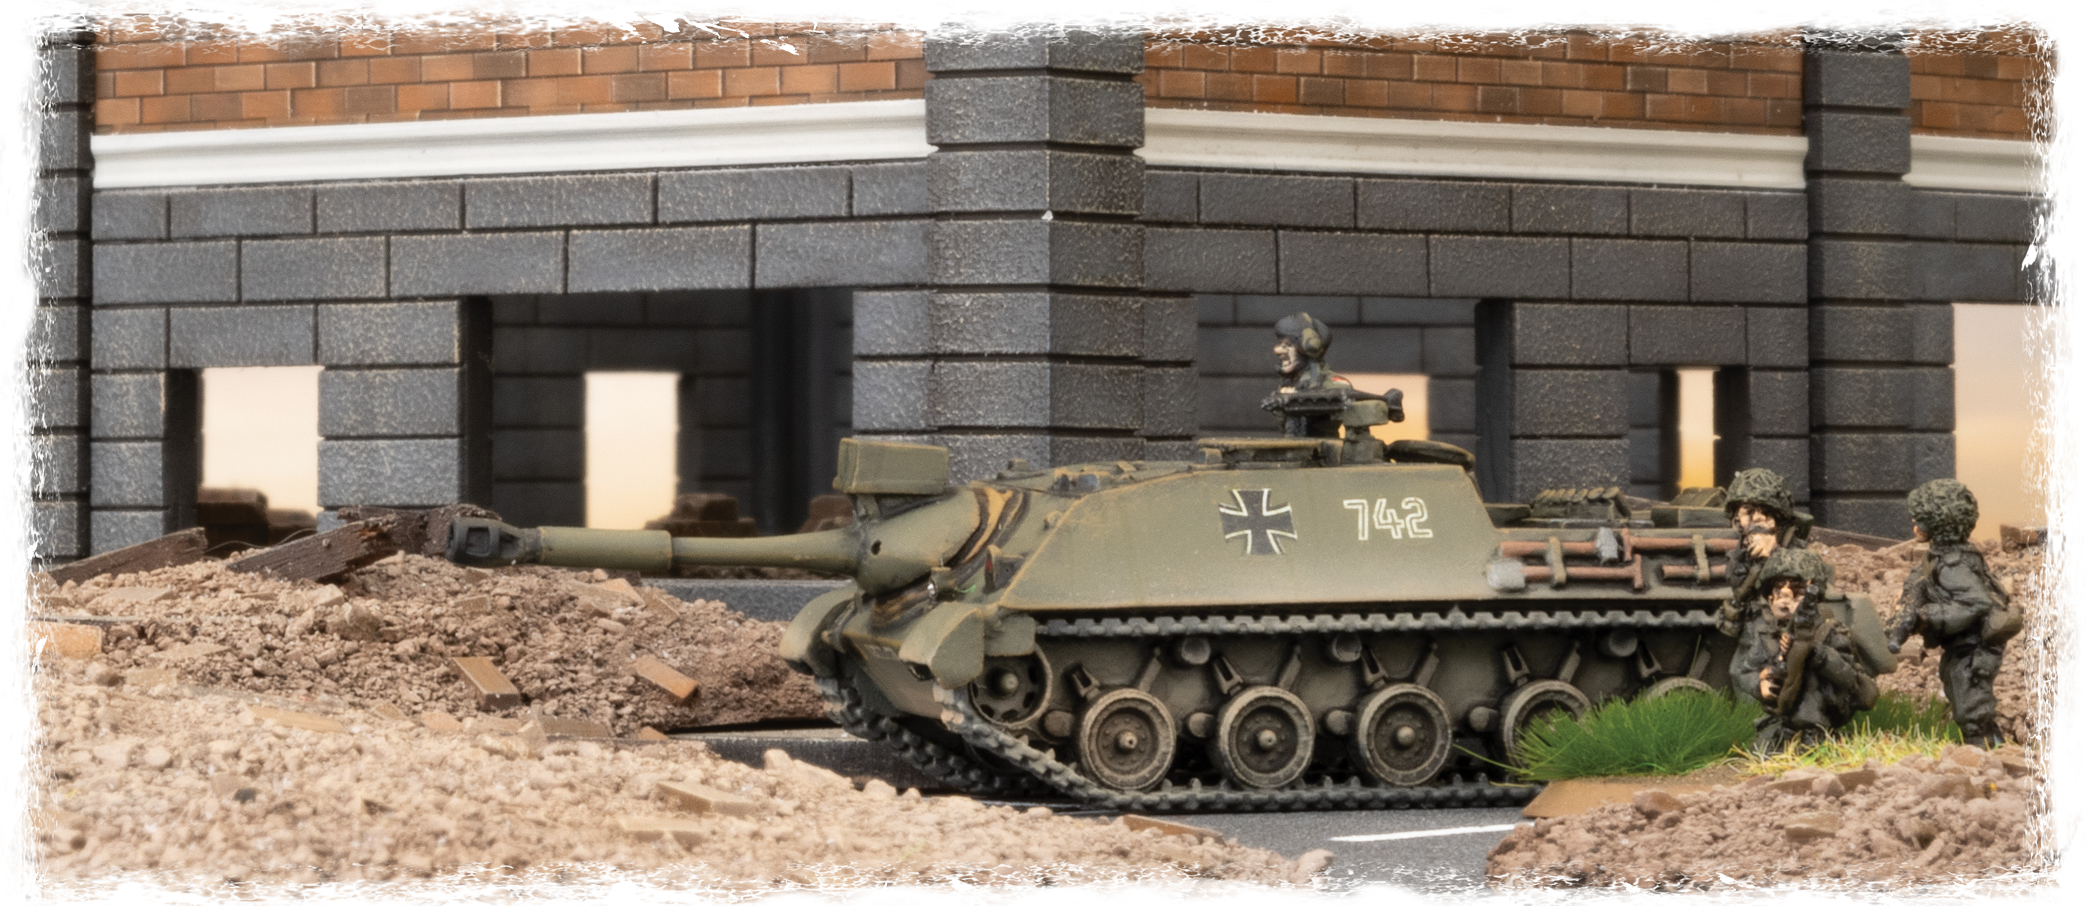 The Kanonenjagdpanzer is a cool looking Tank destroyer but was already obsolete by this stage, so was assigned to the Heimatschutzbrigade (Home Security Units). For those who play Flames of War and love the tank destroyers – this is for you! You can take it as an in-formation unit for the Jager Kompanie and is available as well as a support choice. It has a 90mm gun and has AT16 with 32” range and a handy FP2+. FA6 SA3 TA1. Useful cross check of 3+. Fires HEAT so will struggle against the side armour of top tier tanks but not such a problem against Tier 2 and 3 tanks. Useful to use to hunt down enemy AA units to clear the path for your Tornadoes or take out enemy IFVs and APCs. Now they are hit on 3s so you will need to be careful with them. They cost 4pts for three and 6pts for four. If you are running the Jager formation and do not have enough points to take the Leopard 1s, take the Kanonenjagdpanzer. In fact, take them because they are cool!
So, consider looking at these new options to go along with the other new options available to the West Germans!
Building Better Tables
As a miniatures wargame, the gaming table is an essential component of Team Yankee. More than that, the gaming table can have a huge effect on the enjoyment of a game, not only from the look and immersion but also the game design, balance, and level of strategy that needs to be employed. Unfortunately, sometimes the battlefield gets overshadowed by the excitement of list building, painting, and tactical planning, which can result in awkward or non-immersive battles. Let’s look at building better tables for better games.
Build from the ground up
WWIII: Team Yankee is fought in Europe, specifically Central/North-Eastern Germany. The terrain is vastly different from other regions, and the philosophy behind the infrastructure built over the last hundreds of years reflects this.
- Houses tend to be grouped into tight villages to maximize crop/field space. This is evident in smaller villages right up to growing towns and suburbs
- Large sections of woods on ground unsuitable for farming or rough/hilly terrain
- Lots of linear features ie streams, hedges, tree lines, and irrigation ditches
- Roads will avoid linear features and take the easiest route through the terrain
Google Maps is a great tool that you can use to understand the terrain you’re fighting over. Satellite imagery is brilliant to study linear terrain, roads, railways, streams, and rivers, etc. Street view is also super handy at getting an idea of things like scale and separation, so use this to your advantage. Topographical maps are also available and can help you understand the elevation variance that can’t be seen just using satellite imagery. This is useful if you’re looking at terrain around the Fulda Gap, a key defensive site for NATO troops.
The battle of WWIII: Team Yankee primarily takes place along and around some of the main rivers or canals that run through central Germany, so they’re a good place to start your search. The national Army Handbooks also have brilliant maps in the opening pages, so with a bit of searching, you can very easily find some real-world locations to draw inspiration from.
Be aware that trying to replicate an area 1 for 1 can be extremely difficult due to the scale that we wargame at, so focus on pulling key features from areas and incorporating them into your battlefield design.
So what does all of this look like in a game of Team Yankee? Here are some key points to consider when building a European battlefield:
Roads
 Roads are the easiest place to start, as they can be awkward to fit on a table. Start by placing roads, but think about why the road has been placed the way it is. Are you adding curves to avoid hills and woods, or to make the road run alongside a stream or a line of trees? The German road network is famous for its autobahns, large straight sections of multilane road that would make moving troops around very easy, so ask yourself if your table features a flat area that an autobahn could run through?
Area Terrain
Once the roads are down you can start thinking about those other larger features. Take stock of your terrain and start thinking about what story you can tell. Have four woods pieces? Maybe the road curves around some large woods to get to an ideal village or factory location, so group the woods together to provide a large patch of cover. A particularly windy road could be winding around hills or mountains, and an autobahn could cut right through these with some embankments. Flat areas could be covered with large crop or ploughed fields separated by hedges and bocage, tree lines or irrigation streams providing cover or impairing mobility.
Buildings
 Buildings are another place to improve your tables, and a great way to add area terrain if done correctly. In Europe especially, where space is at a premium, houses tend to be grouped closely together. Instead of placing a building every hundred or so meters, clump your buildings together to form a small township, village, or especially with Team Yankee a small industrial park or compound. Vehicles require a 2cm gap between buildings to shoot through, so keep that in mind. This will force units in towns to spread out to shoot through the gaps in the buildings, another layer of strategy to consider!
Road placement can also affect how you build up urbanized areas. Industrial parks might require autobahn and rail access, adding some good linear terrain options. Villages and townships can tend towards grid layouts for space efficiency, so use your junctions to create town roads.
Streams/Brooks
Europe is a humid continent, so rivers and streams frequently cut through the landscape. Like other wastelands, they are often overgrown with bushes and tree lines along the banks. When adding these to your table, think about 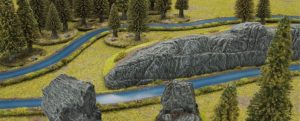 how they flow down from hills towards and through the flatter areas. Roads will tend to avoid crossing them and will run alongside them often as well. Train lines can have the same effect and tree lines that will grow alongside rivers and streams. Irrigation streams can have the same effect in large fields, often without the vegetation lining the edges.
Linear Terrain
After all the large area terrain has been placed, linear terrain is the next step. However, linear terrain like walls, hedges, and treelines are often overlooked or completely ignored, and even if added they are often just there for visual interest and not used with the rules. Linear terrain is extremely important in the game, as it can have a huge tactical impact for a very low terrain cost. Use streams, hedges, walls, train tracks, etc. to add texture to the table, force cross-checks, and make you think twice about your approach. They also have a double benefit in adding a lot of visual appeal and immersion, so don’t be shy when using them! Autobahns would often be lined with walls, and likewise industrial areas. Buildings will use fences or walls to mark property bounds, and crop fields can be lined with fences or treelines.
Tips from Phil
- When designing a table, don’t focus on balance. Tables don’t need to be symmetrical and realistically terrain never will be. Focus on the story you’re telling with your terrain pieces. The missions are designed to challenge your list building skills and how you interpret and interact with the battlefield that is being played on. Do however make sure that you walk around to the other side of the table occasionally while laying out the terrain, as placing all of your terrain in a single corner could make an attacker quite upset!
- Take stock of the terrain available to you and let that decide how you build tables. Roads are awkward to place, so placing them first can let them dictate how the rest of the table comes together. If you have only a few woods pieces, placing them together to create one large woods is more beneficial than scattering them all over the table. Likewise, hills can be grouped to form ridges and buildings clumped to create villages. If you have very few bits of terrain, look at larger crop fields or even modelling a desert, and use linear terrain to split the map up.
- Linear terrain has a huge impact on Team Yankee. Use walls, fences, hedges, and tree lines to add visual interest and provide a huge amount of tactical depth. Remember to use the terrain guides at the start of the rulebook to see how the linear terrain affects your gameplay, such as providing cover, bulletproof cover, forcing cross-checks etc. See pages 24-27, 33 of your rule book for a more detailed explanation of how different terrain interacts with the game.
Putting it to practice – Building a European Table
After a fighting withdrawal on the 11th of August from Bremen and reconsolidating their position on the southern bank of the Mittelland Canal, Panzerlehrbrigade 9 was withdrawn to reequip. As the Heer’s demonstration formation they were deemed the best unit to be issued with two pieces of new equipment. These were the Leopard 2 fitted with the improved modular armour upgrade package and a vehicle for their Panzergrenadiers, the newly designed heavy infantry fighting vehicle, the Marder 2. With them came a cadre of replacement troops who had been busy training with these new vehicles, familiarizing themselves with the ins and outs of both the vehicles and their weapon systems.
On the 15th 1 Panzerdivision, with Panzerlehrbrigade 9 in the lead, advanced from positions between Rheine and Osnabruck across the Mittelland Canal, and north towards Oldenburg. This fictional piece from the new WWIII: West German book is a great place to draw inspiration for our European battlefield. A quick look on Google Maps and we can have a look at exactly where these battles took place:
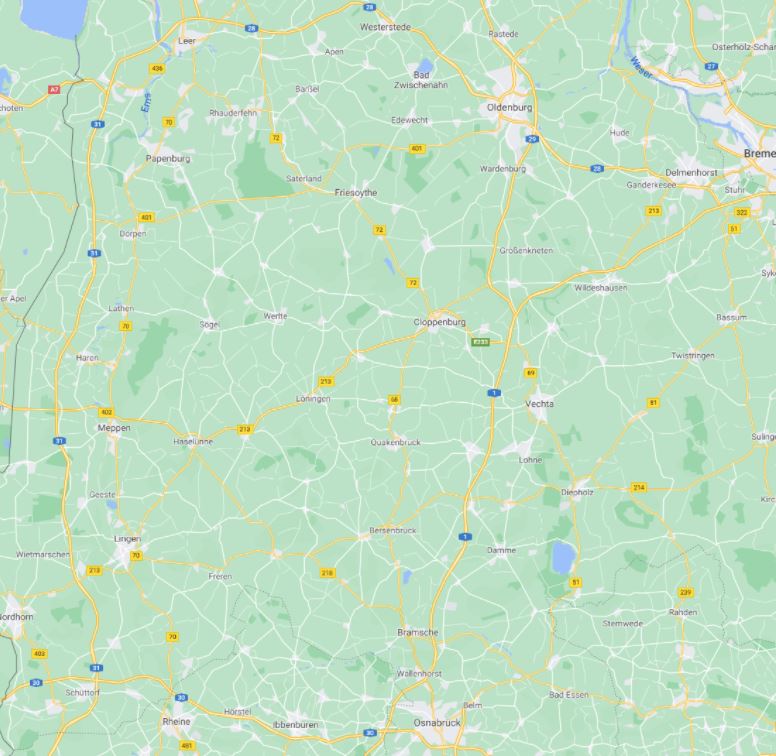
This is a very interesting bit of countryside to be fighting over and provides plenty of exciting opportunities when it comes to designing a table. One thing of note is that using the satellite view we can see the vegetation in the area.
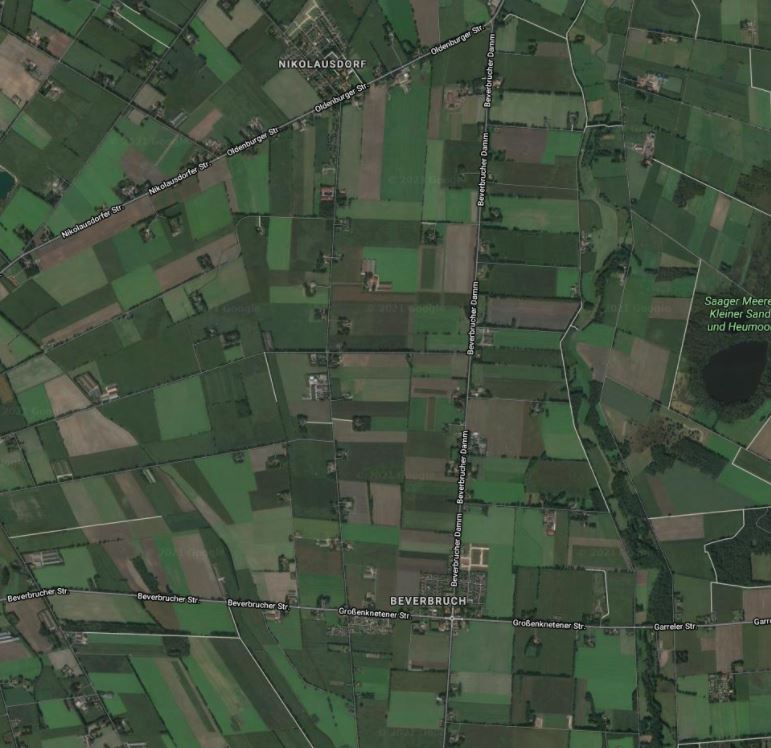
Lots of tree-lined fields and roads and tightly grouped clumps of buildings, with the occasional river wandering through the terrain, and lots of smaller streams and brooks (hint: using the map view draws all waterways in blue, making them very easy to see)
Scrolling between the main towns of our engagement, Osnabruck, and Oldenburg, I’ve picked out a few features that I would like to incorporate into my table design.
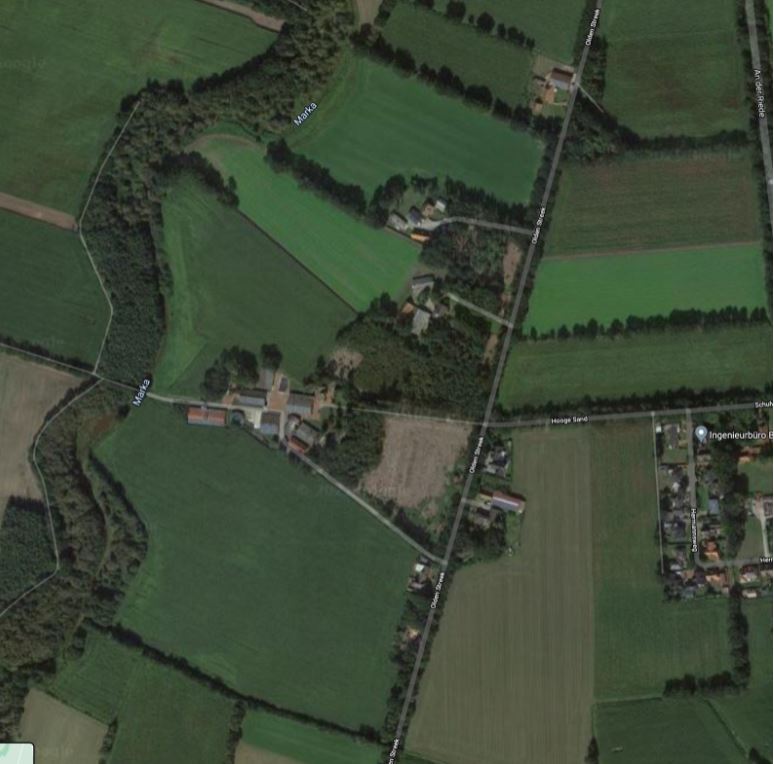
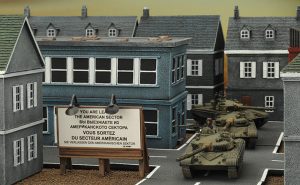
This image shows a small industrial/farming block, with a lot of woods and fields close by. This image also inspires road placement, with bigger, straighter arterial roads leading to the bigger towns, and the smaller roads following terrain and linking the infrastructure together. There is also a stream present in this shot, which is lined with foliage.
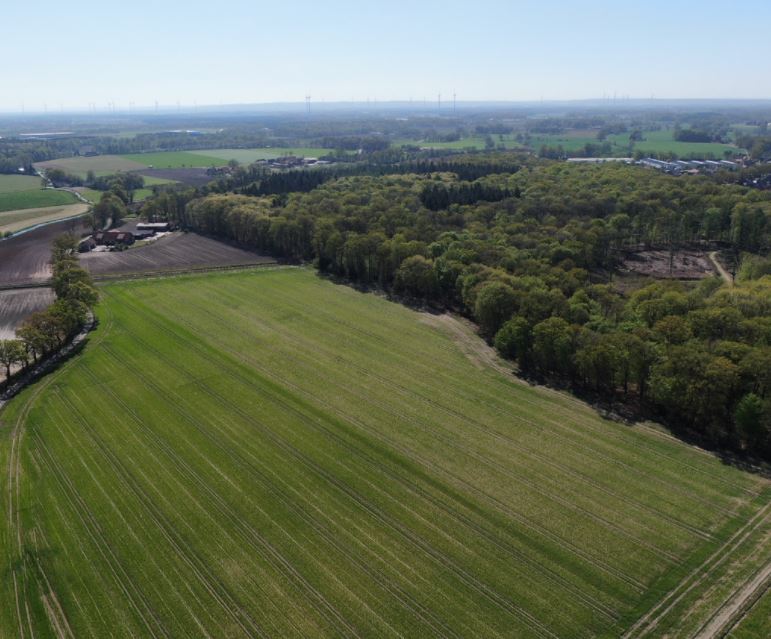
And this is a great drone shot of the landscape, which reinforces how green Germany is. Lots of woods and tree lines that could provide cover and concealment, and big open fields for maneuvering units quickly and efficiently.
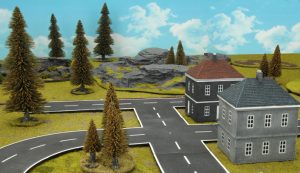
With all this in mind, I set about designing and building a table.
And that’s what I’ve come up with! Without focusing on balance I’ve built a table that has a huge amount of visual interest but more importantly allows for far deeper tactical strategy. This table, although it looks like it’s covered in terrain, could realistically be constructed without everything pictured. As an example, a lot of the trees can be removed and the woods base tiles can substitute, the treeline along the river can be represented with far fewer trees, and the walls and hedges can be represented with other pieces of linear terrain to achieve the same effect.
The most important part of this table, and one of the most important parts of any European table, is the linear terrain. Battlefield in a Box sells a very expansive range of options that make obtaining some great looking terrain very easy, however, making your own is also an option if you have the time and resources. Check out the key linear features I’ve used here:
- BB135 Train Tracks
- BB138 Rural Fields & Fences
- BB168 Village Walls
- BB191 Concrete Walls
- BB243 Bocage
- BB246 Tree Lines
- BB560 Streams
This battlefield will feature live in our first-ever Twitch Plays event! Make sure you tune in live and check it out over at our Twitch Channel to find out how well it plays, with you in the driver’s seat!
Most importantly, keep posting your table designs on the social media pages! Table building is just as collaborative as list building, so post your tables and discuss designs with others to help everyone get the most out of the hobby!
~ Ryan
Second line formations
When players think of the West German army they usually think of an elite force, with highly skilled infantry, good morale, and very modern vehicles. In Team Yankee v1 West Germany had the Leopard 2, the best tank in the game and now that we’re running v2 the Leopard 2A5 will dominate the field, West German infantry is second only to the Israelis but with better weapons, like the Milan.
This is reflected in the ability to only deploy small but effective units. Multiple formations are not common in NATO (with some exceptions like British recce or American HMMWV) but are also far rarer when talking about West German. When considering this you run the risk of being outnumbered by the enemy, especially in a blue vs red game.
Coming in at 33 points is a Leopard 2 Zug, which now isn’t the most expensive tank in the West German arsenal. Czechs and Syrians can deploy 33 T-55AM2s for the same amount, Iranians can deploy 24 T-62s, and East Germans can deploy 12 T-72Ms. Despite these tanks not being a threat for a Leopard 2 frontally, their number may allow them to flank the Front Armour 18 tank and easily destroy them.
If you are already a West German player you’ll know what I’m talking about, but playing expensive tanks that cost 17 points each, or the latest IFV like the Marder 2 may not be the best way to field West German forces and this where the M113 Panzergrenadier Kompanie really shines!

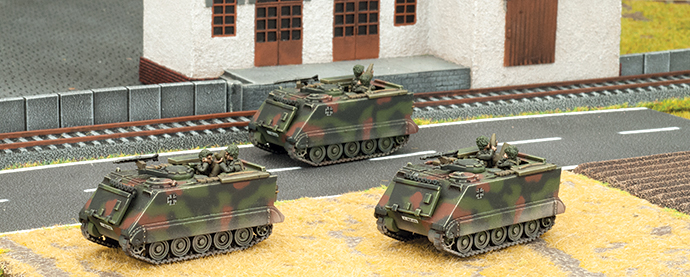
M113 Panzergrenadier Kompanie
A Panzergrenadier battalion consists of three Panzergrenadier companies. Two of them are mounted in Marders 1 and one is mounted in M113s. The M113 equipped Zug are organized the same as Marder-equipped ones, but they have three Milan anti-tank missile systems instead of two. Unfortunately, they don’t have access to the Carl Gustav anti-tank team, but that shouldn’t be a problem.
M113s are equipped with a 7.62 machine gun so they’re good at pushing back assaulting infantry during the defensive fire stage, but cannot manage enemy armoured personnel carriers. They lack the great gun on the Marder 2 (ROF 3/3, AT11, FP 4+) or the good gun on the Marder 1 (ROF 3/2, AT 7, FP 5+) but they keep the platoon cheap. A full M113 Panzergrenadier Zug costs the same as a full Marder 1 Panzergrenadier Zug and is 33% cheaper than a Marder 2, and in both cases, you get an extra Milan team.
The M113 Panzergrenadier Kompanie is composed of the HQ and two compulsory slots. One must be a M113 Panzergrenadier Zug, while the other one can be another M113 Panzergrenadier Zug or a Leopard 1 Panzer Zug. There is also another slot that is not compulsory, for another M113 Panzergrenadier Zug. As expected of a West German formation other slots give core units all the support required. There are two reconnaissance slots for Luchs armoured cars, which are the perfect fit to provide some cheap spearhead movement costing only 2 points for two vehicles.
Artillery is an important part of every war and the M113 Panzermorser is a definite must-have with its low cost and ability to shoot smoke bombardment. Adding an additional 6 armoured mortars should be enough to provide you with the necessary support, however, if you want higher quality you can always look at the M109G as an alternate option. It’s more expensive but is also more effective. Unfortunately, the M113 Panzergrenadier Kompanie only has access to the American version of the M109 instead of the newer M109A3G, but West German players can find all the support needed inside the formation anyway.
 Aircraft are usually a great threat for elite forces with their attacks being lethal against expensive tanks. Because of this having an anti-aircraft element is essential in every World War III list, particularly in a West German one. Even though this isn’t a traditional West German list, including anti-aircraft is important, try adding 4 Gepards since they’re also extremely effective against IFVs. Last but not least we have more AT21 because sometimes 9 Milan anti-tank teams are simply not enough. If you are looking for an alternate option try the Jaguar. They’re an interesting choice and thanks to the Forward Defense rule they can be deployed in addition to a normal tank platoon with a front armour of 4+.
This is my M113 Panzergrenadier formation:
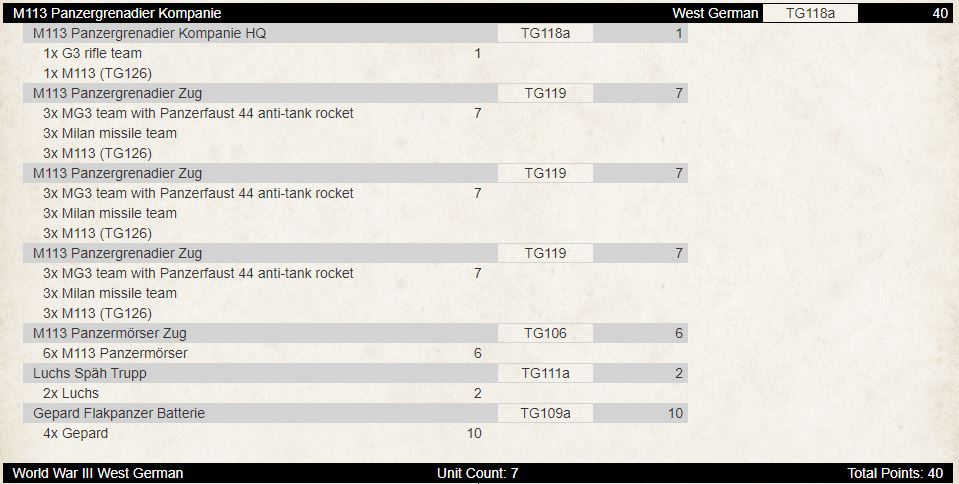
This is a great base for a West German Formation, consisting of three M113 Panzergrenadier Zug with 9 Milan anti-tank teams. Don’t focus only on Milan mind you, keep in mind we are talking about three units and that means you can occupy more ground by deploying them from different points. For example, take the Manoeuvre stance where some units have to stay and others have to move, you have recon for the Spearhead movement. Anti-aircraft or anti-IFV shots are provided by Gepards while the M113 Panzermorser platoon gives artillery or smoke support all for just 40 points. That means you still have more than 50% of your points for the rest of the force. Nice for a West German force, don’t you think? The rest is up to you, you could also deploy 3 Leopard 2s or 2 Leopard 2A5s if you really miss 3rd generation Main Battle Tanks, but this isn’t something I would recommend.
Leopard 1 Panzer Kompanie
Let’s look at another second-line formation with the German-made tank after World War II: the Leopard 1. These days there are many Main Battle Tanks roaming the World War III battlefields, however, this older tank can still be a threat for many WARPAC tanks. That’s the reason why the Bundeswehr didn’t retire them from service.
A Panzerdivision was made up of three brigades. Two of these brigades were equipped with Leopard 2 main battle tanks while the third brigade was a panzergrenadier brigade equipped with Leopard 1 tanks. They were to be the second line of defence after the Leopard 2s had engaged enemies and were on the retreat.
In the game the Leopard I is a lightly armoured tank. Its front armour is only 9, which is not enough to block a main battle tank’s shots. The good news is that every shot from an anti-tank over 17 will kill you without any hope of survival. Why is it good news? Well, if your opponent is shooting at your Leopard 1s with an anti-tank of 21 or 22, then their tanks definitely cost more points.
That means your opponent is investing many points into destroying just a few of your tanks. Because Leopard 1s are hit on 4+, statistically only 50% of shots should connect, (33% if you are maneuvering carefully using some concealment) meaning your maneuverability is your best defence. The side armour is quite poor at a value of 5, but the Leopard 1 also does benefit from Bazooka skirts which can provide a little bit of protection but won’t stop an assault from enemy infantry.
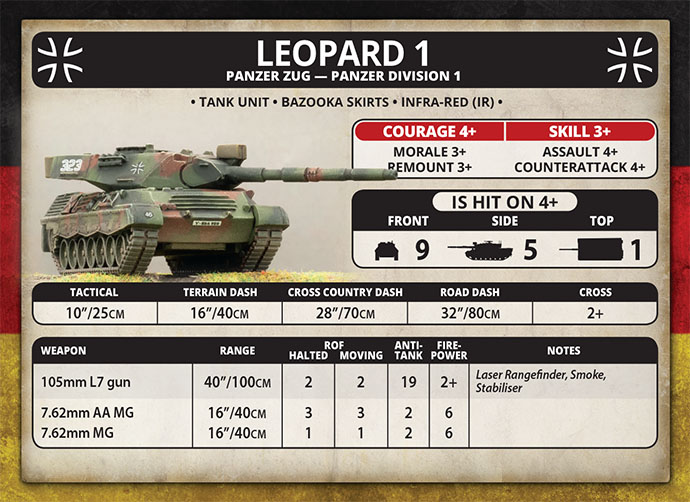
The third armour value is the top armour and is lower than the standard at just 1. This doesn’t make a great difference in close combat but will against artillery. Keeping your Leopard 1 moving and close to terrain should help with this problem. By now you’ll know not to trust the Leopard 1 armour, just try not to get hit! Its saving grace is the 105mm L7 gun with a range of 40” it can hit a target before the target has an opportunity to fire back. In fact, the Leopard 1s ROF is the same halted and moving, giving you the added benefit of moving out fast and getting off the first shot with anti-tank 19! This will be a real threat for the tanks of the WARPAC that usually put West Germany in trouble. A front Armour of 14-15 won’t offer much protection against this gun, so deploying a larger number of tanks is recommended. For less than 10 points you can deploy 3 Leopard 1s and with a small extra point spend you can have 4 tanks deployed. Being able to deploy a four-tank platoon is quite an incredible feat for West Germany.
The Leopard 1 Panzer Kompanie must be consist of an HQ (that can be composed of one or two tanks) and one Leopard 1 Panzer Zug. The second compulsory platoon can be another Leopard 1 Panzer Zug, a Marder 1 Panzergrenadier Zug or a M113 Panzergrenadier Zug. Usually, if you need an infantry platoon in the formation, I suggest the M113 Panzergrenadier Zug as it adds more anti-tank 21 to the force. You can also add another Leopard 1 Panzer Zug to bring more tanks to the table. The rest of the formation choice is the same as the M113 Panzergrenadier Zug we discussed before as both these formations are in the same brigade
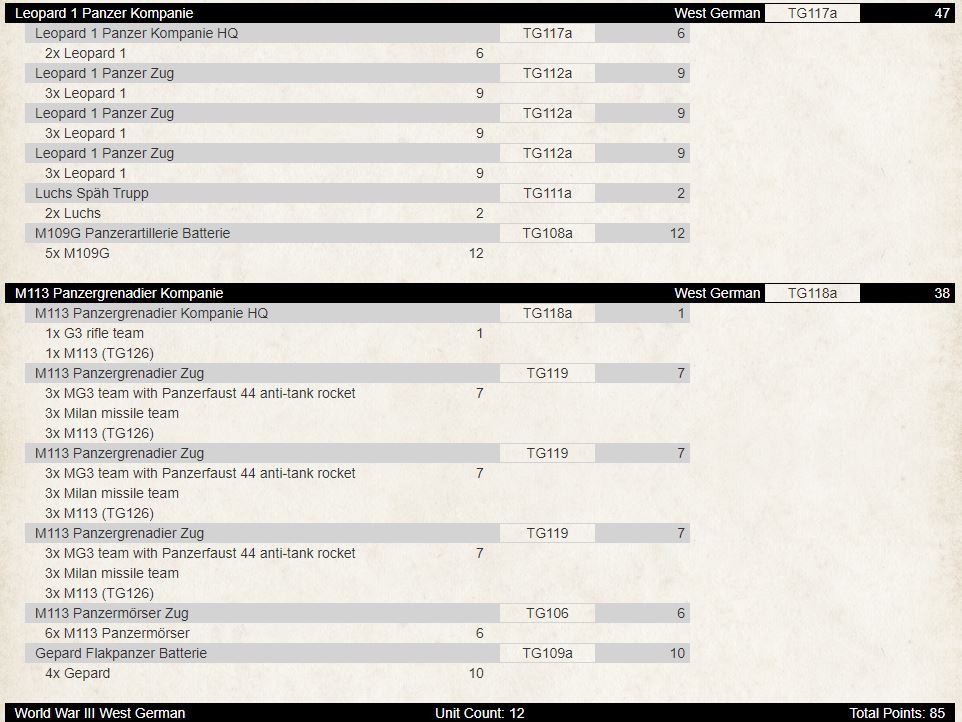
This an example of a Leopard 1 formation:

With 4 Leopard 1s per Zug, managing a tank swarm should be easy since you shoot at least 28 shots a turn. Anti-aircraft (and as we know anti-IFV) fire is provided by Gepards while high-quality artillery support is guaranteed by M109. Depending on the force you should have enough points left for support to deploy what the formation lacks. High anti-tank support is heavily recommended with an infantry platoon. An M113 Panzergrenadier Zug with three Milan missiles will be the perfect addition, adding both infantry team and anti-tank support for cheap!
To properly finish this article I’d like to share the new version of my old West German list:
As I’m sure you notice I have used more or less the same base I used on the base formations. The most important thing is to balance the support units between the formation. Remember that Leopard 1s are quite easy to destroy (at least if you are able to hit them!) so giving this formation some extra units should allow it to survive until the end of the match.