Fallschirmjäger in WWIII – the Green Devils and their Wiesels  


Modern Fallschirmjager jumping from a CH-160 Transall

Apart from the Gebirgsjäger Kompanie, one of the other formations I was really looking forward to seeing in the new West German book was the Fallschirmjäger Kompanie. These iconic warriors had a huge influence in WWII and in the development of new tactics and methods of warfare, which has carried on into the more modern battlefield of the 20th Century and beyond. Although you may not see a mass unit jump again, like the Fallschirmjäger did when they bravely jumped into Eban Emael in Belgium and in the Invasion of Crete during WWII, in what was some of the first successful uses of paratroopers, it did make other nations take notice and implement their own paratrooper programs.

The hard lessons learned in airborne drops like Crete and Operation Market Garden were that you needed to be confident of quick support to the often lightly armed and isolated paratroopers and that they needed to drop with adequate equipment to be able to handle both infantry and armour. Developments of weapons like the Panzerfaust and the FG-42 Paratrooper rifles are examples of what the Germans came up with within WWII to assist the paratroopers with these problems.

The Germans actually developed several early helicopter designs in WWII and some were used in limited roles such as observation vehicles, medical evacuations, and light transport examples such as the Flettner FI 282 Kolibri, and Focke Achgelis Fa 223 Drache are noted, but extensive allied bombing prevented any widespread use of the helicopter by the Germans in WWII. The Allies were also developing their own helicopter designs during the war, like the Bell 30, and Bell 47 (which entered civilian service in 1946), and the Sikorsky R-4. Interestingly the Sikorsky R-4 was the only Allied-designed helicopter to serve in WWII, it was used primarily as a search and rescue vehicle by the USAAF 1st Air Commando Group in the remote Burmese Campaigns against the Japanese.

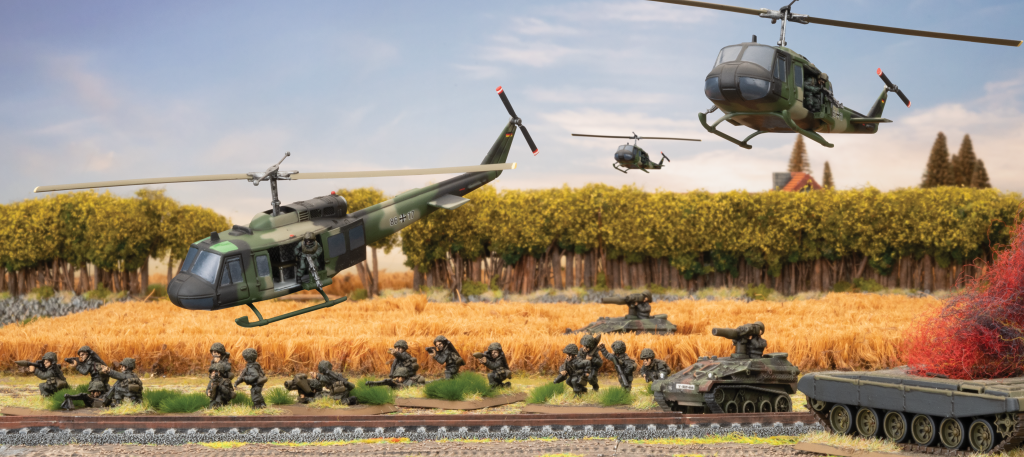
The introduction of the helicopter in the 50s and 60s was mostly used as either an observation vehicle or for quick medical evacuations as was seen in Korea, with the helicopters at the time being too small to carry many passengers or large weapon loads that would make them effective gunships or mass transports. It was not until the Vietnam War and the introduction of large turbine engine helicopters like the UH-1 Huey and CH-47 Chinook that you saw mass troop transport via helicopter.


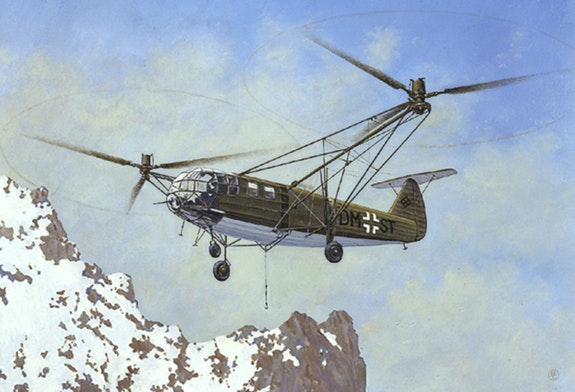
German WW2 Helicopter – Focke Achgelis Fa 223 Drache

The Vietnam conflict saw whole companies carried by helicopters into battle, one of the first was the Battle of IaDrang, where the 1st Battalion, 7th Cavalry Regiment of the US Air Mobile Division was dropped in, one company at a time, with 16 Hueys needed to drop each Company. Airborne assault units like the 82nd Airborne and 101st Airborne are now more often being delivered into combat via helicopter instead of massed paratrooper drops like in WWII.

There are a few reasons for this. Firstly, the slow-moving transports needed to mass drop paratroopers at low levels as they did during WWII would now be sitting ducks for enemy anti-air weapons, so any drops close to enemy lines would be very risky. Also inserting troops via helicopter is very precise, you know exactly where you are inserting them, unlike the mass of troops being scattered across kilometres, which was what happened in WWII. Helicopter insertion can also often be done into “Hot” drop-zones with the advent of helicopter gunships. These gunships can provide massive amounts of suppressing and supporting gunfire to inserted troops.

In the Vietnam War special operations, teams like MACV-SOG, Navy SEALs, and Green Berets were often inserted via helicopter, with support from gunships. They were also often extracted under heavy fire while covered by units such as the HA(L)-3 Seawolves, and the US Army Combat Aviation regiments with heavily armed UH-1B Hogs or similar variants, or Cobra Gunships. If you want to read some stories of heroism, I strongly suggest you look up stories about MACV-SOG and the Seawolves, some of the missions they survived beg belief.

In modern conflicts, it is more common for these airborne troops to be inserted via helicopter now instead of jumping from a plane, as you saw in the Invasion of Iraq in Operation Desert Storm, with 2,000 Paratroopers of the 101st Airborne Division being transported by around 400 helicopters, 155 miles behind enemy lines, in what was at the time the “deepest air assault operation in history”. So this is why in the Team Yankee period we are seeing airborne troops being transported via helicopter instead of parachuting into the action.

In the Team Yankee time period, the Fallschirmjager are part of the 1. Luftlandedivision (1st Airborne Division), which was made up of three brigades, Luftlandebrigade 25, 26, and 27. One Luftlandebrigade was assigned to each Korps and was usually stationed at the rear of each assigned area, they usually split Luftlandedivision helicopter assets between each brigade and had no specific helicopter transport units assigned to each brigade. The Luftlandedivision also had a small airlift field artillery battery attached to it, of what appears to be 6 OTO Melara M56 105mm artillery, originally designed for the Italian Army’s Aplini Brigades.

Each Luftlandebrigade was made up of three Battalions, and also had its own LuftlandepionierKompanie, and LuftlanemörserKompanie with 120mm mortars to provide direct fire support. Each Battalion was made up of two paratrooper companies, and two anti-tank companies, with each anti-tank company having a mix of TOW anti-tank missiles and 20mm rapid-firing dual purpose cannons that could be used in both anti-air and ground fire modes.

As far as transport helicopters, the Bundeswehr had either the UH-1D Huey or the larger CH-53G Sea Stallion available to ferry its Fallschirmjager into battle. Both are Vietnam-era warhorses, but still operate around the world today, with the UH-1D being able to ferry in 10 passengers, and the CH-53G has the capacity for 24 soldiers in 1985, but received upgrades in the 1990s to take 36 armed passengers. The UH-1D was used by the Bundeswehr up until 2021, and the CH-53G is still in service, but it is either in need of an upgrade or replacement to continue serving much longer.

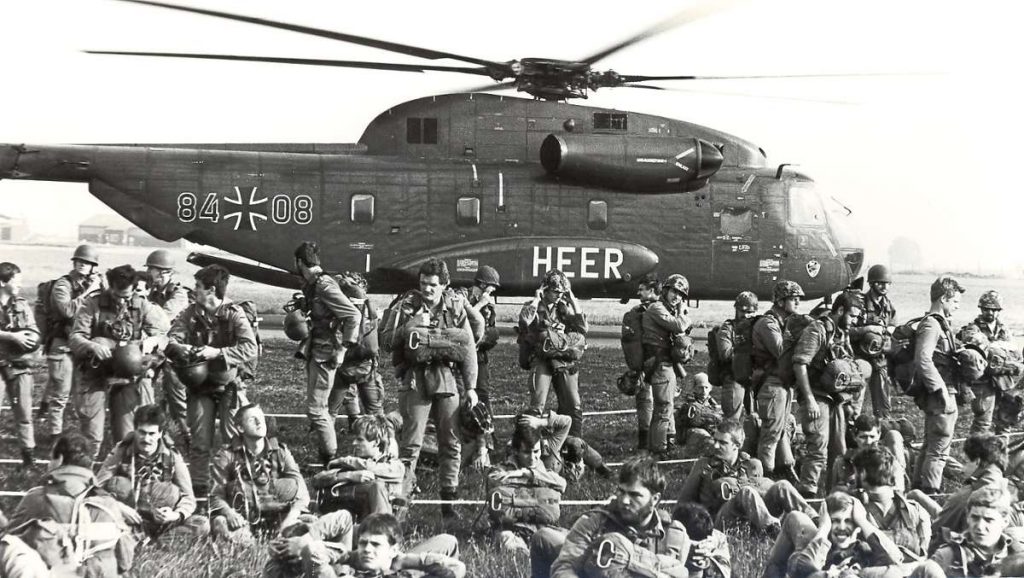
Bundeswehr Fallschirmjäger about to board a CH-53G

A German Bundeswehr Fallschirmjager tells a tale “of sitting in the UH-1D, only a few meters above the treetops, in their “battlefield taxis”, enjoying every moment, but also thinking they will crash at any time, with the Huey pilots laughing at them…”, they also trained to jump with parachutes from the Huey, for rapid insertion where it was either too dangerous for the helicopter to land or for covert insertion. They practised both low-level and high-level insertions, as well as disaster crisis missions, armed repatriation, and evacuation of German civilians in other countries.

As far as the battlefield in WWIII, their mission, in general, would be to act as a quick reaction force, to protect against enemy breakthroughs, engage the enemy on the flanks, or quickly redeploy in areas to bolster the defence. They would also be expected to act offensively, either as an air-assault unit, disrupting enemy communications and supply lines, or harassing enemy reinforcements.

They were considered light infantry and were armed with the typical weapons for the period, so H&K G3 Rifles,  MG 3 machine gun (which is basically an improved WWII MG42), and a Panzerfaust 44 anti-tank rocket launcher for use against armour within 300 meters or less. They were also armed with Milan anti-tank missiles, American TOW wire-guided anti-tank missiles, and for light armour and helicopters a Rheinmetall Mk 20 Rh-202 20mm autocannon, which is the same autocannon mounted on the Marder 1 and Luchs.


The TOW anti-tank missiles and 20mm Autocannons were originally mounted on a small military quad vehicle called a Kraka. It could either mount one TOW missile system or a single 20mm cannon with ammunition and was lightweight and small and foldable, with a top speed of 55 km/h. It could also be used as a battlefield ambulance, munitions carrier, and scout vehicle, and was very easily transported via helicopter. It was in use with the Luftlandedivisionfor for 20 years, from the early 70s to 1990, and was replaced by the Wiesel armoured weapons carrier.

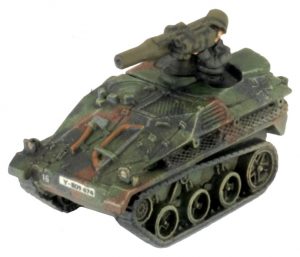
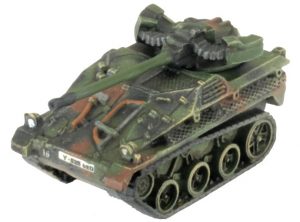
The Wiesel is unique on the modern battlefield, in that it is the only true modern tankette used in Western Europe. It is a light air-transportable weapons carrier made specifically for the Bundeswehr. They saw the need for an air-transportable weapons system to effectively enable their light infantry Fallschirmjäger to successfully engage and destroy modern heavy armour like the T-72. The Kraka quad was their first attempt at this solution, the Wiesel is an evolution of this. It was developed by Porsche who made some prototypes in 1978 but was stopped due to lack of funds. Porsche continued the development due to interest from other countries, the Bundeswehr eventually ordered 343 vehicles in 1985.

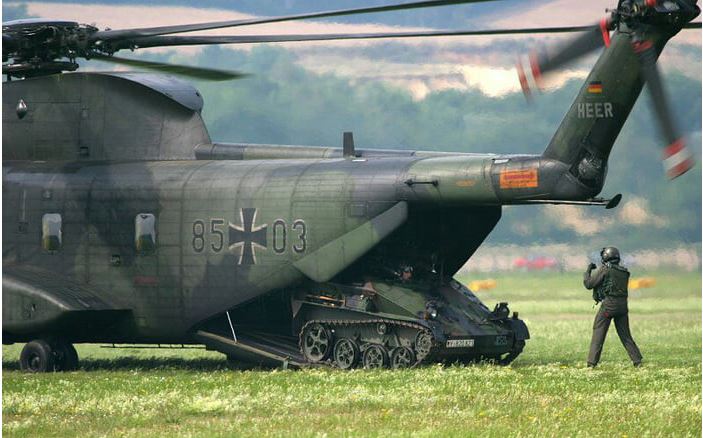
A Wiesel exiting a CH-53G Sea Stallion

It can perform multiple roles, from surveillance, anti-infantry, anti-armour, with the Wiesel 1 (the Team Yankee Version) being armed with either a TOW anti-tank missile system or a dual feed Rheinmetall Mk 20 Rh-202 20mm autocannon for anti-infantry or helicopters. A later variant, the Wiesel 2 Ocelot, can mount 4 Stinger anti-air missiles, as well as a 120mm Mortar variant, Engineering Scout variant, and Command variant.

It is an excellent reconnaissance and ambush vehicle, with a very low silhouette, a height of 2 meters, can travel at speeds of up to 75 km/h, and the chassis can protect from weapons fire up to 7.62 mm rounds. It also weighs less than a US Humvee at just less than 3 tonnes and can ford water depths of up to half a meter. But most importantly it is easily air-transportable, with the CH-53G Sea Stallion being able to carry 2 Wiesel’s, and larger transports like the CH-160 Transall being able to carry 4 or more. Incidentally, the CH-160 can also drop up to 88 paratroopers if they were going to drop into combat in the more traditional role.

Personally, I think this vehicle may take over from the WWII Panzer 2 Luchs, as my favourite tiny tank… as it now comes with missiles!

So having made up a list using the new Fallschirmjager Formation, the first thing I saw was that I needed more Wiesel’s…. not just because they look awesome, but because they were a cheap way to get very mobile TOW anti-tank missiles. So with one full Fallschirmjager formation only costing 25 points without helicopter transports, I got another one with an additional Zug with the helicopter transport upgrade. This gave me 8 TOW Wiesel’s and 12 20mm Autocannon Wiesel’s in total, with the TOW Wiesel’s being able to take care of most tanks, and the 12 Autocannon Wiesel’s being able to harass enemy AA and artillery as well as enemy infantry. They also flesh out your formations to make them harder to break.

As far as your infantry goes the Fallschirmjager Zug has 5 stands plus a Milan launcher, and you only get three Fallschirmjager Zugs per formation, so two formations give you six Fallschirmjager Zugs, with six Milan launchers. Although not as good as the larger Gebirgsjager Zugs, they still have six stands in total so better than the smaller Panzergrenadier Zugs from the Leopard book. They also still have the panzerfaust 44, which does good work if you are assaulted by armour.  This will give you plenty of infantry teams to either defend or push an objective, so although this is probably more of a defensive ambush list, the fact that the Wiesel’s have no armour means they do not count for deep reserves, still allowing you to play an aggressive list if you choose. Also, the Fallschirmjager Zug with the helicopter transport can be used if you want to try to grab an objective later in the game, ideally if you have taken out any nearby AA or units who will fire on it as they attempt to disembark.

In keeping with the Helicopter theme of the Fallschirmjager, I have taken two flights of 2 PAH,  for their anti-tank firepower, as they are the only thing that the Fallschirmjager can take with HOT missiles for more heavily armoured tanks. Having four of them in two units should make it harder for the enemy to counter them and the Autocannon Wiesel’s should be able to support them in either taking out enemy AA or enemy helicopters.


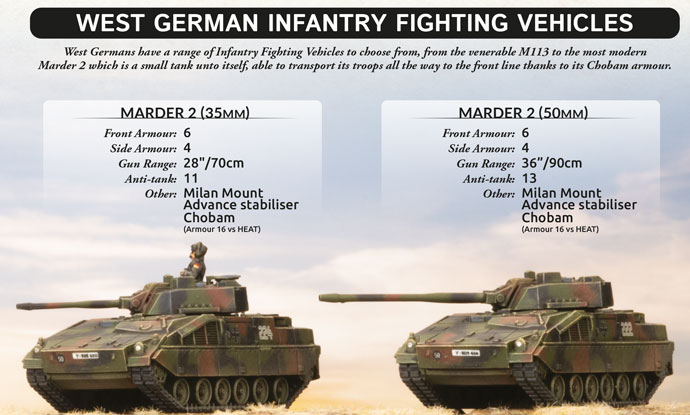
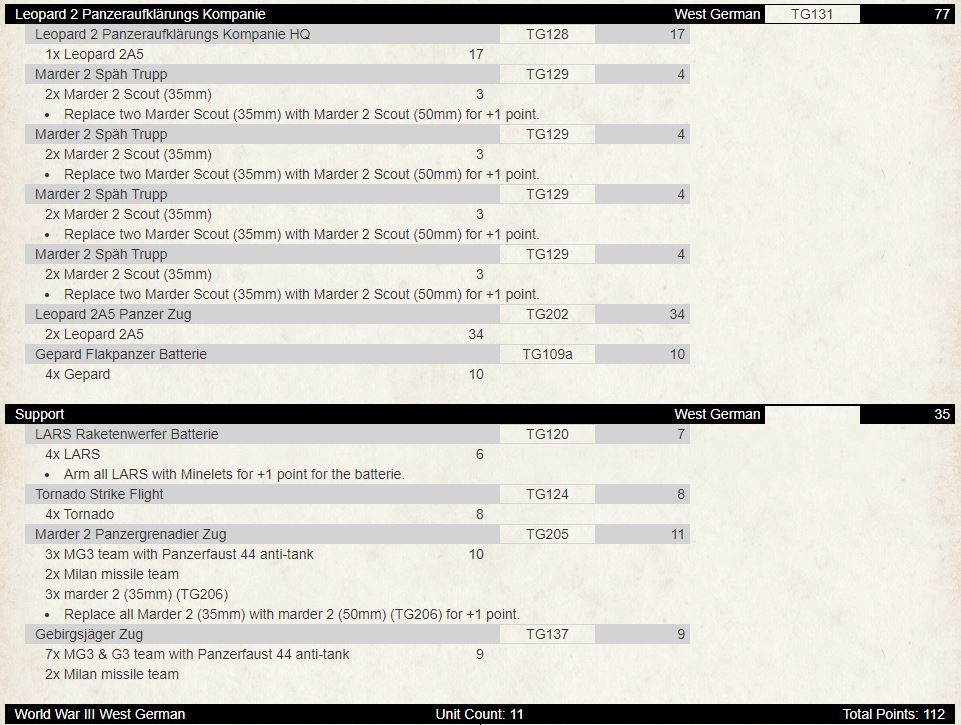
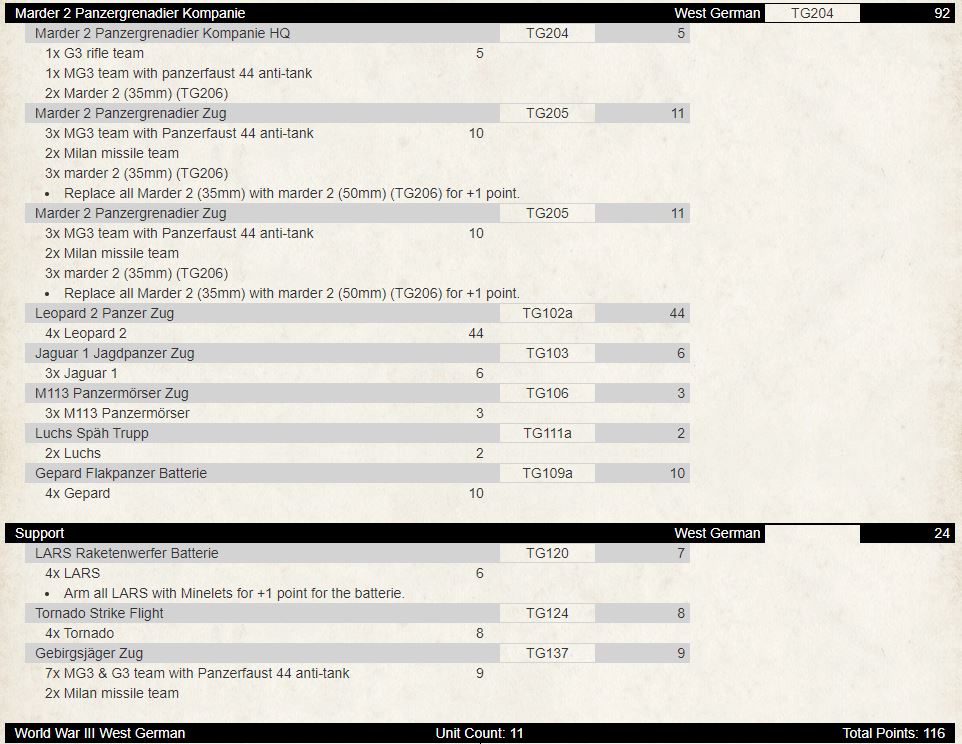
Another great new unit which I spied in the new book is the Marder 2 Späh Trupp from the Leopard 2 Pazneraufklarungs Kompanie. I can’t believe I didn’t notice this little gem earlier. For three points you get a small 2 vehicle Marder 2 Zug, with scout and spearhead, FA 6, Side 4, and top of 1. It also has Thermal Imaging, Chobham Armour, as well as a Laser Rangefinder and Advanced Stabilizers, so much advanced tech for such a small vehicle. It comes standard with a 35mm autocannon, range 28” AT11 and 4+ firepower, which is excellent in itself, but you can upgrade one or both of them for another point, to a 50mm main gun, which has 36” of range, AT 13 and 4+ firepower. I have found my sniper unit against AA and artillery, I wish I could take more, but unless you take the Leopard 2 Pazneraufklarungs Kompanie you can only take one as a black box support option. But these will be in pretty much every list I take from now on, I think these are that good!!! I can also see the Leopard 2 Panzeraufklarungs Kompanie itself as one of the few affordable ways to run the Leopard 2 or Leopard 2A5.

As far as the rest of the units, another Zug of Luchs for extra spearhead and things to annoy enemy artillery and AA, a LARS Zug with minelets for salvos to blanket AA, arty, and infantry, and to block off enemy routes of advance. I also never leave home without the Roland, just to shoot down enemy aircraft at the range, and if my opponent does not have any, they are cheap, so no great loss. You can also put them in reserve if not needed, so win-win. Another unit I never leave home without is the Leopard 1, I still think they are the point for point best tank in the game, people may not agree, but they are usually a smoking crater after I have flanked them…

So my thoughts on the Fallschirmjager Kompanie, is that this will be a bit of a high skill base formation to play, with you really needing to understand and abuse the low West German skill roll of 3+ (or better from HQ units) and to use your movement orders to get the best out of your units. This should not be new to West German veterans, as it is something they should be used to from the previous lists, but will be a steep learning curve for a new player. I do think it will be a very enjoyable formation to play, with lots of opportunities to ambush with the TOW or 20mm Autocannon Wiesel’s or even the Marder 2 Spah Trupp. Or you could have some interesting assaults with the Fallschirmjager both in defence or attack, and once you get the hang of it even try for the Holy Grail, the Helicopter Airborne Assault!

Well I hope you give it a try, I know I will be getting some for myself, especially those Wiesel’s and Marder 2s, I do love me some light armour!

~ Adam

Modern Day Blitzkrieg (Battle Missions Combined Arms)

Welcome ladies and gentlemen to a symposium on the modern blitzkrieg, or more commonly known as combined arms maneuver warfare. The German army since world war two has been very good at launching combined arms blitzkriegs and with the reinvention of the modern German army, it was lucky to have General Speidel at the helm who understood combined arms maneuver warfare. So how do combined arms translate to the game? Well first off we need to look at the extended battle plan missions as this will dictate what kind of list we take. We also need to know what stance we are going to take, be it attack, maneuver or defend, then we can plan accordingly.

For example, if you want to play a defensive list and think you can hold back the hordes of mother Russian and her allies then you need to build your list accordingly, taking into account things like deep reserves which will affect certain aspects of your battlegroup like tanks and FA4 and above transports. The next part to consider is your counteroffensive ability in order to launch assaults or to quickly shift the momentum back in your favour for holding objectives by the use of a quick response force (QRF) to contest or hold objectives until a more concrete defence can be mounted. The same needs to be done for both the maneuver and attack stance as we still need to mount a solid defence while remaining in an offensive posture as we launch our “blitzkrieg” on our unsuspecting opponent.

While looking at our options for attack and maneuver we need to take into consideration the ability to change the flow of the battlespace in order to keep the enemy on the back foot by placing pressure on one point but next turn be able to change to another by exploiting gaps in their defence, forcing them to shift elements of their battlegroup to counteract your move, thus giving you the tactical initiative over your opponent so that you can dictate the battlespace to your advantage.

So for this, we are going to use the West Germans as our army (who doesn’t love new toys) as the new book gives us a lot of options to pick from to make a list for all three stances.  Each list is made with a stance in mind. Now, this isn’t a foolproof guide and should not be considered as such as we will also look at all three lists individually.

First up the defensive list. Our core needs to be strong enough to hold objectives and to be able to counter assault if needed, with this in mind we have a couple of choices. Two options come to mind when considering our core; the Gebirgsjäger list with massed infantry that can hold objectives with their numbers, and Fallschirmjäger which when the need may arise can launch a counteroffensive or be utilized as a cheap QRF role with Huey transports. Both have decent infantry, however, the Fallschirmjäger do have smaller platoons which may become problematic as you start to take casualties as this diminishes your defensive capability. So for that reason, we will go with the Gebirgsjäger formation as it gives us large infantry platoons that have the staying power to defend. It also gives us access to a unit of cheap leopard 1s (Leo1) which can be used to fill that QRF role and can also be used as a deterrent for tier 1 MBTs (T80, M1 family, Challenger) from assaulting your infantry for fear of AT19 side shots.
For our defensive list at 120pts we have a Gebirgsjäger formation:

Our defensive infantry formation is only 55pts and gives us a strong core to hold objectives as you can have two platoons holding one objective each making it harder for your opponent to shift your infantry off them, as well as allowing you to use one of the platoons as a screening force similar to how a real-life company with defensive positions with a platoon in-depth for covering fire and rally point. It also gives us a cheap QRF unit in the Leo1s and some mortars for cheap arty that can if needed lay down smoke to help cover your infantry that won’t be affected by it as they have Thermal Imaging. This also takes into account the one unit that can be more than FA4 for those pesky missions that have deep reserves. So quite the bargain, however, I’m sure right now you think that this has nothing to do with a blitzkrieg. Remember, we still have 65pts to go. So knowing a strong defence is a good offence let’s look at the other half of our list.  The next consideration when defending is what we have in the reserves, as at 120pts, 48pts are allocated to the reserve. So with that in mind, we need to plan accordingly, but we also need to worry about Air and pesky Spearheads which can make you lose the tactical advantage.  So in this instance, it will be our Leo1 formation and Gepard’s as these will be most likely affected by the deep reserve special rule. Once our force is complete we then can look at defensive strategy and how to utilize our force. The good thing about this force is it gives us the ability to change the stance if we end up playing a different type list where a bit more aggression can be used.  The reason why the Leo1s are there is that when coupled with a successful blitz move, it’s a cheap way to bring in decent fire support and gives you the mobility needed to get to the right spot. Additionally, the Leo1s will be able to go toe to toe with T55 hordes or BMP hordes as their ROF both on the move and stationary is sufficient enough to put enough shots downrange.

The three recce units also give us some flexibility to go after enemy AA and arty. The Luchs will have no change to their role in the battlespace as these units will be able to get behind enemy lines quickly and hopefully quietly enough to take care of arty that will try to pin or kill your infantry once ranged in with repeat bombardments.  As for the Marder 2 recce, these nice little units of death with their 50mm 36”, ROF 3, AT 13 gun will be able to hit and run enemy units as well as provide a deterrent for assaults from enemy tanks and any that wish to be foolish enough to expose their side armour. By utilizing Blitz and Shoot and Scoot this unit can become an annoyance as their range will be long enough to become problematic. They’re also useful for supporting infantry assaults as they do have the protection of FA and SA 16 against HEAT thanks to Cobham armour.  So that’s our defensive list, it has everything we need to launch a blitzkrieg if required during the last stages of your defence when you may need to shift the enemy away from the objective or to keep IFV’s in check to ensure you can hold with your infantry.

Next up will be our maneuver stance list. This is where we will see the true form of the modern blitzkrieg come in to play as this is where we can start to make those lightning strikes and shock and awe moves that put your opponent on the back foot. For the list, I have gone with a Leopard 2 Panzeraufklärungs company as this gives you plenty of mobility and the ability to reserve your forces if needed without losing too much of your force. So keeping with the 120pts we have;

Leopard 2 Panzeraufklärungs company;

This list still gives plenty of flexibility, as the leo2A5s will be our reserves if required. First is our HQ, with the Leo2A5 we have plenty of staying power and can run with the other leo2A5s to keep them in the fight with re-rolls for morale and remount which will become crucial.  With three of these beasts, it should be no doubt what our shock and awe unit is just like the panzers of yesteryear. These will form the core of our maneuver stance blitzkrieg. Keeping with the theme and the stance we have rounded it out with 4 Marder 2 recon units as they have the armour, mobility, and firepower to keep up with the Leo2s by applying pressure on exposed flanks. Because these can spearhead we can start to threaten objectives early in the game if our Leo2s are not in the reserves. Who wants 3 FA 22 with SA 13 (16 against HEAT) in their face from turn 1? You can deploy 16” away using spearhead and then use the mobility and skill to get with 18” of any objective on turn 1 with any of these 5 units. We also have our combined force elements for support like our AA and arty for smoke and digging out pesky infantry. The LARS is a good arty choice as it has a good range, is a salvo with a decent FP as well as the ability to lay down a minefield if required to channel a flank or to force low skill units to go through it by dropping it on right on top of them (handy against regular soviet tanks especially T80s). Speaking of heavy armour that’s what our close air support (CAS) is for, as this will be able to make those tier 1 MBTs quake in fear if AA is not around to save them. Last is our infantry, we have two units: the Marder 2 infantry and the Gebirgsjäger platoon. The Marder 2 infantry will be able to keep up with the rest of the battlegroup, but not only will it give you some infantry to hold objectives it will also come with an extra 3 Marder 2s taking our total up to 11 giving us a combined 33 AT 13 shots a turn. Our last infantry unit is big enough to leave on our objective to secure it and defend it given it’s a 9 team stand unit. So that rounds out our list, with this stance we want to try to put pressure on the opponent and be quick enough to block or counter any move they make. As this is a quick force suited to lighting strikes, utilizing Shoot and Scoot to get back into cover to give concealment from return fire will be key.

Lastly, our attack list is designed so we get most of our battlegroup on the table. Keeping with the theme of combined arms blitzkrieg I’ve gone with a Marder 2 infantry company as this will give us enough to keep attacking and apply pressure. On to the list:

Marder 2 Infantry Company:

So this list has the infantry to hold objectives, especially the Gebirgsjäger platoon, and the Marder 2 infantry can advance and disembark once close to an objective and continue to threaten it and apply pressure so any mistake can quickly be taken advantage of. Now I’ve gone with Leo2A4s primarily because despite having less armour than the Leo2A5s it still has the same skill set and gun coupled with its TAC move that can threaten flanks and has the numbers to do so, it also has the ability to assault infantry and support your own if threatened due to its mobility.

The Marder 2s can also go hunting for tanks with flanking side shots due to their great mobility and skill. LARS and Panzermorser can lay down smoke if need to cover the assault but can also dish out the pain to dug-in infantry once ranged in – keep up those repeat bombardments. CAS will do its thing as previously stated in our maneuver list. The idea with this list is to have a locked-down flank with the Jag 1s who have the range and AT to deal with Tier 1 MBTs, then use either the Marder 2s or Leo2s to get flanking shots on them. The LARS minelets will also come in handy for this as well.

So there we have it, three lists for each of the battle mission’s stances, remembering to keep synergy with the battlegroup, as this is key in a combined arms force as each element has its part to play. Each list can choose another stance if required but do remember when choosing your stance take into account mission special rules as this may mean that you may have to place certain units in reserve like Marder 2s due to their high FA.

So I hope you enjoyed this little symposium on the combined arms utilizing the battle matrix stances, as this is an insight on how you could use these lists for each one. So good luck in your future games defending Germany.

~ Scott McCorley

Artillery Options for a WWIII West German Force

WW3: West German release brings in a couple of new units (finally) to add to your force that can complement your artillery options you may already have.  The M109A3G Panzerartillerie Batterie and especially MARS (MLRS) Raketenwerfer Batterie can add some real value to your force.  In this article we look at new and existing equipment, their stats, cost and compare them.

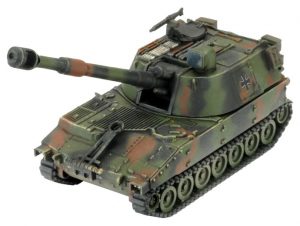
Starting off with the new equipment, let us look at the M109A3G Panzerartillerie Batterie first.  This is an upgrade to the existing M109G (with a longer improved barrel) and has partially replaced the M109G in frontline units.  The gun can deliver a potentially devastating AT4 artillery template out to 112” – pretty much anywhere – even on the larger tables!  Can fire a smoke bombardment and bomblets.  Even tanks need to fear this, you can catch everything underneath it with AT4, you can remove vehicles including tanks.  FP 2+ means anything that fails its saves is most likely to be destroyed.  Direct fire it can reach out 24” with Brutal, AT15 and auto firepower.  Nasty against non-Tanks and infantry.  They are armoured so have some chance of survivability – especially against counterbattery fire and have a cross check of 3+ which means you can park them in woods to conceal them and not too worried if you must move them.  Three for 8pts, four for 11pts, five for 13pts, six for 16pts.

Next is the MARS (MLRS) Raketenwerfer Batterie.  This is effectively the replacement for the LARS.  People are potentially split on this new option due to the 5+ firepower.  I think it has great potential depending on the force you want to run and how many points you may have to spend.  Each vehicle counts as TWO vehicles when firing which is great if you are taking three or more, as it means you can reroll misses.  It has a range of 120” AT3 and FP 5+.  With a salvo template you have the option to suppress your enemy and even destroy light vehicles.  With 5+ FP, if you are playing Czechs with their 5+ remounts, means bailing them is effectively taking them out of action.  What better way to take out six DANAs and RM-70s in counterbattery fire?  They are armoured so have some chance of survivability – especially against counterbattery fire and have a cross check of 2+ which means you can park them in woods to conceal them and be confident that if you must move them, you can almost all the time.  You can take two for 6pts, three for 9pts, four for 12pts.  You can also fire minelets for an additional 1pt for the battery.  The ability to take minelets, with each vehicle counts as two weapons means you can create a bigger minefield.  Very useful addition to have.  An auto-include for me when taking this unit.

Onto existing equipment now, we will start off with the humble M113 Panzersmorser.  This is the workhorse of the infantry formations and provides cheap in-formation ability to be able to pin enemy infantry for the assault or provide a quick smoke screen for your attack or take out light vehicles.  It has a range of 64”, AT3 FP 3+.  Very useful overall ability to take.  Armoured with a cross check of 3+ you can put in the woods for concealment and not be too worried if you need to move them.  Three for 3pts or six for 6pts.  This an absolute bargain and almost an auto-include if you are taking an infantry formation that has them as part of the formation.  They are also in the Jager formation which is slightly cheaper due them being hit on 3s instead of 4s.  Three for 2pts or six for 5pts for the Jager option.

Next up is the ending M109G Panzerartillerie Batterie.  This can be taken in most formations or as support.  Handy if you run a formation which does not have any inherent artillery (such as Fallschirmjager).  Useful to take if you want a second artillery battery in addition to you may already have in the formation – maybe pair it with the Panzermorser.  It has the same stats as the M109A3G except the range is 88” instead of 112” and direct fire is AT12 rather than AT15.  It can still fire bomblets and smoke.  Three for 7pts, four for 9pts, five for 12pts, and six for 14pts.

Finally, we have the very cool looking LARS Raketenwerfer Batterie.  It has a range of 80” AT3 FP 4+.  Useful AT3 and has a salvo template, so its good for pinning infantry and counterbattery fire. Its not armoured so you want to protect them and hide them if you can.  5+ cross check, so you do not want to put them in the woods if you can help it.  Park them behind woods instead if you can, so if you need to reposition them you can.  Two for 3pts or four for six points.  You can also fire minelets for an additional 1pt for the battery.

The tables below do a direct comparison across each of the weapon systems and will help you determine what you might want to include in your force.

Indirect fire:

Weapon Range Type Anti-Tank Firepower Notes
M113 Panzermorser 64”/160cm ARTILLERY 3 3+ Smoke Bombardment
M109G 88”/220cm ARTILLERY 4 2+ Smoke Bombardment, Bomblets
M109A3G 112”/280cm ARTILLERY 4 2+ Smoke Bombardment, Bomblets
MARS (MLRS) Raketenwerfer 120”/300cm SALVO 3 5+ Minelets
LARS Raketenwerfer 48”/120cm SALVO 3 4+ Smoke Bombardment, Minelets

Direct fire stats:

Weapon Range ROF Anti-Tank Firepower Notes
M109G 24”/60cm 1 12 AUTO Brutal, Slow Firing, Smoke
M109A3G 24”/60cm 1 15 AUTO Brutal, Slow Firing, Smoke


Movement Stats:

Weapon Tactical Terrain Dash Cross Country Dash Road Dash Cross
M113 Panzermorser 10”/25cm 16”/40cm 24”/60cm 32”/80cm 2+
M109G 10”/25cm 16”/40cm 24”/60cm 28”/70cm 3+
M109A3G 10”/25cm 16”/40cm 24”/60cm 28”/70cm 3+
MARS (MLRS) Raketenwerfer 10”/25cm 10”/25cm 16”/40cm 32”/80cm 2+
LARS Raketenwerfer 8”/20cm 8”/20cm 14”/35cm 36”/90cm 5+

The last thing to discuss is using the observer.  You can only take an observer if you take at least one unit of the above artillery units.  The advantage of taking an observer for 1pt is the ability to keep your artillery concealed out of sight and allows you to range in on a better skill.  Using an observer allows you to range in on a two instead of three (three instead of four in terrain).  Much better odds to range in first time to get the job done.

In summary, the West Germans finally get the new upgraded artillery options to complement existing weapon systems.  Choose the best unit that suits your requirements and cost to fit into your force.  Personally, I am excited about the new MARS (MLRS) Raketenwerfer.  I am looking forward to finally get them onto the table!

Whats the “Marder 2” With You?

The new World War III: West German book brings to the table another wonderful model, we are talking about the Marder 2. Despite the fact I only play East German at the moment I will be buying this model, I love it! The Marder 2 is a German-built second generation of Armoured Personnel Carrier (APC) and can be compared to the American Bradley or British Warrior.

History

The decision to develop a new APC for the West German infantry was decided in 1979 when the Leopard 2 entered service. The High Command was looking for a vehicle faster than any main battle tank, with a better gun, improved protection, and could transport 7 men. The contract was signed in the mid-1980s but field trials only began in 1991. The Marder 2 IFV planned to enter service at Bundeswehr in 1998 and replace the old Marder 1, but, with the end of the Cold War, the vehicle was no longer needed so was decommissioned due to funding problems. However, I think it’s safe to assume that things would be different if the Cold War went HOT!

Weapons and Amour

The Marder 2 was equipped with a stabilized Rheinmetall MK 35/50 Rh-503 twin-calibre automatic cannon. Curiously this gun had an interchangeable barrel mounted on a universal breach and can be fitted with either a 35mm or 50mm calibre. Thanks to the thermal channel and the laser range finder the gun would be effective both at night and at long distances. The gun could use both APFSDS-T and HE rounds with a ROF of 400-177 rounds per minute, depending on which barrel was used. The Marder 2 armour was supposed to stand a 30mm AP round from the front and 14.5mm round on its sides, this was achieved through modular passive armour bolted onto the hull. Bringing the weight of this monster to 43 tonnes, which is heavier than the initial production of the Soviet T-72! A big tank needs a big engine and the MTU MB-883 turbocharged diesel engine with 1000 hp, provided the necessary power to meet the speed objective, allowing them to run the Leopard 2 off-road.

Marder II in World Word III: Team Yankee

Here we go, guys! Let’s have a look at how Marder 2 appears on our battlefields. West German has the best NATO troops and the Marder 2 isn’t an exception. They have a wonderful hit rating of 4+ making them extremely hard to land hits on (this is probably one of the best advantages of NATO) Embarked infantry will very appreciative! They also have a 3+ Skill that almost guarantees orders like Blitz and Shoot and Scott.

The Assault and Counterattack ratings are interesting with a rating of 4+. Usually, this kind of unit is pushed back by defensive fire so attacking isn’t always the best decision. Thanks to Chobham Armour that guarantees good protection against Heat weapons the Marder 2 is different, with a side armour rating of 16, it will definitely be a challenge for infantry units to engage, especially if they have suffered some losses or are pinned down. So look carefully at the Assault and Counterattack rating. The moral is the standard West German one of 3+ except for the Remount value of 4+ that makes remounting after being bailed out slightly more difficult, however, they should be protected by their hit values. The Marder 2 still has Thermal Imaging for the night fighting and may mount an infantry-carried Milan and two infantry can mount on the vehicle (same as Marder 1).

The standard Marder 2 weapon is the 35mm gun, it’s extremely effective and has a ROF rating of 3 both stationary and moving. This is impressive especially if you have to manage a Soviet swarm like BMP and BTR.

Advanced stabilizers allow the Marder 2 to move fast until 14” and still shoot like a Leopard 2. The range is an incredible 28” that makes them effective at long range thanks to the laser range finder. If math is not an opinion you can move up to 14” and shot at 28”, which means you can hit a target within 42” from your starting position. With an anti-tank value of 11, you have enough power to properly penetrate any second-generation IFV, and any shot that penetrates enemy armour will be very effective with a firepower of 4+. If you feel that 11 is not enough for what you intended to do with your Marder 2 you could consider upgrading to either a 35mm or a 50mm gun. This gives 2 extra points of anti-tank (13) for just 1 point. No other characteristic change, just the opportunity to penetrate more armour. Speed is another important element of Marder 2. The tactical speed is 14” (the same as the Leopard 2) this means they’ll be able to follow the West German main battle tank while shooting . Terrain dash is less impressive, with 18” on the Terrain Dash, 28” on Cross-Country dash, and 32” on Road Dash the Marder 2 is a little bit slower than the leopard 2. That shouldn’t be a big problem thanks to great tactical movement and the long-range options. The Marder 2 has many advantages if compared with the Marder 1, this obviously doesn’t come for free. The same Panzergrenadier Zug with Marder 2 costs almost 50% more than one equipped with Marder 1.

A comparison between IFV
The Marder 2 is the West German version of the 2nd generation IFV. Let’s have a fast comparison between them!

Apart from skills and morale that are determinate by the nation, the first thing to note is that it has less protection than the Bradley. With the M2A2 version, the front armour is only 5 against the 6 of the Marder 2, side armour could seem the same but it’s just an appearance. Because the Bradley only has Appliqué Armour (that guarantees side armour 13 against HEAT weapon) instead of the super effective Chobham Armour (that guarantees 16). Have a look also at Assault and Counterattack values, the Bradley is not as effective while assaulting. Movement is another big difference with the American counterpart as it’s slower on tactical movement (which is the most important in my humble opinion) and similar in its dash movement. The main Bradley weapon is the 25mm Bushmaster gun, that have the same ROF (both halted and moving), but is less effective with a range of only 24”, an anti-tank of 8, and firepower of 5+.

The gun has a Stabilizer instead of an Advanced Stabilizer and lacks a laser rangefinder, at least the Bradley can shoot at a Helicopter, where the Marder 2 can’t. The advantage of the Bradley is without any doubt the TOW-2 missile with an anti-tank 23. The Marder 2 can only mount the Milan missile, which is usually quite effective.

The British Warrior appears similar to the 1st generation IFV if you compare it to the Marder 2, despite that it can carry up to three infantry bases. It lacks any sort of protection against HEAT rounds and only has Infra-Red instead of Thermal Imaging. This makes the rating of the Assault and Counterattack less attractive as any infantry will be able to push them back with defensive fire due to the poor side Armour of 2, also, the front armour isn’t impressive, it’s half of the West German one unless you pay for the unarmoured version. Tactical speed is the other big difference between the Warrior and Marder 2. The British one can only move and shoot at 6” while, as we know, the West German one can do the same things moving at 14”. The weapons are the 30mm Rarden gun which has less range, less anti-tank, and less firepower. The Anti-Tank rating is honestly quite similar to the German one but the difference of one point on firepower is very important. Like the Bradley, the Warrior lacks a laser rangefinder but can shoot at helicopters.


The comparison with the Soviet BMP-3 is the most difficult because the warfare of West German is exactly the opposite of the Soviet one. The  West Germans are an elite force that must be very careful not to expose themselves to their opponent (they are so expensive!) while the Warpact plays like a swarm, with tons of tanks and infantry moving to the opponent. The IFV characteristic represents this style. The BMP-3 doesn’t have any protection on the side with a rating of 3 (however it’s enough to manage 12.7mm) and the front armour is slightly lower than the Marder 2. The speed of the BMP-3 is the most common with a rating of 10” and they have similar ratings for dash movement.

The BMP-3 has a lot of weapons, the 30mm gun is similar to the Warrior one but only has a range of 20”. At least it has a laser range finder that helps. The 100mm gun is definitely not as effective against tanks or IFV due to the poor anti-tank rating of 5 but is useful against vehicles with an armour of 0 and dug-in infantry thanks to firepower 2+. It also has Brutal which helps not only against infantry but also against unarmored vehicles. Laser rangefinder helps at long range, but don’t forget that the range is 24”. The best BMP-3 weapon is the Stabber missile that can be shot while moving. This means that they can move from a hidden place and shoot their anti-tank 21 missiles. This mix of weapons (missiles for tanks, 100mm gun for infantry, and 30mm gun for IFV) makes BMP-3 more flexible than the Marder 2, but the difference of rating and playstyle doesn’t allow us to make a real comparison.

Marder 2 in the book

In the new World War III: West German we find the new IFV can be found in the compulsory slot of Leopard 2A5 and Leopard 2. A particular Marder 2 unit can also be found in the Leopard 2 Panzerauflarungs Kompanie. Before you ask, of course, Marder 2 also has a dedicated formation in the book.
The Marder 2 Panzergrenadier Kompanie must be composed at least by a Marder 2 Panzergrenadier Kompanie HQ, a Marder 2 Panzergrenadier Zug and another platoon between Marder 2 Panzergrenadier Zug, Leopard 2A5 or Leopard 2 Panzer Zug. Curiously the HQ can be composed of a G3 Rifle Team and a Marder 2 or a G3 Rifle Team, an MG3 Team with Panzerfaust 44 anti-tank, and 2 Marder 2. This should allow the HQ to survive! The Mader 2 Panzergrenadier Zug can have 2 different sizes. As usual West Germans are not so good in numbers, the size is quite limited. The bigger Zug is composed of 3 MG3 Team with Panzerfaust 44 anti-tank and 2 Milan with 3 Marder 2, while the smaller only has respectively 2 and one of the same teams with 2 Marder 2. One of the new book additions (that is available for other infantry units) is the option to add one Carl Gustav Team and the formations still have more slots. You can add another Marder 2 Panzergrenadier Zug as well: this means you can deploy 3 -2 platoons and a Leopard 2 platoon.

The reconnaissance slots are composed of up to 2 Luch platoons, which are great to have as a cheap recon unit to make use of the spearhead movement. There are two different artillery slots in the formation. M113 Panzermorser is the cheaper option to bring on the table some smoke and an artillery template to manage red hoard. But you can also deploy something better, really better, and more effective. The M109A3G is another new entry in the book. This is a west German-made conversion of the American M109. The barrel upgrade allows it to use special ammunition variations. Yes, that means bomblets. This new version is a little bit more expensive than the older one but also has a better antitank rating of 15 at direct fire if someone comes too near. If you feel you need some more anti-tank (you never have enough) the Jaguar 1 is the best option to bring some anti-tank 23 on the table. Personally, I love them thanks to the Forward Defense special rule they can also be deployed on the table with another tank unit. The last slot is a must-have slot. Gepard is the perfect solution to manage both enemy aircraft and enemy IFV. They’re cheap and effective you can’t deploy any West German formation without them.
Last but not least the Leopard 2A5 or Leopard 2 option I have already mentioned. You can choose one of them instead of the Marder 2 Panzergrenadier Zug. Usually, it’s a good idea but they aren’t cheap and will force you to make some tough choices.

And that’s would probably be my Marder 2 formation:

The list is quite short, as expected from a West German elite formation. The infantry is supposed to sit on the objective and resist the Red Hoard thanks to the Milan and Marder 2 support. The Jaguar will wait to ambush against a heavy tank formation while the Leopard 1 stays behind as a mobile reserve against fewer armoured tanks. The Gepard could also be an option for an ambush as your opponent is playing a BTR-60 swarm. Aircraft should be properly managed by Gepard so Leopard 2A5 will dominate the field, fearing no enemy tanks on the front. Luchs will lead the spearhead in mobile battles like Counterattack, maybe followed by the Leopard 1. I would also really like to add some M109A3G but I feel that a cheap tank unit is more important for this list. However, 6 M113 Panzermorser should help against infantry, especially with the help of M113 OP.

I can’t wait to assemble the list and play it on the battlefield!