A common question we get is how long a turn of Flames of War takes. It can’t be instant, because setting up mortars takes longer than a second, but it also can’t be a whole day as an assault doesn’t have to take that long.
See Phil’s answer here to clear everything up:
‘The length of a turn is one Command Cycle: the time it takes for you as the force commander to receive reports, assess the situation, issue new orders and have them carried out (or interrupted by enemy action, necessitating a new command cycle).
As Von Clauswitz wrote long ago, “Everything in war is simple, but the simplest thing is difficult.” and “Action in war is like movement in a resistant element. Just as the simplest and most natural of movements, walking, cannot easily be performed in water, so in war it is difficult for normal efforts to achieve even moderate results.”
Everything take much longer when you are trying not to be killed. Soldiers who can hit a target 99% of the time in training will fire a hundred rounds to score a hit because exposing themselves enough to find a clear target will expose themselves as a clear target to every enemy soldier. A duel between two tanks can take hours, with only a dozen shots exchanged as they creep about in a tiny space, trying to get a shot in without getting shot in turn.
Net result, most turns (when compared to the time it takes for a real battle to move forward by the same amount) are likely to be 15 to 30 minutes long. Some, such as when the action is at close quarters, may be quicker, others such as when your forces are waiting for a minefield to be gapped, could be hours long’.
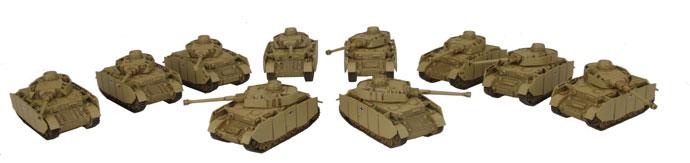
With the release of the upcoming books Ghost Panzers and Red Banner myself and Chris sat down and planned our next armies. Chris being the resident Soviet player grabbed the Red Banner book, meaning that I would be taking a German list: the first in a long time.
Taking the book over the weekend and having a read through (and also watching the great series on tanks on Netflix) my choices were narrowed down to a couple of the lists. As much as I loved the idea of a small but hard hitting Tiger or Panther force, I wanted a few more models on the table. So I jumped at the Mixed Panzer Company.
Using the upcoming Bӓke’s Fire Brigade as the core of my force my list was starting to take shape. I knew I wanted a couple of the big tanks—Panthers and one of my favourite tanks of the war, the mighty Ferdinand. So with a mix of Panzer III’s and IVs I feel that I have a good basic core to my force. Looking to the future I am planning on Armoured Panzergrenadier Company.
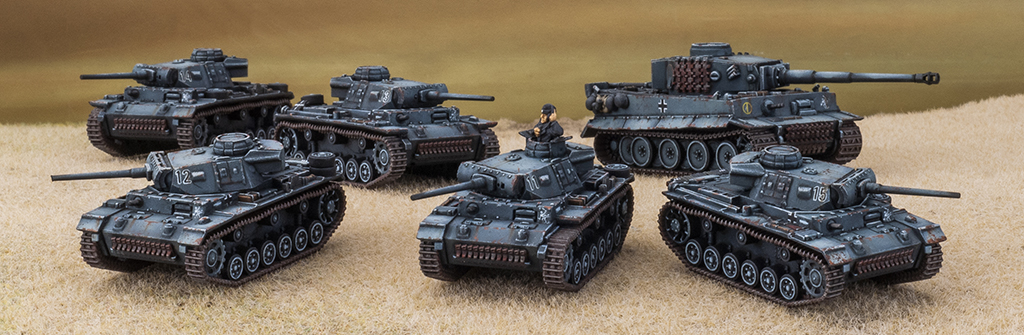
Mixed Panzer Company HQ 21 pts 1x Panzer IV, 1x Panzer III
Troops 27pts Panzer IV Platoon, 2 x Panzer IV 25pts Panzer III Platoon, 3 x Panzer III 36 pts Panther Tank Platoon, 2x Panther
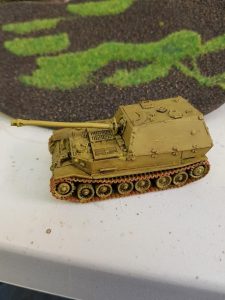
Support 17pts Ferdinand Tank-Hunter Platoon, 1x Ferdinand
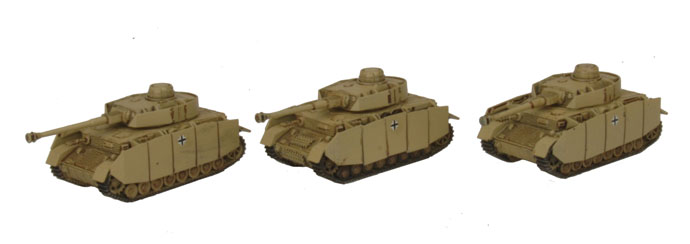
I started my Flames Of War journey earlier this year when I was invited an joined in the annual Battlefront Staff trip down to Panzerschreck. The aftermath of the weekend of fun was I now had ten Panzer IVs all painted and ready to go. Ghost Panzers has introduced the German Panzer IV to Mid War so this seemed like a great chance to take parts of it into a Mixed Panzer Company, expand my Flames Of War collection and get a Mid War army all set.
I partnered up with Andrew for Panzerschreck and we sat down to plan out what sort of forces we’d be taking for the Late War doubles. Early on I decided I quite liked tanks and eventually I settled on Panzer IV Company. This paired up well with Andrew’s Finns who would bring mortars, guns and an infantry company to round out our force and cover all the bases. Our plan was to go all out offense and take our chances and win big or lose big. The aftermath of the weekend of fun was I now had ten Panzer IVs all painted and ready to go.
My games at Panzerschreck taught me some much needed respect for the T-34 (Andrew and I lost to a pair running absolutely massive T-34 companies) but also a great deal of pride in the effectiveness Panzer IVs that they easily became my favourite German tank. With that in mind I will be making a 120 point force using the Mixed Panzer Company. I like slightly larger games and means I’ll get a few more goodies on the table (as will my opponents).
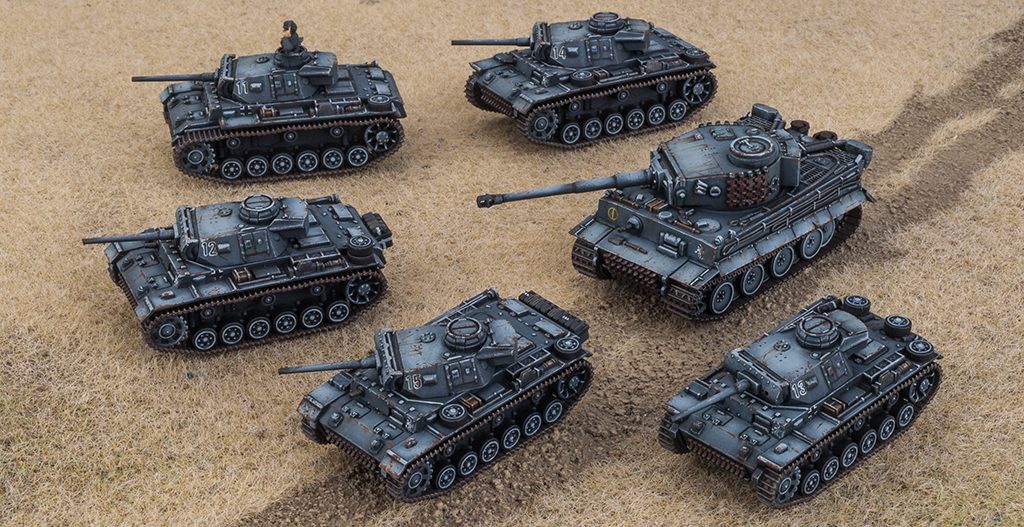
First step will be deciding just how many Panzer IV Lates I’m bringing. First step will be filling out my mandatory picks. My Commander will be riding along in his Panzer IV (this guy passed an unbelievable amount of saves) and I’ll be taking a platoon of four. With AT 11 and front armour 6 they’ll be able to take nearly all comers with very few questions outside of a KV or Churchill. To help out with those I’ll be bringing along two Panther tanks. Their tough armour is sure to attract some firepower but it will keep their eyes off the Panzer IVs with their aggressive +3 to be hit on working to my favour hopefully making the Panther a more tempting target to less powerful guns. Of course the downside is that those weapons that can penetrate the Panther reliably will be hitting more often so it’s a trade-off, but one I’m willing to try out since Panther tanks just look awesome.
With armour largely filling out the list (102 points to be exact) it’s time to look towards what else I need. Since I imagine the tanks will be the ones looking to take objectives I will need something that can hold the fort and take on infantry. For this I’ll be taking a full strength Grenadier Platoon in support and two sMG HMG teams. This will give me nice solid base of infantry with plenty of bodies and (hopefully) enough machine guns to deal with Soviet infantry based armies.
The overall battle plan for this list is fairly straightforward. The tanks themselves will be looking to take out the sorts of things that can destroy them ASAP. The Grenadiers will likely be expected to hold an objective, whether it’s in my own or if I have to take it from the enemy. I can’t rely on the Panthers for any tricks but hopefully they won’t need them
I expect this will be a fun army to paint up and model that adds on very well to my existing models. The new variety of tanks and infantry make this a hobby project I look forward to. I’m especially looking forward to seeing how the Panthers do on the table and start painting up the two I need. With some great results it could well suit me moving towards a Panther company but for now one project at a time!
After a busy week last week managed to get a little build time over the lunch breaks.
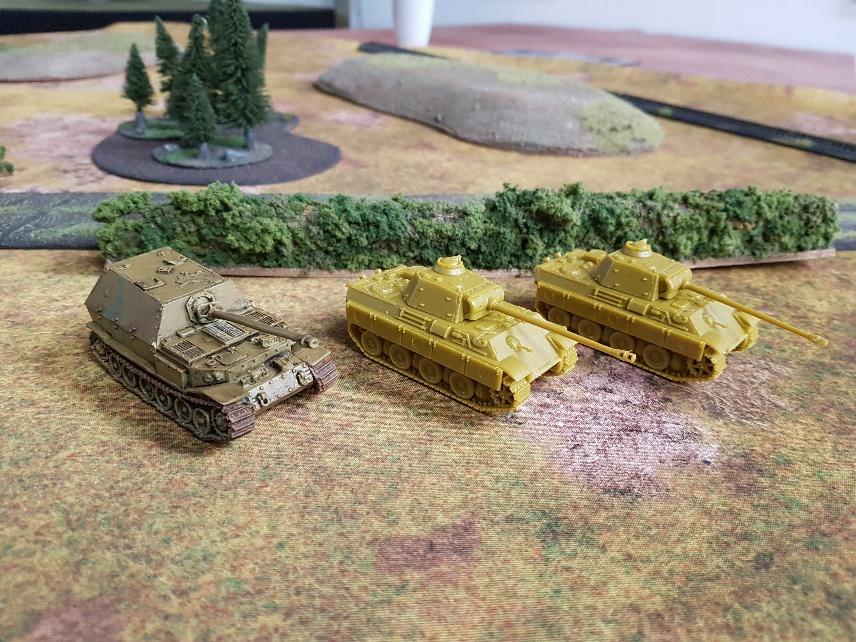
So up first are the armies big guns the Ferdinand and Panthers. I like to have a fairly dark scheme to my army so I start my undercoat with Grenadier Green before the base coat of Panther Yellow.
Next up is a wash and building the Panther Yellow back onto the tank before the camo and decals and then the weathering. I am a going for a dirty battle-worn tank rather than factory fresh.
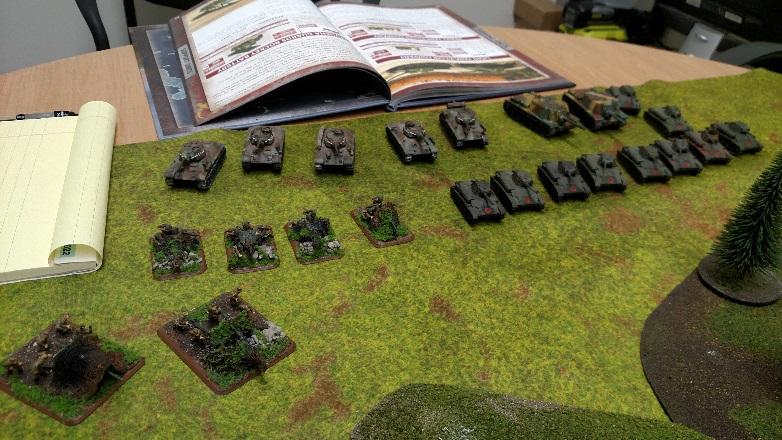
Dave’s Forces: 6ptsT-34 HQ 23pts T-34 Tank Company, 3x T-34 13ptsT-70 Tank Company, 10x T-70 30ptsSU-152 Heavy SP Battery, 2x SU-152 14ptLight Tank-Killer Company, 4x Long 45mm 9ptsHeavy Tank-Killer Company, 2x 57mm
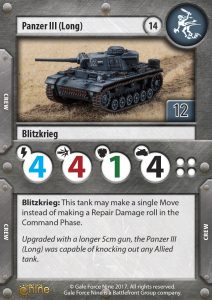
Brian’s Iron Cross Panzer III Company with Ghost Panzer Support 16pts Panzer III (Uparmoured) Tank Company HQ, 2x Panzer III 15ptsPanzer III Tank Platoon, 3x Panzer III (short 5cm) 15ptsPanzer III Tank Platoon, 3x Panzer III (short 5cm) 10pts Panzer II Light Tank Platoon,5x Panzer II 39ptsStuG (late) Assault Gun Platoon, 3x StuG (late 7.5cm)
We decide to try out some of the new lists and threw together an interesting Free For All. I positioned the SU-152 in the middle with both AT gun groups on the left in cover facing the PzIIs and StuGs, both tank groups on the left facing his PzIII tanks.
The 45s moved up through the trees with no problem on the left while the tanks moved forward to get shots on the right. There must have been a brisk breeze because nothing hit on the first turn. Brian then blitzed every unit he had (successfully) and returned fire much more effectively, killing both 57s on the left, one T-34 in the middle and two T-70s on the right.
The 45s then blitzed to the side and engaged the Pz IIs killing one and bailing one. The T-34s killed a Pz III in the Hq and the T-70s on the right moved forward to get side shots but missed entirely. My SU-152s moved to the left side and engaged the Stugs, missing both shots.
Brian then, in true form, killed one and bailed one with his Stugs. His Pz II attempted to get in the woods and assault the 45s, but only succeeded in getting one before breaking off. On the right his PzIIIs kill three T-70s and bailed two.
Needless to say, with my luck, my SU-152 ran away, leaving two poor 45s all by themselves on the flank. Time to try to kill some platoons and break the company. The 45s kill a Pz II and Bail another while the T-70s get in and bail one of the HQ Pz III. The T-34s move forward and kill two Pz IIIs in the send platoon. Return fire is substandard this time, but succeed in bailing all T-70s.
The T-70s run leaving only the T-34s on the field with a couple 45s, which drive off the Pz IIs. Unfortunately Brian makes all the rest of his morale rolls and the company stays intact with his Stugs on the objective.
8-1 victory to the Germans. It will take some work to get used to the overworked issue on all the units, although the better save on the AT guns are a relief and kept them in the fight.
As part of the last Live Launch for Iron Cross and Enemy At The Gates, I started some grey Panzers. Here’s the previous article…
I’ve since finished them off and am happy with how they turned out. The colour is a bit light and fantastical compared to standard Panzer Grey, but it stands out on the table and it was a fun experiment pushing contrast to the extremes.
Tomorrow I’ll be seeing how they perform in a TANKS! battle with Andrew, so I decided to make some custom cards.
Shortly after I joined the Battlefront team back in 2009, fellow Graphic Designer Casey was finishing off his Das Reich T-34s. I thought they were really interesting and I put it on a mental list of armies I would like to build one day. With the release of Ghost Panzers, and the command cards, now is the time.
As with most of my projects, the first step is research. Between quizzing colleagues, scanning books, and of course, Google, I collected all the images and info I could to see what conversions I’d need to do. J.C Von Winterbach’s article was also a good source…
I’m lucky to have access to spare sprues, but lots of the conversions can be done with spare parts you may already have if you’ve built other German tanks. For example, the Panzer III kit comes with both open and closed cupolas, so you’ll have spares of those. You may have also built some Panzer IIIs without the turret stowage bin, or Panthers without the side skirts, so you’ll have those to use for captured T-34s.
Next I made my V4 Flames Of War list using Ghost Panzers and the command cards.
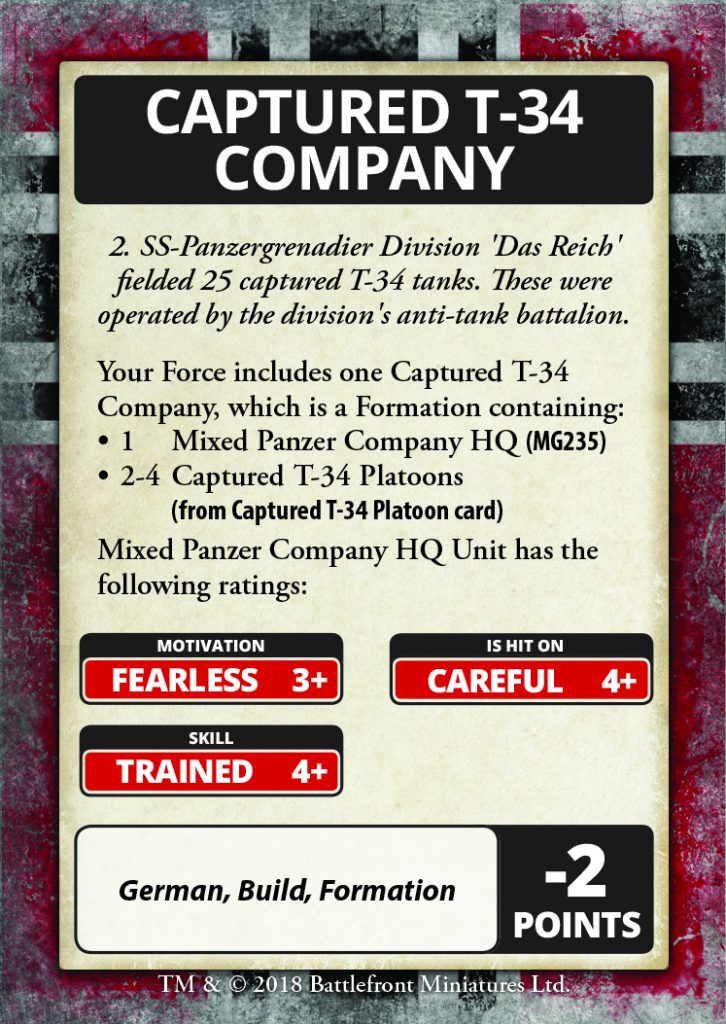
Captured T-34 Company:
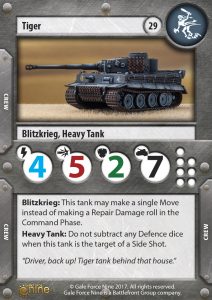
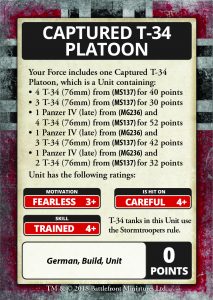
-2pts Captured T-34 Company Card 13pts Mixed Panzer Company HQ, 1x Panzer IV (late 7.5cm): 30pts Captured T-34 Platoon, 3x T-34 (76mm) 30pts Captured T-34 Platoon, 3x T-34 (76mm) 29pts Tiger Heavy Tank Platoon, 1x Tiger (8.8cm)
Total: 100 points
With the list planned out, I started gathering bits for the T-34s. Here’s a list of all the items I used.
– 6x Plastic T-34s
– 2x T-34 early turrets
– Plastic Panzer IIIs (turret stowage bins, cupolas, aerials, Notek lights)
– Panther side skirts
– Various bits of old metal stowage
– Plasticard
– Tin foil
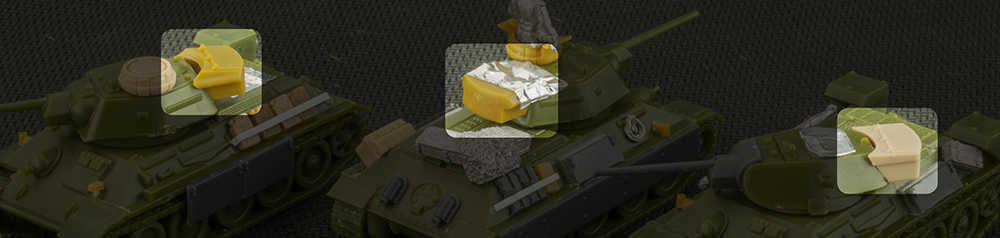
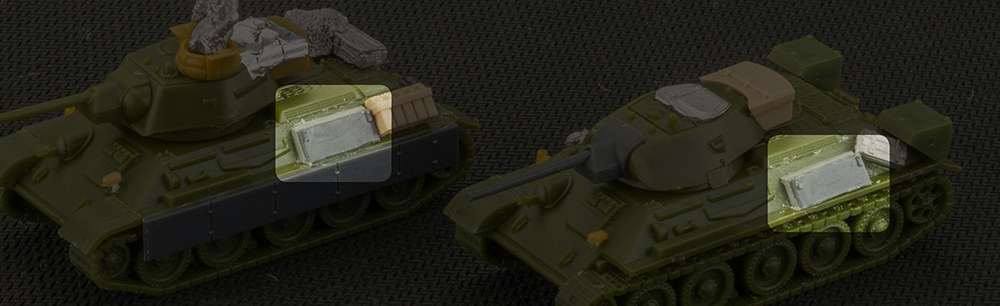
Stowage Bins From looking at photos it seemed quite common for the Germans to add extra stowage bins in various places on the T-34s.
The rear turret stowage bins from the Panzer IIIs fits quite easily onto the back of the T-34 turrets.
To create the angled bins on the sides, I used a section of Panther side skirt, glued it at an angle, and the filled the side with sculpting putty.
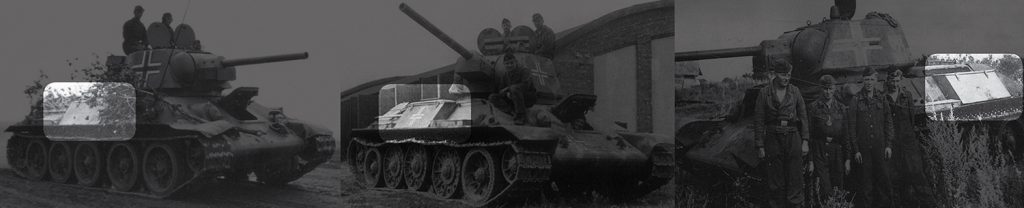
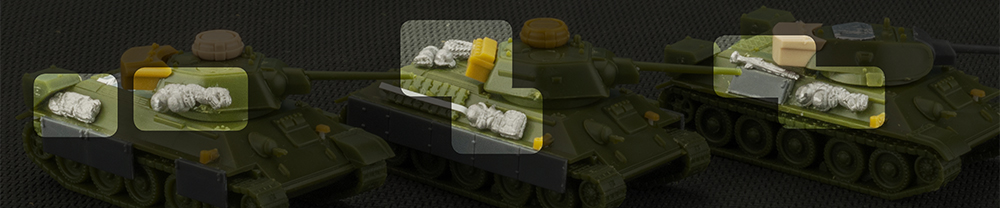
Cupolas
The Germans often upgraded their T-34s with Cupolas from Panzer IIIs. Simply remove the locator pin from the bottom of the cupola and glue in place.
Extra Armour
Less common than some of the other modifications, but too cool to not include, was extra armour around the turret and side skirts.
The side skirts from the Panther kit glue nicely to the sides of the T-34 hull. You’ll just need to remove one section to make them the correct length.
For the turret armour I chose to use the late Panzer IV kit, but in the photos it looks to be custom made.
Aerials and Notek Lights
These were carefully sliced off the Panzer III kit and applied to each T-34. For the Notek lights I used some thin plasticard rod to create the stalk.
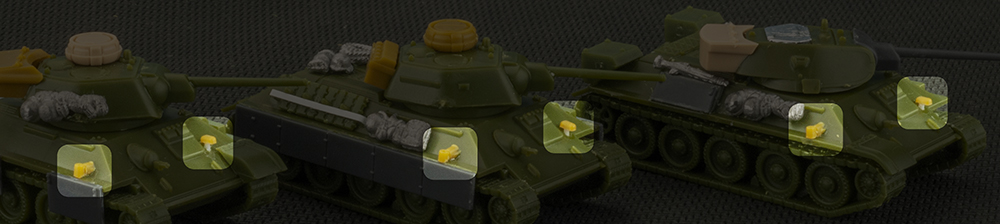
Spare Tracks and Jerry Cans
The Panzer III and IV kits come with spare cans which are great for any German AFV. I made holding brackets by cutting plasticard into strips about 1mm wide using a sharp blade and a steel rule. I then cut them down to the appropriate length and bent the ends with tweezers, before glueing them on with plastic glue.
Flags and Stowage
When using captured equipment there’s always the increased risk of friendly fire, especially from aircraft, so crews often used flags for easy identification.
I made my flags by cutting tin foil into rectangles, and then pressing them onto the tanks. I used superglue to fix them. The good thing about using tin foil is that it hold its shape and doesn’t spring back like paper can.
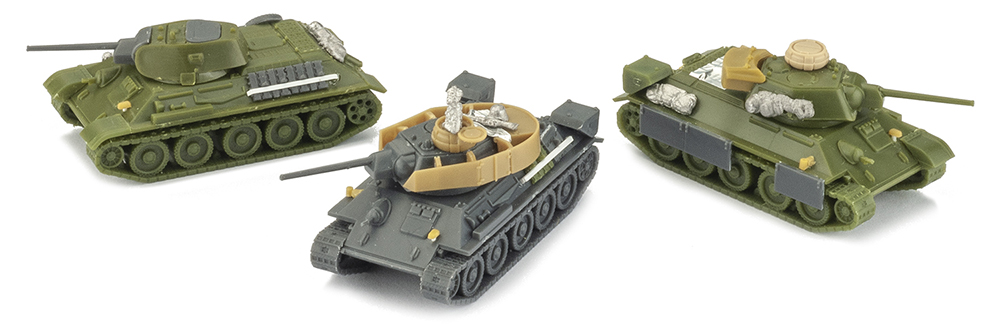
The finishing touch was to add some metal stowage from the special order range to make it look like the Germans had really made these tanks their own, and of course some German tank commanders.
With the core of the force built all that’s missing is my HQ tank and supporting Tiger which I’ll work on later.
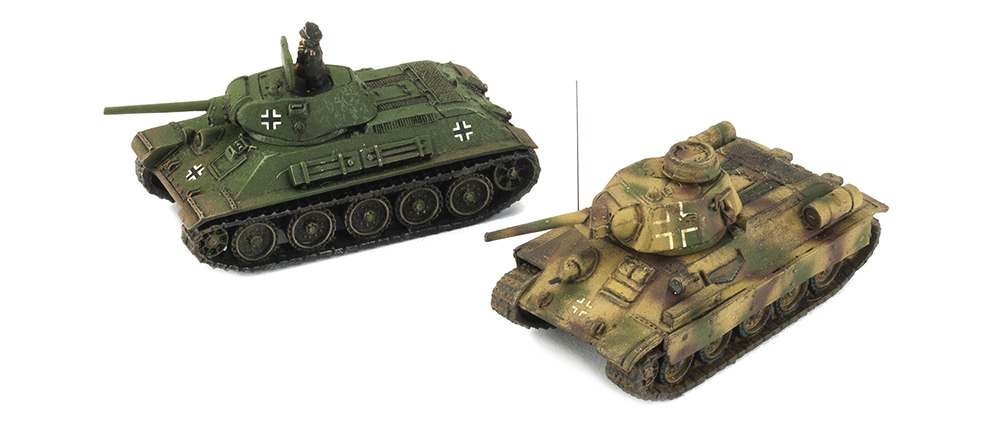
Hopefully this has inspired you to work on some captured T-34s of your own. Remember you don’t have to use all of the conversion ideas here. You can get a convincing captured look with just paint and decals. Here’s an example using just German crosses, and also one of Casey’s with 3 colour camo.
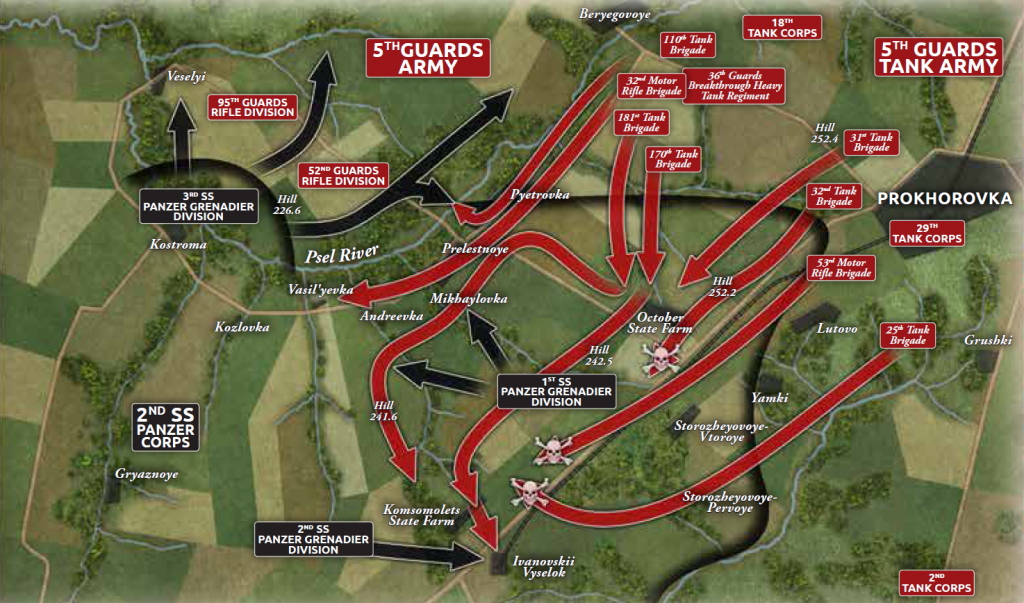
Both Red Banner and Ghost Panzers contain stories of great battles on the Eastern Front. One such battle, famously one of the largest and fiercest tank battles of the Eastern Front, took place outside the small town of Prokhorovka.
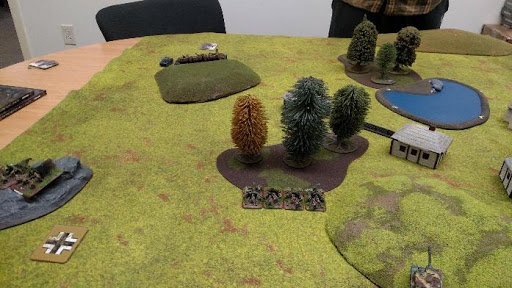
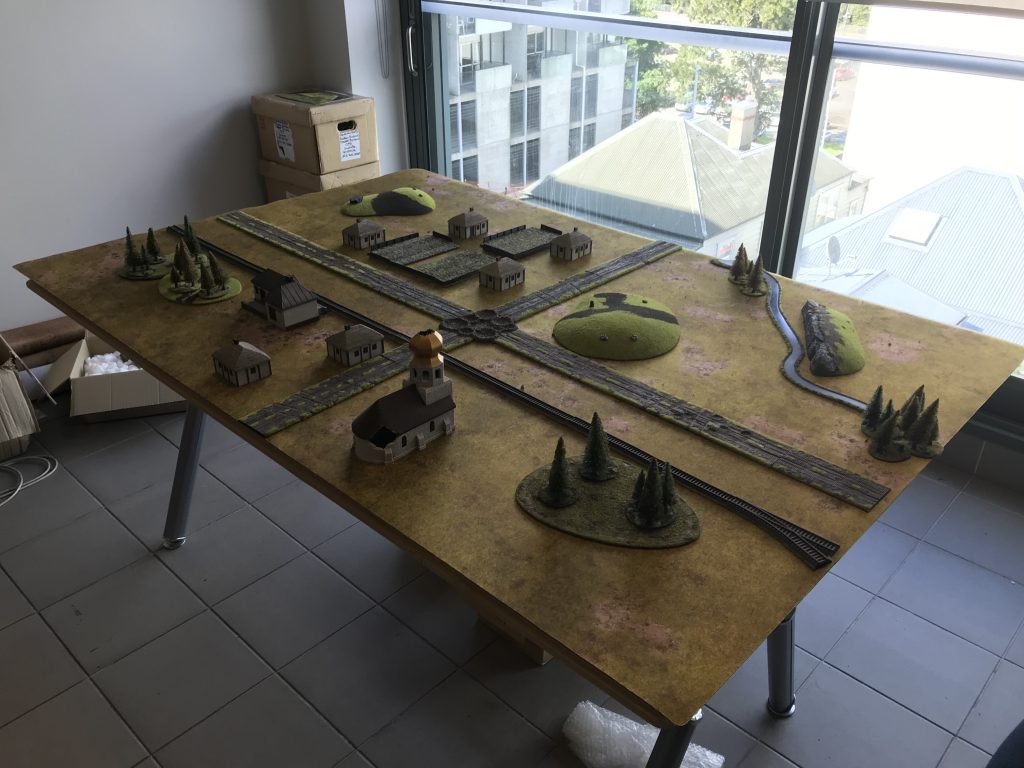
Using Battlefield in a Box terrain, you can recreate any number of historic battlefields for your Ghost Panzers and Red Banner armies to fight over. Knowing that I had a Live Launch to orchestrate, which would inevitably require battles needing to be fought, it seemed a fair opportunity to whip out some of the studio Battlefield in a Box terrain and put together my own representation of the Prokhorovka battlefield.
As an aside, it is probably prudent to mention that on a 6 x 4 table it is unlikely that one will be able to represent a full scale battlefield such as the one shown in the image above. As such, I settled on a particular section of the battlefield to represent. This gave me the chance to cover the battlefield in enough detail to make it recognisably Prokhorovka, without trying to condense hundreds of miles into a few feet.
Perfectly illustrative of combat during the Battle of Kursk, fighting around Prokhorovka, especially in and around the October State Farm, took place place over expanses of Russian steppe punctuated by the occasional village and forest. Hill 252.2, captured by 1st SS Panzer Division Leibstandarte SS Adolf Hitler on July 11 offered a commanding position over the field of battle.
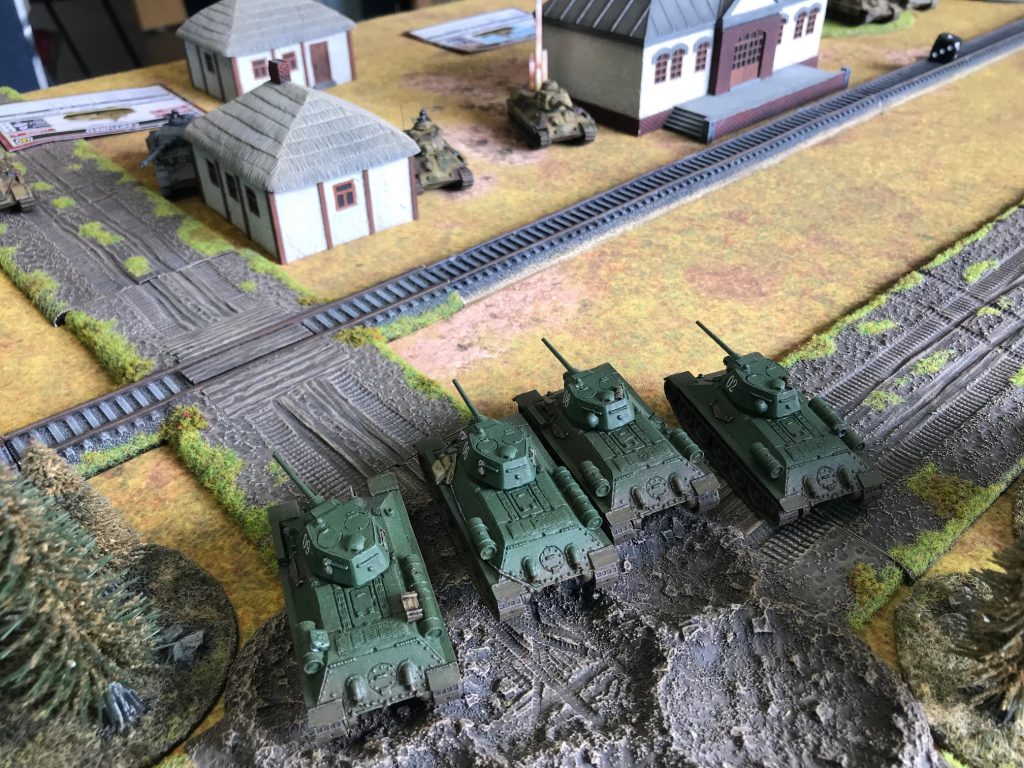
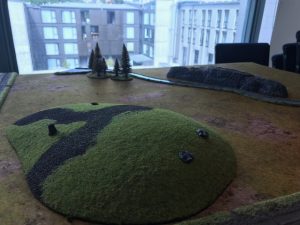
To recreate the battlefield around the October State Farm, I had to focus on some key features. Using Battlefield in a Box 2019 Premium Terrain Sale Rolling Hills, I was able to recreate the two hills on either end of the battlefield.
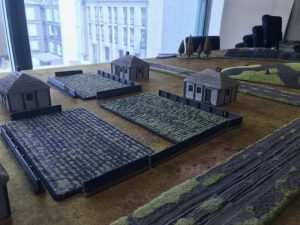
Rural Farm Buildings gave me what I needed to put together both the October State Farm and the small town just outside it.
Rural Roads and Rural Road Expansions, as well as Train Tracks criss cross the board.
Escarpments and Streams sit in one of the corners to represent the rocky streams the Red Army had so much trouble crossing.
Finally, a few woods dotted about provide concealment as well as representing the heavily forested areas outside the farm.
You will have already seen the battlefield in Chris and Casey’s Battle Report, and while it’s potentially a little too sparse for tournament play, the intention was always to evoke something of an ope Eastern Front feel.
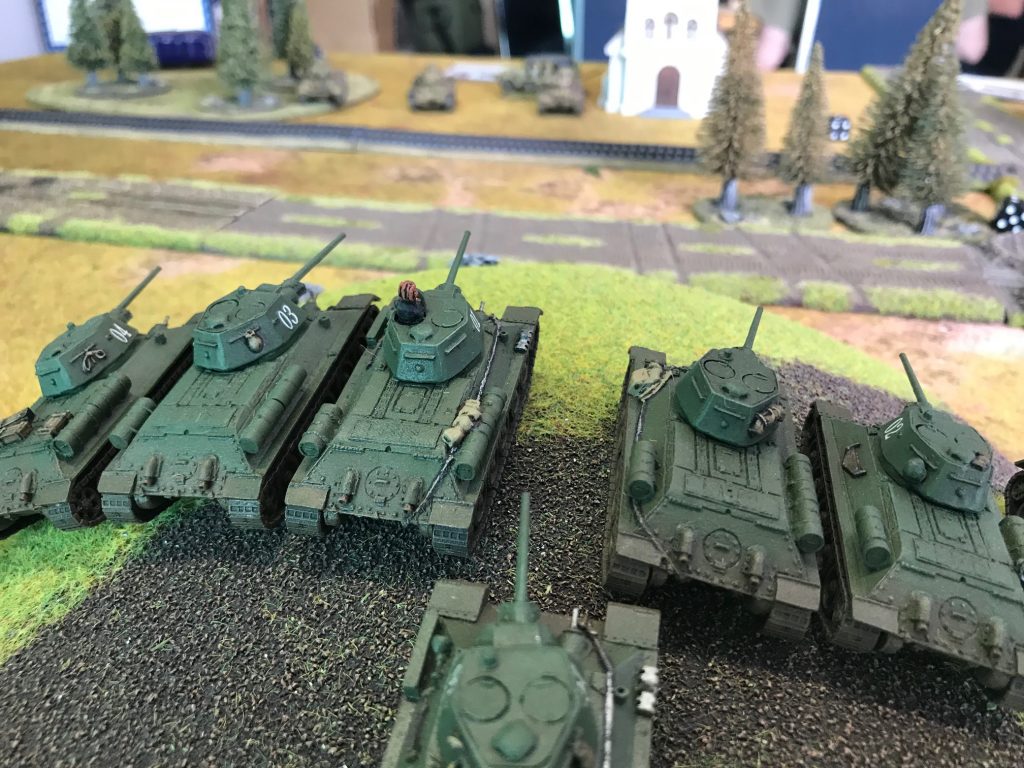
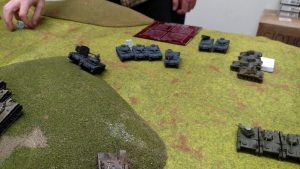
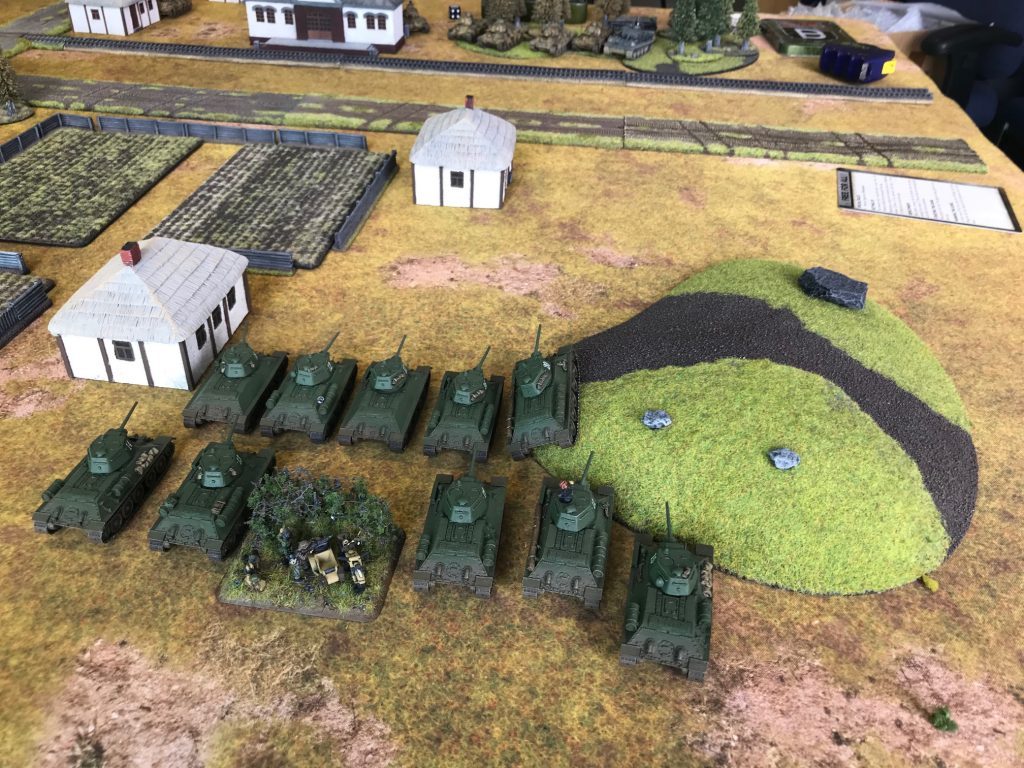
Facing off with Casey is always a fun game and this was going to be no exception. Usually, we find ourselves on the same side but this time things were different. Facing off a large number of Soviet T-34s against a smaller number of German versions would be a real test to see who could handle them the best – the Soviets that built them, or the Germans that captured them.
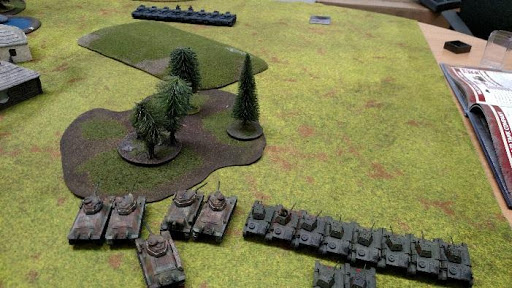
I deployed a line of tanks stretching across the table, confident I could manoeuvre as needed. Casey stuck to cover behind buildings and in forests. He knew I would be coming for him.
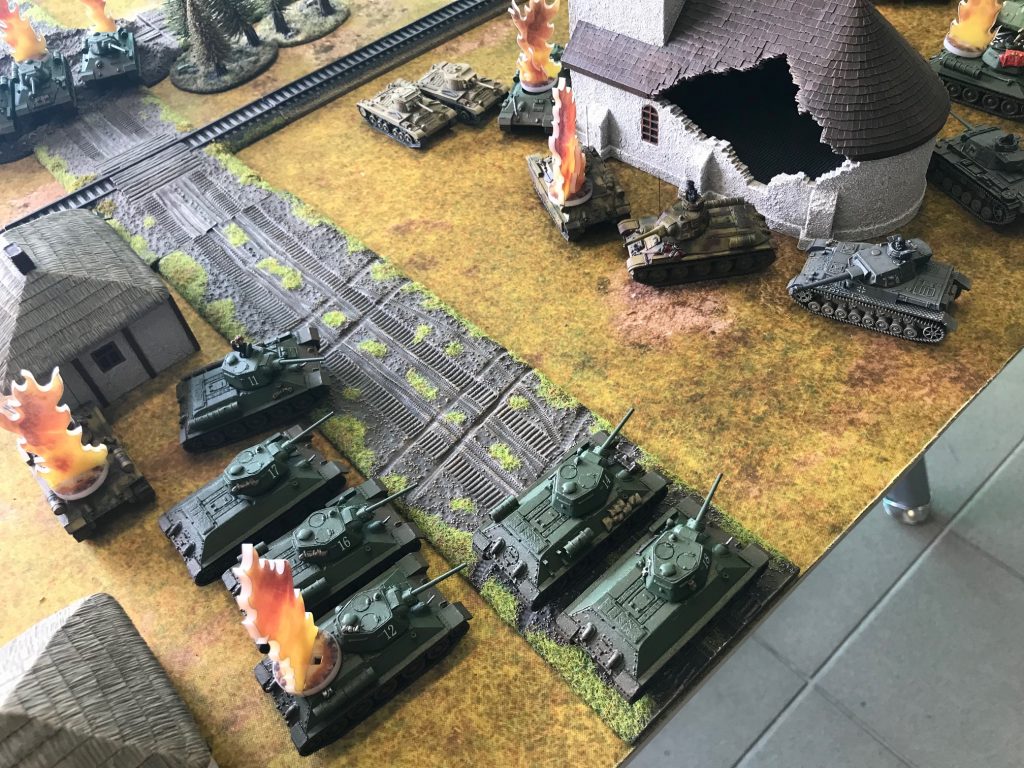
Rolling well (story of the first half of the game) I seized the initiative and surged forward. Over the next couple of turns I closed fast and hard, shooting where possible but focussing on position. Casey’s fire was inaccurate or just unlucky whilst mine accounted for some of his tanks with a string of lucky hits (or poor saves). This was especially lucky in the long term as it cut down the amount of incoming fire I would have to suffer.
Things started to change once we hit close range as Casey’s dice started to work their magic and his T-34s started hitting and killing their targets. The Tiger kept up a steady pace of fire knocking out 1 to 2 tanks a turn whilst his Company HQ Panzer IV proved to be deadly, constantly knocking targets off as they came into his sights.
Shockingly, my ram attack against a Tiger failed at the first roll.
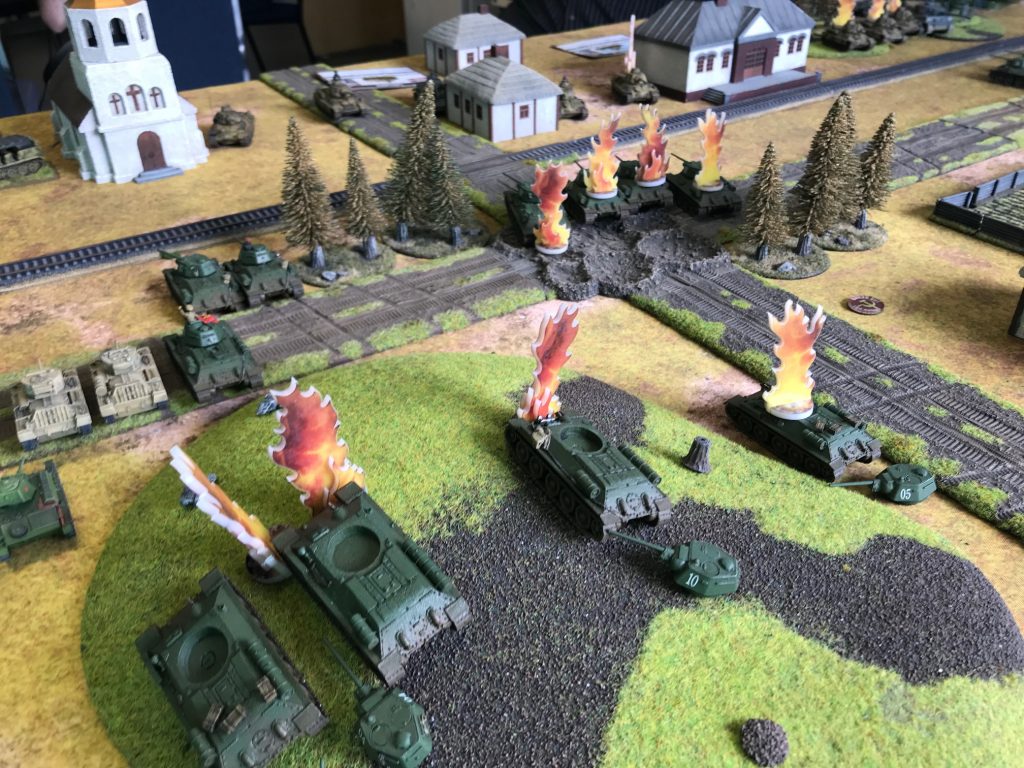
However, my 3-1 tank advantage and outstanding luck with Valentine saves proved to be the difference. The almost untouched Valentine company overran the left-hand objective, whilst the right-hand T-34 company flanked Casey’s remaining tanks (ignoring the Tiger after their ramming effort failed on the first dice throw).
With the objective secured and Casey’s last T-34 running away the battlefield was mine.


 Brian then, in true form, killed one and bailed one with his Stugs. His Pz II attempted to get in the woods and assault the 45s, but only succeeded in getting one before breaking off. On the right his PzIIIs kill three T-70s and bailed two.
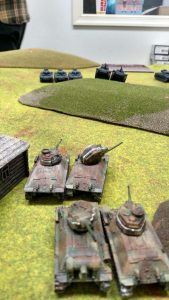
 The T-70s run leaving only the T-34s on the field with a couple 45s, which drive off the Pz IIs. Unfortunately Brian makes all the rest of his morale rolls and the company stays intact with his Stugs on the objective.
 I’ve since finishe
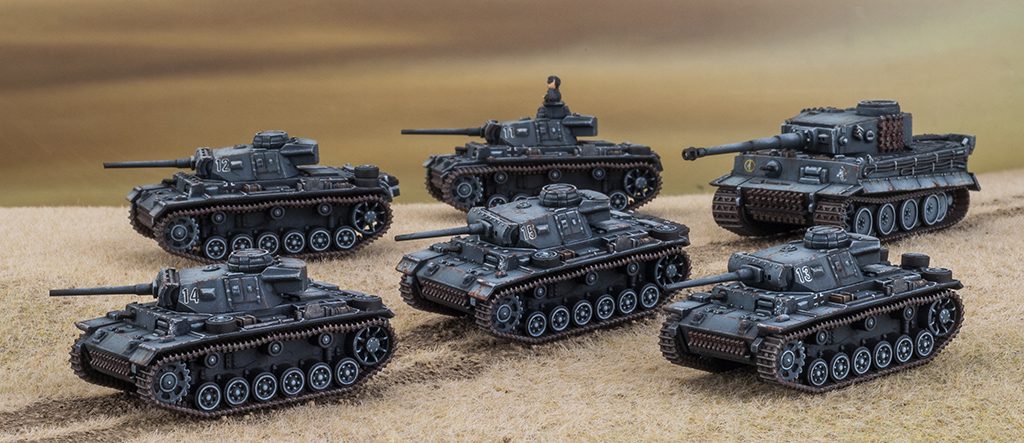


 The Germans often upgraded their T-34s with Cupolas from Panzer IIIs. Simply remove the locator pin from the bottom of the cupola and glue in place.
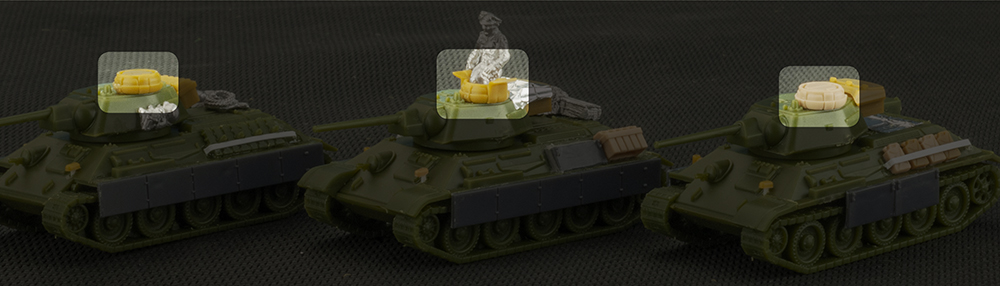
 The side skirts from the Panther kit glue nicely to the sides of the T-34 hull. You’ll just need to remove one section to make them the correct length.
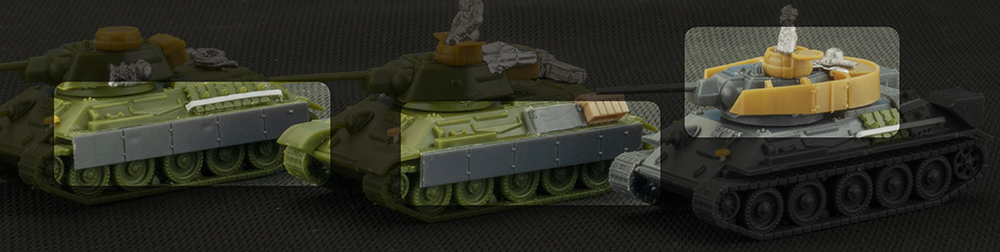

 The Panzer III and IV kits come with spare cans which are great for any German AFV. I made holding brackets by cutting plasticard into strips about 1mm wide using a sharp blade and a steel rule. I then cut them down to the appropriate length and bent the ends with tweezers, before glueing them on with plastic glue.
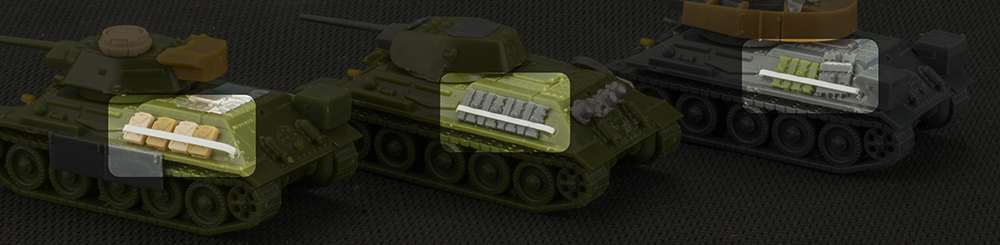
 When using captured equipment there’s always the increased risk of friendly fire, especially from aircraft, so crews often used flags for easy identification.

 Rural Farm Buildings gave me what I needed to put together both the October State Farm and the small town just outside it.
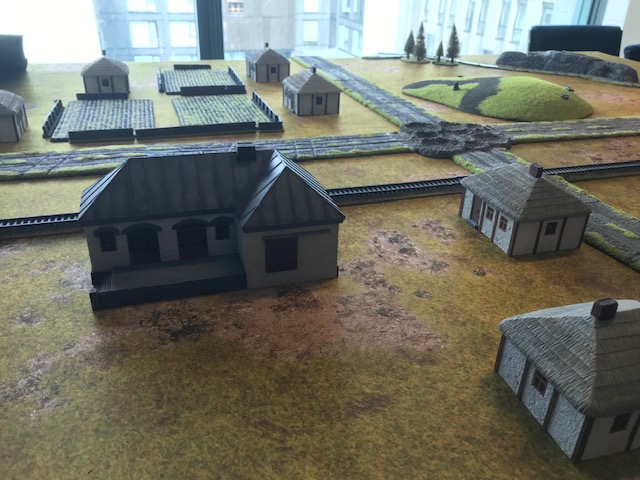

 I deployed a line of tanks stretching across the table, confident I could manoeuvre as needed. Casey stuck to cover behind buildings and in forests. He knew I would be coming for him.