Category: Bagration: German
One Elefant, Two Elefant, Three Elefant
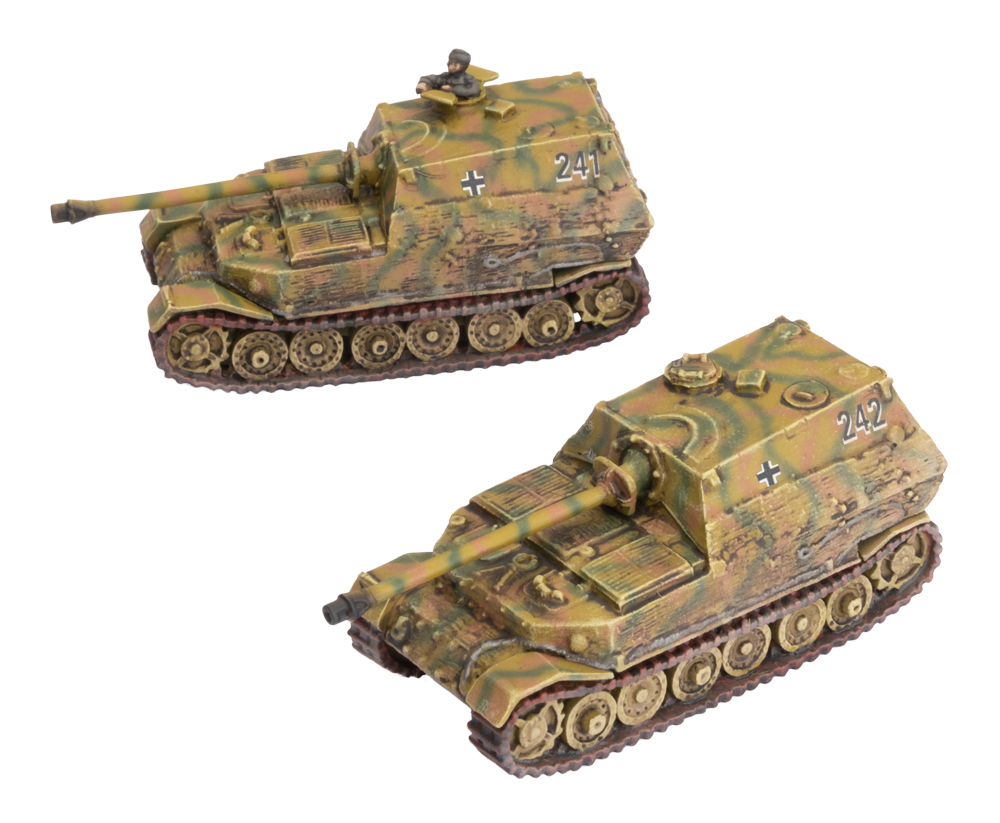
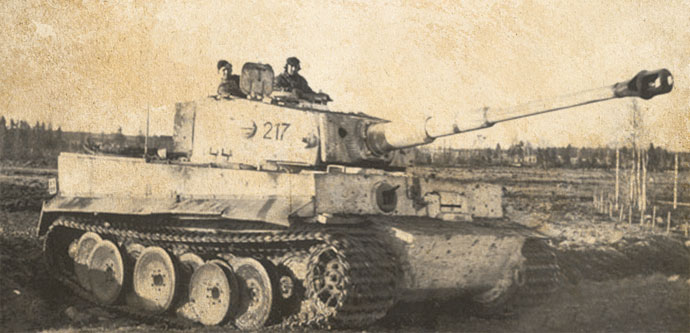
 Finally with Bagration: German one of the bigger tank-destroyers is going to return to the battlefield. We have all been waiting since Fortress Europe, D-Day: German, and D-Day: SS is missing it. I love this tank and I don’t really know why maybe for its shape or probably since it’s too big to be real. So in this article, I’m going to show you the Elefant’s characteristics, the unit size, and its cost. We will also have a look at its tactical use in every kind of list.
The Profile
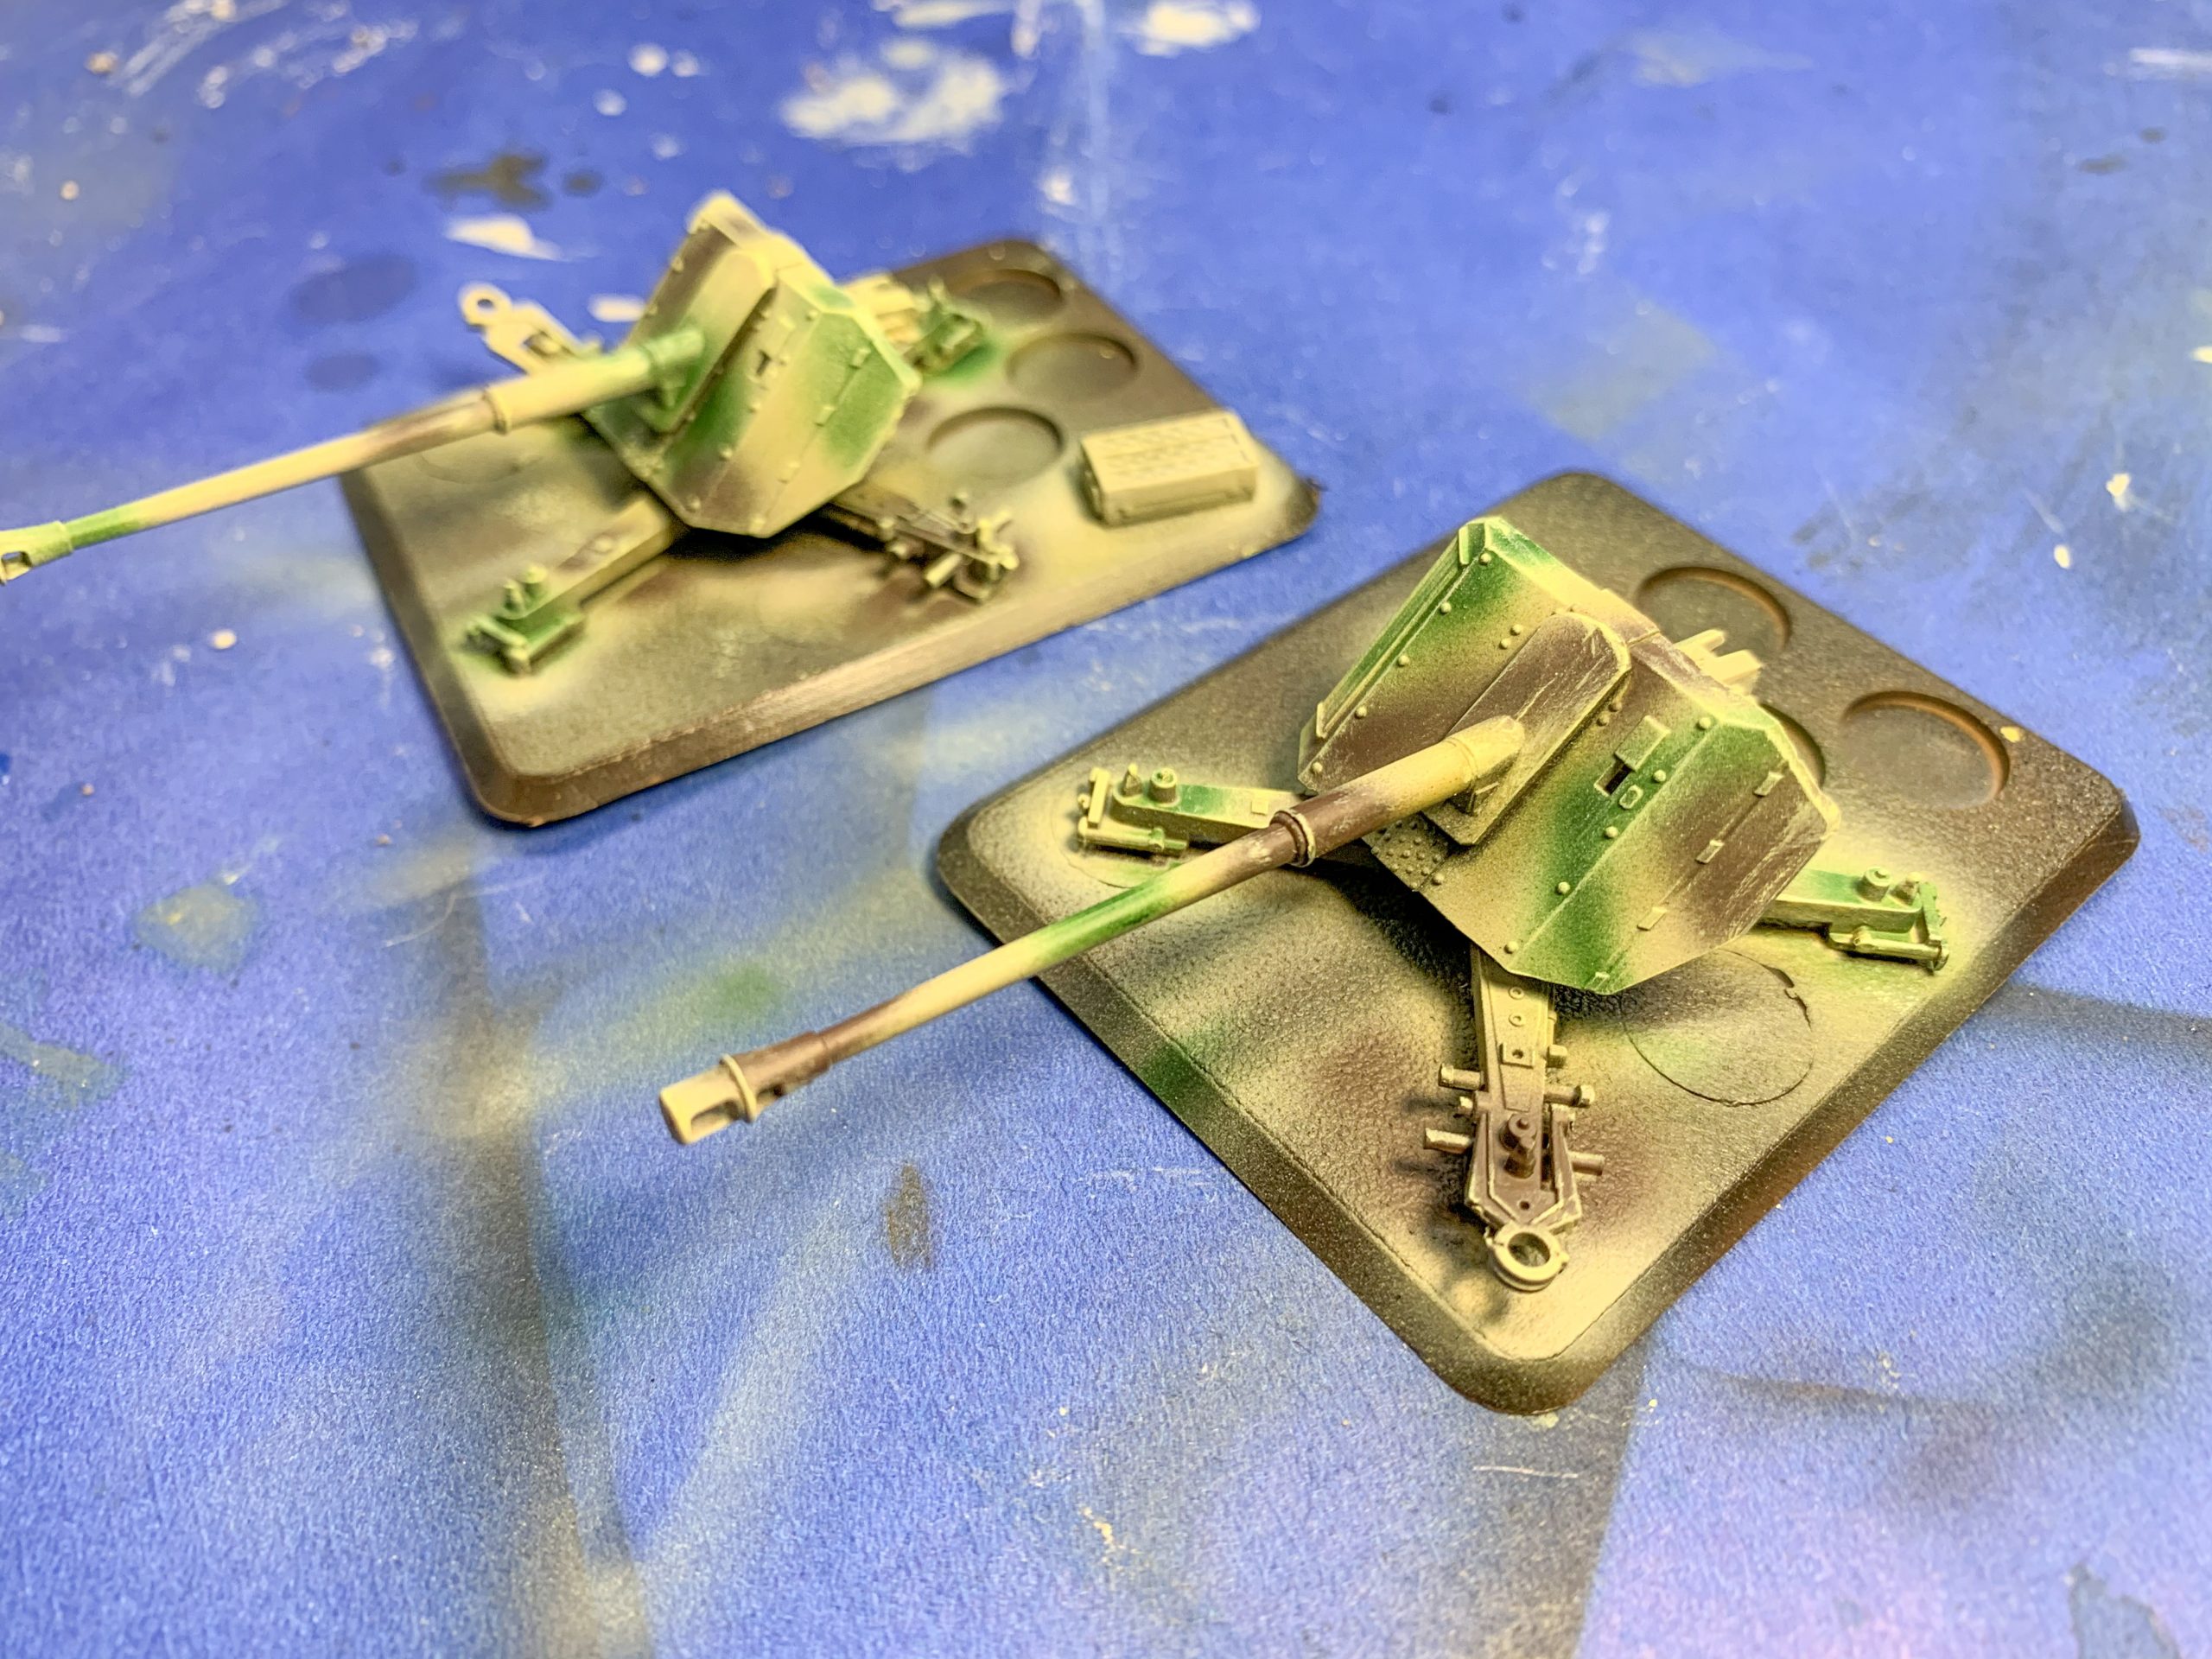
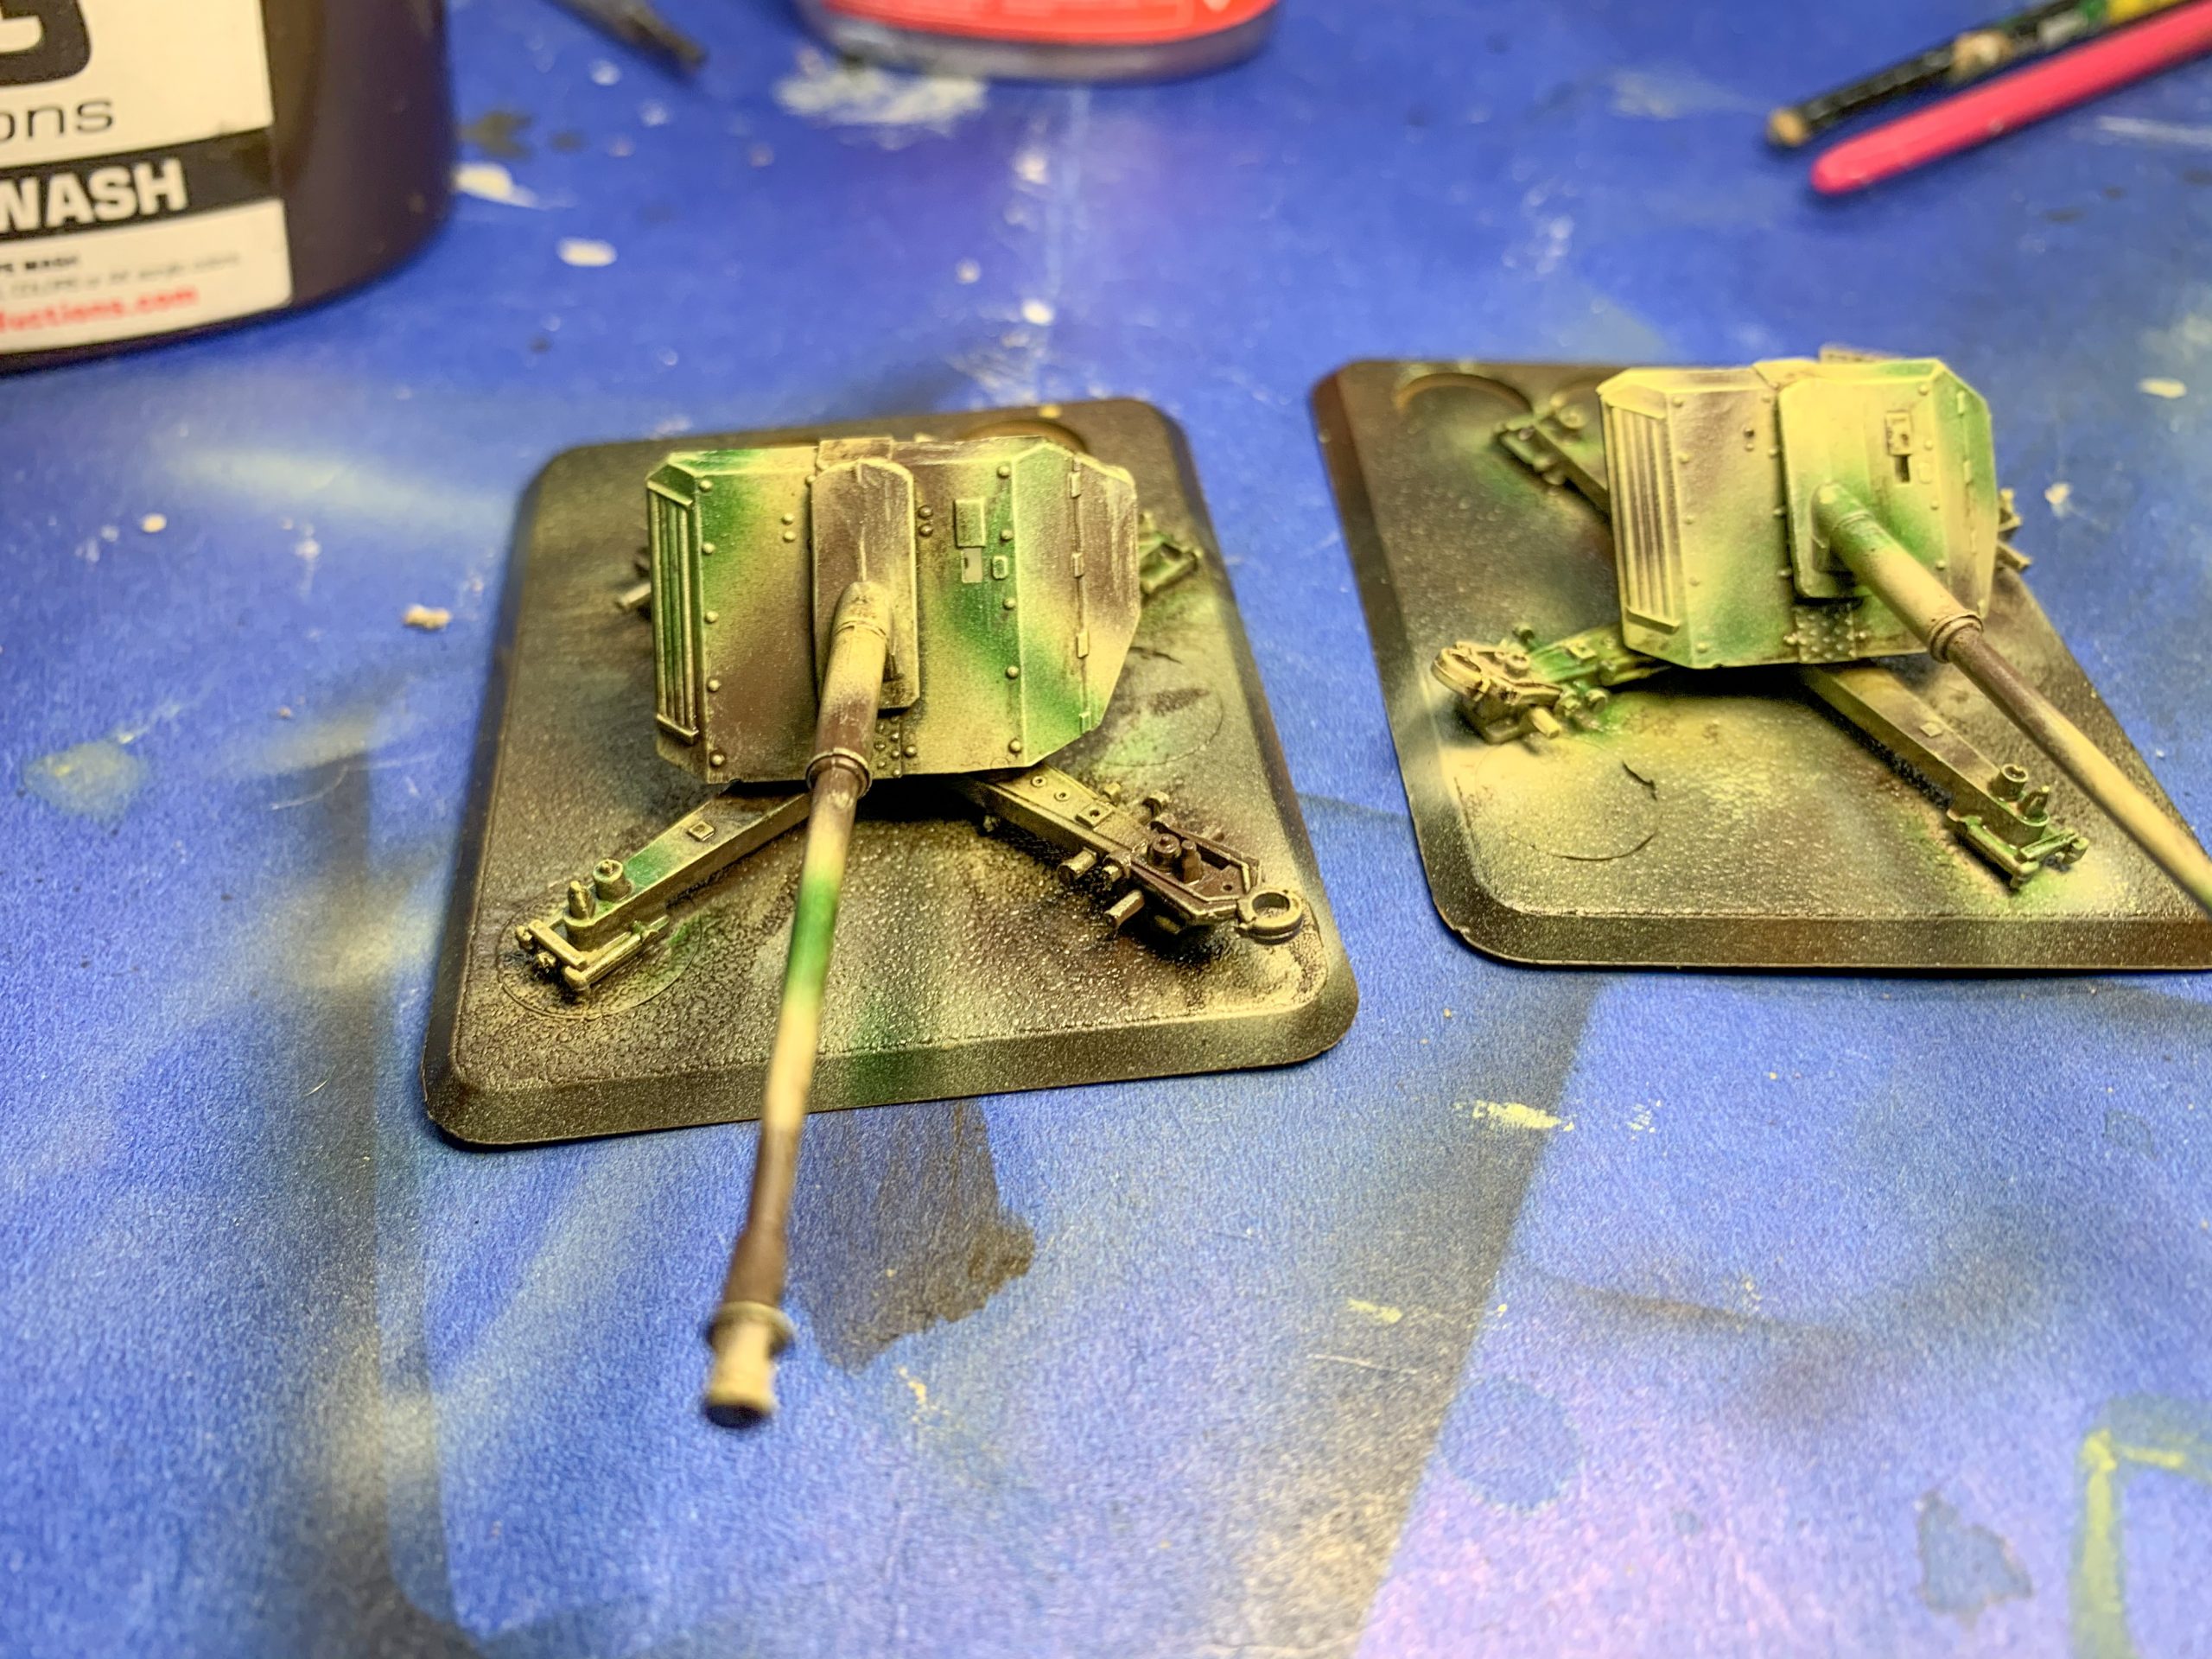
The Elefant is very similar to the Ferdinand we got in the first late-war book but has received some important buffs. The front armour has moved from 15 to 16 which probably doesn’t represent a big change since there aren’t many weapons that can hurt this monster shooting from the front. All the Elefants I’ve ever seen destroyed were hit from its weak point on the side or top of the tank. Given its armour rating on the top and side is “only” 7 it will be vulnerable from the anti-tank 10+ rating hits that are very common in the late war.
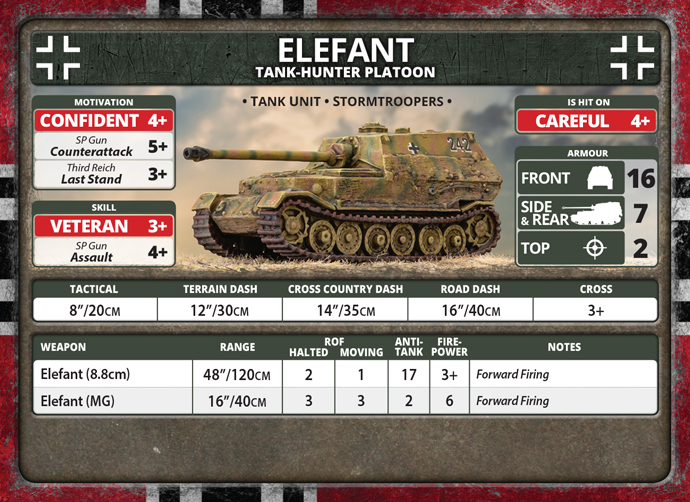
German players should be careful when moving this tank as it only moves 8”/20cm at tactical speed so the risk of being flanked is quite high. The cross-country dash remains the same, the terrain movement has been increased to 12”/30cm. This is interesting if you consider that the cross value has changed from a 4+ to 3+. Of course, moving this tank across a wood usually isn’t a good idea but sometimes it will happen, and a 16.6% extra chance to succeed helps. From my experience on Flames of War battlefields, I’ve learned that the right position of this tank is very important. Due to their armour, they’re nearly invulnerable to fire at the front with the exception of an Aircraft attack, be sure to put them where aircraft need a +1 to range in. Be careful about enemy tank movement, consider their Blitz that adds 4”/10cm, and do not forget about reserves that come from the flanks.
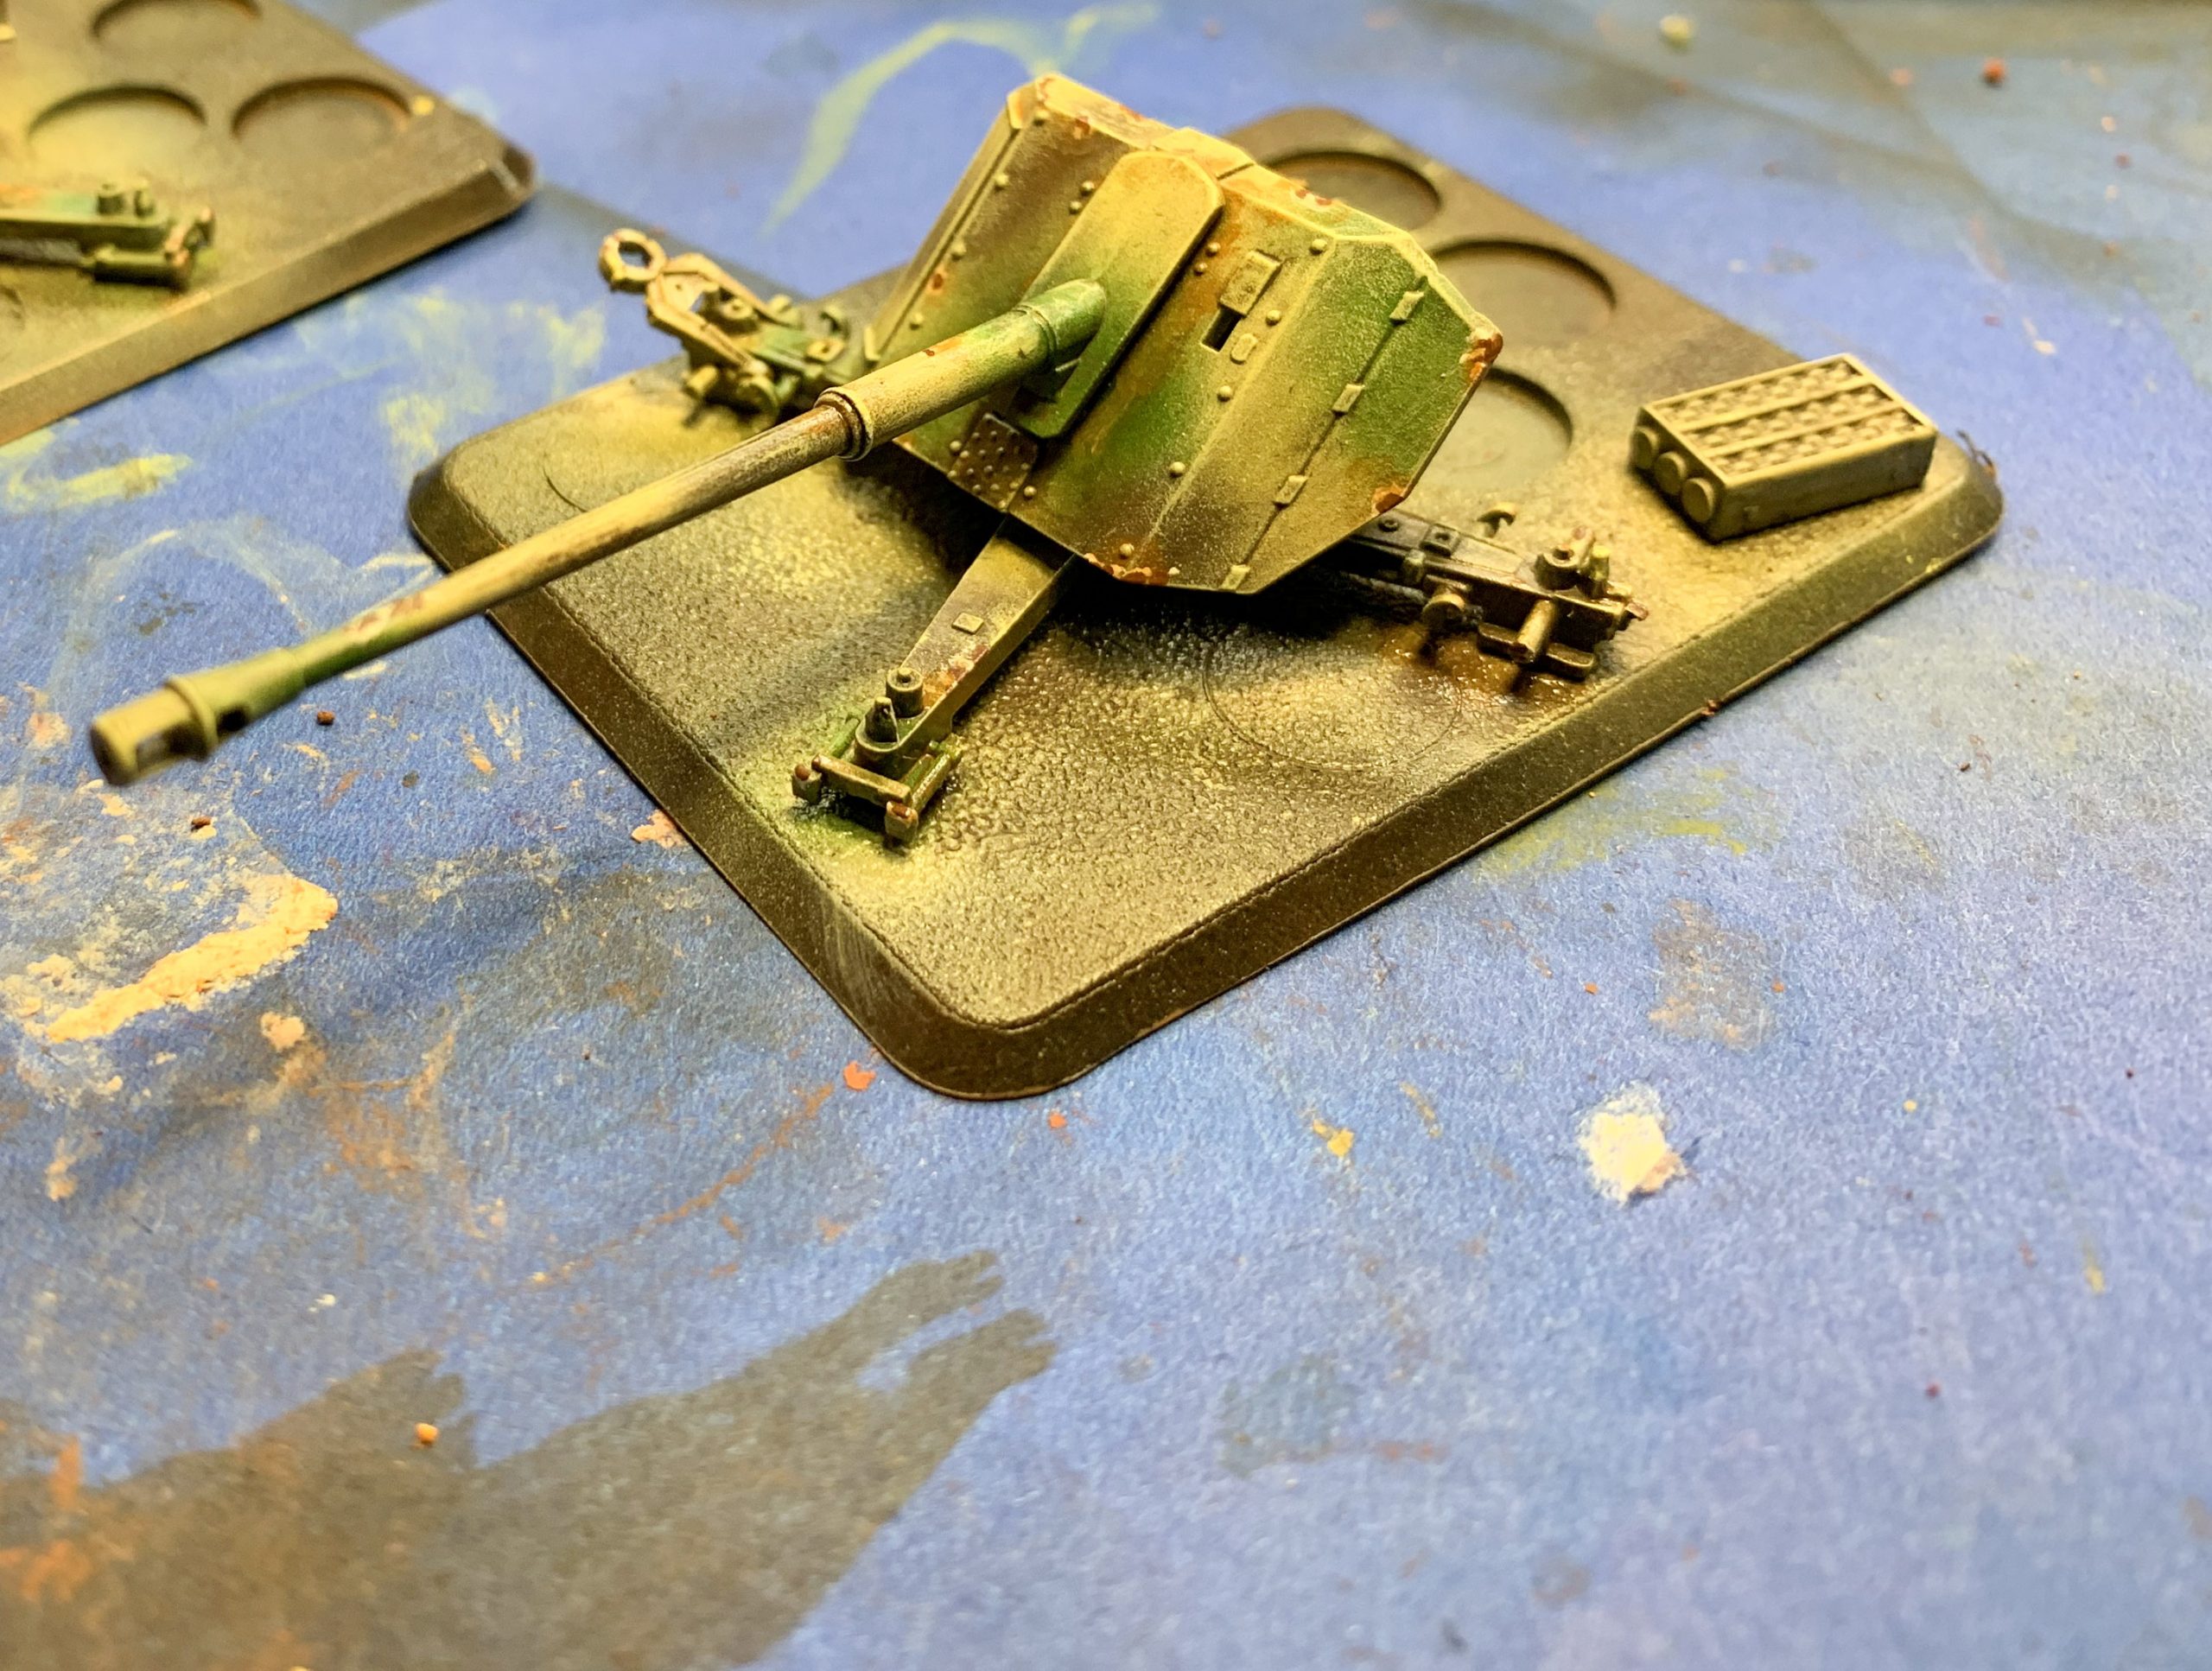
The main gun is the same 8.8cm Pak 43 as the Ferdinand, this is one of the most lethal weapons in World War II. An anti-tank value of 17 means that almost every tank will be scared of it. The range is enormous: 48”/120cm. Yes, you can shoot at enemy teams from one side of the battlefield to the other, so don’t get too close to them because you really don’t need to! You can just shoot with your fire rate of 2 and enjoy yourself. Looking at the weapons the most important addition compared to the Ferdinand is the machine gun. Now the Elefant is finally able to add 3 MG shots during a defensive fire. That can sound not so important but can help when you are in trouble.
What about morale? Well, there’s a big change here because the Elefant is confident. That’s important if your tanks are bailed. Because the third Reich guarantees a 3+ last stand, however, we all know that a 3+ roll can be failed, and failing the last stand with such an important and expensive unit can be very unpleasant.
Last but not least the rating has changed from an Aggressive 3+ to a Careful 4+, it doesn’t matter if the fire is coming from the front since the armour there is almost impenetrable, but this is important for aircraft bombs or rockets as they target the Elefants weak points. It can also help if you fail to correctly position your Elefant and the enemy flanks you.
Cost and Unit
Obviously, all these improvements do not come for free. The Elefant costs 15 points rather than the 13 of the Ferdinand. All considered 2 extra points is not much and this heavy tank-destroyer is still a good choice for almost any German list. The Elefant is definitely the better choice over the Ferdinand due to its better morale and its hit value.
Unit size is very important when investing 15 points in a 100 point list but investing 30 or more points? These are some very expensive tanks. However, the unit size is 1-4 tanks so you will be able to deploy an Elefant and still have a good amount of points for almost any kind of list.
The Elefant in an Infantry formation
Here we go! This is the perfect support for any infantry formation and makes a great focus for other units to pivot around.
The reason this works is quite simple: tanks cannot destroy it and usually not even bail it. Thanks to the Anti Tank 17 of the main gun if the Elefant hits its target, usually, the target is destroyed after its firepower check which is 3+. Deploy your tank behind the infantry to provide defensive fire, this can be useful and would guarantee 2 more shots against assaulting tanks. Against assaulting infantry this is less important, but not at all insignificant. Don’t forget to check if your Elefant is too close to the enemy and watch your flanks. Usually, the defender is just 60 points for deploying his units at the start of a match. If the Elefant is deployed the defender still has 45 points for HQ, one infantry, one artillery, an anti-tank gun unit, and maybe something else. This should be enough but be sure to deploy your Elefants to maximise its hit points in your match.
The Elefant in a Tank Formation
The Elefant has good support for tank formations, it provides heavy anti-tank support exactly where you need. Panzers often have to stop their advance due to a heavy tank platoon that places itself on its objective. This is particularly true if you are playing a medium tank formation that deploys a lot of tanks that lack the heavy anti-tank.The advantage of using an Elefant instead of a 8.8cm gun battery is that nobody can escape forever.
As long as you keep your flanks safe you’ll be able to advance and hunt tanks.
In a Tiger or Panther formation, the Elefant still has a role Why? You know that the front armour is 9 and the tanks are quite effective with shots coming in at anti-tank 12 or less. You should also consider that all armies have a solution for this by fielding anti-tank 13 or 14, so your Tigers and Panthers will not be tough enough to take these head on without taking casualties. In this situation deploying an Elefant can make the difference. Take the IS-2 for example they are a match for tigers, but are good prey for Elefants who take them head on.
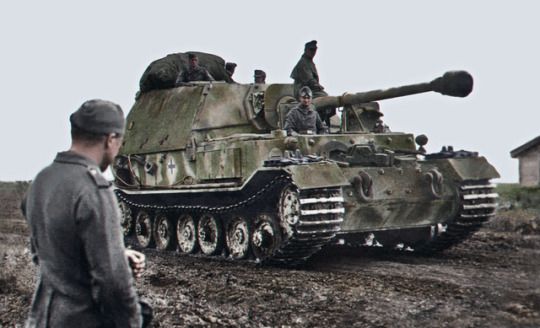
A Whole Elefant Formation
We said that Elefant units are a support unit with a unit size of 1-4. Thanks to the Bagration: German Command cards there is also the opportunity to play a formation entirely composed by Elefants! Once the Ferdinands were refitted in January 1944, the new tank-hunters were all transferred to 653. Abteilung. This formation is made by a HQ, that can be from 1 to 2 Elefant, and 2-3 Elefant units. We should also note that Elefant units in a 653 Heavy Tank Hunters Battalion have a size of 2-4. So you must play at least 5 Elefants, but the good news is that you still have 25 points to take both an infantry and/or artillery support, and maybe something else to make your formation more difficult to disband like an anti-aircraft support unit. I played a similar list in mid-war, using 5 Ferdinands. Despite potential shortcomings, this list won one of the most important Italian tournaments in Milan, I can guarantee that it is not simple to use. Try it out and you might be surprised.
How To Paint A Hetzer: Flames of War Painting Tutorial
Rapid Fire Assaults! The German Escort Platoon in Flames of War
With Joe Saunders
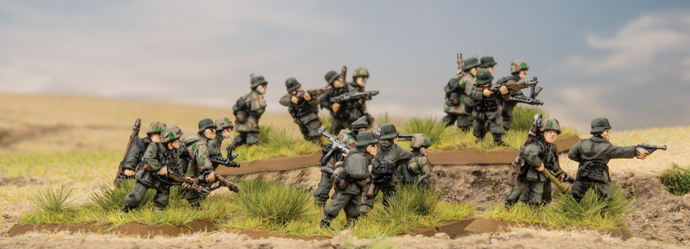
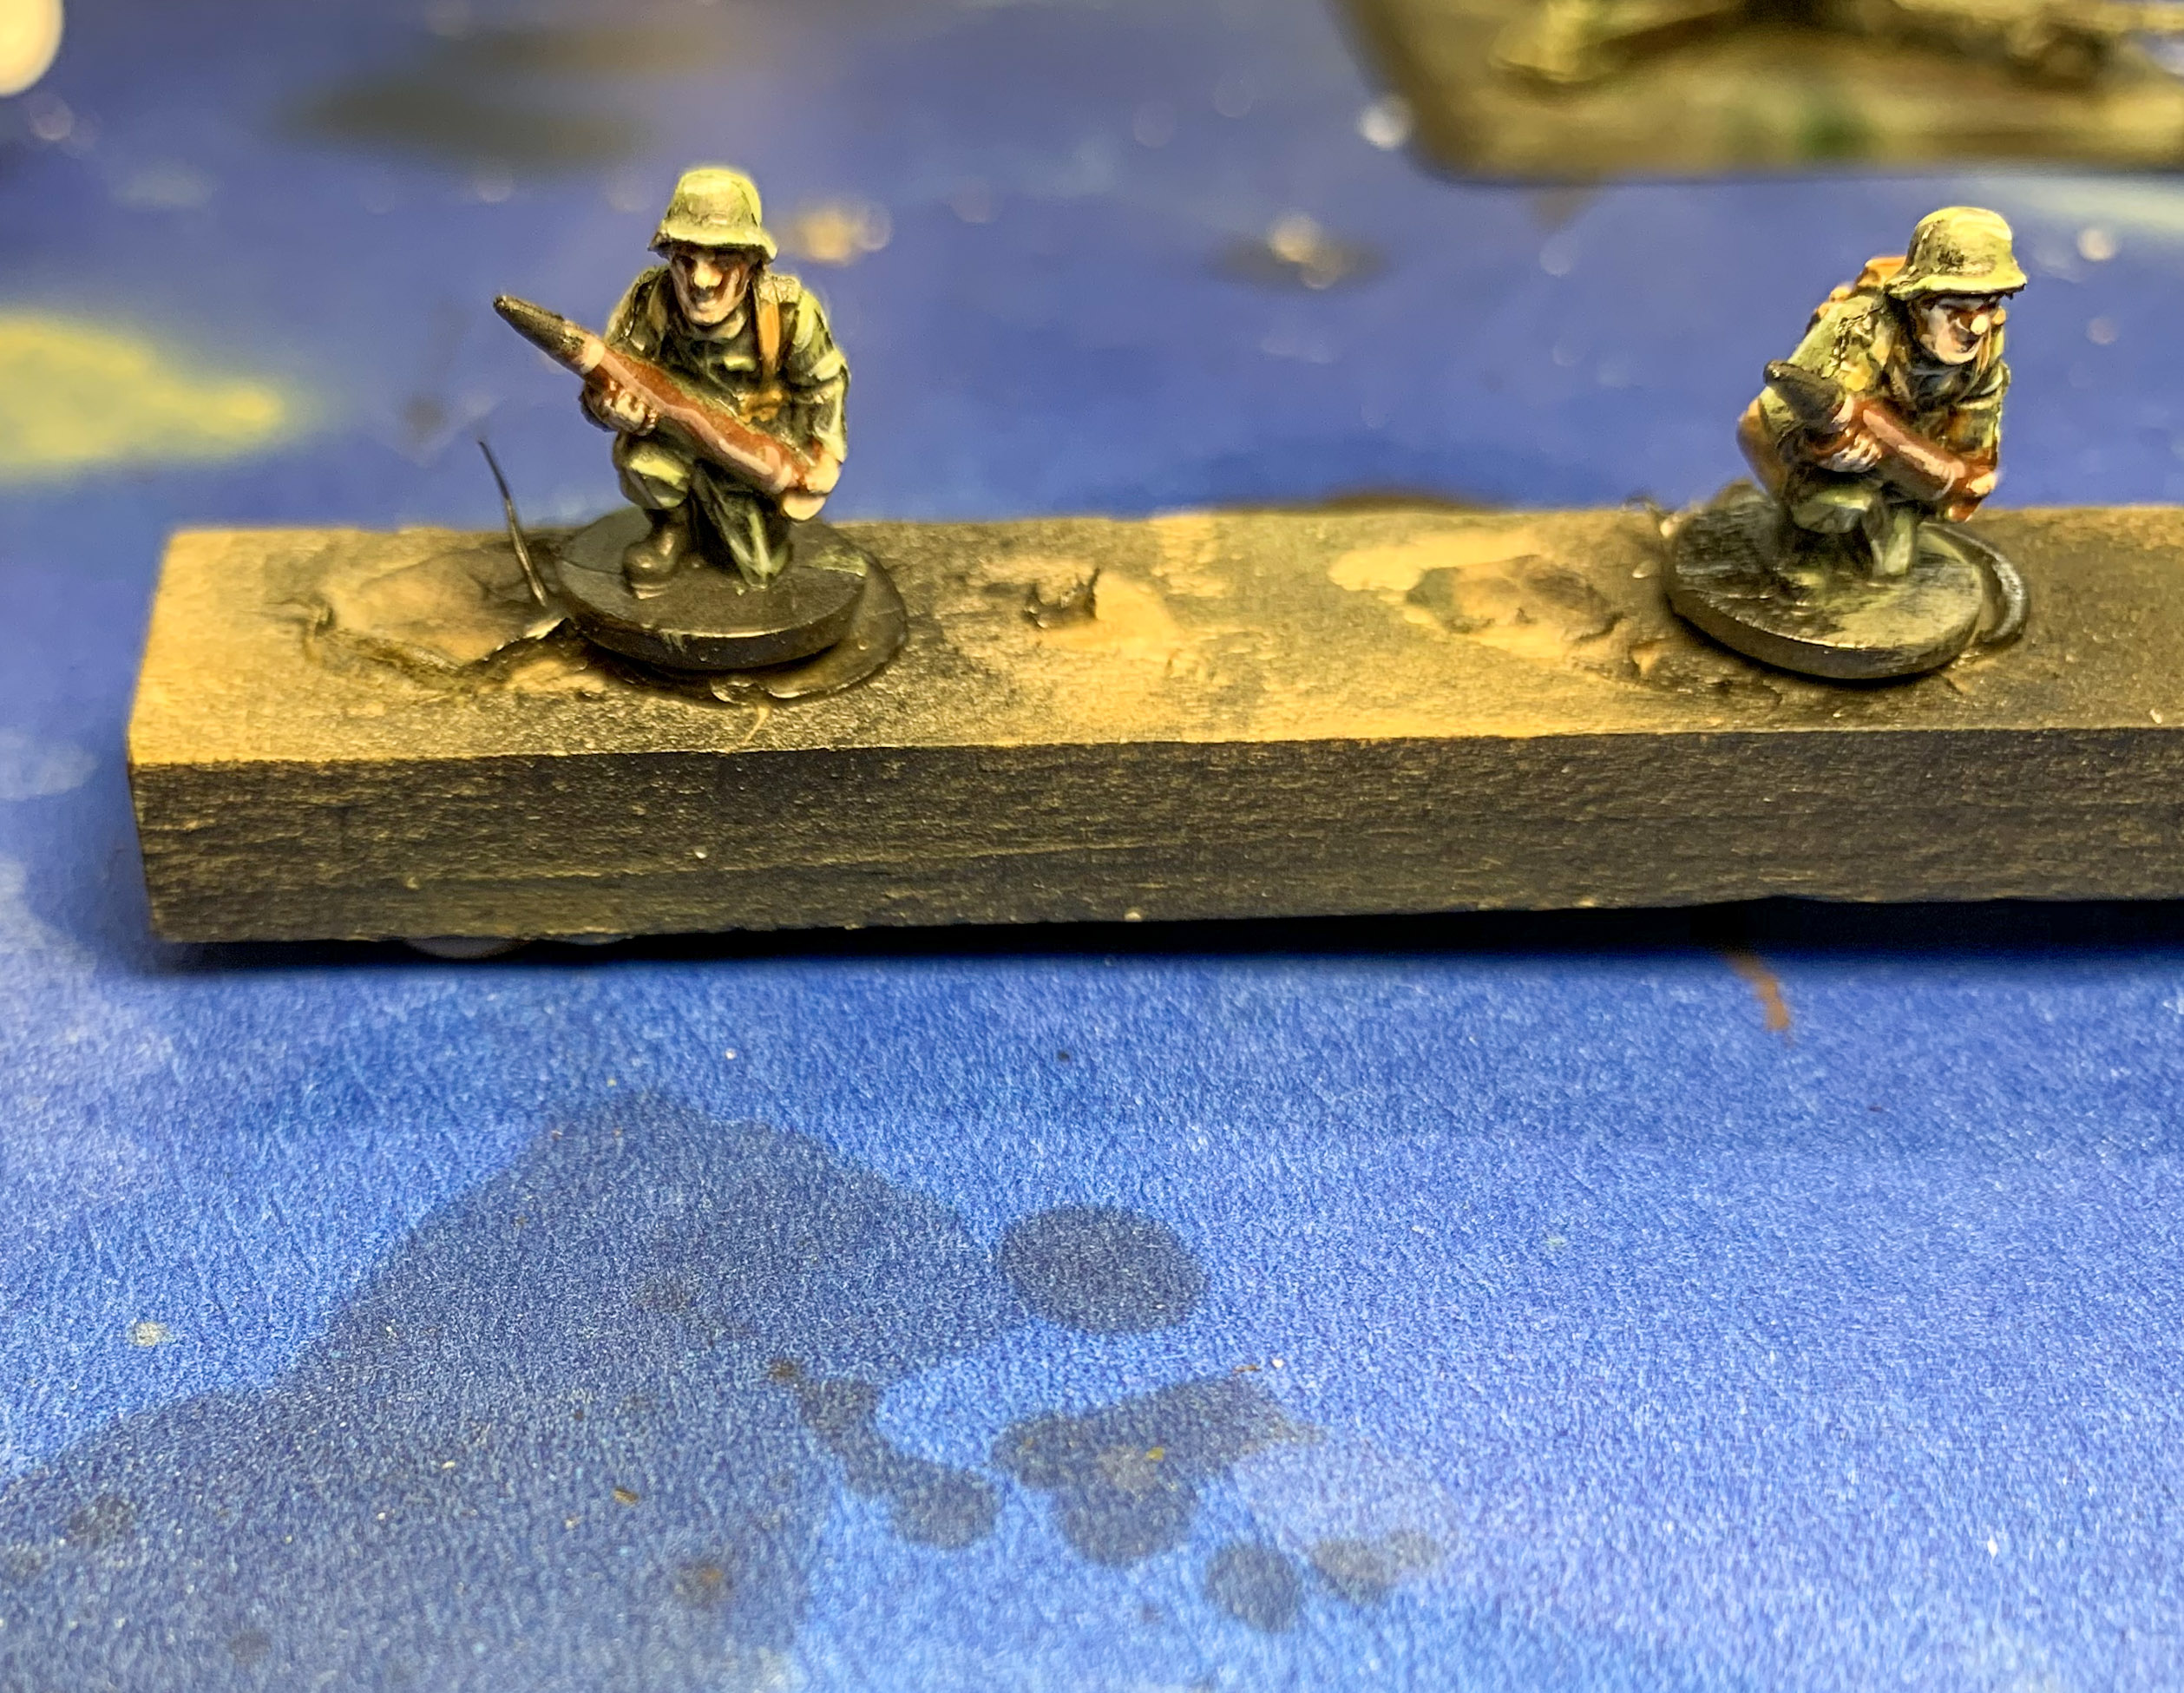
Early on in World War II, Soviet commanders started attaching units of infantry, primarily armed with sub-machine guns to their tank forces. These troops became known as tank riders because they often rode on top of the tanks into combat. This allowed them to use the increased mobility, and partial protection to get them to the hot spots in the fight. The tanks in turn benefitted from this by having infantry support close at hand to ward off any enemies that came too close. As often is the case, any successful idea usually gets copied and the German forces soon duplicated this approach with the Begleit, escort tank riders. These tough soldiers rode into battle on the fearsome StuG Assault Guns and were heavily armed with the new StG 44, the first true assault rifle. With the launch of the new Bagration: German book, these troops can now be added to your Axis forces in Flames of War. In this article we will take a closer look at these unique and powerful warriors and discuss how you could build a 100 point force around them.
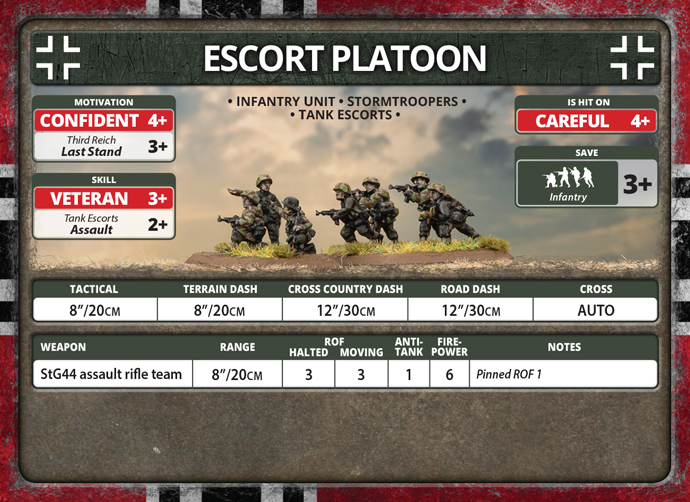
The Stats:
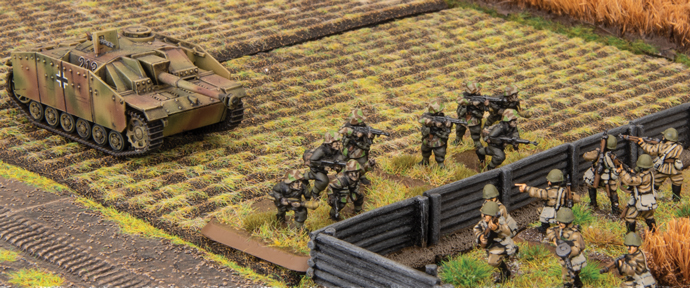
At first glance, you will notice that the Escort Platoon boasts the same excellent stats as most German infantry. A Hit On Value of 4+, Motivation of 4+ and 3+ Last Stand are the hallmarks of German infantry and any Axis player will know this well. But on top of these solid stats, the Escort Platoon has a few additions. True assault infantry has been absent from German formations since Mid-War, so the Escort Platoon is a welcome addition. Not only do they have the StG 44 assault rifle which functions as a range 8” submachine gun, but they also have an assault rating of 2+! Few units compare to this power in close combat and should strike fear into your opponents. To make the unit even more formidable it comes in platoons of either 7 or 10 stands. These are very large unit sizes for Axis players. It is staggering to think that an Escort Platoon could make a tactical move, fire up to 30 times then charge into an assault, hitting on a 2 plus, all in one turn. Lastly, and most importantly, the platoon has the Tank Escorts special rule that allows the unit to charge straight into assaults from the StuGs or StuHs they are riding on.
Weaknesses:
You have to take the good with the bad and the Escort Platoon has a few drawbacks that need to be discussed. In exchange for its considerable advantages, the unit takes a hit in the form of points cost and flexibility. At 13 points for 10 stands the escort platoon is simply a very expensive unit to include in most army compositions. Additionally, they are not a black box choice so in order to take them you have to commit to taking an entire Assault Gun formation. This makes the entire army’s composition very predictable and the assault guns, though good, might not be the first choice for most players in Late War (where their FA of 7 and AT 11 gun are pretty average). The Escort Platoon has no upgrades to add additional weapons such as Panzerschreks or Panzerfausts. This means that the Escort Platoon will be extremely effective against infantry but won’t be assaulting enemy armour except in the most desperate circumstances. Lastly, in Flames of War, most assault troops have access to Flamethrowers and the Escort Platoon does not. This means that when you are attacking opponents in buildings or foxholes, chances are most of the damage you will be dealing will be based on your 2 + assault rolls, not your preparatory shooting. An astute commander will need to rely on the synergy between the nearby assault guns and his Begleit troops when enemy infantry is well prepared or there is substantial armour nearby.
Army Composition:
As detailed above, adding an Escort Platoon to your force requires the addition of a StuG Assault Gun formation making army composition fairly static. This however this does not make the army weak as the StuG is still a fairly solid choice in Late War. Here is a sample army I would consider fielding:
Tactics
This list tries to achieve some balance while maximizing the use of the Escort Platoon. The main strategy would be based on aggression. Choosing to attack whenever possible. This way the Wespes can lay down smoke to cover the advance of the StuG, and the StuHs are available to handle dug-in units. The Tigers are there to deal with any serious high armour opponents may have while the Quad Halftracks ward off aircraft and guard objectives (along with the Wespes). Once the Assault Guns are close to their targets they can unleash the Escort Platoon straight into the assault using the Tank Riders Rule. From here the Escort Platoon’s high rate of fire and 2+ assault value can be used to maximum effect. In the event that this force must take reserves, holding the Tigers and one Assault Gun platoon back uses exactly 40 points.
Prepare for Action:
Hopefully, this article has provided you with some ideas of how to use the Escort Platoon in your games of Flames of War. Being a totally brand-new type of infantry that German players have not had access to before, makes these troops a new challenge and fun option that both Axis and Allied players alike will have to adapt to. Now it is time to get your copy of Bagration: German, load up on StG 44s, and ride into battle!
Join Us On Twitch the Bagration: German Q&A with Wayne
Join us on Twitch as Wayne goes over the questions we’ve already received and as he answers questions from the chat!
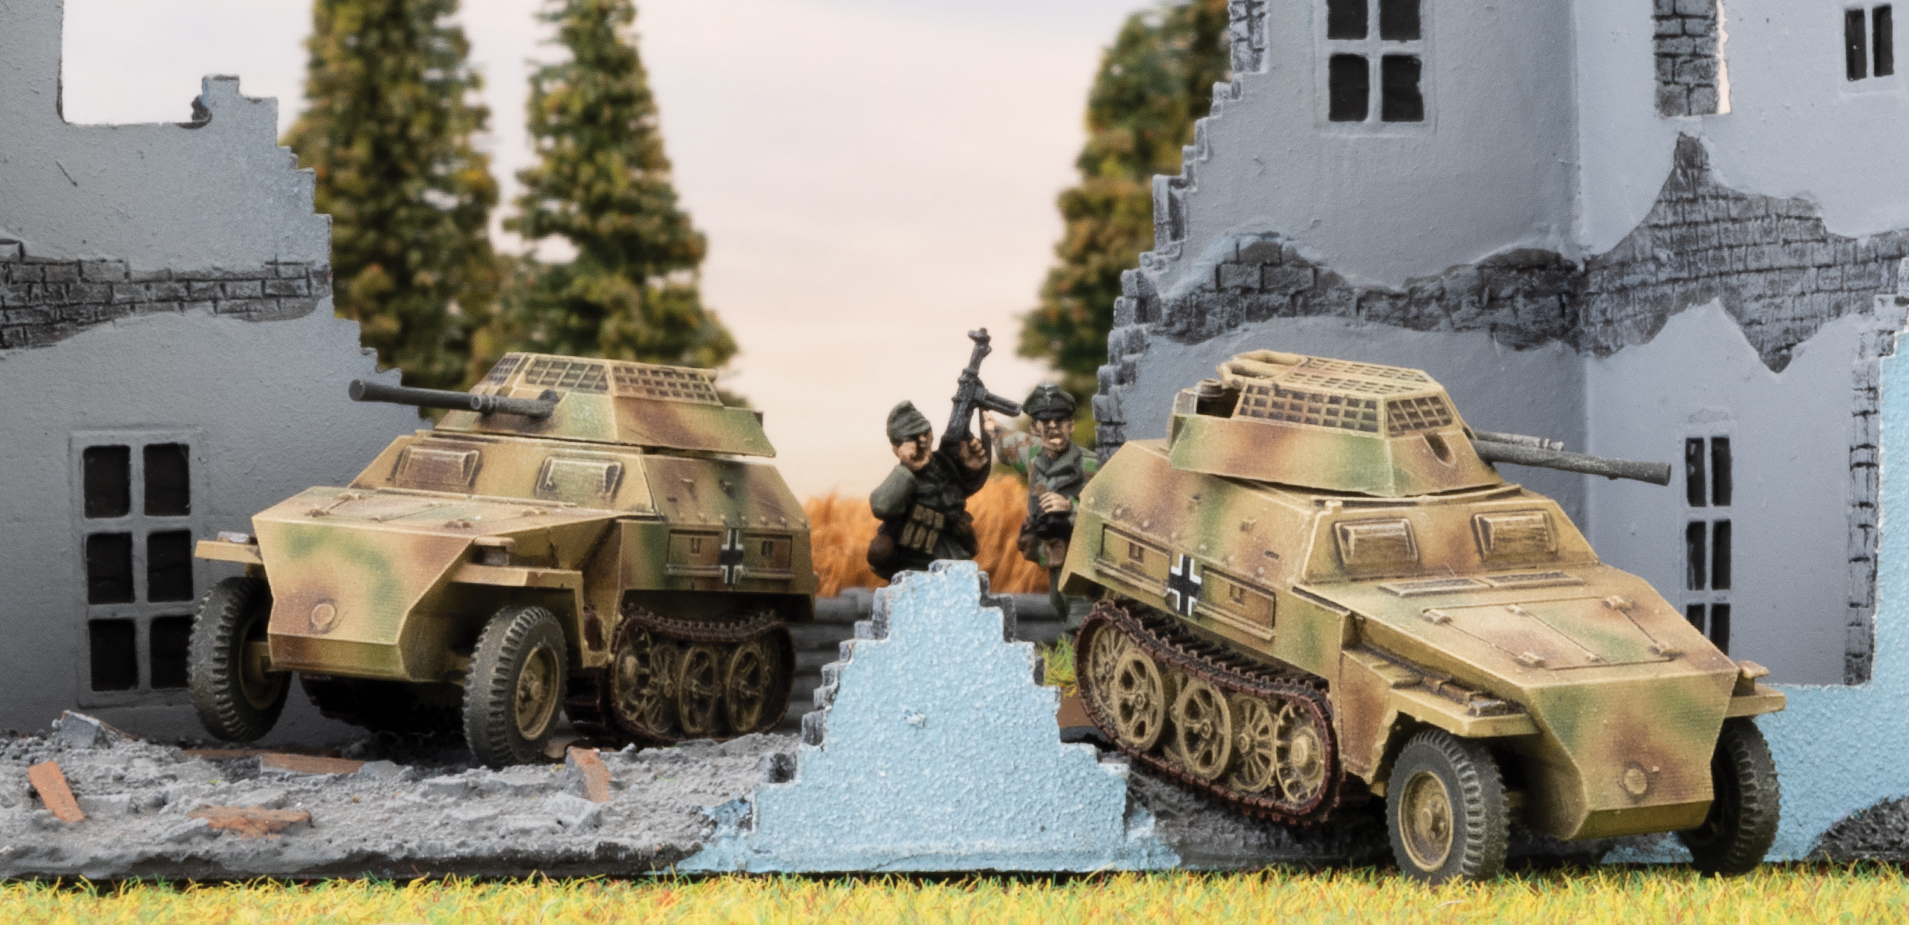
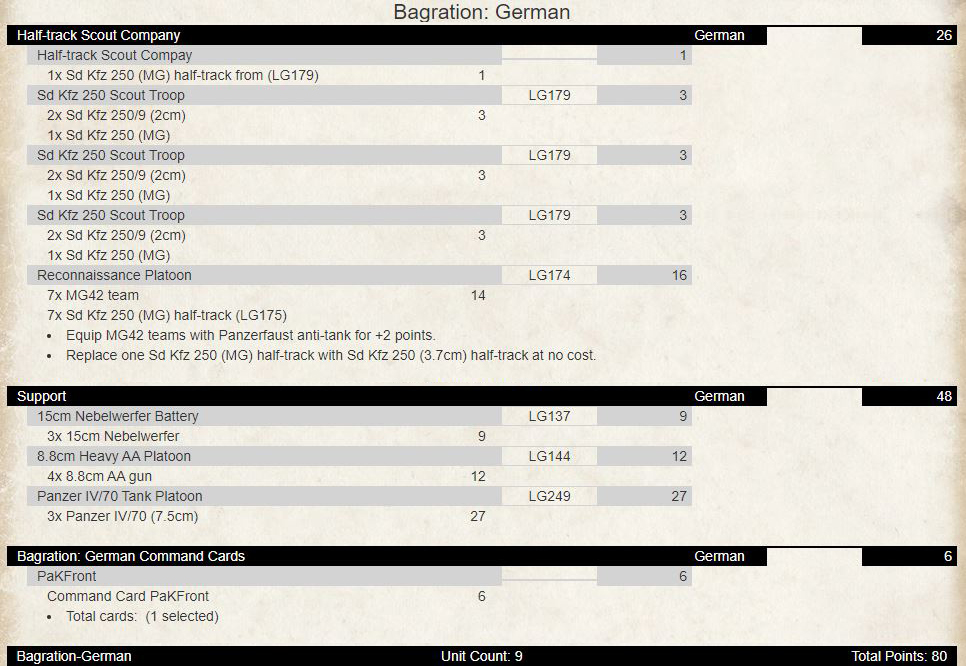
Building a Bagration German Half-Track Scout Company
With John Lee
For those who have read any of my previous articles, you will know that I have an affinity for reconnaissance formations. I had written the article for the Waffen-SS Half-Track SS Scout Company and the D-Day: German variant. To round it out I thought I would look at the Bagration; German variant of the list, examine the differences, and see what new support options we can take now with this formation.
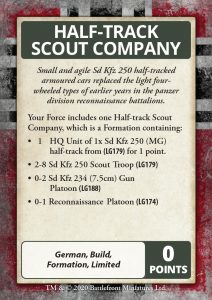 The command card formation comprises the following:
- 1 HQ Unit
- 2-8 Sd Kfz 250 Scout Troop
- 0-2 Sd Kfz 234 (7.5cm) Gun Platoon
- 0-1 Reconnaissance Platoon
This is identical to the D-Day variant in terms of the number of units. The Waffen-SS variant is different, in that it has only one Sd Kfz 234 (7.5cm) Gun Platoon. Looking at the makeup of this formation, we can take three to twelve platoons making it a strong formation if you wish, with built infantry and useful AT9 FP 3+ guns to support your half-tracks. Being Heer, they are also rated as “Careful” meaning hit on 4+, best armour you can get! Add in your scout platoon’s scout ability, which means they will be hit on 6s at close range if you are concealed and did not shoot whilst still moving into position! Now the scout troops have three vehicles in the platoon, lightly armed with a 2cm gun and MGs but useful to get a strong formation on the table, allowing us to look at taking some of the cool new toys in this release.
After exploring the core formation below, we will look at options for 105pt, 80pt, and 55pt lists.
I do not normally max out all the platoons – I feel that taking 4-6 Scout Troops, 1-2 Gun Platoons and the Reconnaissance Platoon is enough to keep the formation from breaking thus freeing up more points on the new kit. Looking below we spend 35pts on getting this core formation solid.
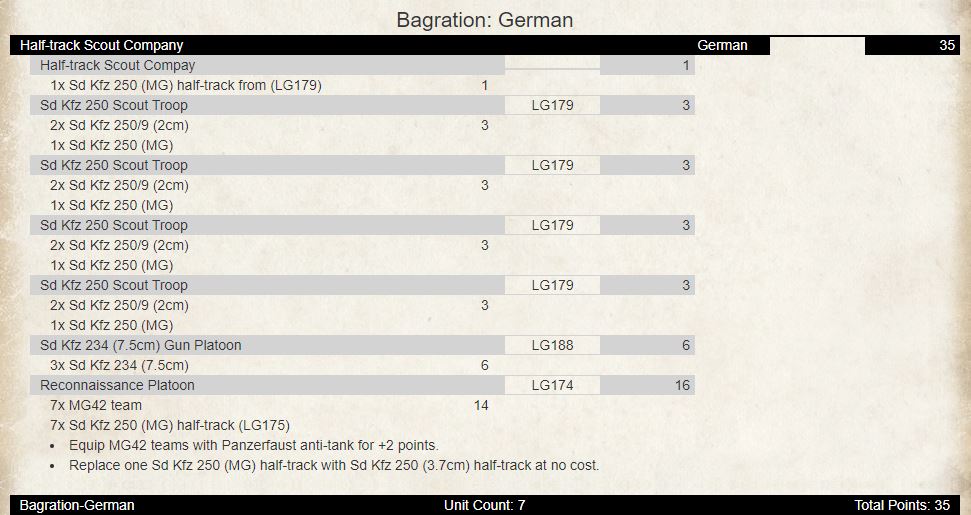
This is a core 35pts for the 105pt and 80pt lists. Looking at the 105pt list first, we now need to look at what support options could be taken. With the ability to choose from Bagration: German, D-Day: Waffen-SS, or D-Day: German black box units, you can mix and match what you want to suit your playstyle. Support options need to be taken from the Bagration: German chart. For this article, I will be looking at taking some of the new equipment for this release.
So, let us look at what we need to consider from a support perspective for this list. They should be supported by tanks, high-end AT, artillery, and what we need to cater for around reserves. With 70pts left to play with, I want to build a mobile reserve unit that can come in and shoot at an opponent at maximum range and have the armour to withstand any return fire. This means either the Panzer IV/70 or Elephant. I think for this list we should take the Elephant. FA16 with AT17 gun with 48” range fits the bill. Three of these costs 43 pts. Can also assault if required on 4s. You can put these in reserve by themselves. I want to take some Flak 88s with Pak Front for 18pts to provide some heavy AT capability across the table if my Elephants are in reserve. Some Nebelwerfers for 9pts to provide some suppression indirect fire. A sample list could look like this:
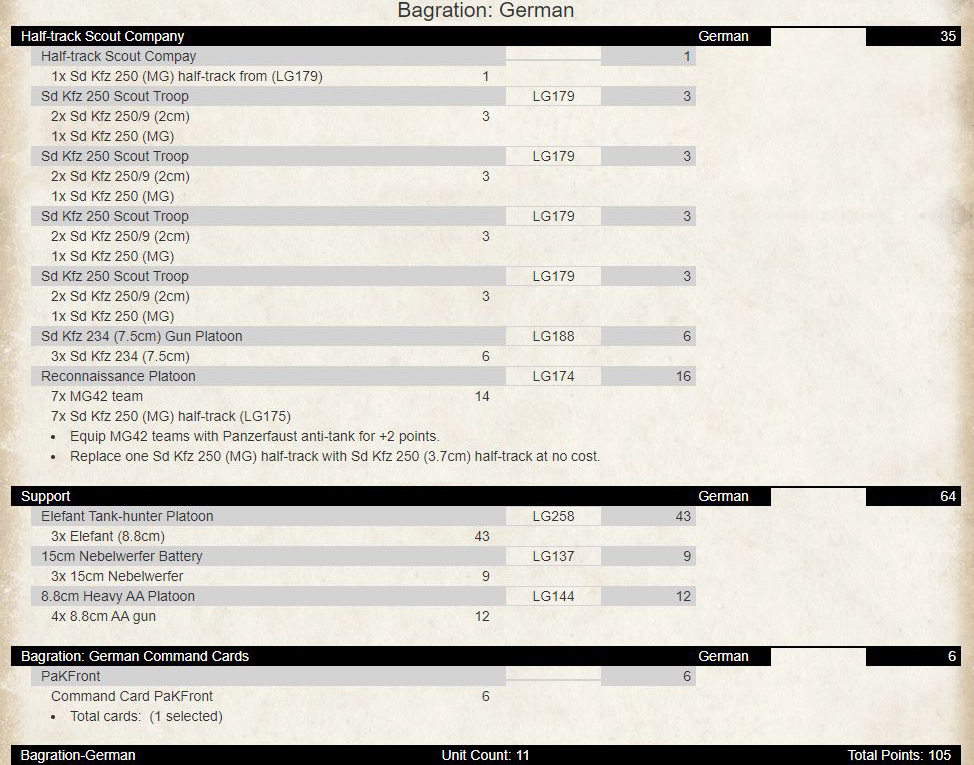
I like this type of force and suits my play style. Lots of small units running around with four AT14 guns in nests spread across the table supported by infantry that can either attack or defend with tank hunters, that can come in from reserve or dominate the table and nebs to keep infantry pinned down in their foxholes. Another option would be to change out the Elephants with four Panzer IV/70 Tanks – AT14 and FA9 and change out the nebs for the new Panzerwerfer 42 Armoured Rocket Launchers. This is how it could look:
For an 80pt list we would change it out a bit by replacing the Elephants (list 1) with three Panzer IV/70s, making artillery nebs (list 2), dropping a scout troop, and removing the gun platoon:
You could take replace the Pak Front command card and reinstate the gun platoon to increase the formation to six units.
For a 55pt game, this is where recon unit lists shine – more flexibility with smaller points than other formations. Still want to take tanks, infantry, artillery:
Downgrade the Panzer IV/70s to Hetzers and you still have nebs (you could change these out to Wespes) and still a strong formation that can take on your opponent with a combined arms approach.
This command card formation with the new equipment can provide some interesting new options. I hope this has given you some food for thought. Happy list building!
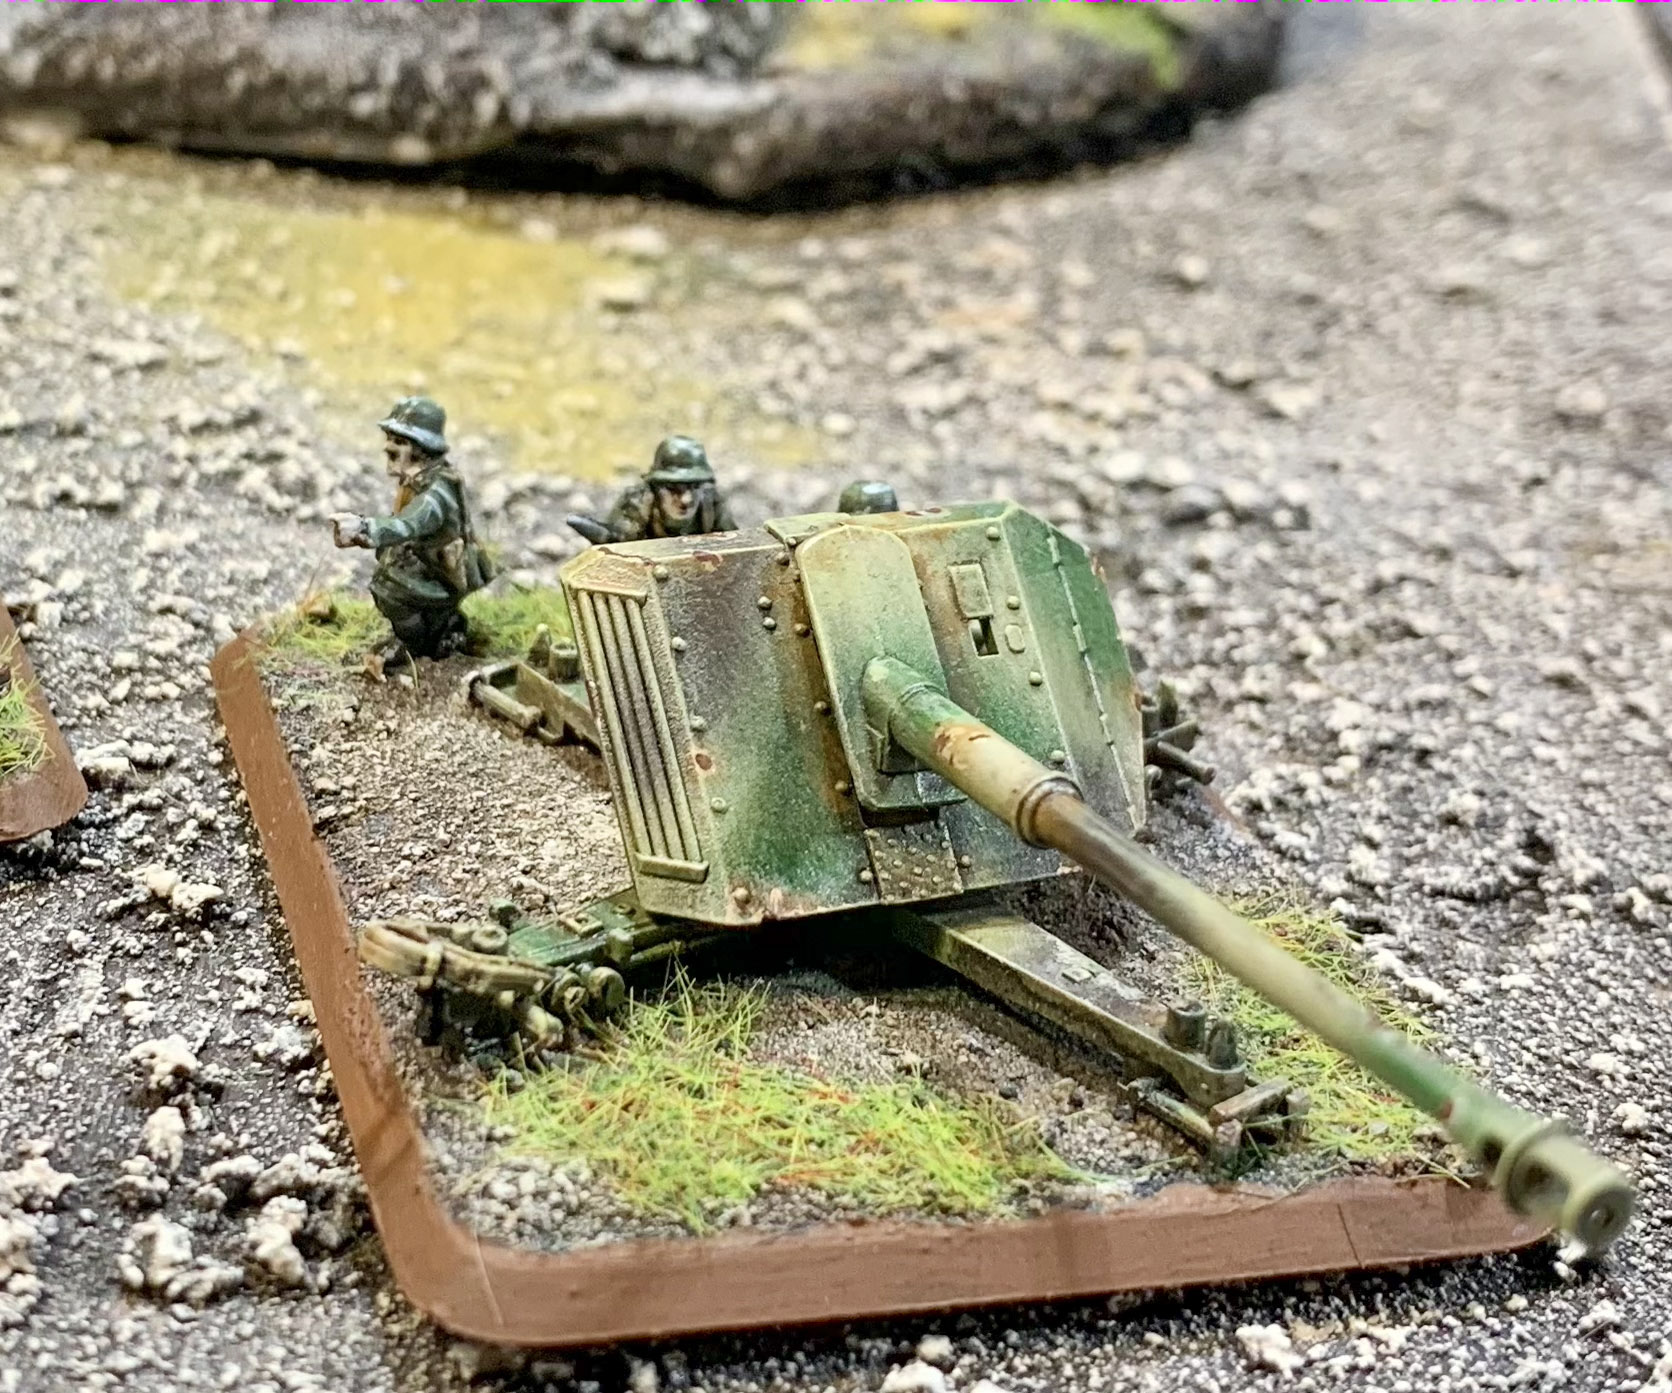
Preparing the Big Guns: My Paint Scheme for Bagration: German
With Joe Saunders
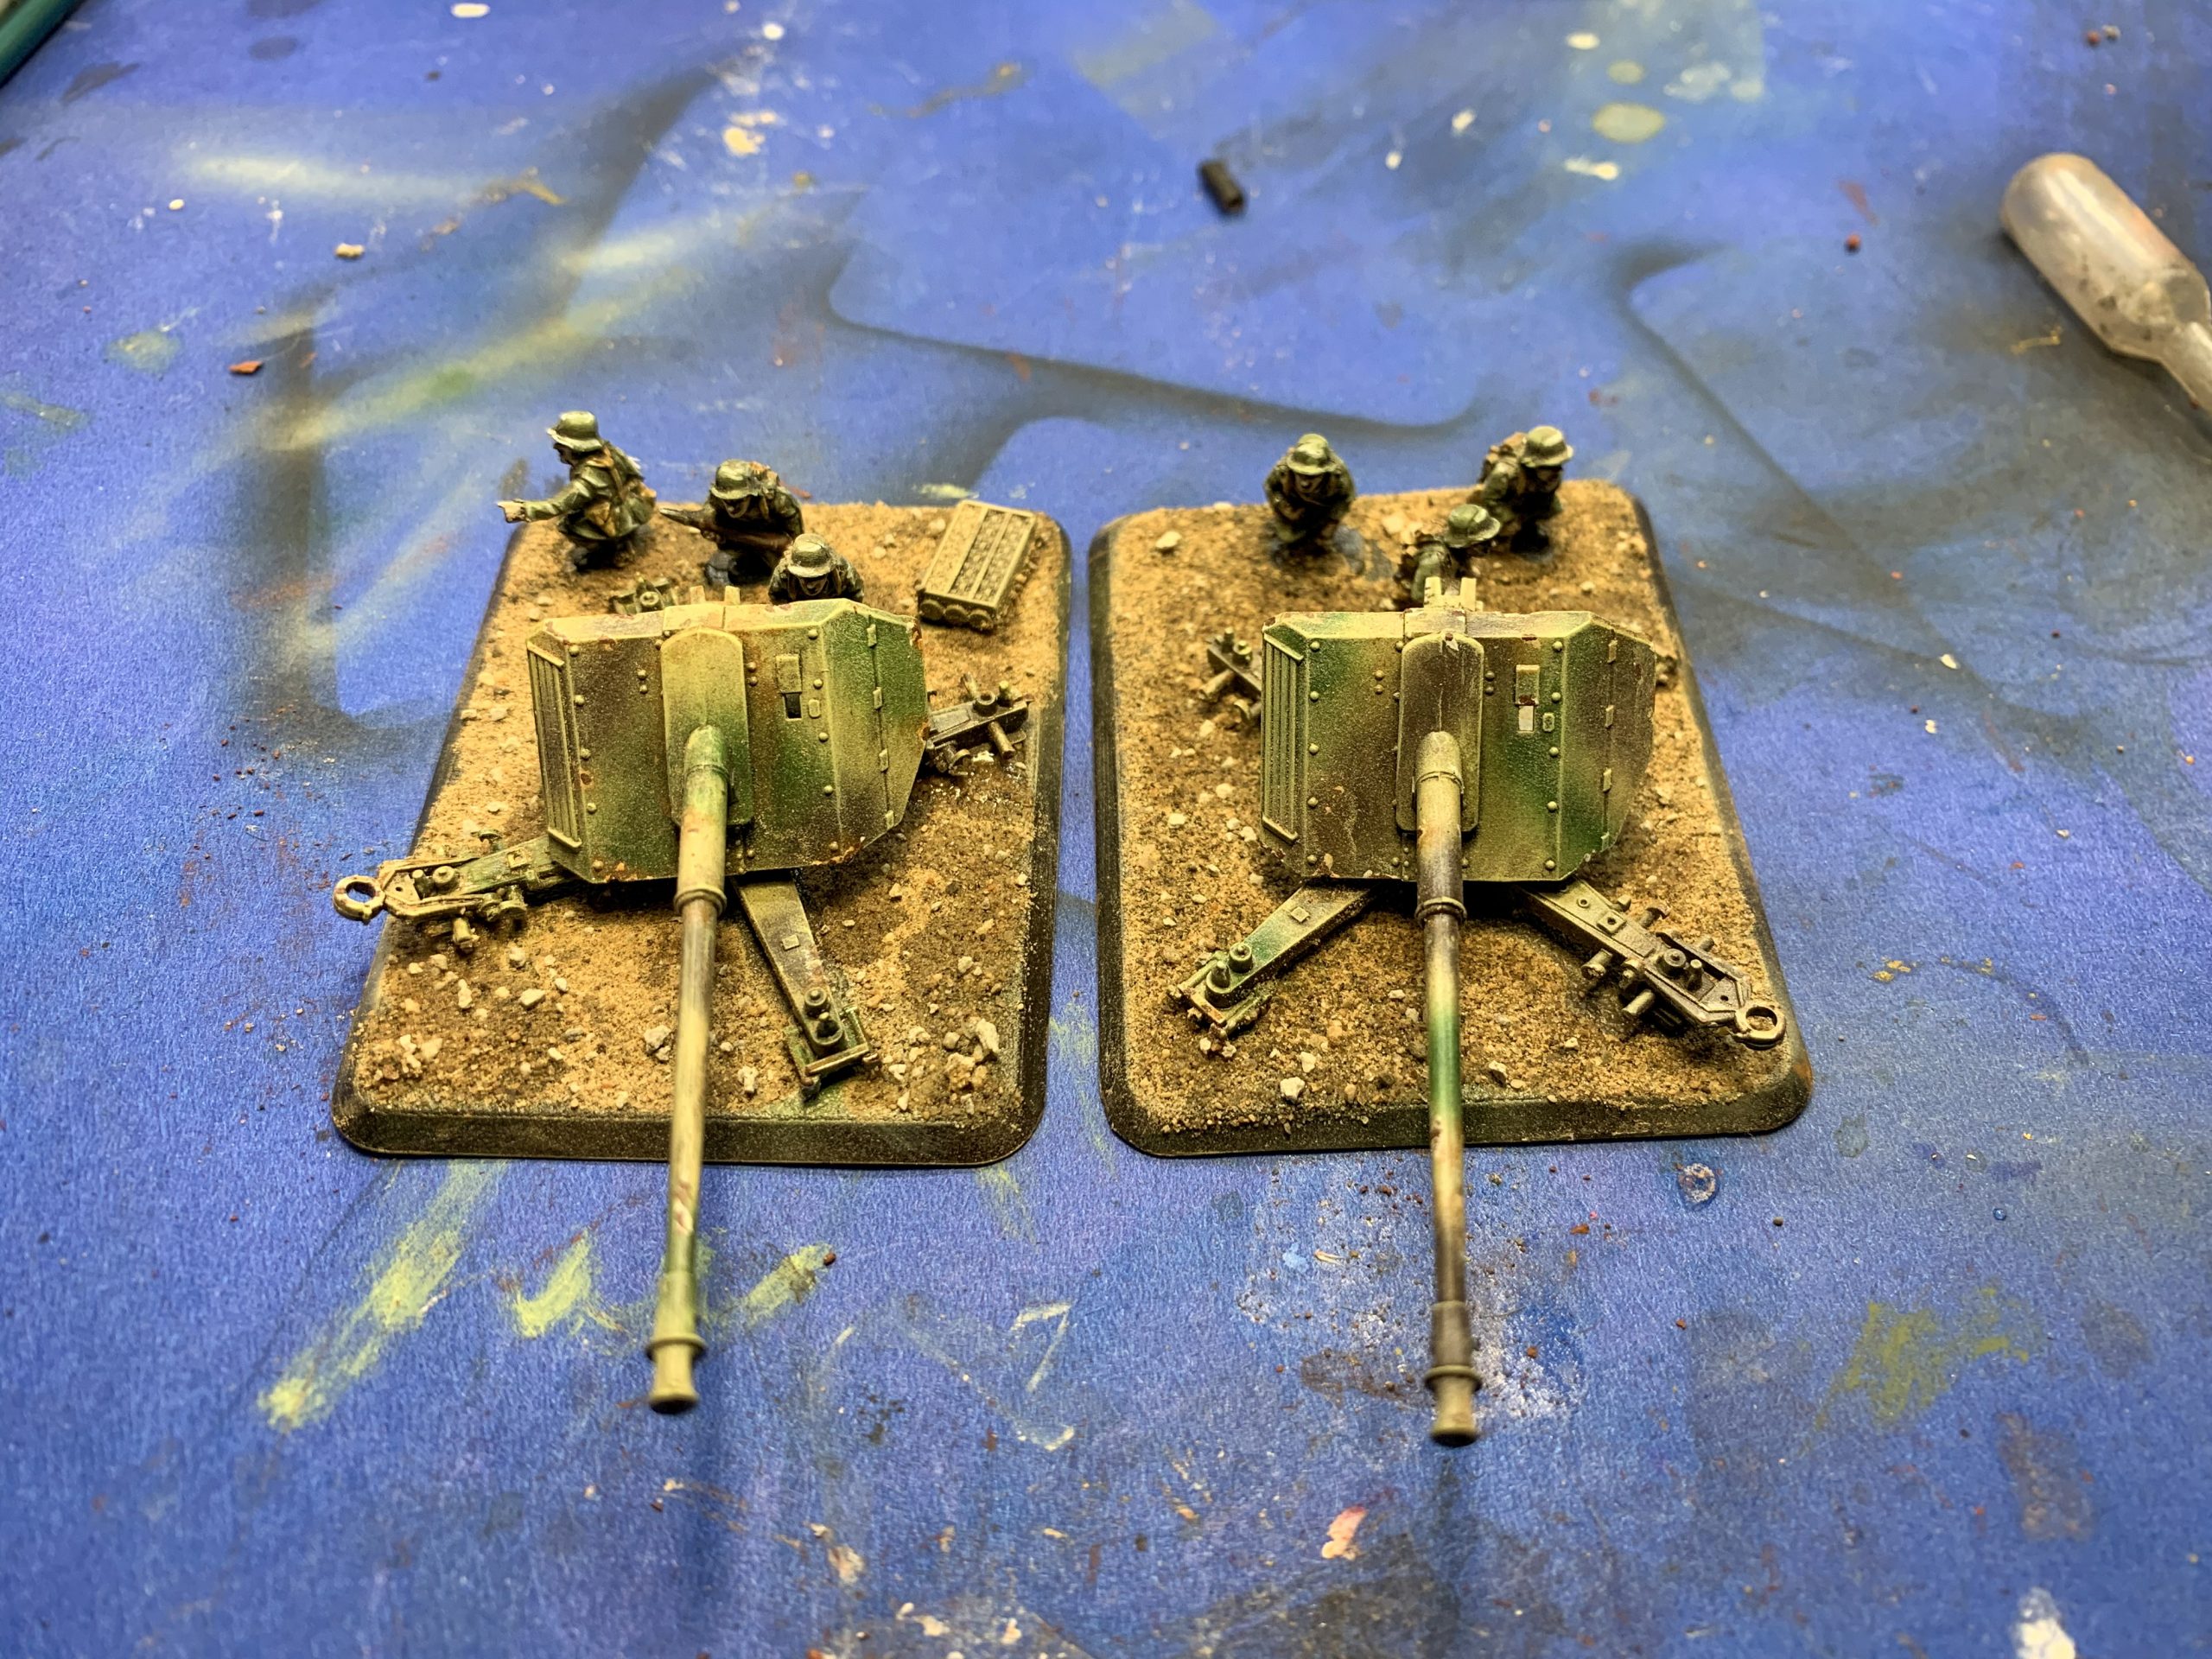
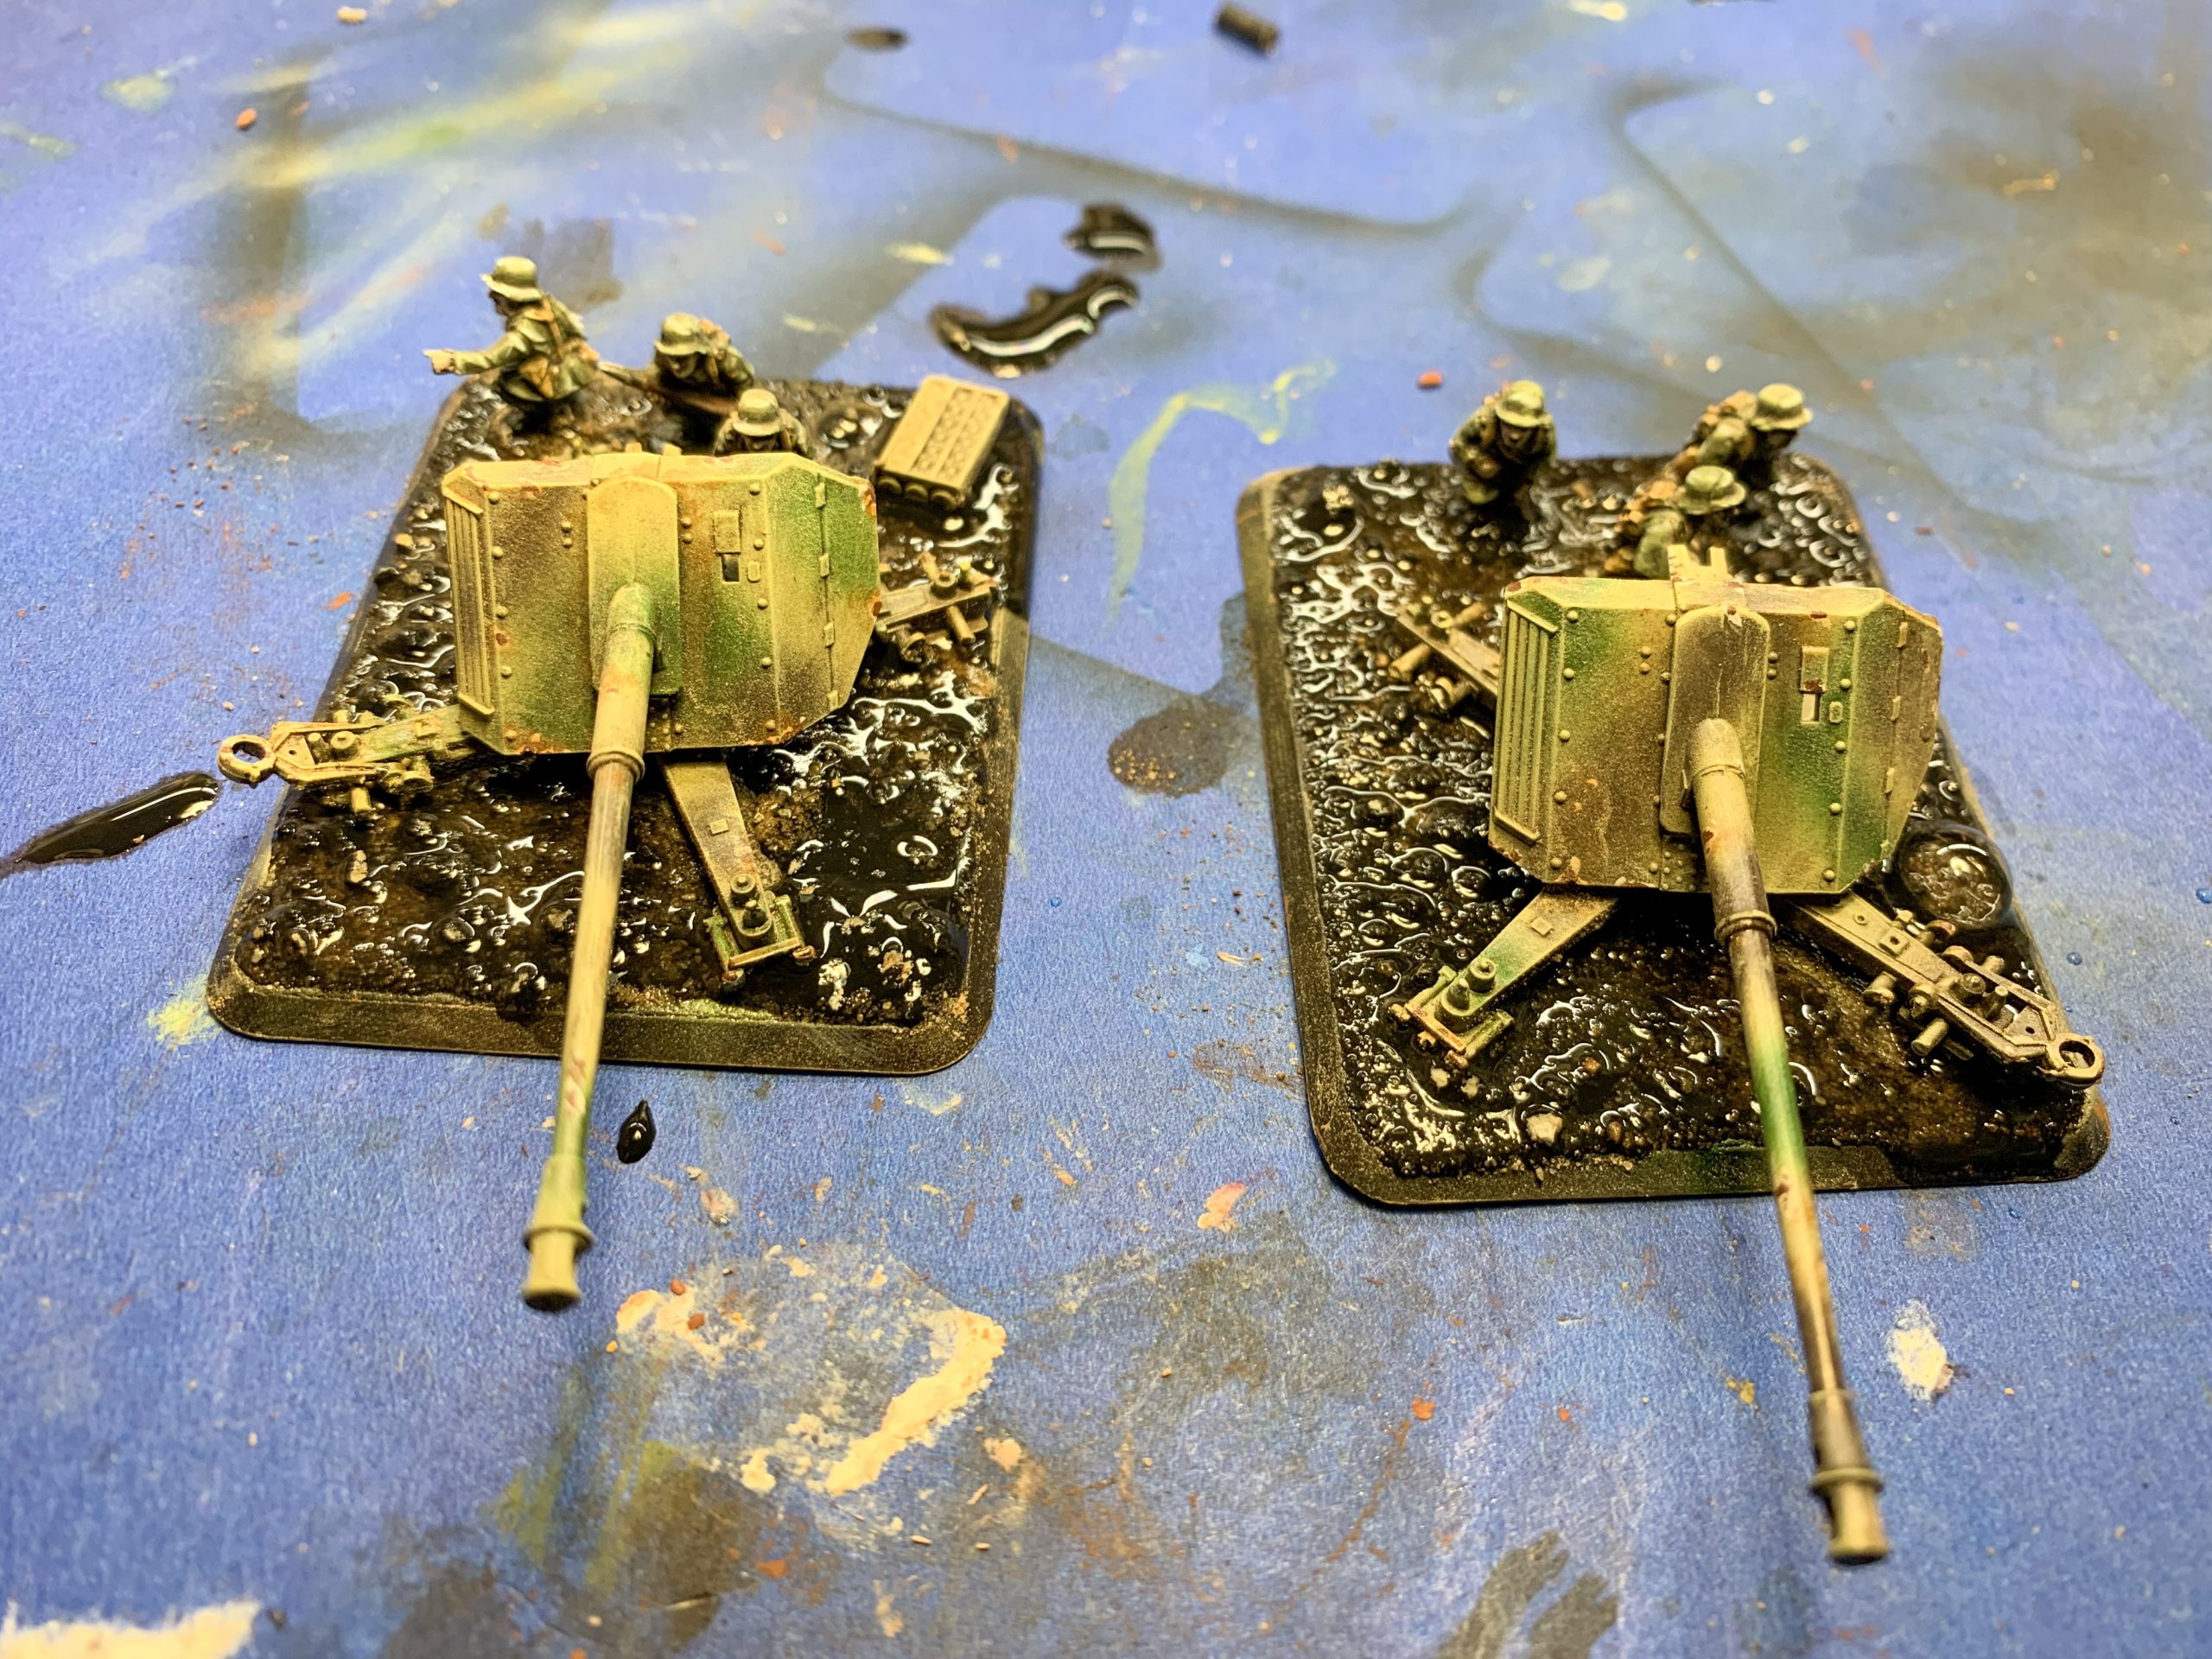
With the launch of the new book Bagration: German I decided it was time to update my Axis colour schemes to something suitable for the Late War time period. I also decided that it would be appropriate to start with some PaK 43s, since the Soviets are currently bringing a lot of heavy armour to the game. I figured the Late War 88 punching out 2 AT 17 shots a turn would be a good place to start and an easy way to show my opponents that the German army is not out of the fight yet.
To come up with this paint scheme I tested it a few times on some spare models until I felt I had it right. Then I recorded the process and colours in a notebook I keep at my painting desk. You should always keep a record of your paint schemes so you can go back and reproduce them at a later date. I had to learn this the hard way. (I have no clue how I got my D-Day American force looking the way it does and every new unit I add is just a little off because I failed to write the details down!)
Materials:
Before any painting project, I gather the necessary materials and ensure I have them in proper quantity. (Nothing is as frustrating as running out of paint halfway through a project!). This is what I used for this project:
| Airbrush & Compressor | Vallejo Model Air Black Primer | Game Colour Earth Brown |
| Airbrush Thinner | Vallejo Model Air DK Yellow Primer | Vallejo Dark Sea Grey |
| Paintbrushes (All Sizes) | Earth Tone Acrylic Paints | Game Colour Wolf Grey |
| Mig Enamel Thinner | Vallejo Model Air: Ivory Sand | Vallejo Field Grey |
| Testors Rust Wash | Vallejo Model Air: Armour Brown | Vallejo Africa Corps Uniform |
| Water | Vallejo Model Air: Olive Green | Black Acrylic Paint |
| Mig Dark Wash Enamel | Vallejo Model Air: Earth Yellow | Vallejo Light Flesh |
| Acrylic Matt Varnish | Vallejo German Yellow | Army Painter Flesh Wash |
| Acrylic Gloss Vanish | Vallejo Hull Red | Balsa Wood Strip |
| Craft knife | Vallejo Iraqi Sand | Sprue Cutters |
| Plastic Glue | Craft Knife | Hot Glue Gun & Glue |
| Super Glue | Sand Box Sand | Kitty Litter (Clean) |
| 2 pipettes | Rubbing Alcohol |
With the materials gathered It was time to start the project. Below is a step by step to reproduce my method. If you want to use this as a rough guide please do so. If you lack a tool or type of paint all you need to do is substitute something similar.
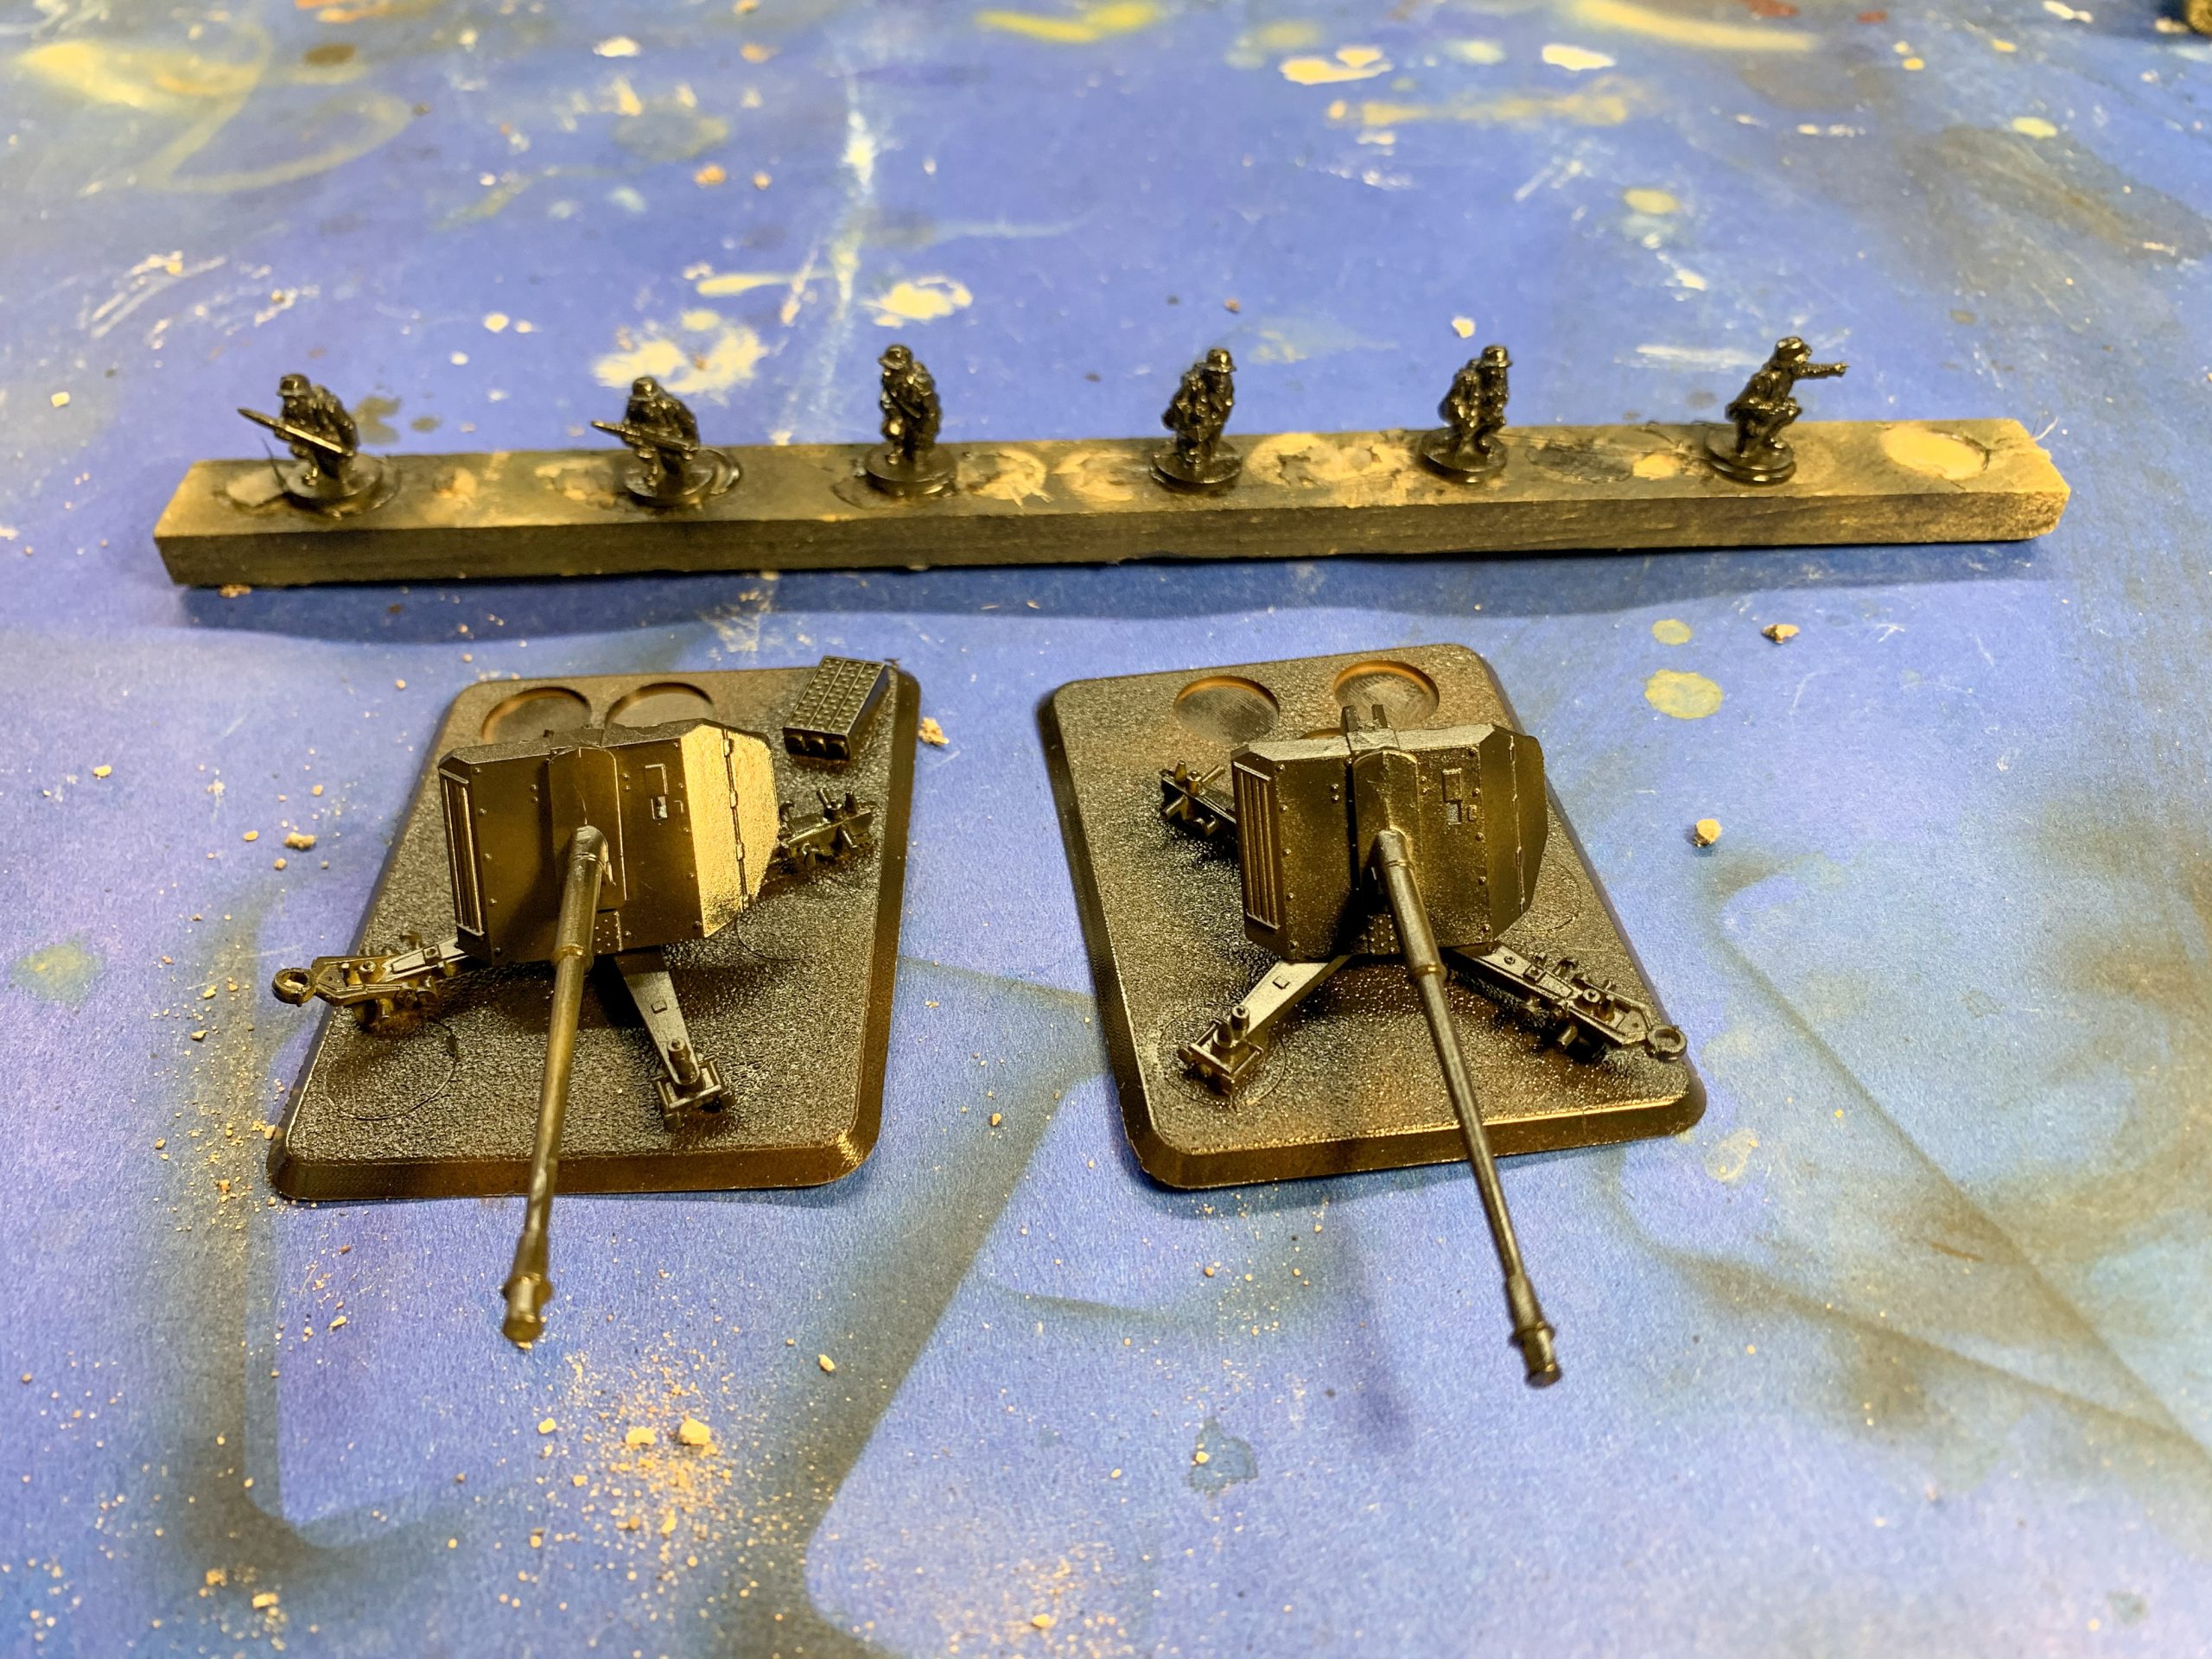
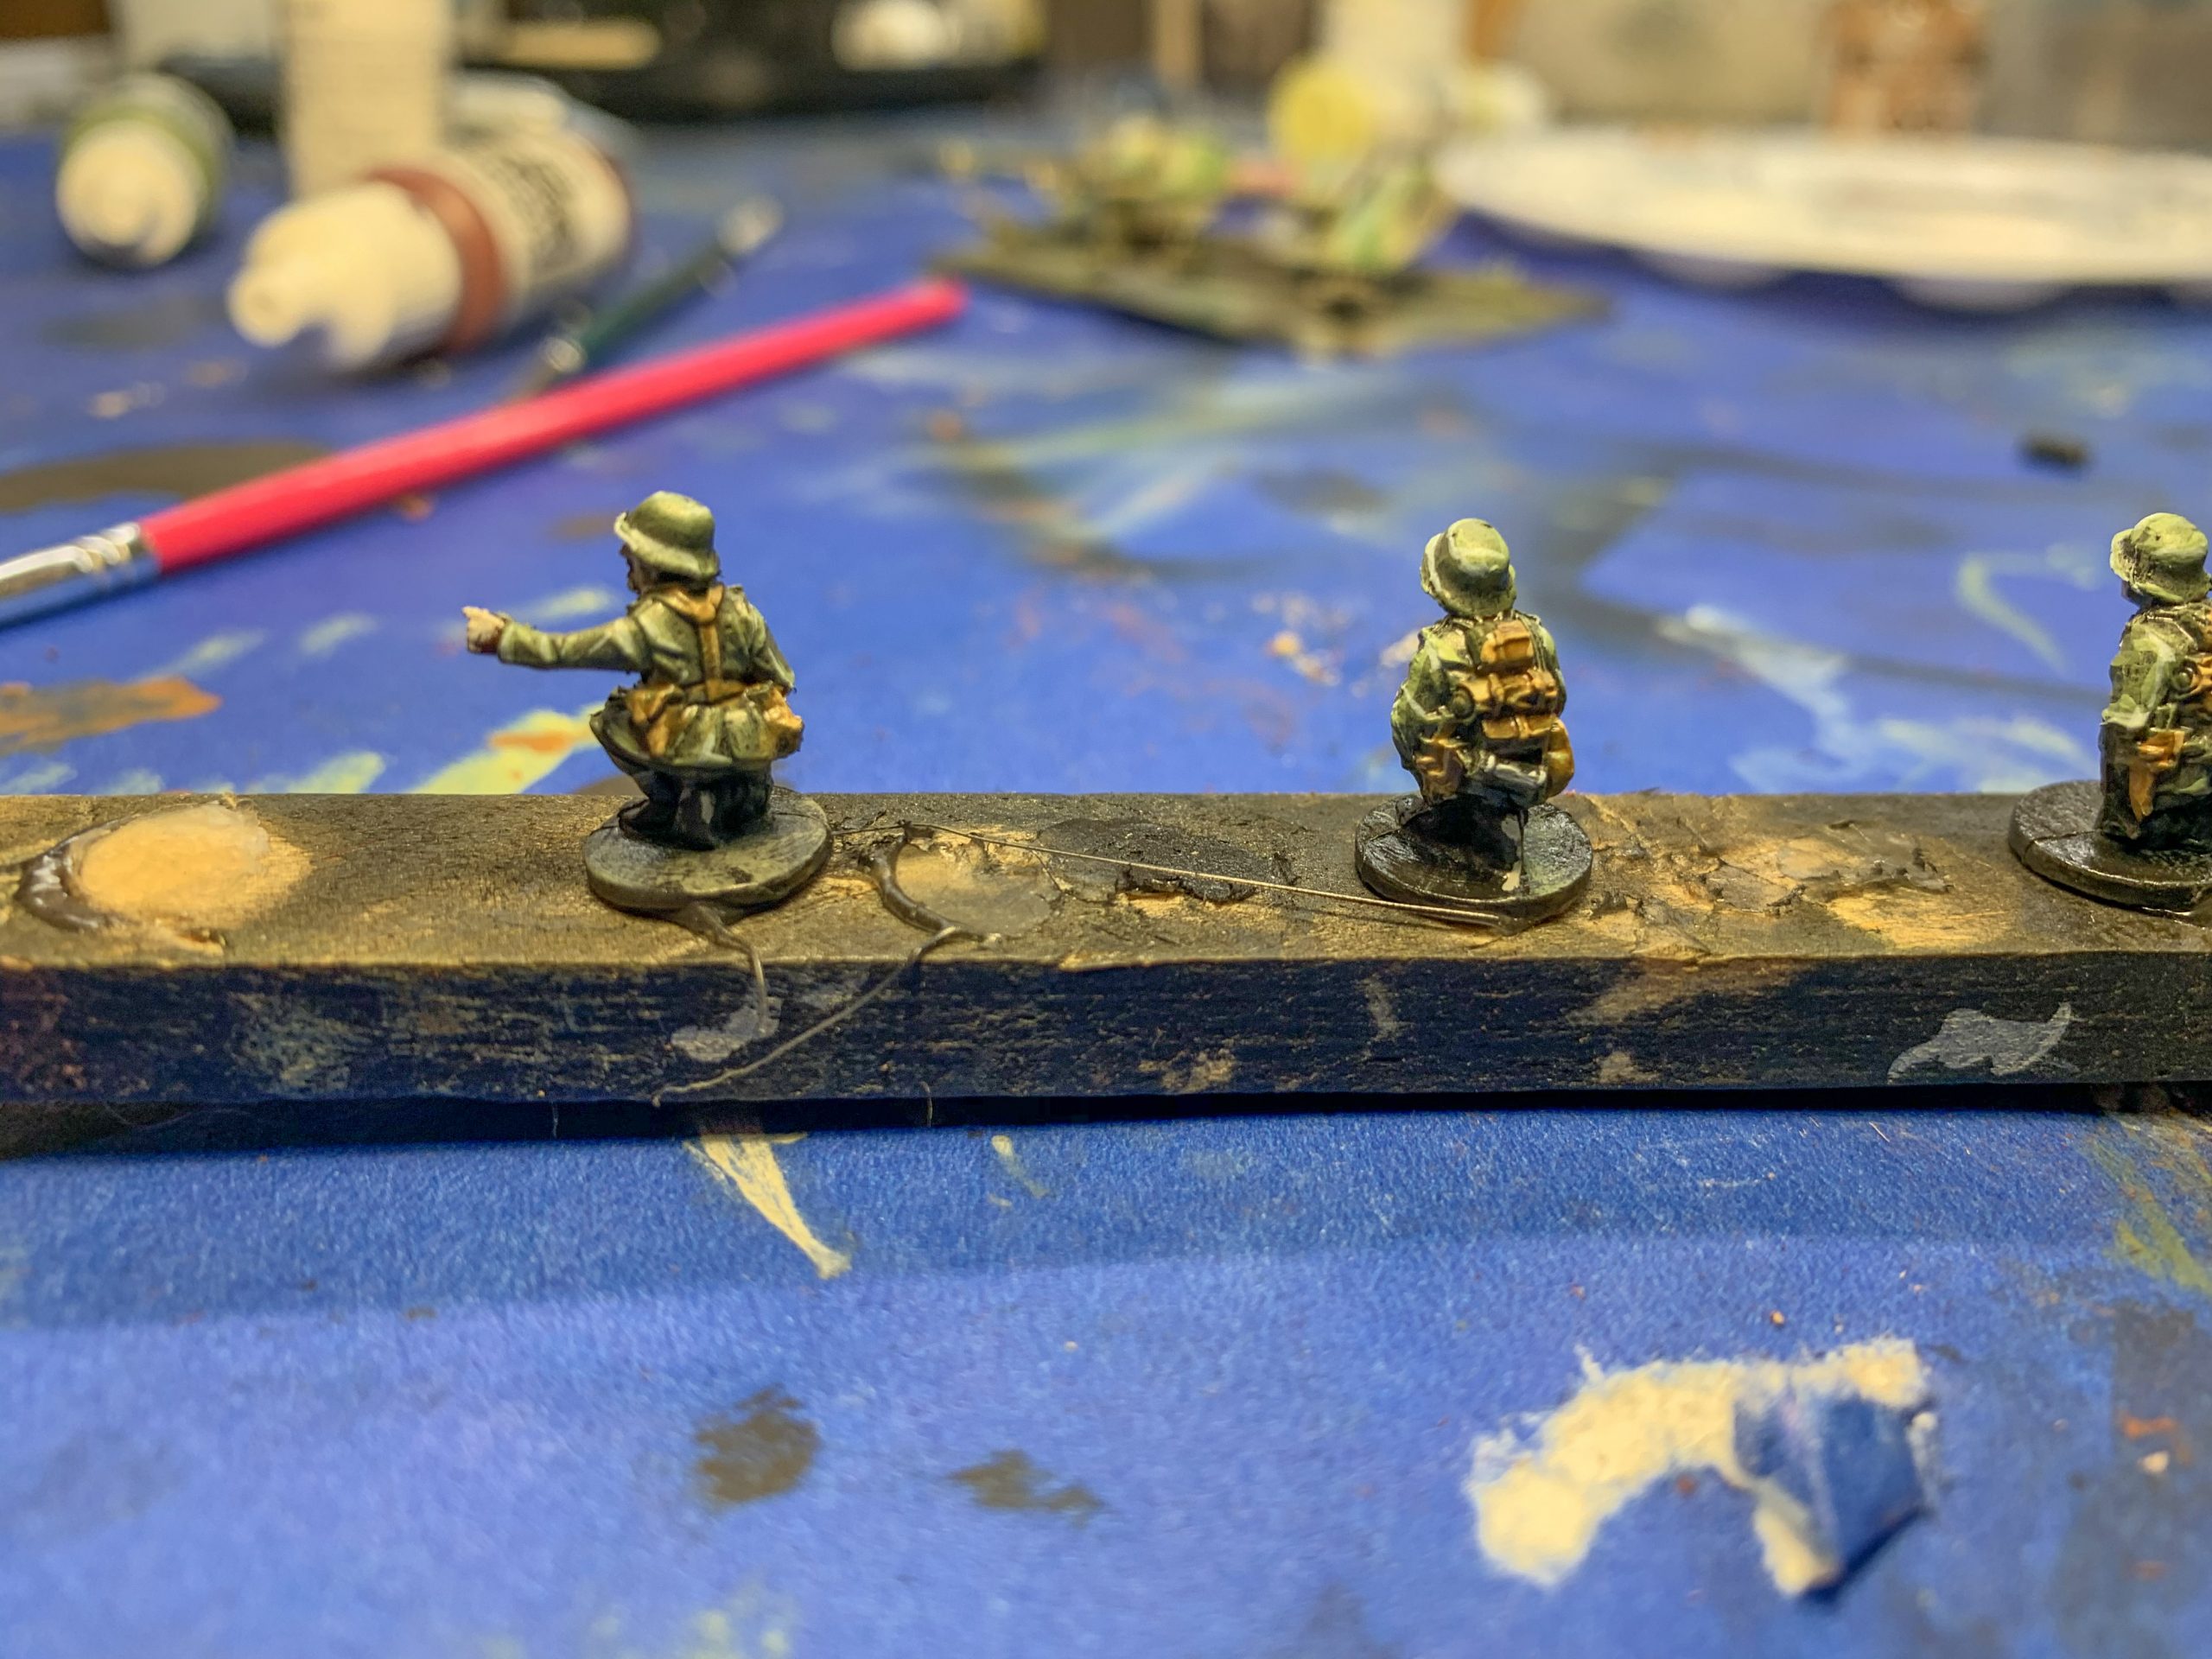
1. Preparing the Model: Using the sprue cutters, cut the parts of the model and crew off of the sprues. Use the craft knife to remove any flash or scars from the parts. Using the plastic glue assemble the model according to the instructions. At this time, glue the canons to the bases and using the hot glue gun adhere the crew to a strip of balsa wood to make them easier to handle while painting.
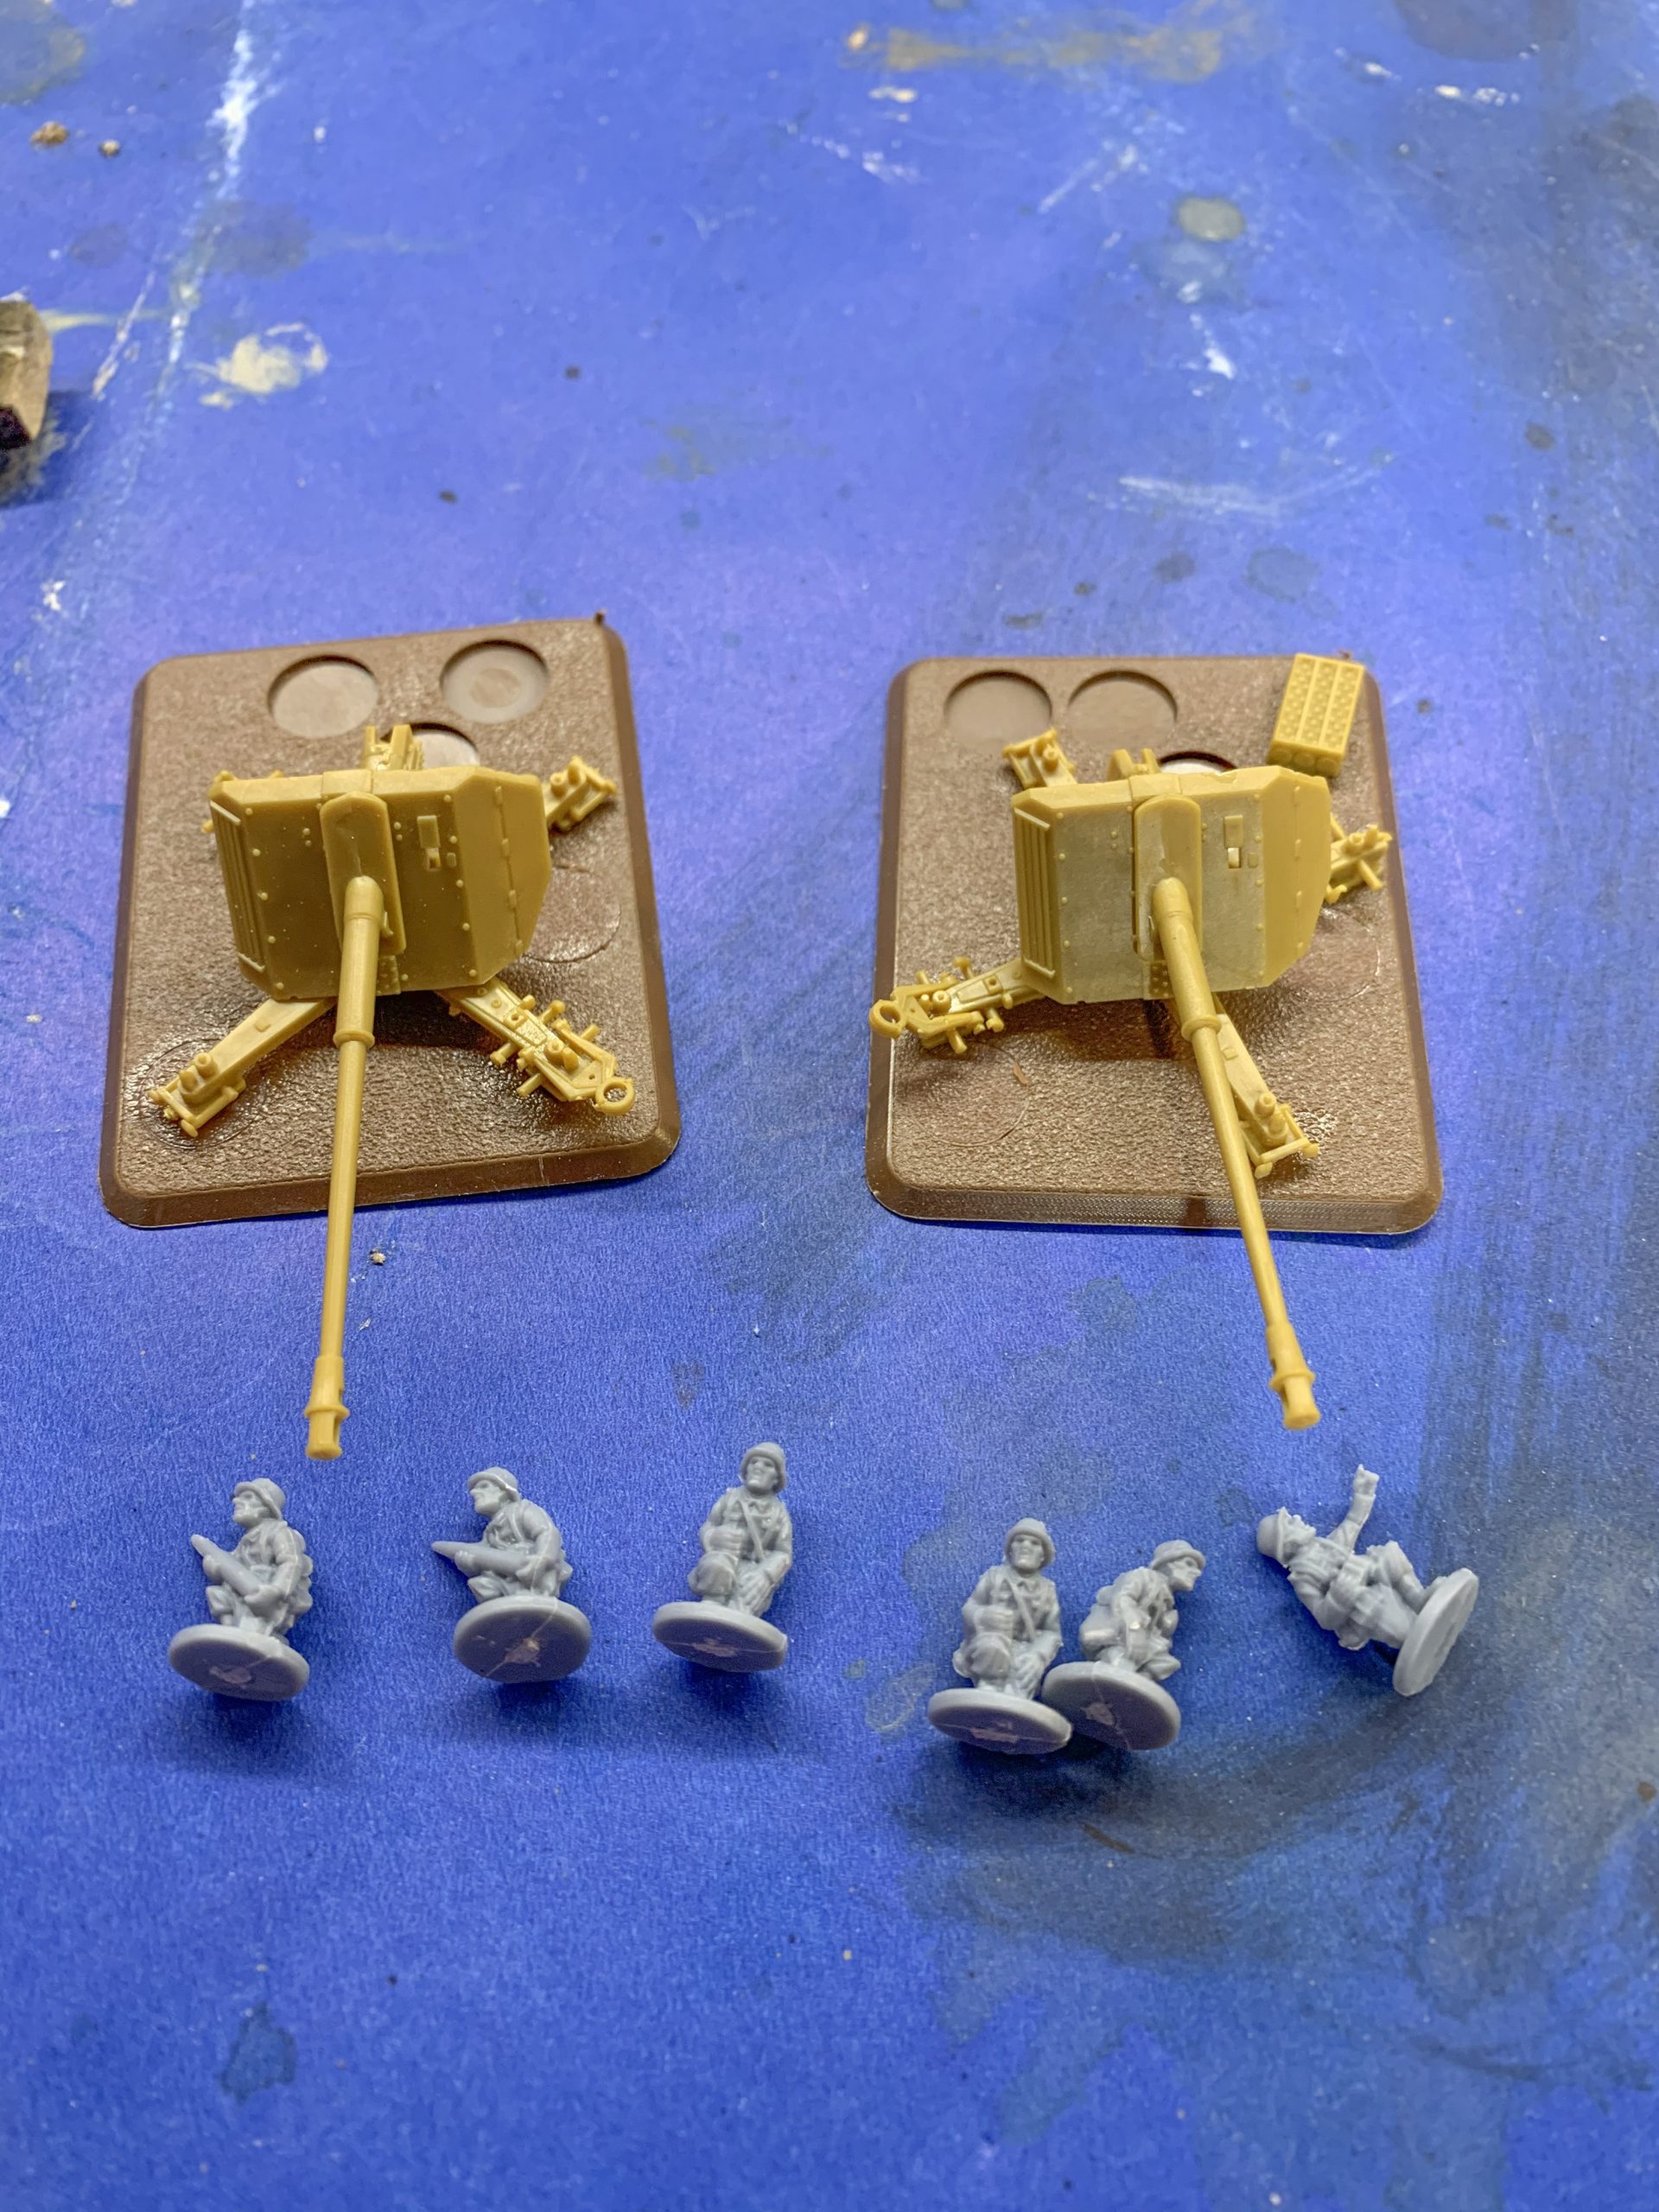
2. Primer: Using the airbrush, spray 2 light coats of the black primer on the models and crew
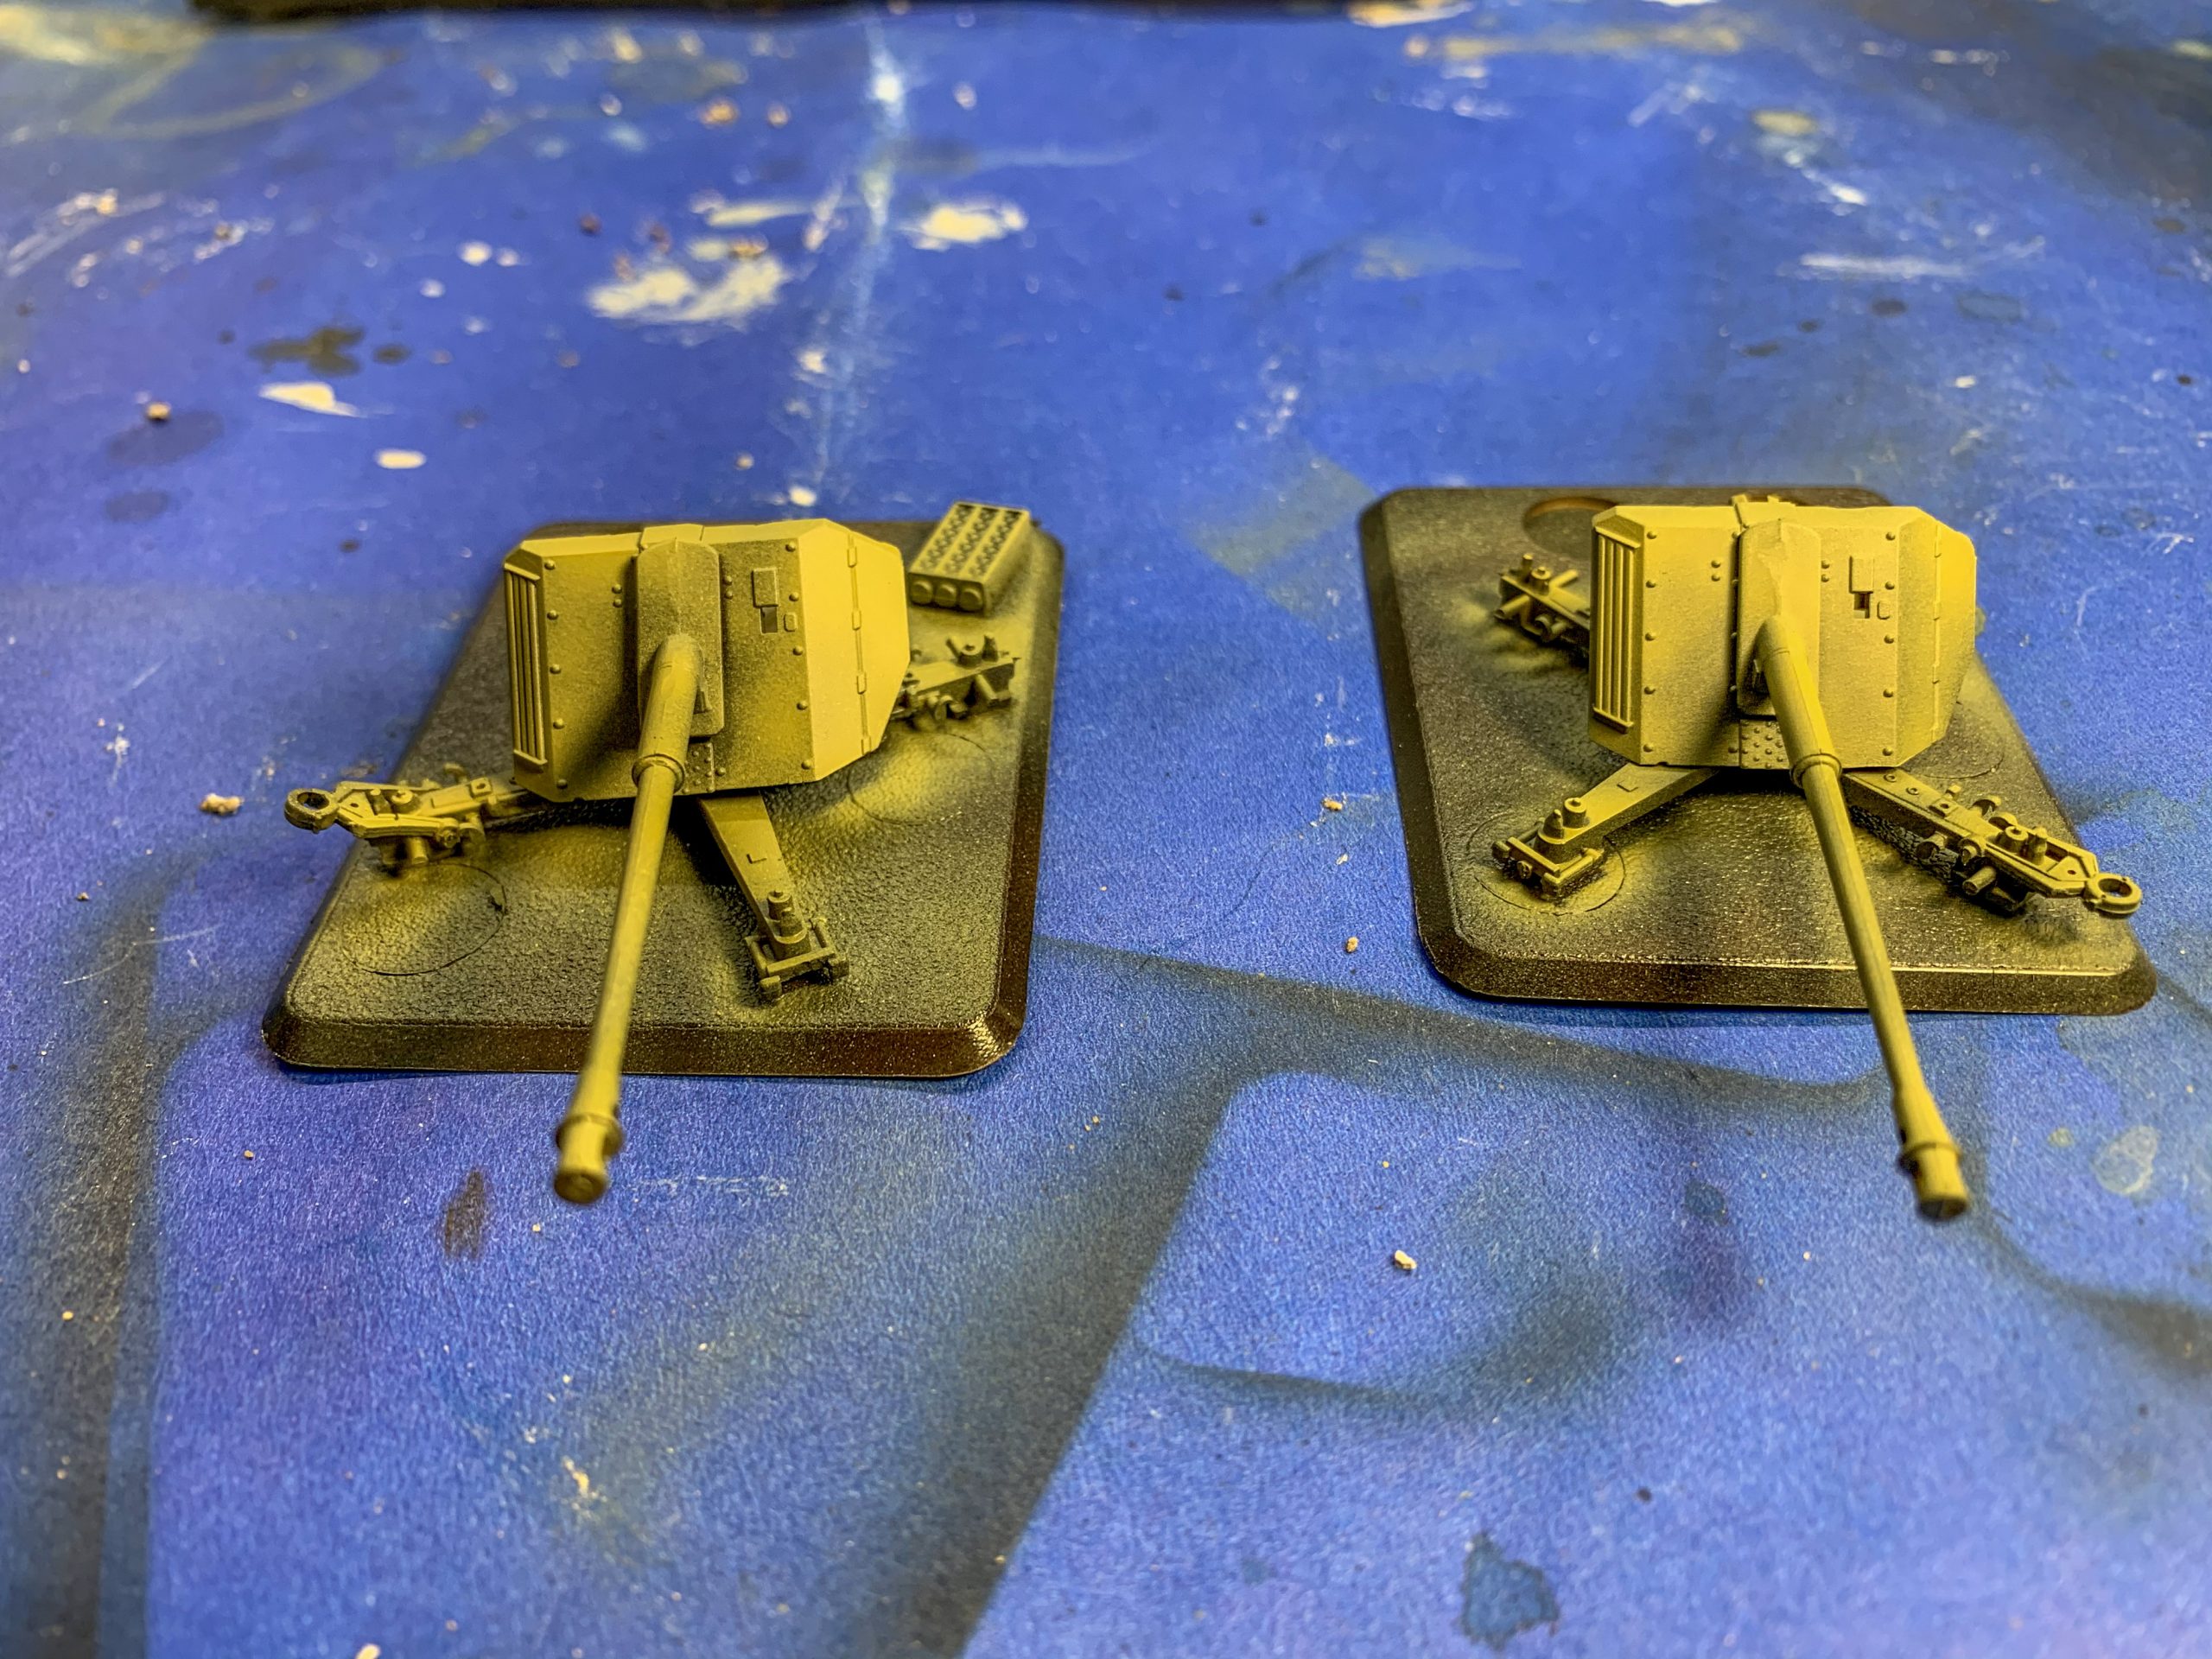
3. Canon Undercoat: Using the airbrush, spray Dark Yellow on the canons focusing on the edges and smooth surfaces and leaving the darker areas showing through in the shadowy areas.
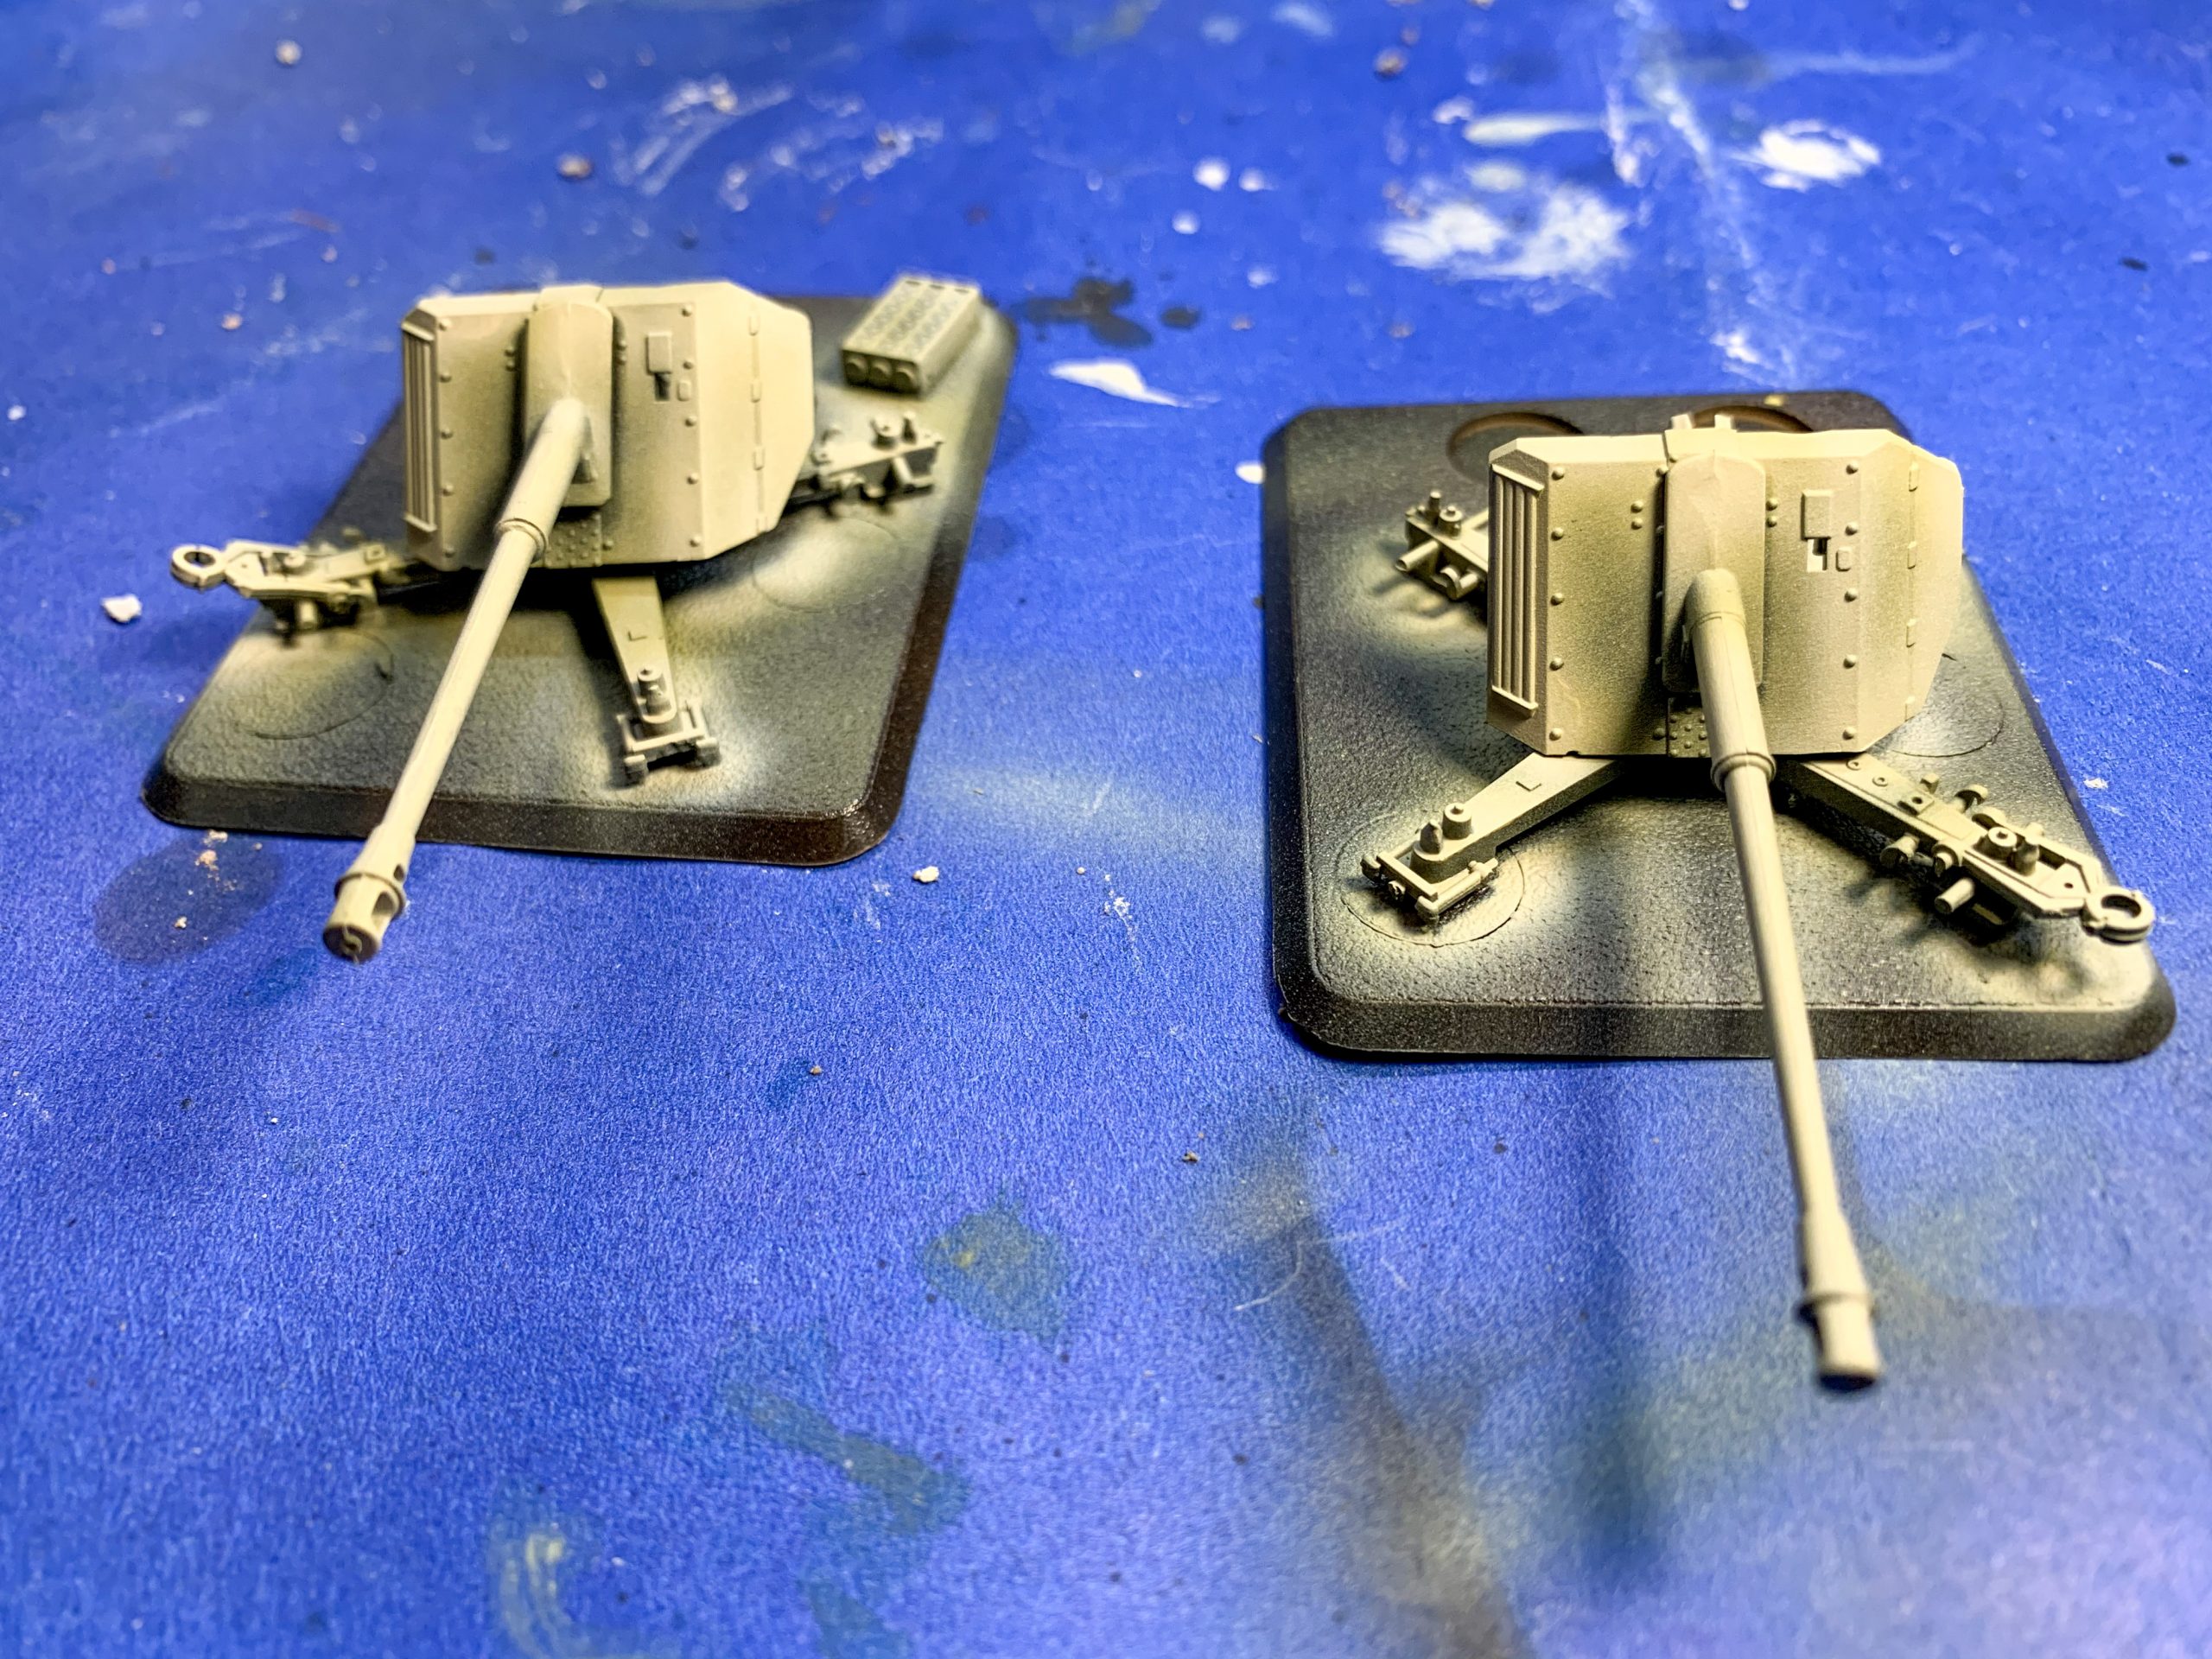
4. Canon Mid-Tone and Highlight: Using the airbrush spray the canons lightly with Earth Yellow leaving it out of the deepest areas. Concentrate on the edges of panels and the upper surfaces. After this, repeat the process with Ivory Sand but keep the pattern confined to only the edges of the canon and anywhere light would fall directly on the model.
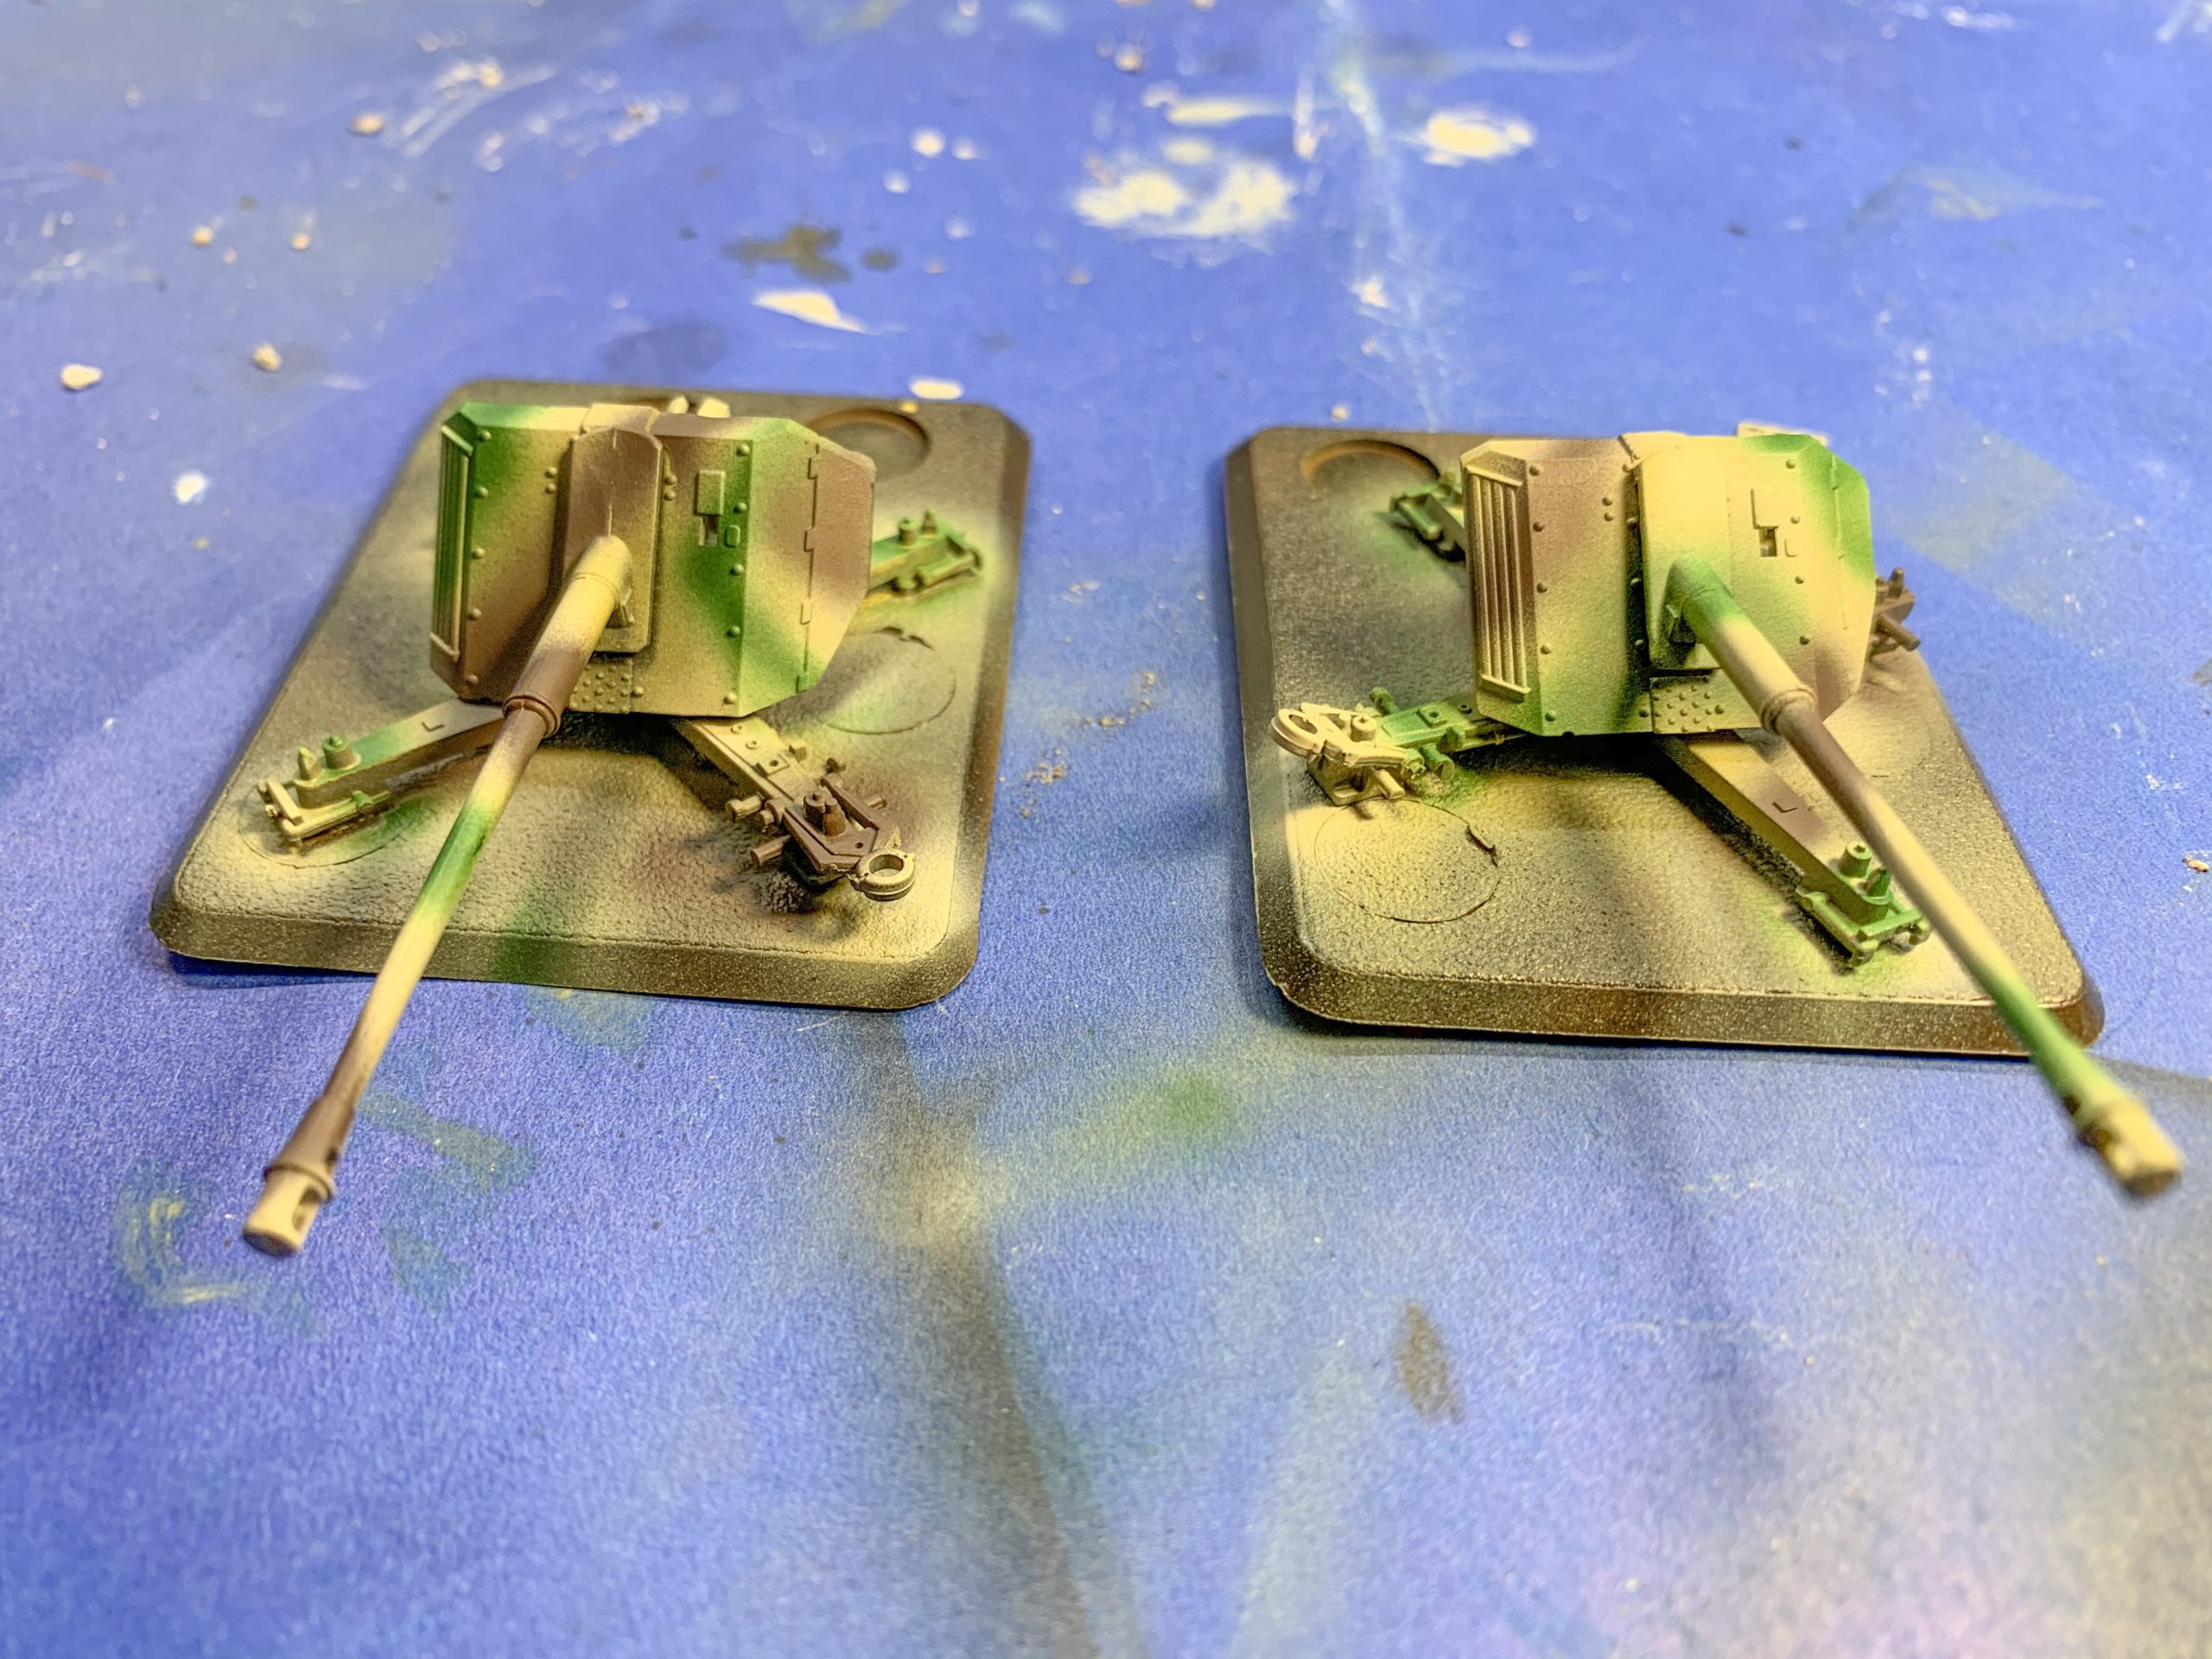
5. Camouflage: With the airbrush spray patches of Armour Brown and Olive green onto the canons.
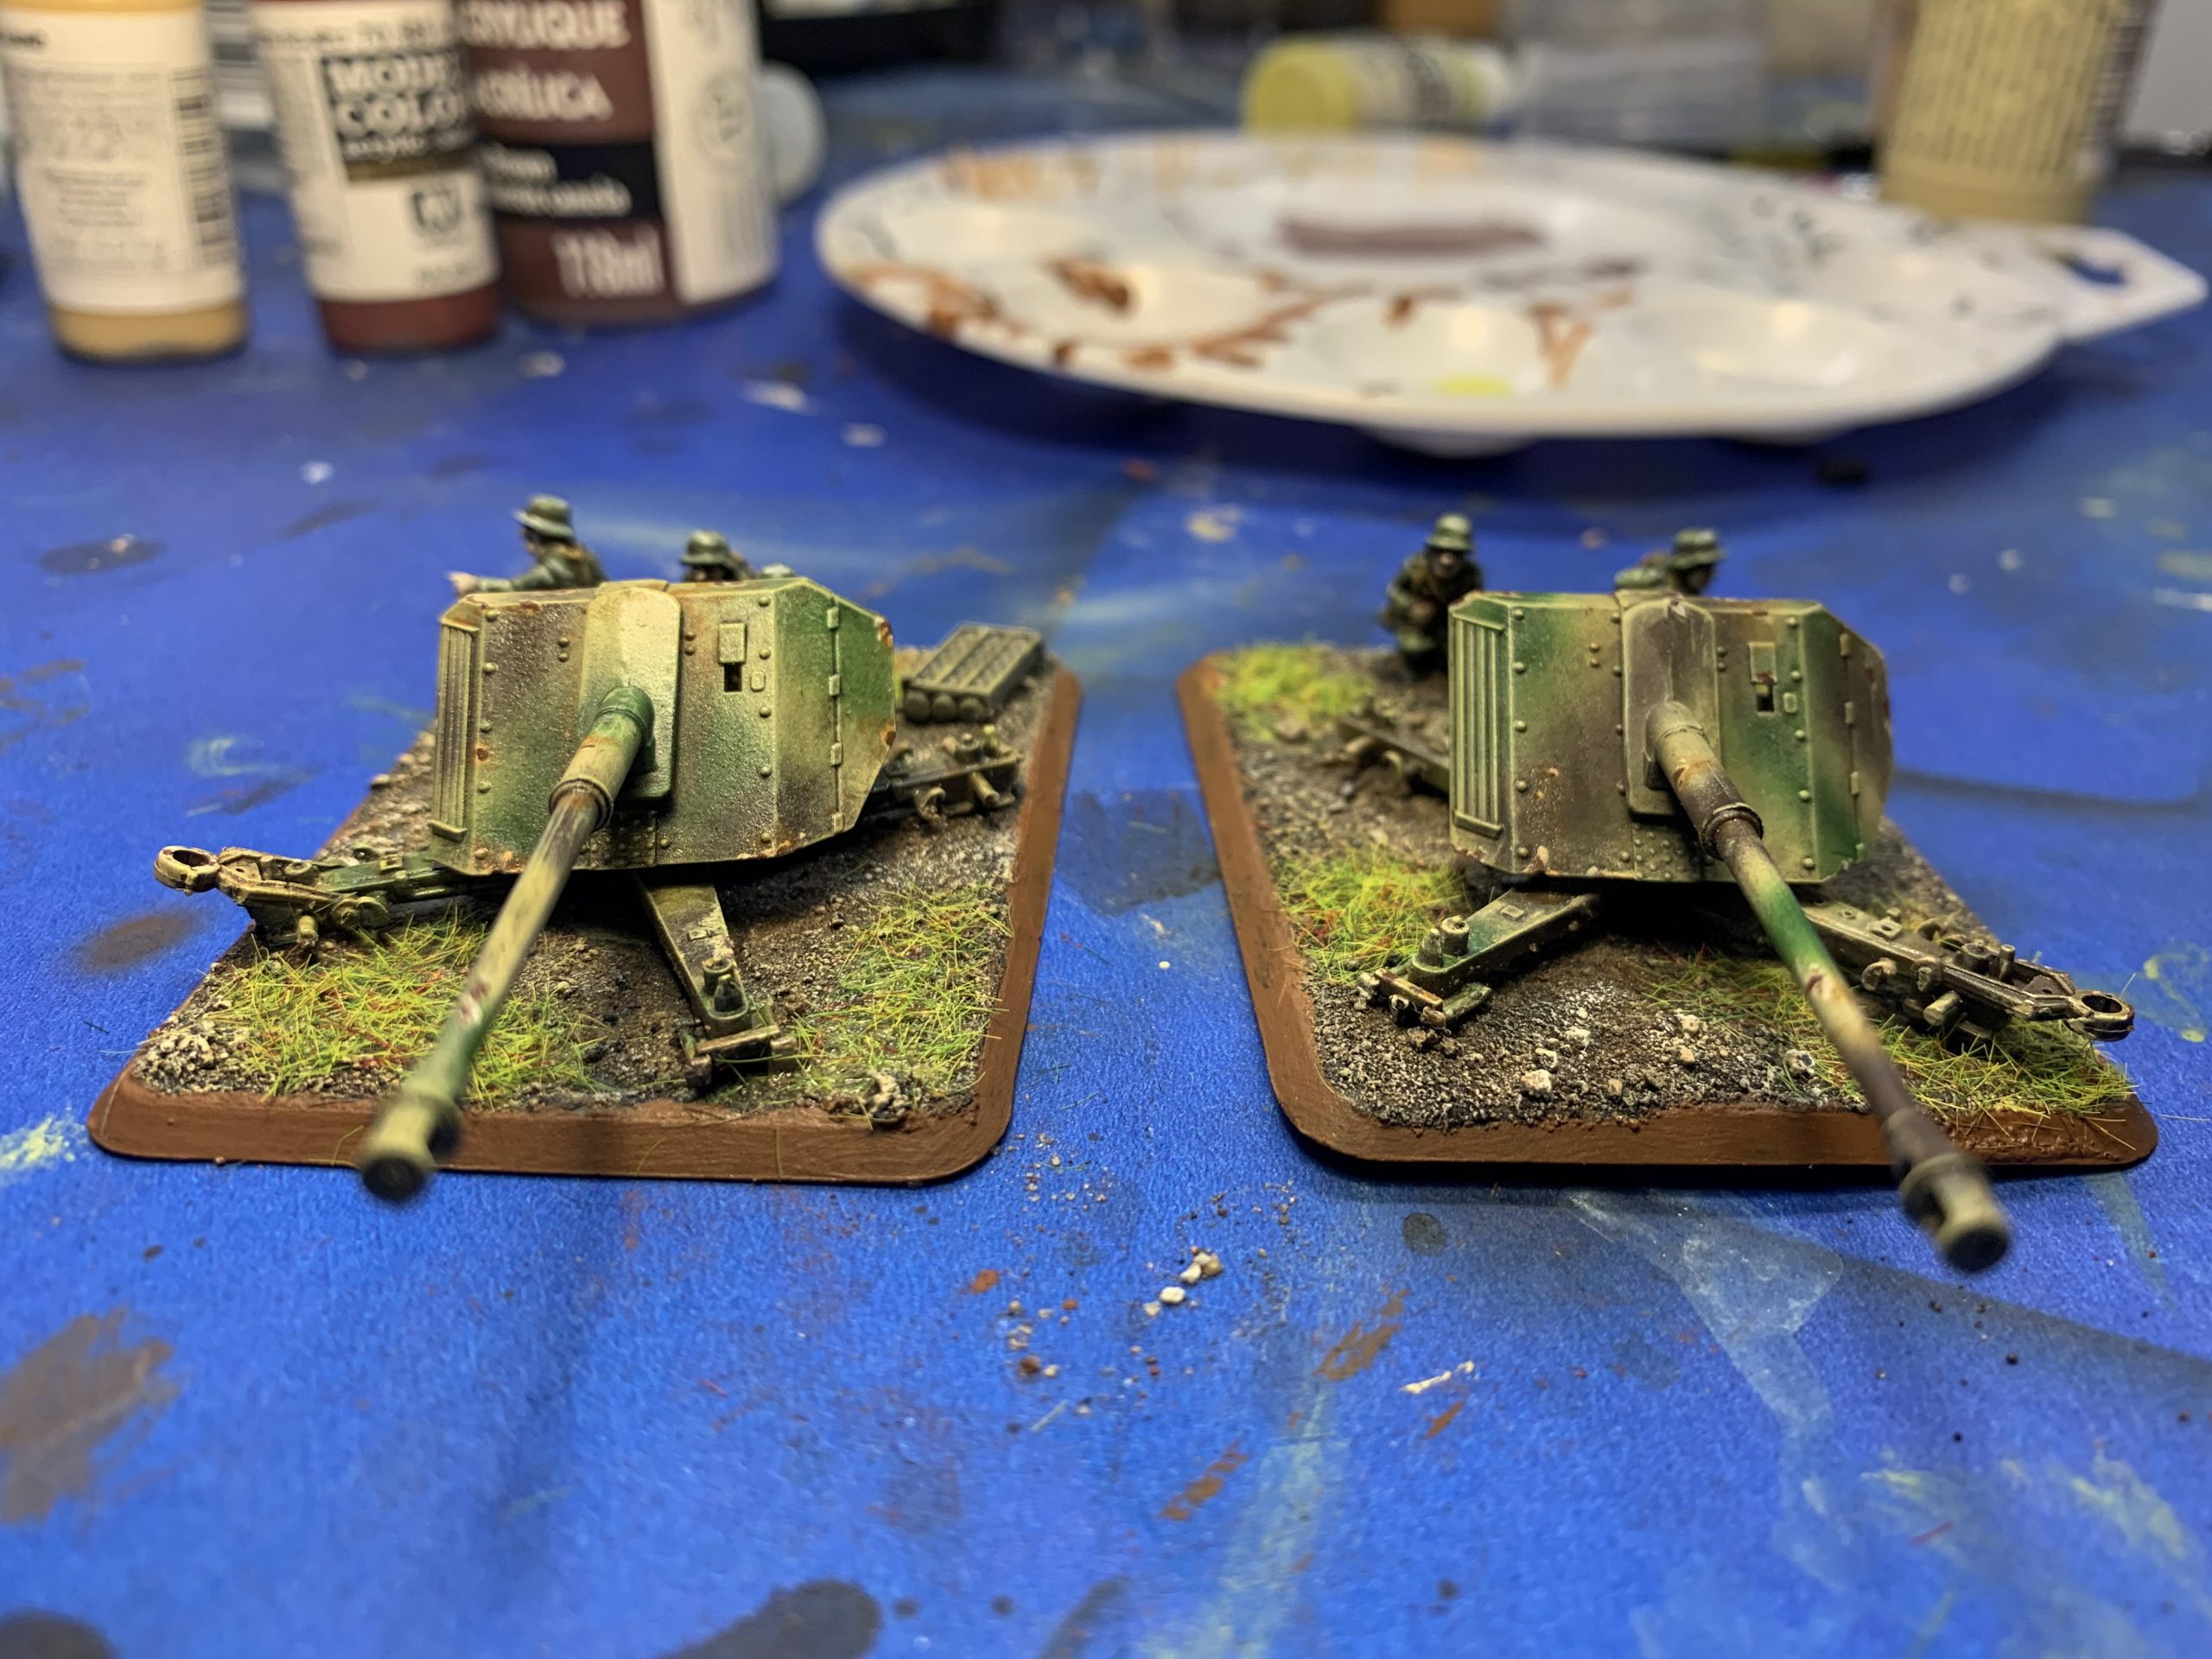
6. Top Highlight and Gloss Varnish: Using a large stiff bristle brush, take some German Yellow straight from the bottle and wipe it off on some paper towel. When there is just a slight amount of pigment left on the brush, drybrush it onto the canons focusing on the edges of the plates and raised details. When this has dried, load the airbrush Gloss Varnish and apply 2 coats to the entire model.
7. Crew Uniforms: While the Gloss Varnish dries, first heavily dry brush Field Grey onto the crew models clothing and helmets. Then follow up with a lighter dry brush of Africa Corps Uniform.
8. Apply Thinner and Wash: Once the gloss varnish is dry take, a large brush and apply enamel thinner over the entire canon model. Then while the thinner is still wet apply the Dark Wash enamel. The Thinner will carry most of the enamel into the crevices and lower areas of the model

9. Clean up Wash and Re-Highlight: Give the wash about 15 min to set then use a flat brush moistened with enamel thinner to remove the wash that has pooled on raised/flat surfaces. Using the brush, you can sweep the wash back into the crevices and the shadows or remove it entirely from raised areas or parts of the model that would be in direct sunlight. Allow the wash to dry then repeat the top highlight dry brush from step 6. Now that the model has been shaded with enamels and varnished, the highlights will be resisted slightly by the underlying layers, keeping the highlights sharp and reducing chalkiness.
10. Crew Details: Now paint the webbing and shells on the crew models Earth Brown and the skin Hull Red.
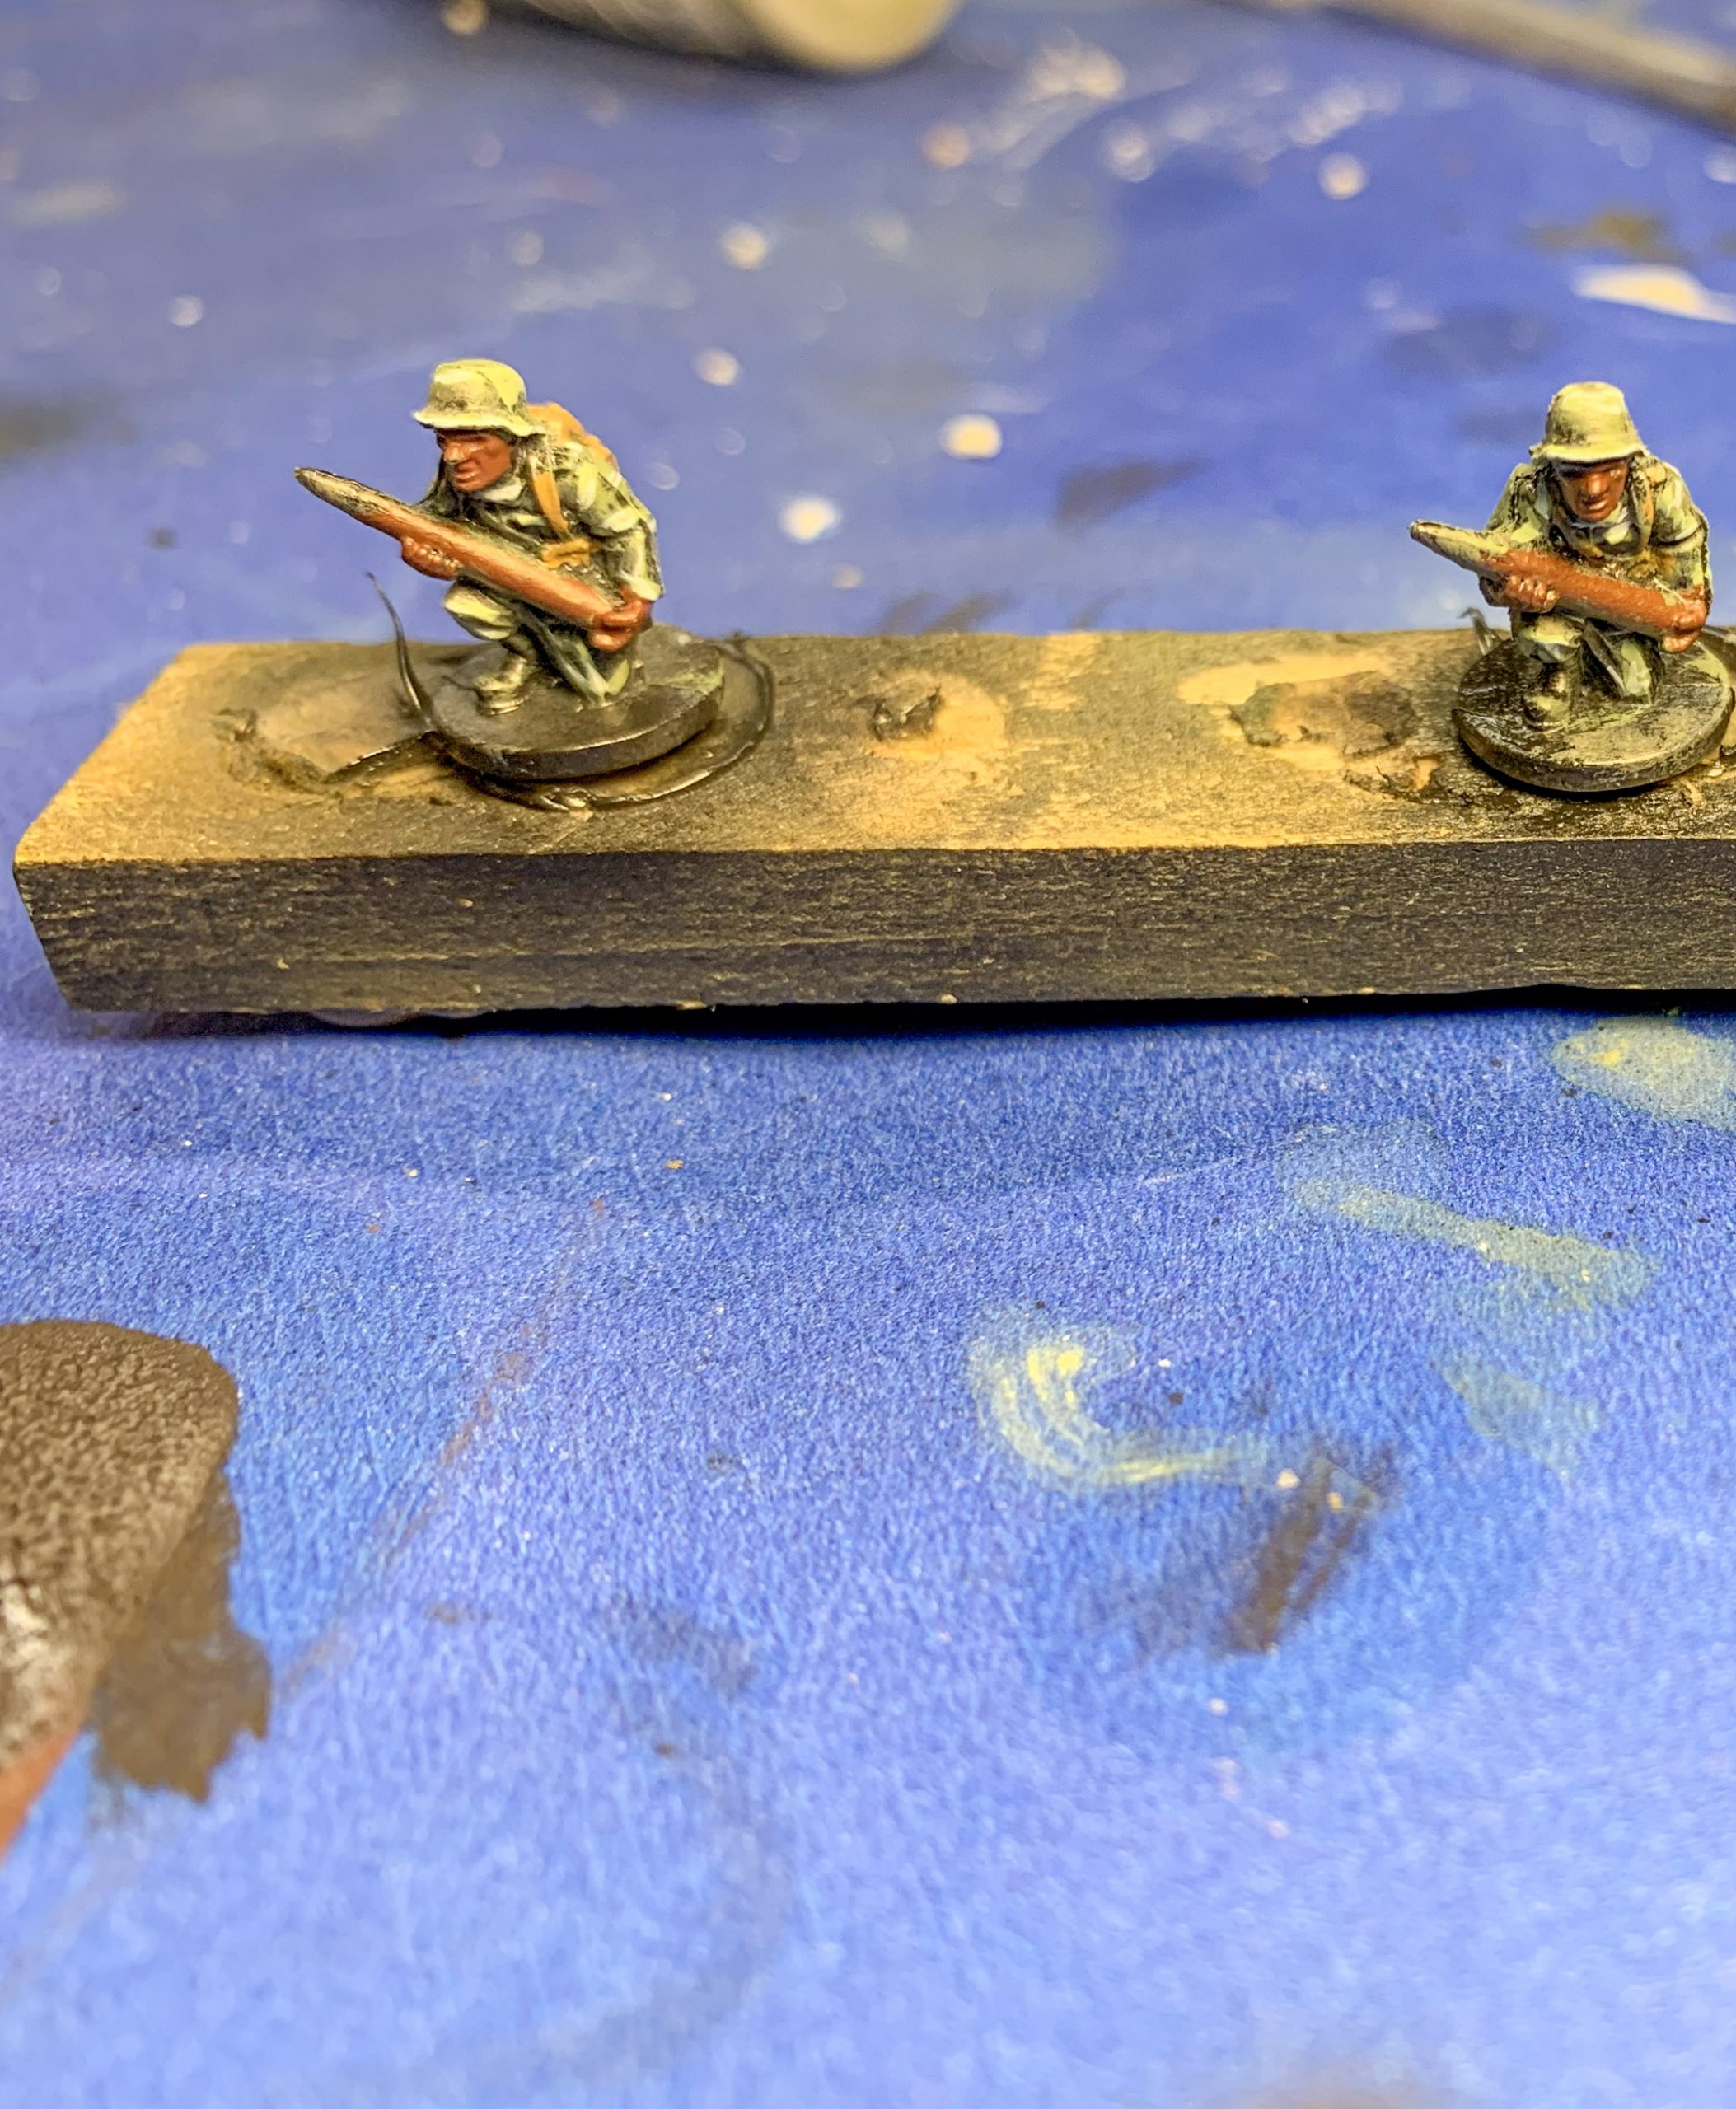
11. Skin Tones and Crew Highlights: Paint Light Flesh onto the skin areas of the crew leaving Hull Red showing in the recesses. Apply highlights to the webbing and shells with Iraqi Sand. When this has dried, wash the flesh areas and brown areas with Flesh Wash. When the wash dries, Highlight the skin with light flesh on raised areas like the chin and nose.
12. Chipping: going back to the canons, paint small streaks and dots of Light Flesh on the model where wear may occur such as at the corners of the armoured plates. After this dries, stipple dots of Hull Red into the centre of the Light Flesh to look like rusty chips. Now brush the enamel rust wash over the “chips” and when it is dried, clean it up with enamel thinner as in step #9. (Note: with chipping on models in 15mm scale less is more. This effect can be overpowering so use it sparingly to build depth and visual interest.)
13. Finish Crew: Paint the warhead of the shells, boots and gasmask canisters black. Follow this by applying Dark Sea Grey to the warheads and cannisters leaving the black in the recesses showing. After this has dried, make a fine highlight with Wolf Grey. Next mix Wolf Grey with Africa Corps uniform in a ration of 1:3 and with a fine brush, highlight any raised areas on the uniform and make sure to do the rim and top of the helmets. Finally, you can now use superglue to adhere the crew to the gun bases.
14. Texturing the Bases: Using an old brush spread a mix of 8 parts white glue to 2 parts water on the base. Next sprinkle this with a mix of kitty litter and sand and shake off any excess.
15. Fixing the Grit: While the glue is still wet, use a pipette and deposit a mix of 3 parts rubbing alcohol to 1 part black acrylic ink onto the base. Drop the mixture until the grit is coated and the capillary action draws the mixture into the crevices around the model. Next while everything remains wet, mix 8 parts water to 2 parts white glue and using a different pipette, layer this on top of the grit mixture. The rubbing alcohol will break the surface tension and everything will flow together to form a strong bond. Leave this overnight to dry.
16. Finishing the Base: When the grit has dried, dry brush various shades of dark and light brown onto the base working from dark to light. Then paint the rim of the base brown (Use 2 coats). When this has dried you can use watered down white glue to attach lichens and static grass. Finally, when all of the glue has dried, use an airbrush to spray on 2 layers of matt varnish.
The Models are Now Complete
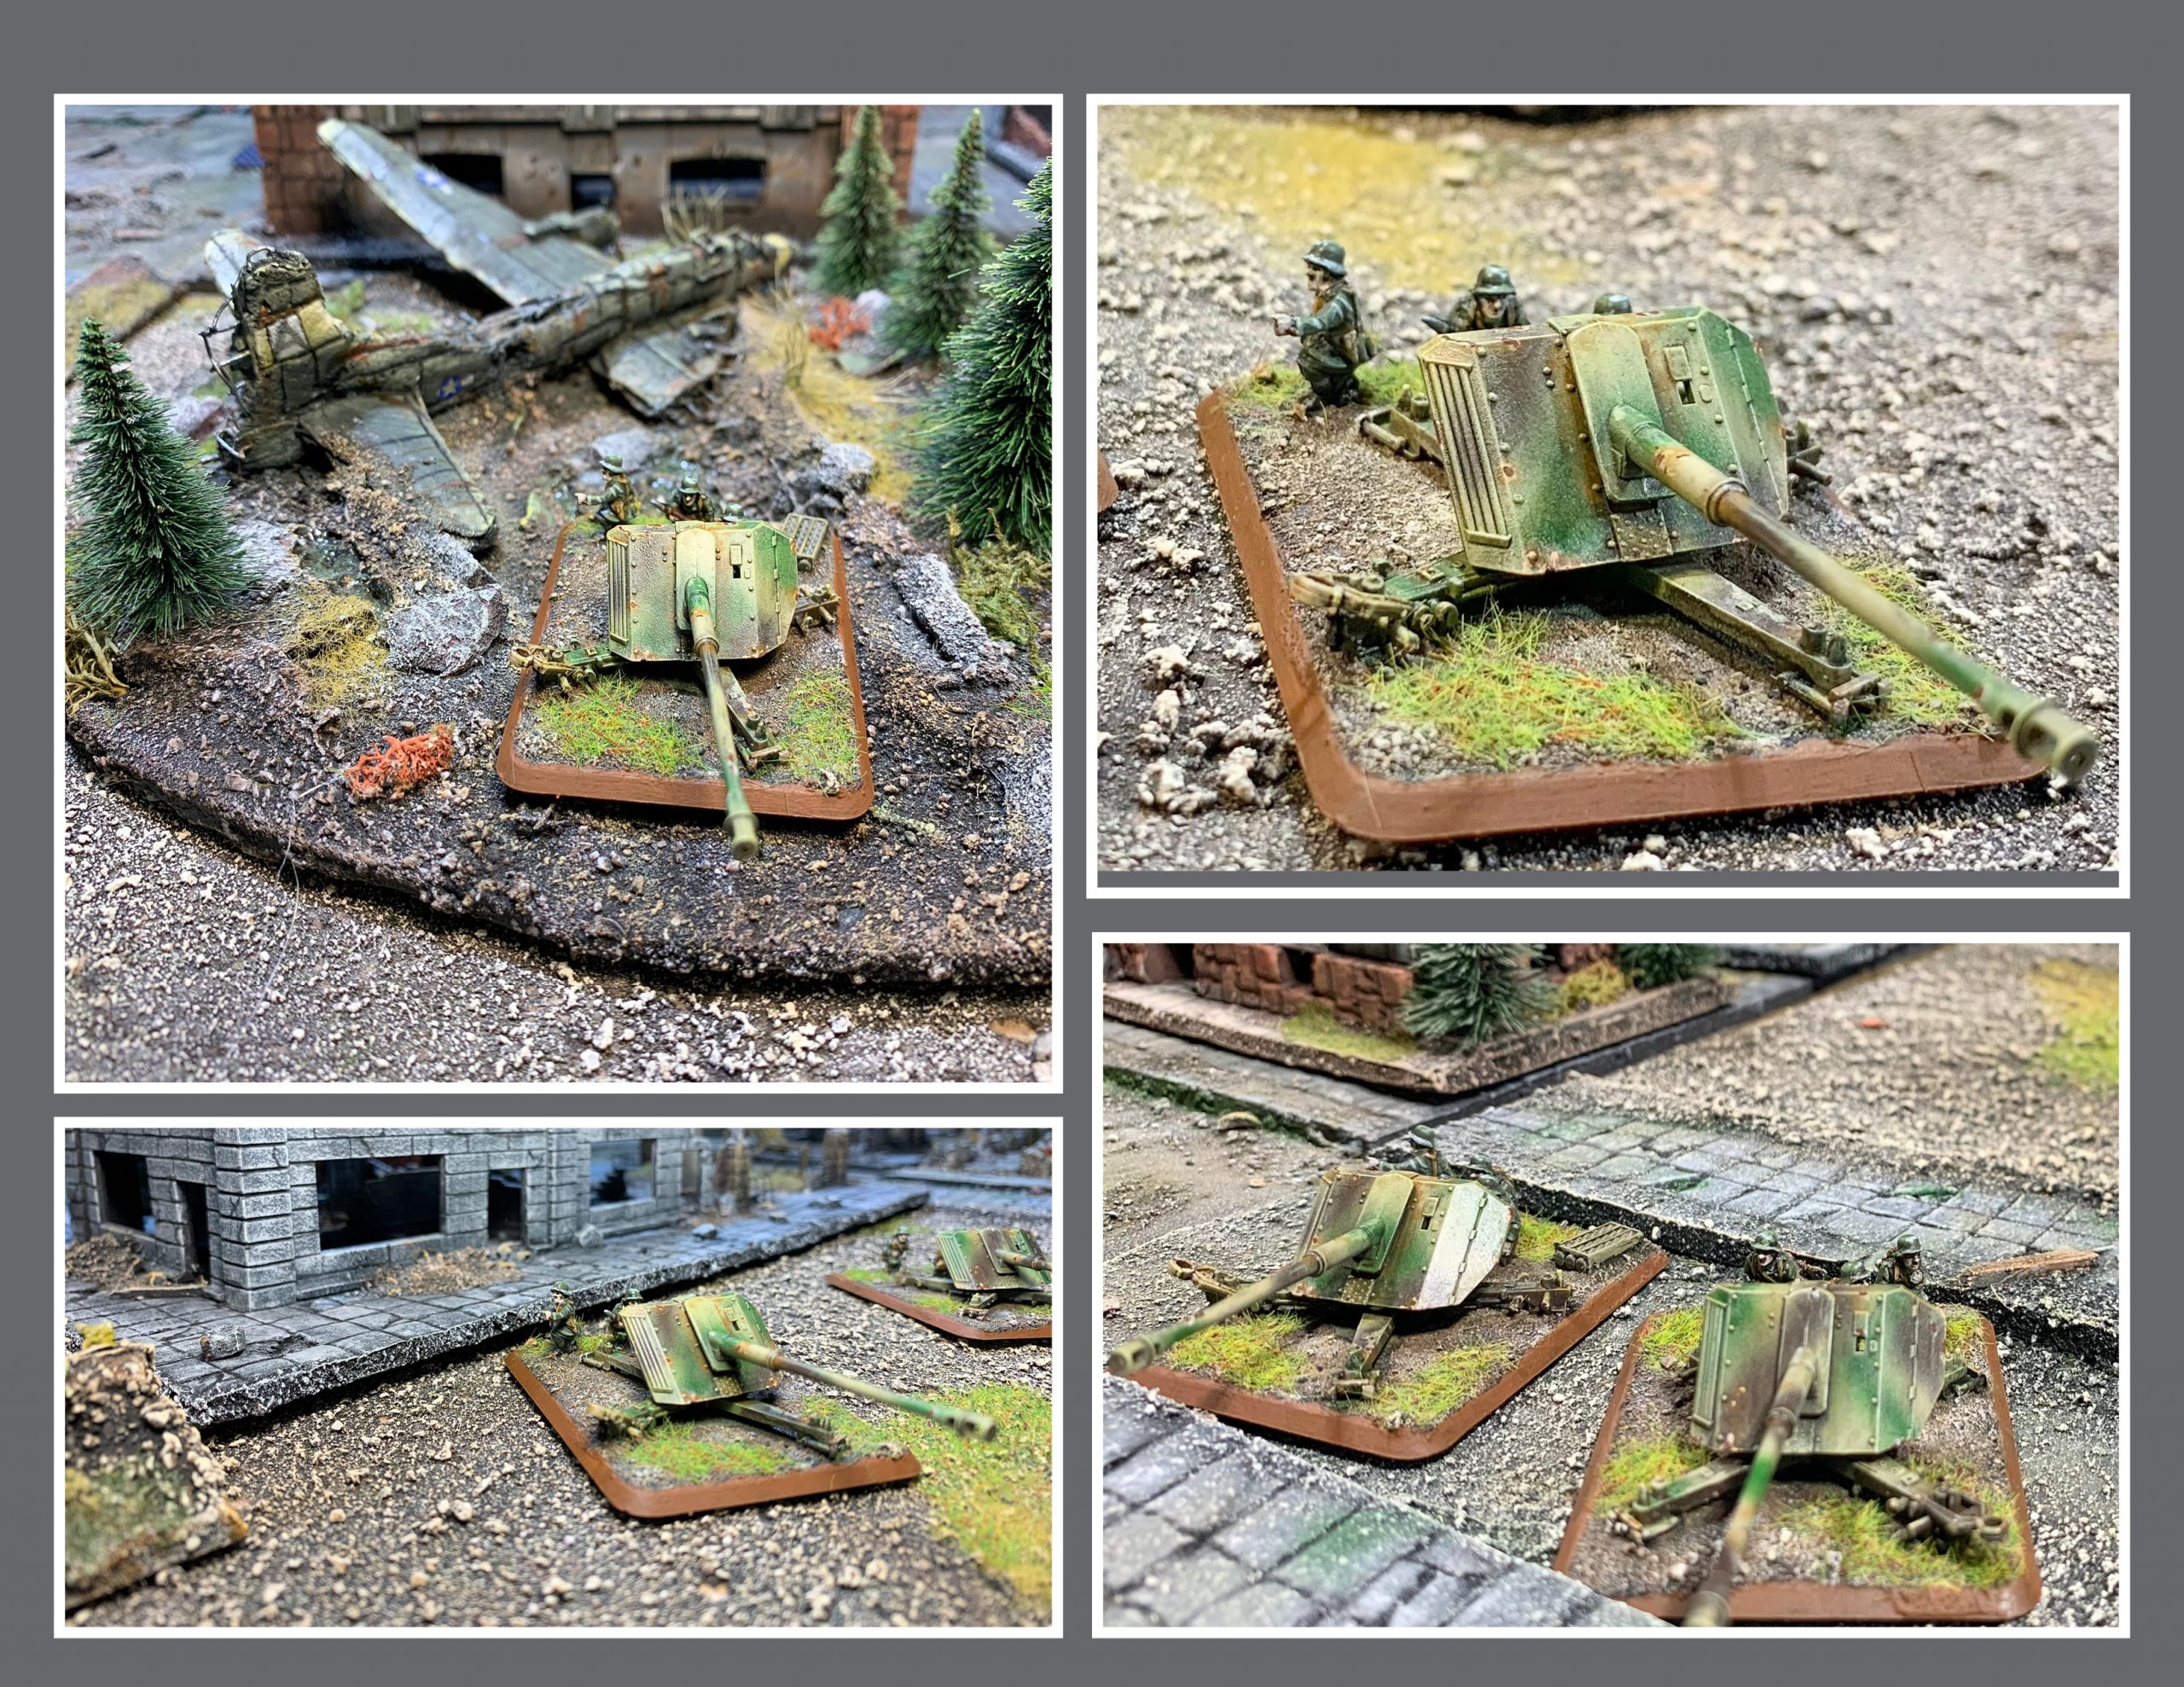
I hope this process gives you ideas for preparing your models for the launch of Bagration: German. With the sheer variety of paints and techniques for model painting available it is extremely unlikely that you will have the same products to achieve identical results as I have, but the challenge with the hobby is not to duplicate the work of others but travel your own artistic path. So, go ahead and create some exciting and unique paint schemes for your models then grab an opponent and get playing Flames of War!
Tigers in the Mud Otto Carius on the Eastern Front, 1942-1944
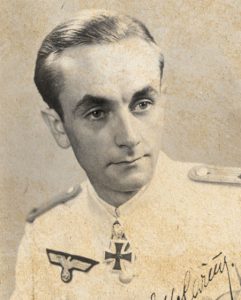 Otto Carius was born in 1922 in Southwest Germany. In May 1940, Carius volunteered to join the 104th Infantry Placement Battalion. He received training in the infantry before being assigned to the 21st Panzer Regiment, of the 20th Panzer Division. He saw his first combat action in June 1941, during Operation Barbarossa, the invasion of the Soviet Union.
On the Leningrad Front, 1941-42
The 21st Panzer Regiment was equipped with the Czech-made Panzer 38(t). Otto Carius served as the tank’s loader in the 10th Panzer Company. When Carius and the rest of his crew received its first Panzer 38(t) tanks they were excited.
The tank was fast, manoeuvrable and they felt the armour would protect them from anything the enemy could throw at them. However, as Carius noted, ‘We were enthusiastic about the armour protection and didn’t realize until later that it would only serve as moral protection for us. If necessary, it would stop small arms fire’.
Only a month into the Russian campaign, Carius’ tank was hit and the crew had to bail out for the first time. A disillusioned Carius wrote, ‘We cursed the brittle and inelastic Czech steel that gave the Russian gun so little trouble. The pieces of our own armour plating and assembly bolts caused considerably more damage than the shrapnel of the round itself’. Carius was hit in the face, losing several teeth in the process. He recovered at an aid station and hitchhiked his way back to the front.
In early August 1941, Carius was promoted to Unteroffizier and received orders to report to the 25th Panzer Replacement Battalion to begin officer training. In February 1942, Carius failed to meet the qualifications for officer and was returned to the 21st Panzer Regiment. He was given command of a Panzer platoon, but the regiment only had enough tanks to equip a company, so his platoon had to fight as infantry until they received new Panzer 38(t) tanks. Carius and the rest of the 10th Panzer Company finally received replacement tanks and joined the fight once again.
During the fighting in the early summer of 1942, the regiment received its first Panzer III and IV tanks, which helped even the playing field against the tough new Soviet T-34 tanks. For his combat experience and leadership Carius was promoted to Leutnant and served as the commander of the battalion’s pioneer platoon.
Carius and his Tiger
In January 1943, Carius was transferred to the 500th Replacement Battalion. When he arrived, he discovered that the battalion was formed exclusively from Eastern Front Panzer veterans to train on the new Panzer VI Tiger heavy tank. His excitement was somewhat curbed when he was assigned to run the officer’s club instead of taking command of a Tiger. Nevertheless, Carius went to work and met Hauptmann Schober, commander of the 2nd Company.
Carius kept him well supplied with French vermouth and Schober saw to it that Carius was reassigned to his company. Soon there after the battalion was renamed the 502nd Heavy Panzer Battalion, and Carius was given command of a Tiger from the 2nd Heavy Panzer Company.
After a short stay in France, where the crews became acquainted with their new tanks, the company was dispatched to the Leningrad sector on the East Front. Carius and the rest of the company first saw action in July 1943 and fought for eight straight weeks.
 In November 1943, the company was moved to counter the Russian breakthrough near Vitebsk and fought to hold open the important highway to Newel. Here, Carius commanded several attacks with his platoon of Tiger tanks and added several more tank kills to his already impressive tally.
During the fighting Carius’ gunner had an amazing stroke of luck. Carius wrote, ‘My gunner, Unteroffizeier Kramer, can take credit for a deed that was probably unparalleled on the Eastern Front. That is, he succeeded in shooting down a Russian fighter with a tank cannon … Kramer, upset by the unrelenting nuisance of these guys, elevated his cannon along the approach route. I talked him in. He took a chance and pulled the trigger. On the second attempt, he hit one of the ‘bees’ in its wing. The Russian crashed behind us’.
Narva
The 2nd Company, 502nd Heavy Panzer Battalion was then ordered to reinforce the front with the 11th ‘Nordland’ SS-Freiwilligen Panzergrenadier Division at Narva. Carius fought hard and as a result won the Knight’s Cross in recognition of his efforts on 4 May 1944.
In Narva, Carius had assumed default command of the company. Oberleutnant von Schiller was officially in command but lacked the respect of the rest of the company. Von Schiller often shrugged off operations onto Carius who picked up the slack and commanded the company in his stead.
In Dünaburg
In June 1944, Carius and the 2nd Heavy Panzer Company were transferred to Dünaburg to fend off the Soviet offensive against Army Group North. The Soviets managed to outflank the German defensive lines further south during Operation Bagration aimed at destroying Army Group Centre. The renewed Soviet assault in the north intended to take the port city of Riga.
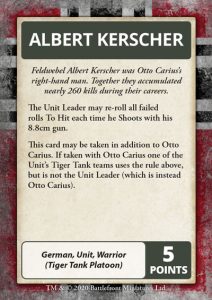
On 22 July 1944, Leutnant Carius with his company of eight Tigers advanced towards the village of Malinava, north of Dunaburg, to halt the Soviet advance. Carius and Feldwebel Albert Kerscher took a Kübelwagen to recon the village. They found the Soviets had arrived in the village. Carius knew that the force in the village was only the vanguard, waiting for the rest of the Soviet force to arrive. He knew that this was the critical time to attack and recapture the village before the reinforcements arrived.
Carius attacked the village using two Tigers and kept the six remaining Tigers in the reserve. There was only one road leading into the city and attacking with the entire company would create a dangerous bottleneck. Carius led the attack in his Tiger and Kerscher’s Tiger followed close behind.
Surprise and speed were critical to Carius’ plan. When Carius’ Tiger was about to enter the village, two T-34/85 tanks were observed rotating their turrets. At that moment, Kerscher fired and knocked them out.
Then Carius noticed a strange tank ahead of him and for a second he thought he was facing a captured King Tiger. However, he quickly reidentified the target as one of the new Soviet IS-2 heavy tanks. He opened fire and catching the heavy tank in the flank. The Soviet tank exploded into a ball of flame.
The two Tigers went on to cause havoc within the village, knocking out 17 Soviet tanks in 20 minutes. Carius received Oak Leaves for his Knights Cross for his involvement in and around Dünaburg.
 A Brush with Death
 A Brush with Death
On 24 July 1944, Carius dashed ahead of his tanks in a motorcycle and sidecar on a reconnaissance mission, as he often did prior to a mission. No sooner had he got out of his motorcyle than he and his driver were ambushed by Soviet troops, suffering shots through the leg and arm, as well as four bullets in the back.
Carius tried to draw his weapon with his one healthy arm, but was stopped by a Russian officer who was aiming his pistol at Carius’ head. Just as the Russian pulled the trigger, Carius turned his head and the shot went into his neck.
As Carius faced death, the Tiger tanks from Carius’ company stormed onto the scene in a sort of Hollywood-style rescue operation. The Russians were scared off and Tigers stopped to help Carius. They bandaged him up and stopped the bleeding from his leg using Carius’ elastic suspenders. They put him on the back of one of the Tigers and Carius clung to the turret for dear life.
Suddenly, the Russians opened fire again. Carius stood up on his good leg and yelled at the tank commander, telling him were the fire was coming from. However, as the turret turned, Carius’ foot was jammed in between the turret and the hull.
Now completely exhausted and only one functional limb, Carius was taken to a field hospital where he was treated and made a full recovery after cheating death.
Otto’s Finale
In August 1944, Carius was transferred to the newly created 512th Heavy Tank-hunter Battalion where he received the command of the 2nd company newly equipped with the powerful new Jagdtigers.
This 72-ton tank hunter was armed with a 128mm Pak44 L/55 gun. Despite its size and powerful gun, Carius hated it. He didn’t like that it was exteremely slow, had poor manoeuvrability, and used a weak transmission. Since it was an assault gun, Carius also lamented the loss of a turret. Overall, Carius was not impressed.
The company was called into action in March 1945, without finishing its training. Carius fought in the Ruhr Pocket, before surrendering to the US Army on 15 April 1945.
After the war, Otto Carius became an owner of a pharmacy called the Tiger Apotheke. He remains the highest scoring tank ace alive today, with well over 150 kills to his credit
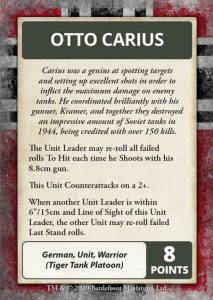
Otto Carius in Flames Of War
The Command Card (to the left) represents Otto Carius during 1944 when he was fighting in his Tiger I E heavy tank supporting Army Group Narva. You can also field Carius’s right-hand man, Feldwebel Albert Kerscher.
Otto Carius and Albert Kerscher may join a Tiger Tank Company from Page 30 of Bagration: German.
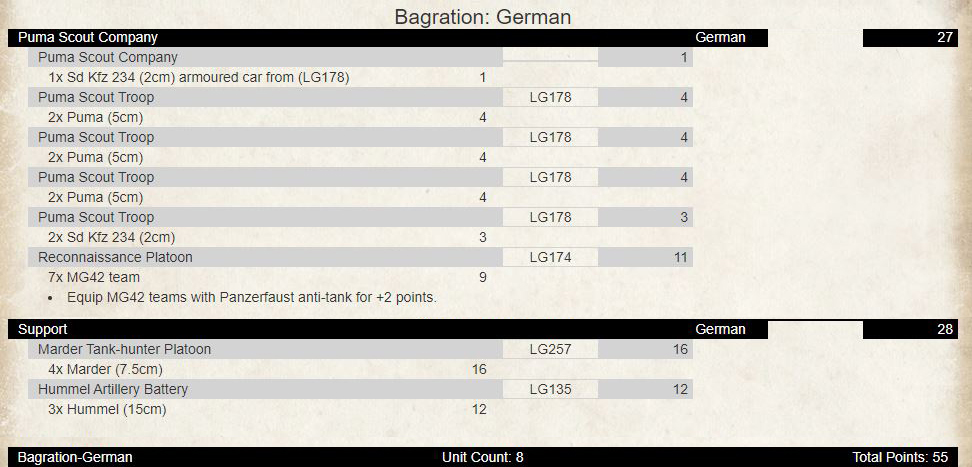
Building a Bagration: German Puma Company
With John Lee
For those who have read any of previous articles, you will know that I have an affinity for reconnaissance formations. I had written the article for the Waffen-SS Puma Scout Company and the D-Day: German variant. To round it out I thought I would look at the Bagration: German variant of the list, examine the differences and see what new support options we can take now with this formation.
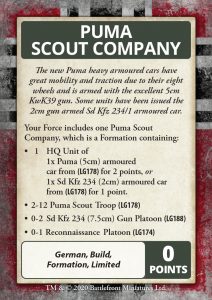 The command card formation comprises the following:
- 1 HQ Unit
- 2-12 Puma Scout Troop
- 0-2 Sd Kfz 234 (7.5cm) Gun Platoon
- 0-1 Reconnaissance Platoon
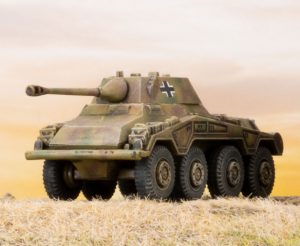
This is identical to the D-Day variant in terms of the number of units. The Waffen-SS variant is different, in that it has only one Sd Kfz 234 (7.5cm) Gun Platoon and can only take almost half of the Puma platoons. Looking at the make of this formation, we can take three to sixteen platoons making it a strong formation if you wish, with built infantry and useful AT9 FP 3+ guns to support your armoured cars. Being Heer, they are also rated as “Careful” meaning hit on 4+, best armour you can get! Add in your scout platoon’s scout ability which means they will be hit on 6s at close range if you are concealed and did not shoot whilst still moving into position! Now, the scout troops have only two vehicles in the platoon, making them a bit brittle and will need some careful handling. You have two options for each of these two vehicle platoons. The lightly armed Sd Kfz 234/1 with 2cm gun for three points a platoon or the Iconic 5cm armed Sd Kfz 234/2 Puma for four points a platoon, however still useful to get a strong formation on the table, allowing us to look at taking some of the cool new toys in this release.
 I do not normally max out all the platoons – I feel that taking 4-6 Scout Troops, 1-2 Gun Platoons and the Reconnaissance Platoon is enough to keep the formation from breaking and gives you more options to take the big tanks you are trying to get on the table. I will explore a couple of maxed-out formation options later in the article but will focus on balanced lists first. Going for my minimum recommended size as pictured:
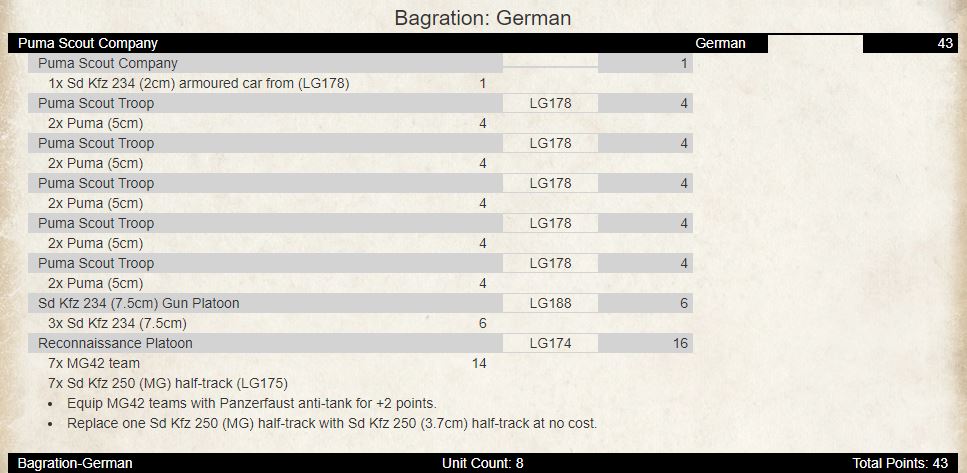
This is a core 43pts for the 105pt and 80pt lists. I would reduce the core list further for the 55pt option covered further below. Looking at the 105pt list first, we now need to look at what support options could be taken. With the ability to choose from Bagration: German, D-Day: Waffen-SS or D-Day: German black box units, you can mix and match what you want to suit your playstyle. Support options need to be taken from the Bagration: German chart. For this article, I will be looking at taking some of the new equipment for this release.
So, let us look at what we need to consider from a support perspective for this list. They should be supported by tanks, high end AT, artillery, and what we need to cater for around reserves. With 62pts left to play with, I want to build a highly mobile reserve unit that can come in and shoot an opponent’s armour at maximum range. Let us take four Hornisse with AT17 and 48” range for 32pts. You can put these in reserve with the gun platoon and a Puma platoon. I want to take some Flak 88s with Pak Front for 18pts to provide some heavy AT capability across the table if my Hornisse’s are in reserve. Add some artillery in the form of three Wespes and an OP to round out the points. A sample list could look like this:
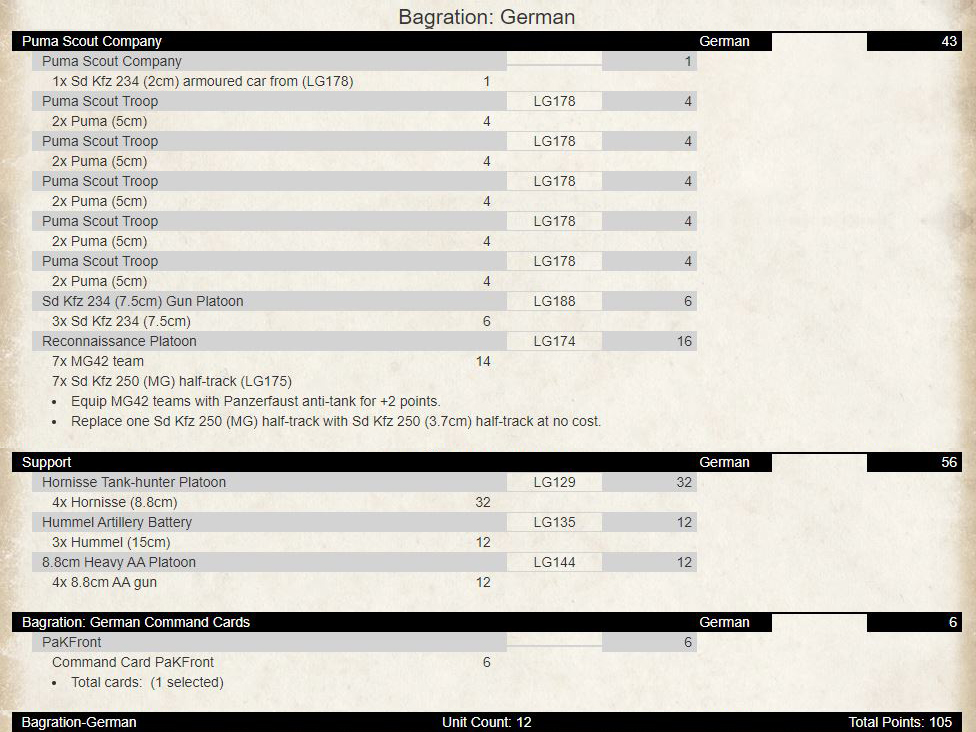
I like this type of force and suits my play style. Lots of small units running around with four AT14 guns in nests spread across the table supported by infantry that can either attack or defends with tank hunters, that can come in from reserve or dominate the table and Hummels to keep infantry pinned down in their foxholes. Another option would be to change out the Hornisses with three Panzer IV/70 Tanks – AT14 and FA9 and change out the Hummels for the new Panzerwerfer 42 Armoured Rocket Launchers. This is how it could look:
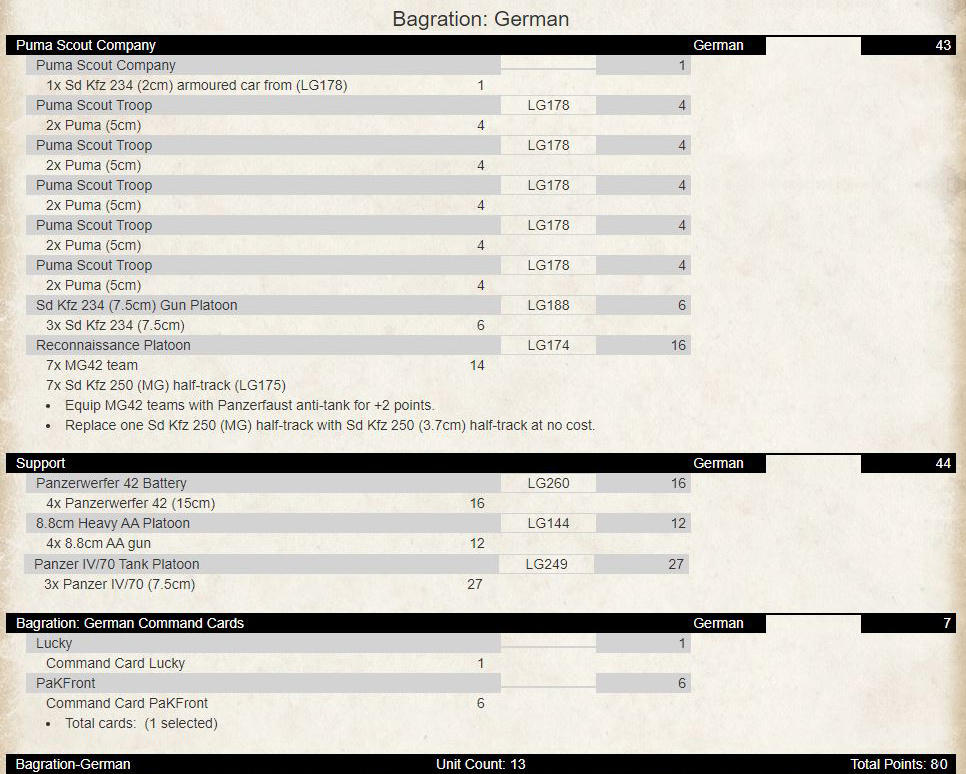
For an 80pt list we would change it out a bit by replacing the Hornisses (list 1) with three Panzer IV/70s, making artillery nebs instead of Hummels or Panzerwerfers, downgrading a Puma Scout Troop, removing a scout troop and the gun platoon:

You could take replace the Pak Front command card and reinstate the gun platoon to increase the formation to six units.
For a 55pt game, this is where recon unit lists shine – more flexibility with smaller points than other formations. Still want to take tanks, infantry, artillery:
Downgrade the Panzer IV/70s to Marders and replace the nebs with Hummels, remove the infantry’s transports, and still a strong formation that can take on your opponent with a combined arms approach.
This command card formation with the new equipment can provide some interesting new options. I hope this has given you some food for thought. Happy list building!
Bagration: German Command Card Previews
 With Wayne Turner
As you might expect, the Bagration: Germans have many of the same Command Cards as other nations like Softskin Transport, Lucky, etc. However, you will also find a great variety of cards for Warriors, Unit and Formation builds, as well as cards that enhance a particular part of your Forces capabilities. You will find plenty of flavourful cards as well to give your force a feel all of its own.
Order your Bagration: German Command Cards here…
(Click on the images to see a larger version)
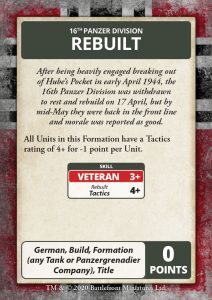
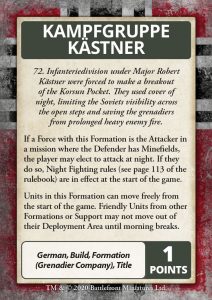
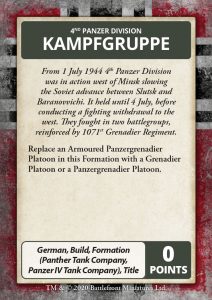
As an example, there are a number of different Divisional theme cards. Some do simple things like the 4th Panzer Division Kampfgruppe card that lets you field a Grenadier or Panzergrenadier Platoon instead of an Armoured Panzergrenadier Platoon in a Panther Tank Company or Panzer IV Tank Company. Others modify the ratings like the 16th Panzer Division Rebuilt card which drops their Tactics rating to 4+ for -1 point per Unit. The Kampfgruppe Kästner card allows a Grenadier Company to conduct a night attack in the right circumstances.
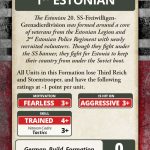
There are even cards for making a couple of Waffen-SS options. There is a series of cards for making your armoured troop represent the 3rd and 5th SS-Panzer Divisions, upgrading their motivation to Fearless. For something a little different, you can take the 20th SS-Volunteer Grenadier Division 1st Estonian. This card lets you field a Grenadier Company rated Fearless Trained Aggressive with Tactics 3+.
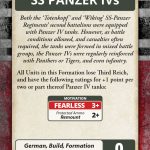
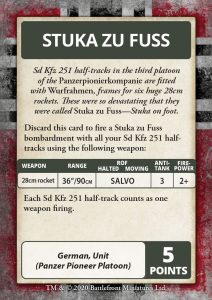
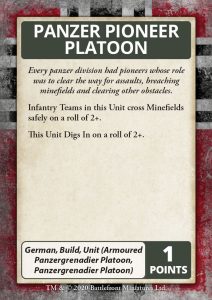
There are also a number of Unit build cards Panzer Pioneer Platoon that converts your Armoured Panzergrenadier Platoon into pioneers. To go with this is the Stuka Zu Fuss card that fits heavy rocket launchers to your Panzer Pioneer’s Sd Kfz 251 half-tracks.