Exploring the Bagration Romanian Infantry Formations

With John Lee

With the release of Bagration: Axis Allies, each nation gets one infantry formation in the book.  Now you must be thinking what about the rest of them.  Well, they are in the command cards.  The premise is that you take the core infantry formation and then apply the command cards to create the formation you want to play.  For the Romanians, there are seven infantry formations (well six and one cavalry but who is counting) in total you can take.  So, let us explore the core infantry formation (Motorised Rifle) first then look at the six command card options – Pioneer, Rifle, Guard Division, Training Division, Mountain Rifle, Cavalry Squadron.

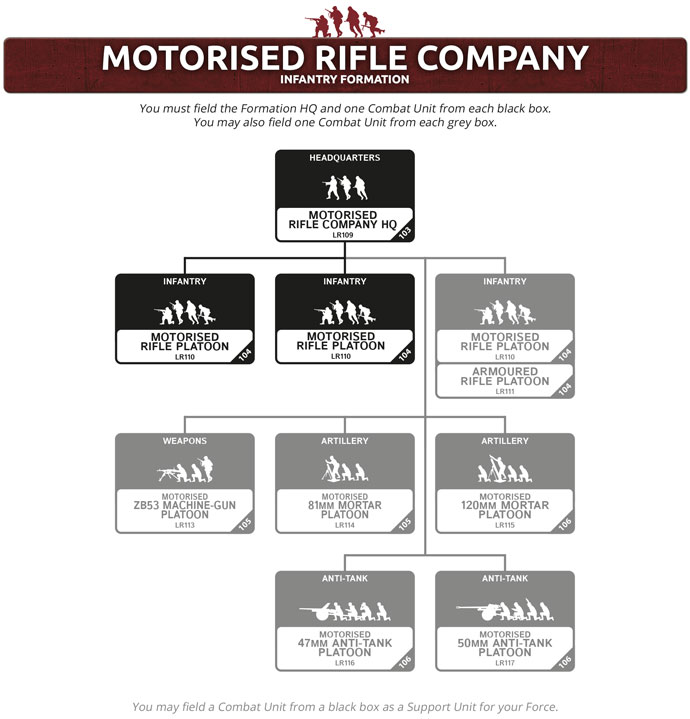
The Motorised Rifle Formation is comprised of the following:

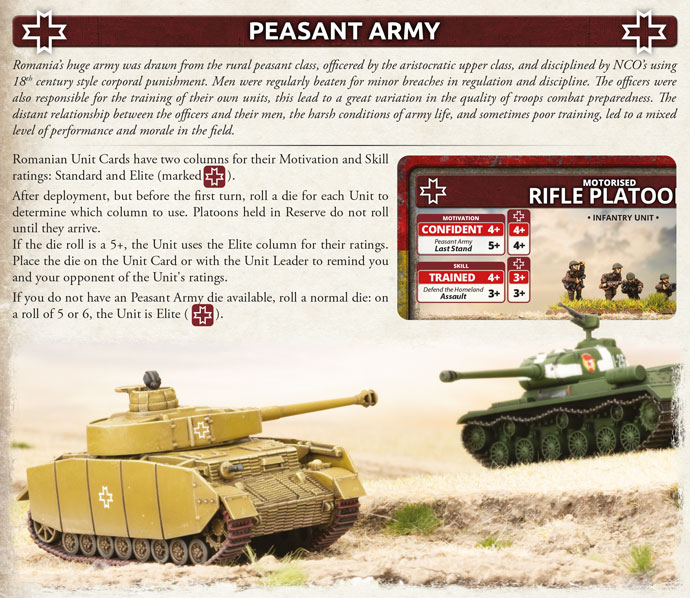
The Romanian infantry are rated Confident Careful Trained and have the special rule “Peasant Army”.  This rule is “Each unit has two columns on their unit cards for Motivation and Skill – Standard and Elite.  At the start of the game, roll a die and on a 5+ use the Elite column.”   So, in the case of this formation, each unit that you roll a 5+ on (either at start of the game or as they come on from reserve), you have a better last stand rating of 4+ and veteran instead of trained.  The other rating, they have is “Defend the Homeland”.  This gives you a better assault rating – so on a 3+.  Very handy for your infantry!

The HQ platoon comprises of two ZB24 rifle teams for 2pts.   There are no addons such as panzerfausts.  This is the basic HQ.

With the motorised rifle platoons, you have several options to optimise how you want the makeup of these platoons to look.  Five ZB30 MG teams for 6pts, seven ZB30 MG teams for 8pts or nine teams for 11pts.  Now what I like about these troops is that they are MG armed meaning ROF 3 (stationary) or 2 (moving/pinned) which is great for assaulting or defensive fire.  You can add Panzerfausts for +2pts to the platoon and is a no brainer for me here regardless of team type or size.  You can also beef up the platoons by adding a 60mm mortar team for 1pt or a Panzerschreck team for +1pt.  I like to take the Panzerschreck, in my mind totally worth it if you have the points.  Adds a second AT option for defending assaults or jumping out and having a go at a tank that wanders too close.  Makes most tanks think twice about assaulting facing two AT11/12 teams.

The 60mm mortar is interesting, gives your platoons their own template – works like the US mortar.  Yes, you need to reroll hits being only one weapon but sometimes all you need is one hit for the pin before you assault with the rest of your platoon.

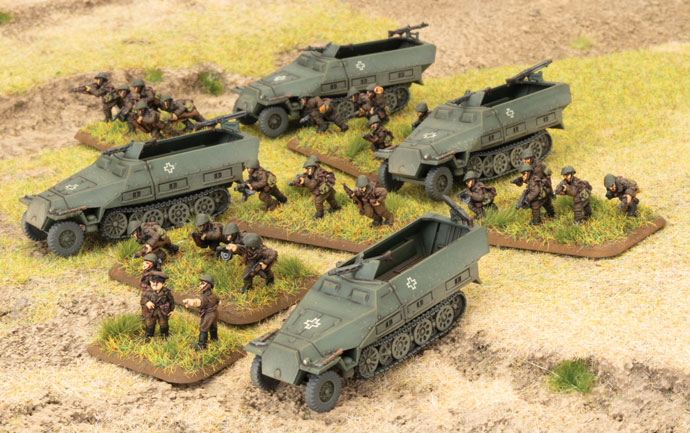
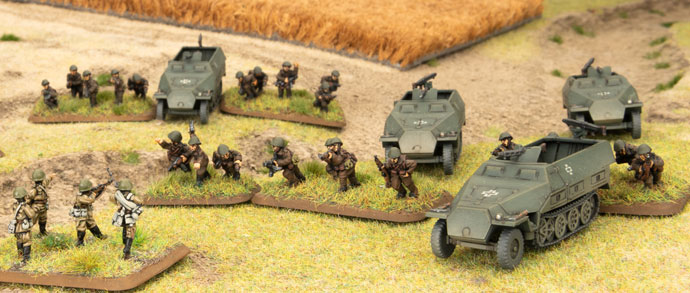
The Armoured Rifle Platoon is slightly different in that they have TB (German Sd Kfz 251) half-tracks to ride in and no 60mm mortars.  The interesting thing here is that you now have a platoon that can be mounted in their half-tracks for assault or dismounted with additional MG firepower to support an assault or help with defensive fire.  Five ZB30 MG teams with three TB half-tracks for 8pts, seven ZB30 MG teams with four TB half-tracks for 11pts or nine teams with five TB half-tracks for 15pts.  That is right, FIVE half-tracks with a maxed-out platoon!  You can add Panzerfausts for +2pts to the platoon and is a no brainer for me here regardless of team type or size.  You can also beef up the platoons by adding a Panzerschreck team for +1pt.

This is an interesting option to take, I think.  If you take the Armoured Rifle platoon instead of a Rifle Platoon as your third platoon, gives you another offensive option to either assault or come on from reserve to relieve pressure on a contested objective using their half-tracks speed to get there and if required, launch a mounted assault.

The next platoon to look at is the ZB53 Machine-Gun platoon where you can have four of these teams for 4pts.  Something to consider taking, especially if you do not take the Armoured Rifle platoon.  Adds another platoon for the formation count.  I do not always take these but can be useful to bolster defending an objective or protect artillery.

Up next are the mortar platoons, starting with the 81mm Mortar Platoon – I think one of the best buys in the formation with two for 3pts, three for 4pts, four for 6pts.  This is an absolute no brainer – range of 48” and can fire a smoke bombardment.  This is one of my core units for this formation and three mortars are the best price point.

The 120mm Mortar Platoon is also a great option – two for 3pts, four for 6pts, and six for 9pts.  Taking six allows you to reroll misses.  Combined with repeat bombardments, can make your opponent squirm rerolling saves.  If you roll 5+ for the peasant army rule for this unit, they become veteran allowing you to range in much easier.  Another no brainer for me with a range of 56”, AT2 and FP3+ and can also fire a smoke bombardment!  Another core one for me.

The final units to round out the formation are the Anti-tank Platoons.  The 47mm Anti-tank Platoon has two guns for 3pts or four for 7pts.  Useful AT8 FP4+ with a range out to 24”.  The 50mm Anti-tank Platoon has two guns for 5pts or three for 7pts.  Better AT9 FP4+ with a range out to 28”.  Great little units to provide some AT support for defending assaults or keep your opponent’s recon elements honest and provide another unit for the formation break.

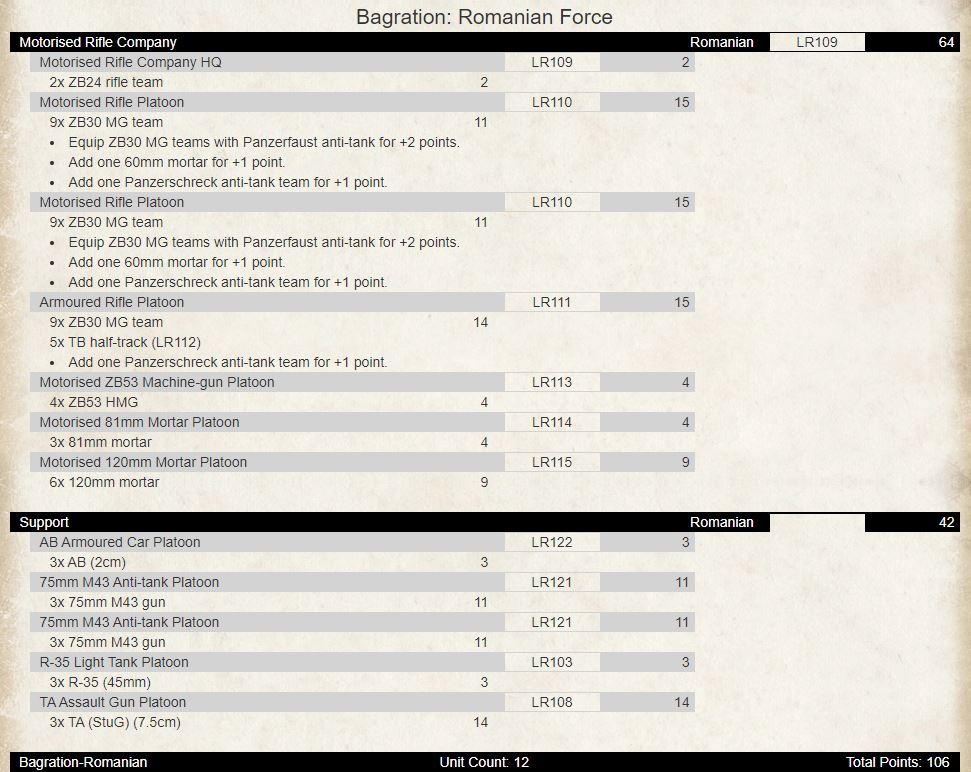
Whilst the Romanians do not have high end AT (14 or greater) in their force, they can take Soviet or German allies to help with that.  I feel though that with the infantry formation, you may not even need it, as the 75mm M43 Anti-tank is AT13 out to 36” and you can take two platoons in your force!  Let us look at two lists – one with allies and one without. Lists will be based on 105pts.

Seven units for the formation break.  Four artillery templates.  Six guns with AT13 and a unit with spearhead to get your Armoured Rifle platoon into assault range quickly with TA Assault Guns in support and some light tanks to run a diversion on the other flank or to help with the assault.

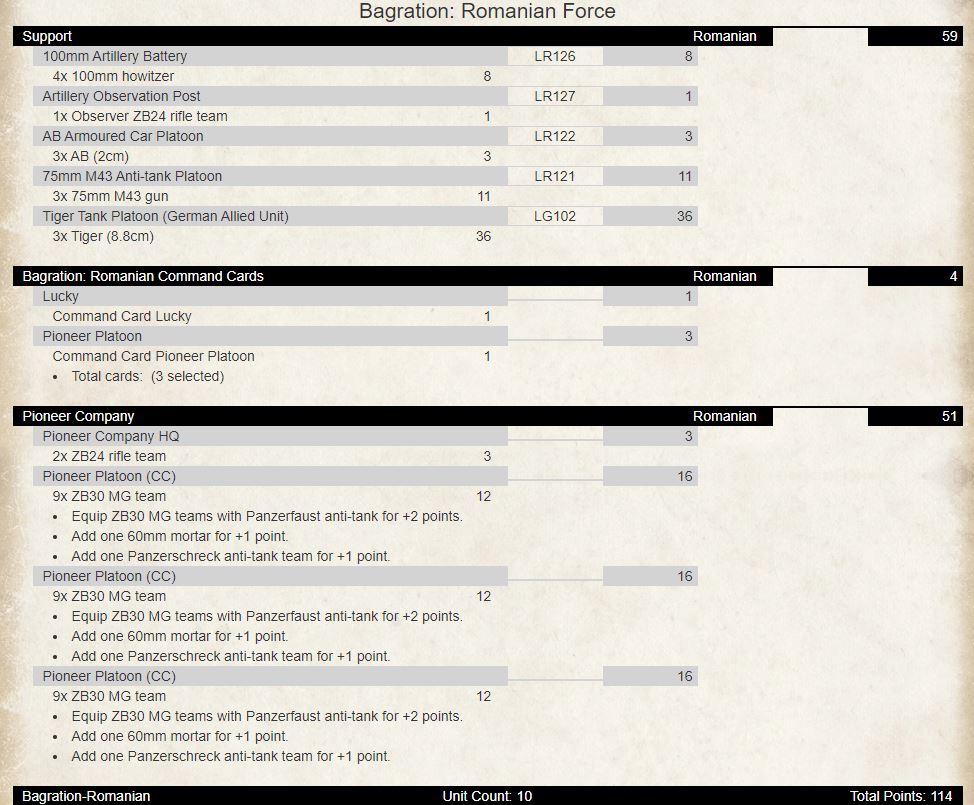
Now you have the AT14 you need and six units for the formation break.  Had to drop the Armoured Rifle platoon and one of the 75mm M43 platoons but bring in a TACAM T-60 Tank-hunter platoon to do it though.  A Soviet allied option would provide you with five IS-2 for one more point than the Tiger platoon in which we need to remove one of the 60mm mortar teams to achieve that.  On reflection, I think that the IS-2 company of five tanks would suit this list – but again choose what suits your playstyle.

Now onto the six command card formations.  First up is the Pioneer Company and is comprised of the following:

  • 1 Infantry Company HQ
  • 2-3 Pioneer Platoon

The platoons have the same characteristics as the core Motorised Rifle Formation.  The difference is that you pay an additional 1pt for the formation.  The HQ platoon and Pioneer platoons can dig in on a 2+ and cross minefields on a 2+.  You also pay an extra 1pt for each Pioneer Platoon.  There are no other units in the formation, so if you take it, you will probably want to take three platoons and maybe take some allied Soviet or German heavy armour, 75mm M43 AT guns, and some artillery would help too.

You have a maxed-out formation and can leave two platoons defending objectives if required.  The Tigers for heavy AT work, four artillery templates, AB Armoured Cars for spearhead with AT13 AT guns to provide overwatch.  If you want to swap out Tigers for five IS-2s then also remove the lucky card.

The next formation to look at is the Rifle Company.  The units that make up this formation are:

  • 1 Rifle Company HQ
  • 2-3 Rifle Platoon
  • 0-1 Rifle Company ZB53 Machine-Gun Platoon
  • 0-1 Rifle Company 81mm Mortar Platoon
  • 0-1 Motorised 120mm Mortar Platoon
  • 0-1 Rifle Company 50mm Anti-tank Platoon or Rifle Company 47mm Anti-tank Platoon or 47mm Infantry Gun Platoon
  • 0-1 Scout Platoon

So, it is pretty similar to the Motorised Rifle Company in strength.  The main differences are that they are rated Confident Aggressive Green with an assault rating of 4+ and keep the Peasant Army rule.  The Rifle Platoons ROF drops from 3/2 to 2/1.  The other differences are that you can now have an Infantry Gun Platoon as an option and the introduction of a Scout Platoon.  The Infantry Gun Platoon has three 47mm guns without gun shields, a range of 24” AT6 FP4+ with HEAT for 3pts.  The Scout Platoon can have either five Z30 MG and ZB24 teams for 4pts or seven teams for 5pts.  You can upgrade them to have panzerfausts for +2pts.   They have Scout and Spearhead attributes.  This platoon is also available as a support option in the force diagram.  There is also a command card SMG Scouts that allow you to replace the weapons for the platoon with SMG for no cost.  For the rest of the units in the formation, the costs are:

  • Rifle Platoon: -3 pts per unit
  • Rifle Company ZB53 Machine-Gun Platoon: -1pt per unit
  • Rifle Company 81mm Mortar Platoon: 2pts for two, 3pts for four
  • Rifle Company 50mm Anti-tank Platoon: 3pts for two, 5pts for three
  • Rifle Company 47mm Anti-tank Platoon: 3pts for two, 4pts for three

A cheaper formation and you get more into your list – just do not expect them to be assaulting.

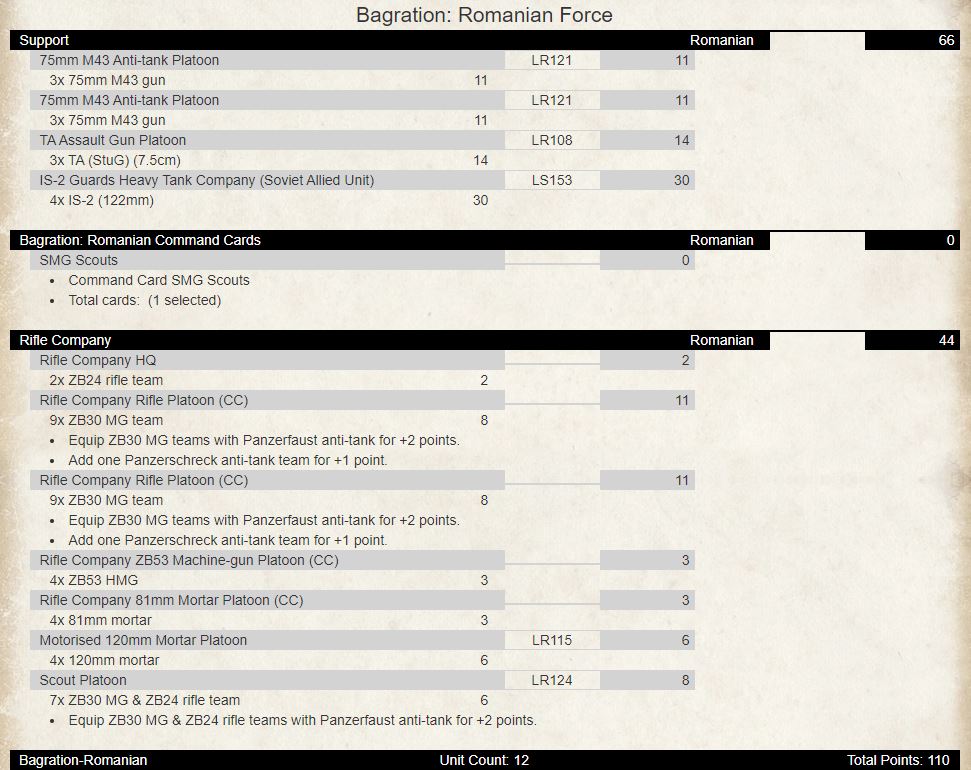
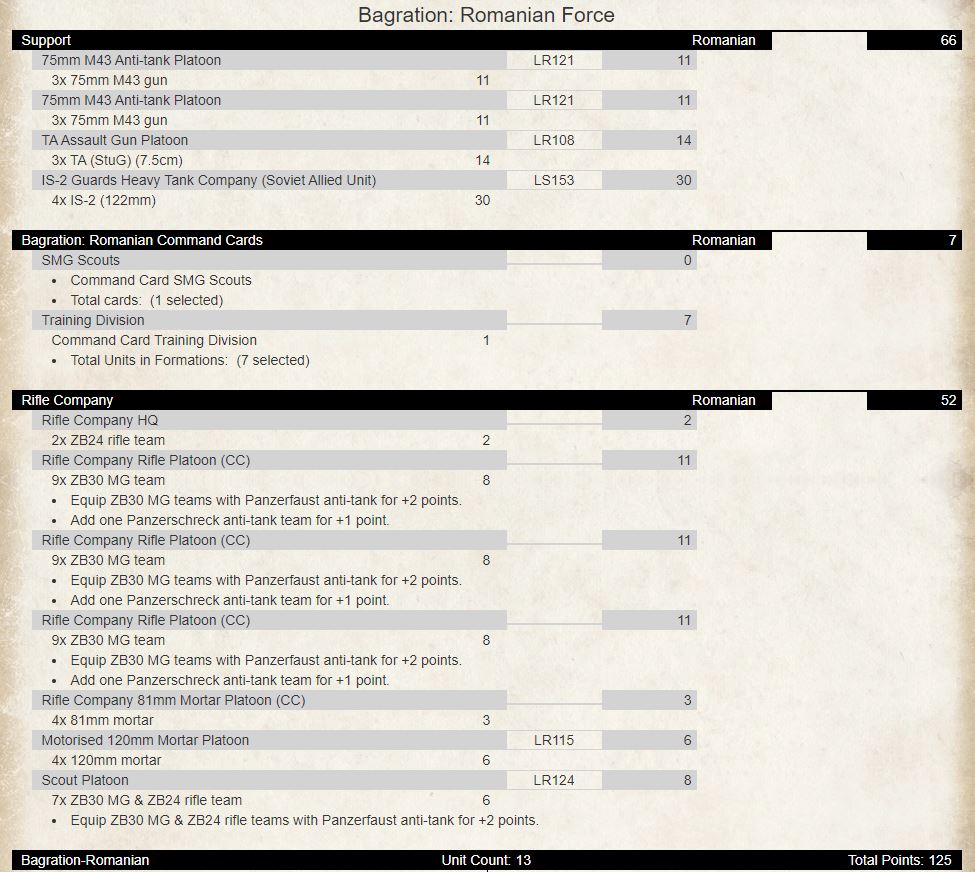
Seven platoons for the formation break.  Two platoons backed up by two platoons of AT13 guns to anchor your defence along with HMGs.  Scout platoon (armed with SMGs) is your either your reserve platoon to reinforce a defence or to spearhead your IS-2s into assault on turn 2 supported by Stugs and two artillery templates.

The next two formations are based on the Rifle Company and have either better or worse ratings.  The first is the Guard Division.  For +1pt per unit in the formation, they gain Fearless Careful (but still Green or whatever their skill is) and lose the Peasant Army rule.  Unusual to have this combo but makes for an interesting formation – especially for assaulting the enemy.

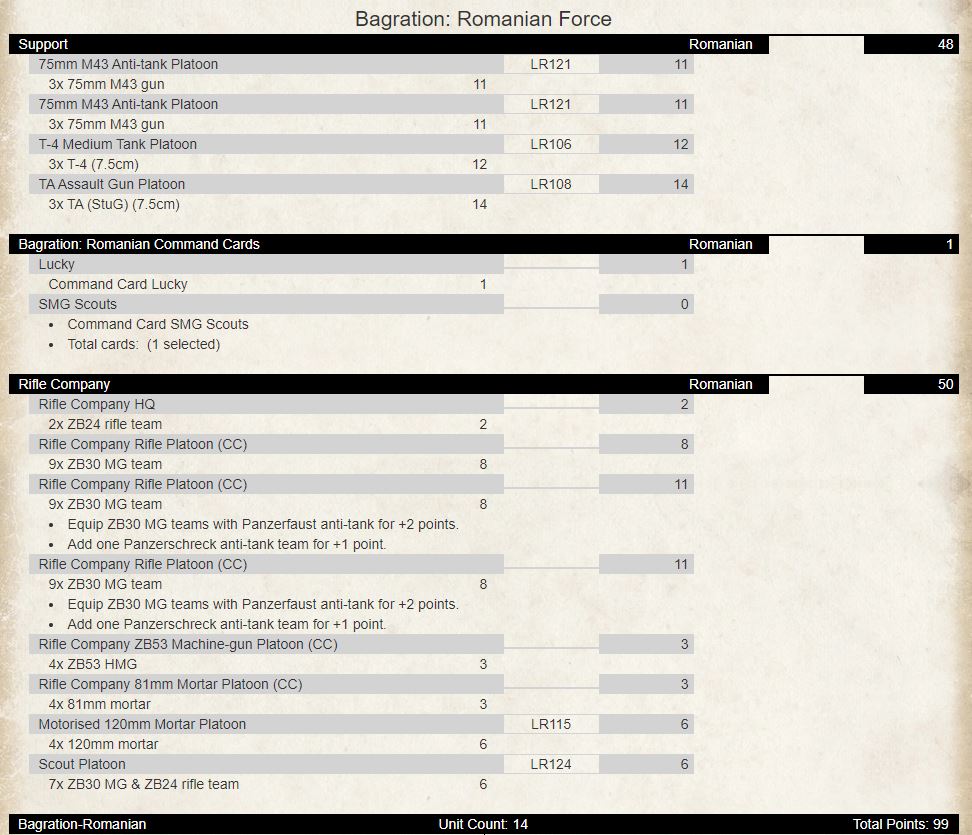
With Fearless Careful Infantry, I have maxed it out with four platoons (including the scouts) that should be able to take on all comers backed by two platoons of AT13 guns and two templates.  T-4s and Stugs to provide mobile support.

The second card that transforms the Rifle Company is the Training Division.  For -1pt, all units in the formation become Reluctant Aggressive Green, and lose the Peasant Army rule.  All gun and weapons teams now have assault 6.

Very similar to the Rifle Company but with an added rifle platoon and only dropping the HMGs – still seven units for the formation break.   Still need the IS-2s for offensive operations or assaulting and use the scout platoon to spearhead them in.

The next formation is the Mountain Rifle Company.  The units that make up this formation are:

  • 1 Mountain Rifle Company HQ
  • 2-3 Mountain Rifle Platoon
  • 0-1 Motorised ZB53 Machine-Gun Platoon
  • 0-1 Motorised Company 81mm Mortar Platoon
  • 0-1 Motorised 120mm Mortar Platoon
  • 0-1 Mountain 47mm Infantry Gun Platoon
  • 0-1 Motorised 50mm Anti-tank Platoon or Motorised Company 47mm Anti-tank Platoon
  • 0-1 Mountain 75mm Artillery Battery

Main differences here are the Mountain Platoons and the 75mm Artillery Battery in the formation.  The Formation HQ and Mountain Rifle Platoons also have the attributes from the Mountaineer Command Card.  The rule on the card is “Teams that start their Movement Step adjacent to a cliff or mountain side (or another similar Impassable terrain feature) roll a Skill Test. If successful, the Team may move using Terrain Dash across the terrain”.

The Mountain Rifle Platoons ROF drops from 3/2 to 2/1 for -2pts per unit.  Mountain 47mm Infantry Gun Platoon has three guns for 4pts and no gun shield and is Confident Trained Careful.  The Mountain 75mm Artillery Battery is a useful addition and provides some flavour to the formation.  It has an indirect range of 64” with AT2 FP4+ and smoke bombardment.  A direct fire range of 16” with AT5 FP3 and smoke capability.  Two for 4pts or four for 8pts.

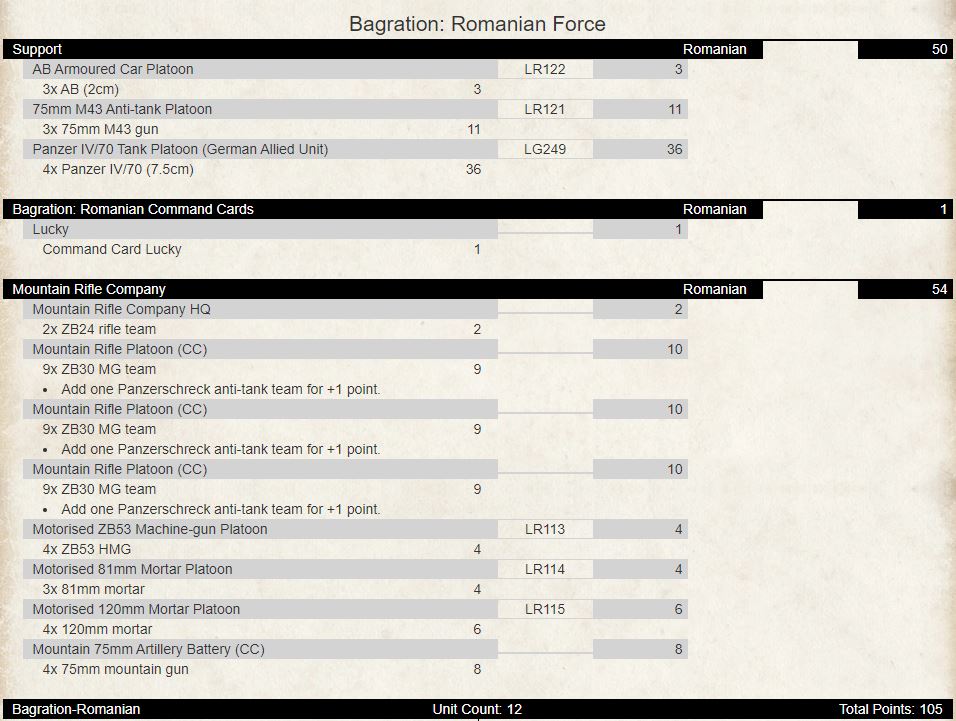
Eight units for the formation break, three templates, spearhead with the armoured cars and both static and mobile high end AT guns.  This army is more suited to defence and manoeuvre with one platoon for defence mixed in with HMGs and AT guns with the remaining platoons to go on the offence.

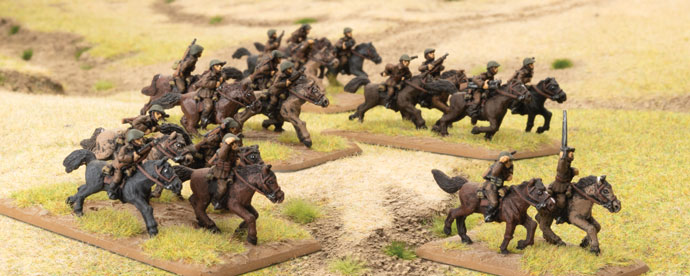
The final and most exciting formation is the Cavalry Squadron!  The units that make up this formation are:

  • 1 Company HQ
  • 2 Cavalry Troop
  • 0-1 Cavalry Troop or Cavalry Scout Troop
  • 0-1 Motorised ZB53 Machine-Gun Platoon
  • 0-1 Motorised Company 81mm Mortar Platoon
  • 0-1 Motorised 50mm Anti-tank Platoon or Cavalry 45mm Anti-tank Platoon

The Company HQ is made up of two teams for 2pts.  The Cavalry is Confident Careful Trained and has the Peasant Army Rule.  ROF is 2/1 and assault on 3+.  The Cavalry Troop is made up of four ZB30 MG & ZB24 rifle team for 4pts or seven teams for 6pts.  Add panzerfaust for +2pts.   Add a 60mm mortar for +1pt.  The Cavalry Scout Troop costs an additional point and gain Scout and Spearhead and use rifles only so ROF is 1/1 slow firing.  Cavalry 45mm Anti-tank Platoon is comprised of captured Soviet long 45mm guns.  They have a 20” range with AT8 FP4+.  Two guns for 3pts or three for 5pts.

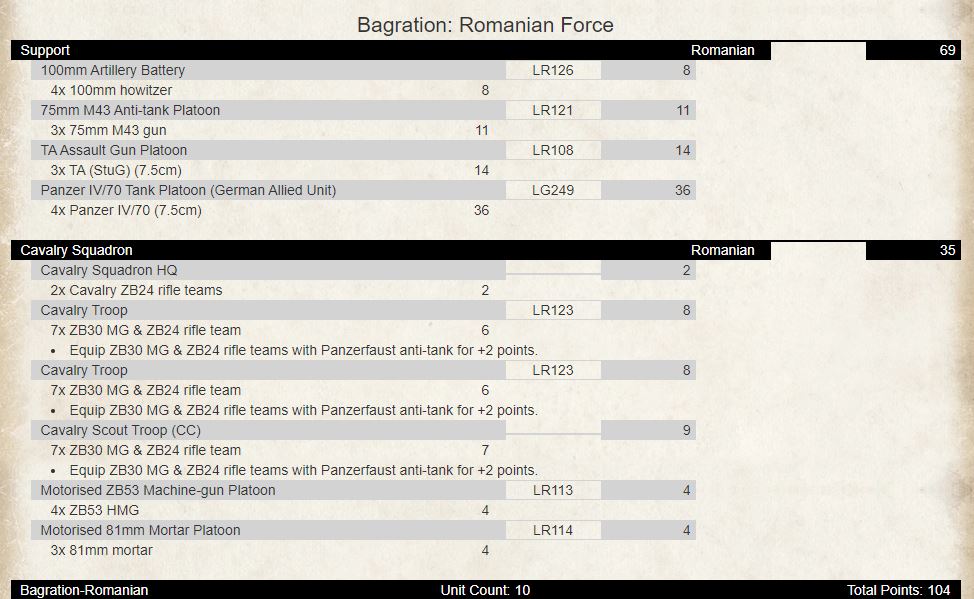
Six platoons for the formation break.  Two templates and high-end AT.  Maxed out cavalry troops including one Scout Cavalry Troop.  Use that troop for spearhead to get all three troops into position using their speed to dismount and assault.  20” cross country move, whilst mounted and follow me extends another 4” will get you across the board quickly.  Also if coming from reserve can get there quickly when mounted!

One last thing to look at before wrapping up.  There is one warrior who you can take with either a Motorised Rifle Platoon or Rifle Platoon – Aurel Sandu.

Aurel Sandu Command Card: The unit leader may reroll their infantry save once per turn.  Infantry teams cross minefields safely on 2+.  Tactics rating of 3+.  Costs 4pts.

So, there you have it – seven infantry formation options to choose from.  Romanian Infantry have some uniqueness about them with Cavalry, Guards, Motorised Rifles that you can exploit in your games.  I hope this has been of some help.  Happy List Building!


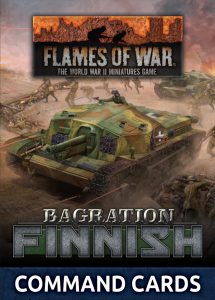
Bagration: Finnish Command Cards

Contains 23 cards to enhance your force, field iconic warriors and customise your units.

Command Cards allow Flames Of War generals to field iconic warriors, build new types of units, field new types of equipment, enhance your commander’s capabilities, and bring new tactics and stratagems to the battlefield.

Order your Bagration: Finnish Command Cards here…

Command Cards are entirely optional and can be added to your force in two ways. You can add them to your normal point cost, just as you would add a unit to your force, or you and your opponent can agree on a set amount of points that each may use just to add Command Cards to your lists.

Many Command Cards are hidden until they are used, so you’re never quite sure what your opponent’s battle plans are until they are revealed. While hidden, Command Cards do not affect their attached unit—a player must reveal them if they wish to gain the benefits of the card. Some Command Cards must be revealed at the start of the game; these cards are used to build your army and have the keyword ‘Build’.

Download a copy of the Command Card Rules here…

Check out the Command Card Q&A here…

The Bagration: Finnish Command Card pack is a full set of Late War Command cards, like in Mid-War you can add these cards to your force for a point cost listed on the card. But there have been some changes to the Late War Command Cards as well; we have two new types of command cards, Titles and Equipment. Here is a list of what command cards come in the box.

The Bagration: Finnish Command Card List
  • Softskin Transport
  • Lucky
  • Pioneer Platoon
  • Pioneer Company
  • Panzer IV Armoured Platoon
  • Log & Concrete Armour
  • Machine-gun Nests
  • Light Infantry Company
  • Light Infantry Company Light Infantry Platoon
  • Light Infantry Company Light Infantry SMG Platoon
  • Light Infantry Company Panzerfaust Close Defence Platoon
  • Light Infantry Company 50mm Mortar Platoon
  • 75mm PSTK/97-38 Anti-tank Guns
  • 40mm Bofors AA Guns
  • 122mm Artillery Battery
  • Close Defence
  • Lapinsota The Lapland War
  • Lauri Törni
  • Toivo Ilomäki
  • Adolf Ehrnrooth
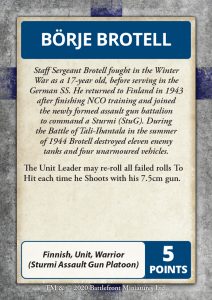
  • Börje Brotell
  • Finnish Allies

Command Card Previews

As you might expect, the Bagration: Finnish have many of the same Command Cards as other nations like Softskin Transport, Lucky, etc. However, you will also find a great variety of cards for Warriors, Unit and Formation builds, as well as cards that enhance a particular part of your Forces capabilities. You will find plenty of flavourful cards as well to give your force a feel all of its own.

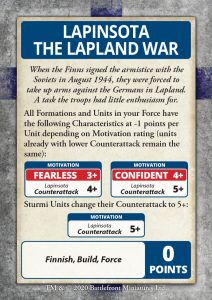
As an example, there are a number of different build cards. Some do simple things like the Lapinsota The Lapland War, which changes the rating of the Units in a Finnish Force to reflect the less enthusiastic approach the Finns had against the Germans as the ushered them out of their country into Norway. This Command Car changes the Counter Attack ratings down by one.

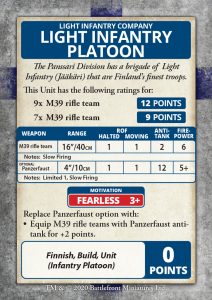
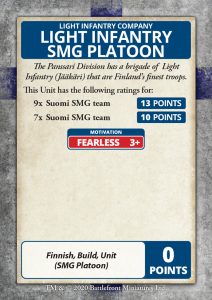
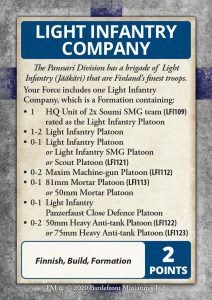
The Light Infantry Company allows you to build a Formation of the elite Jäger or Jääkäri that formed the infantry of the Finnish armoured division. As well at the formation build card there are four cards to build specific units for this formation.

There are four Warriors to field with the Finns. One of these is Borje Brotell who fought in 1944 is a Sturmi StuG assault gun commander. He and his crew destroyed eleven Soviet tanks during the Battle of Tali-Ihantala. Hi is rather handy with his Sturmi’s 7.5cm gun.

The Panzer IV in Bagration Axis Allies

With Livio Tonazzo

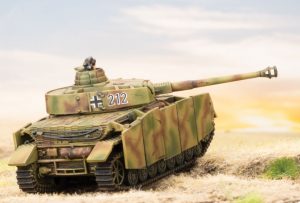
When one thinks of the most widespread German tank of the Second World War, everyone immediately thinks of the mighty Tigers or the beautiful lines of the Panther. In fact, as many of us know, the backbone of the German armoured forces was Panzer IV. Excellent medium tank, it was produced in various versions in 8-9,000 units, against just 1,350 for the Tiger or 6,000 for the Panther. The Panzer IV literally accompanied the Wehrmacht throughout the entire conflict, from 1939 until 1945, serving in all theatres from the frozen wastes of Russia to the scorched wastes of Africa, from French bocage to the ruins of Berlin.

The Panzer IV was, together with the Panzer III, also one of the most widespread tanks among the minor allies of the Axis. Hungarians, Romanians and Finns and also Italians. Shortly before the armistice of September 8, 1943, the Divisione Corazzata M was finishing their training on their Panzer IVs.

A comparison between Panzer IV, T-34 and Sherman

Before getting to the heart of the article I would like to make a comparison between the main medium tanks of the Late War. A framework will undoubtedly be very useful. On the other hand, even if outclassed by more armoured or more powerful models, they are the backbone of the armoured forces!

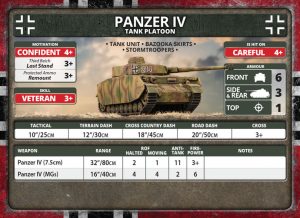
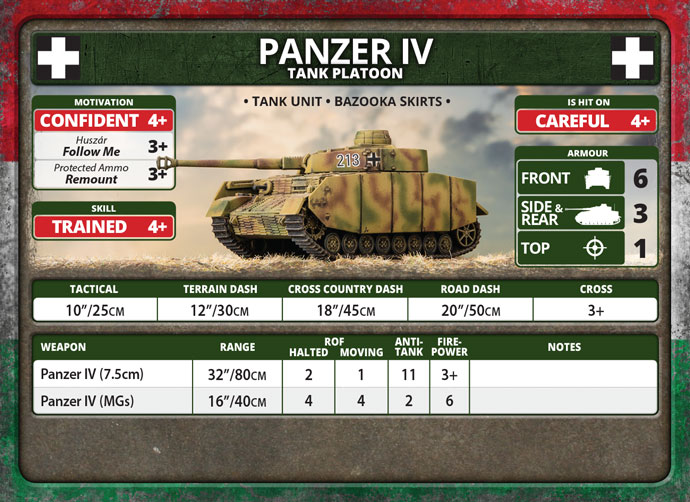
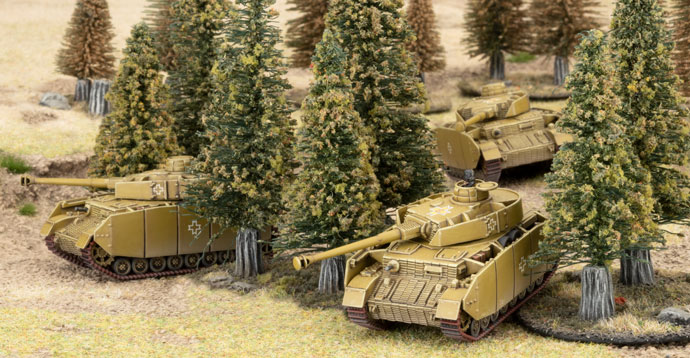
The Panzer IV has a decent 6 front armour which makes it well protected against 45mm light guns, on average protected against 50-75mm medium guns but very lightly protected against high speed guns like the German Pak40, British 17pdr or the Soviet 100mm. Given the proliferation of anti-tanks weapons above 11 (something to expect in this period of Flames of War) the Panzer IV must be played with great caution by avoiding exposure without adequate shelter. These types of tanks are useful for taking advantage of the numerical superiority and combined with good Anti-tank and Firepower value can give excellent results, just don’t move them in the open field! They are somewhat protected against anti-tank 7 hits from armoured cars on the sides. Against guns with comparable anti-tank values ​​you might even think of an assault, perhaps adequately prepared by a powerful suppression fire to make the target unit pinned down. The Top armour value is 1 so the Panzer is not really suited to the assault but can be used if there are enough tanks and counter decimated units.

The Panzer IV cannot properly be called a fast tank. It moves 10 “at Tactical, so nothing in particular, it is an average value. Many tanks in Late War are slow (being more armoured) so you can try to take advantage of the advantage. Terrain Dash’s value is 12 “therefore only slightly better than the Tactical. Better instead the Cross Country Dash which is equal to 18 “, enough to take advantage of some unguarded sectors of the battlefield. If by chance the opponent left a road unguarded, you could even move 20”. But don’t hope too much!

As previously mentioned, the armament is a strong point of the Panzer IV. The 75mm gun has an anti-tank value of 11 which makes it lethal for light and medium tanks and still useful for flanking heavy tanks which, having a maximum value of 8, can be heavily threatened. A Panzer IV on the side of an IS-2 is a pretty sight! The Panzer IV gun also has a considerable range, almost always higher than that of the other counterparts. It can actually hit a target 32 “away. If you successfully perform a Blitz Order, you can practically fire 36” from the position where you started your turn. Many other guns fire at 28 “or even 32”, which means that very often you will have the so called “first fire”. Sometimes it is crucial. The firepower value is also good, a classic 3+ like many other guns of that calibre.

Panzer IV also has two special rules, one of which is very important in terms of play. One of these is Protected Ammo which allows the crew to more easily remount a bailed tank. The other is that the Panzer IV is equipped with Bazooka Skirts which help it resist shots fired by 5+ firepower weapons such as bazookas. Of course that doesn’t make the Panzer IV a good assault tank but it helps. Plus you’ll have to worry a lot less about the 20mm guns who managed to reach your flanks.

Overall the Panzer IV is a successful tank. Well armed and fairly armoured, it can find excellent uses on the battlefield of the Late War period. The cost in points, which varies according to Morale and Training, is reasonable and allows you to deploy a fair number of tanks.

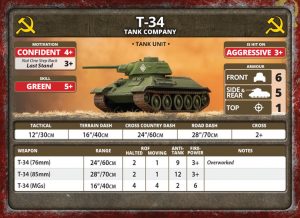
The T-34 has a front armour value of 6, a side Armor value of 4, and a top armour value of 1. The values ​​are practically the same as those of the Panzer IV except that of the side armour which makes the Russian tank slightly better in assaults and more resistant to blows from the side. In truth you will notice that medium tanks are not exactly excellent for assaulting troops armed with anti-tank weapons  such as the Panzerfaust, Panzerschreck, bazooka or PIAT. Against infantry that don’t have anti-tank weapons, a side armour of 3 is more than enough. This point of difference shouldn’t mean much. As for the attacks on the flank, on the other hand, you shouldn’t have big problems manoeuvring medium tanks appropriately and avoiding them if you consider them dangerous. The T-34 also doesn’t have a bazooka skirt!

The best weapon of the T-34 when compared to the Panzer IV is speed. The Soviet tank has a Tactical value of 12 ” which makes it 20% faster than its German counterpart. The gap widens further when you consider the Dash. The Terrain Dash is 16″ for the Soviet tank against only 12 ” “than the German one, while the Cross-Country Dash values ​​are 24” against only 16 “of the Panzer IV. The Road Dash is also very different, 28” against 20“. Even when it comes to traversing obstacles or terrain the Soviet tank is superior. The Cross value of 2+ is truly incredible while the 3+ of the Panzer IV give you some nasty surprises.

The weak point of the T-34 is undoubtedly the armament. The Soviet 75mm gun has an anti-tank of 9, well 2 points lower than the German 75mm. This gives the Panzer IV a great advantage that at short range it can match the enemy antitank with a meagre 3+ and overtake it with a 4+. Range is also an important factor. 24 “for the Soviet gun against 32” for the German one. Note that even though the T-34 is upgraded to the T-34/85, the Panzer IV maintains a higher range, retaining the advantage. Firepower and mg shots are identical, no difference here!

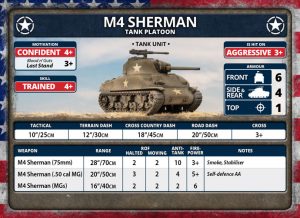
The Sherman is the allied counterpart of the Panzer IV. These two tanks have the same front armour value of 6 and a top armour of 1. The Sherman has a better side armour value, but as we said for the T-34 it shouldn’t be too important. The speed of the Sherman, however, is equal to that of the Panzer IV. Both tanks have the same Tactical and Dash movements values. Nobody will take advantage! The Anglo-American gun is inferior to the German one by having an Anti-tank value of 10 instead of 11 and a range of 28 “instead of 32”. The American Sherman version has a Moving Rate of Fire of 2 so you need to pay close attention. Those two shots with anti-tank 10 are better than one shot at anti-tank 11 in particular against a 6 armour. worse. The machine guns are also in this case the same, but the American Sherman also has the .50 calibre for anti-air defence. On the other hand, the Sherman’s ammunition is better, sometimes the smoke bombs can be very important.

The Panzer IV of the Royal Hungarian Army

The Hungarians received their first twelve Panzer IV H tanks in May 1944 when the 2nd Armoured Division got them as replacements from the Germans while fighting in Galicia.

The training perfectly reflects the historical situation. Despite they are still Hit on 4+, the Hungarian crews are less trained than their German comrades, they are Trained instead of Veterans and therefore pass the skill tests with a result of 4+. This makes them slightly more difficult to play using Blitz and Shoot & Scott. They are less expensive than the German ones, they come with a discount of around 12%. Also Unlike the Germans, the Hungarians do not have the possibility to use two orders in one turn due to the lack of the Stormtroopers rule. They do not have the Third Reich rule which guarantees the Germans a Last Stand of 3+. However, they retain a decent value of 4+ (Confident) which makes them fairly tenacious fighters. Descended from Magyar horsemen, Hungarian has a strong cavalry tradition. The Huszar rule grants them a better value to pass the Follow Me rule test! This helps a lot with wraparound manoeuvres, especially for a tank we have seen is not quite as fast as we have seen previously.

The Panzer IV formation consists of a compulsory HQ consisting of two tanks and a Panzer IV platoon. The Panzer IV platoon consists of 3 to 5 tanks. Personally, I always recommend deploying at least 4 tanks but 5 would be better. Certainly the investment in points is more considerable but the tactical use of a large platoon has more impact on the battle. You can lose 1-2 tanks and still be a threat. The third compulsory slot can be made up of another Panzer IV platoon or a Panzer III platoon. The Panzer III are much less expensive but with a less effective main gun. It only has an anti-tank rating of 9 and a Firepower of 4+, which is not really effective at this time. Personally it is not a choice that I recommend that much, also because the platoon can only be composed of 3 or 4 tanks, not 5. Moving on to the non-compulsory slots, one slot is the same as the latter just described (Panzer IV or Panzer III). Another instead allows you to choose between Panzer IV, Panzer III, Panther or Tiger. Yes, you heard right! The Hungarians can field their own heavies (But we’ll talk about it in another article). This choice is very interesting because it allows you to have tanks in the formation that have a big impact on the game. With an anti-tank value of 14 they can easily pierce almost any enemy tank while their armour of 9 protects them from most enemy hits but the best thing is to have them in formation without being too limited on the number of tanks played: it’s the Panzer IVs that make the crowd! Personally, however, I recommend choosing the Tigers because they compensate for the partial inability of the Panzer IVs to attack infantry equipped with anti-tank weapons.

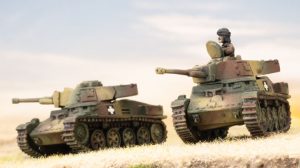
Another optional slot is the Toldi II which allows you to have an armoured reconnaissance in formation at a very modest price. The Toldi II is a completely ineffective tank against enemy tanks, but lethal against enemy armoured cars. The platoon can also be very numerous, including up to 5 tanks. The Toldi II has both the Scout and Spearhead rules. Wonderful! The last slot, on the other hand, is dedicated to air coverage which is always useful. Nimrod’s platoon consists of only two pieces, which however have a ROF of 3 when stationary and a firepower of 4+ that has a fair chance of shooting down enemy aircraft.

The Hungarian Panzer IV formation is a decidedly numerous and complete formation being able to include light, medium and heavy tanks in addition to anti-aircraft support. Only an infantry platoon is missing, but that shouldn’t be a problem since you can take it for support.

The Panzer IV of the Royal Romanian Army

Romania began receiving the first Panzer IVs (renamed T-4) in mid-1943. Some were new, others were decommissioned tanks from the German armoured divisions. The T-4s received baptism of fire in early 1944 but went on to form the 1st Romanian Armoured Division only in August.

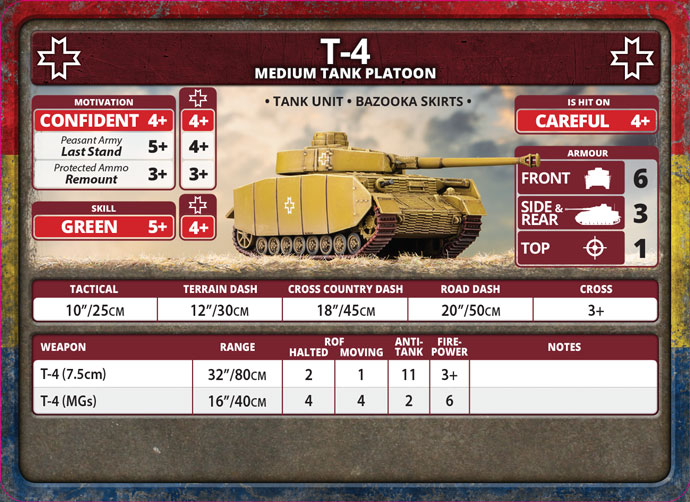
Romanian T-4 are Hit on 4+ like German or Hungarian ones. All things considered, the Romanian soldiers have also been at war since 1941 and have had the opportunity to learn how to move properly on the battlefield. However, the training and morale are on the whole bad enough to represent the unfamiliarity of the Romanian crews with the new tanks and the negative trend of the war against the Soviet Union. Much like the Italians of the Mid War, the training and motivation of the Romanian army is somewhat variable. The T-4s pass their Skill tests with a score of 5+ unless they have been lucky enough to roll 5+ for the Peasant Army roll in which case they have 4+ skill, which is not exactly a great value. The Last Stand also needs a roll of 5+, which can be improved to 4+. The normal Morale value still 4+, which combined with the Protected Ammo gives it a good Remount value. Failing the Remount rolls means the platoon could easily miss the Last Stand roll. The poor training and morale however result in a major reduction in point cost. The T-4 is 25% less expensive than a German Panzer IV and this allows you to play a lot of tanks, field them in large numbers!

The T-4 formation is compulsorily composed of one T-4 Medium Tank Company  HQ and two platoons of T-4’s. The HQ platoon is a bit of a highlight of the list. In fact it can be composed of 1 to 3 tanks. That’s right, you can have a T-4 Medium Tank Company  HQ consisting of 3 tanks which is the number of tanks that the opposing platoons generally have! This has at least two advantages. First is that the Company HQ is very resilient. Unlike the other platoons, this particular one is not forced to roll for the Last Stand if it does not have at least two active tanks. Keeping a T-4 company in the field shouldn’t be too difficult. Secondly thanks to the 3 tanks in the T-4 Medium Tank Company  HQ  you will be able to assault with 6 tanks at once because the Company HQ can join an assault platoon forming an armoured mass. I would always recommend getting all three tanks for the HQ platoon.

The core platoon on this list is the T-4 Medium Tank Platoon which consists of 3 tanks. There are no other options, just 3 tanks. Not one more, not one less. Two of these platoons are compulsory while another is optional. In another non compulsory slot, you can choose between another T-4 Medium Tank Platoon and a TA Assault Gun Platoon. This platoon consists of three StuGs (7.5cm). The German assault cannon has a two point armour value higher than the T-4, but is not equipped with a turret as well as being much worse in assault while also being slightly more expensive, I personally prefer not to include it in the T-4 formation. An additional optional slot consists of an option between T-4, R-2 and R-35. These light tanks are very cheap but are lightly armoured and lightly armed. The last slot is what the platoon I like most about the Romanian army: the Armoured Rifle Platoon. I love the Sd Kfz Half-track and the fact I can play it with a Romanian units is really beautiful and personally I consider them a must have. The platoon can be composed of 5, 7 or 9 teams and in addition you can add a team armed with Panzerschreck (in addition to upgrading an existing base with the Panzerfaust). Moving in an armoured transport offers infantry a lot of protection in addition to speed with he Sd Kfz half-track also adding a lot of machine-gun fire which is useful in both attack and defence.

The formation of T-4 is a large and fairly complete formation thanks to the possibility of including infantry. It does however lack anti-aircraft and scouts but you can’t have everything in life.  You should be taking advantage of the number of tanks you can bring since Romanian T-4s can be really dangerous for many opposing lists.

The Panzer IV of the Finnish Army

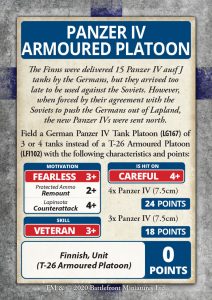
Surprise surprise! Even if there are no Panzer IVs in the book, the Finns still have the option of deploying Panzer IVs! How?  Thanks to a wonderful Command Card that you will find in the deck! In 1944 the Germans sent 15 Panzer IV Js to their Finnish allies. They latter, however, signed the armistice before these tanks could be used against the Soviets. In return, the Finns used the Panzer IVs against the Germans themselves during the Lapinsota War. Due to the very small numbers the Finnish army received Panzer IVs do not have a dedicated formation but a T-26 platoon can be upgraded to a Panzer IV Platoon. The platoon can only consist of 3 or 4 tanks. Everyone knows that Finns are exceptional fighters and their training and morale are truly enviable. With a Fearless Morale and  Veteran Skill they will pass most of their tests with a result of 3+. The Remount check also takes advantage of the Protected Ammo so it only needs a 2+ while the Counterattack suffers from the lack of motivation of the Finns to fight against their previous allies and therefore needs a 4+. They are of course Hit on 4+ in line with the rest of the Finnish. The cost in points however increases from these exceptional values and the Finnish Panzer IVs are more expensive than the German ones by about 12%.

For the Finns the Panzer IV is a characterizing addition that can be very useful on the battlefield. Just remember to move them carefully and take advantage of their superior training as getting hit can be very painful.

Mix and Match Armour – The Finnish T-26 Armoured Company

With Joe Saunders

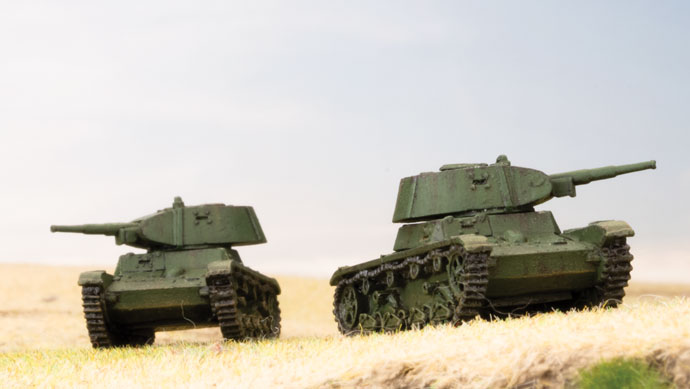
Finland did not really have much in the way of domestic tank production in World War II.  Instead they relied on a mismatched series of tanks captured from the Soviets during the Winter War, older pre-war models they already possessed or whatever they could get from their German “allies”.  In a few cases, the Germans handed over captured soviet T-34s to bolster the Finn’s ranks for armoured vehicles.  The results created armoured companies that were very eclectic in nature with a few containing modern German and captured Soviet vehicles such as Panzer IVs and T-34/85s.  However, the majority had platoons of the outdated T-26 light tank.

New Options for Your Games

When I saw the T-26 Armoured Company force diagram In the Bagration: Axis-Allies Book I was thrilled to see the variety of options that could be taken to evoke the thoroughly mixed up and varied nature of the Finnish tank divisions.  I knew it would be fun (and challenging) to play such a force.  Also, and more importantly for me, with the variety of vehicles, modelling opportunities would be boundless.  I love tanks in all forms and was happy to see that the more obscure tanks, like the T-28, could get back on the table.

In this article I am going to go over my thoughts on the Finnish armour options and detail some ideas of how they can be employed in your games of Flames of War.

The T-26: Obsolete Does Not Mean Useless

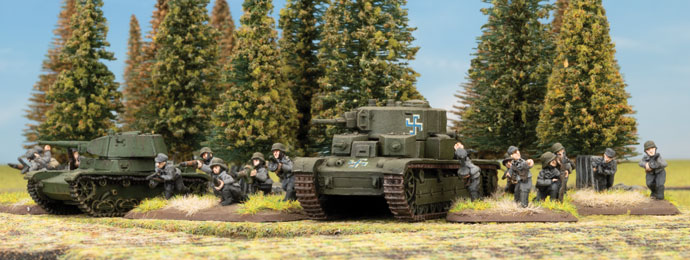
The immediately obvious fact is that the Finns have to rely on tanks that are past their prime. The T-26 has an armour rating of only 1 (on all facings) and an AT 7, 4+ firepower main gun, while the T-28, though it looks awesome, only has a front armour of 4 and its gun is hardly any better.  When you consider that these vehicles will be going toe to toe with IS-2s, Churchills and M-10s, they seem rather outclassed.  Which of course they are.  But a at least you won’t strain yourself picking up the dice to take their armoured tank team saves as you are not likely to ever get one!

What Flames of War players need to remember though is that good armour and big guns are only part of the equation.  As the saying goes veterancy is the best armour, and the Finns have that going for them.  With a Hit On stat of 4+, a Skill of 3+ and a Motivation of 3+, Finnish armour is hard to hit, very hard to scare off the table and really good at maximizing Blitz and other special movement orders.  Though the tanks will blow up when hit, for a skilled user you can spend a lot of time drawing enemy fire but remaining in the fight.

There is also the great wargames equalizer to consider. Points costs! The T26 runs 6 points for 5 tanks.  That is cheap.  A single IS-2 is about 7 points (and don’t get me started on Tigers) so you can go ahead and outnumber your opponent 5 to 1.  (I hear you say, but the T-26 can’t penetrate the armour of the IS-2 and you are right, but hold on until we talk about captured tanks).

The T-28: Old School Firepower

Like the T-26, the T-28 is past its prime.  It has essentially the same drawbacks with lack lustre armour and guns. Despite this, it also has similar advantages to the T-26 in that the crew stats are excellent and it is cheap.  It is however less numerous as they max out at 4 in a unit (for a cheap 9 points) and you can only ever take one platoon in a formation.   On the table where they really differ is in the assault.  The T-28 is absolutely festooned with machine guns and this is reflected by its 2+ Assault Value.  Don’t get me wrong, this makes the tank pretty situational as it would need to get close to gun teams or infantry units that do not have panzerfausts or other anti-tank weapons to guarantee success.  But if you can find the right target, you could cause your opponent a real headache.  Ultimately though, the T-28 for its imposing size and appearance is likely to be of more use drawing your opponent’s fire as they seek to ward off the potential of facing a 2+ assault. This of course is not necessarily a bad thing because while your enemy is shooting T-28s they are not shooting your more valuable tanks.

The T-34: Turning the Tables on the Soviets

For any experienced Flames of War player, the T-34’s capabilities should be well known.  They are flexible, have decent armour, can be well armed and are not overly pricey for points.  The Finns bring a new dimension to this by adding their great stats, making them even better than the Soviet version as they are hit on a 4+.  Despite this, the Finnish armoured platoons armed with the T-34 get smaller number to reflect that the T-34s they have are all captured from their enemies.

The real importance of the T-34 in Finland’s ranks however comes from its ability to make up for the shortcoming of the T-26.  The T-34’s 85mm canon has a range of 28 inches and a AT of 12 (Firepower 3+). This makes it the premier anti-tank weapon in Finnish tank companies and you will want it to sit back and snipe at other enemy tanks.

The KV-1: Big and Scary

The next tank option is the KV-1 of which the Finns only ever had 2.  You unsurprisingly then, you can only get these as a 2 tank platoon for 12 points.  The KV-1 is a more capable assault tank than the T-28 and likely would work exactly the same in the game, although better.  With a front armour of 9 and a 2+ assault it can really force your opponent to worry about having these behemoths penetrating their lines.  Despite this, since you will only ever have 2 in your formation, it is more of a fun inclusion than a competitive one in my opinion.  Platoons of 2 tanks are notoriously vulnerable in Flames of War because of last stand tests.

The Panzer IV: German Technology to Bolster Your Firepower

The command card Panzer IV Armoured Platoon requires a mention.  With this you can replace a T-26 platoon with up to 4 Panzer IV (7.5cm) for 24 points.  This is a good option to add a decent all-round tank with the same excellent Finnish stats to your force.  This is more expensive than a squad of T-34s (85mm) but also has 1 more tank.  Panzer IVs bring a lower AT of 11, but a better range of 32 inches than your T-34s.  If you suspect your engagements will be at longer ranges then this card will likely be of interest to you.

Putting It Into Practice:

By now it is likely obvious that there are 3 main approaches to using the Finnish T-26 Armoured Company. These are:

  1. The Swarm: Overpower your opponent with 3 maximum size T-26 platoons and an HQ of 2 T-26s. This would make no less than 17 tanks in the formation, all hit on 4+ for only 21 points!  You could swap in T-28s or KV-1s in to decrease the model count and up the threat level if you want.  In terms of application you could just drive this at your opponent or an objective and draw their fire away from any more important units you may be fielding.  If you play it correctly, such a large force could spend several turns tying up your opponent, or even overrun objectives due to sheer weight of numbers.
  2. High Quality Guns: You can take T-34 85s and max them out in the formation providing you with excellent anti-tank firepower. The formation allows you to take 2 3 tank platoons of T-34 85s and an Hq with 1 T-26 and 1 T-34 85.  This means you could have 7 hard hitting tanks for 50 points (and a T-26 to protect your HQ T-34 with mistaken target).  You would probably want to spend another 6 points to add 5 T-26s to increase your formation break point.  Alternatively, you could use the Panzer IV armoured platoon command card for 24 points and add another 4 long range tanks.
  3. Mixed Formation: You have an interesting synergy available to you by combining the T-34 with cheap and numerous T-26s.  As the more numerous tanks rush forward to take objectives and threaten flank shots, your opponent will end up with a tough decision.  Either they can focus on the T-34s shooting at long range, or concentrate on the more numerous tanks closing on them.  This ability to force the opponent to split their fire and risk being swarmed, or suffer from ignoring the T-34s could be quite punishing.   To do this the formation would likely be setup with 1 T-34 85 and 1 T-26 as an HQ option, 1 platoon of T-34 85s and 2 platoons of 5 T-26s each. This formation would only cost 41 points and is in my opinion best choice for the Finnish tank player.

Time for Battle

Whether you use swarms of light tanks, higher quality tanks, or a mix of the two, the Finns bring excellent stats and a lot of flexibility to the games table that should be fun to play.  Bagration: Axis -Allies really has the potential to add an exciting series of options to Flames of War and creates a new dimension for players who love a good variety of armour in the game.  So, grab some Finns and start mixing and matching your armoured vehicles.  Discover the new possibilities that can bring you victory on the table top.

Exploring the Bagration Finnish Infantry Formations

With John Lee

With the release of Bagration: Axis Allies, each nation gets one infantry formation in the book.  Now you must be thinking what about the rest of them.  Well, they are in the command cards.  The premise is that you take the core infantry formation and then apply the command cards to create the formation you want to play.  For the Finns, there are three infantry formations in total you can take.  So, let us explore the core infantry formation first then look at the two command card options – Pioneer and Light Infantry.

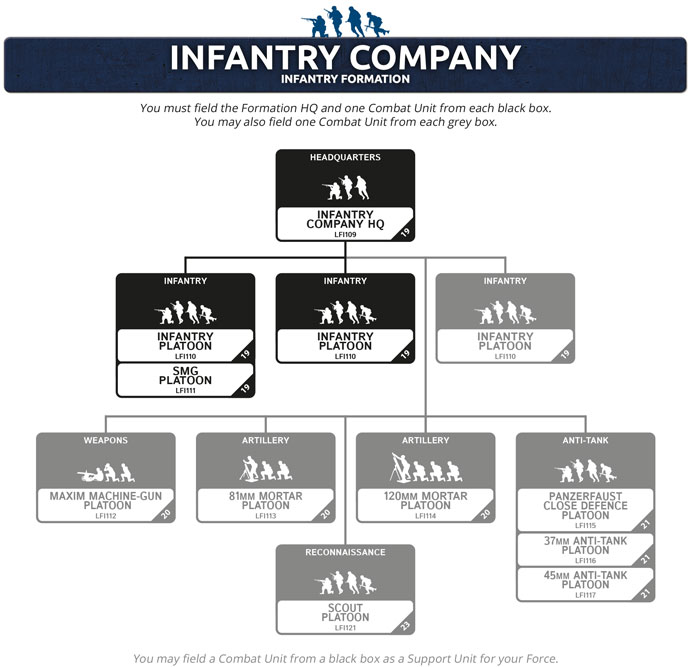
The formation is comprised of the following:

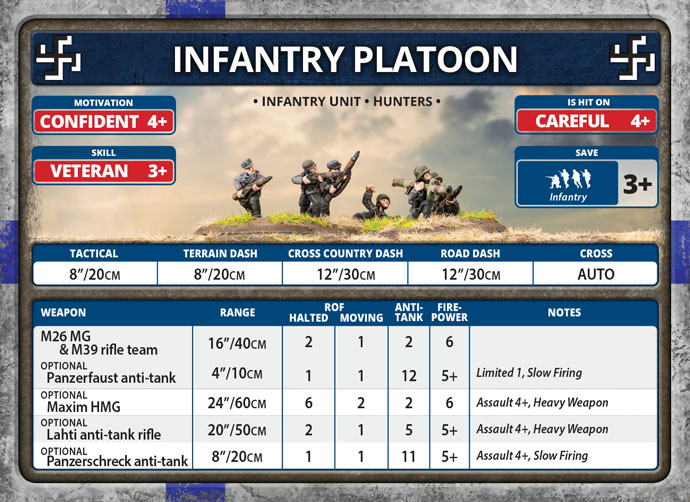
The Finnish infantry are rated Confident Careful Veteran and have the special rule “Hunter”.  This rule is “Infantry Teams treat Snow, Woods or Forests as Cross-country Dash instead of Terrain Dash.”   So, in your games with lots of cover, you can move 12” instead of 8”.  If you also use a Follow Me order, you could move up to 16” in a single turn!  Use that to your advantage.  So, lets dig into the formation platoon by platoon.

The HQ platoon comprises of two SMG teams for 2pts.  No panzerfausts, but there is a command card called “Close Defence”.  You can use it for a turn for any infantry or gun teams in the unit to give them AT3 FP1+ against Top Armour for 2pts.  Oh, and the other thing is that the HQ unit assaults on 2+!

With the infantry platoons, you have several options to optimise how you want the makeup of these platoons to look.  Seven M26 MG and M39 rifle teams for 7pts or nine teams for 9pts.  You can add Panzerfausts for +2pts to the platoon and is a no brainer for me here regardless of team type or size.  You can also beef up the platoons by adding a Maxim HMG team for +2pt and either a Lahti anti-tank rifle team for +1pt or a Panzerschreck team for +2pt.  I like to take the HMG team if I have the points.  If the platoon gets pinned, then you need that extra dice defending in assaults.

I like to take the Panzerschreck, in my mind totally worth it if you have the points.  Adds a second AT option for defending assaults or jumping out and having a go at a tank that wanders too close.  Makes most tanks think twice about assaulting, facing two AT11/12 teams.  Throw in the Close Defence card as well, and your infantry is looking scary defensively.

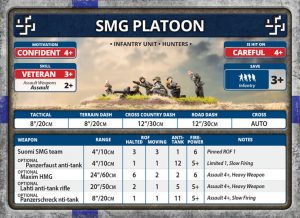
The SMG platoon is configured the same as the infantry platoon except all teams are armed with SMGs instead of rifles and MGs.  Difference is 8pts for seven teams and 10pts for nine teams.  The Panzerfaust, HMG, Lahti and Panzershreck options are the same here also.

Depending on what your preference is, you could take two or three infantry platoons – take the third if you have the points.  If you are offensive minded, you would take the SMG platoon as the third platoon to assault whilst the other two platoons defend the objectives.

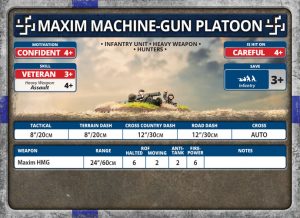
The next platoon to look at is the Maxim Machine-Gun platoon where you can have four of these teams for 5pts.  Something to consider taking, especially if you do not take them in the infantry platoons.  Adds another platoon for the formation count.  I do not always take these but can be useful to bolster defending an objective.  You can also take the Machine-Gun Nests command card for 2pts.  This will allow you to place you HMGs across the table in your deployment zone as independent nests.  No longer counts toward your formation anymore but that depends on your playstyle and how you want to use them.

Up next are the mortar platoons, starting with the 81mm Mortar Platoon – I think one of the best buys in the formation with three for 3pts.  This is an absolute no brainer – range of 48” and can fire a smoke bombardment.  This is one of my core units for this formation.

The 120mm Mortar Platoon is also a great option – two for 4pts or three for 6pts.  Another no brainer for me with a range of 56”, AT2 and FP3+ and can also fire a smoke bombardment!  Another core one for me.

The next unit is an auto-include for me.  The Panzerfaust Close Defence Platoon is a five-team platoon of riflemen equipped with a panzerfaust per team.  That is right – per team!  No limited 1 rule here.  You do not want to be assaulting this platoon with tanks!  A scary option for your opponents for 8pts!

If you cannot afford the points for the Panzerfaust Close Defence Platoon, then we can look at the other two options in this slot.  The 37mm Anti-tank platoon is made up of two 37mm guns that can fire Stielgranate as well as its normal ammunition and is included for 4pts.  With normal ammunition, they have 24” range with AT6 FP4+.  Stielgranate has a range of 10” with AT12 FP5+.  The 45mm Anti-tank platoon is made up of two 45mm guns.  Short 45mm has a range of 20” with AT7 FP4+ for 4pts.  Long 45mm has a range of 24” with AT8 FP4+ for 5pts.

The last unit to make up the formation is the Scout Platoon.  This platoon is rated Fearless rather than Confident and has Scout and Spearhead attributes.  You can take seven M39 rifle teams for 11pts or nine for 15pts.  Add another 2pts to include panzerfausts.  Adding a Close Defence command card here for 2pts, means you have a platoon that can spearhead into enemy territory, using your cross-country speed through the woods gone to ground with Scout to start assaulting the enemy on turn 2 potentially.  Having the Panzerfaust Close Defence Platoon in the spearhead bubble means your opponent will be feeling very nervous with those units potentially attacking on turn 2.

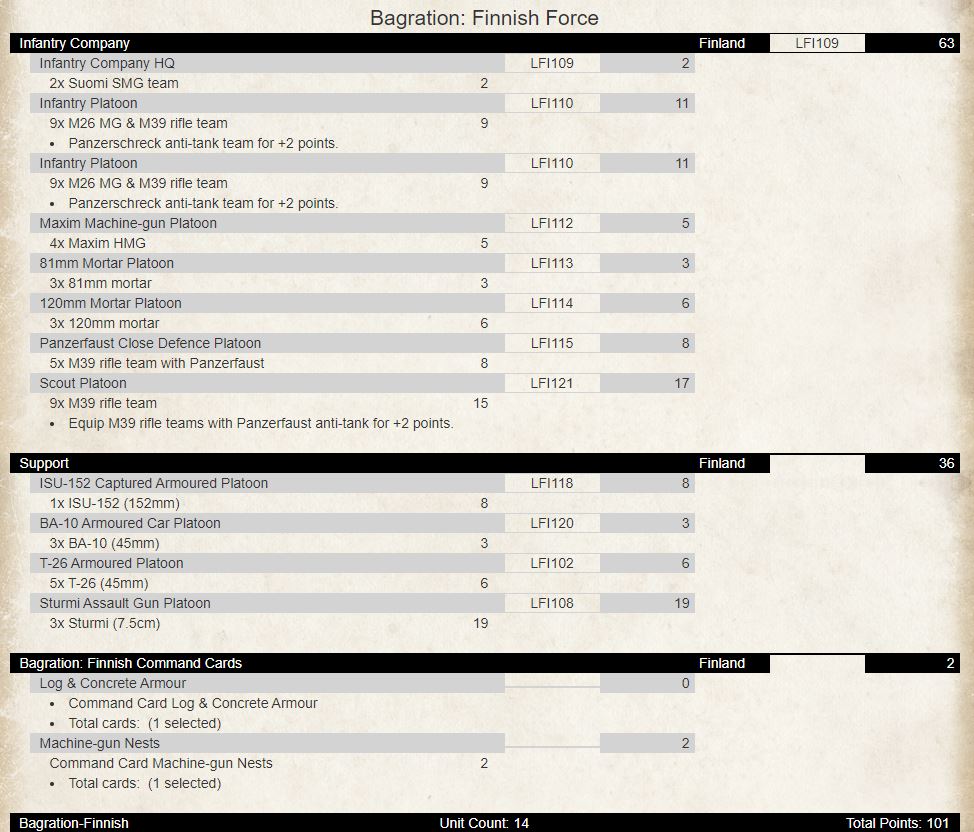
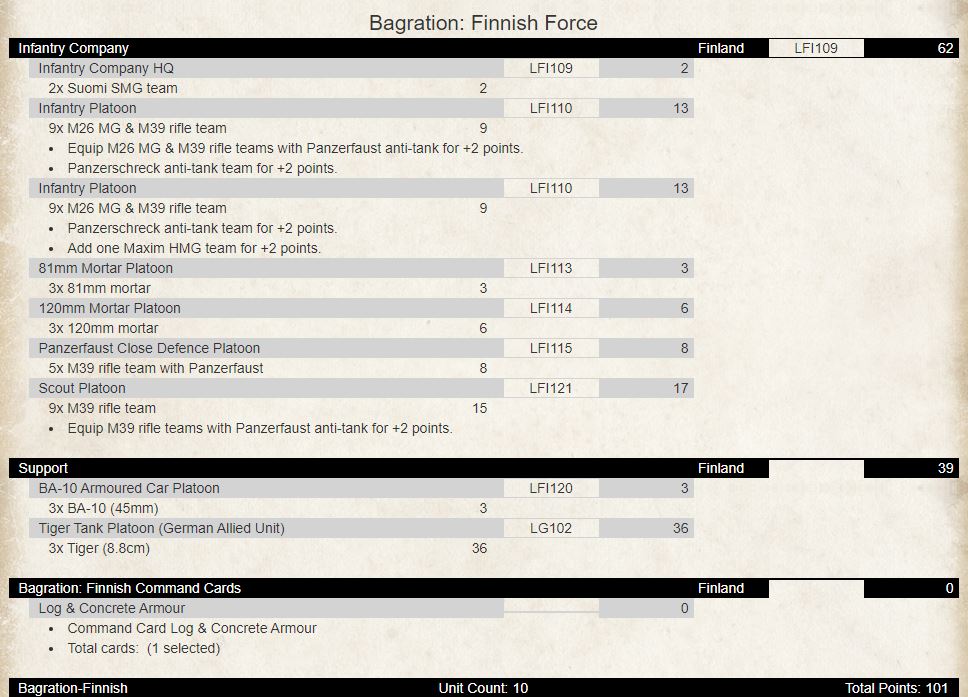
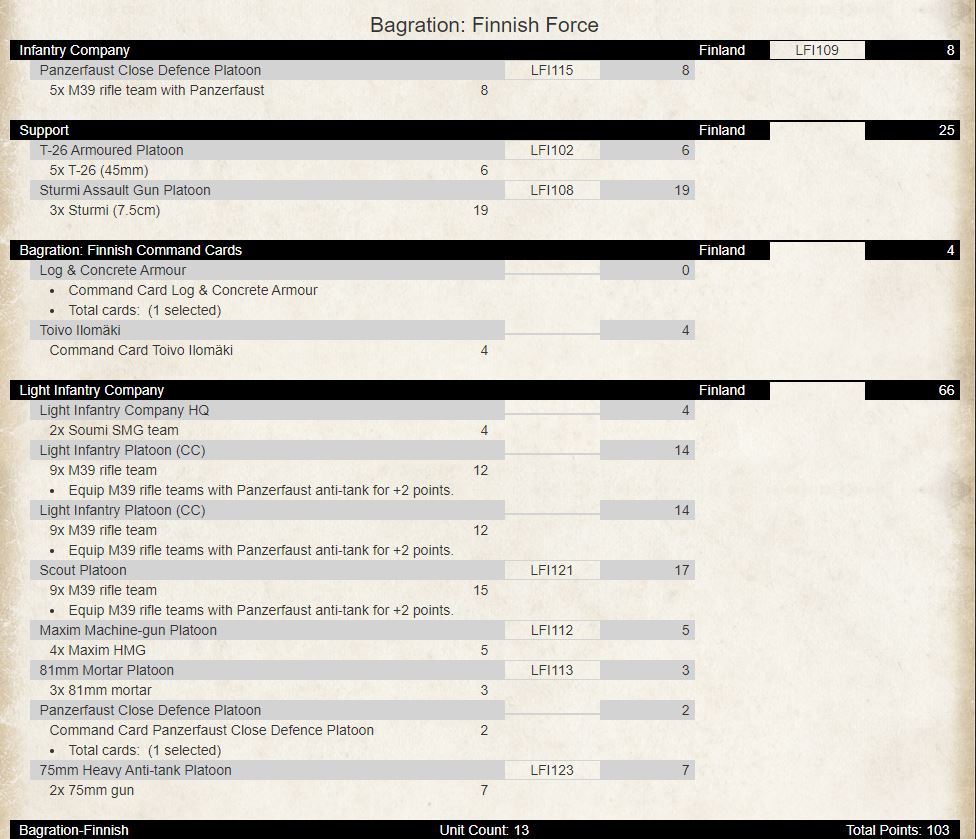
Whilst the Finns do not have high end AT (14 or greater) in their force, they can take German allies to help with that.  I feel though that with the infantry formation, you may not even need it.  Let us look at two lists – one with allies and one without. Lists will be based on 105pts.

There are eight platoons for the formation break.  Two artillery templates that are part of the formation.  Four infantry platoons that will allow you to have two defending objectives and the Scouts with the Panzerfaust Close Defence platoon to attack with support from the Sturmi and ISU-152.  HMG nests to help break up any infantry attacks.  BA-10s and T-26s to screen against any light armour, infantry, or go and create diversions or even tie up the enemy on the other flank.  Looking at taking German allies now:

Removing the Maxim HMG platoon and adding a team to the Infantry platoons along with the Sturmi, T-26s, and ISU-152.  This list would suit those who prefer to have the heavy tanks do the heavy tank lifting.  Still has seven platoons for the formation break.

Now onto the two command card formations.  First up is the Pioneer Company and is comprised of the following:

  • 1 Infantry Company HQ
  • 2-3 Pioneer Platoon

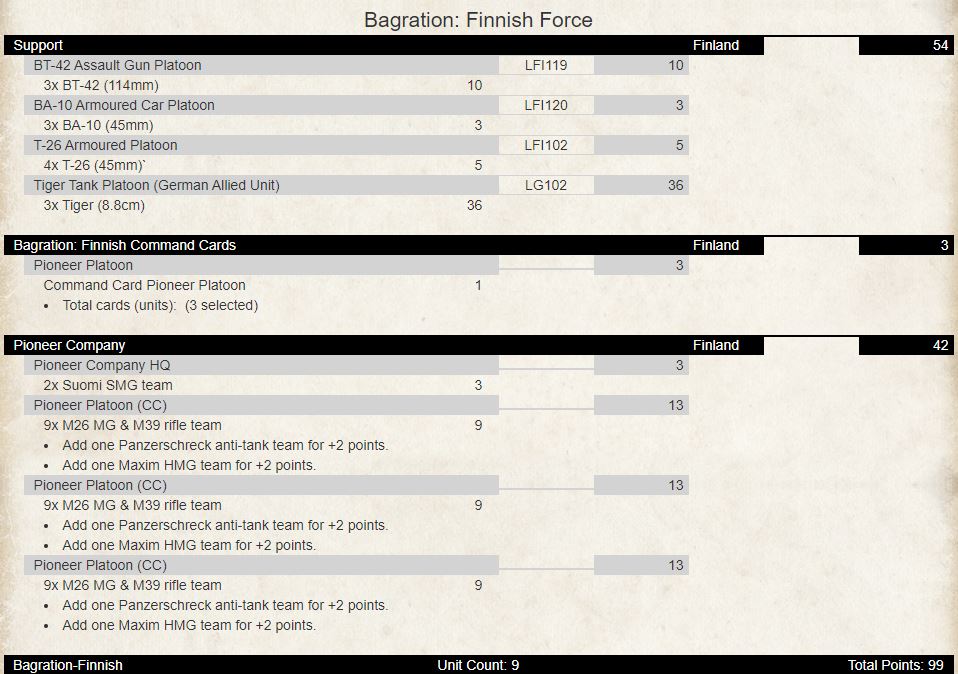
The platoons have the same characteristics as the core Infantry Formation.  The difference is that you pay an additional 1pt for the formation.  The HQ platoon and Pioneer platoons can dig in on a 2+ and cross minefields on a 2+.  You also pay an extra 1pt for each Pioneer Platoon.   The Pioneer platoons can also replace up to two teams per platoon with Flame-throwers for 1pt each.  There are no other units in the formation, so if you take it, you will probably want to take three platoons and maybe take some allied German heavy armour.

You have a maxed-out formation and can leave two platoons defending objectives if required.  The Tigers for heavy AT work, BT-42s provide an artillery template, T-26s to provide a screen and BA-10s for spearhead.

The second command card formation is the Light Infantry.  These are meant to be Finland’s finest troops.  They have a slightly different composition to the standard infantry formation.  It comprises the following:

  • 1 Light Infantry HQ
  • 1-2 Light Infantry Platoon
  • 0-1 Light Infantry Platoon or Light Infantry SMG Platoon or Scout Platoon
  • 0-2 Maxim Machine-Gun Platoon
  • 0-1 81mm Mortar Platoon or 50mm Mortar Platoon
  • 0-1 Light Infantry Panzerfaust Close Defence Platoon
  • 0-2 50mm Heavy Anti-tank Platoon or 75mm Heavy Anti-tank Platoon

The formation costs 2pts and includes two SMG teams for the HQ.  The Light Infantry platoons have no panzershrecks or integral HMGs, but they are Fearless instead of Confident.  Seven M39 rifle teams are 9pts and nine teams are 12pts.  Adding Panzerfausts costs 2pts.  The Light Infantry SMG platoon are Fearless but have no Panzerfausts.  Seven SMG teams are 10pts, nine are 13pts.  The Light Infantry Panzerfaust Close Defence Platoon is also rated Fearless and costs an additional 2pts making it 10pts.  You can take the 81mm Mortar Platoon or now take the 50mm Mortar Platoon instead.  It costs an additional 1pt as they also become Fearless and no longer an artillery unit.  They have a 16” range, ROF 1 with overhead fire instead of an artillery template.

The other new additions to the formation are the 50mm and 75mm Heavy Anti-tank Platoons.  The 50mm Anti-tank Gun Platoon has two guns for 5pts.  Range of 28” AT9 FP4+.  The 75mm Anti-tank Gun Platoon has two guns for 7pts.  Range of 32” AT12 FP3+.  Whilst they are fragile with only two guns, you would consider taking the 75mm option for 7pts per platoon.  Especially as you can add a Warrior to one of the platoons for 4pts which could be useful and adds some flavour.  Toivo Ilomaki allows the unit to automatically pass all rally tests and the unit leader can reroll all misses.


Eight platoons for the formation break.  Lots of Fearless infantry plus one template.  Warrior with the 75mm Anti-tank guns for ambush or to bolster the defence on an objective.  The Sturmi and T-26s give you some mobile support for your Fearless assault infantry.

Finally, you can choose one of two warriors with your infantry formation.  The famous Lauri Torni and Adolph Ehrnrooth – remember only ONE warrior per force!

Lauri Torni Command Card:  Allows the unit in the formation to pass Blitz tests on 2+ and pass Last Stand checks if within 6” and in line of sight of the Formation Commander.  All for 2pts!

Adolph Ehrnrooth Command Card:  Allows the unit in the formation to pass Blitz tests on 2+ and pass Last Stand checks if within 8” and in line of sight of the Formation Commander.  All for 2pts!

So, there you have it – three infantry formation options to choose from.  Finnish Infantry have some uniqueness about them with Fearless Scouts and Panzerfaust Close Defence Platoons that you can exploit in your games.  I hope this has been of some help.  Happy List Building!
Armoured Versatility – Looking at Zrinyi Assault Gun Battery

With Joe Saunders

The Zrinyi Assault Gun was Hungary’s attempt to capitalize on the success that their German allies had with the STUG.  As a trade-off between complexity and fire power, the STUG became a very attractive weapon as the Axis powers were put on the defensive by allied attacks.  The main issue was that the STUG was never plentiful enough to be shared with all of Germany’s supporters, so other means had to be sought out.  The Hungarians took the problem into their own hands and built a similar vehicle, the Zrinyi.  The intention was to produce the Zrinyi in 2 variants, the first being a high velocity gun armed tank hunter and the second being a 105mm howitzer armed assault gun.  Unfortunately for the Hungarians, the first version did not make it out of prototype stages, but the Howitzer reached the battlefront with between 60-70 of them produced.  Eager to use these machines to good effect, they did not let their scarcity deter deployment and they put Zrinyi in mixed companies of other weapons.

In Flames of War the Zrinyi Assault Gun Battery is the main formation to let you field this interesting tank.  But don’t let the name fool you, like many of the Axis Allies, the Hungarians had to mix and match the contents of their armoured companies to fill out the numbers.  In game terms this means that the Zrinyi assault Gun Battery can have STUGs, Hetzers and 7.5cm Anti-Tank guns in it as well.  Let’s take a look at each in turn and explore how these make for a flexible and fun formation to play in Flames of War.

Zrinyi Assault Gun

Despite the anti-tank version never being completed, the 105mm howitzer Zrinyi proved extremely capable in multiple roles for the short time it was available.  In Flames of War this is reflected in the vehicle’s stats.  Hungary has decent soldiers meaning all of their tanks are Hit On a 4+ and the Zrinyi troops have a skill boost over other Hungarian units with Veteran Skill of 3+.  These are solid values, but what makes the Zrinyi platoon interesting and unique is the tank itself. With a decent Front Armour of 7 the Zrinyi is able to hang out with the other medium tanks (and assault guns) in the late war arsenal. This rating is good for most situations but is not going to make it an impenetrable behemoth.  What is different is its gun.  The 105mm Howitzer is quite possibly the most flexible big gun in Flames of War. It has artillery stats with AT 3, 3+ Firepower and a great range of 64 inches.  As they come in platoons of 3, the Zrinyi can rain down long-range fire as well as any dedicated artillery unit… but this is not all.  The 105 also has an AT of 10 and 2 shots halted (1 moving) from direct fire meaning it can take on other medium tanks and even some heavy ones.  Better still, it has Firepower 2+and HEAT, so when it hits, its target is pretty much doomed.  In addition to this, the gun also sports the Brutal rule.  The rerolled saves this causes makes a mockery of foxholes and other bulletproof cover for infantry.

These weapon stats then make the Zrinyi interesting in that this tank can almost do it all.  The major trade off being that it is slow firing, but that can often be mitigated with using Blitz moves.  (It also takes the usual penalties in assault as all assault guns do). Though none of these stats make it tower over Tigers or IS-2s in effectiveness, the Zrinyi can take on most missions making it a very adaptable choice for filling multiple roles on the battlefield.

StuG Assault Gun

This option is nothing new.  The STUG, more than any other axis vehicle, is the ubiquitous late war option.  It has a decent gun, decent armour and the Hungarian version has good crew stats.  It is an all-around dependable tank.  Despite this, the Stug’s gun with AT 11, Firepower 3+ is maximized for anti-armour duty and this is the key difference from the Zrinyi’s generalized armament.

While building a force you can select 2 platoons of STUGs in a Zrinyi formation which can up your dedicated anti-tank abilities quite a bit.  If you worry the 105mm howitzer is not enough to take on your opponent’s armour, then the STUG might be just what you need

Hetzer Assault Gun

The Hetzer is really a kind of bargain basement STUG.  They are 4 points each vs the STUG at 6.  The trade-off comes at the expense of Overworked in the gun profile and a dismal cross of 5+.  Don’t get me wrong, the Hetzer can still hit hard with essentially the same gun as the STUG but you have to play smart to compensate with careful tactics.  Where the Hetzer shines for the Hungarians though is in numbers.  You can take 2 batteries of 5 tanks in a Zrinyi Formation if you want.  That would mean 10 small tank hunters pounding out up to 20 AT 11 shots each turn.  This can take the focus off your Zrinyi so they can sit back and shoot as artillery in peace, or fill the same role as the STUG, only with greater numbers on the table.

7.5 cm Anti-Tank Platoon

Zrinyi formation can take 1 platoon of up to 3 7.5cm guns for an economical 11 points.  Like the STUG, this weapon is nothing new.  At AT 12 it is a solid choice when you don’t need mobility.  This option gives the formation a unit that excels in missions with the Ambush special rule, or when you need a unit to sit on and hold an objective (while scaring enemy armour away).

Putting into Practice

Looking at the units available to the Zrinyi Assault Gun Battery I see 2 main applications for the Formation:

Flexibility:
By loading the formation up on 3 full batteries of Zrinyi you can capitalize on the “Jack of all trades” nature of the tank.  This could be really useful in situations where you are rolling off for your missions and/or are uncertain about terrain.  By having a unit that can both direct fire and function as artillery, you can simply adapt to the conditions…hopefully better than your opponent.

If you are taking your Zrinyi as your only tank in the formation you may consider dropping 1 platoon for 7.5cm guns, or using the Assault Artillery Rifle Platoon Command Card to add more staying power.  A good-sized squad of Anti-tank guns or Infantry could be very useful for guarding any objectives should your Zrinyi have to drive away to exploit gaps in the enemy lines, or go on direct fire duty.

Anti-Tank:
Though the Zrinyi is cool, so are Hetzers and Stugs!  If you feel that the multi role nature of the Zrinyi makes them just a little too weak in a tank on tank fight, then might I suggest loading up the formation with 2 platoons of STUGS or Hetzers (or 1 of each)!  Their AT 11 guns punch harder than most other dedicated tank killers the Hungarians can get.  Also, since you need to take a compulsory Zrinyi platoon, you will come way with solid formation level artillery as a result.  If the formation has to do antitank work entirely, then the 105mm Howitzer can back up the more powerful guns of your other units.

The Might of Hungary

The Zrinyi Assault Gun Battery is an interesting option for the Flames of War player.  Not many tanks in the game can function in practically all capacities like the Zrinyi. But remember the Zrinyi formation can still take solid anti-tank options at the formation level should the need arise.  This combination should lend the Hungarians the much-needed versatility to take on their opponents and prevail.

So grab your Hungarian armour or go to your friendly local games store and get some of the awesome new plastic Zirinyi kits and put your plans in motion.

Building a Hungarian Assault Battery With the New Starter Force

With John Lee

With the launch of the Bagration: Axis Allies release, I thought I would look at how a new player, or someone on a budget, can get a Hungarian force on the table that would be semi-competitive or at least hold its own with the focus on the new Zrinyi Assault-gun.  For the new player, it opens the door to playing Flames of War without needing to buy, assemble or paint too much and get into playing the game quicker.

So, if we look at what we get in the excellent value starter set (Zrinyi Assault-Gun Battery), that will help decide what formations to run.  The starter set contains the following:

  • Complete A5 Rulebook
  • Hungarian “Start Here” booklet
  • 4 x Zrinyi Assault-guns
  • 3 x Hetzer Assault-guns
  • 3 x StuG Assault-guns
  • 3 x Panther Tanks
  • 4 x 10.5cm Howitzers
  • 2 x Decal Sheets
  • 7 x Unit Cards

The bonus here is that the rulebook is included in the box – so the new player makes a saving right away.  Now if we look at what formations are in the Bagration: Axis Allies book, we can see what we can maximize from what we get in the starter box.  The most obvious formation is the Zrinyi Assault-gun Battery but we will also explore the Stug and Hetzer Assault-gun Batteries.  We will look at options for 105pts.

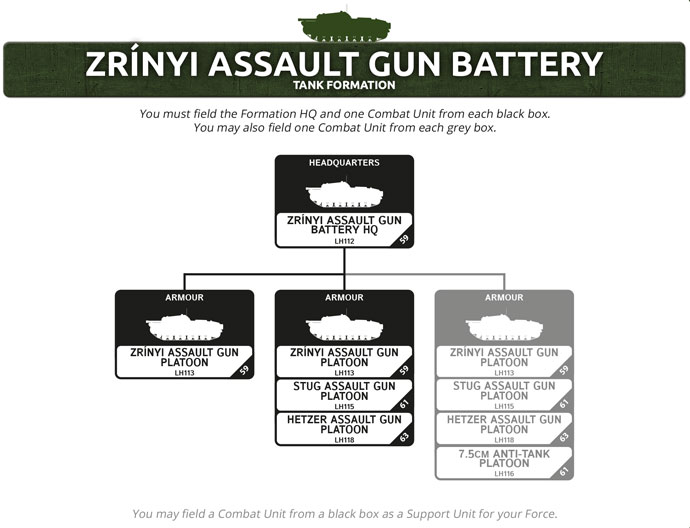
Looking at the Zrinyi Assault-gun Battery first, let us look at what units comprise this formation:

Looking at the formation and what we get in the starter box, we can maximise all the assault guns.  The Panthers could be used as formation support with the 10.5cm Howitzers in support.   The thing I really like about the Zrinyi is that has a ROF 2 AT10 dual purpose weapon.

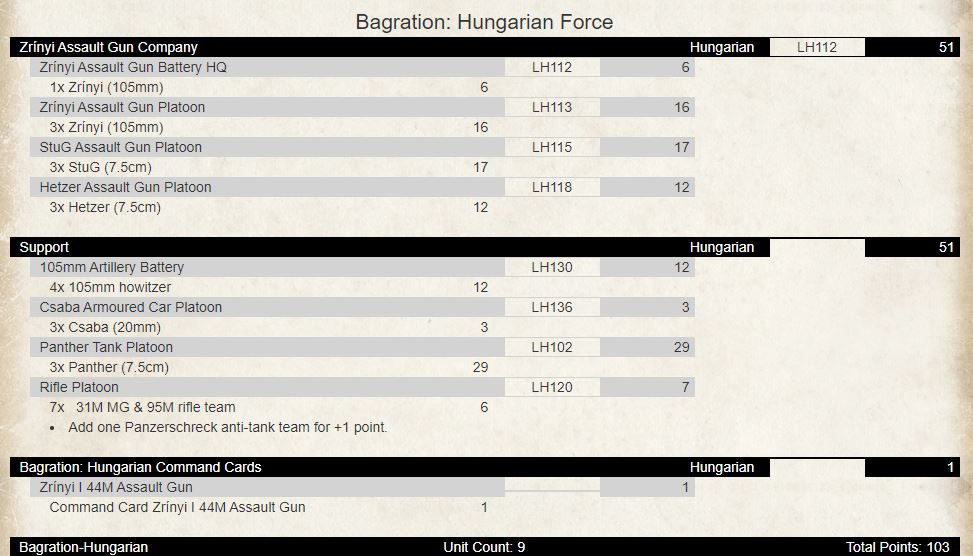
We are using everything from the box and adding an infantry platoon and armoured cars for spearhead.  Maxed out the formation of four units.  Upgraded the command Zrinyi to a 75mm gun with AT11 as we already have two artillery templates in the force with Zrinyi battery and 105mm artillery battery.  Panthers provide the heavy AT, and the infantry platoon can screen your assault guns or dig in on an objective.

To buy this army you need only to purchase the following for $211:

1 x HUAB01 Hungarian Starter Force: Zrinyi Assault Gun Battery (Plastic)   110
1 x HU702 Rifle Platoon     27
3 x HU300 Csaba Armoured Car     39
1 x FW269HC Bagration: Hungarian Command Cards     10
1 x FW269 Bagration: Axis Allies     25
TOTAL $211

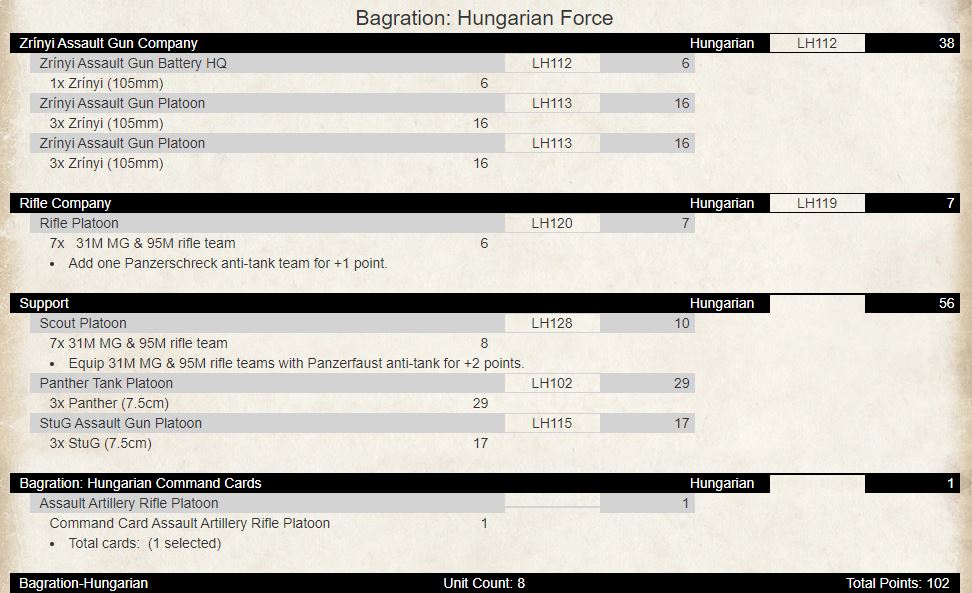
We can change this up a bit by buying an extra box of Zrinyi’s to provide two core platoons and use the Assault Artillery Rifle Platoon command card to replace the third core platoon slot with infantry.  This helps anchor the formation for one additional point.  We can drop the 105mm artillery and use the Hetzer and Stug platoons as formation support.

Now the only things not used from the starter are the Hetzers and 105mm guns.  You still have two artillery templates and now a scout platoon which can either spearhead, dig in on the other objective or screen the assault guns.  Nice balanced force (well for my playstyle anyway).

To buy this army you need only to purchase the following for $249:

1 x HUAB01 Hungarian Starter Force: Zrinyi Assault Gun Battery (Plastic)   110
1 x HBX03 Zrinyi Assault Gun Platoon (Plastic)     50
2 x HU702 Rifle Platoon     54
1 x FW269HC Bagration: Hungarian Command Cards     10
1 x FW269 Bagration: Axis Allies     25
TOTAL $249

You could also swap out the Scout Platoon with a platoon of four Csaba (4pts) and Heavy AA battery (6pts) if you still wanted some more mobility and additional AT14 goodness.

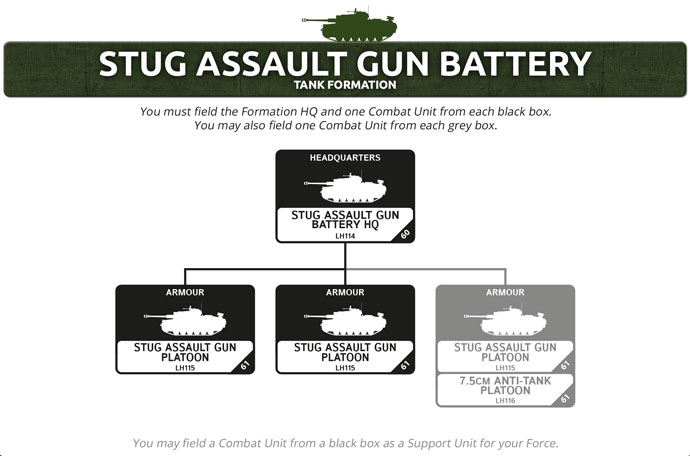
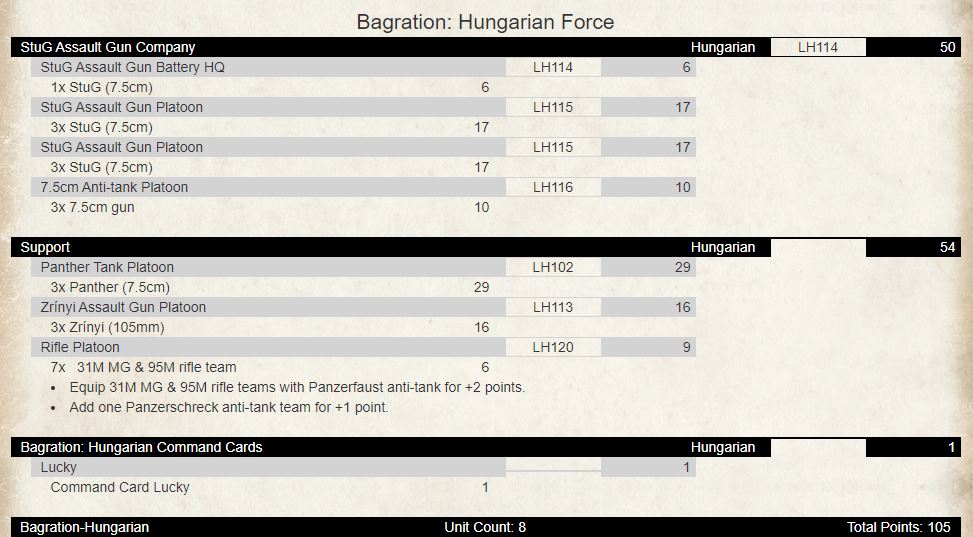
Looking at the Stug Assault Gun Battery now, it is a similar configuration to the Zrinyi with the following units comprising the formation:

We can take the two compulsory platoons and let us take the 7.5cm Anti-tank Platoon as the third platoon.  Gives us some flexibility in the list by having an ambush unit and that extra pip of AT could be useful.

Only the 105mm guns, Hetzers and one Zrinyi not used from the starter box.  Still has one template and ability to handle enemy armour with AT14 from the Panthers.

To buy this army you need only to purchase the following for $248:

1 x HUAB01 Hungarian Starter Force: Zrinyi Assault Gun Battery (Plastic)   110
1 x GBX143 Fallschirmjäger StuG Assault Gun Platoon     50
1 x HU702 Rifle Platoon     27
3 x GSO209 Plastic PaK40 Sprue     18
1 x HSO104 Anti-tank Gun and AA Crew     18
1 x FW269 Bagration: Axis Allies     25
TOTAL $248

If you want some spearhead, you could replace the Zrinyi platoon with a 105mm artillery battery (12pts) and Csaba armoured cars (4pts).

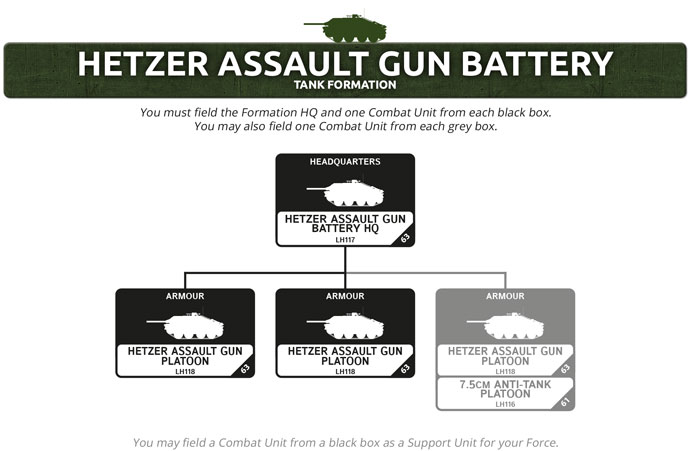
With the Hetzer Assault Gun Battery, it has a similar configuration to the assault gun batteries above.  The units that comprise the formation are:

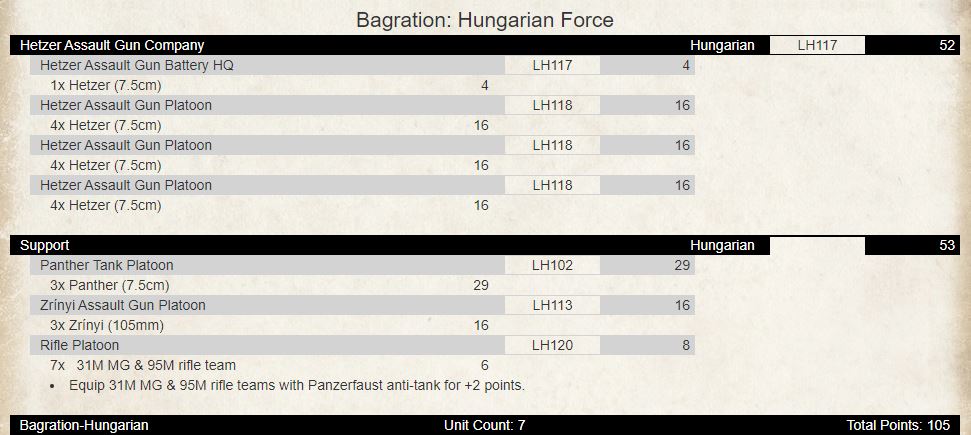
The main difference with the Hetzer platoons is that you can take up to five in the platoon instead of just three.  We can take advantage of that and take tank platoons of four instead by investing in two additional boxes to make thirteen tanks to max out the formation.

Using everything except the Stugs, 105mm guns and one Zrinyi from the starter box.  The combat platoons are more resistant with four tanks rather than three.  Still has one template and high-end AT with infantry to screen the Hetzers.

To buy this army you need only to purchase the following for $262:

1 x HUAB01 Hungarian Starter Force: Zrinyi Assault Gun Battery (Plastic)   110
2 x GBX167 Hetzer Tank-Hunter Platoon (Plastic)   100
1 x HU702 Rifle Platoon     27
1 x FW269 Bagration: Axis Allies     25
TOTAL $262

If you want a spearhead option, you could either replace the Rifle platoon with a Scout platoon (no panzerfaust or smaller one with panzerfaust), or as above with the Stugs, replace the Zrinyi platoon with Csaba armoured cars and 105mm guns.

There are a lot more options to take with a Hungarian force as you will see in other articles for this launch.  I would suggest combining this starter box with one of the three German starter boxes if you want to run a Panther company or provide more options to your force.  Each box provides more options, whether it is Hungarian (Panthers, Tigers, Hetzers, Stugs, Panzer IVs, 88mm AA Guns, Neberwerfers) or a German allied unit of Panzer IV/70s, Reconnaissance Platoon or Armoured Panzergrenadier Platoon.  You can also take a German allied formation as well or if you already have a German force, you can now take Hungarian units or formations now as allies.   Take a Zrinyi Assault Gun Platoon with your German forces for flavour.

Having German Allies provides future proofed support options for the Hungarians as the release timeline progresses.  With Kingtigers, Jagdpanthers and Jagdtigers still to come, you will be able to provide AT17 support for your Hungarian force!

There you have it – some options to ponder for getting started with different formations with the starter box(es).  Enjoy!