
Category: Bagration: Axis Allies
Building a Romanian Starter Force based on the T-4 Tank Formation
With John Lee
With the launch of the Bagration: Axis Allies release, I thought I would look at how a new player, or someone on a budget, can get a Romanian force on the table that would be semi-competitive or at least hold its own with the focus on the T-4 Tank Formation. For the new player, it opens the door to playing Flames of War without needing to buy, assemble or paint too much and get into playing the game quicker.
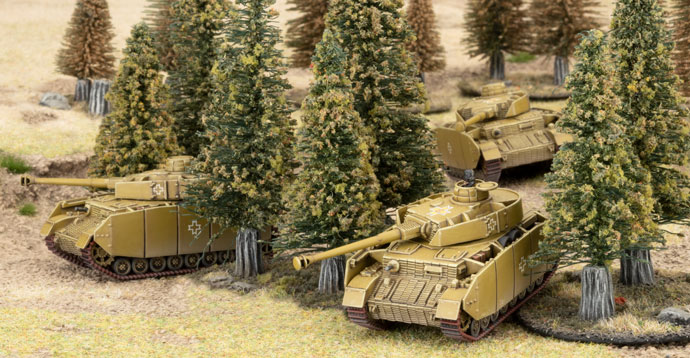
There is no starter box for the Romanians so we can look to build out either the T4 (Panzer IV) formation or the TA (Stug) Formation. There is the German Panzer Kampgruppe Starter Box that gives us several options we can use from it and save some money at the same time.
The starter set contains the following:
- Complete A5 Rulebook
- German “Start Here” booklet
- 5 x Panzer IV Tanks
- 2 x Tiger Tanks
- 3 x StuG Assault-guns
- 1 x Panzergrenadier Platoon
- 4 x Sd Kfz 251 Half-tracks
- 3 x Nebelwerfer
- 2 x 8.8cm AA Guns
- 10 x Unit Cards
From this starter set, we can use the Panzer IVs, Stugs, Sd Kfz 251s for our Romanian force and the Tigers or Panzergrenadiers as an allied platoon. That leaves the Nebelwerfers and 8.8cm AA Guns which we cannot use. The other bonus here is that the rulebook is included in the box – so the new player makes a saving right away.
OK – let us have a look at the T-4 formation and see how we can apply the above starter box for our force:
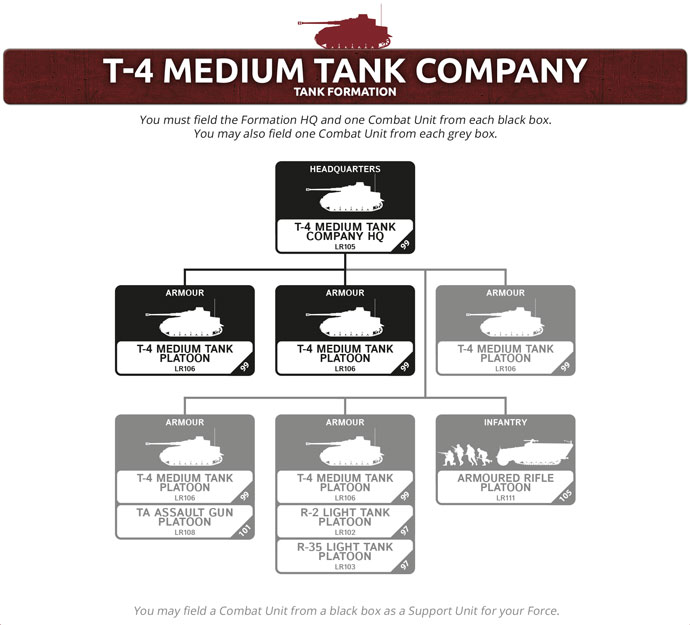
We will need one or two more boxes of Panzer IVs to flesh out the rest of the formation and some infantry, but the Romanian Panzer IV is the cheapest in the game so we should get as many as we can.
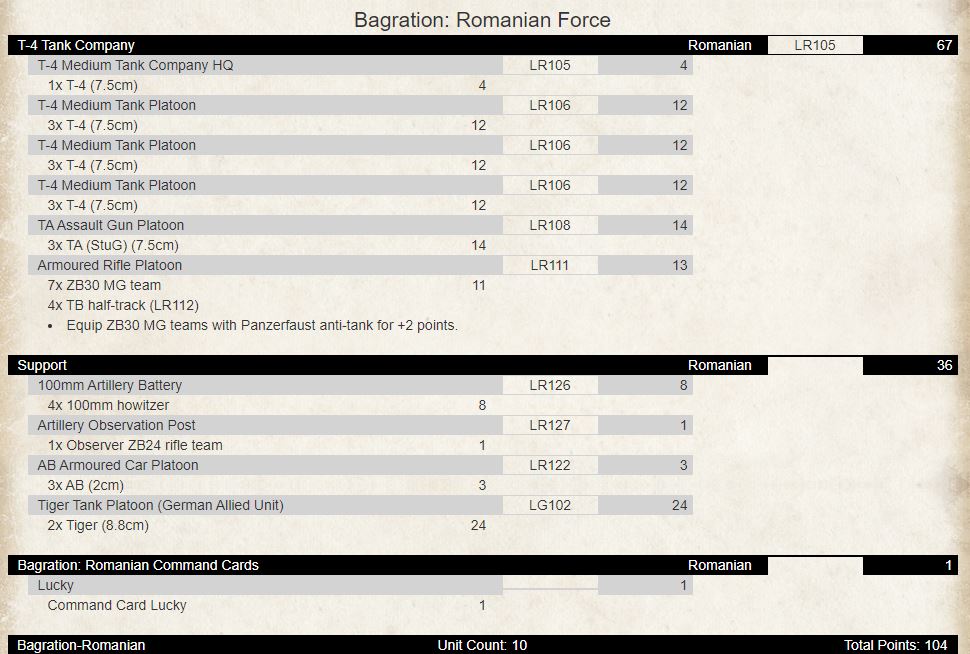
We have six platoons for the formation break out of a possible seven. We have maximized the starter box. This is an offensive force with 15 tanks, infantry mounted in half tracks, spearhead with armoured cars and artillery to round out the force. The allied Tigers can go into ambush if available. You could remove the Lucky command card and change out the Tiger Platoon for a SS Tiger Platoon.
To buy this army you need only to purchase the following for $291:
| 1 x GEAB18 German Panzer Kampgruppe Army Deal | 110 |
| 1 x GBX142 Panzer IV Tank Platoon (Plastic) | 50 |
| 1 x RO702 Rifle Platoon | 30 |
| 3 x GE301 Sd Kfz 222 (2cm) | 39 |
| 4 x ISO185 Plastic Skoda 100/17 Howitzer sprue | 24 |
| 1 x RSO101 Artillery Group | 13 |
| 1 x FW269 Bagration: Axis Allies | 25 |
| TOTAL | $291 |
If you do not think the starter box is for you, or you want different allied options, you could go and get two or three boxes of Panzer IVs to start and flesh out from there. Here is an alternate option:
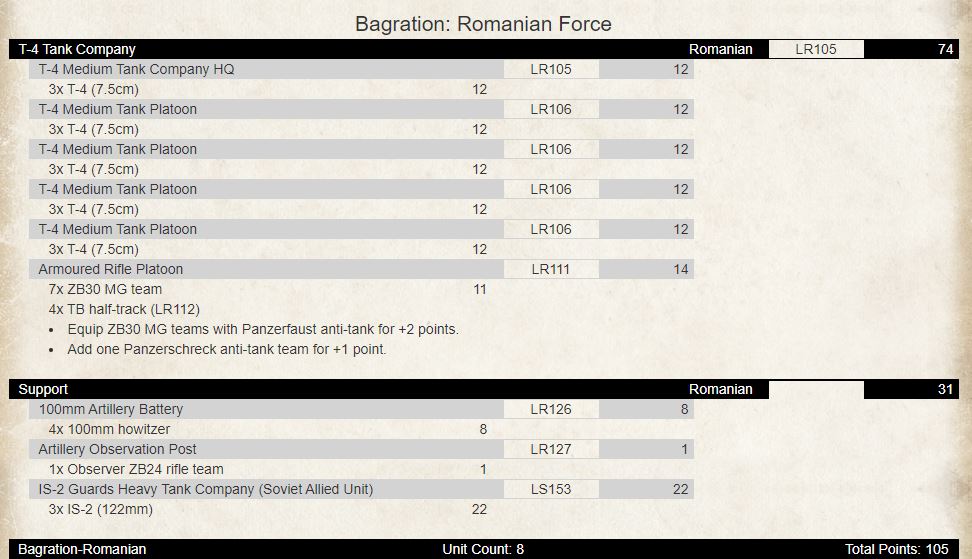
Still six platoons for the formation break and now we have the mighty allied IS-2. Fifteen Panzer IVs is not something to be sniffed at – especially if you mass them together. Either formation option is viable and allows you to choose what allied options you want to add flavour or provide high end AT.
To buy this army you need only to purchase the following for $332:
| 3 x GBX142 Panzer IV Tank Platoon (Plastic) | 150 |
| 1 x RO702 Rifle Platoon | 30 |
| 1 x GBX152 Sd Kfz 251 Transports (Plastic) | 40 |
| 4 x ISO185 Plastic Skoda 100/17 Howitzer sprue | 24 |
| 1 x RSO101 Artillery Group | 13 |
| 1 x SBX62 IS-2 Guards Heavy Tank Company (Plastic) | 50 |
| 1 x FW269 Bagration: Axis Allies | 25 |
| TOTAL | $332 |
Starting off with a T-4 formation gives you an introduction to taking a Romanian tank force. You can also look at taking a TA Assault Gun Formation as another option and take similar support choices.
 The Romanians have a great tank formation to take as a core force with a plethora of allied support or formations – either Soviet or German. If you are a Soviet or German player, consider taking a formation of T-4s as allied support – give you an extra boost with the cheapest Panzer IV in the game so far. You could take a formation of ten T-4s (HQ of one and three units of three) for 40pts. 65pts for your core Soviet or German force. You could take a Soviet Hero Motor Rifle Battalion with core infantry platoons, mortars and decoy tanks giving the high-end AT. German Armoured Panzergrenadier with infantry, mortars and panzer IV/70s. Lots of options available.
Having Soviet or German allies provides future proofed support options for the Romanians as the release timeline progresses. With IS-2 (Late), Kingtigers, Jagdpanthers and Jagdtigers still to come, you will be able to provide AT14 or higher support for your Romanian force!
If you were considering starting a Romanian force or just a formation, I hope this gives you some food for thought.
Finnish Tank Showcase
Hungarian Heavies
With Livio Tonazzo
Tiger and Panthers in Hungarian service
One of the most exciting novelties of the new book Bagration: Axis Allies undoubtedly concerns the Hungarians. They are in fact the only ones among the minor Axis powers who are able to field two of the most iconic tanks of the Second World War. We are talking of course the Tiger and the Panther.
In 1941 at the time of Operation Barbarossa, Hungary proved reluctant to go to war with the Soviet Union. Nevertheless the Hungarian troops participated in the offensive being called to cover the flanks of the German 6th Army which fought in the rubble of Stalingrad. The Hungarians tried to resist at all costs against the overwhelming Soviet offensive of Christmas 1942 and the Hungarian armoured forces were almost completely destroyed on that occasion. After the defeat and subsequent retreat the Hungarian forces settled near Novi Oskol. Here they were relegated to secondary tasks such as occupation and patrolling. At the beginning of 1944 the Hungarian desire to continue the war was falling. The Germans understood the situation perfectly and effectively occupied the country reducing Hungary to a puppet state which meant that the Hungarian army would therefore continue the war.
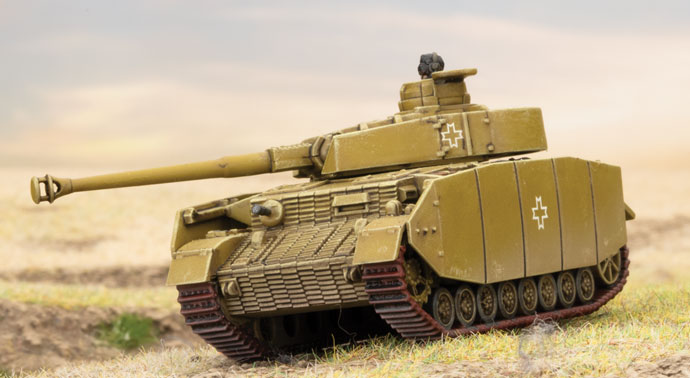
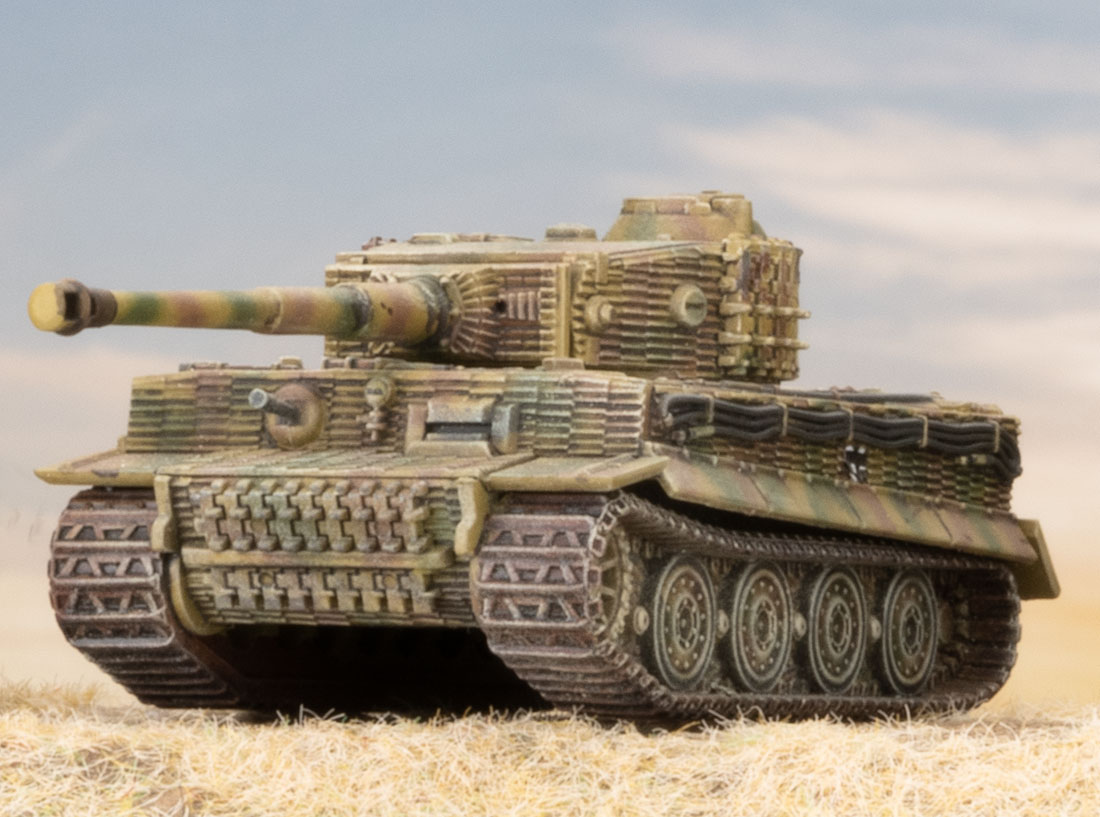
With the idea of strengthening the Hungarian armoured component (of which were somewhat outdated) so the Germans began to supply more and more tanks such as the Tiger and Panther, but also Panzer IV, Hetzer and Stug III. In May 1944 the 2nd Armoured Division received 10 Tiger I E to replace Turán tanks while it was fighting in Galicia. Two more Tigers were delivered in July and one in August. Interestingly these Tigers came from German units that had begun the process of converting to the new Tiger II heavy tank and still had German markings. Hungarian Tigers were fielded in small companies of five to six tanks under the command of Ervin Tarczay and János Vedress.
Hungarian Panthers came a little bit later than Tigers and it was August 1944, when the 2nd Armored Division received five Panther A tanks which came under the command of Ervin Tarczay’s 2nd Company. Another ten to twelve Panthers originally destined for Romania may have been redirected to the Hungarians in September following the Romanian defection to the Allies. Ultimately Tiger and Hungarian Panther are few in number, but ready to fight!
Tiger and Panther in Flames of War
Tigers and Panthers are some of the most famous tanks of World War II. Almost all players know them and have faced them on the battlefields. We will not dwell long on the profile but the clear fame surrounding these tanks still requires us to review the profile.
The Tiger can boast a truly enviable Armor. With a Front Armor value of 9 it is able to completely ignore many shots fired on the battlefield. To even hope to destroy a Tiger you need an Anti-tank value of 11 at short range! Late War however has a number of weapons capable of piercing this armour so you must still pay close attention to how to move the Tiger on the battlefield (unlike Mid War when it can run almost undisturbed very often). The Side Armor is another of the Tiger’s strong points. The value of 8 makes it exceptional in assaults as most infantry Anti-tank weapons have an Anti-tank value ranging from 10 to 11. A Side Armor of 8 also makes it not so vulnerable to flanking. Often what you are dealing with when an enemy flanks you are usually facing light tanks. It is too bad for them that not many light tanks have an anti-tank of 10 which is the minimum value needed to hope to destroy a Tiger on the sides.
The Top Armor of 2 confirms just how formidable the Tiger is in assaults. Infantry without anti-tank weapons are completely helpless and cannot hope to bail a Tiger, only to repel it.
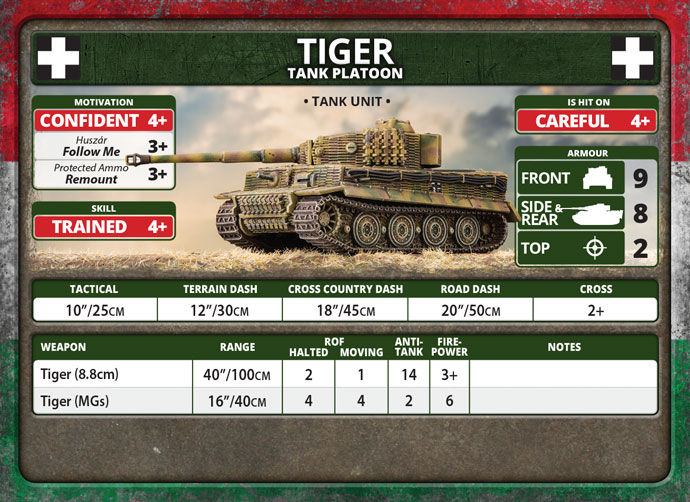
This heavy tank is as heavily armoured as it is heavily armed. It mounts a very effective 8.8cm cannon that is capable of destroying almost any tank that comes in front of it. It is anti-tank 14 and firepower 3+ can hit and destroy virtually all enemy tanks within 40 “. The rate of fire is also good (the 88 was born as an anti-aircraft gun!), Having a ROF of 2 while Halted and 1 while moving. To deal with infantry the Tiger has two machine guns, one on the hull and one coaxial with these 4 machine-gun shots which can come in handy for dealing with infantry. Despite the thick armor and the powerful cannon the Tiger is not a slow tank. The 57 tons of this tank are powered by a Maybach HL230P45 12 cylinder 60 ° V petrol engine which guarantees an excellent power-to-weight ratio. In Flames of War the Tiger can move tactically at 10 “, exactly like almost all medium tanks. As for the Dash movements, the Tiger can move 18 “on Cross-Country, 20” on road and 12 “on terrain. These are more than good values especially for a heavy tank. In addition the wide tracks guarantee the Tiger a Cross value of 2+ so the terrain is not be a problem! The cost in points is of course proportionate to such a dominating profile with most Tiger tanks costing so much that a formation will often use most of your points.
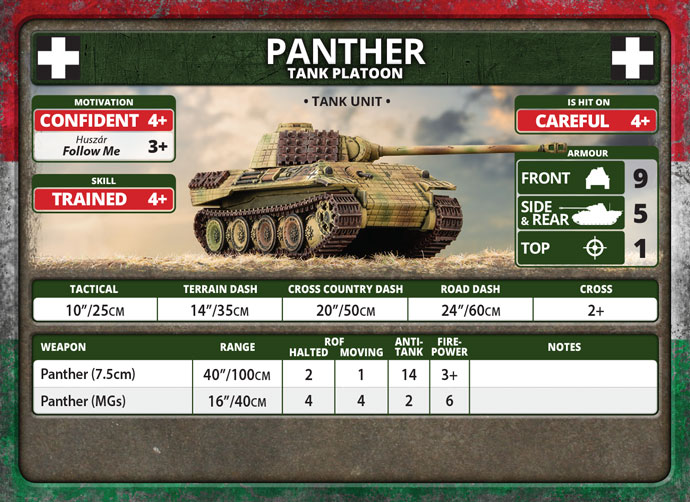
The Panther is the definitive version of the WWII German medium tank often putting to shame what the Allies would call a “medium tank”. Inspired by the Soviet T-34 and developed from 1941 it entered service in Kursk. In 1944 (and also in 1945) The Panther was still an excellent tank and able to face almost all the opposing counterparts. Although it was a medium tank, its thick armour and its inclination guaranteed it excellent protection. This is represented in Flames of War with a Front Armor of 9 which is equal to or better than other enemy heavy tanks. The Side Armor has a value of 5, better than that of other medium tanks but not exceptional. The Panther is therefore not a particularly suitable tank for assaults as it is able to be knocked out by medium anti-tank guns or even by light ones if one is particularly unlucky. The Top Armor of 1 confirms what has just been said, in a close combat the Panther has no better protection than a Panzer II. On the other hand this less protection on the sides and top which makes the Panther a lighter tank than the Tiger. Being “only” 45 tons and powered by a Maybach HL230P30 12-cylinder petrol-powered engine the Panther can move very quickly on the battlefield. Although the Tactical Speed is only 10 “, the Panther can move 20” on Cross-Country Dash, 14 “on Terrain Dash (with a Cross value of 2+) and 24” on Road Dash. The Panther is equipped with a 7.5cm high-speed cannon with a performance equal to that of the famous 88. An anti-tank value of 14 and a firepower of 4+ makes it superior to practically all enemy and capable medium tanks. to face almost all heavy tanks. Two machine guns grant them adequate protection against infantry. Again such features are not cheap with the Panther costing little less than a Tiger.
Summing up, the Tiger and Panther are two tanks that can look very similar with Front Armor values of 9 and anti-tank 14 guns. On the battlefield, however these two tanks play completely different roles. The Tiger is a heavy tank that gives its best in assaulting enemy infantry but that can also engage enemy tanks, certainly outperforming the other Allied tanks and facing heavy ones on an equal footing. The Panther, on the other hand is a particularly protected medium tank that can engage and destroy almost any tank that comes in front of it, perhaps even flanking an enemy tank thanks to their movement. It is essential not to confuse the roles or you will receive some unpleasant surprises.
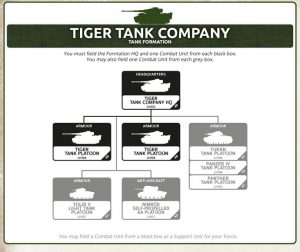
Hungarian Tiger formation
The Hungarian Tigers naturally have the same profile as the German ones and they still have the German insignia! What differentiates them are of course training and morals. The Hungarians had little time to get used to the Tiger tank and did not develop an adequate doctrine to use them. This causes their crews to be considered Trained meaning they pass the various Skill Tests with a result of 4+, so these Tigers will have less chance of using a Blitz or a Shoot & Scott. If you consider that in Late War there are many weapons capable of piercing its excellent armour this disadvantage must be taken into account. Positioning the Tigers correctly is vital in order not to see them burn in short order. Their Careful 4+ hit rating should still offer some protection but don’t rely too heavily on it. Morale can be considered adequate thanks to the Confident rating, which allows you to pass the various tests with a result of 4+. In addition the Tiger’s Protected Ammo rule allows for a Remount value of 3+ which really helps a lot. Hungarians do not have the Third Reich rule but instead have their own national Huszar rule. It allows him to pass a Follow Me test with a result of 3+, making the Tigers faster. Overall the Hungarian Tiger is less skilled than the German one and the cost represents this difference with a slight discount.
 The HQ of a Tiger Tank Formation consists of a single tank. Tiger platoons consist of two or three Tigers. Personally, I always recommend deploying 3 as missing a Last Stand could make you lose about 1/3 of your army! It is possible to deploy two Tiger platoons in addition to the HQ platoon for a total of 7 Tigers, a nice challenge for any enemy Force. In addition to the Tiger platoons, there are 3 other units that can be deployed in the formation. The first slot is the one reserved for medium tanks and it is possible to choose between Turan, Panzer IV and Panther! Using a platoon of medium tanks is a choice that I always recommend. They are useful for handling light tanks or armoured cars which when being deployed in large numbers can gnaw the Formation around the Tigers. Thier numbers supplement your Tigers allowing you to fire more shots and more targets. Among the three options I tend to exclude the Panthers as they are more or less like the Tigers, leaving little room for other units. Sure a mixed formation of Tigers and Panthers is nice but you will have very few tanks and this could be a problem. The Turan is a medium tank of national production. It entered service in 1943 and was still in service in 1944 when it could be said to be almost obsolete. The 75mm version you can field can represent an economic choice to deploy a medium tank and save a few points. The worse courage and the less powerful gun (24 “, AT9, fp3 +, heat) compared to the Panzer IV guarantees it a significant discount. It is undoubtedly an alternative that must at least be considered. Another slot is the one reserved for Light tanks. Here too you can deploy a light tank of Toldi II. Lightly armoured and armed it should still find space in the formation thanks to the Scout and Spearhead rules that will give the formation more mobility. They have the advantage of being in the formation (making it more difficult to break the formation) as well as being able to manage enemy armoured cars without too many problems, especially in the Toldi IIa version which can boast a good armor and a good anti-tank gun 7. The choice between Toldi II and Toldi IIa depends on how many points you have available since the armour comes at a cost.
Last but not the least we have the anti-aircraft slot. The swedish desegned Landsverk, called Nimrod in Hungarian service has proving to be a valuable weapon to limit Soviet air supremacy. With its 40mm gun the Nimrod is effective enough for other roles as well. An anti-tank ranting of 7 and firepower 4+ are still respectable values especially with a rate of fire of 3 when stationary and 2 in motion. Considering that Tigers have a Top Armor value of 2 this is a useful but not essential choice. Sure they got more lethal against their missiles in Late War, but the point cost isn’t exactly low.
As we have seen the Hungarian Tiger Tank formation is varied and very often it will absorb a good part of the points at your disposal to complete.
Hungarian Panther Formation
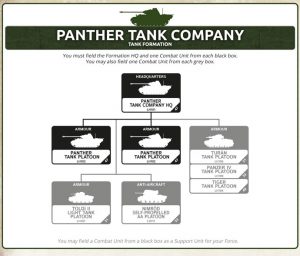 Much of what has been said about the Tiger also applies to the Panther. Compared to its German counterpart it is less trained and for this reason it will pass the various Skill tests with a result of 4+. Considering that the Side Armor and Top Armor are more fragile than those of the Tiger, carefully positioning the tank on the battlefield is even more important. The flanks are really dangerous since unlike the Tiger, the Panther does not have the Protected Ammo rule, so if Bailed, they can only Remount on a roll of 4+. The Panther, despite the 9’s Front Armor, is a bit of a Cinderella that needs to be treated with care! The formation is identical to that of the Tigers. The HQ platoon is made up of a single Panther while the Panther platoon can be made up of 2 or 3 Panthers. Similarly the formation must consist of the HQ platoon and two Panther platoons. The recon slot and the anti-aircraft slot are exactly the same. It is worth noting, however, that Nimrods are much more important in a Panther formation than in a Tiger formation owing to it’s lower side and top armour. The Panther is not a cheap tank, even the Hungarian one costs about ten points so it is essential to protect it as much as possible from threats from above.
The slot reserved for medium tanks has an important difference in which can choose between Turan, Panzer IV or Tiger.. However, what we have already said eariler with the Tiger formation holds much the same. If you want to field both Tiger and Panther you probably won’t get any points for anything else. The similarity of the formations is striking, despite the fact that the tanks in question are profoundly different. If you build either of the Tiger or Panther Formation however you will have very different needs in terms of support.
Conclusion
We talked in depth about the Panther and Tiger formations. Don’t forget, that both tanks are Compulsory Units for their respective formations. So you don’t have to field an entire formation to field Tigers or Panthers. They can serve as excellent support for other formations Such as Hungarian hussars supported by 3 mighty Tigers? Or the fearsome Zrinyi supported by 3 formidable Panthers? Some formations such as those of Panzer IV and Turan can even field Tigers and/or Panthers within their formations in non-compulsory slots. Usually including them in a medium tank formation reinforces the formation and is a good choice. Infantry can also benefit from choosing Tiger and Panther as support. Having about 30 points in a single platoon means that you have almost all the Force in the field already when the first reserve that arrives which can really change the course of a battle. Tigers are particularly suited to being deployed with infantry because they allow them to better attack other infantry. The Panthers, on the other hand, give their best in supporting other tanks, especially the lighter ones given the effectiveness in dealing with medium tanks. The possibilities are truly endless, you will really have a lot of fun with Hungarian heavies.
Exploring the Bagration Hungarian Infantry Formations
With John Lee
With the release of Bagration: Axis Allies, each nation gets one infantry formation in the book. Now you must be thinking what about the rest of them. Well, they are in the command cards. The premise is that you take the core infantry formation and then apply the command cards to create the formation you want to play. For the Hungarians, there are ten infantry formations (well nine and one cavalry but who is counting) in total you can take. So, let us explore the core infantry formation (Rifle) first then look at the nine command card options – Pioneer, Assault Pioneer, Fresh Division, Motorised Rifle, Border Guard, Volunteer Rifle, Scout, Huszar Squadron, Parachute.
The Rifle Formation is comprised of the following:
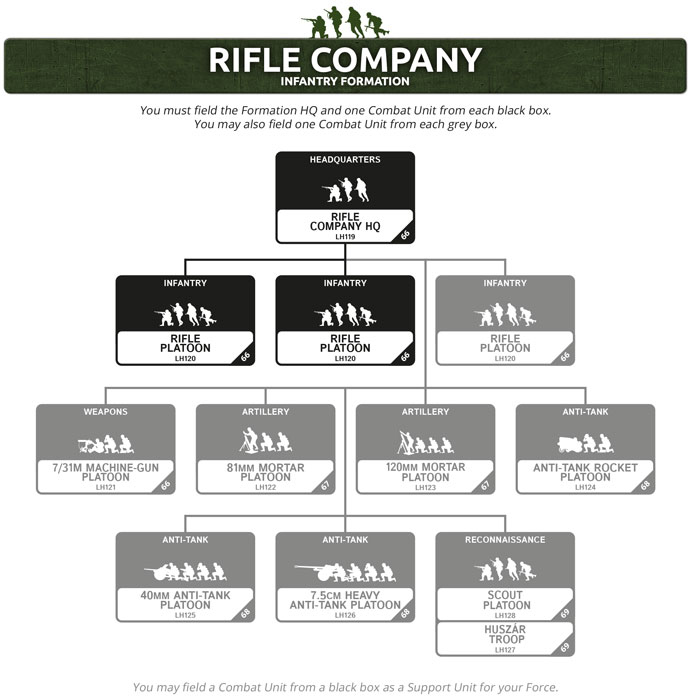
The Hungarian infantry are rated Confident Careful Trained and have the special rule “Defend the Homeland” which gives each unit a 3+ Last Stand. The HQ platoon comprises of two 39M SMG teams for 2pts. There are no addons such as panzerfausts. This is the basic HQ.
With the rifle platoons, you have several options to optimise how you want the makeup of these platoons to look. Seven M31 MG and 95M rifle teams for 6pts or ten teams for 10pts. You can add Panzerfausts for +2pts to the platoon and is a no brainer for me here regardless of team type or size. You can also beef up the platoons by adding a 7/31M HMG team for 1pt or a Panzerschreck team for +1pt. I like to take the HMG team if I have the points. If the platoon gets pinned, then you need that extra dice defending in assaults. The Panzerschreck, in my mind is totally worth it if you have the points. Adds a second AT option for defending assaults or jumping out and having a go at a tank that wanders too close. Makes most tanks think twice about assaulting facing two AT11/12 teams.

The next platoon to look at is the 7/31M Machine-Gun platoon where you can have three of these teams for 3pts. Something to consider taking, especially if you do not take them in the infantry platoons. Adds another platoon for the formation count. I do not always take these but can be useful to bolster defending an objective. You can also take the Machine-Gun Nests command card for 2pts. This will allow you to place you HMGs across the table in your deployment zone as independent nests. No longer counts toward your formation anymore but that depends on your playstyle and how you want to use them.
Up next are the mortar platoons, starting with the 81mm Mortar Platoon – I think one of the best buys in the formation with two for 3pts or four for 6pts. This is an absolute no brainer – range of 40” and can fire a smoke bombardment. This is one of my core units for this formation.
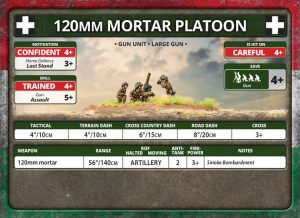 The 120mm Mortar Platoon is also a great option – two for 4pts or four for 8pts. Another no brainer for me with a range of 56”, AT2 and FP3+ and can also fire a smoke bombardment! Another core one for me.
Next up are the Anti-Tank platoons. The first up is something unique to the Hungarians – a home grown anti-tank rocket launcher called 44M Buzoganyveto. It is an AT14 FP5+ close defence weapon with a range out to 12”. Take two for 5pts or three for 8pts. Absolute no brainer here for the points. Put these with one of the infantry platoons defending an objective against any tanks freeing up other assets to defend the other or go on the offensive. The 40mm Anti-tank Platoon has three guns for 7pts. Useful AT7 FP4+ with a range out to 24” or firing Kerngranate has AT12 FP5+ out to 12”. The 7.5cm Anti-tank Platoon has two guns for 7pts or three for 11pts. AT12 FP3+ with a range out to 32”. Great little units to provide some decent AT support for defending assaults or keep your opponent’s armoured elements honest and provide another unit for the formation break.
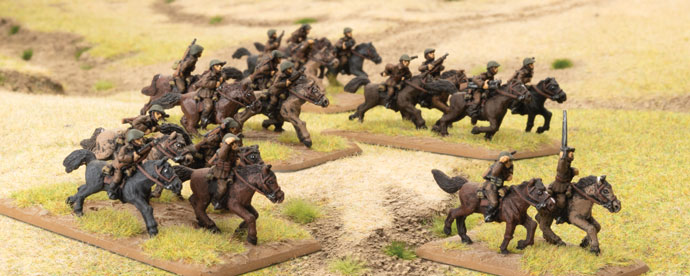
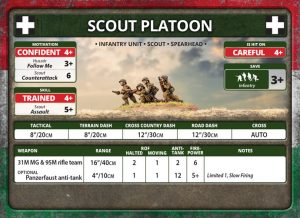 Last up is the recon element of the formation. We have two options here to choose from. First is the Scout Platoon. Essentially the same as an infantry platoon except smaller and has the Scout and Spearhead attributes. You can take five M31 MG and 95M rifle teams for 5pts or seven for 8pts. Add another 2pts to include panzerfausts. The Huszar Troop is made up of five M31 MG and 95M rifle teams for 6pts or seven teams for 9pts. Add panzerfaust for +2pts. These are mounted on horses and are descendants of the famous Hussars. They have the spearhead attribute and are also veteran instead of trained. Take one of these of recon elements to spearhead your force into enemy territory.
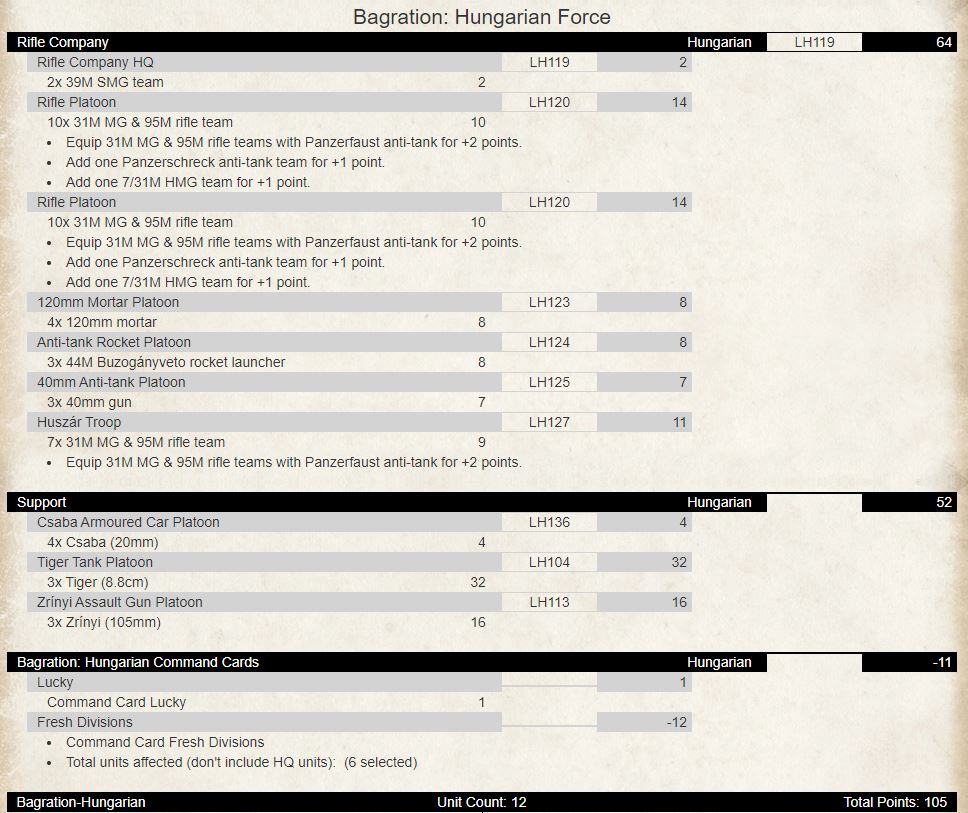
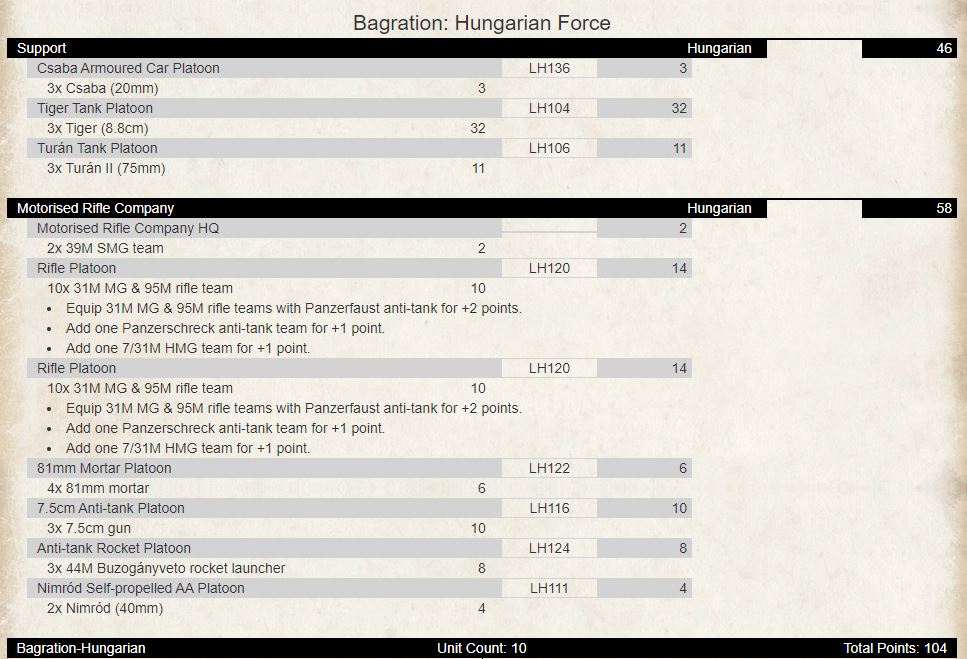
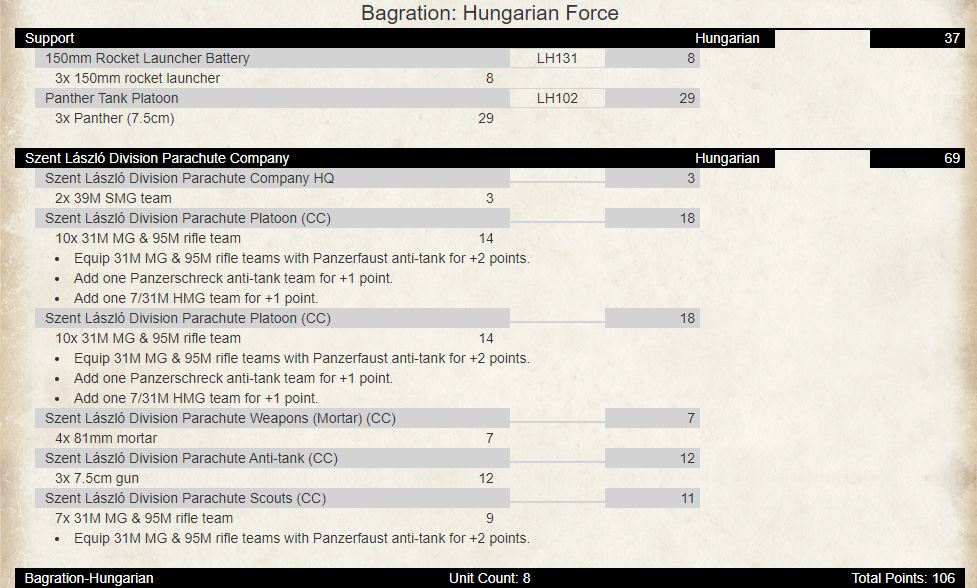
Unlike the Finns and Romanians, the Hungarians do have access to AT14 with their home-grown anti-tank rockets as well as their own Tigers and Panthers. So, we do not need to rely on the German allies for this although there would be cases to add some German units or formations for flavour. Let us have a look at how a list might look at 105pts:
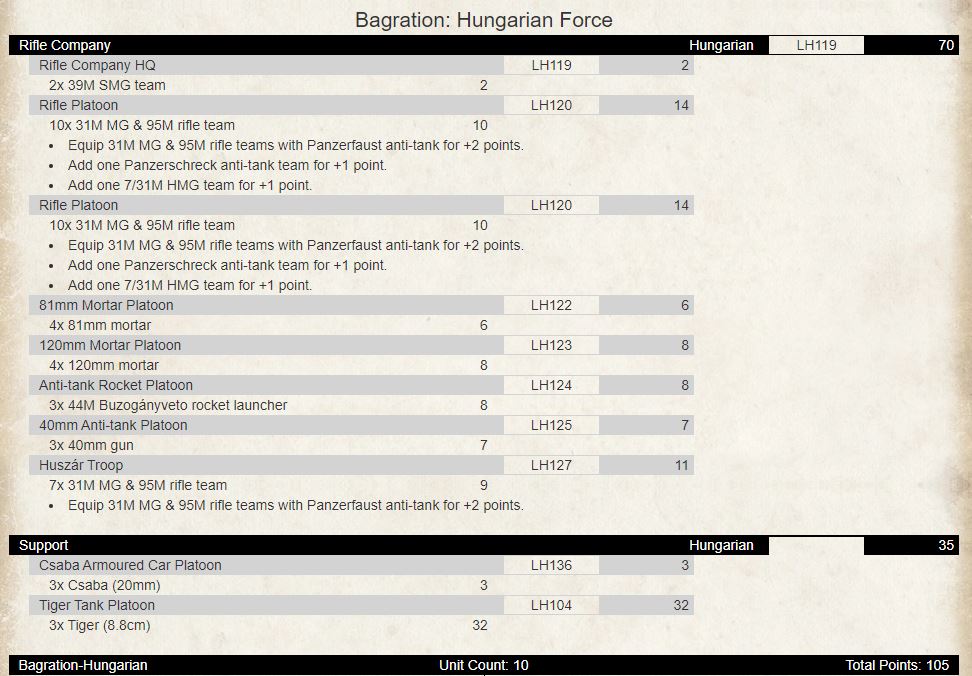
Eight units for the formation break. Twelve teams in the infantry platoons making it eight hits for a pin. There are two platoons to defend objectives with close defence AT units in support. Two spearhead units with the Huszars and Csabas to launch your attack from. Tigers for high end AT and assaulting. Two mortar batteries for your template options. If you wanted to get some other options in – eg another tank platoon or assault guns then you could have a list like this:
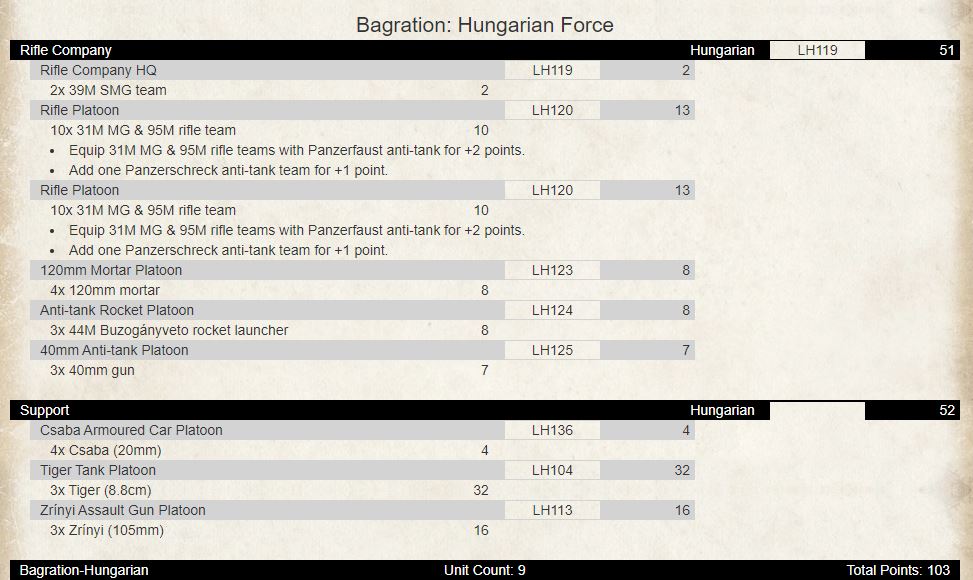
Dropping the Huszar Troop and the 81mm mortars allows us to take the Zrinyi Assault Gun Battery. Still have two templates with more amour and we still have spearhead and the Tigers. Six platoons for the formation break.
Now onto the nine command card formations. First up is the Pioneer Company and is comprised of the following:
- 1 Infantry Company HQ
- 2-3 Pioneer Platoon
The platoons have the same characteristics as the core Rifle Formation. The difference is that you pay an additional 1pt for the formation. The HQ platoon and Pioneer platoons can dig in on a 2+ and cross minefields on a 2+. You also pay an extra 1pt for each Pioneer Platoon and you can swap out up to two teams for flamethrowers for +1pt each. There are no other units in the formation, so if you take it, you will probably want to take three platoons and take some heavy armour, and some artillery.
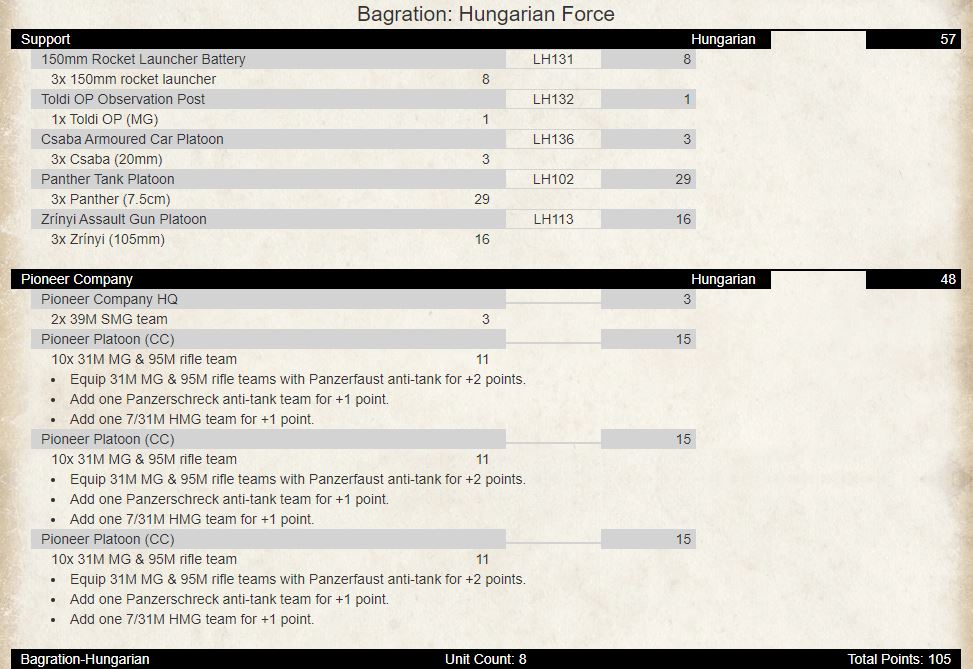
You have a maxed-out formation and can leave two platoons defending objectives if required. The Panthers for heavy AT work, two artillery templates, Csaba Armoured Cars for spearhead.
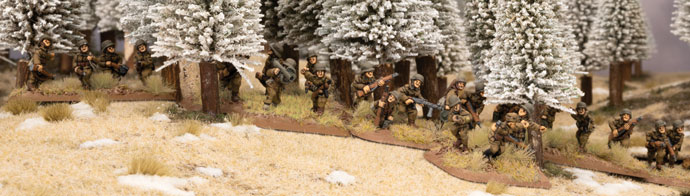
The next one up is the Assault Pioneer Company and is comprised of the following:
- 1 Infantry Company HQ
- 2-3 Assault Pioneer Platoon
The platoons have the same characteristics as the core Rifle Formation. Like the Pioneer Formation above, the difference is that you pay an additional 5pts for the formation. The units are now Veteran instead of Trained. The HQ platoon and Pioneer platoons can dig in on a 2+ and cross minefields on a 2+. You also pay an extra 2pts for each Pioneer Platoon and you can swap out up to two teams for flamethrowers for +1pt each. There are no other units in the formation, so if you take it, you will probably want to take three platoons and take some heavy armour, and some artillery.
You have a maxed-out formation and can leave two platoons defending objectives if required. The Tigers for heavy AT work, one mobile artillery template, Csaba Armoured Cars for spearhead.
The next formation is called Fresh Divisions. This card downgrades all units except the HQ to Confident Aggressive Green for -2pts per platoon. Also, all gun and heavy weapons teams now assault on 6. This card allows you to pack more into your force – probably add another armoured platoon, anti-tank guns or artillery battery. Taking the same units as the first list, lets see what else we can add:
So, I dropped the 81mm mortar platoon as well as the downgraded units to add in a Zrinyi Platoon. Seven units for the formation break. Doubles as second template and anti-tank platoon. This force will not be attacking much but you can still defend, and you have mobile elements to cause some havoc.
Next up is the Volunteer Rifle Company and comprises the following:
- 1 Company HQ
- 2-3 Volunteer Rifle Platoon
- 0-1 7/31M Machine-Gun Platoon
- 0-1 7.5cm Anti-tank Platoon
The formation costs 2pts and includes the HQ. The Volunteer Rifle Platoons cost -4pts for ten team or -2pts for seven teams. Both the HQ and Volunteer Rifle Platoons are rated as Fearless Aggressive Green. They do get a better Last Stand and Tactics of 4+ though. Let us see what a list could look like:
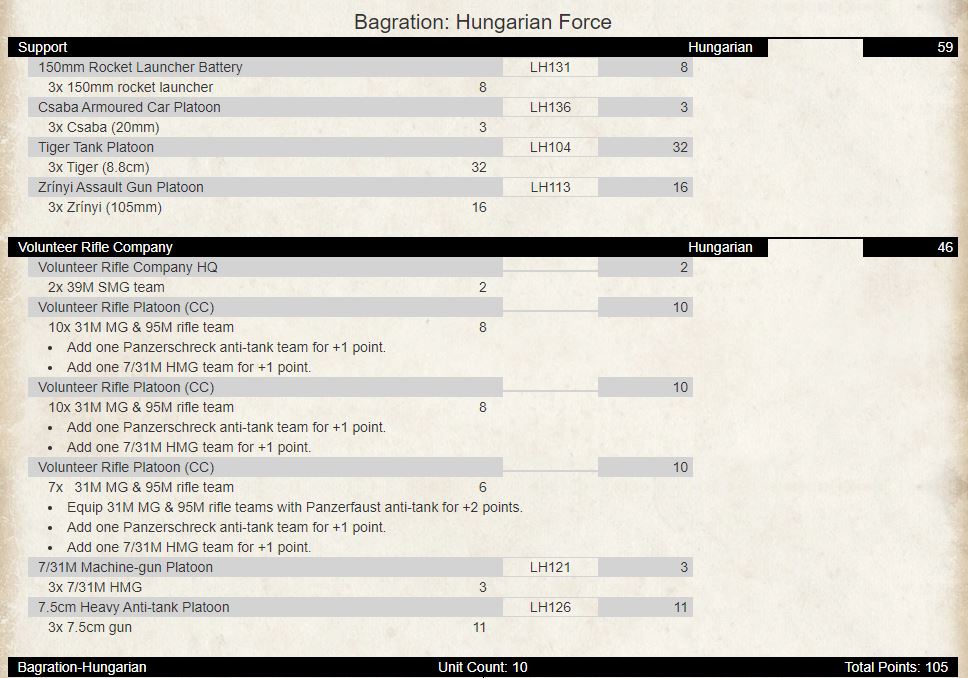
 Maxed out the formation with six units. Fearless Aggressive troops use to your advantage with twelve team platoons to absorb eight hits and get those assaults in using the Csabas to spearhead in with the Tigers and artillery in support. Leave a platoon of infantry and HMGs on defence with the 7.5cm AT guns.
Border Guards is the next formation – comprised of the following:
- 1 Rifle Company HQ
- 2-3 Border Guard Platoon
- 0-2 7/31M Machine-Gun Platoon
- 0-1 81mm Mortar Platoon
- 0-1 40mm Anti-tank Platoon
- 0-1 75mm Mountain Battery
The differences here is that the Border Guard Platoons do not take panzerfausts or panzershrecks. You can replace up to one team with a flamethrower for +1pt and add a 20mm Anti-tank Rifle team for +1pt. The other unique platoon here is the 75mm Mountain battery. This card allows you to change a 100mm Gun battery for 1pt with a range of 64” AT2 FP4+ template or AT5 FP3+ with a range of 16” for direct fire. Advantages are also that it now has a 4” tactical move and a 3+ cross check. How could this look?
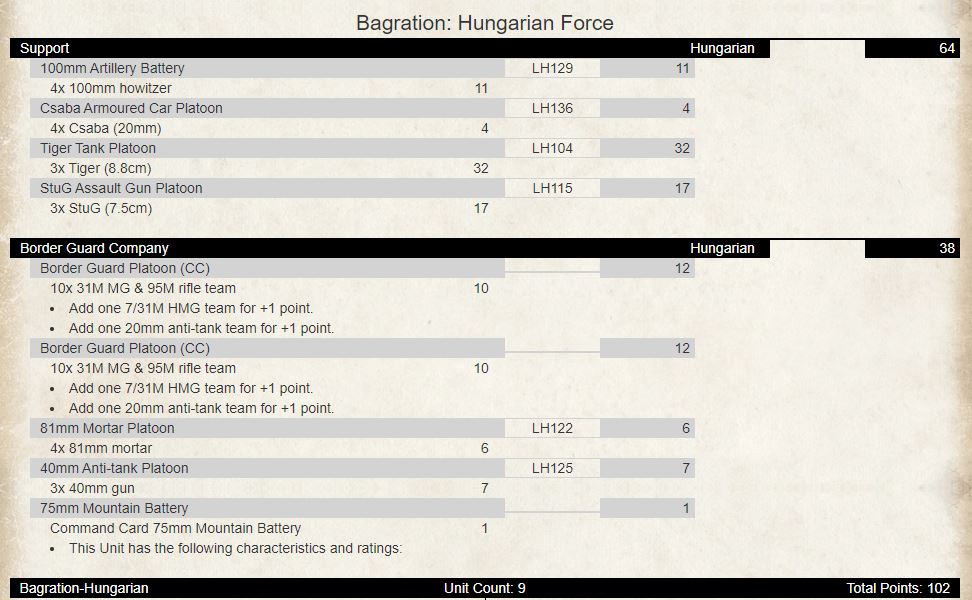
Six units for the formation break. Two templates in the formation. High end AT to deal with heavy armour along with some AT11 to deal with light and medium armour. Spearhead to complement the list. Infantry light on anti-tank defence though – so need to be careful there.
Next is the Motorised Rifle Formation, which is comprised of the following:
- 1 Rifle Company HQ
- 2-3 Rifle Platoon
- 0-1 7/31M Machine-Gun Platoon
- 0-1 81mm Mortar Platoon
- 0-1 7.5cm Anti-tank Platoon
- 0-1 Anti-Tank Rocket Platoon
- 0-1 Scout Platoon
- 0-1 Nimrod Self-propelled AA Platoon
Essentially the same elements as the core rifle formation but with a Nimrod Self-propelled AA Platoon. This unit is two Nimrods for 4pts. Mounting the 40mm Bofors gives you AT7 FP4+ with FA1 SA1 TA0 and 4+ cross check. They also lose the Home Defence rule but gain Huszar which allows you to roll a 3+ for a Follow Me.
Seven units for the formation break. Only one template unit but another tank platoon to deal with light and medium armour. You could switch out the Turan IIs, switch out the Tigers for Panthers, and drop the two HMGs to get a Zrinyi Platoon for dual purpose artillery template and light medium AT work.
The Scout Company Formation is like the Motorised Rifle Company. It is comprised of the following:
- 1 Rifle Company HQ
- 2-3 Scout Platoon
- 0-1 7/31M Machine-Gun Platoon
- 0-1 81mm Mortar Platoon
- 0-1 7.5cm Anti-tank Platoon
- 0-1 Anti-Tank Rocket Platoon
- 0-1 Huszar Troop
- 0-1 Csaba Armoured Car Platoon
The main difference here is the addition of the Csaba Armoured Car Platoon instead of the Nimrod platoon. Here is an example list:
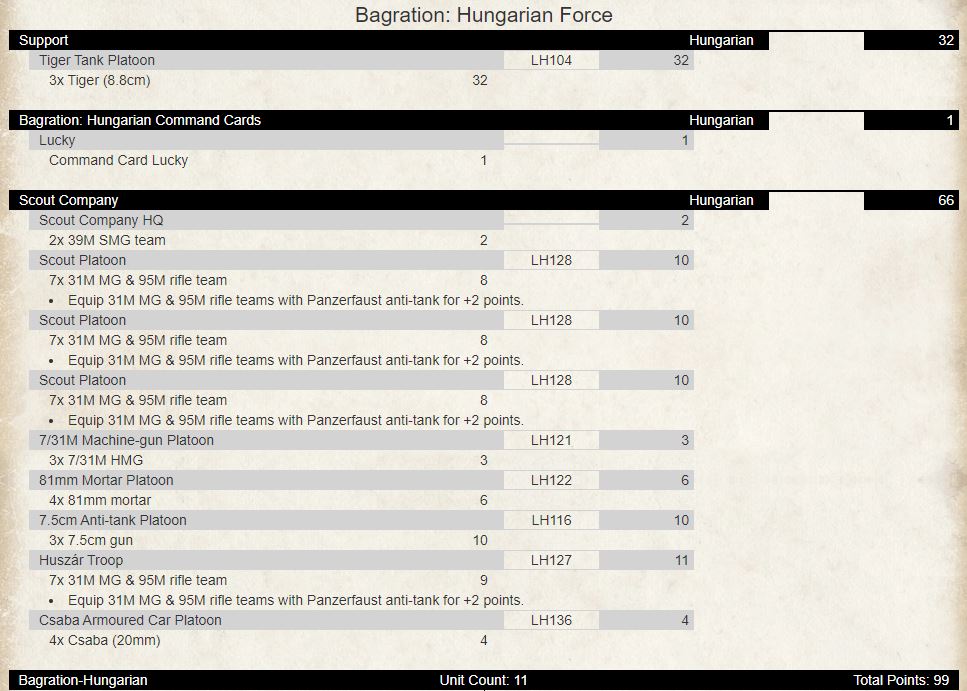
Nine units for the formation break and the Csaba Armoured Car Platoon is now part of the formation. You have five spearhead units in the formation. Only one template. If you want two templates, then remove a scout platoon or Huszar troop.
Second to last formation now and one of the most exciting is the Huszar Squadron! The units that make up this formation are:
- 1 Squadron HQ
- 2-3 Huszar Troop
- 0-1 7/31M Machine-Gun Platoon
- 0-1 81mm Mortar Platoon
- 0-1 40mm Anti-tank Platoon
- 0-1 75mm Huszar Battery
The cavalry units lose Home Defence and gain Huszar rule where you roll a 3+ for Follow Me. The formation includes a command card artillery battery called 75mm Huszar Battery. This card allows you to change a 100mm Gun battery for +1pt for two guns or +2pts for four guns with a range of 64” AT2 FP4+ template or AT5 FP3+ with a range of 16” for direct fire. Advantages are also that it now has a 4” tactical move and a 3+ cross check. Oh, and they now have Veteran skill. How could this look?
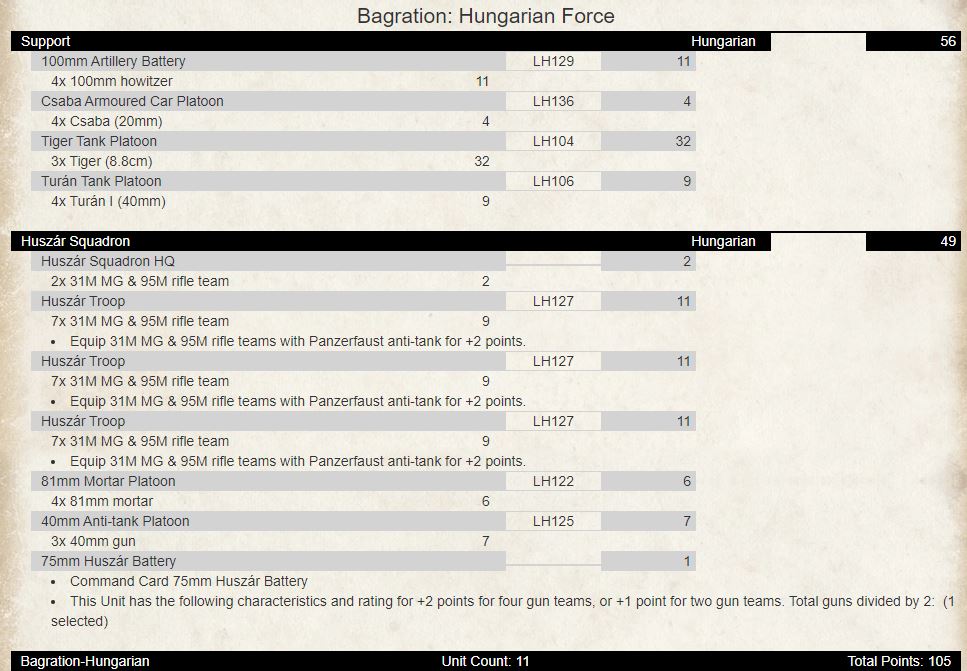
Seven units for formation break and you have three Huszar troops in the formation with Armoured Cars to spearhead them into assault with the Tigers and Turans providing support. Two templates to help pin enemy infantry and gun teams.
Alright, the final formation. The Parachute Company. The best of the best and saved to last. This Formation is comprised of the following:
- 1 Rifle Company HQ
- 2-3 Parachute Platoon
- 0-1 Parachute 7/31M Machine-Gun Platoon
- 0-1 Parachute 81mm Mortar Platoon
- 0-1 Parachute 7.5cm Anti-tank Platoon
- 0-1 Parachute Scout Platoon
The cream of the crop in Hungarian Armed Forces. They are Fearless Careful Veteran and gives your force some elite infantry that you can take on other elite forces on an equal footing. The formation loses Home Defence, but they are now Fearless. The HQ is 3pts for two teams. Parachute platoons cost an additional 4pts per platoon. The remaining four optional platoons, machine guns, mortars, 7.5cm anti-tank guns and scouts cost an additional 1pt per unit. The Scouts also now assault on 4+.
So, let us see what we could take in the force now with these twelve team strong platoons:
Six Fearless Careful Veteran Platoons for the formation break. Two templates to assist with pinning the enemy whilst the Scouts spearhead in the Parachute platoons. You could tweak the list to get the third Parachute platoon in there by removing the Panthers and on Turans instead.
So, there you have it – ten infantry formation options to choose from. Hungarian Infantry have some uniqueness about them with Cavalry, Recon, Parachute that you can exploit in your games. I hope this has been of some help. Happy List Building!
Hungarian Zrínyi Assault Gun Battery – Rohamágyús Üteg
With Adam Brooker
When I think of Hungarians AFVs in Flames of War I think of the Zrínyi Assault Gun!! For me this is the quintessential Hungarian WW2 vehicle, and is without a doubt it’s most successful locally produced design. It came about because of the great success of the German Assault gun design, the StuG III. The Hungarians originally wanted to purchase these off the Germans in 1942 so they could have some sort of modern vehicle capable to combat the increasingly modern soviet designs they were facing like the T-34 of KV-1 tank on the Eastern Front, with an obsolete vehicle like the Czech designed T-38. But the Germans refused, probably rightly so, as they could not even keep up production for their own needs, let alone the additional output that would be required to equip an ally. The Germans did eventually provide them with some 50 StuG IV assault guns, but only when the Soviets were pushing at the Hungarian borders in 1944, and the Hungarians had very little else to stop them with, but their experienced crews did put them to good use.
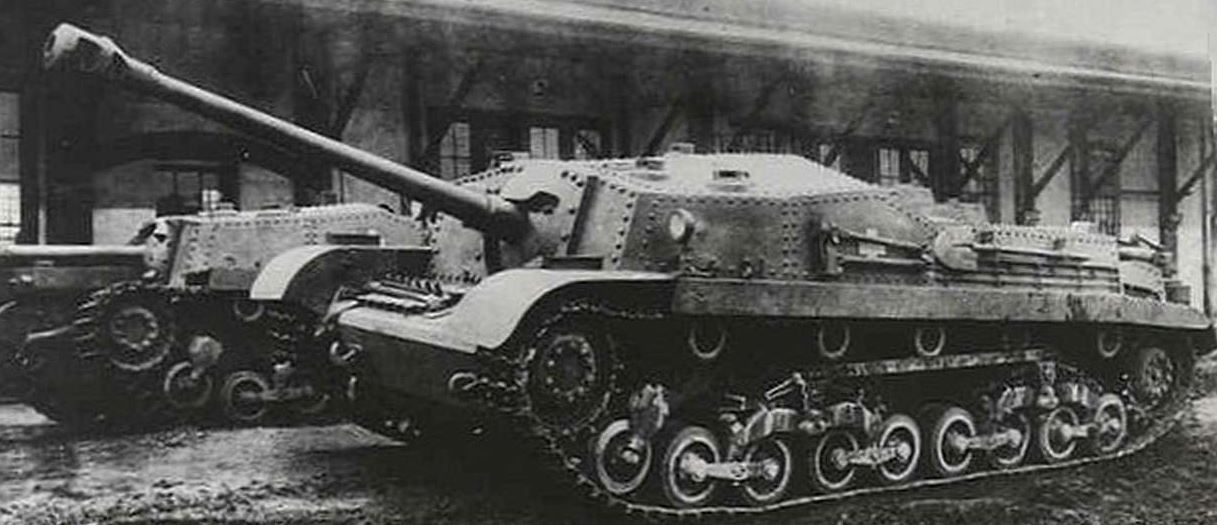
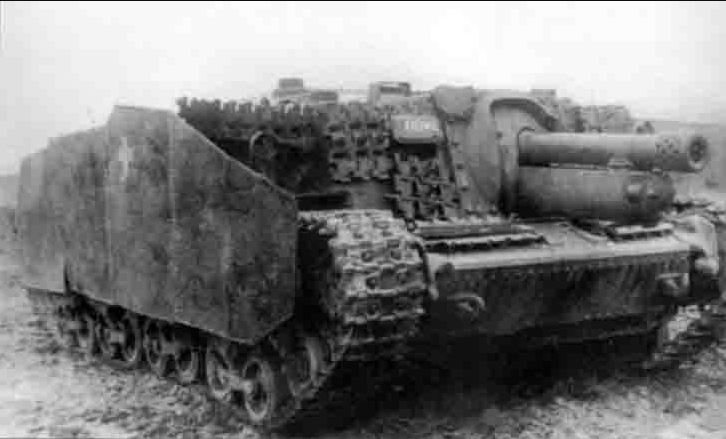
The Zrínyi was based on the Hungarian designed medium tank the 40M Turan, which was a decent tank in of itself, but the design process was initially started in 1940, and the quick advancement and up-gunning of tanks in this period meant that it was obsolete when it was produced in numbers. The Turan I had a 40mm gun, which was upgraded to a short 75mm gun in the Turan II by 1943, which was an improvement, but the short 75mm on the Turan II could only penetrate the T-34 if within 500m. A Turan III prototype with a long 75mm gun was designed and made in 1944, but it no longer exists except in photos, it is possible it did actually fight in the defence of Budapest, but there are no records of this, and nothing remains, so it is lost in the fires of battle.
Two variants were required by the Hungarian army, a 75mm tank destroyer variant, and a 105mm infantry assault gun version. The Zrínyi I was the 75mm assault gun variant that would act in a similar role to the StuG III, so an anti-tank focused assault gun, rather than a dedicated infantry assault gun the StuG was originally designed to be. The prototype was armed with the Hungarian produced 75mm 43M tank gun, only two were produced, one put in the single Turan III prototype, and the other in the single Zrínyi I prototype. This would have been of similar performance to the German Pak 40 7.5cm KwK anti-tank gun, but was a different gun, locally produced by Hungary. The Zrínyi I prototype was tested and accepted for production, but none were made for a few reasons, a lack of materials (main gun), the US flattened the Manfréd Weiss factory meant to produce them in a July 1944 bombing run, and when the Germans occupied Hungary in May 1944 they stopped all unnecessary Hungarian tank production, and only allowed spare parts to be made for the vehicles they currently had in service. Like the Turan III, it has been said anecdotally that this also saw combat in the Siege of Budapest in October 1944, but there are no official records, and no vehicle left to see, so it is more than likely it was destroyed in the fighting around Budapest.
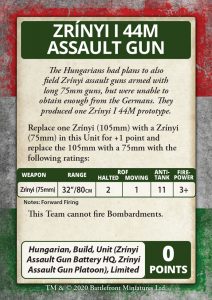
But the good news here is that you can upgrade one of your Zrínyi assault guns in your force using the Zrínyi I 44M command card, either from a platoon or the HQ vehicle. I personally recommend upgrading the HQ vehicle, as the Zrínyi I 44M can no longer bombard, but it does have an extra 6” range on the 105mm armed Zrínyi II, and an extra AT, with reduced firepower of 3+. I think this is an excellent little hobby project as a relatively easy conversion, and also adds a bit of flavour (and AT) to the unit, to hopefully give the red hordes a bloody nose. It’s interesting to think how many more Soviet tanks the Hungarian assault gun batteries would have knocked out if they had of acquired enough 75mm guns to make this design feasible. They certainly knocked out a lot with the 105mm gun the Zrínyi II was armed with, they would have knocked out even more, at a greater range, with most likely less casualties with the long 75mm gun.
The other infantry support variant, the Zrínyi II 43M, used the same modified Turan medium tank chassis, but was armed with the locally produced 105mm MAVAG 40/43M Howitzer. This gun was similar to the 10.5cm leFH 18 howitzer that is found on the German StuH III assault guns, with a comparable shell weight and muzzle velocity. This variant was also tested and approved for production in mid 1943, and because there was locally made guns available, by July 1944 only 63 Zrínyi II were produced, and started to be distributed to the waiting Hungarian Assault Gun Battalions (Rohamtüzér Osztály).
The Zrínyi II had a rate of fire of about 5 to 6 rounds per minute, this was due to the two part ammunition that every howitzer armed cannon fired. During development the test crews suggested changing this to fixed ammunition, to increase the rate of fire, and this was approved, but was never implemented, the same happened with the AA machinegun that was supposed to be mounted on the roof. Each Zrínyi II carried 52 rounds of ammunition, 30 HE frag round, 16 HEAT rounds, and 6 smoke rounds, but crews found with battlefield experience they could carry an additional 30 rounds if they reduced other equipment internally.
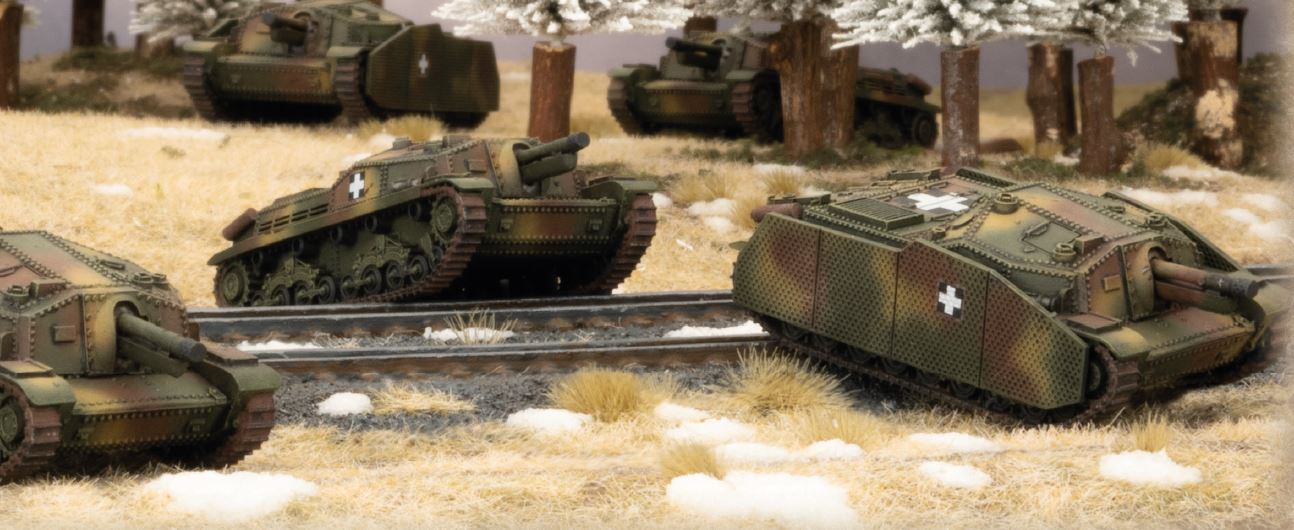
As far as close support weapons, they had one co-axial machine gun, and the crew had multiple personal weapons, one light machine gun, three sub-machine guns, eight hand grenades, and a flare pistol. They also tried to get extra weapons, so crews would often ‘acquire’ extra German light machineguns and Panzerfausts for close actions. It also had a form of side skirts called ‘Thoma side skirts’ which were lighter wire mesh side skirts that still deflected the anti-tank rifles rounds they were initially designed to stop, causing them to tumble when they strike the wire. So this is the unique side skirt design you see on the wonderful Battlefront model.
The Assault gun was painted either in a plain olive green with the late war Hungarian cross on the side, or a Hungarian 3-tone, of Olive Green, Khaki and a red-brown. Either would be suitable depending on your preference, but I think the plain olive green is an earlier paint scheme and that the 3-tone was adopted more in mid to late 1944 onwards.
It should be noted that due to production difficulties, material shortages and bombing by the Allies, vehicle production was slow, with only 5 or 6 assault guns produced a month. The same Manfréd Weiss factory that was levelled to the ground in July 1944 and halted the production of the Zrínyi I, also produced the Zrínyi II. From the hulls trapped under rubble and other parts stored in nearby warehouses, another 9 or 10 were assembled by November 1944, making around 72 vehicles in total. I have heard anecdotally that Zrínyi II, were still slowly being produced and repaired by the Manfréd Weiss during the Siege of Budapest, much like the T-34 factory in during the Siege of Stalingrad from firsthand accounts.
An Assault Gun Battalion (Rohamtüzér Osztály) was originally planned to have 31 vehicles, the Battalion Commanders assault gun, and 3 Batteries (Rohamágyús Üteg) of 10 Assault Guns (one company commander vehicle, and 3 troops of three assault guns), also the first 2 Batteries were planned to have the 75mm Zrínyi I, with the third Battery using the 105mm Zrínyi II infantry support variant. But this was rationalised to all Battalions using the 105mm Zrínyi II, as they felt it could do just as good of a job as the 75mm Zrínyi I, and they also had no choice, as they could not produce any 75mm Zrínyi I anyway.
Due to a lack of sufficient 105mm Zrínyi II produced, some Assault Gun Battalions were only partially equipped with 105mm Zrínyi II, with 50 German StuG IV finally given over to the Hungarians in late 1944 to fill out some of the Battalions, others were equipped with the Czech produced Hetzer Assault guns based off a converted Panzer 38t chassis, or a mix thereof. Some Battalions also had the German produced 7.5cm Pak 40 anti-tank guns initially, instead of assault guns, when they started to run out of vehicles, or even Turán II or Toldi II tanks. When the units lost vehicles and had no replacements, the crew often fought on foot similar to German panzergrenadiers, and were very effective from reports, they seemed to be very motivated, often playing hide and seek with Soviet T-34s and Panzerfausts…
There were 8 Assault Gun Battalions in total, numbered the 1st, 7th, 10th, 13th, 16th, 20th, 24th and 25th. Only the 1st and 10th Battalions received their full complement of 31 Zrínyi II, and the 20th only got one Battery of 10. The 7th Battalion received 31 StuG III, and the rest received the Hetzer, or as noted before some 7.5cm Pak 40 anti-tank guns, or Turan II’s or Toldi II’s. There is some excellent information about each Battalion specifically in the Bagration Axis Allies book, and it also expands on some of the brave assault gun commanders and famous actions, that you will see represented by Command Cards as warriors.
When Budapest was under siege in late 1944, many Assault Gun Battalions already ravaged by advancing Soviet forces, amalgamated into Group Billnitzer, commanded by General Erno Billnitzer or ‘Uncle Bill’, this was made up of 2000 infantry, around 30 assault guns from the 1st, 7th and 10th Battalions, as well as parts of the 13th, 16th and 25th Battalions. This contained Zrínyi II, StuG III, Hetzers, as well as 7.5cm Pak 40s, and dismounted assault gun crews, they fought hard, stopping many Soviet assaults on the surrounding suburbs, and as noted above was reinforced by new Zrínyi II produced in the Manfréd Weiss while the Siege was in progress. They eventually lost all of the assault guns, but held back the Soviet forces for 50 days, before finally breaking out before the city was encircled.
In game the Zrínyi is a very good assault gun, it has a front armour of 7, and a side of armour of 2 (with Bazooka skirts), so it would be beneficial not to have these flanked, as almost all side shots will penetrate. It has decent mobility and a cross check of 3+, and a machine gun to attempt to drive of infantry assaults. Stats wise it is very good, with a Careful 4+ to hit rating, and a Veteran skill of 3+, and a Fearless Motivation of 3+ as well, this will mean in most cases it will hang around, but being a self propelled gun, it does not do well in Assaults, so should only do so if there is no other option.
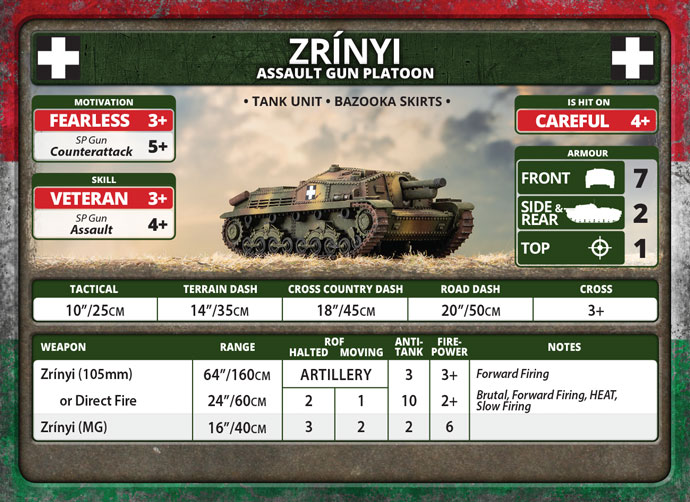
The best attribute of this vehicle is its main gun, this can bombard as artillery, with a decent, AT3, 3+ firepower bombardment, but crucially it has a RoF 2 10.5cm gun, with 24” range, HEAT and a 2+ Firepower with Brutal. So it will be excellent at digging out dug in infantry, and as far as I know, it is the only RoF 2 10.5cm armed tank, so will still be very handy at taking out tanks at range. So a very versatile unit, that can be useful in both attack and defence, it will be hard to take out at range, and has the hitting power at range due to the HEAT rounds as well.
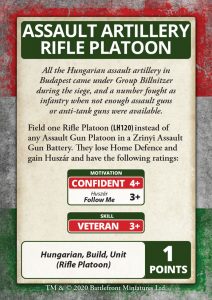
The formation itself is also very versatile, with a HQ of one Zrínyi assault gun, and being made up of three platoons of 3 assault guns, one of which must be Zrínyi platoon. But it also allows you the option of taking a StuG III platoon, a Hetzer platoon or a 7.5cm anti tank gun platoon. Additionally you can use the Assault Artillery Command Card to turn a Zrínyi platoon into a large veteran rifle platoon, which is a cheap option of getting veteran Hungarian troops to support your Assault Gun Battery.
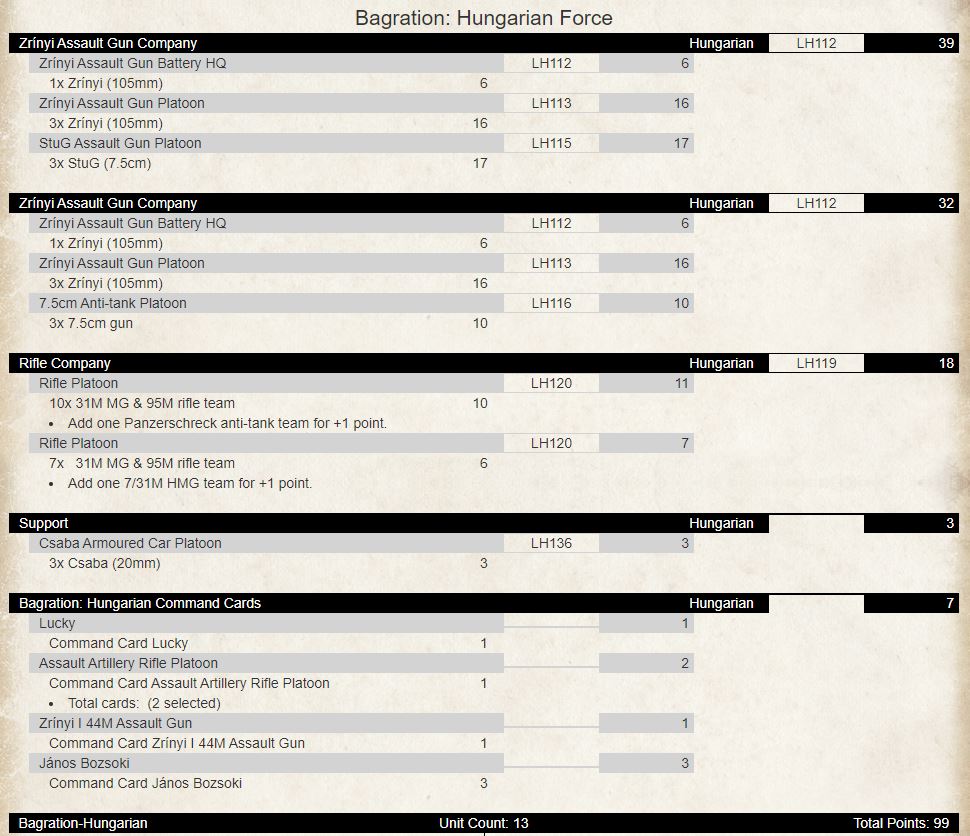
I have written up a Zrínyi Assault Gun Battery list below, focusing on taking more Zrínyi, rather than German vehicles in Hungarian service, so the two Zrínyi Assault Gun Battery Formations, but I have taken 3 StuG III, for the extra firepower and range on the 7.5cm StuK 40 L/48 gun. I have also liberally taken the Assault Artillery Rifle Platoon Command Card, which gives you a veteran rifle platoon that also has the Huzr rule, so an improved Follow Me roll, which is well worth it. Also I have included the 7.5cm anti-tank gun platoon of 3 guns, which is slightly different to the support choice, being a point cheaper, as it does not have the improved last stand roll of 3+ from the Home Defence rule.
The Hungration Bagration Axis Allies also has a great variety of Hungarian warriors based off brave historical figures that were members of the various Assault Gun Battalions. Leaders like Lt General Erno Billnitzer from Group Billnitzer that were encircled in Budapest, Jósef Barankay the well-loved Commander of the 1st Battalion who was involved in creating the Assault Gun Battalions, who died when Soviet planes strafed his vehicle. Sándor Hanák, from the 10th Battalion who led an attack driving over and knocking out 15 anti-tank guns in the fighting around Budapest, or Barnabás Kőszeghy leading the 2nd Battery of the 7th Battalion (StuG) that knocked out 12 T-34s in an attack but lost all 9 of their own vehicles (6 were recovered the next day), that gave the Battery the nickname “The Battery of the Dead”.
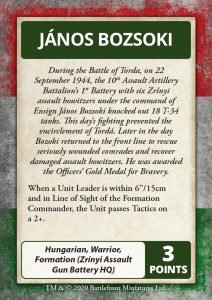 The warrior I’ve chosen to use in my force is János Bozsoki also from the 10th Battalion that was fighting around Torda, Romania in September 1944, attempting to stop attacking Soviet and Romanian forces pushing through Transylvania into Hungary. A battery of six Zrínyi helped halt a soviet counter-attack from a Soviet Tank Brigade supported by elements of four Divisions. They knocked out 18 T-34 tanks, and Janos even returned the next day to help rescue wounded comrades and recover damaged Zrínyi assault guns. In game he allows any unit leader with 6” and in line of sight to pass a Tactics roll on 2+. So very very handy for the RoF 2 Zrínyi to get the best from its howitzer.
I think this list will be fun to play, having the StuGs to sit back and provide overwatch, the smaller infantry platoon to hold an objective, and the larger to assault, hopefully deployed forward a bit with the spearheading Csaba armoured cars. The two Zrínyi platoons will be used to support the assault and to help knock out any anti-tank guns or machine guns that will make it hard for the Assault artillery rifle platoons. They can also bombard positions if needed to help suppress before an assault.
Overall a decent list, but it is lacking some high AT weapons if I come up against heavy tanks, my best AT is the 7.5cm anti-tank guns (12), so if I do face them it may be best to take a defensive stance to get an ambushing unit, or choose attack and just play defensively and use my mobility to flank them. I just could not afford Panthers, but if either the StuGs or the Zrínyi get the flank of any heavy tanks they will make a mess of them.
Well I hoped you learned a few things from this, and found it as interesting as I did. I strongly recommend you take a look at the Hungarian lists in the Bagration Axis Allies book, lots of very cool options and forces to try out.
Miniature Landscape Hobbies: Bagration Axis-Allies Terrain- Ruined Church and Graveyard Part Two
Zrinyi Assembly Guide – Axis Allies Bagration
Anti-tank Support Options for a Bagration Romanian Force
With John Lee
The Romanians have some interesting home-grown anti-tank options so I thought I would look at the options available to support them. There are both self-propelled and towed guns and there are advantages to both depending on your points, force, and playstyle.
There are three anti-tank slots in the army diagram support section. The chart below shows you the options for each slot:
| Anti-tank Slot 1 | Anti-tank Slot 2 | Anti-tank Slot 3 |
| TACAM T-60 Tank-Hunter Platoon | 75mm Anti-tank Platoon | TACAM T-60 Tank-Hunter Platoon |
| TACAM R-2 Tank-Hunter Platoon | 75mm M43 Anti-tank Platoon | TACAM R-2 Tank-Hunter Platoon |
| 75mm Anti-tank Platoon | ||
| 75mm M43 Anti-tank Platoon |
As you can see, you can take whatever mix suits the needs of your force. Need something mobile then take one of the TACAMS (TACAM stands for Tun Anticar pe Afet Mobil or self-propelled anti-tank gun). Playing more defensively then take two platoons of guns.
Starting off with the guns first, we look at the workhorse gun of the German army – the PAK 40 7.5cm anti-tank gun. A number of these were supplied to the Romanians. This gun has a 32” range and packs a AT12 FP3+ punch. Two for 6pts, three for 10pts. Can take on most tanks and has a 3+ gun save making them harder to dig out.
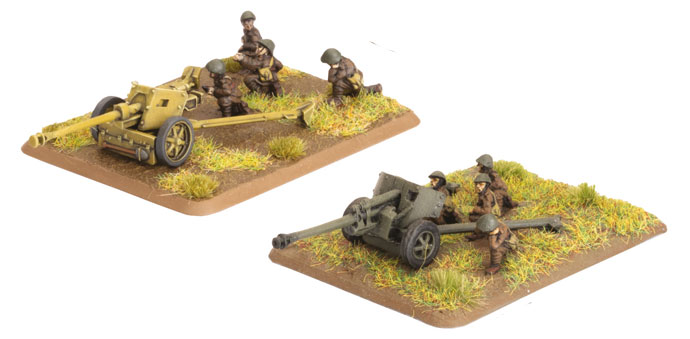
The second gun is the home grown 75mm M43 Anti-tank gun. This gun took the best characteristics from the Pak 40 gun, Vickers 75mm AA gun and Zis 3 Anti-tank guns. This is reflected in the game with a 36” range and packs a AT13 FP3+ punch. Still has a 3+ save so this is probably the best gun overall for the Romanians combined with the range and AT. Take two of these platoons to cover the whole board. Two for 7pts, three for 11pts.
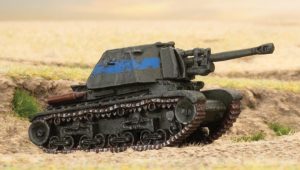 Moving onto the self-propelled guns now, we have the TACAM R-2 first. This tank hunter came about by taking old R-2 tanks and mounting captured ZIS-3 guns on the chassis and chambered to fire Romanian ammunition. It has FA3 SA1 and open topped so TA0. The gun has a range of 28” and AT10 FP 3+. Its slow but has a 3+ cross check. This is suitable against most light and medium armour and provides some flavour to your force and a cheap ambush unit of two vehicles for 5pts and three for 8pts.
 The final tank hunter is the TACAM T-60. This came about from using two pieces of captured equipment to create a new gun platform. Mating the T-60 light tank and the 76.2mm obr 1936 field gun together gave birth to the TACAM T-60. FA3 SA1 and open topped so TA0. The gun has a range of 32” with AT12 FP3+. It has a terrible cross check of 5+ though – so you do not want to spring your ambush in the woods if you can help it. This unit would also provide some flavour for your force and at 7pts for two or 11pts for three.
The tables below do a direct comparison across each of the weapon systems and will help you determine what you might want to include in your force.
| Weapon | Range | Anti-Tank | Firepower | Notes |
| TACAM R-2 Tank Gun | 28”/70cm | 10 | 3+ | TACAM R-2 only |
| 7.5cm Anti-tank Gun | 32”/80cm | 12 | 3+ | Towed Pak 40, TACAM T-60 |
| 76.2mm obr 1936 field Gun | 36”/90cm | 13 | 3+ | Towed M43 |
So, depending on what you take in your formation(s), the force anti-tank slots can give you some extra oomph, mobility, or coverage to take on the enemy depending on your preferences. If you are taking Soviet or German allies with AT14 or higher (think IS-2, Tiger, Panther, Panzer IV/70) then you could take the cheap TACAM R-2. If you are not taking allies, then you should consider taking the 75mm M43 Anti-tank guns. Take both platoons if you can.
In summary, the Romanians get some cool AT options to choose from. Take the best unit(s) that suits your requirements and cost to fit into your force and enjoy list building!
Big Four Of Late War Hobby Hang Out – Twitch
We will be going live on the Battlefront Twitch Channel. Join Chris, Casey, Victory and Wayne as we stream them hanging out, talking about the new Bagration: Axis Allies forces and maybe even talking a bit to chat!
UPDATE: Sorry everyone for the delay! The Big Four are currently held up due to Auckland Traffic and will be starting shortly!
Click here to go to the Battlefront Twitch Channel and join the chat now…