Intelligence and Reconnaissance Platoon Unit Card

with Jim Westerfield

From the mid-1930s until the late 1950s, U.S. Army infantry regiments in each division contained an Intelligence and Reconnaissance (I&R) platoon as part of the regimental headquarters company. In 1939, the I&R platoon Table of Organization & Equipment (TO&E) authorized 10 infantrymen to make up the unit. This was expanded to 18 infantrymen in 1940 and the platoon TO&E, in 1941, was authorized to include 1/4-ton vehicles (Jeeps).

I&R Platoon of the 180th Regiment, 45th Infantry Division in WWII.

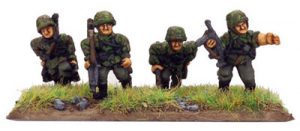
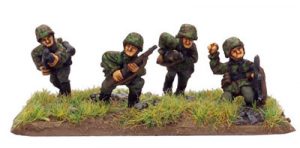
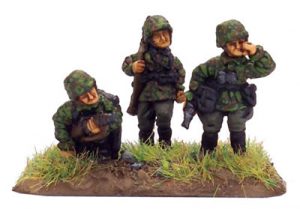
The I&R platoon consists of a platoon headquarters and two reconnaissance squads. Platoon headquarters consists of the platoon leader, platoon sergeant, driver, topographic draftsman, radio operator, and scouts and observers. Each squad consists of a squad leader, assistant squad leader, radio operator, drivers, scouts and observers. The platoon headquarters had one jeep while each squad had three jeeps, some of which carried radios.

     
The soldiers that made up the platoon are all infantrymen, given additional training by the regimental S-2, as there was no institutional military intelligence school at the time. Training of the platoon members focused on operating as scouts along with map and aerial photograph reading, conventional signs, military symbols and abbreviations, sketching, oral and written reporting, scouting and patrolling, theory and practice of observation, camouflage and the art of concealment, and the collection of information.

Individual equipment for members of the I&R platoon include standard infantry small arms and equipment, though individuals in the field often supplemented the standard issue as they saw fit. Each squad also had a prismatic compass, a 20-power monocular telescope and/or a pair of field glasses, and a watch. The platoon members carried notebooks and writing materials and colored pencils to pass along information and mark maps.

War Department FM 7-25, Headquarters Company, Intelligence and Signal Communication, Rifle Regiment, October 7, 1942 states:

“The principle mission of the regimental intelligence platoon is to serve as the special intelligence agency of the regimental commander, for the collection, recording, evaluation and dissemination of information, under the supervision of the regimental intelligence officer (S-2). The platoon is also charged with counterintelligence measures and surveillance. Actual operations of this platoon are conducted under the immediate control of the platoon leader. He may receive his orders directly from the regimental commander, S-2, or S-3. During training periods, it may be required to assist the S-2 in conducting intelligence and counterintelligence instruction within the regiment.”

The main function of the I&R platoon was to be the ears and eyes of the regimental commander. FM 7-25 describes the principle functions of the platoon as:

  • Gathering detailed information about the enemy and terrain in locations that are not readily accessible to the rifle companies of the battalions or regiment.
  • Assemble, evaluate and distribute information and intelligence gathered by the platoon and by subordinate, higher, or adjacent friendly units.
  • Provide early warning to the regiment on the presence, disposition, composition, and approach of enemy forces of all types. Operate well in advance of the regiment in order to gain and maintain contact with the enemy.
  • Maintain contact with reconnaissance and security formations of other, larger formations that are operating forward or to the flanks of the regiment.
  • Regain lost contact with adjacent, attached and assigned friendly units. Locate and maintain contact with the flanks of an enemy force when contact is gained by dismounted combat elements of the regiment.
  • Reconnoiter avenues of approach, routes, river crossings and complex enemy obstacles. Search suspicious, dominating and critical areas along the route of march to identify possible ambush sites, defended roadblocks, route classification and contaminated areas.
  • Establish and operate 24-hour observation and listening posts.
  • Conduct dismounted patrolling to the front, flanks, and rear of the regiment when terrain or enemy situation precludes the use of mounted patrolling.
  • Assist the regimental S-2 at the command post or at a tactical observation/tactical command post by maintaining the intelligence situation map, and/or keeping an intelligence log, taking and preparing reports, messages and sketches.
  • Carry out such counterintelligence measures as directed by the regimental commander or S-2. Provide instruction on the subject to other units of the regiment. Search undefended or captured towns and villages and captured enemy equipment and positions.

Some other missions performed by the platoon that were not specifically included in standard doctrine were;

  • Liaison between regiments of the division.
  • Messenger duties between battalions of the regiment.
  • Escort and security for the regimental commander as he moved forward of the main command post.
  • Serving as radio-telephone operators for regimental command in dismounted offensive operations.
  • Marking of route of march for the regiment and providing guides at traffic control points.
  • Accompanying a combat or reconnaissance patrol conducted by rifle platoons or companies from subordinate infantry battalions of the regiment in order to report on tactical progress of intelligence acquired directly to the regimental commander.
  • Conduct economy of force operations on a flank of the regiment in order to provide early warning and prevent the regiment from being surprised.

While being trained infantrymen, thus capable of getting involved in direct fighting against enemy forces, the primary duty of the I&R platoon is to support the front-line infantry and regimental commander by carrying out the above type of missions and not get directly into a firefight.  The MTOE did vary during the war but we will go with the 1942 organization.  
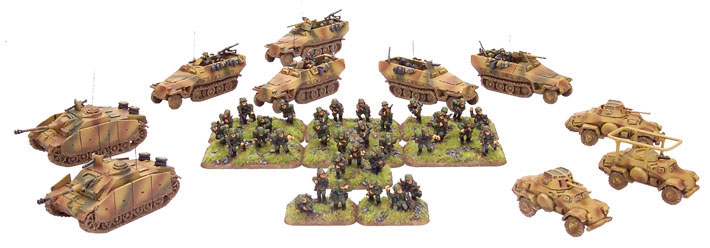
In Flames of War:
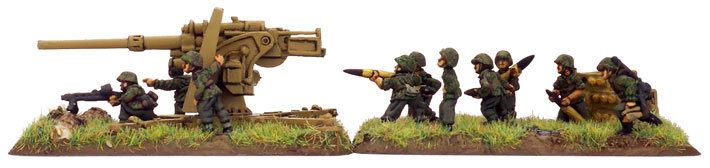
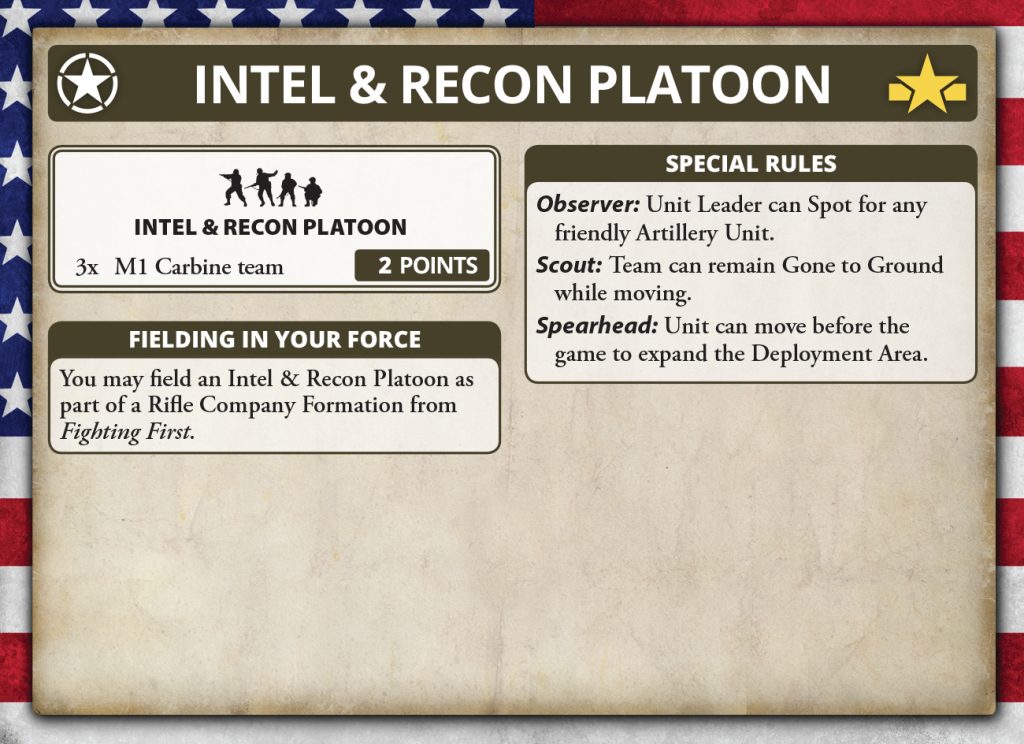
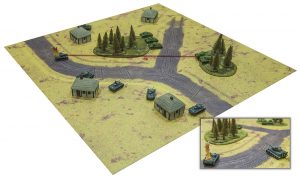
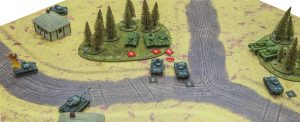
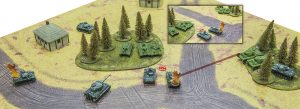
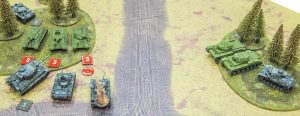
The I&R platoon is an additional platoon in the Rifle Company formation diagram.  To model the platoon, we will use the organization from V3 North Africa with a command carbine team of 3 figures and 2 carbine teams of 4 figures.  I used the dismounted armored recon platoon to build the unit. As the pick of the litter they are a little better trained than most of the rest of the guys in the regiment.  Very useful for calling in fire. For points we will use the rifle platoon as a benchmark. We will be adding recon and spearhead skills, but in compensation we will have worse Rally and Counter Attack ratings. At slightly less than one point per rifle team we, rounding up we get 1 point for the platoon.  
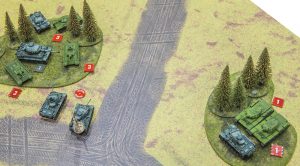
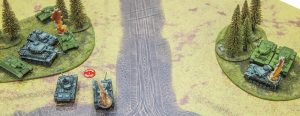
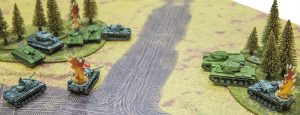
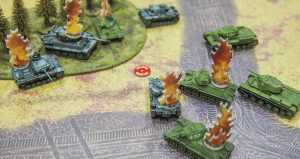
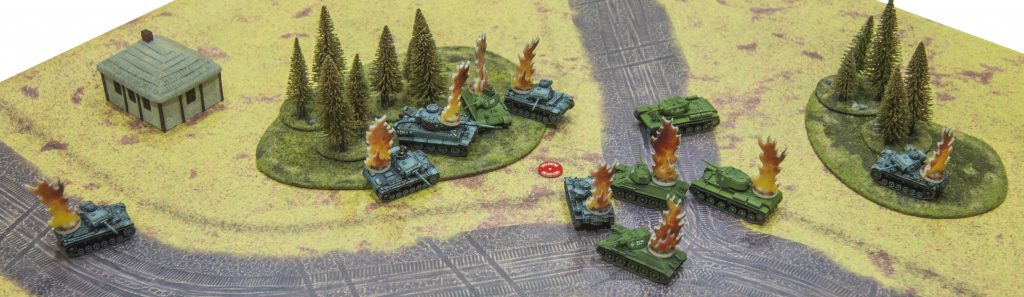
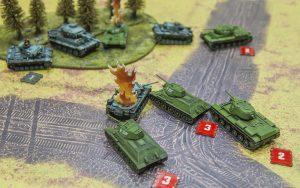
Wayne’s StuG Force

with Wayne Turner

I’ve decided to put together a StuG Assault Gun Company for the Kursk period from Ghost Panzers. By June 1943 many Assault Gun Battalions (Sturmgeschütz Abteilungen) had started to be equipped with the latest version of the StuG assault gun, the StuG III G armed with the long 7.5cm StuK40 gun. The 301. Panzer Battalion chosen as the theme unit in Ghost Panzers is a radio control unit that also contains Borgward demolition carriers, but by not taking the Borgward options it can also be used to represent any of the Assault Gun Companies or Batteries that served on the eastern front.

At Kursk in particular there are a number of Assault Gun Battalion or Brigades involved in the operations. Sturmgeschütz Abteilungen 904 (31 x StuG III) and 245 (22 x StuG III and 9 x StuH 42) served with XXXXVII Panzer Korps on the north side of the salient. Sturmgeschütz Abteilungen 177 (22 x StuG III and 9 x StuH 42) and 244 (22 x StuG III and 9 x StuH 42) served under command of XXXXI. Panzerkorps.

In addition a number of divisions had their own assault gun units. 78. Sturm Division had Sturmgeschütz Abteilung 189, Panzergrenadierdivision ‘Grossdeutchland’ had Sturmgeschütz Abteilung ‘Grossdeutchland’, 7. Infanteriedivision’s Panzerjäger Abteilung 7 contained one company equipped with StuG III, and 6. Infanteriedivision’s Panzerjäger Abteilung 6 contained one company equipped with StuG III.

To be a bit different I’m going to base my StuG force on 6. Infanteriedivision, representing the Sturmgeschütz Kompanie (Assault Gun Company) of Panzerjäger Abteilung 6 (6th Tank-hunter Detachment/Battalion). 6. Infanteriedivision fought in the middle of the 9thArmy’s attack on the north of the Kursk Salient and pushed as far as Olkhovatka during the battle along with the Panzertruppen. During the fighting the divisions also has the 1st and 2nd Companies of Heavy Panzer Battalion 505 (Tiger IE heavy tanks) and Panzerkompanie (Fkl) 312 attached.

My Force

13 pts StuG (Late) Assault Gun Company HQ, 1x StuG (late 7.5cm)

39 pts StuG (Late) Assault Gun Platoon, 3x StuG (late 7.5cm)

39 pts StuG (Late) Assault Gun Platoon, 3x StuG (late 7.5cm)

That’s 91 points. I’ll make this up to 100 points, but I haven’t decided what to spend my last 9 points on as yet.


TANKS! The Battle for Prokhorovka

with Andrew Haught

Victor and I decided to sit down for a quick TANKS battle while we work on our larger Flames Of War forces during the live launch.

We decided to do the battle of Prokhorovka, which ended up being one of the largest tank battles in military history. We were playing a themed game, and to this end we put as many tanks as we could into our 100 point lists. We chose King of the Hill as our battle to force the action to be in the middle of the table.

I put together some Factory Fresh T-34s and a pair of KV-1s.

Victor went with 5 Panzer III (Longs) and a Tiger tank, which he wrote an earlier article about…

We started setting up terrain; I wanted to make sure there was a forest near the middle and Victor wanted to put some houses up so he could advance in cover. Next we rolled for Attacker and Defender, Victor became the attacker and I became the Defender. I chose the side that gave me a forest through which to advance my KV 1s.

Moving to deployment, I deployed my T-34s first. With the Factory Fresh upgrade these three tanks were only initiative 1! Yikes. I placed my tanks in the centre of my table, planning on using my fast speed to move into the centre woods and gain a foothold near the objective. Victor Deploys the rest of his tanks next, he places them along his table edge in a wide spread, hoping to spread out and surround me. My KV-1s are placed last, I place them within pouncing distance of the small forest, with the plans to move into the forest to gain cover during the first turn.

Turn One Movement
Both Victor and I stuck to our plans, Victor getting cover in and around the buildings and me moving all my tanks into the forests.

Turn One Shooting
Well this was lucky, for me, I opened up with my KV-1s and managed to do 1 normal damage and an Ammo Explosion to one of Victor’s Panzer III (Number 14), this was enough to kill him at the end of the turn. First Blood goes to the KV 1s!

Due to the high movement and defence the Germans fail to land a hit during this turn. One of the T-34s managed to get one cheeky damage of on one of Victor’s Panzer III (Number 11).

Turn One Command
The Germans used their Blitzkrieg to move towards the objective and get into good positions for the next turn.


Turn Two Movement
The T-34s move deeper into the forest, getting within an arrow of the objective and forming a firing line. Two of the Panzer IIIs make moves for the objective, while the other two move down my flanks. The Tiger stays still as do the KV-1s tanks.

Turn Two Shooting
Once again my KV-1s focus on one of Victors Panzer III tanks (Number 12) and they deal 4 damage, killing it at the end of the turn. All the Panzer IIIs shoot at various targets each having their shots bounced against my armour and high movement. The Tiger fires last and scores three hits against one of my T-34s (Number 17). In retaliation all my T-34s shoot back but blinded by rage they were not able to score even a single hit.

Turn Two Command
The Germans used their Blitzkrieg to get into good positions for the next turn.


Turn Three Movement
The T-34s did some ducking and weaving in the forest to maximise their defence. Two of the Panzer IIIs stayed stationary. Victor moves the Tiger closer to the objective and the remaining Panzer III moves into the woods flanking my KV-1s tanks. The KV-1s, in their arrogance choose to ignore the Panzer sneaking up their flanks and remain stationary.

Turn Three Shooting
Once again my KV-1s focus on the Tiger only scoring one hit in the end. The Panzer III on the flank of my KV 1s tanks fires and scores 3 damage on one of them. The rest of Victor’s tanks try to take out some of my T-34s and all their shots missed. My T-34s focus on the Tiger tank, and they only score one hit.

Turn Three Command
The Germans decide to skip their movement Blitzkrieg.


Turn Four Movement
The T-34s moved into a more tactical position. Victor moves his Tiger into the forest to counter some of my movement decisions. The Panzers III tanks stay stationary. I moved the KV-1s once to destroy the tank that flanked them in the previous turn.

Turn Four Shooting
The KV-1s deal enough damage to kill the Panzer III (Number 15) in the small woods at the end of the turn. The The Tiger and a Panzer III both shoot at one of my T-34s (Number 16) and score enough hits to destroy it at the end of the turn. The remaining Panzer III tanks fail to hit their targets. The T-34s fire on one of the Panzer IIIs (Number 11), scoring only one hit in total.

Turn Four Command
The Tiger and a Panzer III (Number 13) Blitz closer to the objective.


Turn Five Movement
I move my T-34s three times to get them in a better position, the Tiger stays stationary, while the Panzer III (Number 13) moves two times to the flank of one of my T-34s. Fresh from their kill last turn the KV-1s are out of of the woods to threaten another Panzer III.

Turn Five Shooting
Once again my KV-1s focus on a Panzer III (Number 13), the first tank scoring enough hits to leave it with only one damage left, they also manage to bail it, preventing it from shooting this turn. Victor’s Remaining tanks fire on one of my T-34s (Number 20) only scoring one damage.

Turn Five Command
The bailed Panzer III (Number 13) fails to repair its Bailed Out damage, and the remaining Panzer III (Number 11) Blitzes back a bit to get nearer the objective.


Turn Six Movement
The T-34s stay still, as does the Tiger. The unbailed Panzer III moves to a more defensible position while the KV-1s moves twice to get into range to contest the objectives.  

Turn Six Shooting
Seeing the damaged Panzer III (Number 13) only had one health left, I thought it would be quick work to dispatch it with my KV-1s—but I was wrong. I failed to score even a single hit. The remaining Panzer III and Tiger shot at one of my T-34s (Number 17) scoring one hit and bailing it out, it survives with only one hit left. My unbailed T-34 (Number 20) fails to land a hit.  

Turn Six Command
Nether tank was able to repair the bailed damage, and Victor decides he likes his tanks’ placement and choose not to Blitz move.


Turn Seven Movement
No movement, every tank decides to remain stationary.

Turn Seven Shooting
The KV-1s manage to do four damage to the Tiger, leaving it with one damage point left. The Panzer III and Tiger shoot and destroy one of my T-34s (Number 20). My unbailed T-34(Number 20) unleashes its final shots scoring no hits.Turn Seven Command
Nether tank was able to repair the bailed damage, and Victor decides he likes his tanks’ placement and choose not to Blitz move.


Turn Eight Movement
No movement, every tank decides to remain stationary.

Turn Eight Shooting
The KV-1s managed enough damage to kill Victor’s Tiger and one of his Panzer IIIs (Number 11). In retaliation, Number 11 kills my bailed out T-34. The Tiger’s final shots deal 3 damage to my already damage KV-1s almost knocking it out.

Turn Eight Command
Victor was was able to repair the bailed damage on his Panzer III (Number 13) Finally!


Turn Nine Movement
13 moves into cover, the KV-1s stay stationary.

Turn Nine Shooting.
The KV-1s was able to deliver the final hit on the last Panzer III (Number 13). Before it dies the Panzer III fires back and manages to destroy  my damaged KV-1s, leaving just one of my KV-1s tanks still alive at the end of the game. Soviet Victory!

Man, that was close game; I got some lucky shoots right away with my cool KV-1s tanks and Victor getting the constant damage throughout with his Panzer III Long horde! I really like the factory fresh card, in this game the downsides didn’t come in and it gave me the points I needed to add my two KV-1s tanks that did most of the damage I dealt in the game.

From Stalingrad to Kursk

with Phil Yates

When Enemy at the Gates came out, I backdated my Kursk T-34 company to the earlier model and added some KV-1 tanks to create a Mixed Tank Battalion [Article Reference Here]. Now that Red Banner is out, I’m in the process of updating it to the latest and greatest for Kursk.

T-34

The first step is simple, I just replace the T-34 (early) turrets with the later ‘Mickey Mouse Ear’ turrets (so called because when the two circular hatches are open, they look like Mickey mouse’s ears!) that I originally painted.

While the differences between the early and late T-34 are subtle, they are much appreciated by a speed freak like me. The later model is 2”/5cm faster through terrain and 4”/10cm faster across country, and has a Cross rating of 2+. This makes my preferred tactic of racing a mass of T-34s into the middle of an enemy tank group and engaging in a short-range firefight even more effective. At that range, and shooting into the flank of the enemy, the 76mm gun is very effective, while even the side armour is still good enough to bounce plenty of shots! It takes a Panzer IV (long) to match me in that firefight – anything less and I’ve got the advantage tank-on-tank.

Valentine

The next step is sort of the reverse – painting the late-model turrets for my Valentines. Fortunately, the kit has the parts for both early and late turrets, so I just grabbed the leftover bits and made three late 2 pdr turrets and four 6 pdr turrets. The late 2 pdr turrets with their space for an extra crewman get rid of the Overworked penalty (+1 to hit when I move), while the 6 pdr guns give me Anti-tank 10 (rather than 7) instead – but at the cost of no MG. This makes my Valentines quite a bit more shooty, although less effective against infantry and guns.

T-70

While I love the Valentine (it’s sooo ugly!), its slow speed makes it difficult to use with the T-34, so I’d rather something faster, so I’m painting a company of T-70 light tanks as well. These are like a T-60 on steroids. They mount a 45mm gun (even if it only has one shot!) and have decent armour and speed, but are still dirt cheap. While they are way faster than the Valentines (and at least as fast as any opposing tank), they still feel slow compared with my T-34s, but with ten for less than the price of three T-34s, they make a nice cheap flanking or distraction force.

Churchill

Finally on the tank side, I’m adding a company of Churchill tanks. Like the Valentine, they are so ugly that they are beautiful, and I just had to make some of the new plastic kit. Fortunately for my not-so-inner geek, the heavy tanks supporting the tank corps at Kursk were Churchills, so they go well with my T-34s. The Churchill is like a slightly faster and less armoured KV-1 (a bit more armour than the way faster KV-1s). Its gun has similar performance against tanks (slightly higher Anti-Tank, but worse Firepower mean more Bailed Out, but roughly the same number of destroyed enemy tanks), but with No HE, it’s  way worse against enemy guns. The price is cheaper, but they’ll need some support to come out on top.

Between the two forces, I now have most of the Soviet and British Lend-Lease tanks to choose from, so that’s a plus when I want a bit of variety.

Katyusha
The new plastic Katyusha rocket launcher is too cool to leave out, so I’ve grabbed four of them as well. Now I’m not convinced of the need for artillery in a hard-hitting tank force, so it’ll be a bit different for me. On the other hand, having a big Salvo template means that their ability to pin down targets quickly and reduce their threat to my tanks is going to come in handy. Having built one in the Enemy at the Gates launch event, I wasn’t surprised by how easily they go together for such a complicated looking model, but it was nice when it came time to make four of them.

SMG Company
I haven’t picked it up yet, but I’d also like to paint up an SMG company to go with my tanks. I love the image of tanks covered in infantry racing forward, with the infantry dismounting and unleashing a hail of fire as they roll over the enemy in a combined-arms assault! Once the tanks are done, they’ll be next on the painting table.

The Force
So, with all of these toys, what will I field? Without the Valentines, its 143 points, so great for a bigger game! For a 100-point force though, I’ll have to trim something back. If I leave out the Churchills, I have a nice T-34 Tank Battalion:

  • T-34 Tank Battalion HQ – 1x T-34 = 6 points
  • T-34 Tank Company – 10x T-34 = 56 points
  • T-70 Tank Company – 10x T-70 = 13 points
  • SMG Company – 15x SMG = 15 points
  • Katyusha Guards Rocket Battery – 4x Katyusha = 8 points

For the remaining two points I could have Partisans to slow down enemy Reserves, Reconnaissance by Combat to start the game with my Katyushas Ranged In where I need them, ot Guards and Lucky together to make my tanks Remount better and counter a bad die roll. At present I’m liking Partisans to give my tanks an edge in numbers.

Alternatively, I could add in three Churchill tanks to support the infantry and drop the T-34 and T-70 companies to six tanks each. It would be a very different force with a much slower strategy. The infantry and Churchills would be the lead elements, with the tanks tanking the role of Reserves or a flanking force stalking the enemy rather than the spearpoint of a headlong rush.

The Proof of the Pudding
The only way to prove whether this particular pudding is worth eating will be to try it out in battle. It’ll be interesting to see which version has the most success.

Firestorm: Kursk

with Andrew Haught

The battle lines have been drawn, the tanks have been fully serviced. It’s time for Firestorm: Kursk.

Firestorm Kursk
Firestorm is back and this time we are fighting around Kursk. Firestorm: Kursk recreates the two-pronged German attack around the town of Kursk in an effort to cut off the Soviet forces in the area. Of all the battles that occurred around Kursk, none quite compare to the battle of Prokhorovka, which ended up being one of the largest tank battles in military history.


The Campaign
This kit has everything you need to play a full Firestorm: Kursk campaign at your store or club. The campaign will consist of a series of Flames Of War games in which players attempt to capture areas from the enemy or recover those lost in earlier games. Each time a player attacks they place a marker on the map, once all the markers have been used the campaign is over and the side with the most victory points wins.

Battle of Prokhorovka
The 5th Guards Tank Army was one of the most powerful armoured forces fighting in the Battle of Kursk. It was formed in March 1943 from the brand-new 29th Tank Corps and the experienced 5th Guards Mechanised Corps, and gained the 18th Tank Corps as it moved to counterattack positions as the Germans attacked at Kursk. Once in position near Prokhorovka, it added the 2nd Tank Corps, 2nd Guards Tank Corps, and the 9th Airborne Division from the forces that had been delaying the German advance.

On 12 July 1943, this force of over 800 tanks attacked, including more than 500 T-34 tanks, throwing the Germans back in hectic, close-range battles. Phalanxes of tanks charged across the dry steppes, dodging the gullies that slashed the battlefield, crossing through the enemy formations to shoot at point-blank range into the flanks of their tanks. The hills and state farms that the Germans had captured the previous day were littered with burning tanks by nightfall.

Massive Tank Battles
Battle of Prokhorovka being one of the largest tank battles in Military history, makes it the perfect place to play large tank battles. We suggest you play at least 150 point forces with an emphasis on tanks formations. This is the perfect time to pull out every T-34 you have or that large Panther army you been trying to play but was too many points for a standard 100 point game. The 150 points is only a suggestion—got a large Tiger tank company and you want to fight at 200 points? Go for it! The more tanks, the better.

Unlike normal areas on the map, Prokhorovka is fought over a series of battles. So you can stage loads of large tank battles during your campaign. Each victory at Prokhorovka will earn the winning side a control token that is placed on the Prokhorovka Battle Track. Each control token on the Prokhorovka Battle Track is worth one victory point and is added to the totals on the Firestorm Kursk map once all battles have been played, so winning in Prokhorovka can decisive when calculating victory points at the end of the campaign.

You can also check out Firestorm: Stalingrad here…

Beutepanzers- Modifications and Markings

with J.C Von Winterbach

These two articles are taken from the Flames of War website and combined for this launch event. There is a link at the bottom of the page to the original articles with plenty more pictures.

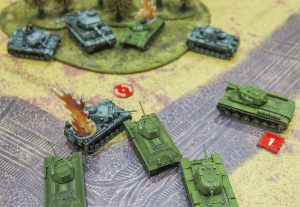
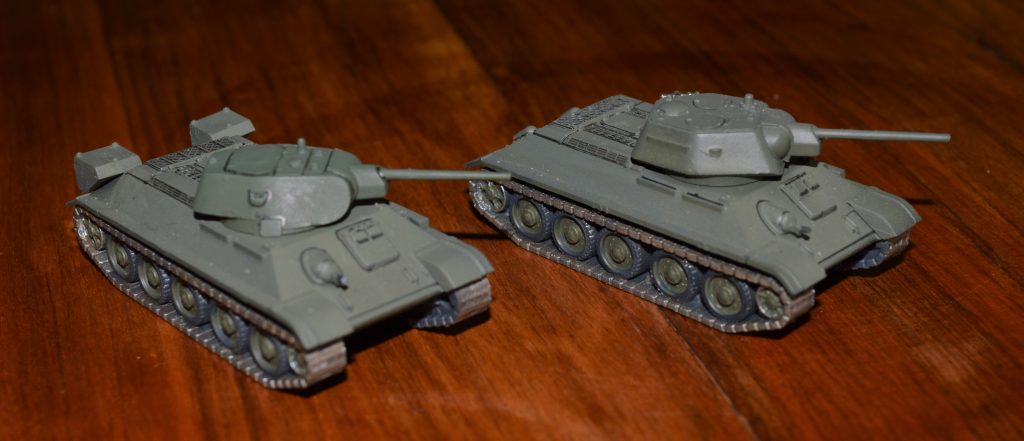
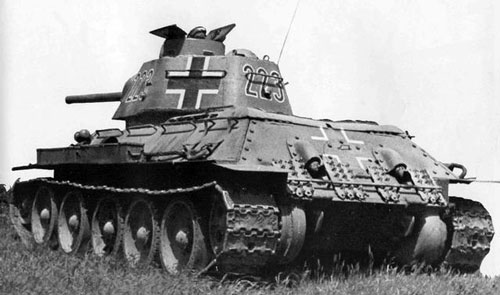
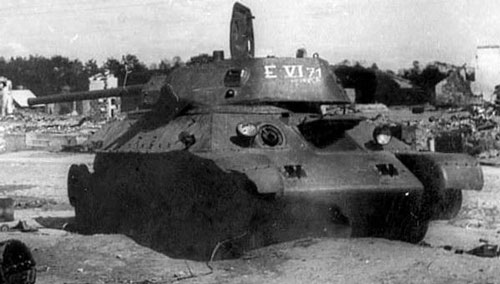
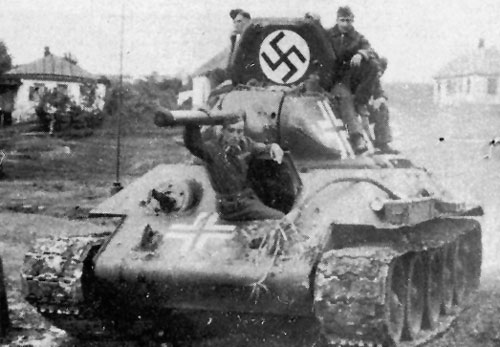
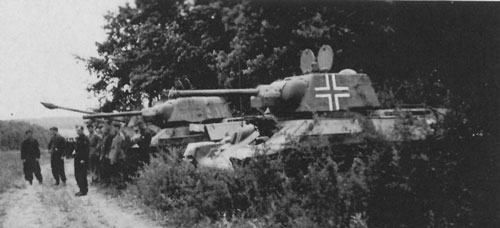
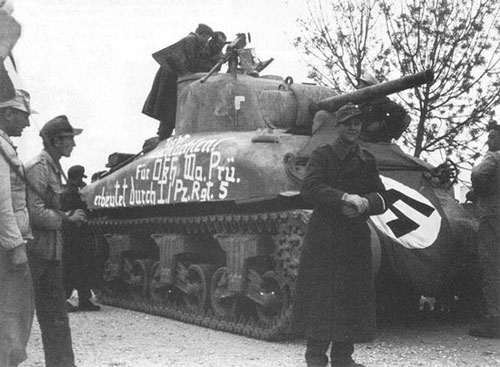
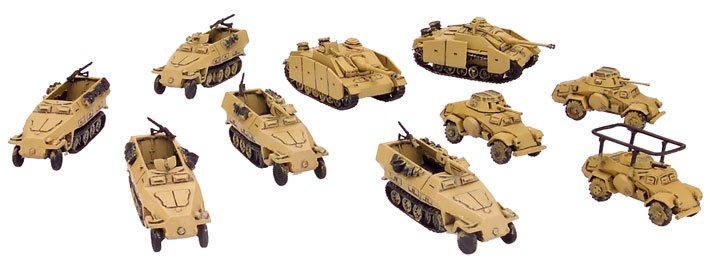
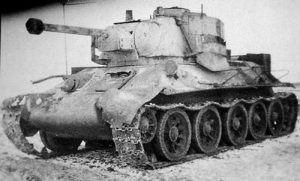
There are many ways these Beutepanzers were modified which I will be listing in this article. Some of the modifications ranged from Panzer III/IV cupolas, notek lights, stowage bins (fitted to the rear of the turret or the sides of the hull), antennas, and schürzen. These modifications can add a very unique and historic feel to your Beutepanzers, making them stand out even more on the table.

Notek Lights
All of the Notek lights were designed to be used under blackout restrictions so the indirect lighting/hooded light concept was essential for the front light when the standard/main lights couldn’t be used so to avoid being spotted from ground or aerial observers.

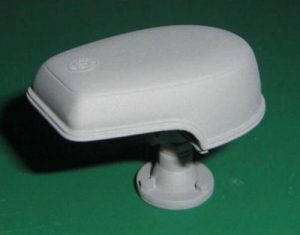
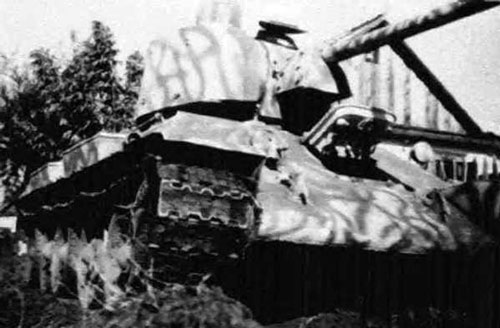
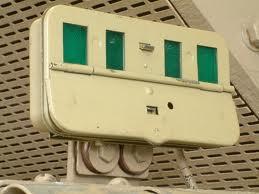
The rear Notek light had a lot more functionality, it could used as a normal rear brake light or used to maintain proper vehicle spacing at night under black-out conditions. It worked on the concept of optical convergence at different distances, which is why the rectangular shaped light had two sets of two different sized lights.
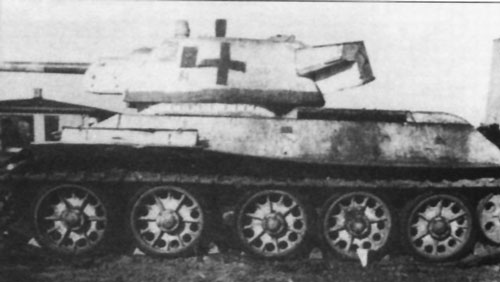
 The distance between vehicles dictated what patterns of the four lights were visible and provided a constant frame of reference to avoid vehicles ramming into each other in the dark.

An ideal distance between vehicles meant two lights were visible. If only one was visible, the distance between two vehicles was too great while four visible looks meant the distance was too close.

Tactical Markings
The numbering system used on the Beutepanzers were the same as those of the normal German tanks being the three-digit or four-digit standard (1024, 895, 354, 48, 9, etc.)

T-34 mod 1942/43 using a three-digit number on the side (Frontal section) of the turret & on the rear panel of the turret.

But some of these Beutepanzers received a different numbering system called the E-Mark. This numbering system includes the letter “E”, followed by a roman numeral and a further two-digit or a three-digit number. On most assumptions the letter “E” indicates Erbeutet (Captured).

T-34 mod 1941/42 using an E-Mark numbering system on the side (Rear section) of the turret.

Position of Markings
The areas where these identification marks were located where mainly on the frontal, sides and rear panels of the turret and hull. The turret hatches and the barrel of the main gun, as well as under the barrel of the main gun, and track guards were also used as locations for identification marks. These signs were usually painted considerably large.

Other Markings
Some of the markings found to be painted on the Beutepanzers ranged from the Balkenkreuz, Swastikas, Divisional or Sub-Divisional Insignias, individual inscriptions or simply a German flag.

Among the individual inscriptions found on the Beutepanzer were the names of Soldiers (Emil, Karl, Radetzski, Jaeger, etc.), the names of wild animals (Tiger, Leopard, etc.), the names of municipals or provinces (Dantzig, Saar, etc.).

M4 Sherman (M4A2) using a flag that’s tied down on the front panel of the tank.

Kill Rings (Victory Rings) where also paint onto the barrel of the main gun to show how many victories the Beutepanzer & its crew had accomplished.

Tank Colors
Beutepanzers saw just as much change to their paint schemes as the rest of the German Armored Core due to the different periods, areas of operation, seasons and special needs. For starters, a lot of the Beutepanzers were repainted in the German Panzer Grey color, but as times went forward, these tanks also changed as the German tanks changed. From the beginning of 1943 they began to use camouflage patterns (Please refer to Art of War II for a complete list of German Camouflage painting schemes throughout the periods) on the Beutepanzer. These tanks also followed the winter camouflage paint scheme. But records & photos also show that a of of these tanks were left with their original colour scheme and went unchanged, except for their identification markings.

You can read J.C’s Modifications article and see more pictures here…
And more markings pictures here…


Painting Ghosts Part II

with Gareth Richards

Up next was the camo scheme, taking from the painting guide at the back of Ghost Panzer book applied Army Green and applied the camo pattern, this is still a weak point of my painting and something that hopefully will improve as I paint more tanks. In the cervices I worked in Panzer Grey mixed with black to add working dirt, this was also drybrushed onto the barrel and the wheels to add more dirt and weathering to the model.

Before applying decals which I will do as batch run for the entire army I added on a drybrush of Dry Dust to the edges of the Ferdinand to add a bit of pop colour to help it lift from the table.


The Ferdinand, table-ready (barring decals and battle damage) is ready for its first game. I will be starting on the Panthers this week and then onto the Panzers, aiming to have them completed and ready for decals and weathering and then onto to some games the following week.


Casey’s Waffen SS

with Casey Davies

Much like Soviets, over the years I’ve painted a vast amount of Waffen SS, Initially I built this as part of a 600 point staff army (insert link to article here)


Going back to Kursk is a chance to dust these models off again and have a few games. The largest part of my painted collection is a Gepanzerte Panzergrenadierkompanie.

Ghost Panzers has really given these a new lease of life. Under Eastern Front I always found it difficult to build Armoured Panzergrenadier lists because the Panzergrenadier platoons were so expensive, while Ghost Panzers has made them much more affordable.

How Long Does a Turn Take?

A common question we get is how long a turn of Flames of War takes. It can’t be instant, because setting up mortars takes longer than a second, but it also can’t be a whole day as an assault doesn’t have to take that long.

See Phil’s answer here to clear everything up:

‘The length of a turn is one Command Cycle: the time it takes for you as the force commander to receive reports, assess the situation, issue new orders and have them carried out (or interrupted by enemy action, necessitating a new command cycle).
As Von Clauswitz wrote long ago, “Everything in war is simple, but the simplest thing is difficult.” and “Action in war is like movement in a resistant element. Just as the simplest and most natural of movements, walking, cannot easily be performed in water, so in war it is difficult for normal efforts to achieve even moderate results.”
Everything take much longer when you are trying not to be killed. Soldiers who can hit a target 99% of the time in training will fire a hundred rounds to score a hit because exposing themselves enough to find a clear target will expose themselves as a clear target to every enemy soldier. A duel between two tanks can take hours, with only a dozen shots exchanged as they creep about in a tiny space, trying to get a shot in without getting shot in turn.
Net result, most turns (when compared to the time it takes for a real battle to move forward by the same amount) are likely to be 15 to 30 minutes long. Some, such as when the action is at close quarters, may be quicker, others such as when your forces are waiting for a minefield to be gapped, could be hours long’.