
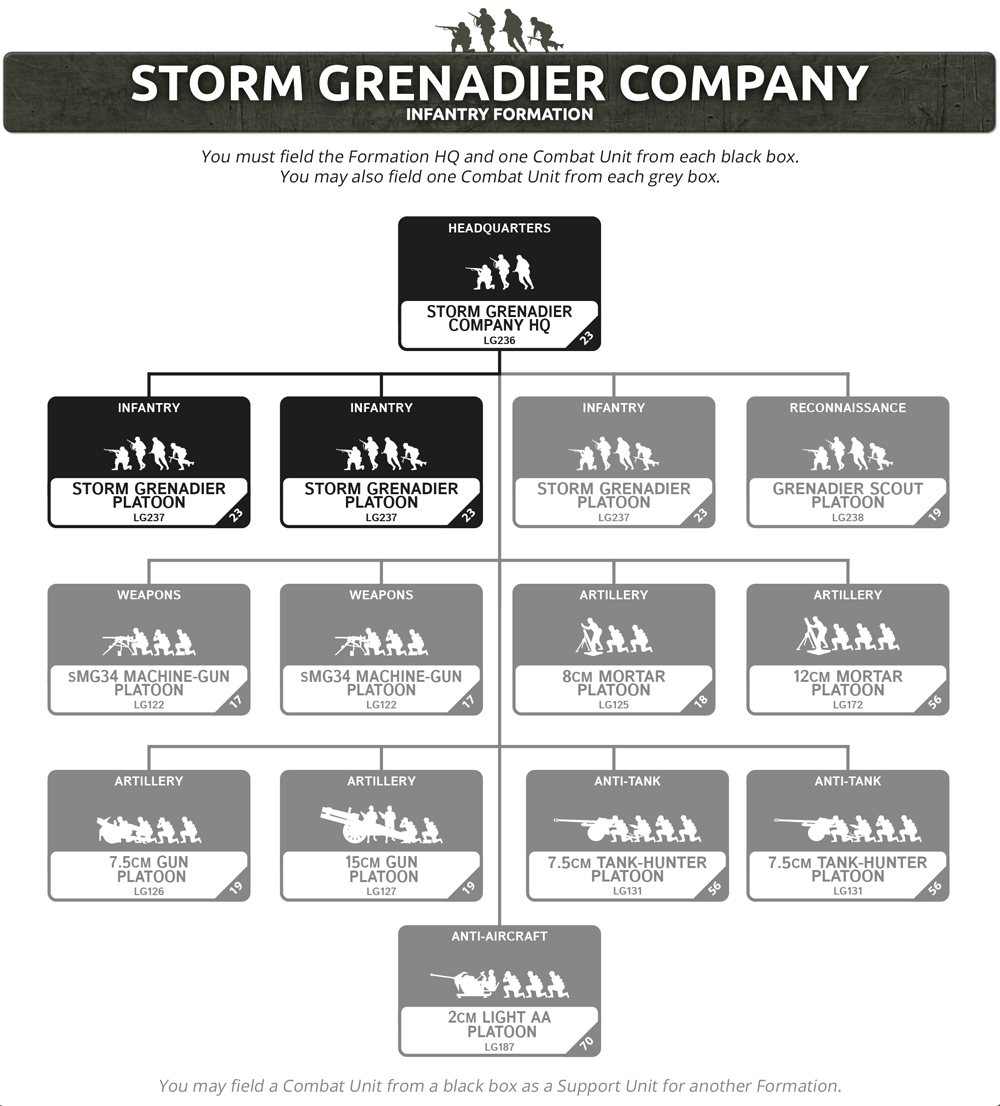
Artillery Support Options for a Bagration German Force
With John Lee
With several new artillery weapons being released I thought I would look at all the options available to me that I might have previously not even looked at plus the new stuff. To my surprise when I tallied up the number of units able to deliver an artillery or salvo template, it was at least twice to three times what I imagined! If you consider what is available in several formations, support, and command cards, the total number of different indirect weapon systems totals nineteen! That is right, nineteen! Here is the list of them:
| Formation Weapons | Support Options | Command Cards |
| 8cm Mortar Platoon | 10.5cm Artillery Battery | 21cm Neberwerfers |
| Armoured 8cm Mortar Section | Wespe Artillery Battery | 30cm Nebelwerfers |
| Reconnaissance 8cm Mortar Section | Hummel Artillery Battery | 7.5cm Mountain Artillery |
| 12cm Mortar Platoon | 15cm Nebelwerfer Battery | 10.5cm Mountain Artillery |
| 7.5cm Gun Platoon | Panzerwerfer 42 Battery | Stuka Zu Fuss |
| 15cm Gun Platoon | Brummbar Assault Tank Platoon | |
| Grille 15cm Gun Platoon | JU 87 Stuka Dive Bomber Flight |
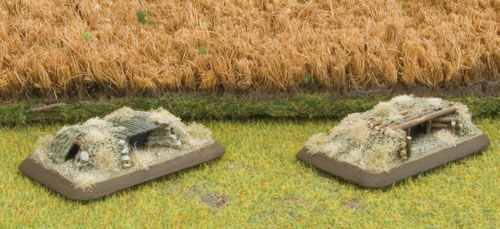
Starting out with the formation weapons we look first at the mortars. These tend to be the cheapest artillery assets and can be taken by several infantry formations. As well as being cheaper, they also count towards keeping the formation from breaking.
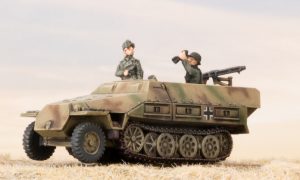 The humble 8cm mortar has a range of 40” AT1 and FP4+. It can also fire a smoke bombardment and useful to defend objectives if required as they can assault on fours. Two for 3pts, four for 6pts, or six for 9pts (no brainer to take six for rerolling misses). These are found in the Grenadier, Storm Grenadier, and Panzergrenadier (two tube option only) formations. The armoured versions of this mortar are mounted in the Sd Kfz 251 Half Tracks in the Armoured Panzergrenadier formation and are two for 3pts or four for 6pts. The advantage they have is that they are armoured and can keep up with tanks and easier to escape the counterbattery fire. The reconnaissance version is mounted in the smaller Sd Kfz 250 Half-Track and is two for 3pts or three for 5pts.
The next mortar is the 12cm variant. This mortar was a direct copy of the Soviet 120mm mortars that were captured earlier in the war. They have a range of 56” AT2 and FP3+. That 3+ FP is very useful for digging out enemy infantry and gun teams. Two for 4pts or four for 8pts. Another no-brainer here to take four if you can. You can get these in the Grenadier, Storm Grenadier, and Panzergrenadier formations.
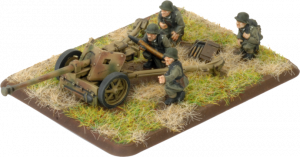
The 7.5cm gun is the first dual-purpose artillery unit. Range of 48” AT2 FP4+ for indirect fire and can also fire directly out to 16” with AT8 FP3+ and smoke. Another great unit to put in the formation if you have spare points and can fire smoke directly. Can be used to deter light/medium tank assaults from objectives. Two for 6pts or four for 12pts. These are available in the Grenadier, Storm Grenadier, and Panzergrenadier formations.
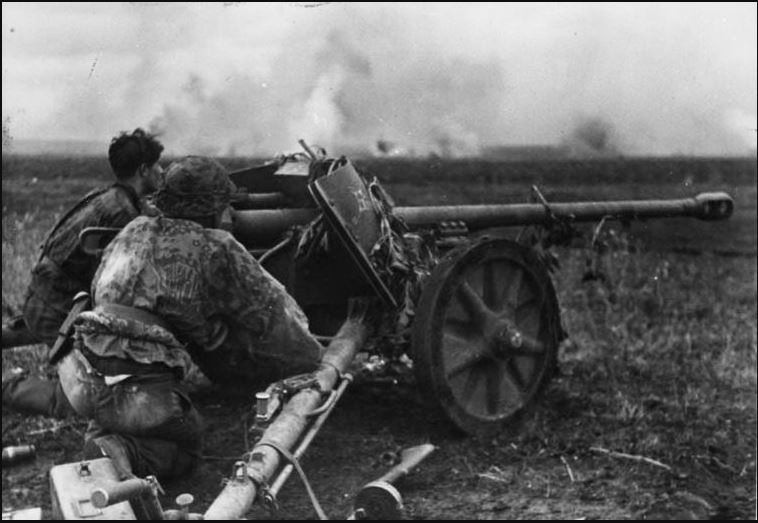
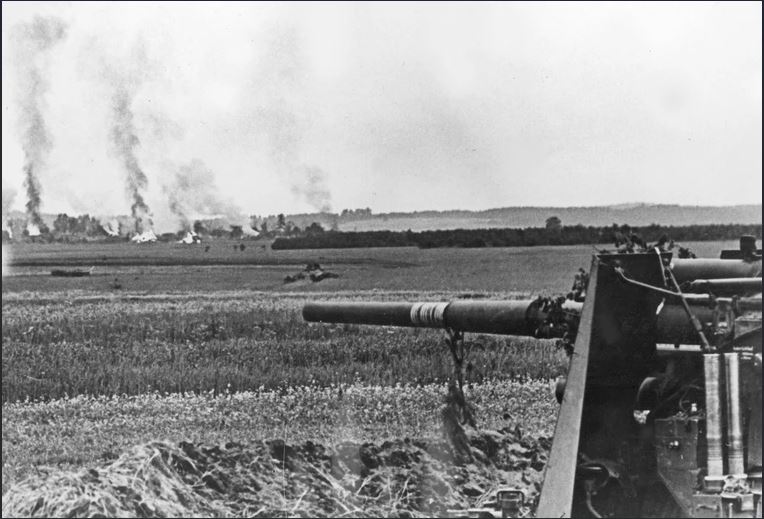
Onto the heavy 15cm gun now. This comes in two variants, the Grille (armoured and mobile) and the towed version. The gun has a 56” range with AT3 and FP2+. You want something to stay down, you take these with the AT3 and FP2+. They can also fire direct out to 16” with AT7 and AUTO FP and Brutal. They only come in pairs mind you, so it’s 8pts for either version. The only caveat here is that you will automatically be rerolling hits with only two guns. Depends on whether you want FA4 and mobility or the ability to be dug in. All four infantry formations can take the towed variant with the Armoured Panzergrenadier and Panzergrenadier formations able to take the Grilles.
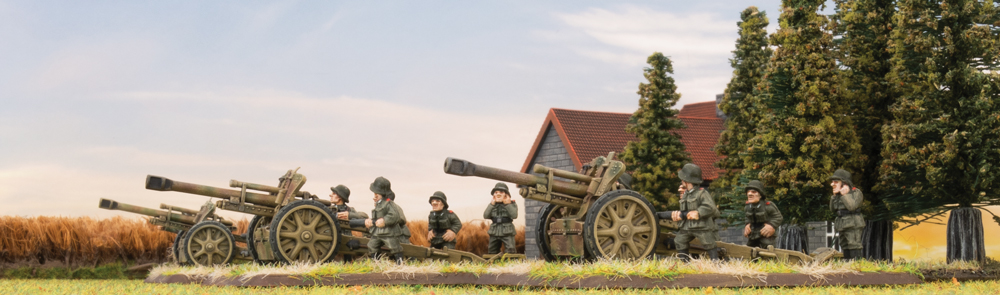
Moving onto the support options now we look at the guns first starting with the workhorse of the artillery – 10.5cm howitzers. Again, you have the choice of the towed version or self-propelled (Wespe). The range is 72” with AT3 and FP3+ with a smoke bombardment. Direct fire out to 24” AT9 FP2+ with Brutal and Smoke. Towed is two for 7pts and four for 14pts. Self-propelled is three for 9pts and six for 18pts.
Next up is the Hummel (self-propelled 15cm howitzer). Massive 80” range AT3 FP2+. Again, you want something to stay down, this is it. The gun can fire direct out to 16” with AT11 AUTO FP and Brutal. If you can afford these over the Wespes or 10.5cm towed guns, then do it. Three for 12pts or six for 24pts.

One of my favourites and almost an auto include for most of my lists is the 15cm Nebelwerfer Battery. Sporting a salvo template to keep your enemies hunkering in their foxholes, it has a range of 64” AT2 FP4+ with a smoke bombardment. Three for 9pts or six for 18pts.
The new kid on the block for this release is the armoured version of the nebelwerfer. This is your counterbattery rocket launcher battery. Able to lay down a devastating barrage and then move to take up alternative positions – can never be pinned. Same stats with 64” range and AT2 FP4+. Two for 8pts and four for 16pts.
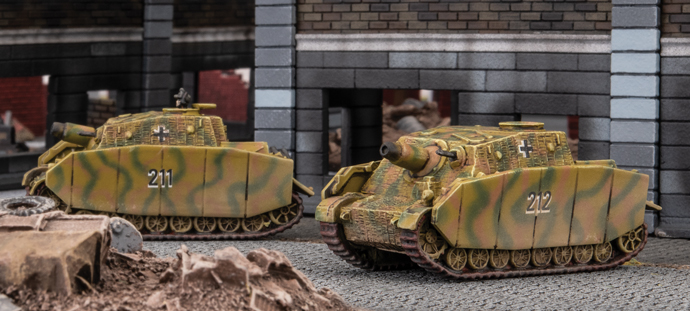
The Brummbar whilst is primarily an assault tank has the indirect capability. 56” range AT3 FP2+ that also has a direct range of 16” AT7 AUTO FP…and FA10. That is right, FA10 – can get right up in the enemy’s face and dig them out after bombarding them for a turn or two first from the range! Two for 14pts, three for 21pts, and four for 28pts.
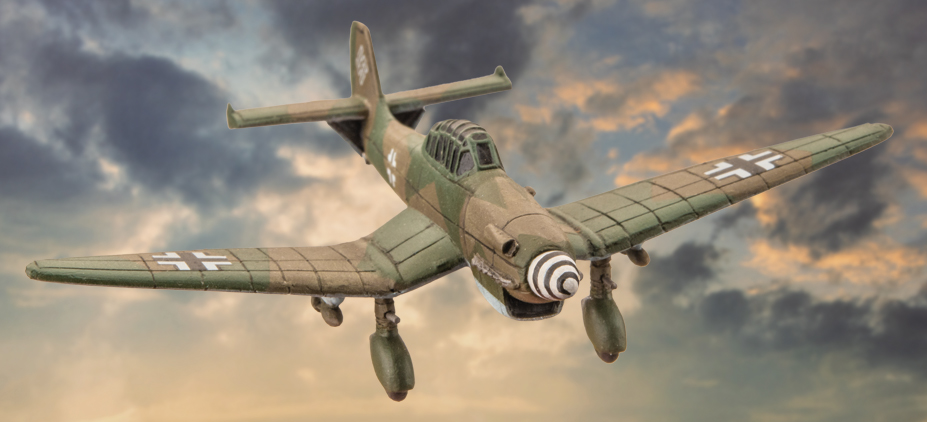
The final support option is the JU 87 Stuka Dive Bomber Flight. You can fly anywhere on the board and drop bombs on your opponent and with a template with AT4 and FP2+ this is probably the best artillery option for taking on tanks if you need to. The AT4 can even threaten heavy tanks such as the Tiger and IS-2s top armour. A flight of two costs 8pts. With the Bombs rule, even though you only have two planes, you are not penalised for having to reroll hits.
Surprisingly in this release, there are also several command upgrades if you want to take something a bit different. The first of these is the mountain guns – flavour for those who want to run Gebirgsjager Company Command Card (but can be used independently). The 10.5cm Mountain Artillery Command Card is basically the same stats as the standard 10.5cm battery with it being less than 1pt for the battery due to having no gun shields. A good option if you need a spare point back for something else and are taking 10.5cm guns anyway. If they are going to be dug in, then it saves you a point – the only issue is if you want to move them and risk getting fired at directly and no FP save due to no Gun Shield.
The 7.5cm Mountain Artillery Command Card allows you to field the 10.5cm Artillery Battery with better movement stats, ability to cross on a 3+, same indirect range but AT2 and FP4+. Direct fire out to 20” AT6 FP3+. All this for -1pt per gun in the battery. If you took a battery of two it would be 5 pts or the full battery would be 10pts.
For those who love their rocket launchers, you have a couple of options here too. The first is the 21cm Nebelwerfer Command Card. For an extra point per gun team, the range increases to 72” AT to 2, and FP improves to 3+. Something to consider if you have the points available. For me, the difference between 3+ and 4+ is the ability to remove something from the board if the target team fails its save. Three for 12pts or six for 24pts.
The 30cm Neberwerfer Command Card allows you to field the largest rocket launchers. I have the models for these – very cool looking! This card replaces the 15cm variant for an extra point per gun team. Same range as the 15cm version but AT3 and FP2+. Now we are talking – salvo goodness and removing enemy teams who fail saves on 2+! The caveat here is that it is a three-shot weapon only. Use it three times and it cannot fire anymore – so make those barrages count! Three for 12pts or six for 24pts.
The last command card is the Stuka Zu Fuss. This command card applies to the Panzer Pioneer Platoon only. This is a one-shot weapon for five points and allows you to fire one bombardment with your Sd Kfz 251 Half Tracks. Each Half-Track counts as one weapon. Stats are 36” range with AT3 FP2+. Another salvo option for 5pts if you take that platoon. Could be useful if you have the points and can shock your opponent if they do not look at your list in detail.
The tables below do a direct comparison across each of the weapon systems and will help you determine what you might want to include in your force.
Weapons using a standard artillery template:
| Weapon | Range | Anti-tank | Firepower | Notes |
| 8cm Mortar | 40”/cm | 1 | 4+ | Smoke Bombardment |
| 12cm Mortar | 56”/cm | 2 | 3+ | |
| 7.5cm Infantry Gun | 48”/cm | 2 | 4+ | |
| 7.5cm Mountain Gun | 72”/180cm | 2 | 4+ | |
| 15cm Infantry Gun | 56”/cm | 3 | 2+ | |
| 10.5cm Gun | 72”/cm | 3 | 3+ | Smoke Bombardment |
| 15cm Gun | 80”/cm | 3 | 2+ | |
| JU 87 Stuka | Anywhere | 4 | 2+ | Bombs |
Rocket launchers using the salvo template:
| Weapon | Range | Anti-tank | Firepower | Notes |
| 15cm | 64”/cm | 2 | 4+ | Smoke Bombardment |
| 21cm | 72”/180cm | 2 | 3+ | |
| 30cm | 56”/140cm | 3 | 2+ | |
| Stuka Zu Fuss | 36”/90cm | 3 | 2+ |
The last thing I want to cover off is using an observer. You have a choice of a Panzer II OP or Sd Kfz 250 OP if you wish to take an observer. Both cost 1pt. The Panzer III has more armour, so is probably more survivable, but if you already have Sd Kfz 250s in your force, it makes sense to use that option. Now you can only take an observer if you take one of the following artillery support units:
- 5cm Artillery Battery
- Wespe Artillery Battery
- Hummel Artillery Battery
- Panzerwerfer 42 Battery
- 15cm Neberwerfer Battery
If you take one of the command card options that replace one of the above, eg 7.5cm Mountain Artillery Battery, that also applies. Once you have an observer in your force, it can spot any artillery unit including any formation units except for the JU 87 Stuka Dive Bomber which must self-observe.
In summary, the Germans get a lot of artillery options to choose from with this release. Choose the best unit that suits your requirements and cost to fit into your force and enjoy list building!
Bagration: German Previews
78. Sturmdivision – The Iron Hands of Eastern Front
With Adam Brooker
The 78. Sturmdivision or 78th Storm Division was one of the more famous German Wehrmacht divisions from the Eastern Front campaign. It was raised in Stuttgart Germany in 1939, and had fought all the way from the Polish border, through the Russian Steppes, and finally to the gates of Moscow in 1941 as part of Army Group Centre, in Operation Barbarossa. The division was finally turned back not only by stubborn Soviet defences but also “General Winter”, it then had to fight a series of defensive battles against the Soviet Winter Offensive in late 1941/early 1942, in the fighting known as the Rhzev Meat Grinder, due to the significant Soviet losses in man-power. Despite heavy losses for both sides, it was a strategic stalemate, with the Soviets unable to destroy Army Group Centre, and the Germans being forced to retreat from the Rhzev salient in Operation Buffalo (Büffel), to shorten their line and release some divisions to create a reserve.
The 78. Infantry-Division (at the time) having taken heavy losses in the fighting was pulled back to reorganise. In early 1943 it was reorganised as the 78. Sturmdivision, with their Divisional symbol now becoming the armoured fist of Götz von Berlichingen, a famous 16th-century German knight, mercenary, and poet, who has lost his hand in battle, had a metal prosthetic made (and continued fighting for another 40 years….). He also invented a rather crude phrase, which you should google.
For example, each company was authorized 3 enlarged infantry platoons (with 2 light machine guns, instead of 1), a heavy platoon of two heavy machine-guns and two 81mm mortars, and two platoons of three PaK40 anti-tank guns. With 3 Regiments in the Division (14th, 195th, and 215th) and each Regiment having 2 Battalions, and 3 Companies per Battalion, it was a possible 18 Pak 40 per Battalion, and 108 for the whole Division.
In practice, they only ever achieved around eleven Pak 40 (75mm) anti-tank guns per Battalion, which was almost the usual allotment for a whole Grenadier Regiment. In total, the Division had an amazing 99 Pak 40s available to it, as well as many Panzerfaust and Panzershreck anti-tank launchers. This is a luxurious amount of anti-tank firepower, as a standard 1944 Org Infantry Division would have 35 75mm Anti Tank guns in total, which includes 21 standard Pak40s, and another 14 self-propelled Pak 40s (probably Marders or equivalent).
Additionally, the division was given extra regimental artillery support, as well as more heavy mortars and, Nebelwerfer rocket launchers that were not normally organic to an Infantry Division. It even had its own Assault Gun Battalion, 189. Sturmgeschütz-abteilung with 31 StuG III Assault guns with a dedicated Escort Troop (Begleit) Company, as well as 21 Marder II Tank Destroyers of 178. Panzerjäger-abteilung. All this extra firepower and support greatly increased the morale as well as the combat effectiveness of the 78th Storm Division, but it was also critical to the success of this Division in combat, as it needed all these extra weapons to make up for the fewer men in the units.
After the rebuild, the 78th Storm Division then fought in the meat grinder at Kursk in Operation Citadel as part of XXIII Corps of the 9th Army, in the fighting at Ponyri, before having to eventually pull back as the Wehrmacht retreated. During the following Soviet Counteroffensive, the division was first transferred from the Ninth Army to the Fourth Army in Byelorussia, in July 1944, at the outbreak of Operation Bagration to defend the city of Orsha that sat along the highway from Moscow to Minsk on the 22nd of July 1944.
Hitler had designated it a Festerplatz or Fortress City, that was to be held at all costs, which was ultimately a failed strategy that caused even more losses than a normal fighting withdrawal, as it allowed the defenders to be encircled and destroyed in detail. The Division took part in the defence of Festerplatz Orsha, along with the 25th Panzergrenadier Division and the 260th Grenadier Division, defending a 32km front across the highway to Orscha.
At the time this division was one of the largest and well-equipped Infantry Divisions on the Eastern Front. In fact, by the middle of 1944 while most German Divisions were a shadow of their former strength, the 78th Stormdivision was easily double the strength of any other division with a trench strength of 5700 fighting troops, compared to around 2500 in other Infantry Divisions at the time. It was also supported by 18 Hornisse Heavy Tank Destroyers from the Armee support. This was also known to the Soviets, who massed significant resources against it, with the 11th Guards Army and the 71st Rifle Corps arrayed against it.
The Stormdivision halted the Soviet offensive for the first two days, inflicting severe losses on the Russians, from their prepared positions, with large networks of trenches and strong-points. The Soviets even had heavily armed engineer units of PT-34 mine rollers, sapper-engineers, and assault gun support over several waves, but they were repulsed, no doubt the numerous Pak 40 anti-tank guns assisted greatly.
By the evening of the 23rd of July, the 78th had withdrawn to its second defence line in good order, and the German thought their position was reasonably secure. Unfortunately that evening, a Soviet reconnaissance unit found a disused narrow-gauge rail line that allowed a path through a swampy area in the North, that the 78th Stormdivision bordered with 256th Grenadier Division (the southern-most defenders of Festerplatz Vitebsk to the north).
This was the weak link in the German defences, and the Soviets pounced the next morning. The 1st Guards Rifle Division pushed through the swamp and caught the Germans by surprise, causing the defenders to pull back to their 3rd line, with them struggling to keep contact with the neighboring 25th Panzergrenadier Division to the south. The Soviets then pushed a mixed cavalry and mechanised exploitation force through the gap, and with the German forces to the North at Festerplatz Vitebsk collapsing this made their position exposed to being encircled.
They pulled back again into Orscha on the 26th of July, and intense city fighting ensued with the 78th trying to hold off two full Soviet Divisions. Meanwhile, the Soviets pushed the 2nd Guards Tank Corps to break through the German lines towards Minsk. The 505th Heavy Tank Battalion and 5th Panzer Division arrived and attempted to hold them, but failed, with the fast armoured force continuing on to Minsk, leaving some troops to complete the encirclement.
The 78th fought hard and bravely, holding on at the railway station in the center of Orscha to allow a train of wounded men to be evacuated and to buy time for the other German forces to retreat. By the morning of the 27th, Orscha had fallen and the road to Minsk was wide open. Despite the loss, it was still an impressive feat, the Germans had held for 5 days, with four Battalions holding nine times their number, and allowing the rest of the Storm division to retreat.
By the 5th of July, they had retreated over 200 kilometers, in a series of fighting withdrawals, escaping encirclement after encirclement. They were finally caught around Minsk, and could not fully escape this encirclement. The Division was practically destroyed around the 5th/6th of July, and any surviving elements were taken over by the 565th Volksgrenadier Division. Their commander, General Traut was also captured, and most of their equipment lost.
Later that month, the few surviving elements were reconstituted as the 78. Grenadier Division, with parts of the 543rd Volksgrenadier Division which was in the process of forming at the time, and was then renamed the 78th Volks Sturm Division. It then fought as part of the Army Group Center in Poland, Upper Silesia, and Czechoslovakia until they finally surrendered to the Soviets in May 1945.
How does this unit get represented in German Bagration? Well, it is similar to your standard Grenadier Company, but it basically has ALL of the guns. It has two sMG34 Platoons instead of one, both an 8cm Mortar Platoon and a 12cm Mortar Platoon instead of either/or, and two 7.5cm (Pak40) Tank Hunter Platoons, instead of a choice between a 5cm Pak 38 or the 7.5cm Pak 40. Also, the Storm Grenadier Platoons’ extra unit firepower is shown by them being equipped with MG42 teams, instead of MG42 and K98 Rifle teams of a standard Grenadier Platoon, so RoF 3 instead of two. Although like the standard Grenadier Platoons they are equipped with a Panzerfaust, and the option of adding, up to 2 sHMG42 teams, and 2 Panzershreck teams. That is a lot of firepower!! A full Storm Platoon with two sHMG can release a punishing 33 shots into any infantry unit attempting to assault it… not a Soviet Motor Rifle Company’s Captain’s idea of a great time……
This is not even considering the additional firepower a Storm Grenadier Company can bring to bear, getting through all those additional sHMG’s, mortars, 7.5cm, and 15cm infantry guns, 2cm AA guns, and 7.5cm anti-tank guns would be a real pain. But all this extra firepower comes at a price, and as per usual German formations are very expensive. If you were to take all the units in the formation alone, maxed out with all the options, it comes to 152 points, that is without taking the MG Nest or PAKFRONT command cards that would be relevant to this force.
Support units that would be historically accurate to associate with this force given its additional forces in the Division would be 10.5cm Artillery, 15cm Nebelwerfers, Marder II, Stug Assault guns, and more 7.5cm Anti-tank guns. Additionally Tigers and Hornisse Tank Destroyers if you wanted to represent the fighting around Festerplatz Orscha.
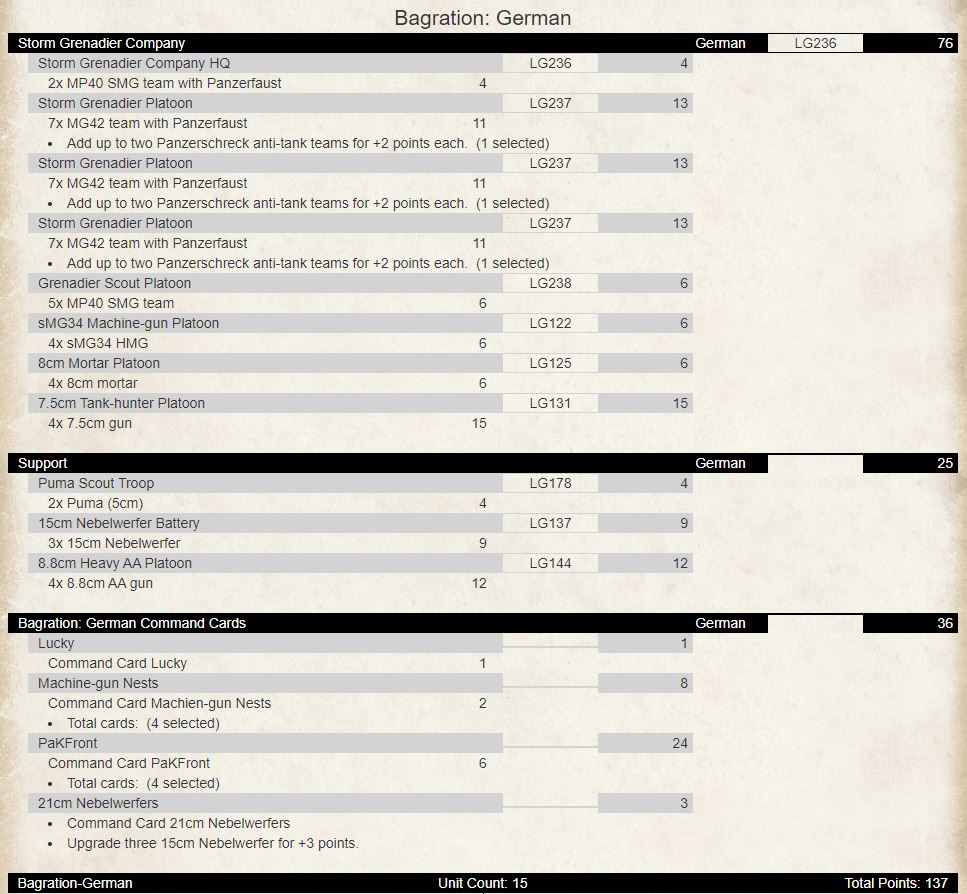
I put together a list trying to keep it reasonably true to the Divisional organisation in 1944, but also kind of competitive. As you can see it has a solid core, of 2 Storm Grenadier platoons, as well as 8cm mortars, sHMG’s, and 75mm anti-tank guns. I also have the SMG armed scout Grenadier platoon, to be able to advance the deployment of a Storm Platoon and HQ if I think there is a favorable position to be aggressive with my infantry. A well-played aggressive infantry list can be very hard for some lists to stop, especially if there is some nice concealing terrain to advance through.
But primarily this is a defensive list and should be played as such usually if you are using battle plans, never choose ATTACK or MANEUVER with this list, having to choose reserves will be a massive pain.
I have given the PAKFRONT card to the 8.8cm AA guns, as they will be my primary method of taking out and restricting the movement of any heavy armour, such as the Soviet IS Tanks. This means they can be placed independently, rotate 360°, have a bulletproof cover and an enemy need to re-roll their firepower tests to destroy it. The only downside is they cannot move or charge into contact but gun teams cannot charge into contact anyway, and not moving is fine and well worth the cost. For extra protection, I have taken the lucky card, as you never know when the re-roll will come in handy, say stopping your 8.8cm AA gun from getting destroyed.
Anything that the 8.8cm AA guns will be overkill for, the 7.5cm Pak 40s can handily take care of them. They are also a good choice if you are given the option to put a unit into an ambush and are facing a force with a large number of tanks.
I have also bought 4 sMG34 heavy machine guns with the Machine-gun Nests Card. This works similarly to the PAKFRONT card but is for machine guns. I will use these to protect areas from infantry assault, and like PAKFRONT as they are independent, they have to be taken out one at a time. It should be also noted that you could upgrade your Storm Platoons with sMG42 HMGs, and use this card as well if you knew it was going to be a defensive unit. But it’s only 2 extra points to get 4 HMGs this way, where if you upgrade the Storm platoon, you only get 2 HMGs for 6 points, but it could be useful.
Also just to let you know, you can buy both Pak Nest (XBX07) and MG Bunkers (XBX02) from the online store, they are great extras to add to your terrain and really set your battlefield apart. Both are in the terrain section of the online store.
I have also upgraded the 15cm Nebelwerfers to 21cm Nebelwerfers, this gives them a 72” AT 2, 3+ Firepower bombardment, compared to the normal 64” AT 1, 4+ Firepower bombardment of the 15cm variant. This is a new command card in the Bagration German Command Card deck. This extra AT and firepower will be good for digging out any infantry sitting on an objective, or also destroying any gun teams sitting under your templates. You can also destroy any open-topped vehicles if your opponent rolls badly and you roll well.
Another option is to upgrade to the massive 30cm Nebelwefers, for the same cost, which has an even better AT 3, 2+ Firepower bombardment, but a shorter range of 56”. The downside is it can only fire 3 times per game, so that needs to be kept in mind, and only fire at targets that are really worth it. But note, failing to range in does not use up one of your 3 Bombardments per game, you only count successful SALVO bombardments. So this to me is a very viable option, which I will definitely try, given how few times you really need to have a bombardment be successful in a game.
Overall this list should be a hard nut to crack, with plenty of anti-tank and anti-infantry firepower. The Puma’s are just there to be annoying, as I find they annoy me when I play against them, so should be annoying for my opponents as well. Just don’t treat them as little tanks, they as glass cannons, and should only be firing on tanks if there is a very good chance that there will be little to no effective return fire.
Well, I hope this gives you some ideas for your own Storm Division Company Formation, just the raw firepower a Storm Platoon can pump out has made me think about playing the odd defensive infantry formation, especially with the new Command Cards in this Bagration German book as well.
German Stater Force – Tank-hunter Kampfgruppe Unboxing
Anti-tank Support Options for a Bagration German Force
With new Tank-Hunter options available being released, I thought I would look at the anti-tank options available to support the force. There are both self-propelled and towed guns and there are advantages to both depending on your points, force, and playstyle.
There are two anti-tank slots in the support section plus the heavy anti-aircraft slot (which can double as anti-tank guns). This could give you the ability to take up to three platoons of anti-tank guns if you wish. The chart below shows you the options for each slot:
| Anti-tank Slot 1 | Anti-tank Slot 2 | Heavy Anti-aircraft Slot |
| 8.8cm Tank-Hunter Platoon | 8.8cm Tank-Hunter Platoon | 8.8cm Heavy AA Platoon |
| Jagdpanzer IV Tank-Hunter Platoon | 7.5cm Tank-Hunter Platoon | |
| Marder Tank-Hunter Platoon | Marder Tank-Hunter Platoon | |
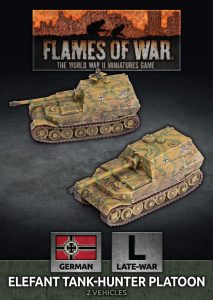
| Elephant Tank-Hunter Platoon | ||
| Hornisse Tank-Hunter Platoon | ||
As you can see, you can take dual 8.8cm Tank-Hunters or the Marder’s if it suited you.
 Starting off with the guns first, we look at the workhorse gun of the German army – the PAK 40 7.5cm anti-tank gun. These are integral to most infantry formations as well as being available to the force here in the support slot. This gun has a 32” range and packs an AT12 FP3+ punch. Two for 7pts, three for 11pts, and four for 15pts. Can take on most tanks and has a 3+ gun save making them harder to dig out.
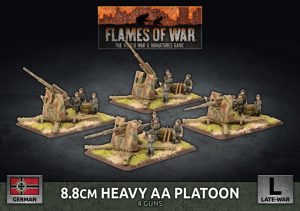 The next gun is the most recognised anti-tank gun of the war – the Flak 88. This is a dual-purpose gun that can take on aircraft as well as tanks and commands a 40” range with a punch of AT14 FP3+. Can take on all tanks – even heavy tanks. Two for 6pts or four for 12pts – a bargain, I think! A 4+ save though, so need to be careful. This can be mitigated by spending an additional 6pts on the Pak Front Command Card. This turns the guns into individual nests (reroll FP to be destroyed), and you can string them out along your line to cover all firing lanes and deny parts of the board to your enemy. This is one of my favourite combinations for four guns and a card costing 18pts.
The final gun is the crucible mounted long Pak 43 8.8cm gun. You can command the battlefield with this beast of a gun with a whopping 48” range and AT17 FP3+. Combine a platoon of these with the Pak Front Command Card to dominate the table. An alternative would be to take dual platoons and then cover both sides of the board with the massive range of the gun. With AT17 you can pretty much put down any tank you hit – even at range. The only vehicle you cannot penetrate from the front is the Elephant which I talk about a bit later.
Looking at the self-propelled options now, we look at the Jagdpanzer IV. Mounting the shortened Pak 40 gun 7.5cm gun it has the same range of 32” but slightly less AT of AT11 FP3+. This vehicle is the precursor to the Panzer IV/70. FA7 which is reasonable and like a Stug. SA3 which with the Bazooka Skirts rule means it goes to 5 ifs being hit with 5+ FP weapons such as Bazookas, PIATs, etc. Two for 11pts, three for 17pts, four for 23pts.
This brings us to the Marder Tank-Hunter. Mounting a Pak 40 7.5cm gun onto a Czech 38(t) hull, this is the final evolution of the Marder Tank-Hunter series – the Marder 3M. With FA1 and SA1, you will not win the armour contest, but the best armour for Germans is Careful and the Stormtrooper ability. Blitz out of cover, shoot full ROF and Shoot and Scoot back into cover. Two for 8pts, three for 12pts, four for 16pts.
Next up is the Hornisse Tank-Hunter mounting the Pak 43 8.8cm anti-tank gun on a Panzer IV chassis. With only FA2 SA1, you will be relying on the cover and being careful to keep them in the game. Fortunately, the gun’s long reach and penetration mean they do not need to close with the enemy. To me, this is the cheap man’s high end self-propelled gun, but if you use them well, they will pay dividends – same philosophy as the Marder’s – use your ability to Blitz followed by Shoot and Scoot. Two for 16pts, three for 24pts, four for 32pts.
Rounding out the heavy hitters is the monstrous Elephant. Sporting the Pak 43 8.8 anti-tank gun and FA16, you do not need to hide with this beast! Pretty much impervious from anything in the front, you still want an infantry screen to protect it from the flanks as whilst it has SA7, there are several vehicles out there that can a side shot and take it out. Protect the flanks and watch these beasts get to work on enemy armour. They can also assault on 4+ – handy to clear off an enemy dug on an objective if no other assault force handy! You can also take just one if you want to add that sniper ability to your force for 15pts. Two for 29pts, three for 43pts, four for 57pts.
The tables below do a direct comparison across each of the weapon systems and will help you determine what you might want to include in your force.
| Weapon | Range | Anti-tank | Firepower | Notes |
| 7.5cm Tank Gun | 32”/80cm | 11 | 3+ | Jagdpanzer IV only |
| 7.5cm Anti-tank Gun | 32”/80cm | 12 | 3+ | Towed, Marder |
| 8.8cm Heavy AA Gun | 40”/100cm | 14 | 3+ | Towed only |
| 8.8cm Anti-tank Gun | 48”/120cm | 17 | 3+ | Towed, Elephant, Hornisse |
So, depending on what you take in your formation(s), the force anti-tank slots can give you some extra oomph to take on the enemy depending on your preferences. For Bagration battles, you want at least AT14 as a minimum in your force. If you are not taking any AT14 in your formation units, then I recommend at least the Heavy AA Platoon and ONE AT17 unit – whether it is the Elephants, Hornisses, or Pak 43 Anti-tank guns, especially if you are facing Front Armour 10 IS2’s!
In summary, the Germans get some new heavy AT options to choose from with this release. Choose the best unit that suits your requirements and cost to fit into your force and enjoy list building!
All Miniatures Great and Small – Bagration: German Panzer IV/70
Bagration River Battles: Terrain for Operation Bagration Scenarios
With Joe Saunders
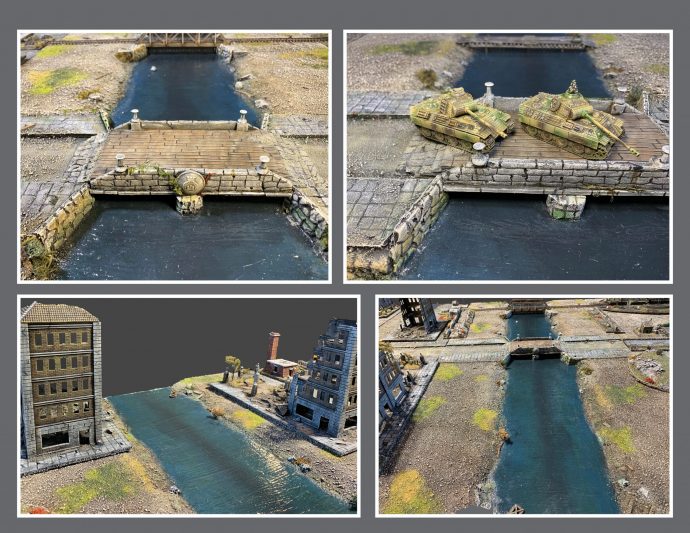
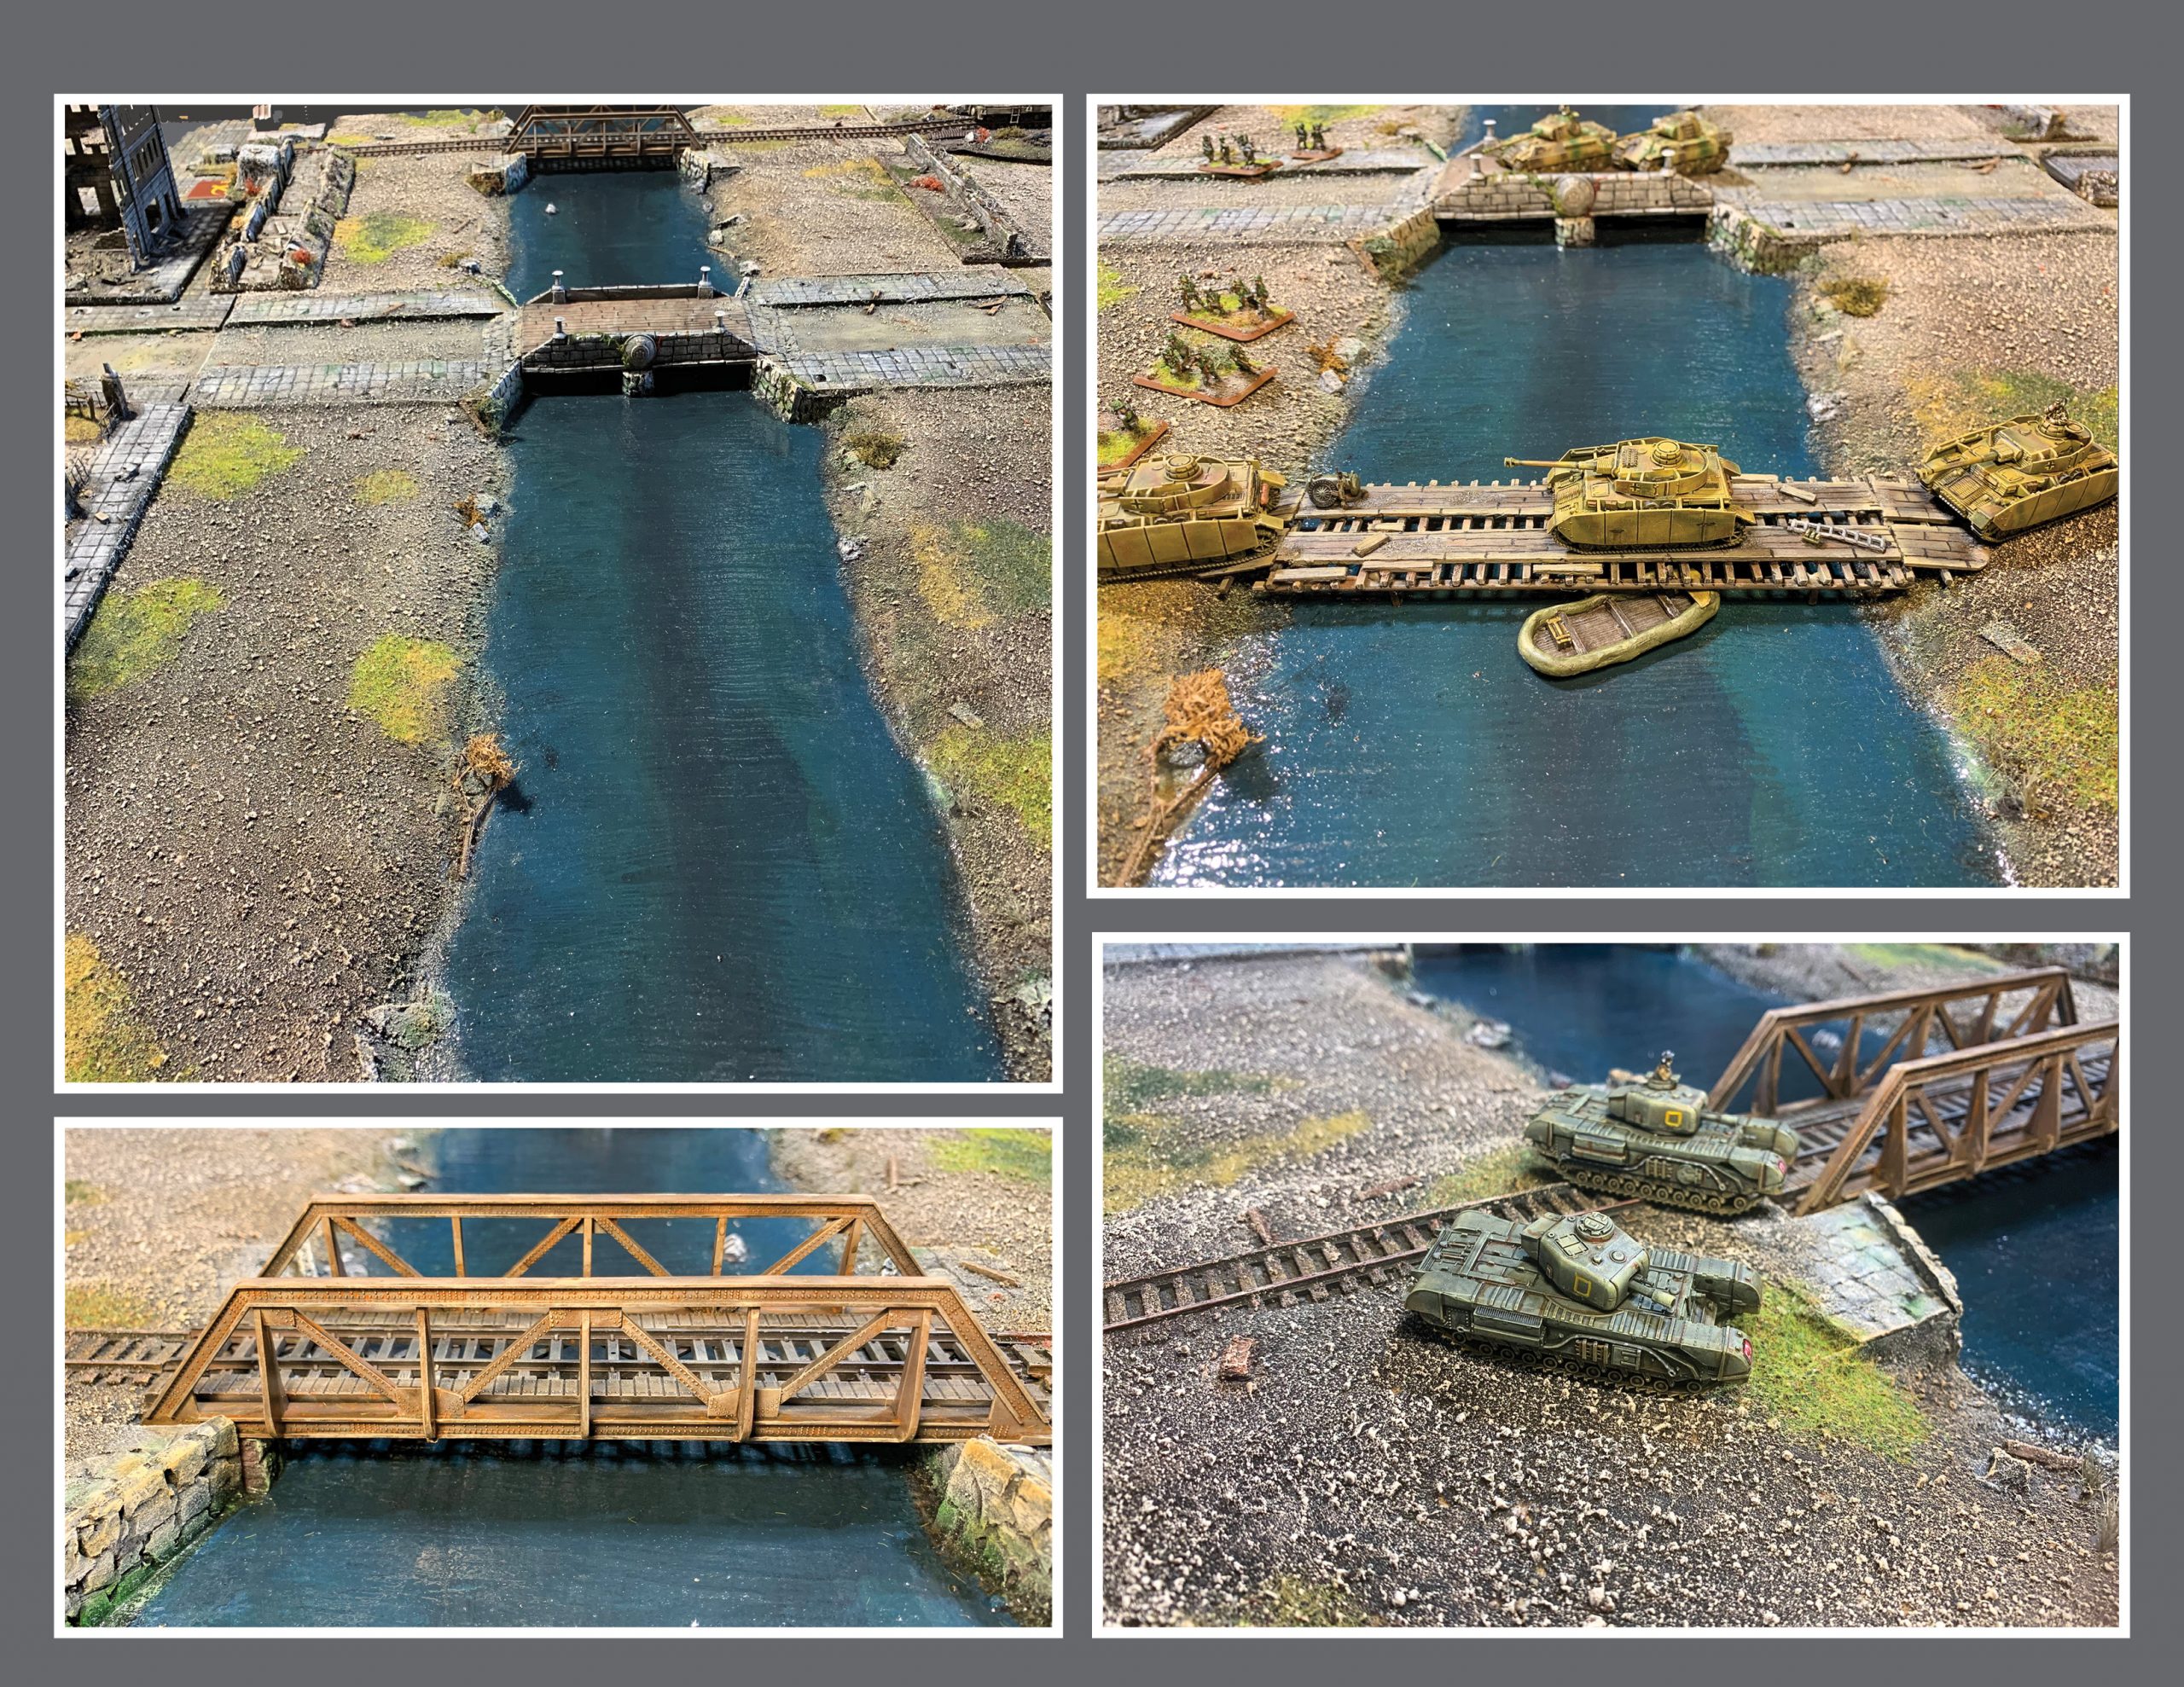
The launch of Bagration German combined with the Bagration Soviet now gives us a complete set of options for fighting some really dynamic Eastern Front themed games in Flames of War. Between the 2 books we have quite a few new scenarios adding attacks on both fortified cities and river crossings. In my previous articles we have explored the city fighting , so now I figured I should turn my attention to the river crossing scenarios.
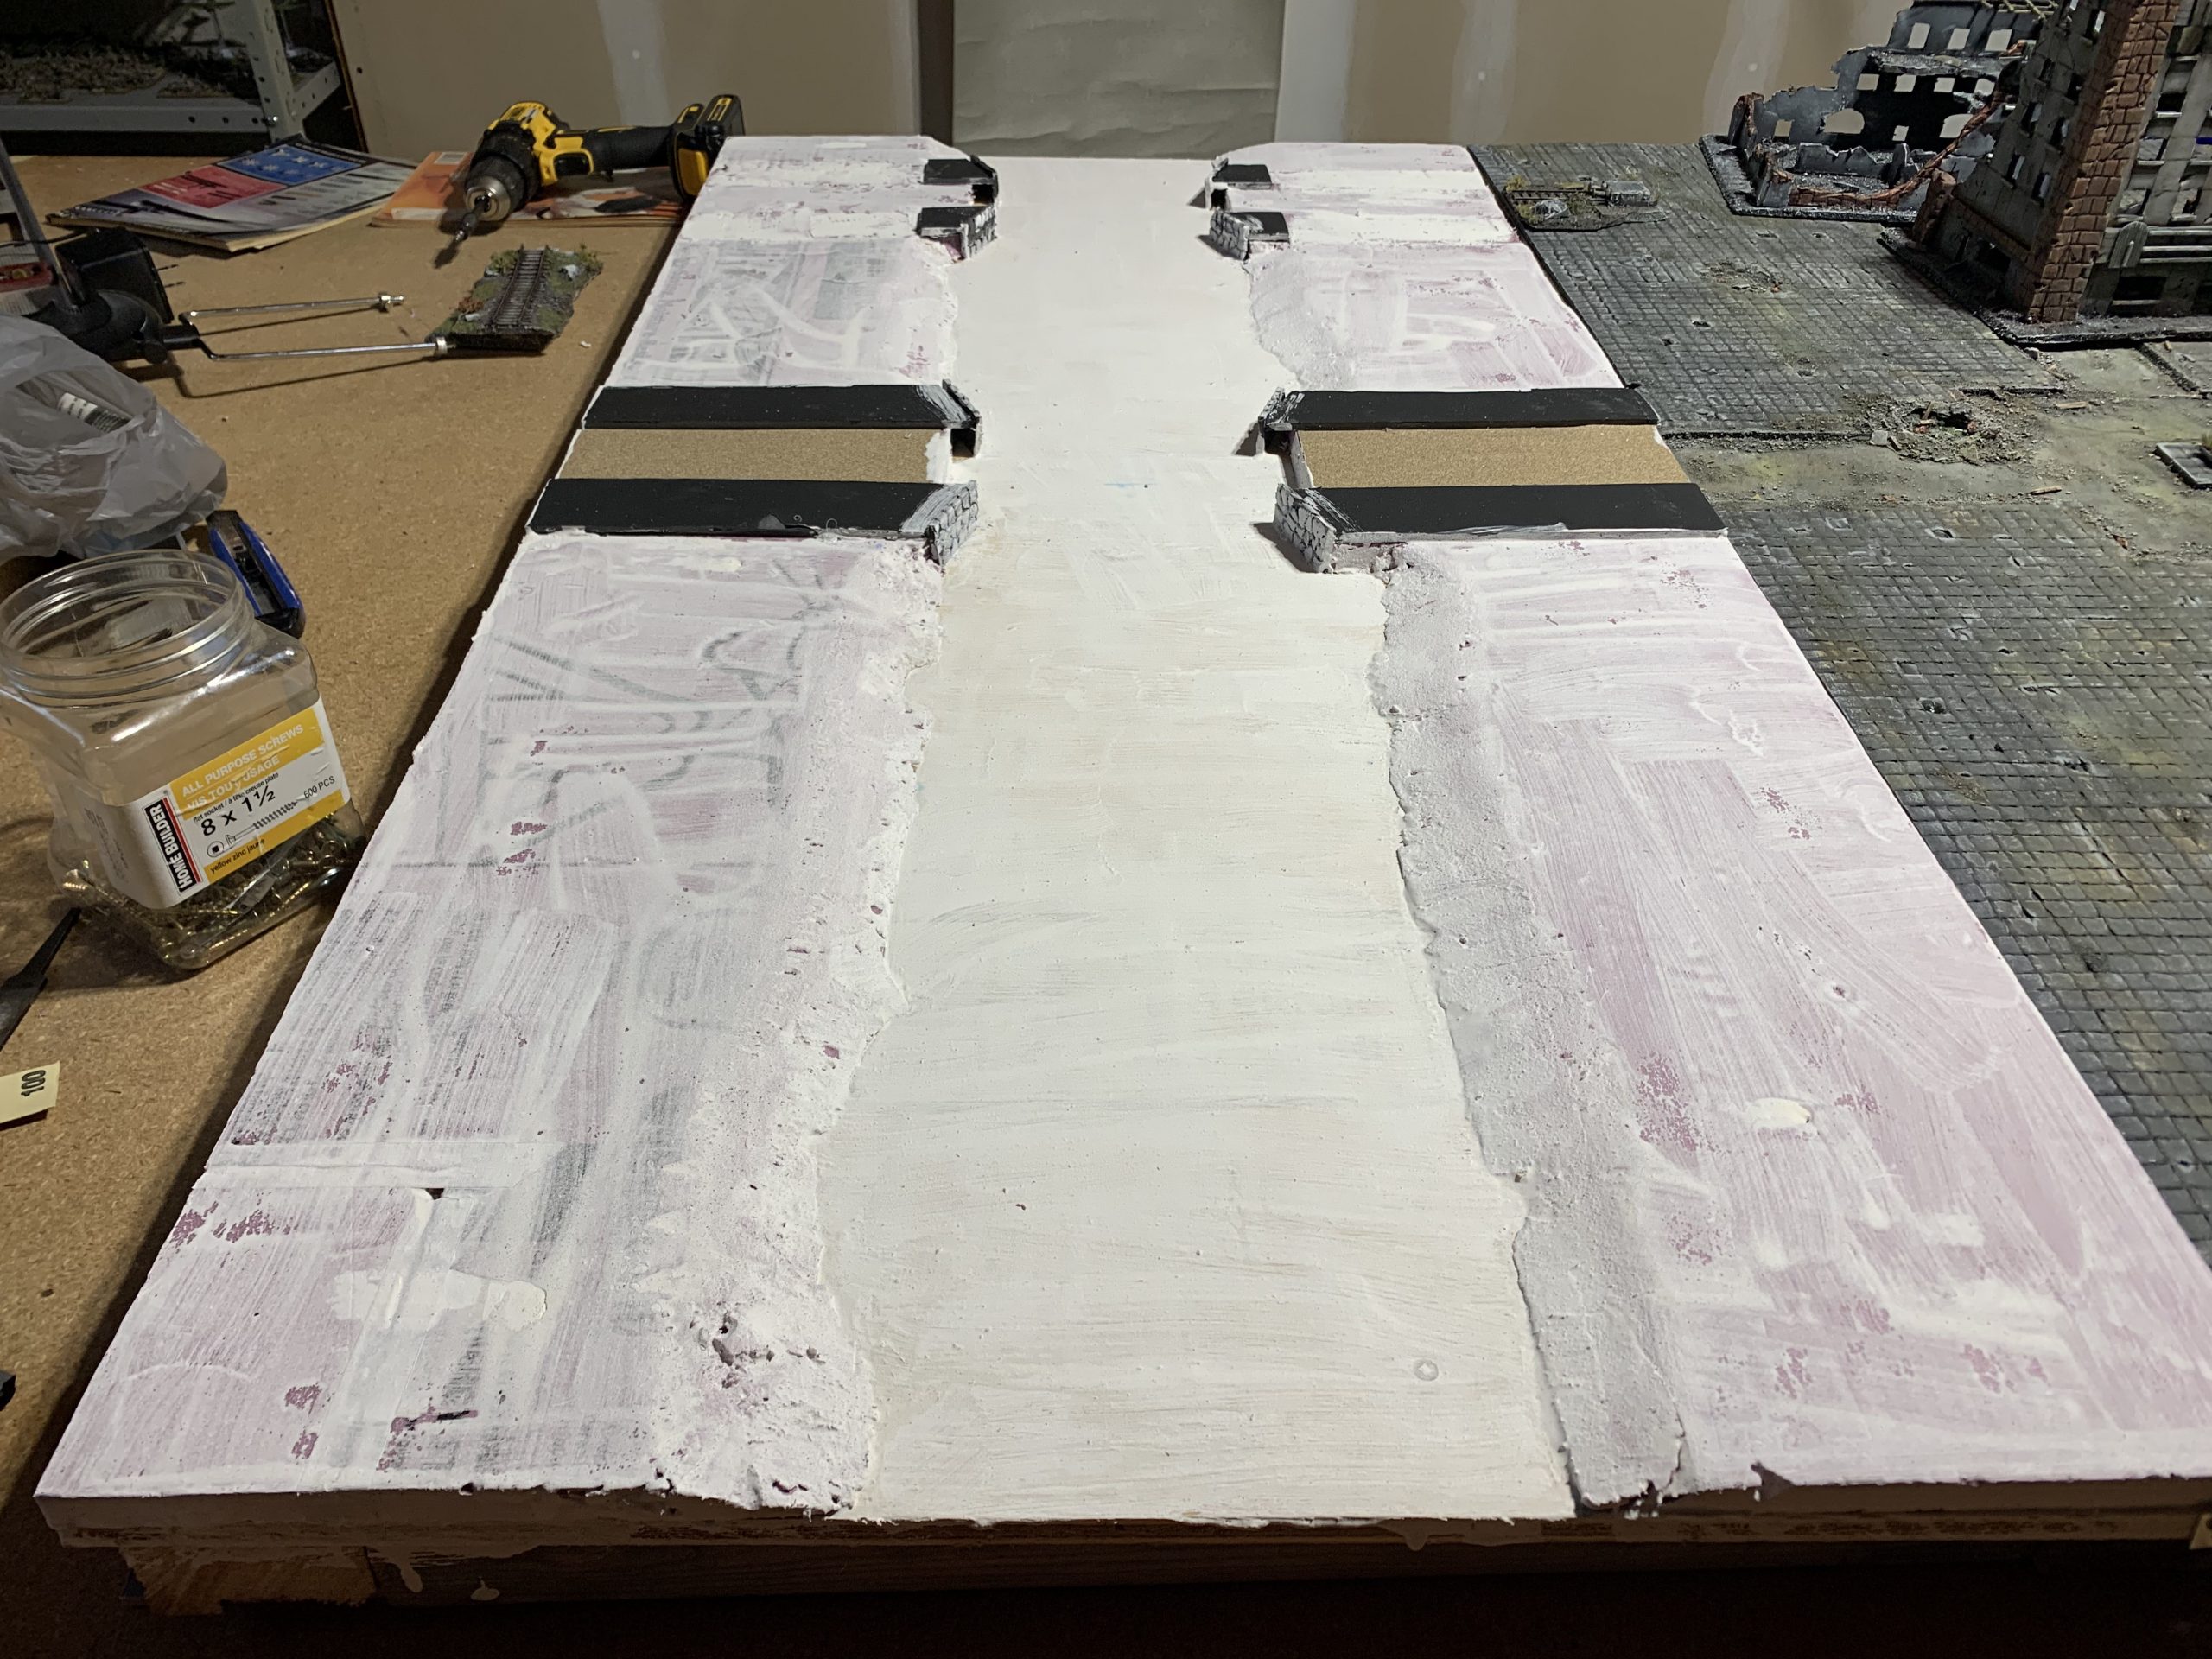
In order to play the river scenarios, we obviously need river terrain to fight over. Battlefront makes the new Bagration: River Assault Mission Terrain Pack to handle this. It provides a ready-made battle matt, card counters including assault boats, bridges and weapon emplacements and all of the tokens for your scenarios. However, I decided to build my own river crossing board to use. If you are interested in building a special backdrop to put your shiny new Bagration themed models on, read on and I will describe the process.
Materials:
This project requires a wide range of tools and skills to build. If you don’t have a particular tool or product you can always substitute something similar or use a different technique. As there are a few chemicals involved, make sure to work in a ventilated space and be careful with the knives hot glue gun etc. Here is the list of materials for the build:
| Airbrush & Compressor | Water | Grey Acrylic paint |
| Paint Brushes (all sizes) | Tweezers | Black Acrylic ink |
| Craft Knife | Hot Glue Gun | Brown Acrylic paint |
| Sand & Kitty Litter | Metal Ruler | Green Acrylic Paints |
| 2x4ft Piece of Plywood | Black Matt Spray Paint | White Acrylic Paint |
| 2×4 Boards | Foam Core Board | Beige Acrylic Paints |
| Plastic Mixing Cups | Plaster/Spackle | Blue Acrylic Paint |
| Matt Spray Varnish | White Glue | Mod Podge Gloss |
| Static Grass | Gloss Acrylic varnish | Pen & Paper |
| Rubbing Alcohol | Match sticks | Wood Saw |
| Wood Screws | Push Pins | Foam Glue & Caulking Gun |
| 2x 4ft Insulation Foam | Drill | Tape Measure |
| 2 Spray Bottles | File | Masking Tape |
| Model Lichens | Rolls of Sand Paper | Keyhole Saw |
| Drop Cloth | Various Bits box Objects | Model Train Track |
| Balsa Wood Sheet | Cardboard | Plastic Wrap |
Steps:
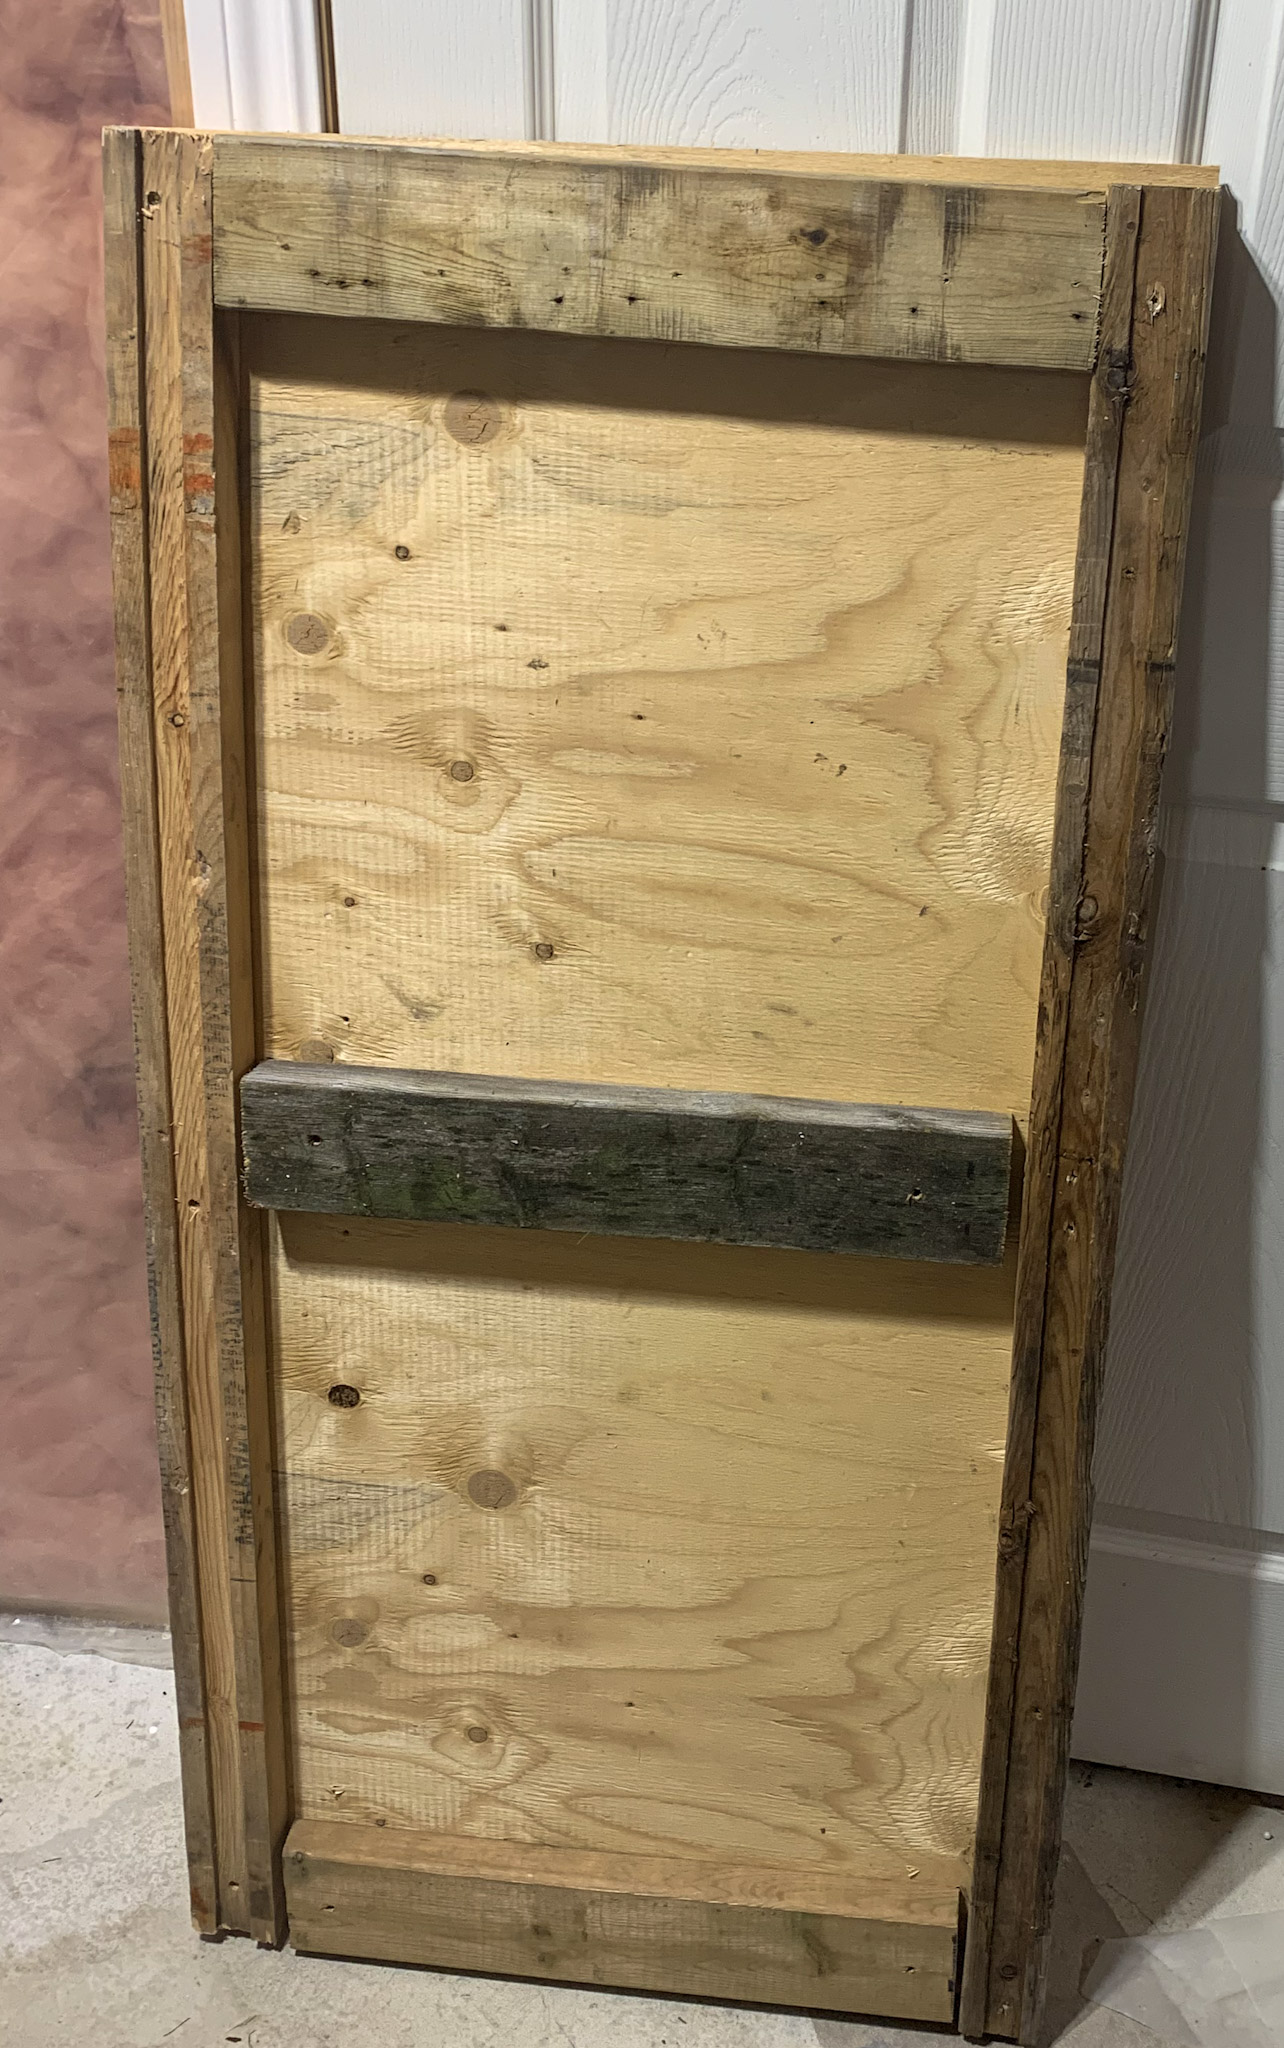
1. Building the Board: Using your tape measure rule out a 2ft by 4ft section of plywood. Cut this out with your wood saw. Next cut your 2×4 s into 2 4 ft long sections and 3 21-inch long sections. Place the 2 ft sections along the outside edges of the long side of the plywood and cap the ends with the 21-inch lengths. Place the third 21-inch length in the middle. Now using the wood screws and drill, screw the 2x4s onto the bottom of the plywood to create a supporting frame. Note: the picture shows the board from the bottom.
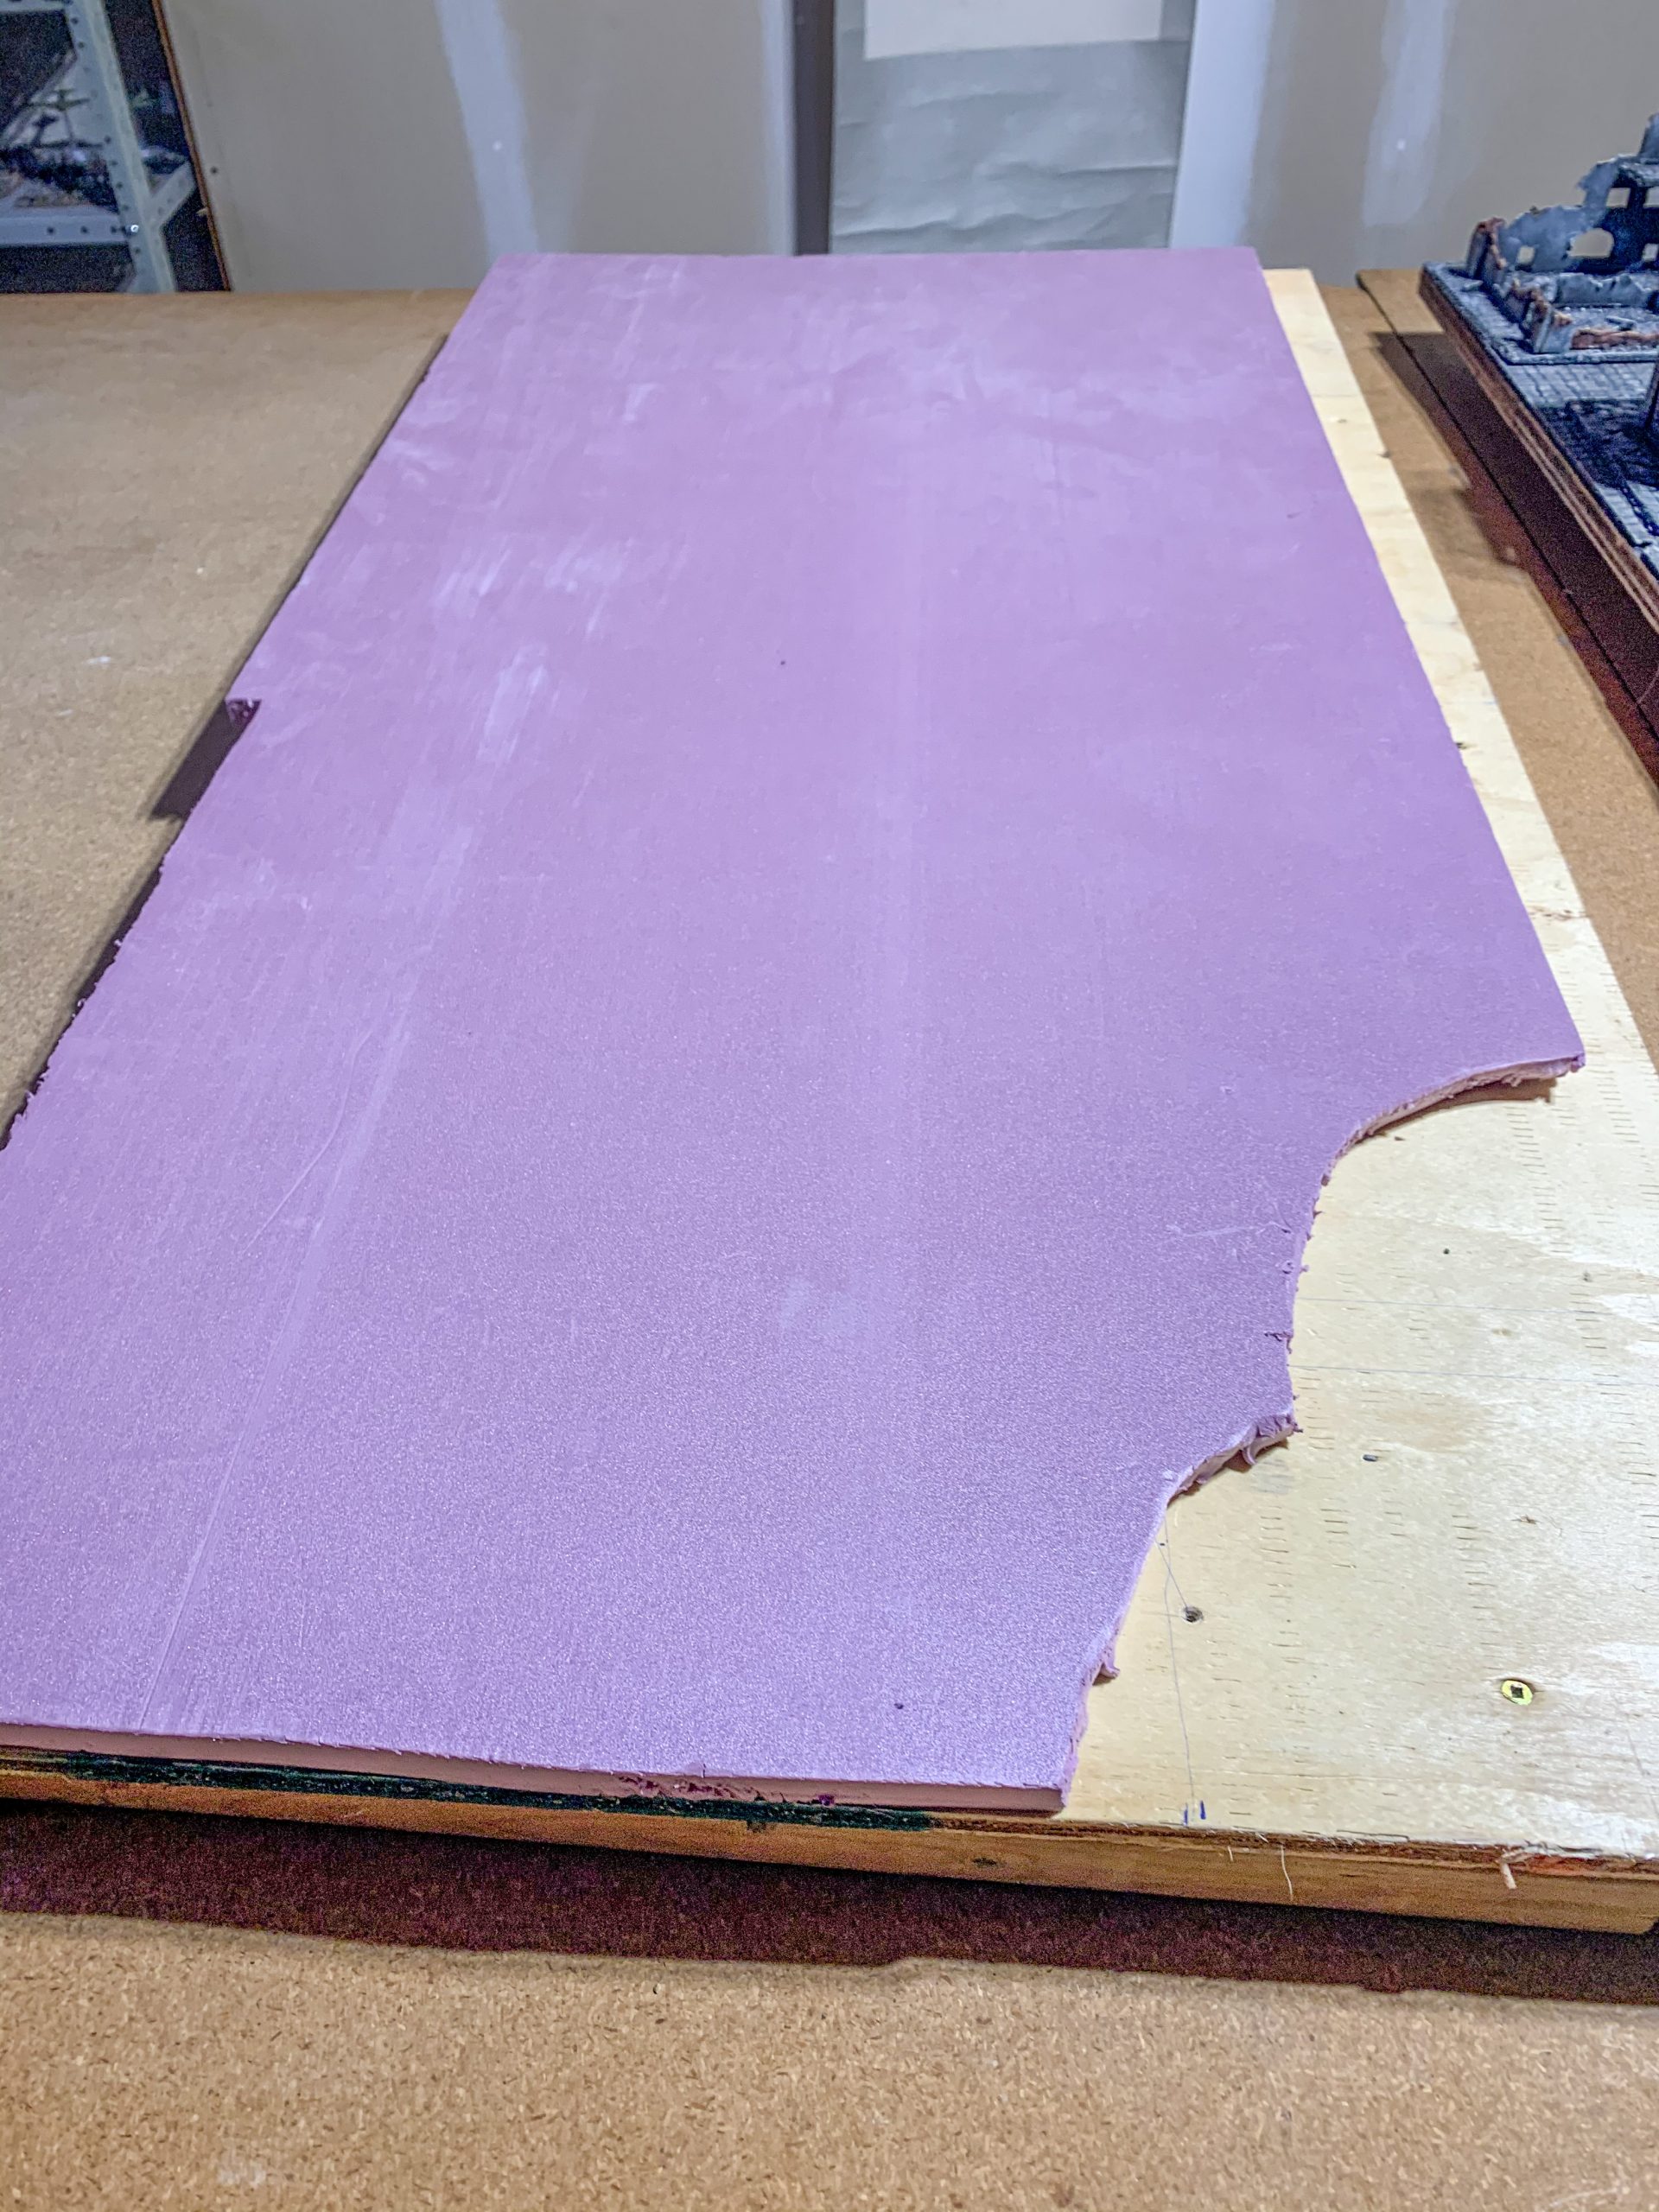
2. Preparing Insulation Foam: With the tape measure rule out the insulation foam to the same dimensions as the board. The laying this foam over the board us the drill to screw it onto the surface of the board. If the foam is not the same size, use your metal ruler and the key hole saw to cut out the foam to match the shape of the board. When this is done you can remove the screws and take the foam back off the top of the board. You may want to use the file and sandpaper to smooth out any rough edges from cutting the foam.
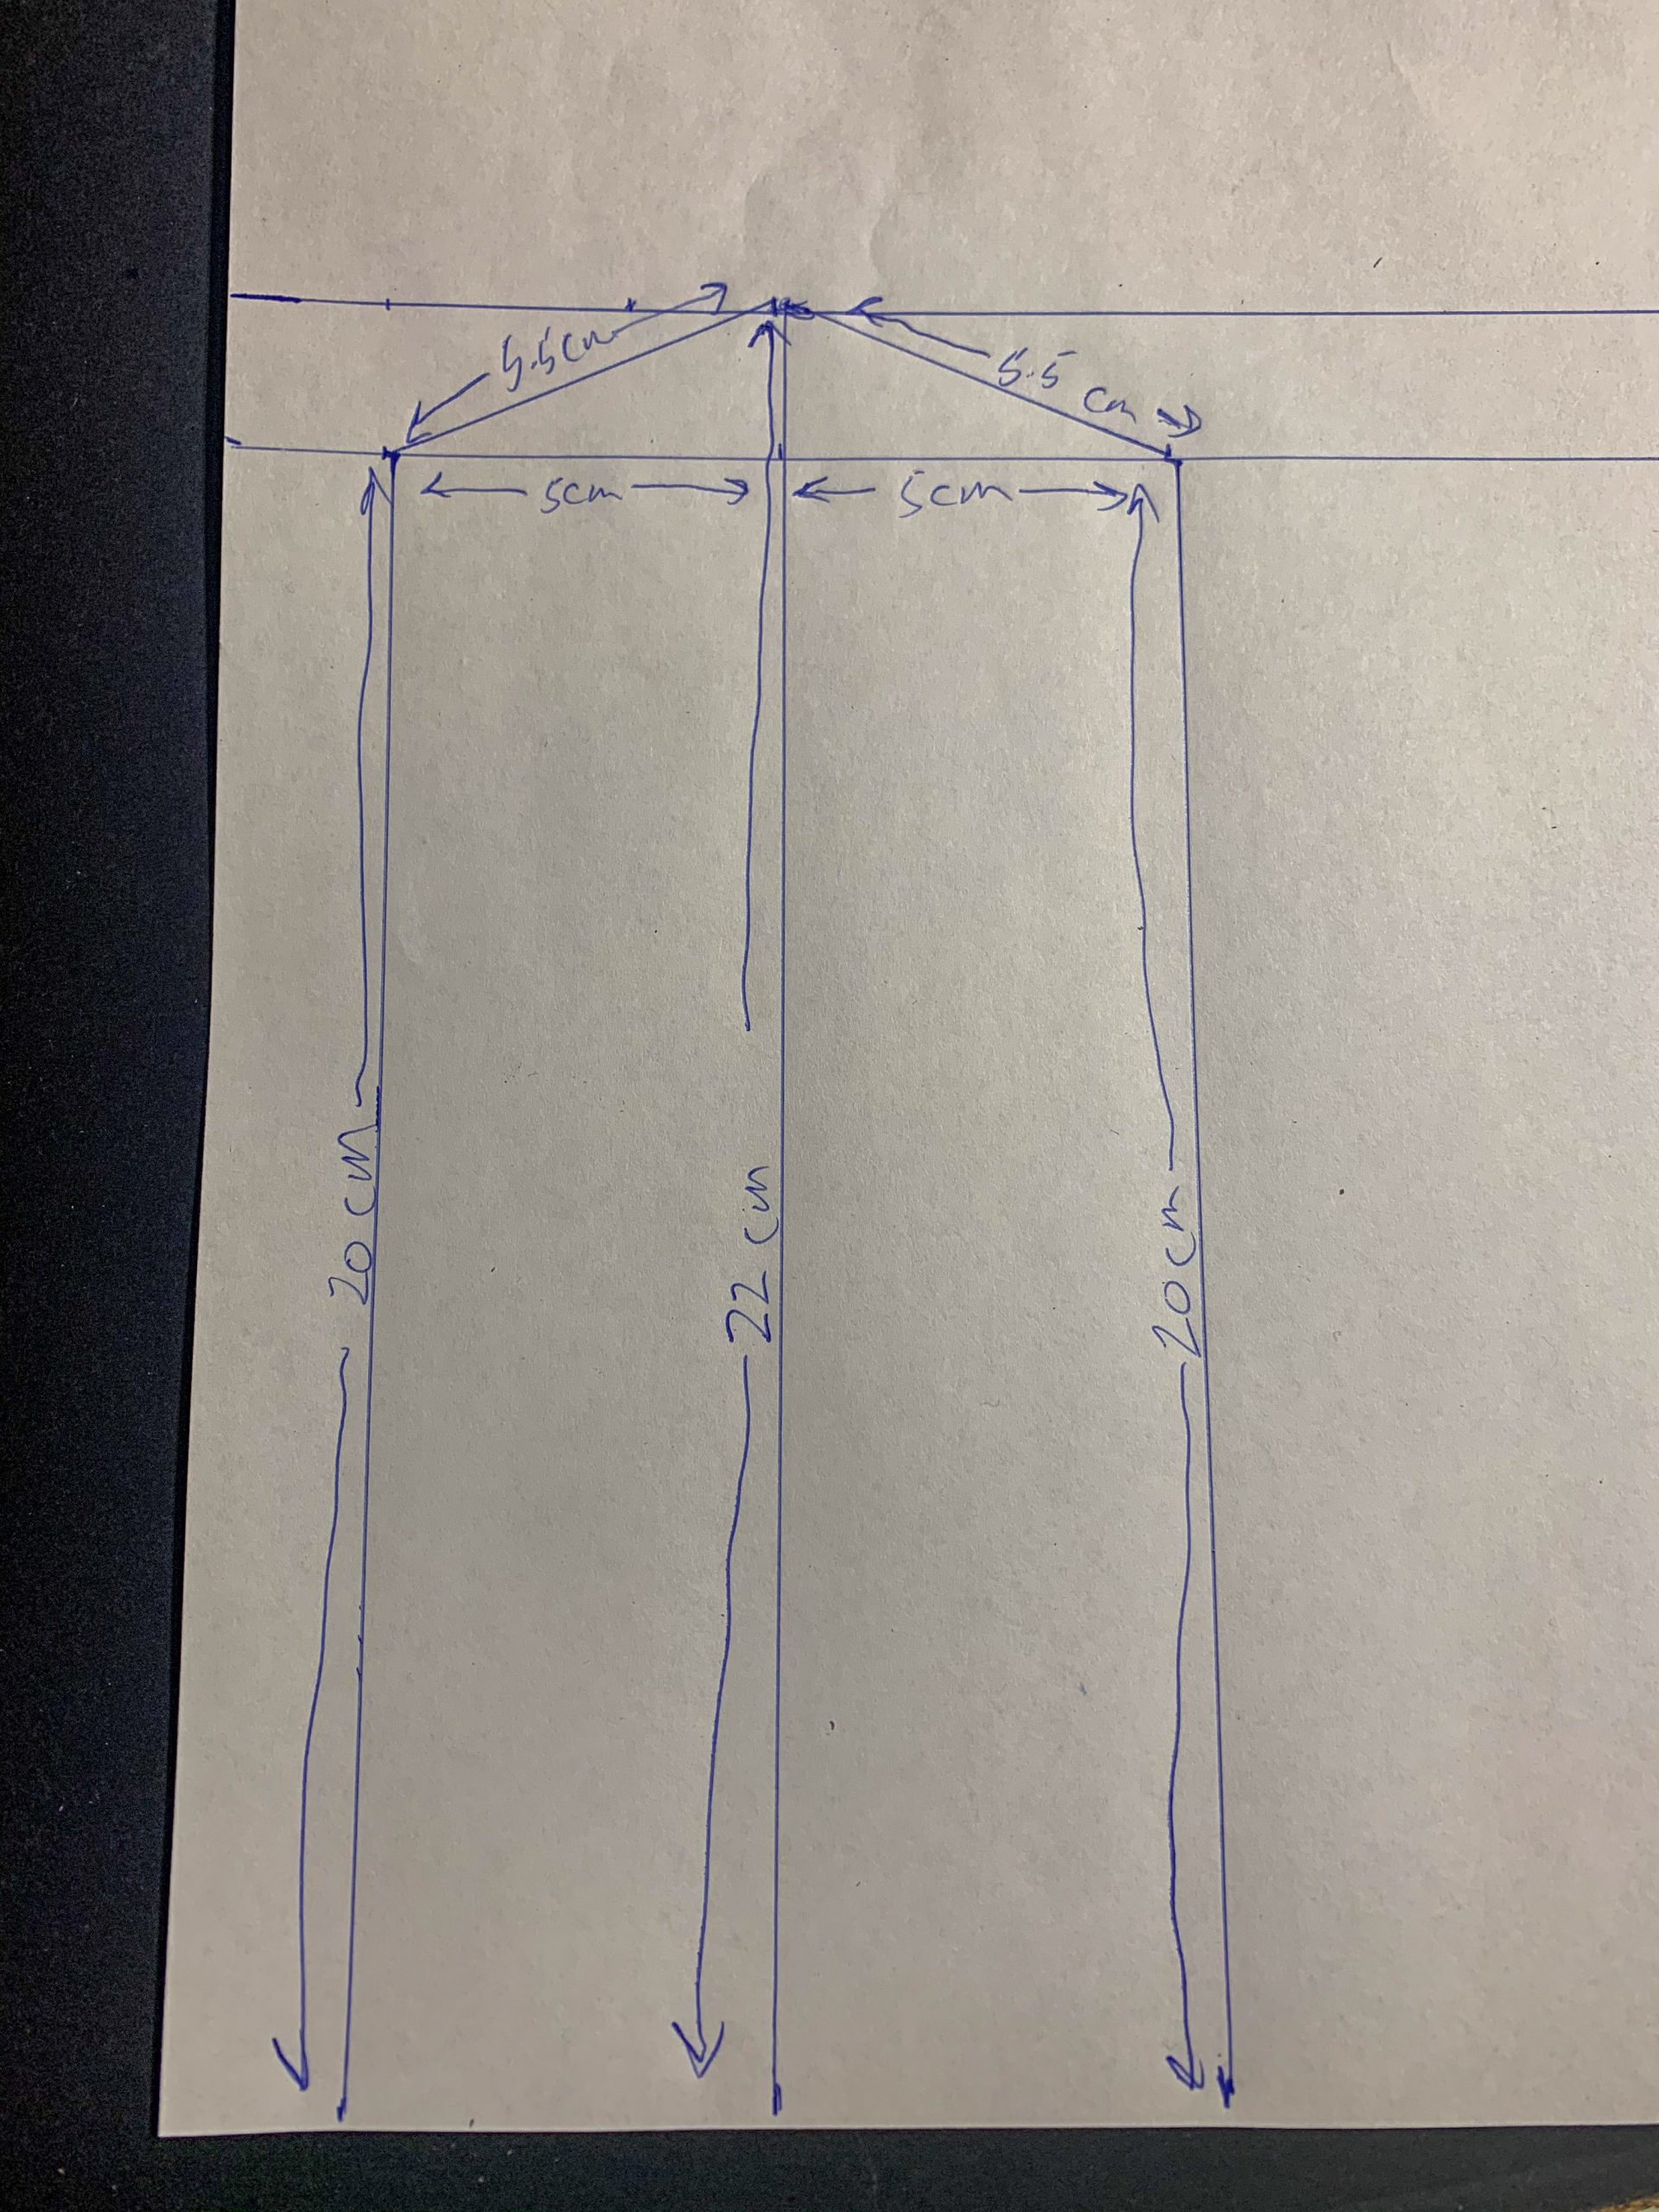
3. Planning: Tacking the ruler and pen I drew onto the board the measurements for the bridges and sketched a rough shape for the river. I designed each bridge to be slightly wider than the river at 20cm long and about 8 cm wide. I planned a stone embankment for the 2 bridges (1 is a rail bridge the other is a road bridge) that projects out 2.5 cm from the face of the river bank and with a 6cm wide retaining wall on either side of each bridge. After these measurements were drawn on the board, I duplicated them on paper for reference.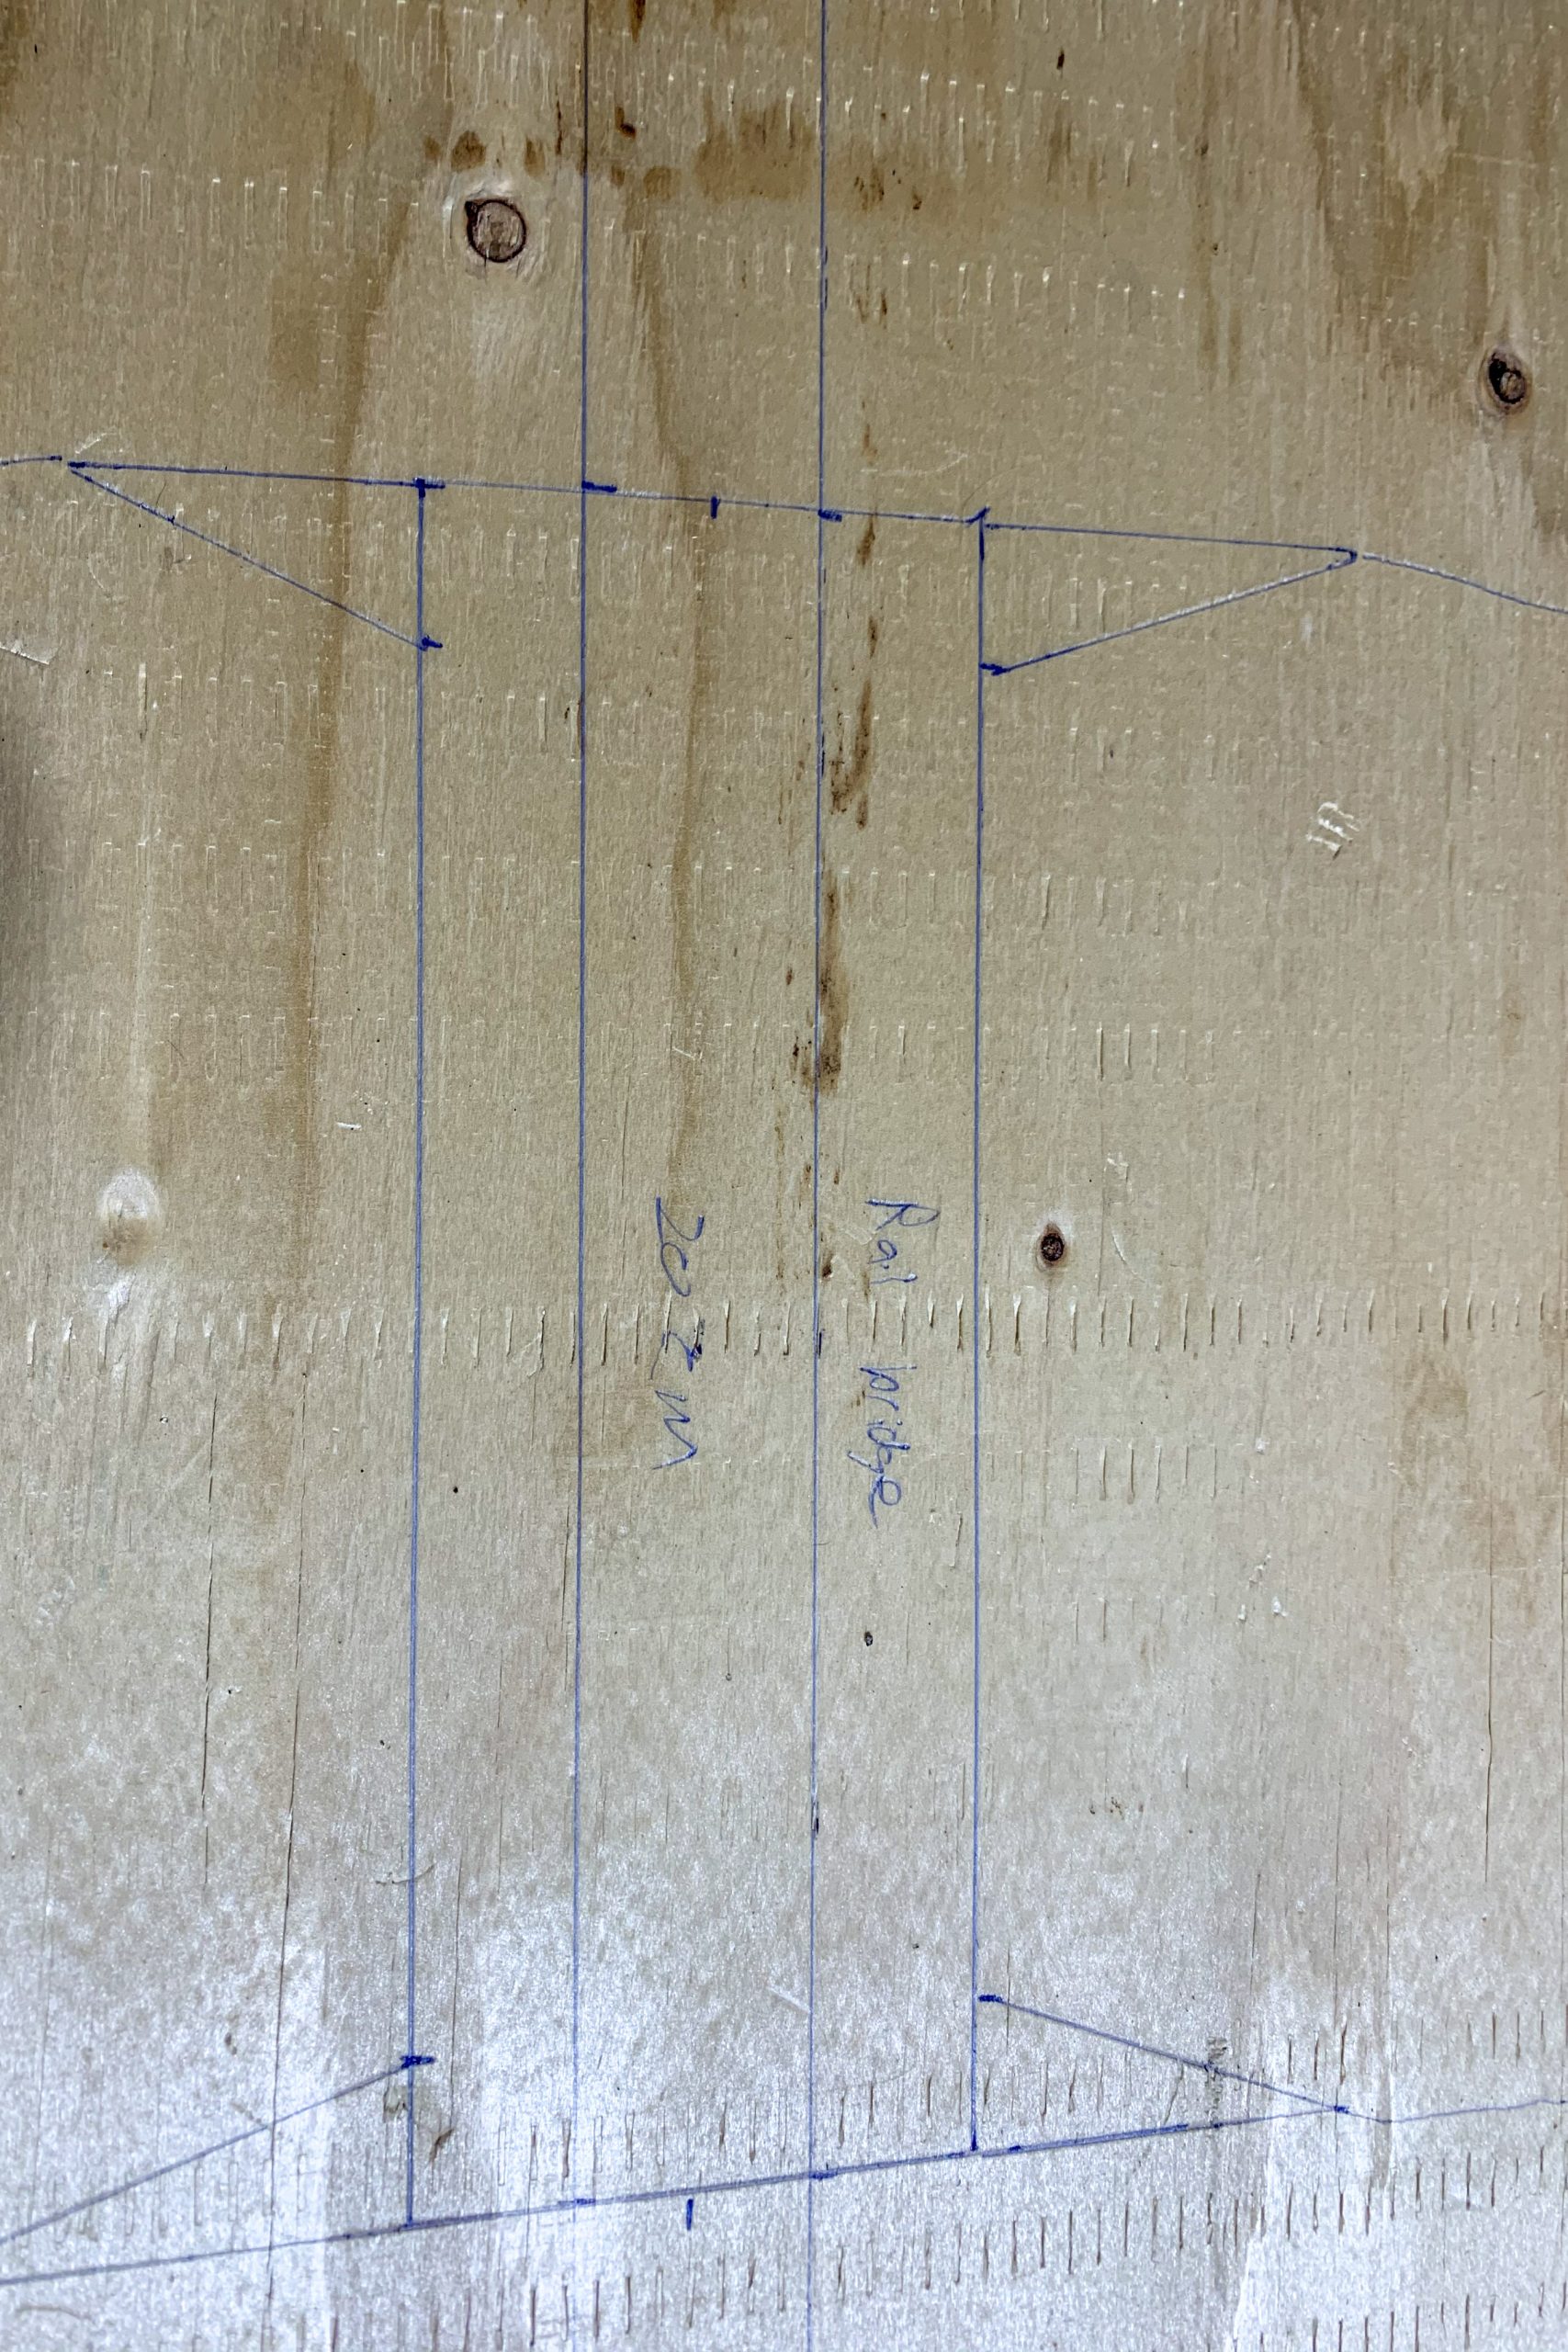
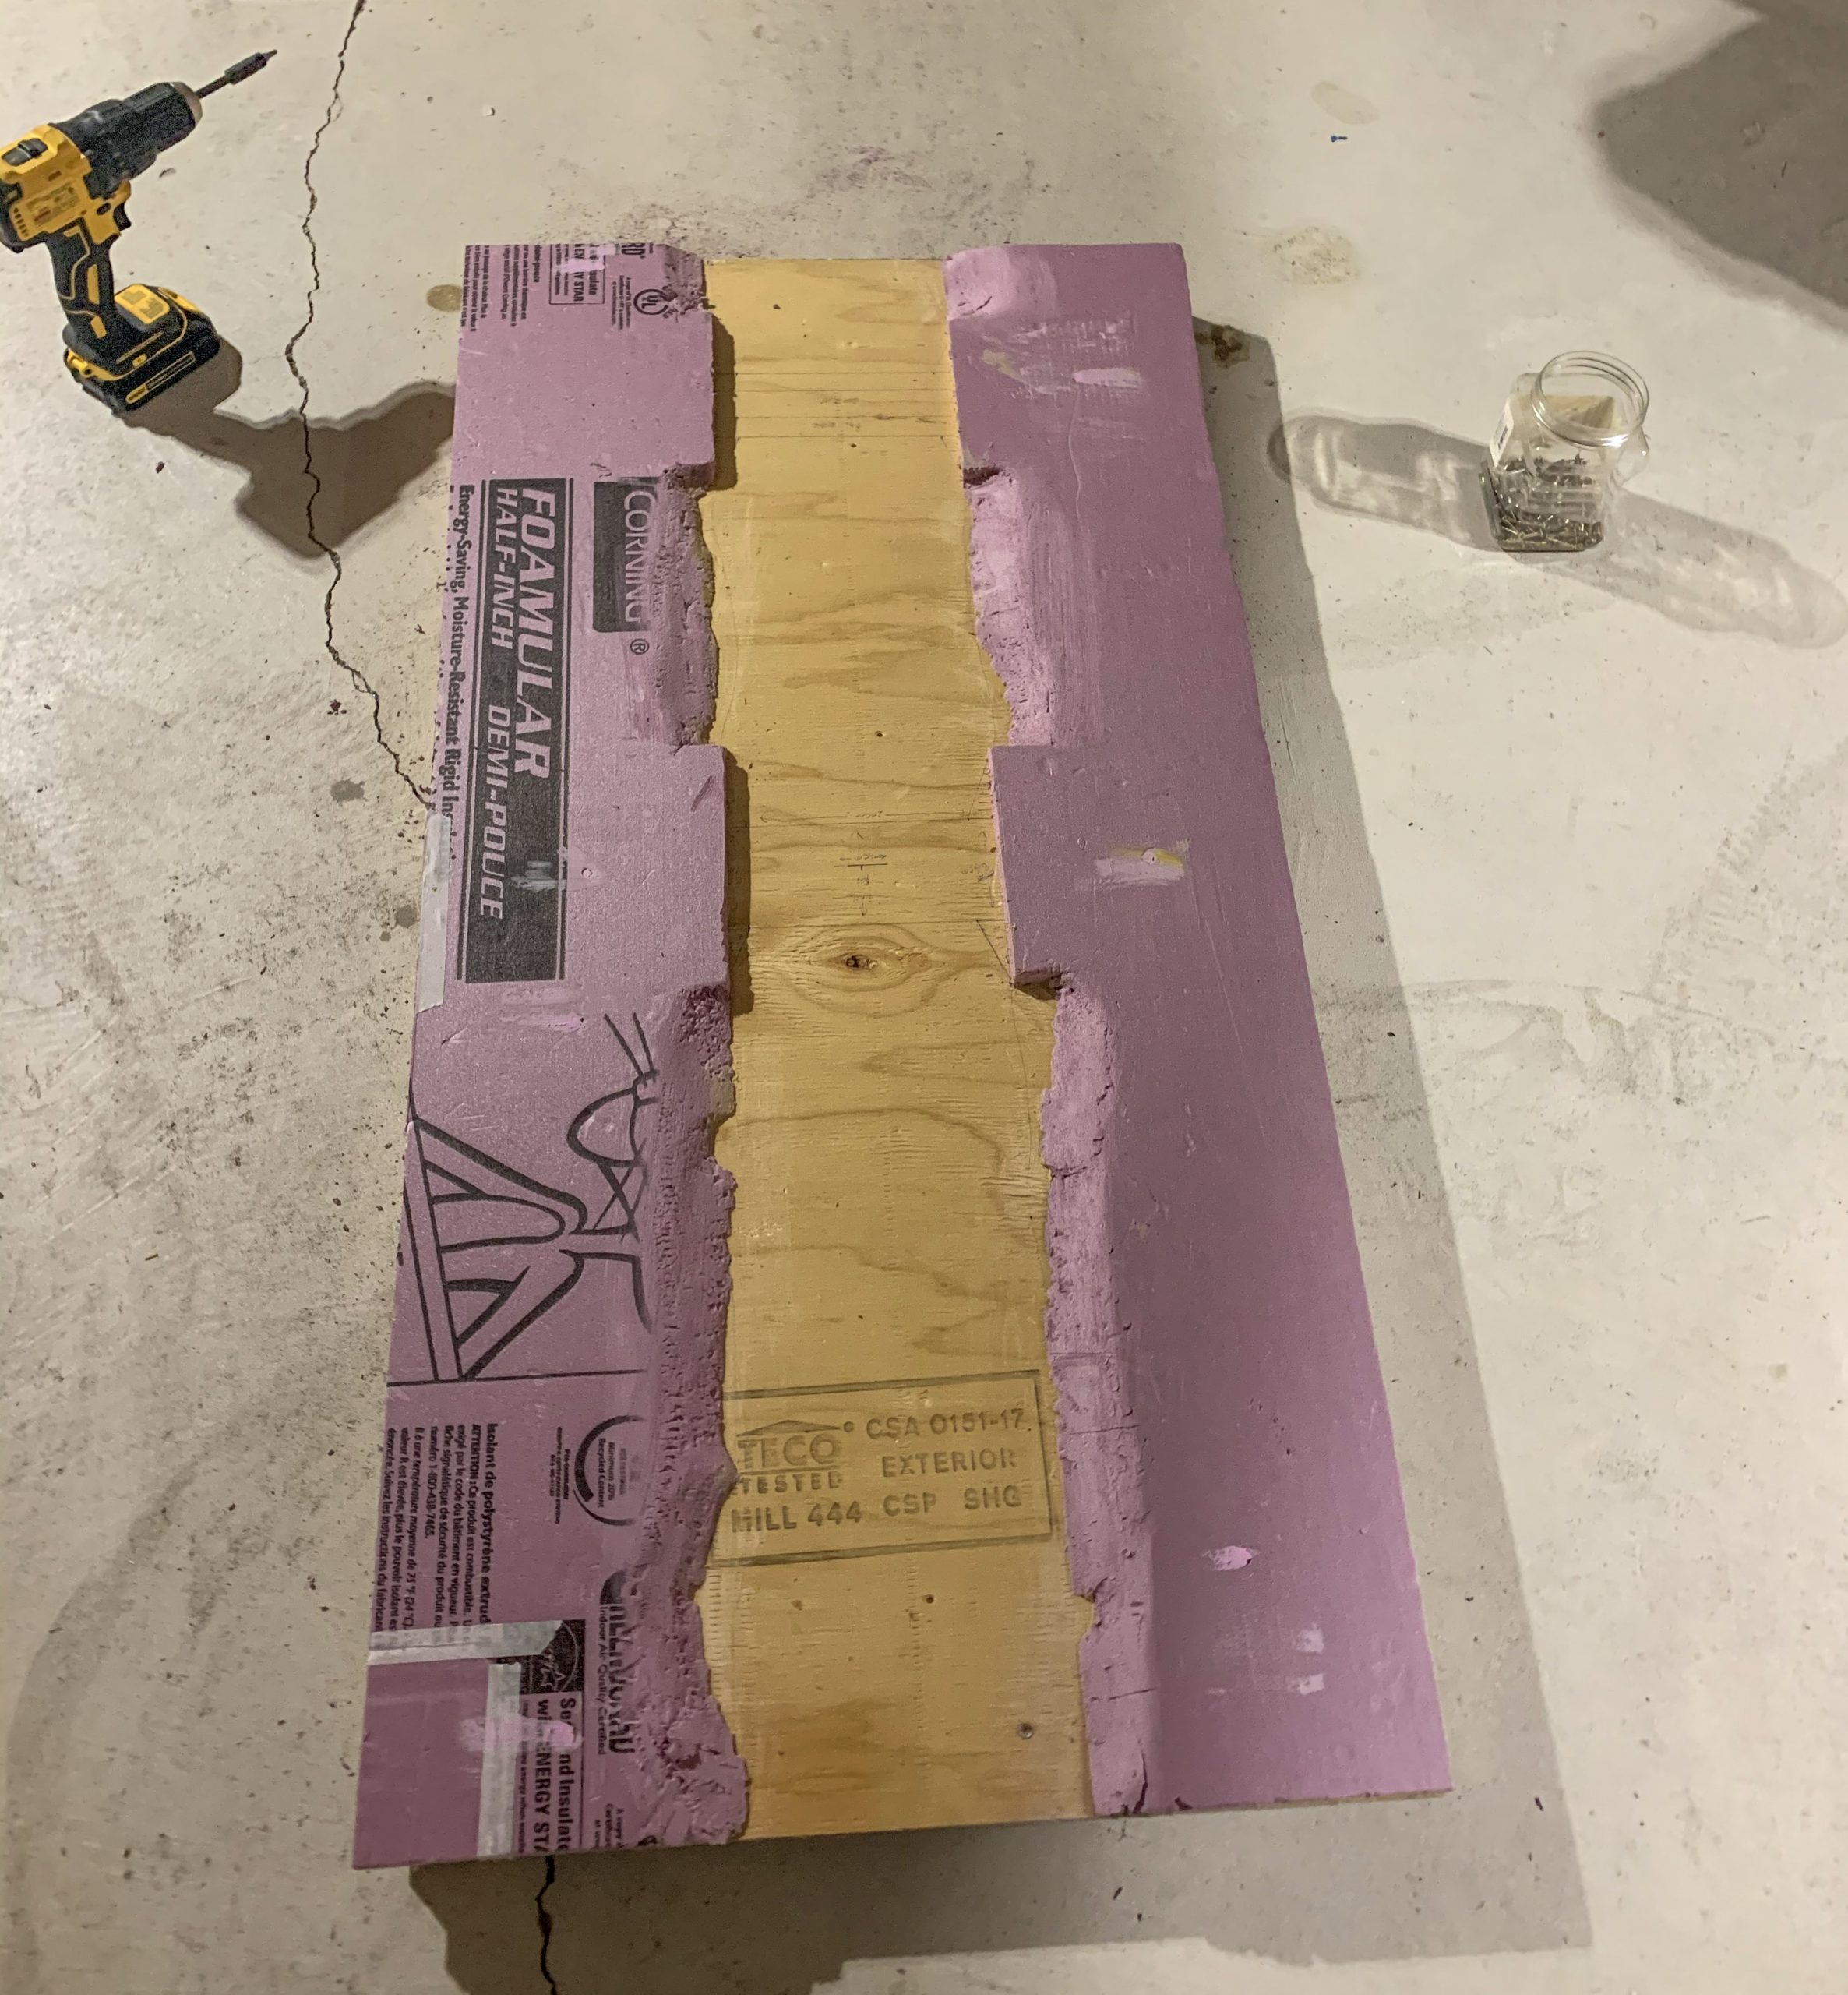
4. Cutting the River: Using the keyhole saw I cut the insulation foam to match the plan I drew on the board. Next, I replaced the screws to hold the foam in place on the plywood. Taking the knife, I cut downwards at an angle inserting the knife about 6 cm back from the river bank with the blade angled to protrude at the edge which was cut to form the river. I did this to form the river banks on both sides (making sure that the areas where the bridges and retaining walls would be remained squared off). This left a steep angle down to the river which I then smoothed out with my file and sandpaper. This formed a gradual slope to the edge of where the river would go.
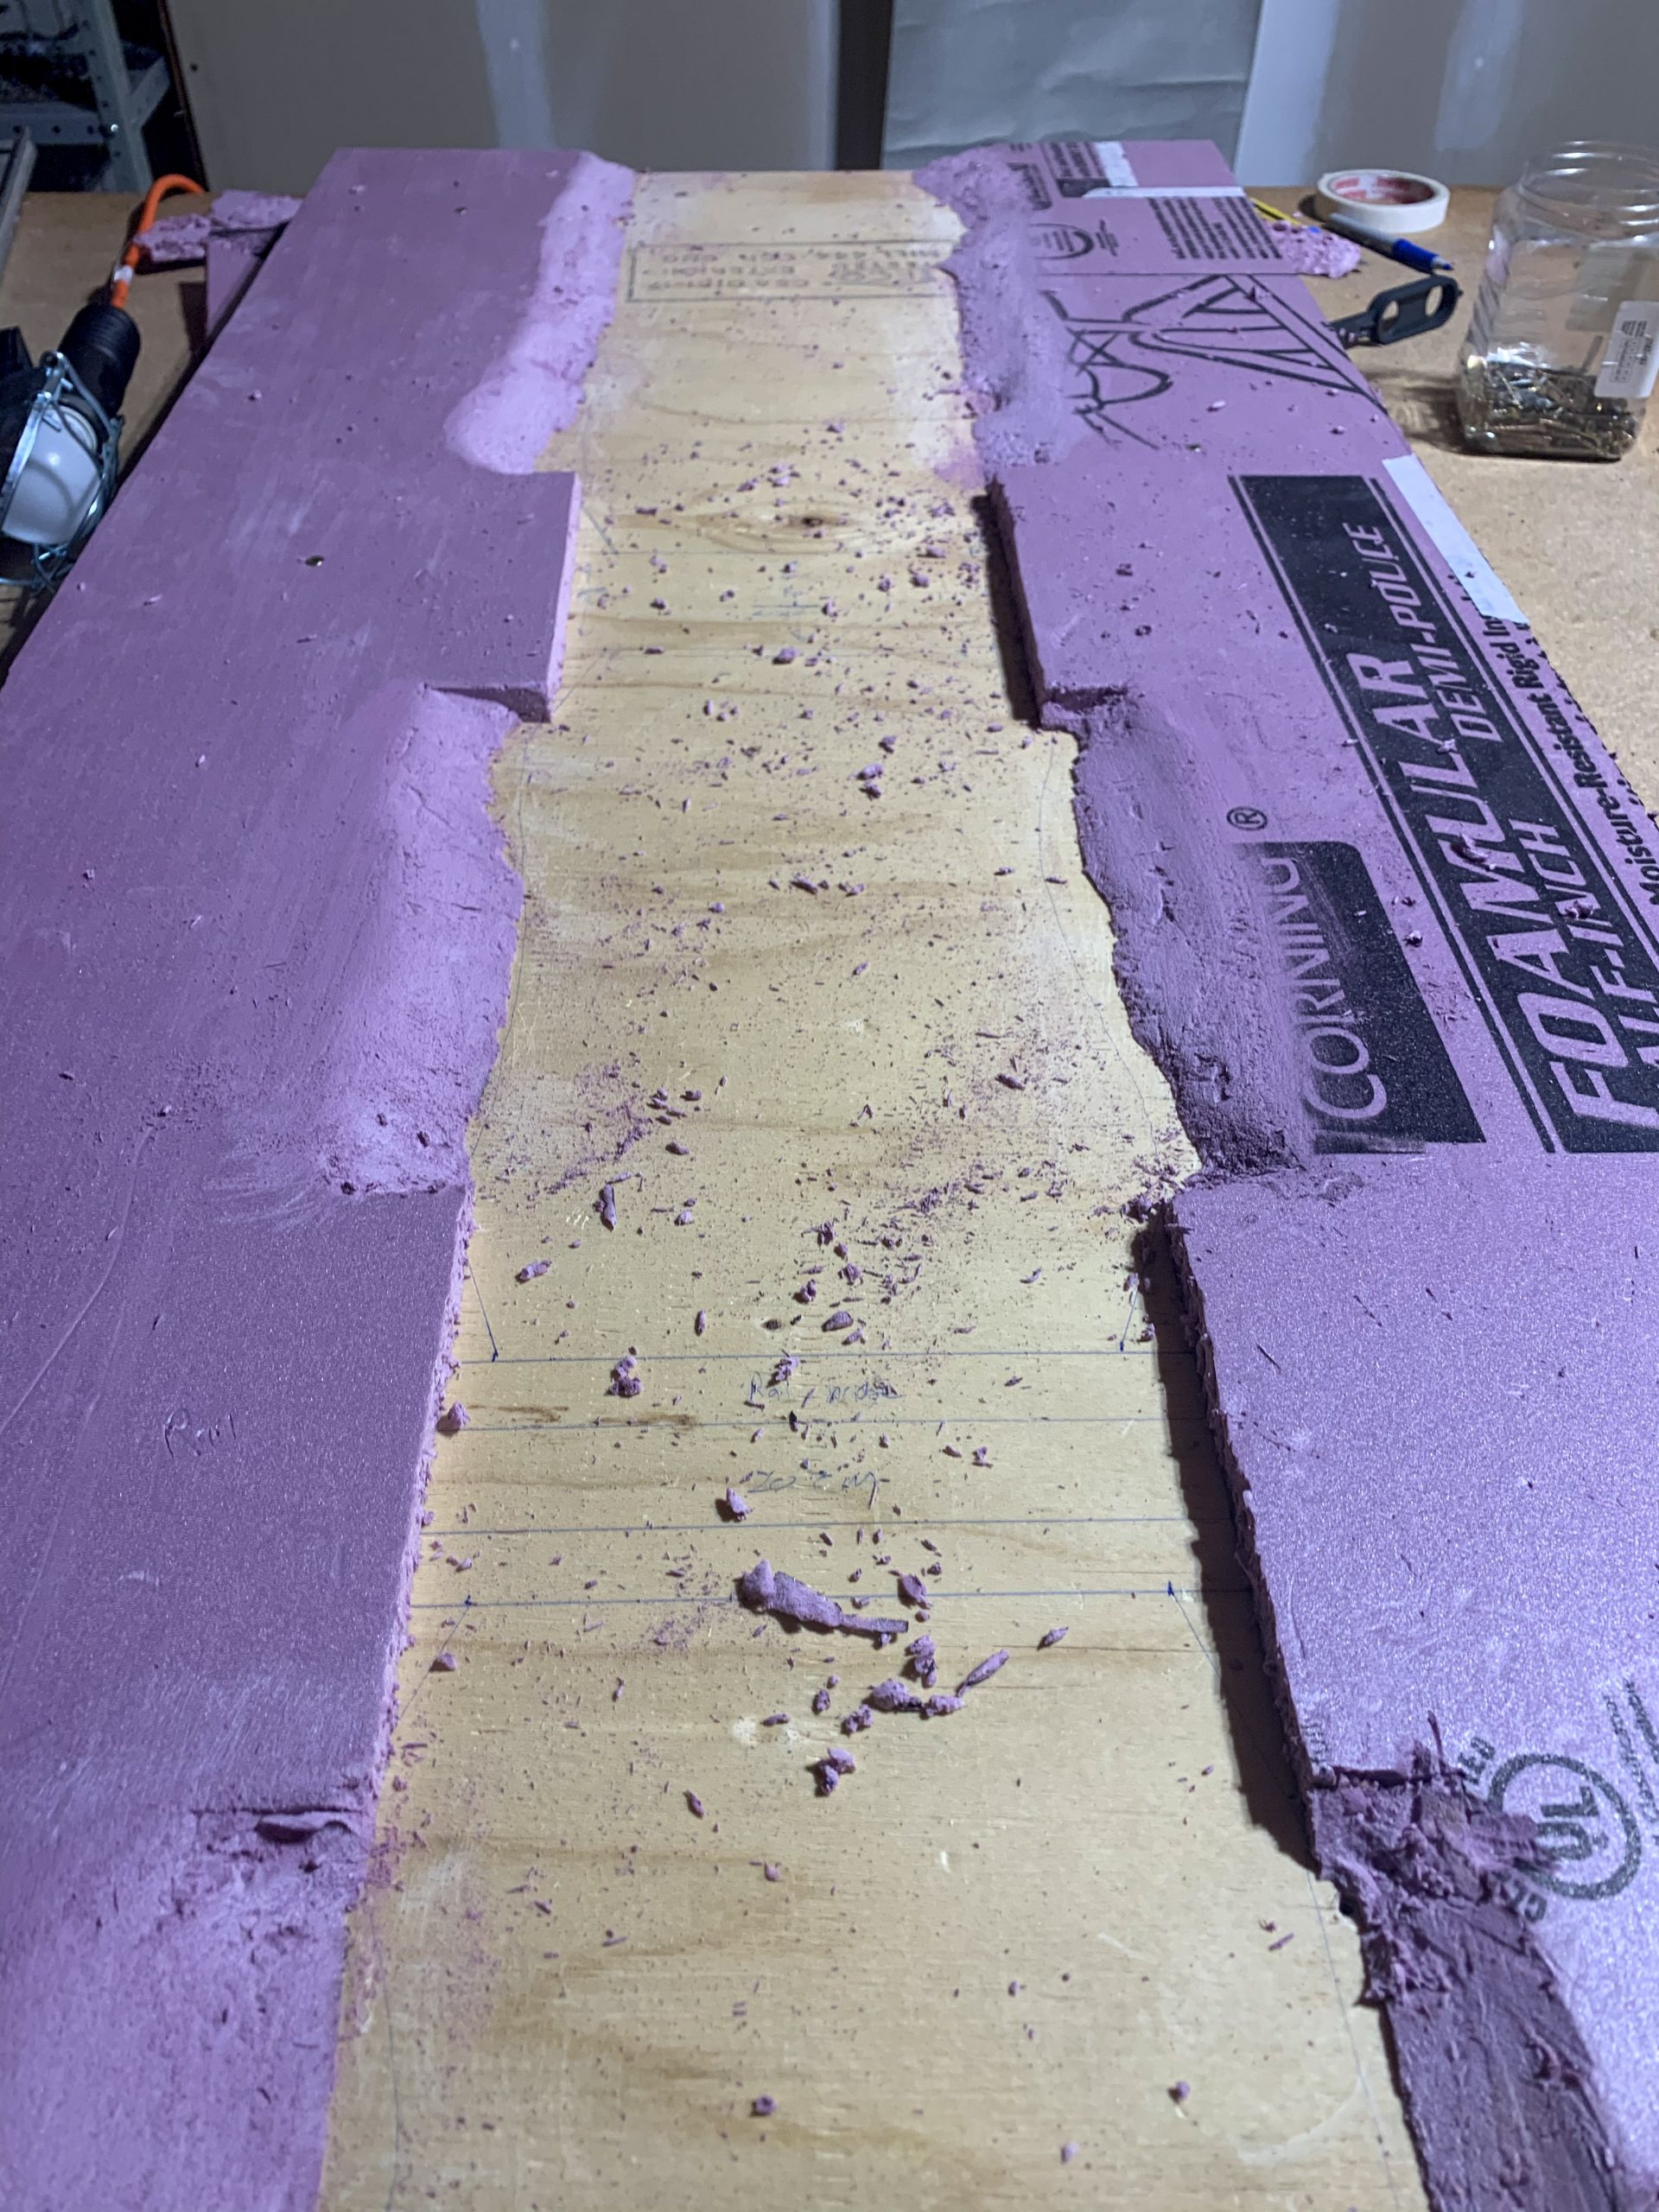
5. Gluing Down the Foam: First I removed the screws and took the foam river banks off of the board. Then taking the foam glue and putting it in the caulking gun, I spread adhesive evenly across the bottom of the foam. I then pressed the foam sections into place on the board and replaced the screws (again) and counter sunk them slightly. With this in place I filled the screw holes and any other blemishes on the foam surface with spackle and smoothed it down with sandpaper after it dried. Note: Do not use screws alone to hold the foam to the board. The foam will warp during the following steps if it is not held down securely
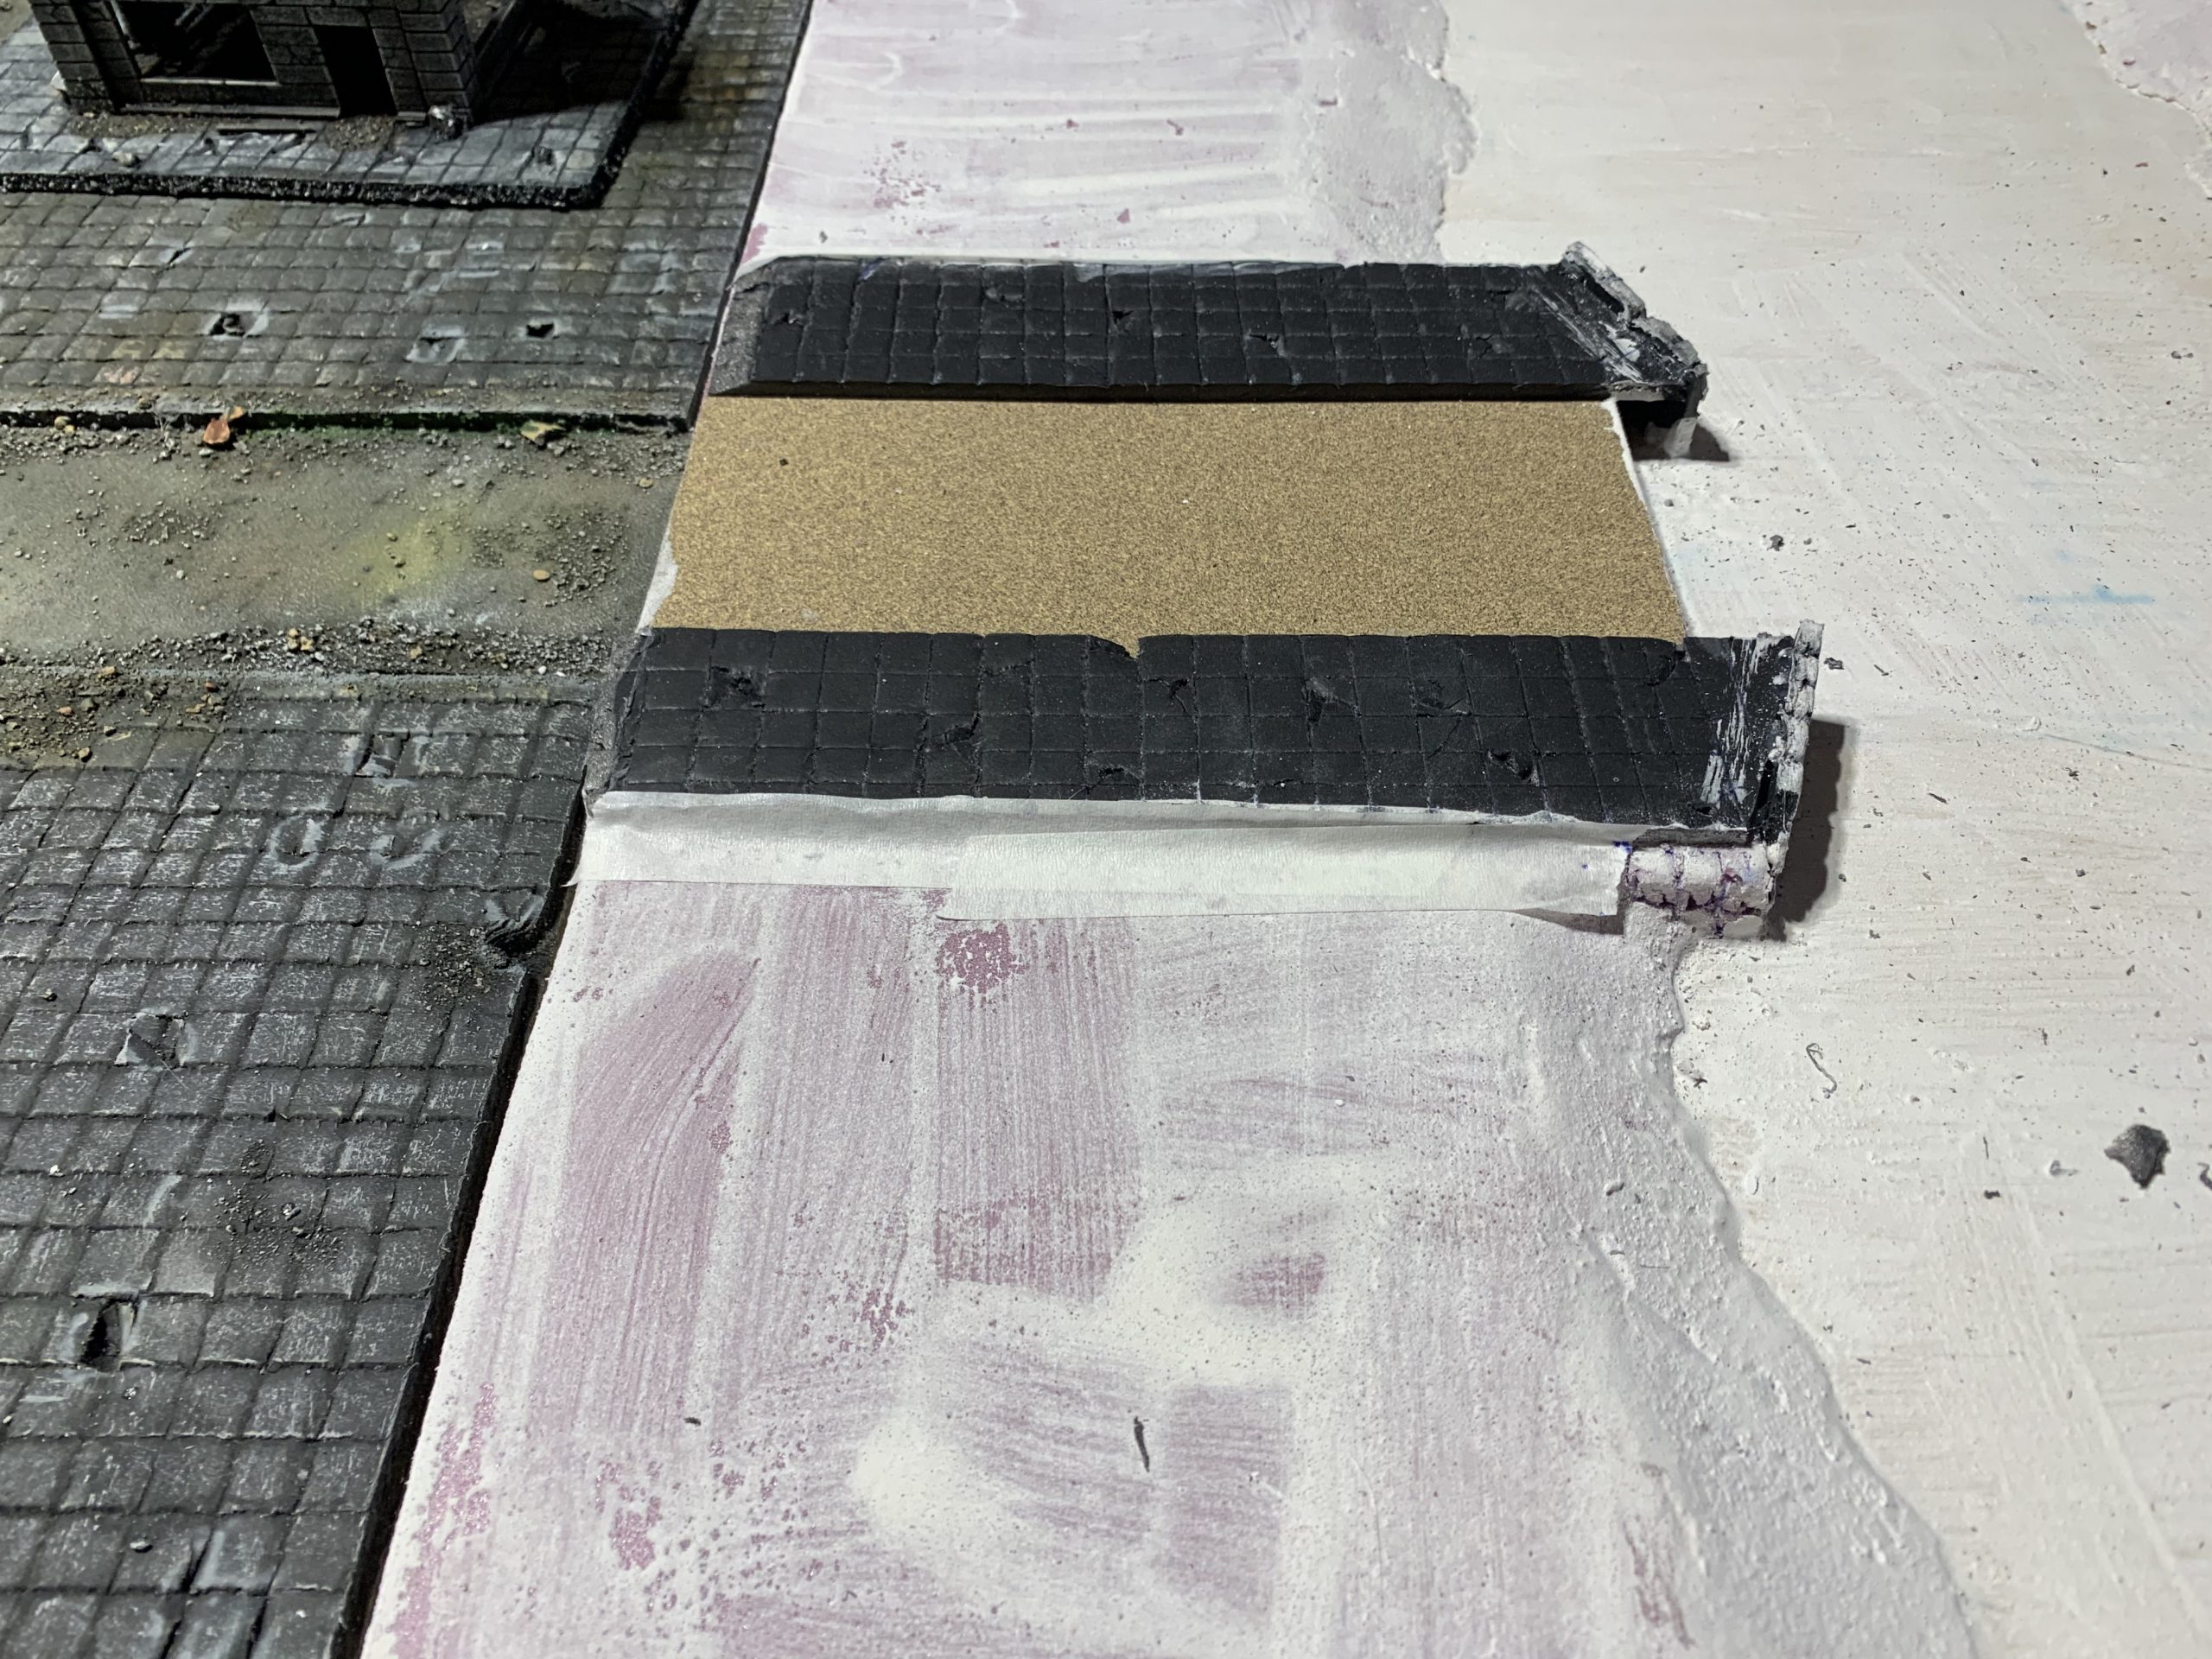
6. Roads & Curbs: It was now time to design the roads leading to the bridge. First, I measured 2 road sections from my sandpaper rolls, cutting each 8.5cm wide by 20 cm long. Using white glue, I adhered this to the surface of the foam running from the board edges to where the bridge will meet it at the retaining wall on either bank. Then I ruled out the curbs/sidewalks on either side of the road. I designed these to meet with the retaining wall on either side of the bridges. These worked out to be 5cm wide, 20cm long at the outer edge and 22cm long on the inner edge (creating a diagonal end on one side to meet with the retaining wall. I cut out 8 of these sections so I had 2 sets of 4 for each river bank. For the rail bridge, full curbs were not required so I cut 4 pieces short at about 5 cm on the long side and 2 cm on the short side. (The image below is a template I made for cutting out 2 of the curbs)
7. Retaining Walls: As I had already ruled out 2 retaining walls on either side of each bridge, I cut out 8 6cm long x 2.5 cm high (the river bank is approximately 2.5cm high) rectangles of foam core. I then filled a bowl with water and submerged the foam for about 10 minutes. After it soaked, I peeled the paper backing off one side of the foam core and scored a texture of stacked rocks into it with my pen.
8. Building the Curbs Walls & Surfaces: Now I used hot glue to adhere the curbs to either side of the retaining wall and glued the retaining walls (with the rock texture facing outward) to the ends of the curbs following the diagonal cut on the ends. Then I mixed a watered-down spackle mixture of about 8 parts water to 2 parts spackle in a mixing cup and painted this over all of the insulation foam and the riverbed. On the riverbed I tried to keep the brush strokes going at right angles to the shore to create a wave pattern. Then I left this overnight to dry.
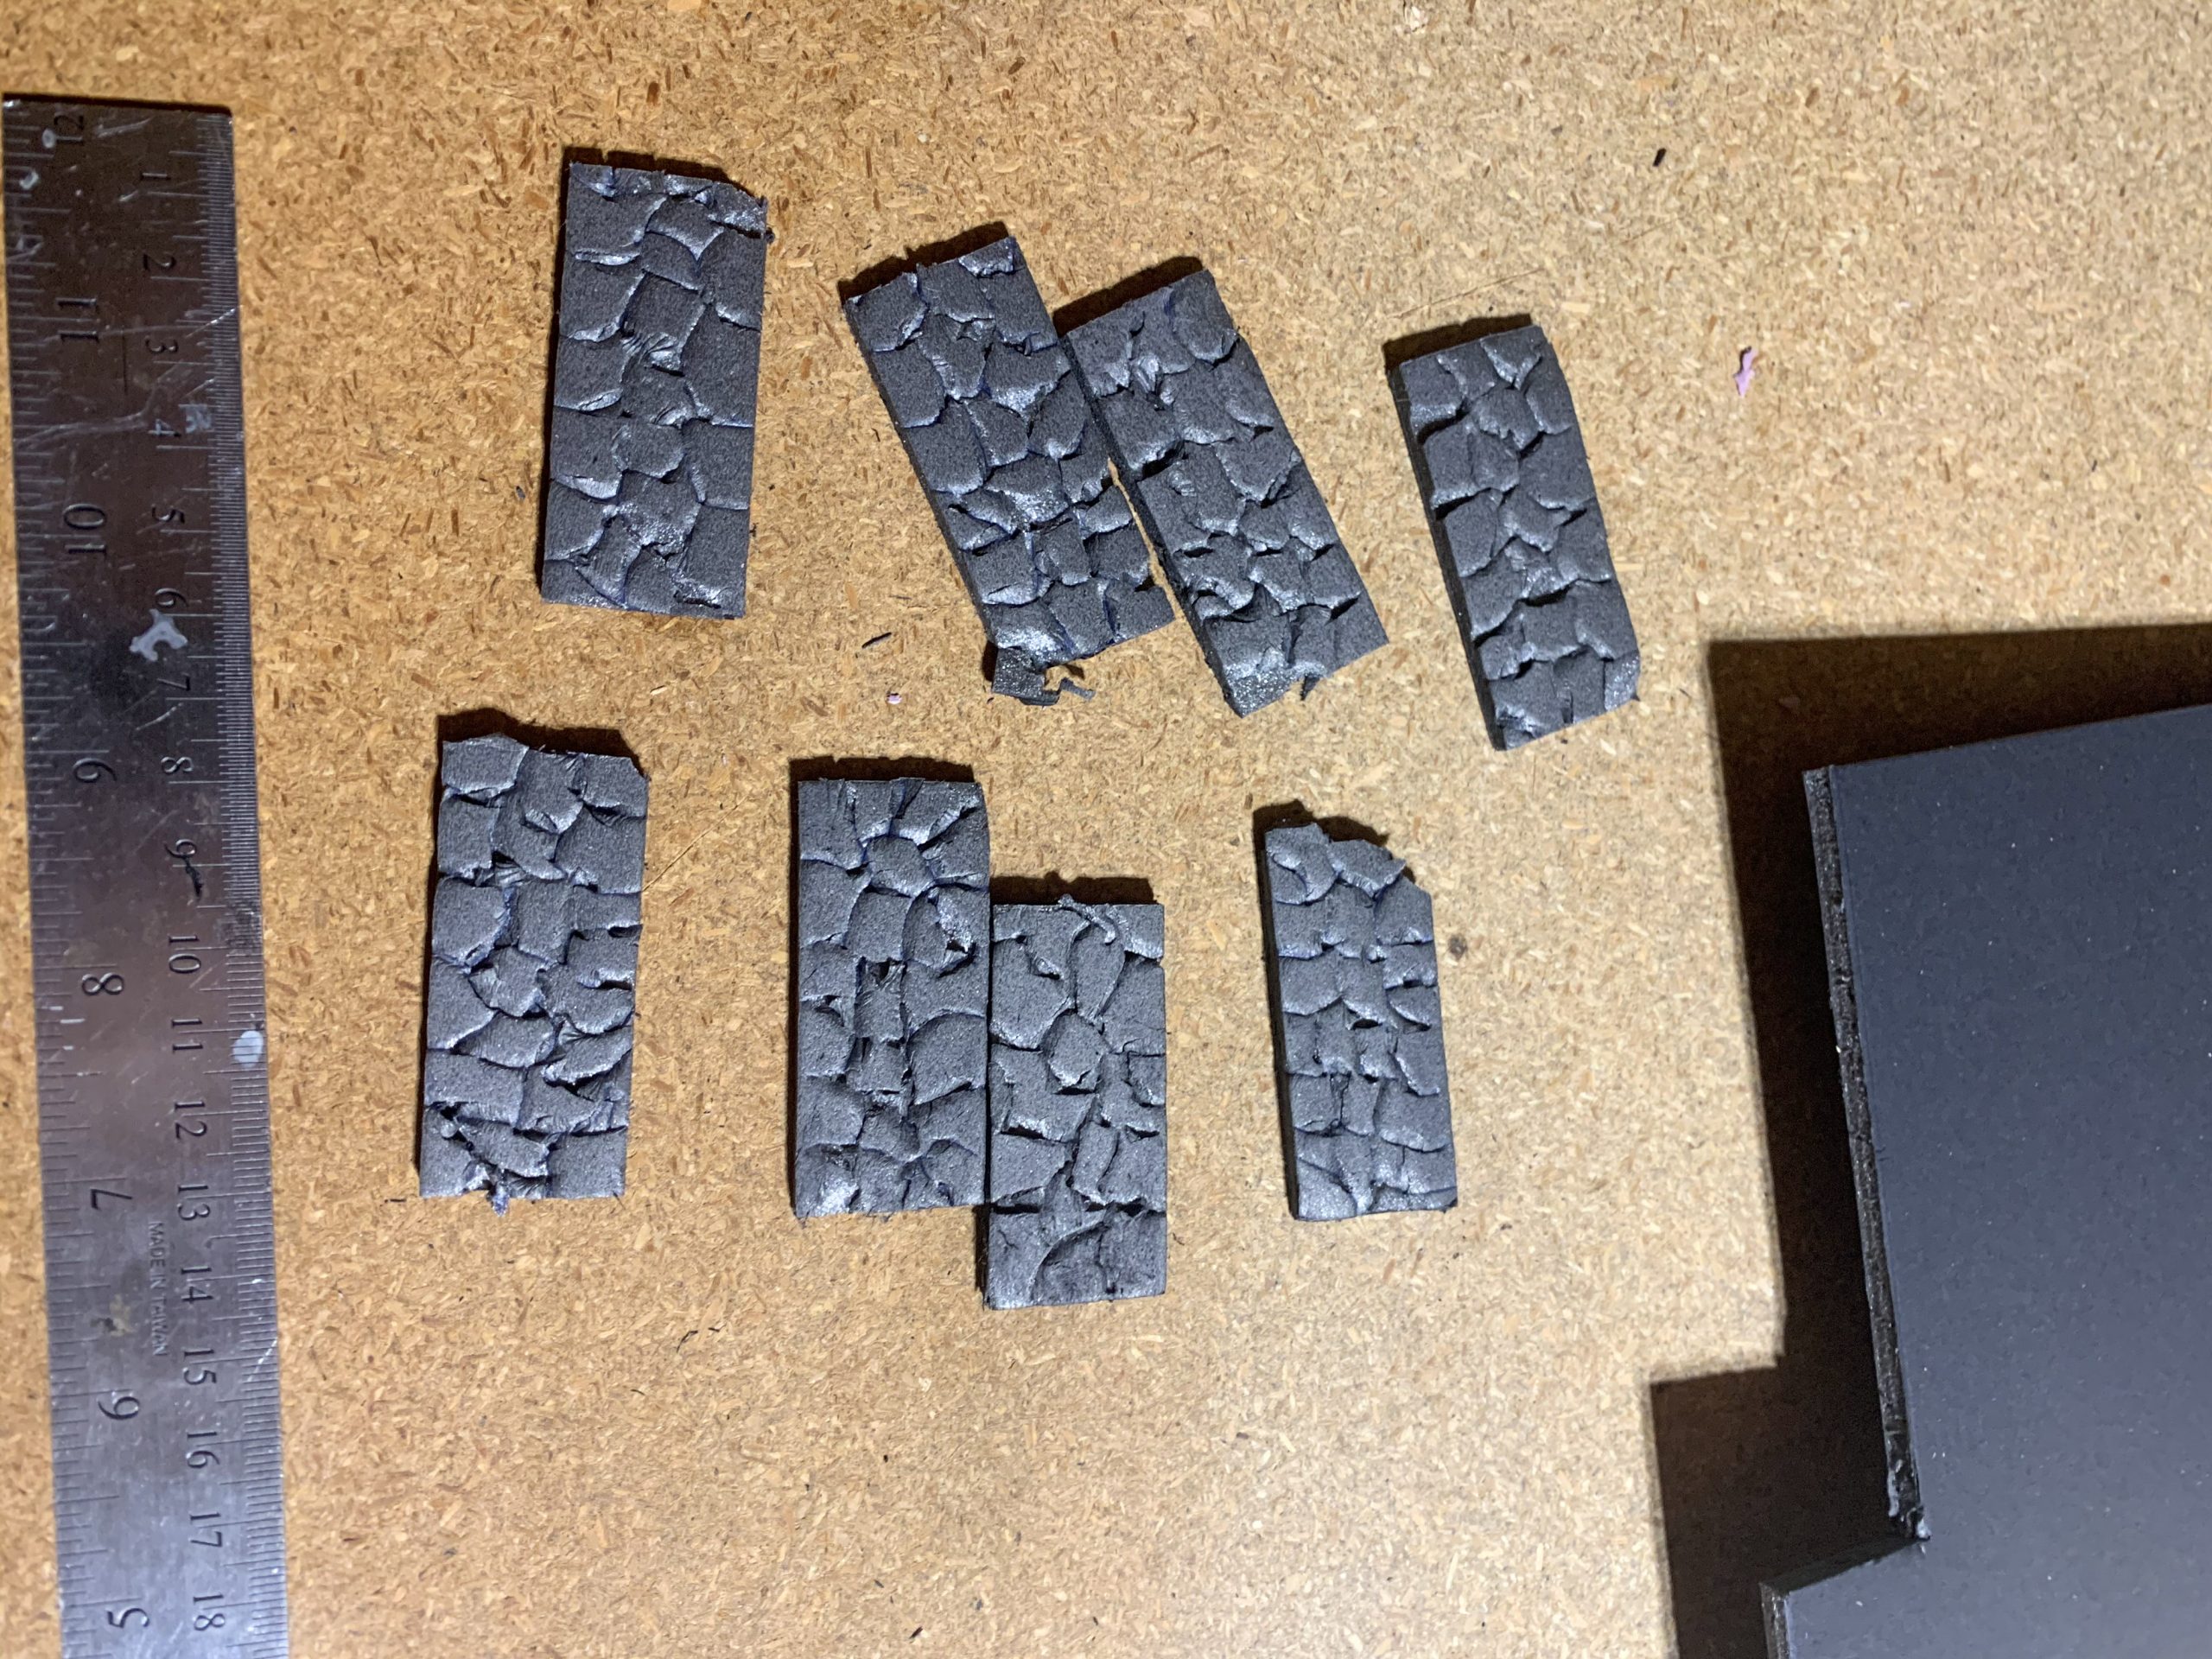
9. Texturing the Curbs: Taking the pen and ruler, I drew out a 1cm by 1cm grid on the surface of each curb. Then I scored this with the pen to form tiles. I randomly sculpted cracks and holes in the tiles as well. After this was done I put a piece of masking tape on the outer edge of each curb to level off the drop between the curb and the board surface.
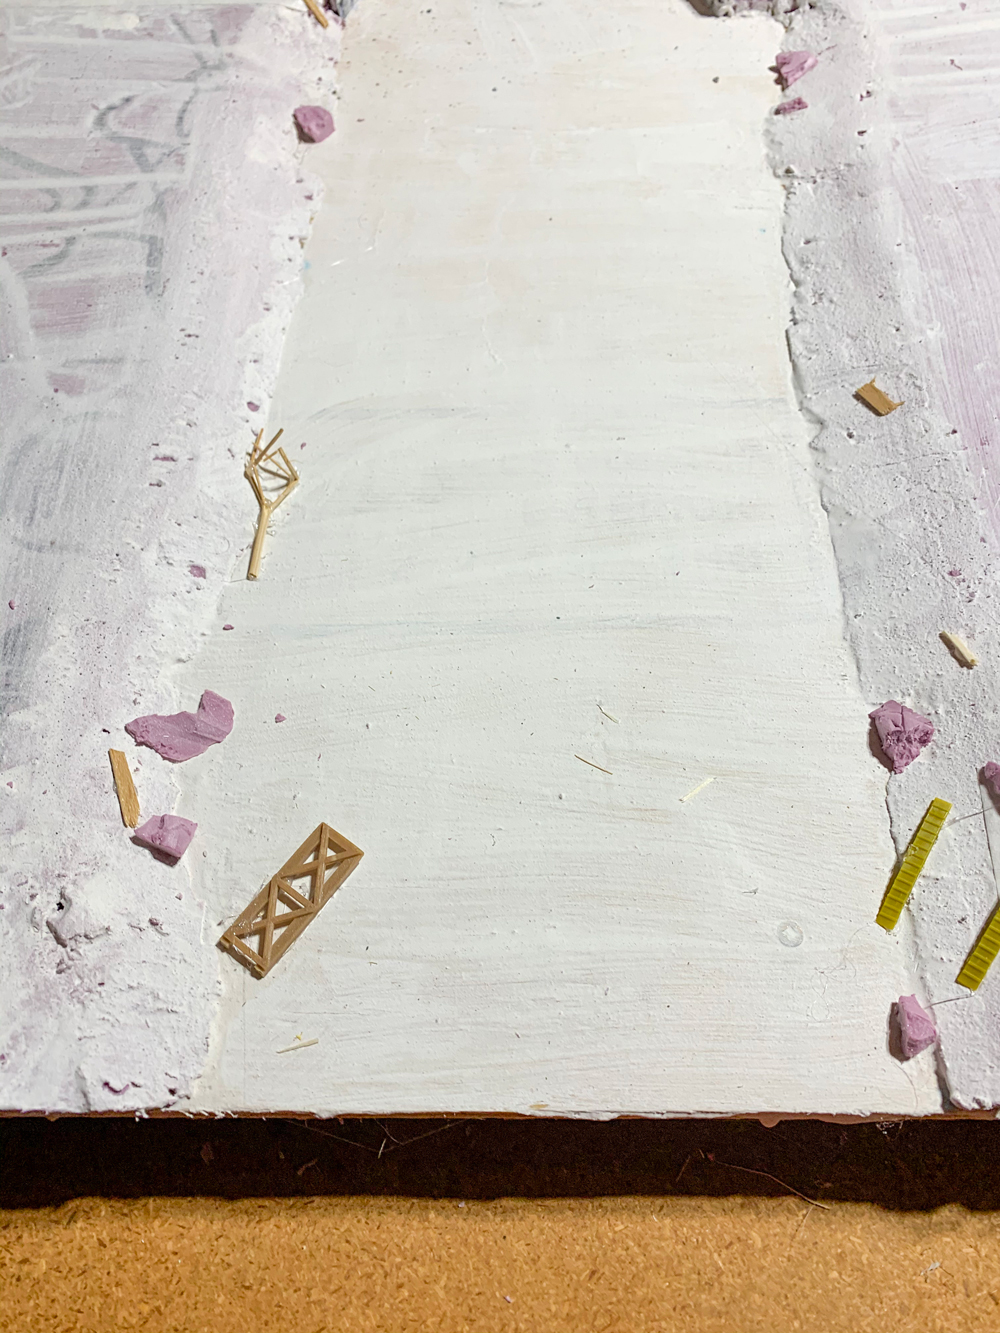
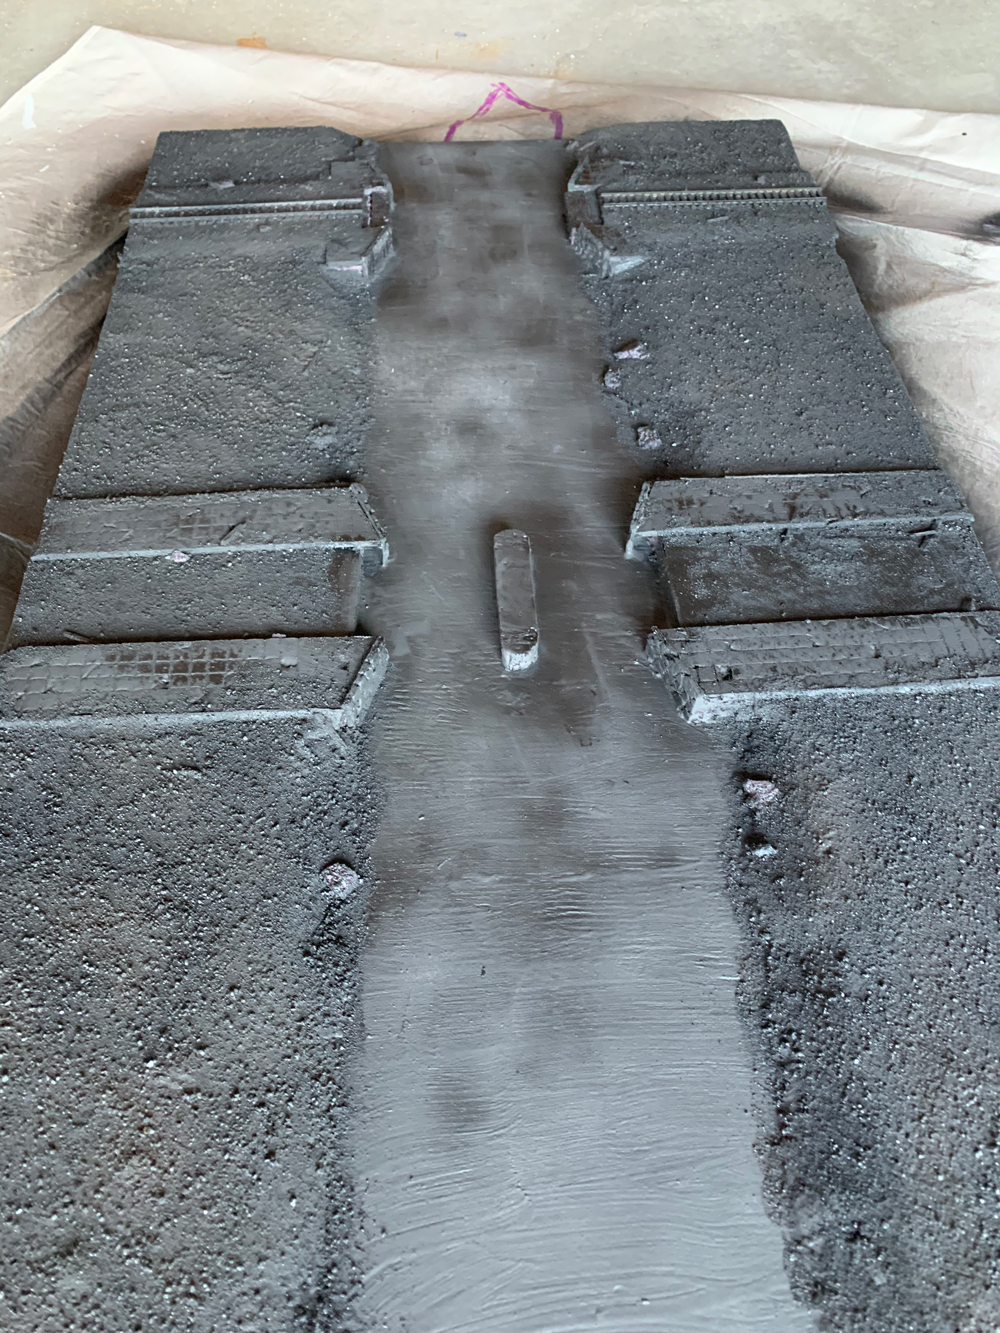
10. River Bank Details: Using foam chunks cut from leftover Insulation, I sliced them into random shapes, scoring them and shaping them in various ways to act as rocks and stones. Then I added more details by breaking match sticks and bamboo skewers into different lengths and chose some discarded objects like halftrack bridge runners and various building materials from my bits box to use as small details. I fixed these in place along the river edges and curb sides using hot glue. I put a few items and rocks in the “shallow” areas where the river will go as well. I also glued lengths of model railway track leading up to the rail bridge. With this done I took my tweezers and removed all of the loose strands of hot glue left over from the previous steps.
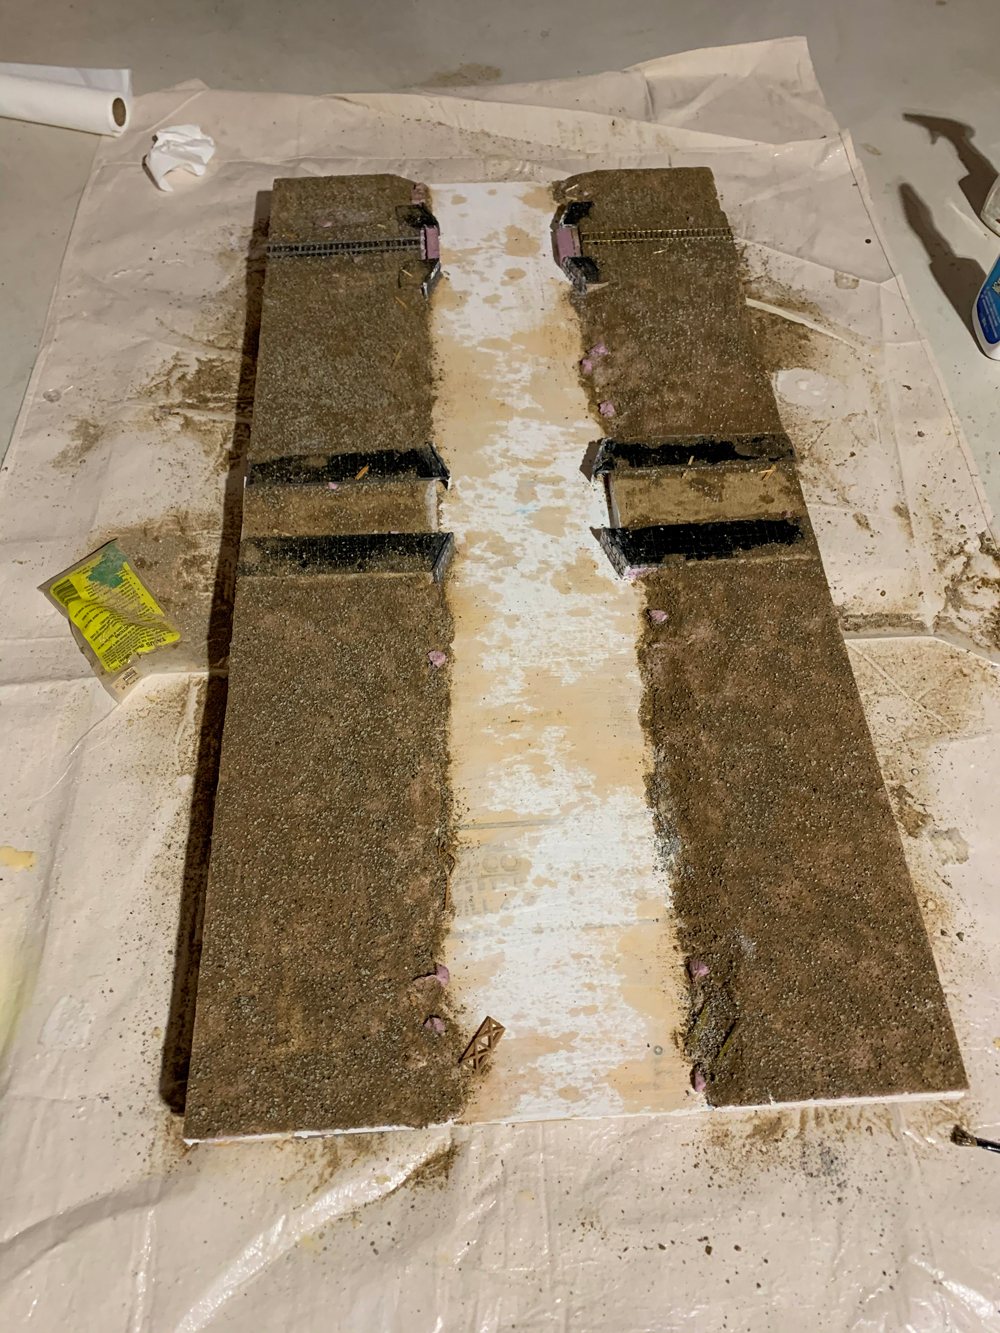
11. Grit: To begin this step I laid down a drop cloth and worked in a ventilated space. Then I prepared one spray bottle with about 9 parts water to one-part white glue, and the second bottle with 8 parts water to 2 parts rubbing alcohol. I also mixed a container with about 8 parts sand to 2 parts kitty litter. Finally, I filled a bowl with white glue with a few drops of water added to form a thick but spreadable paste. With the materials prepared I proceeded as follows:
- Using a large brush, I spread the glue paste over the surfaces avoiding the curbs, sandpaper “roads”, river beds and retaining walls. Using a small brush, I went back and dabbed random patches of glue on the roads and curbs for scattered dirt and debris. Make sure you spread the mixture over the foam rocks and any other exposed foam (to protect it from spray paints).
- I Sprinkled the sand/kitty litter mixture onto the glue paste. The foam rocks should each have a little grit on them but should not be coated entirely.
- While the glue paste was still wet, I misted the entire board with the rubbing alcohol mixture. This broke surface tension to help the glue flow.
- Following this I took the white glue/water mixture in the spray bottle and misted it over the whole board.
- Now I let the board to dry for 24 hours.
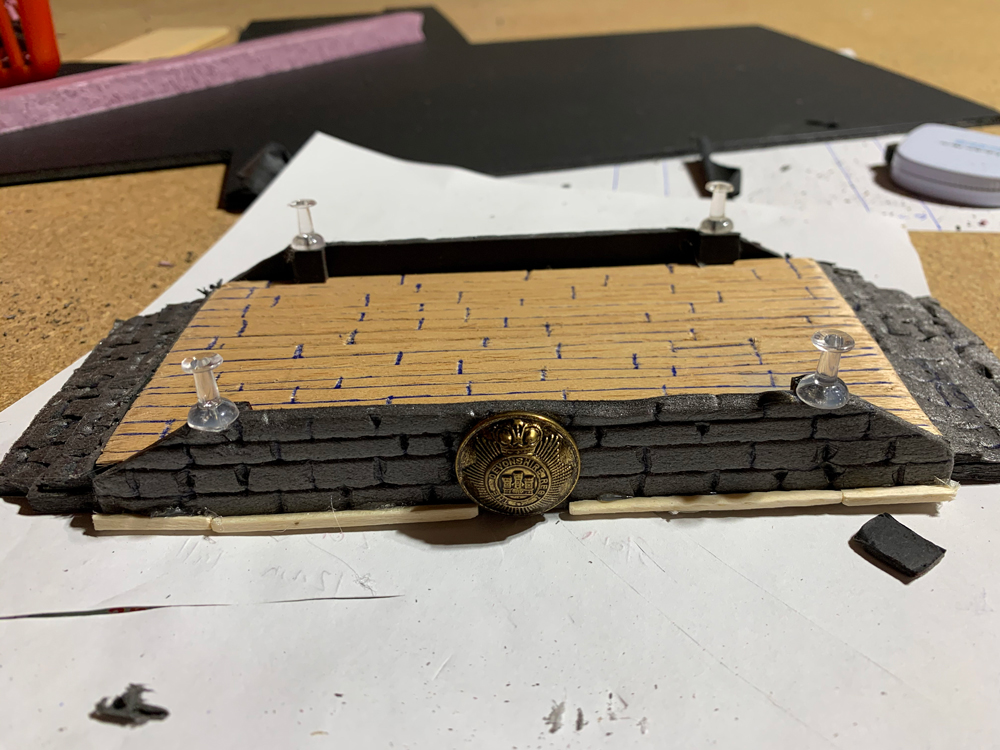
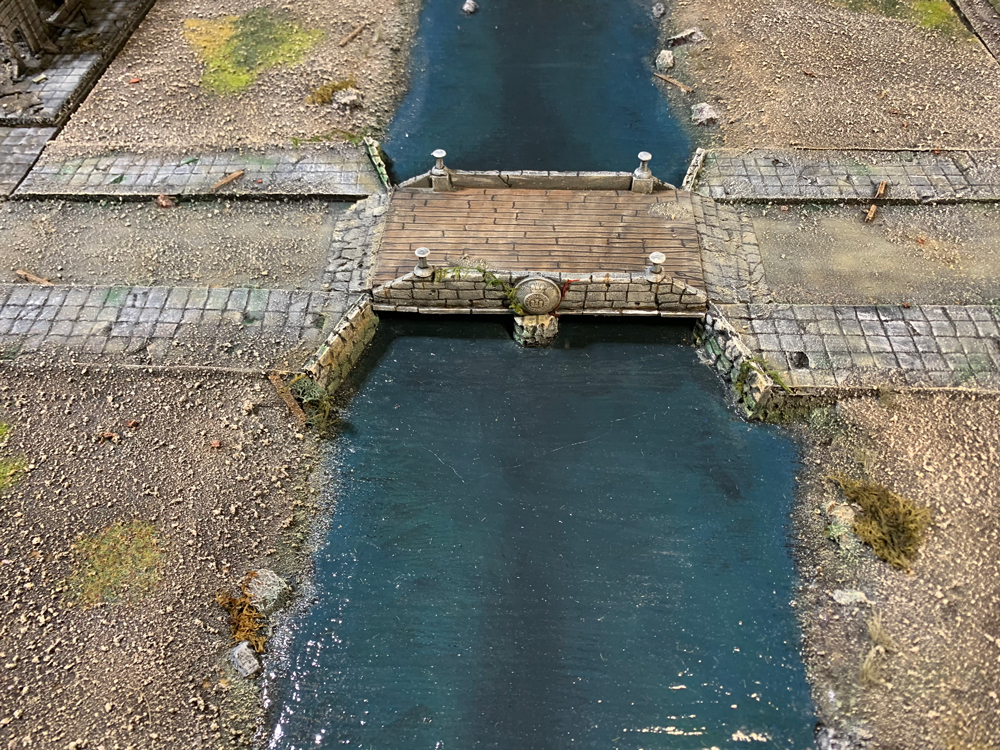
 12. Bridges: It was now time to build the bridges. If you wish to use a pre-made bridge there are many options and Battlefront/GF9 have some excellent bridge models you could use. I decided to build the road bridge and use an old HO scale model bridge which I had in my bits box for the rail bridge. For the Road bridge I cut 2 20 cm by 8cm wide layers of foam core and removed the paper layers by soaking them. Then I glued them together with hot glue and using a file tapered the ends to slope down to the road surface. I capped the sides with more foam core (with the paper peeled off) and scored a stone pattern in it with my pen. I surfaced the bridge with a sheet of balsa wood and scored wood planks in it. On the outer side of the bridge I added details with a spare button featuring a coat of arms (which my mother in law gave me!) and a few push pins. Finally, I brushed watered down spackle over the whole bridge (except the balsa wood).
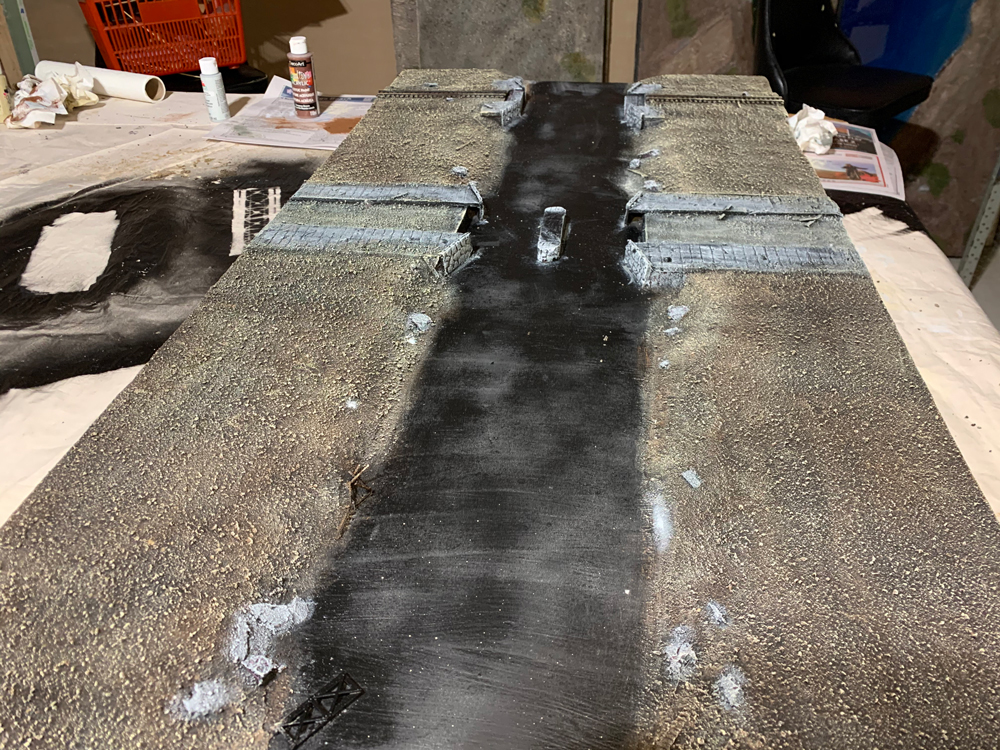
13. Under Coat: Putting down a drop cloth in a well-ventilated space I prepared to spray paint the board. (It is very important that any exposed insulation foam was coated with glue, sand, or spackle as foam can be destroyed by the propellant in spray cans.) Now I spayed several coats of matt black spray paint on the board varying the angles to get a full coverage. After this had dried, I sprayed the board with several coats of matt spray varnish. I then left this to dry for about 4 hours. At this time, I also sprayed and varnished the bridges.
14. Painting the Banks and Bridges: Taking a large brush I dry brushed the grit areas starting with layers of dark brown and worked up to a very light layer of white. I then repeated this process with shades of grey on the retaining walls, curbs and roads. I prepared the bridges in a similar way using rust red tones on the rail bridge and train tracks and greys and browns on the road bridge.
 15. Painting the River: First I used masking tape to protect the stonework and any features I did not want to paint the same colour as the river. Next, I mixed a dark shade of blue green which I brushed into the centre of the river. Following this I gradually blended the colours outward to the river banks with lighter colours of blue. My objective was to keep the centre where it is deepest dark, while the shallow areas would be lighter.
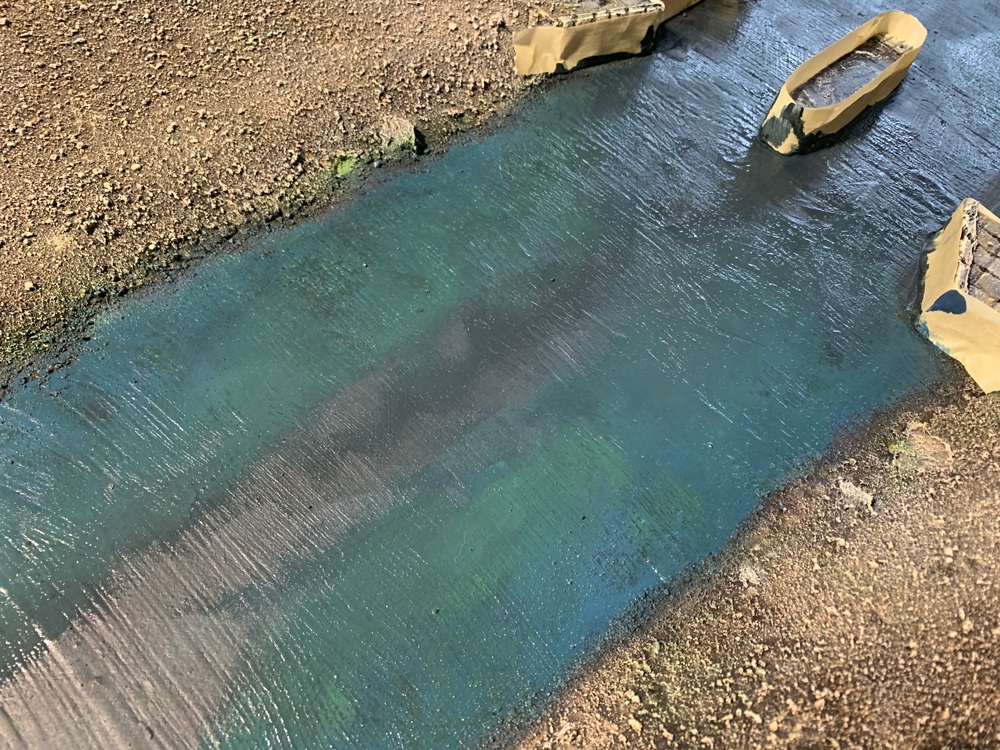
16. Preparing for Water Effects: Now it was time to prepare a dam at either end of the river to stop the Mod Podge from overflowing. First, I put down a large drop cloth then cut 2 pieces of carboard larger than the width and height of the ends of the river. I wrapped these in kitchen plastic wrap, then using push pins fastened it to the end of the board, pushing the pins into the foam and plywood. I then reinforced the join by adding masking tape around the edges.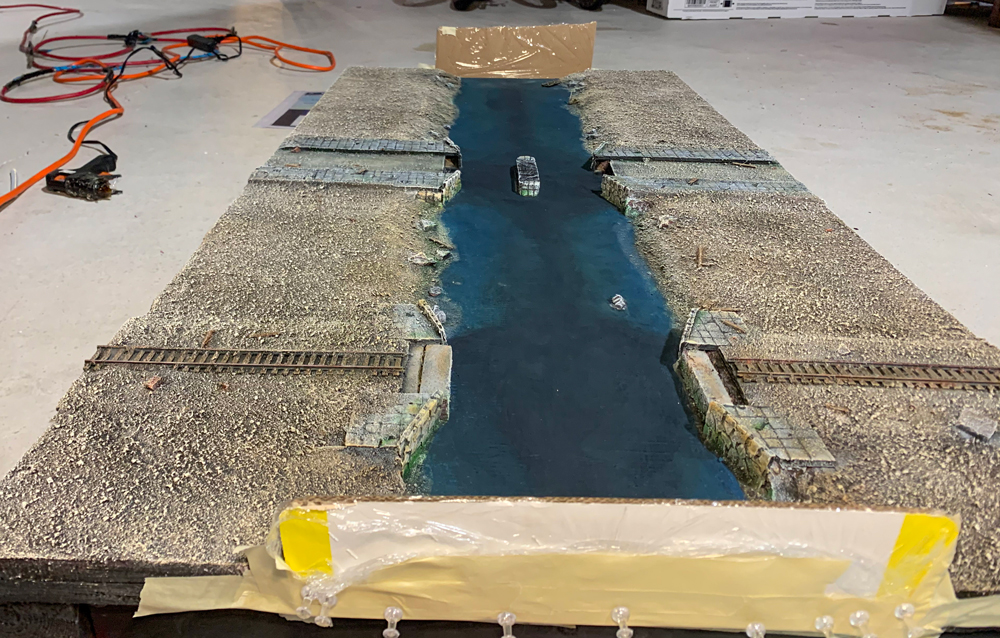
17. Adding the Mod Podge: Taking a large brush I painted Mod Podge Gloss thickly over the river. I kept the brush stokes oriented perpendicular to the shore to look like waves going up the river. Then I removed the masking tape but left the carboard/plastic wrap dams in place and left this to dry for 24 hours.
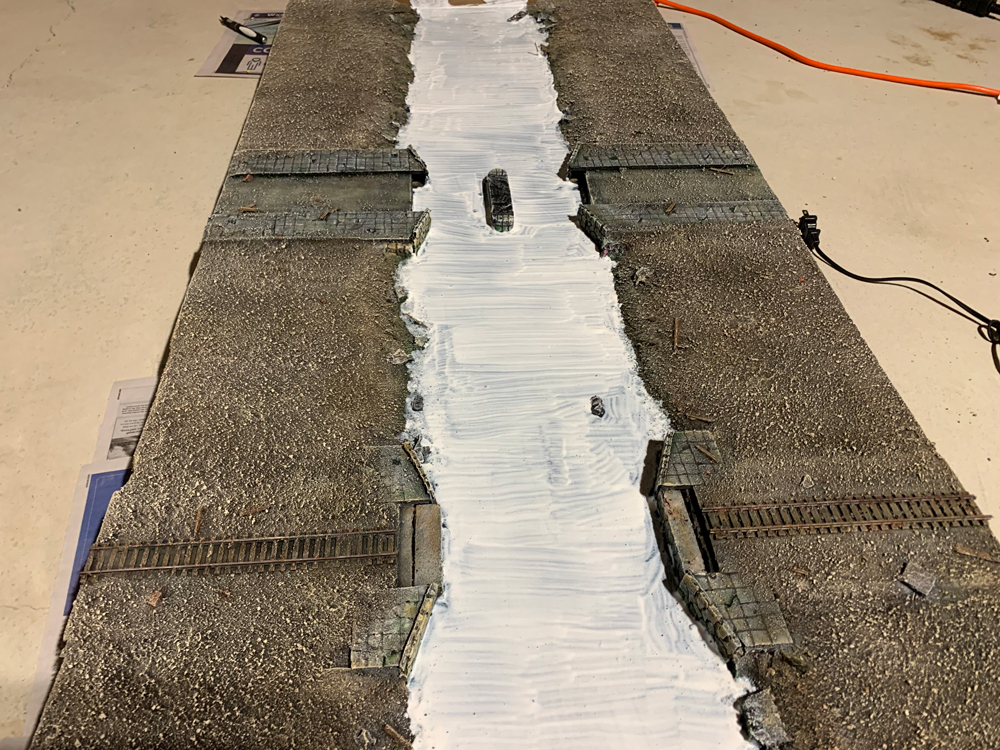
18. River Varnish and Details: After the Mod Podge was dry it remains slightly tacky so I coated it with 2 layers of gloss acrylic varnish. I intentionally painted varnish up slightly onto the river banks and retaining walls to make them appear wet. When this had dried I removed the cardboard/plastic wrap dams. Then I painted any remaining details like spare equipment, rocks and wood appropriate colours. Now I placed the bridges in their respective spots at the end of the retaining walls. (I did not glue them down so they were removable.)
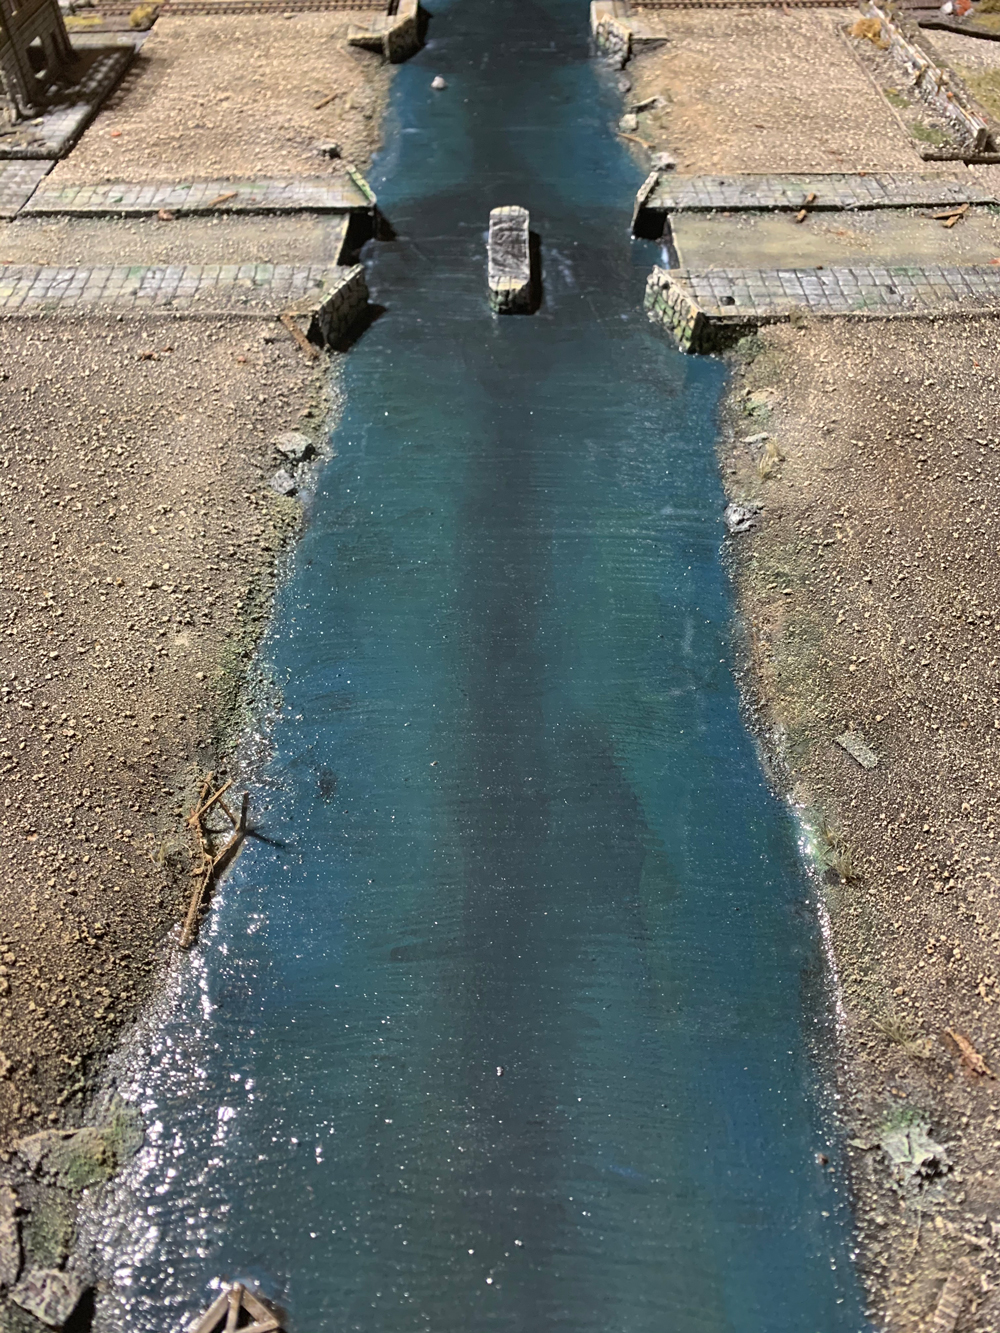
19. Static Grass and Lichens: Mixing up a batch of white glue/water paste as in step 11, I spread random patches on the board and sprinkled these with various shades of static grass. I also used the glue paste to add a few model lichens on the board. Make sure you don’t put the lichens where you may want to put scatter terrain. When the glue was dried, I loaded my airbrush with matt varnish and sprayed the lichens and patches of grass with it to hold them in place and protect them. Where I sprayed near the glossy water I used a sheet of paper to mask against overspray.
The River Section is Now Complete!
Whether you use this tutorial as a guide to build something similar, or copy it step by step, I hope it gives you inspiration for your games of Flames of War. Combining your home-made terrain with some of Battlefront’s excellent range of scenery helps make the game unique and adds an added degree of artistry to the hobby. Moreover, when combined with special scenarios such as the river crossing missions, it helps make the game both visually impressive and introduces new, fun challenges to test your generalship.
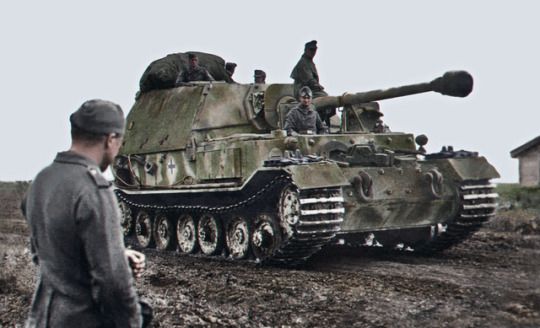
All Miniatures Great and Small – Flames of War Unit Overview – German Bagration Elefant
One Elefant, Two Elefant, Three Elefant
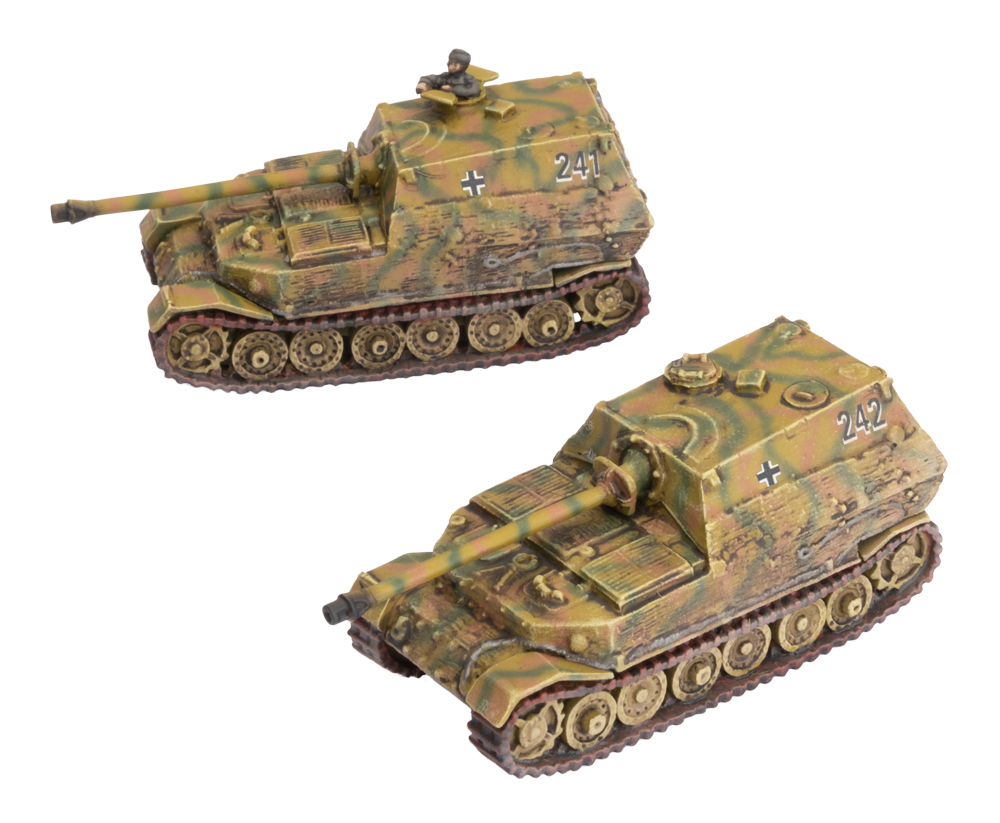
 Finally with Bagration: German one of the bigger tank-destroyers is going to return to the battlefield. We have all been waiting since Fortress Europe, D-Day: German, and D-Day: SS is missing it. I love this tank and I don’t really know why maybe for its shape or probably since it’s too big to be real. So in this article, I’m going to show you the Elefant’s characteristics, the unit size, and its cost. We will also have a look at its tactical use in every kind of list.
The Profile
The Elefant is very similar to the Ferdinand we got in the first late-war book but has received some important buffs. The front armour has moved from 15 to 16 which probably doesn’t represent a big change since there aren’t many weapons that can hurt this monster shooting from the front. All the Elefants I’ve ever seen destroyed were hit from its weak point on the side or top of the tank. Given its armour rating on the top and side is “only” 7 it will be vulnerable from the anti-tank 10+ rating hits that are very common in the late war.
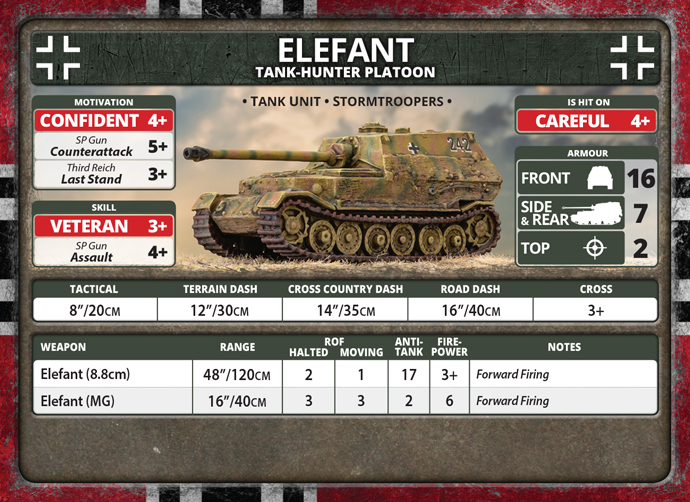
German players should be careful when moving this tank as it only moves 8”/20cm at tactical speed so the risk of being flanked is quite high. The cross-country dash remains the same, the terrain movement has been increased to 12”/30cm. This is interesting if you consider that the cross value has changed from a 4+ to 3+. Of course, moving this tank across a wood usually isn’t a good idea but sometimes it will happen, and a 16.6% extra chance to succeed helps. From my experience on Flames of War battlefields, I’ve learned that the right position of this tank is very important. Due to their armour, they’re nearly invulnerable to fire at the front with the exception of an Aircraft attack, be sure to put them where aircraft need a +1 to range in. Be careful about enemy tank movement, consider their Blitz that adds 4”/10cm, and do not forget about reserves that come from the flanks.
The main gun is the same 8.8cm Pak 43 as the Ferdinand, this is one of the most lethal weapons in World War II. An anti-tank value of 17 means that almost every tank will be scared of it. The range is enormous: 48”/120cm. Yes, you can shoot at enemy teams from one side of the battlefield to the other, so don’t get too close to them because you really don’t need to! You can just shoot with your fire rate of 2 and enjoy yourself. Looking at the weapons the most important addition compared to the Ferdinand is the machine gun. Now the Elefant is finally able to add 3 MG shots during a defensive fire. That can sound not so important but can help when you are in trouble.
What about morale? Well, there’s a big change here because the Elefant is confident. That’s important if your tanks are bailed. Because the third Reich guarantees a 3+ last stand, however, we all know that a 3+ roll can be failed, and failing the last stand with such an important and expensive unit can be very unpleasant.
Last but not least the rating has changed from an Aggressive 3+ to a Careful 4+, it doesn’t matter if the fire is coming from the front since the armour there is almost impenetrable, but this is important for aircraft bombs or rockets as they target the Elefants weak points. It can also help if you fail to correctly position your Elefant and the enemy flanks you.
Cost and Unit
Obviously, all these improvements do not come for free. The Elefant costs 15 points rather than the 13 of the Ferdinand. All considered 2 extra points is not much and this heavy tank-destroyer is still a good choice for almost any German list. The Elefant is definitely the better choice over the Ferdinand due to its better morale and its hit value.
Unit size is very important when investing 15 points in a 100 point list but investing 30 or more points? These are some very expensive tanks. However, the unit size is 1-4 tanks so you will be able to deploy an Elefant and still have a good amount of points for almost any kind of list.
The Elefant in an Infantry formation
Here we go! This is the perfect support for any infantry formation and makes a great focus for other units to pivot around.
The reason this works is quite simple: tanks cannot destroy it and usually not even bail it. Thanks to the Anti Tank 17 of the main gun if the Elefant hits its target, usually, the target is destroyed after its firepower check which is 3+. Deploy your tank behind the infantry to provide defensive fire, this can be useful and would guarantee 2 more shots against assaulting tanks. Against assaulting infantry this is less important, but not at all insignificant. Don’t forget to check if your Elefant is too close to the enemy and watch your flanks. Usually, the defender is just 60 points for deploying his units at the start of a match. If the Elefant is deployed the defender still has 45 points for HQ, one infantry, one artillery, an anti-tank gun unit, and maybe something else. This should be enough but be sure to deploy your Elefants to maximise its hit points in your match.
The Elefant in a Tank Formation
The Elefant has good support for tank formations, it provides heavy anti-tank support exactly where you need. Panzers often have to stop their advance due to a heavy tank platoon that places itself on its objective. This is particularly true if you are playing a medium tank formation that deploys a lot of tanks that lack the heavy anti-tank.The advantage of using an Elefant instead of a 8.8cm gun battery is that nobody can escape forever.
As long as you keep your flanks safe you’ll be able to advance and hunt tanks.
In a Tiger or Panther formation, the Elefant still has a role Why? You know that the front armour is 9 and the tanks are quite effective with shots coming in at anti-tank 12 or less. You should also consider that all armies have a solution for this by fielding anti-tank 13 or 14, so your Tigers and Panthers will not be tough enough to take these head on without taking casualties. In this situation deploying an Elefant can make the difference. Take the IS-2 for example they are a match for tigers, but are good prey for Elefants who take them head on.
A Whole Elefant Formation
We said that Elefant units are a support unit with a unit size of 1-4. Thanks to the Bagration: German Command cards there is also the opportunity to play a formation entirely composed by Elefants! Once the Ferdinands were refitted in January 1944, the new tank-hunters were all transferred to 653. Abteilung. This formation is made by a HQ, that can be from 1 to 2 Elefant, and 2-3 Elefant units. We should also note that Elefant units in a 653 Heavy Tank Hunters Battalion have a size of 2-4. So you must play at least 5 Elefants, but the good news is that you still have 25 points to take both an infantry and/or artillery support, and maybe something else to make your formation more difficult to disband like an anti-aircraft support unit. I played a similar list in mid-war, using 5 Ferdinands. Despite potential shortcomings, this list won one of the most important Italian tournaments in Milan, I can guarantee that it is not simple to use. Try it out and you might be surprised.