Building a T-55AM Formation

With John Lee

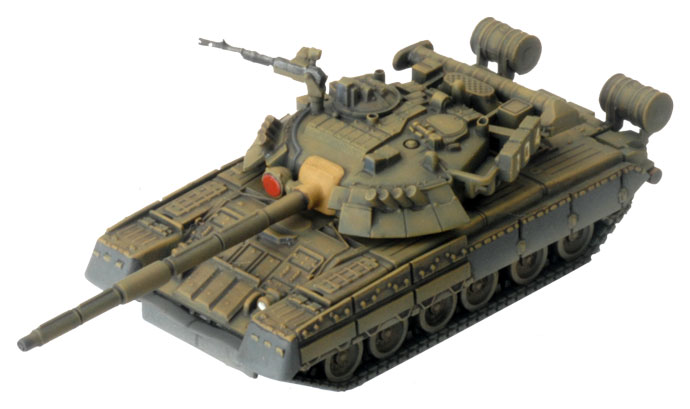
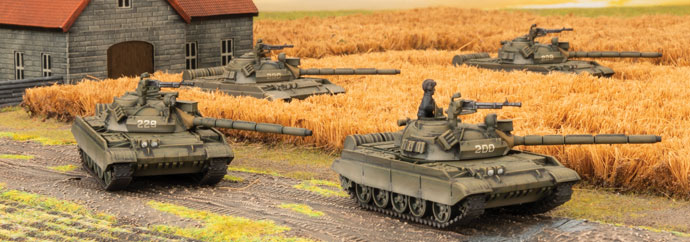
A nice surprise for this release is the T-55AM formation.  Now finally the Soviets have access to the T-55 at last.  You do not have to rely on allied formations to run the T-55 horde!  Not only that, but the Soviet T-55AM is better than the Warsaw Pact T-55AM2.  As a Soviet player, I can now run all the different tank options from T-55AM up to the T-80!

What does the T-55AM bring to the table over the T-55AM2?  No slow firing in the Soviet variant, main gun with higher AT and an optional gun tube fired missile!

The gun – 32” range AT18 with NO Slow Firing means moving up to 10” and able to fire its main gun on the move with no penalty.  So effectively its range is up to 42” if you move and fire.  Brutal – hit dug in infantry with it and that infantry is re-rolling its saves!  Laser rangefinder – No +1 to hit targets over 16”.  Infrared – roll two dice and choose the highest die roll for shooting range at night.

The missile – AT21 with a 16” – 48” range provides an option to take out most vehicles at range.  Guided – no +1 to hit over 16”.  HEAT – no +1 to armour save for over 16” range.

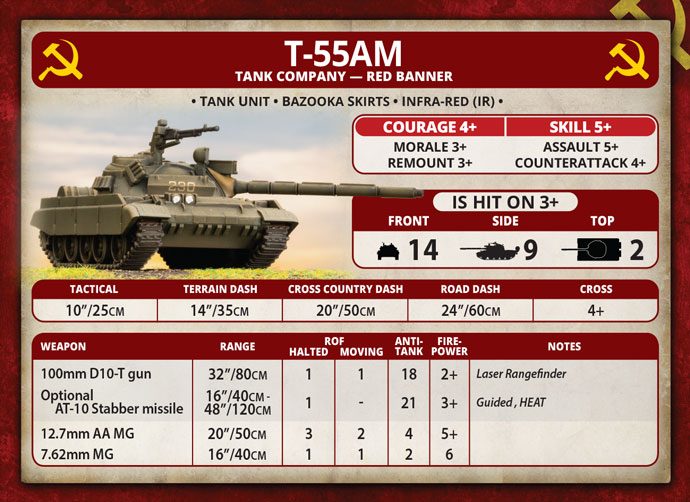
The armour – FA14 SA9 TA2 with Bazooka Skirts.  Most modern tank guns and missiles will go right through the frontal armour but has enough to stave off attacks from other weapons. Side armour is relatively decent and has Bazooka Skirts which means it goes to 10 vs HEAT weapons.   Against more modern infantry anti-tank armed units, it is still not going to stop it but against older weapons you have a chance.

The speed – 10” tactical speed means you will keep moving suffering no penalties for moving and firing.  4+ cross check which means you will pass them 50% of the time – so best not to rely on it.  14” terrain dash and 20” cross country dash if you need it – not as fast as the more modern tanks.

The stats – Skill 5+ so blitzing and shooting and scooting are not reliable orders.  Remount is a 3+ so easier to get back in.  Morale 3+ to stay in the battle.  Assaults are 5+ and counterattack on 4+ – so only assault if you really need to!  HQ has better stats of course so you want the HQ close by for the assaults.

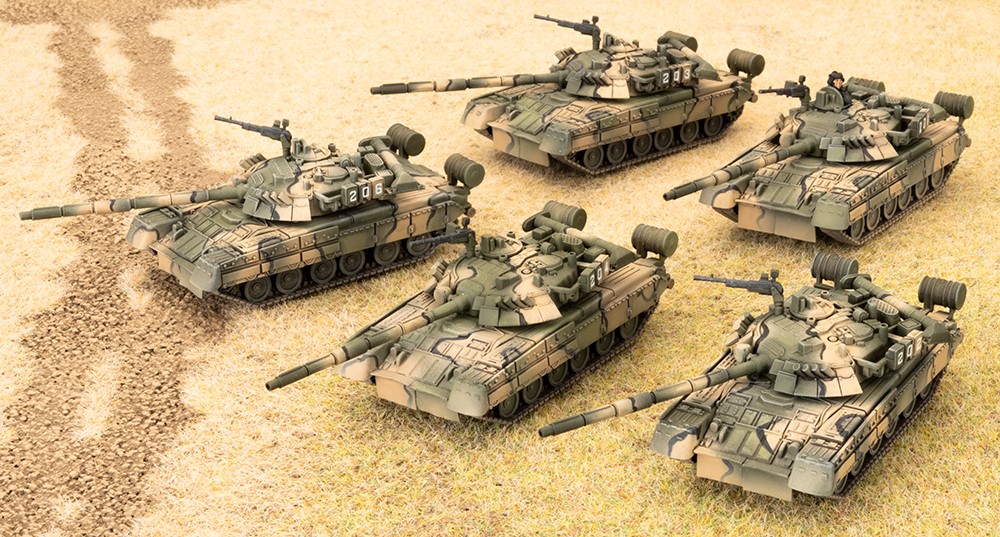
Before looking at the formation and composing some lists, I want to see what the size and cost of the T-55AM Tank Companies are.  Minimum in a company is five tanks for 7pts.  Maximum is ten tanks for 16pts.  Each tank beyond the minimum is an additional 2pts.  The tenth tank is only 1pt extra.  So, if you are looking to run a horde army, you gain a point running maximum points.  If you want the optional missile its +2pts for the whole company – a bargain when running a large company of them.

Let us have a look at what comprises the formation:

  • 1 T-55AM Tank Company HQ
  • 2-3 T-55AM Tank Company
  • 0-1 BMP-1 Motor Rifle Company or BTR-60 Motor Rifle Company
  • 0-1 BMP-2 Recon Platoon or BMP-1 Recon Platoon or BRDM-2 Motor Recon Platoon
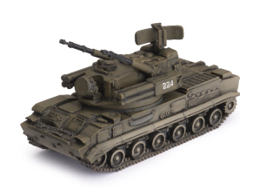
  • 0-1 ZSU-23-4 Shilka AA Platoon
  • 0-1 SA-9 Gaskin SAM Platoon or SA-13 Gopher SAM Platoon
  • 0-1 2S1 Carnation SP Howitzer Battery

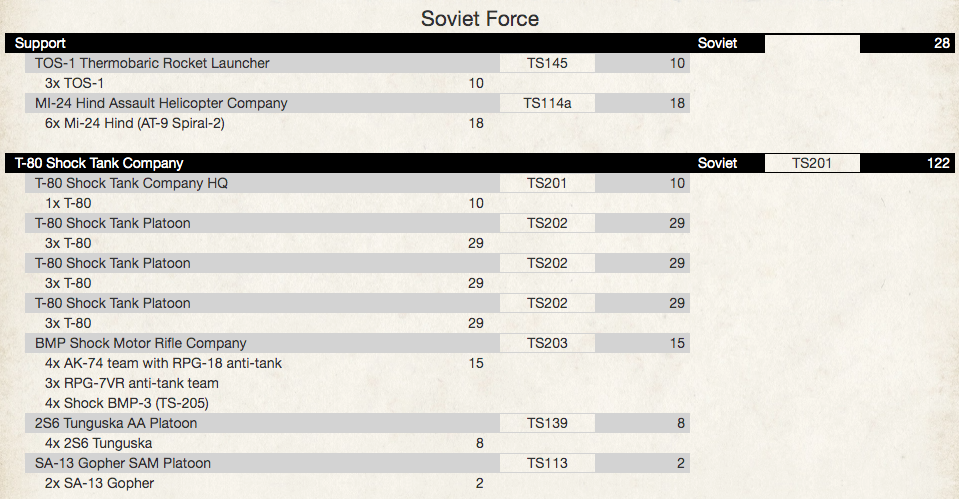
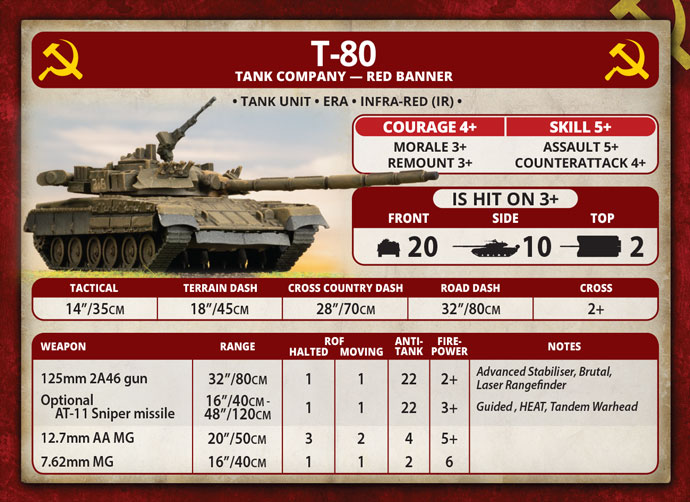
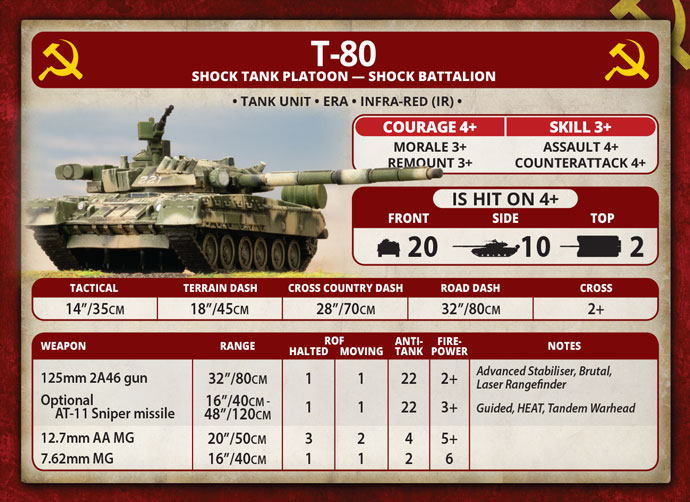
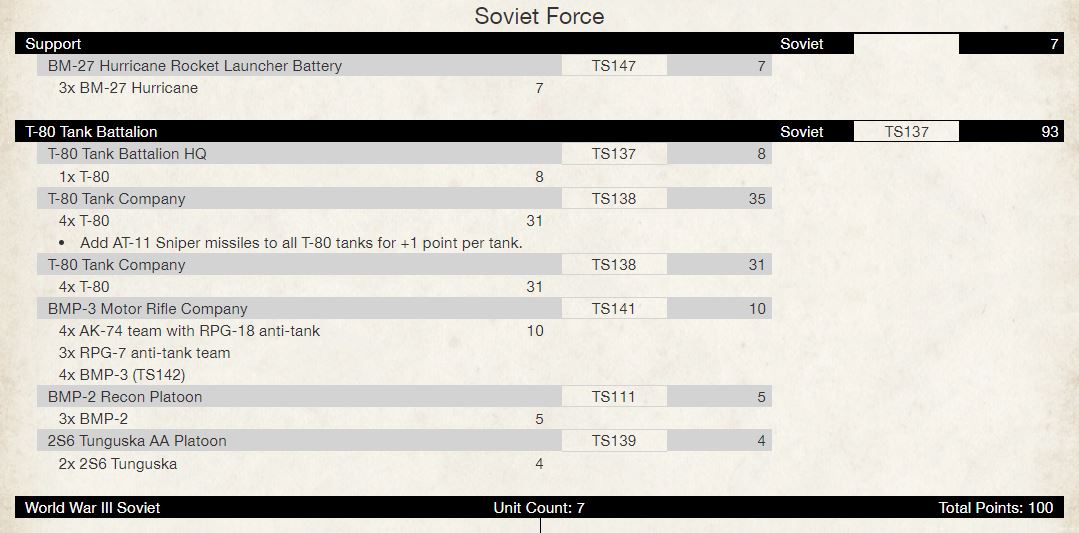
With the low points for the volume of tanks you can take, you have a number of options for taking two formations of T-55AM or one formation with a secondary formation of say Air Assault Afgansty or BTR-60 infantry or even an allied formation, such as Iranian Chieftains.  With V2 of the rules, we can now take black box options as formation support – Shock T-80 Tank Platoon anyone?  Of course, you could just stack it with lots of support options, such as the new artillery (BM-27 Hurricanes, TOS-1), full complement of Hinds, Frogfoots – lots of combinations depending on your playstyle and budget.

We will look at various options for 120pts, 100pts and 75pts for running one or more formations.  Starting off with 120pts first let us see how this may play out:

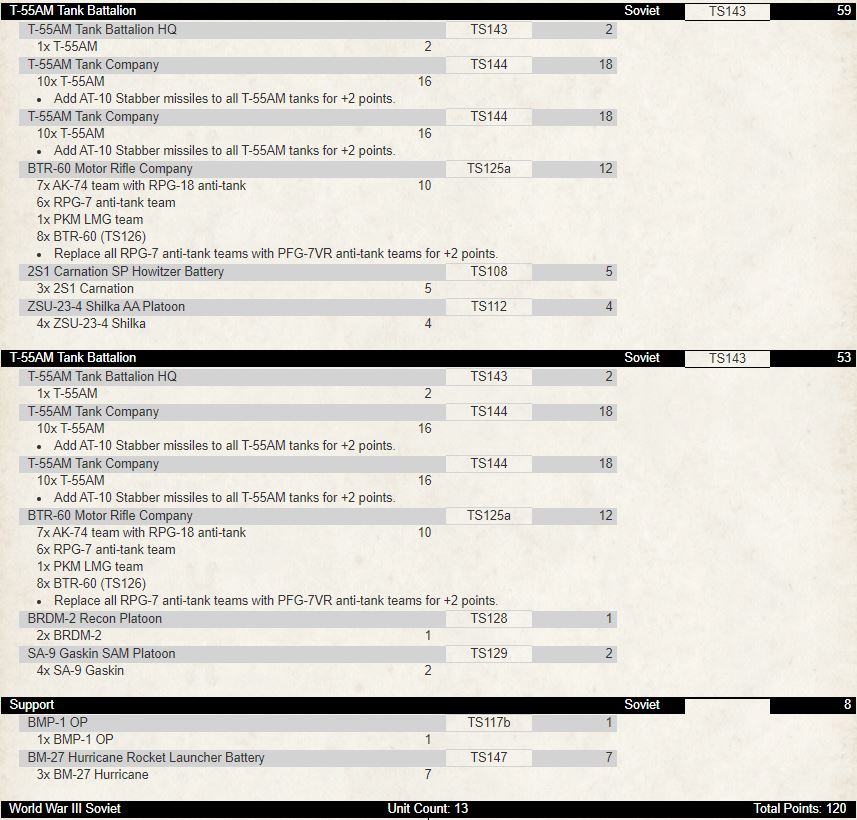
Dual T-55AM formations stacked with missile firing tanks, infantry with upgraded RPGs that can stand up to Tanks with AT19 against advanced armour in assaults!  Each formation is relatively strong with six units in each, two infantry companies to dig in on both objectives and if required, drive the enemy infantry off theirs.  Two artillery templates including the new BM-27 rocket launchers that can launch minelets to wreck the enemy’s backline.  Spearhead and AA coverage to go with your 44 tanks.  40 x AT21 missiles with your tanks will cause your opponent headaches.  You have some room to modify the list here – remove either some tanks from the companies and or missiles if you want additional AA coverage or another artillery template.  You could also make one of the infantry companies smaller and or downgrade all the RPG-7VRs to standard RPG-7s.

Let us see how it looks if we pair the formation with an Air Afgansty formation:

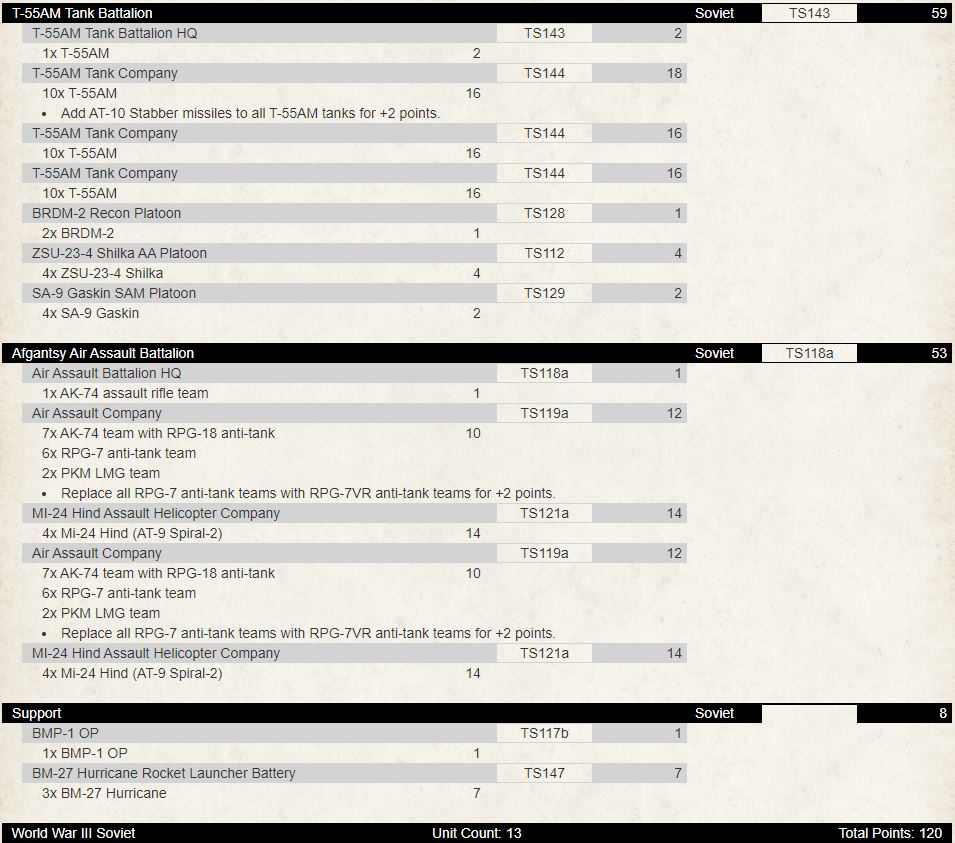
Running with 31 x T-55AMs (10 with missiles) you have seven units in the formation – very durable with AA and spearhead.  You get two companies of the best infantry (outside of Shock Motor Rifle Infantry) equipped with the enhanced RPG-7s along with eight Hinds with AT24 missiles!  BM-27s to fire salvos and minelets.

How could this formation work with black box units – let us have a look:

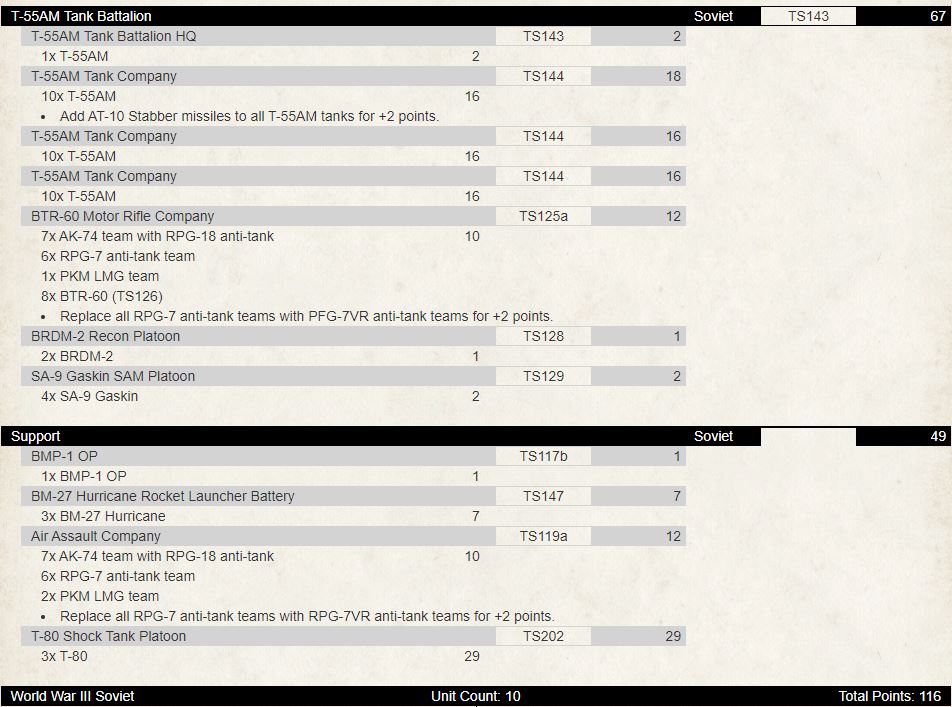
Running with 31 x T-55AMs (10 with missiles) you have eight units in the formation – hard to break and has AA and spearhead.  You have intrinsic infantry with the formation plus one company of Air Afgansty infantry for assaulting or defending the key objective.  Platoon of shock T-80s – hit on 4s – oh yeah!

Want more of the support options for a more surgical strike force – here is an option :

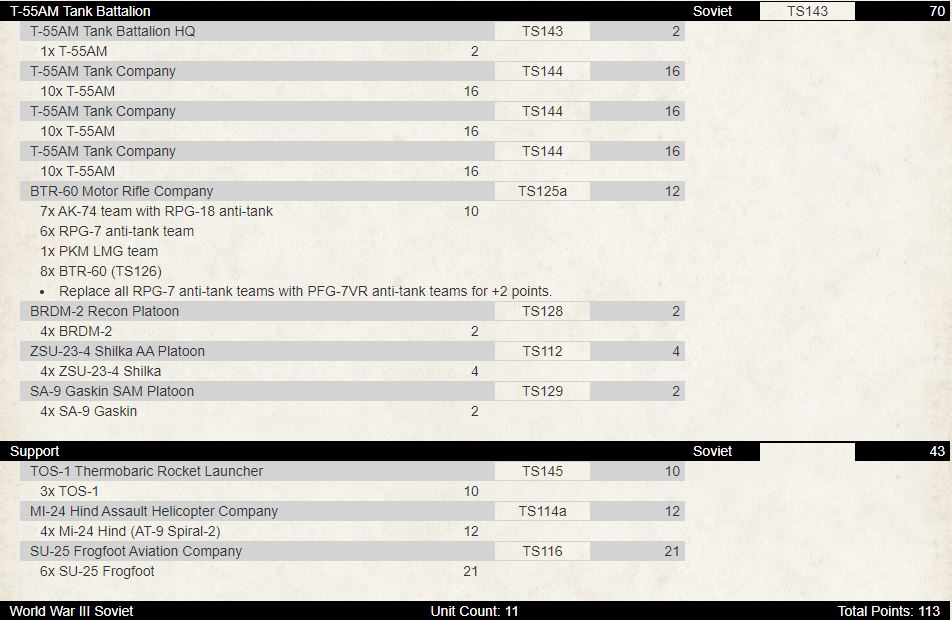
Your T-55AM formation will hold the field with eight in the formation with one infantry company to anchor it.  The TOS-1 is there to wreck infantry formations with its brutal salvo and auto firepower.  The six hinds with AT24 and six Frogfoots with AT27 are your surgical strike instruments.  Use your T-55AMS to bum rush your opponents AA so your air assets can rip apart the enemy armour whilst the TOS-1s suppress enemy infantry.

Looking to 100pts now, we could remove the Frogfoots, swap out the TOS-1 for BM-27s and add some Storms:

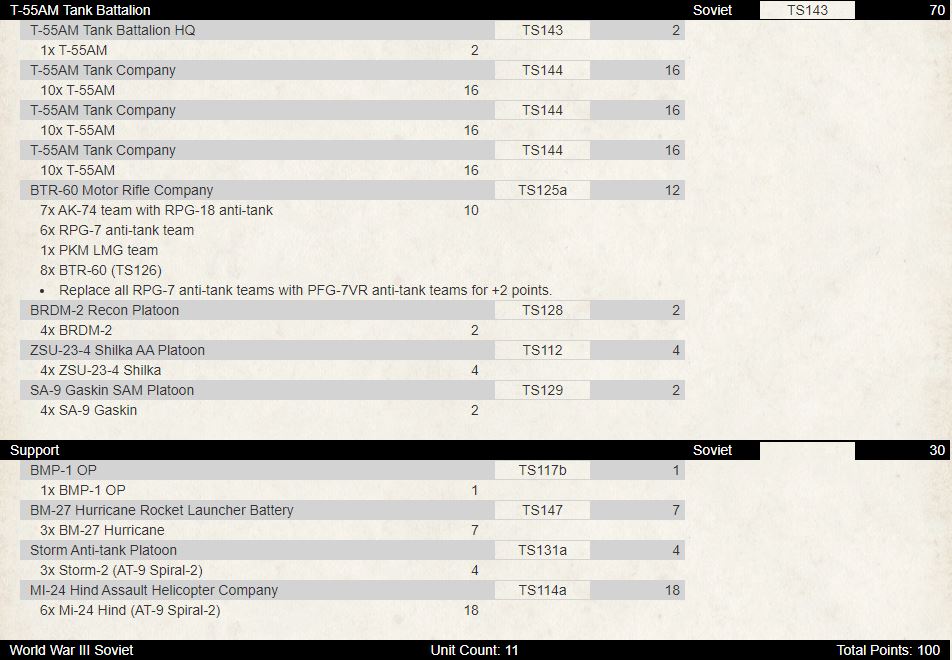
The Storms add more AT24 goodness.  Storms and Hinds are you surgical instruments for taking on high end tanks.   You could also change out the BM-27s for 2S1 Carnations or 2S3 Acacias to add missiles to one of the T-55AM companies to bolster your missile count.

For me, I find that running 10 tank companies are difficult to manoeuvre, so I prefer running them in units of 7-8 tanks.  This allows more tweaking of points to get other units I want for my force.  Here is an option that suits my playstyle:

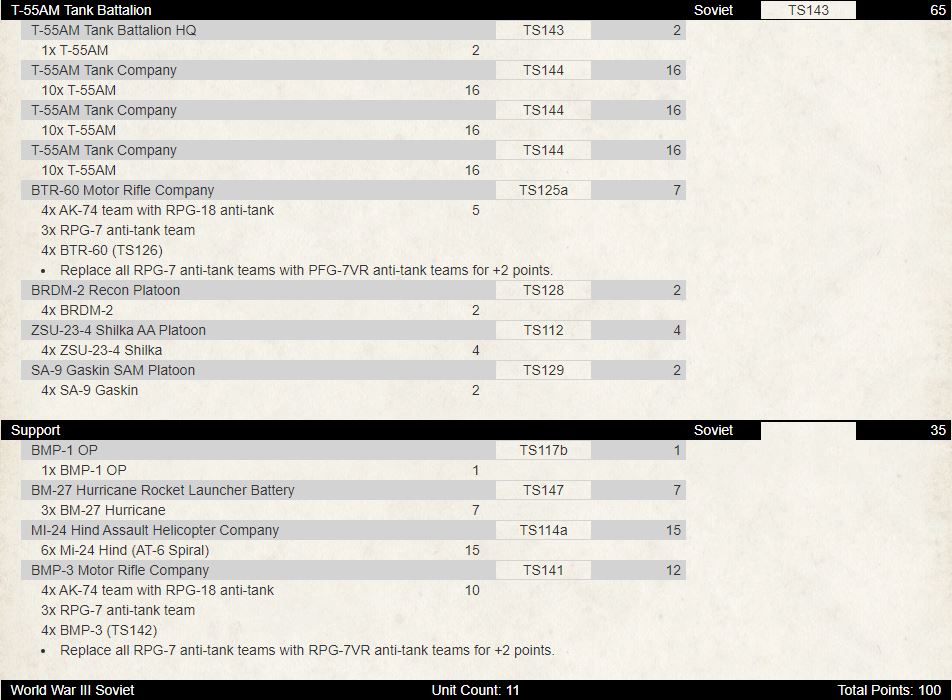
This list has two small infantry units, the formation still has eight units, and I can incorporate the new BMP-3 with its firing on the move AT21 missile! 6 x AT24 and 28 x AT21 missiles!  As you can see, you can tweak the T-55AM list to suit your playstyle at 100pts and 120pts.

Having played at NukeCon here in Auckland a number of weeks ago, I thought I would see if I could get a T-55AM Tank Battalion list together that I could have taken if it was available then (I took an Iraqi T-72M force – which was fun to play):

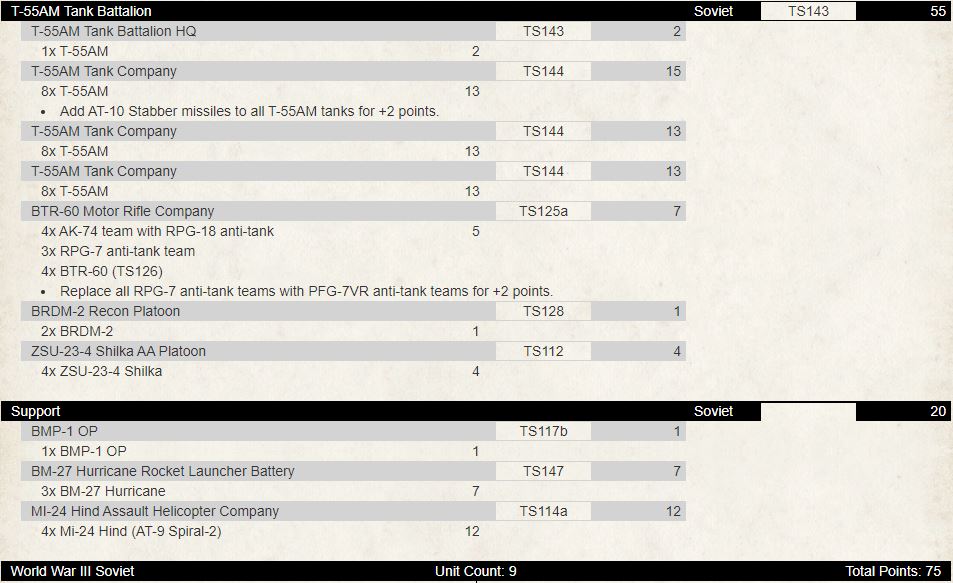
Still have 4 x AT24 take on the heavy tanks with back up of 8 x AT21 missiles.  Formation is strong with seven units.  AA in the form of Shilkas and Gremlin.  Smaller infantry unit but has the upgraded RPG-7VR so can hold off tanks in assault.  Use the remaining T-55AMs to bum rush the enemy (from reserve if required) or from spearhead.

So, there you have it – this formation gives plenty of options depending on your play style and the points you are playing to.  I love all the options you can add from either black box formation support or the support options.  The horde rides again!

~John Lee

Casey’s T-80 Tank Battalion

Like most of the Big Four Of Late War I was super-jazzed with the T-80 arriving in the WWIII: Soviet book, and decided to join in the fun and paint up a new army for the launch (evil glares at Chris for not participating).

Now I’m a bit of a perfectionist when it comes to painting which means I’m normally a slow painter, so I thought I would just this as an opportunity to challenge myself to pump out an army quickly.

Rather than noodling an army list to build my army around I decided to just paint some of the new models that I thought looked cool, points and army composition didn’t really make me decide what to paint.

The core of my force are some T-80s. I figure 10 should be enough to cover me for most situations. Next up are some BMP-3 Scouts, again because they are new plastic and look super cool.

One of my favourite new units in the book is the TOS-1. I have been badgering Wayne, Phil, Chris, Evan, and Pete to make the TOS-1 since the start of our WWIII journey, so now that we have it I thought it would be rude not to paint some. As well as looking cool, game-wise I think it will be a good choice to have available to my Soviets since I tend to run tank heavy armies and struggle to deal with infantry. Their Brutal bombardment will certainly help with that.

Lastly, I’m painting a platoon of 2S6 Tunguska AA tanks, mainly due to rule of cool, I just think they look awesome.

Plugging this into Forces it comes out to an inconvenient 101 points, so I’d probably have to drop a BMP-3 if I were to take it to a tournament.

Amongst the Big Four Of Late War we have been discussing playing big boy games of 150 points using the more modern equipment that has started appearing (T-80s, M1A1 Abrams, Challenger I’s, Leopard 2’s etc). Luckily I can make this a 150 point list just by making them Heroes and adding the Mi-24 Hinds that I have already painted, a few infantry stands, and a pair of Gophers for a bit more AA. The TOS-1s are probably a suboptimal option given that none of the guys are going to go particularly infantry heavy for these games, but sometimes you don’t always get given the tools that you need to do a job and just have to make do with what you have available.

As far as the fast paint challenge has gone, I’m about 3 weeks in and I’ve managed to finish the T-80s apart from the tracks and the rest of the army is not far behind. With another week I think I’ll have the army completely finished. The army is definitely not painted as well as I would usually paint, but I’m pretty happy with it, and I think looking at effort vs reward it’s pretty good. I’m just looking forward to putting it on the table for a few games.

– Casey

Shock Therapy: Hurting People With The Shock Tank Company

With Chris Allen

The WWIII: Soviet book is bringing all sorts of new toys and ways to play a Soviet force to the table. The most dramatic change and divergent force is without a doubt the T-80 Shock Tank Company. Formed from the 26th Guards Training Tank Division utilizing the most advanced equipment with the T-80U, BMP-3 and Tunguska, along with the most experienced officers and top second year conscripts the Shock Battalion is a whole different situation for NATO forces.

The Company is largely organized the way any Soviet Battalion would be, holding a support company of infantry, and platoon artillery, anti-air and reconnaissance support

Organization – tank platoons in a coy. But where you would normally have 2-3 companies of tanks, here you find 2-3 platoons of tanks.

So the core of the formation is the T-80 tank. This newly introduced monster is a beast. Sporting front armour of 20 the T-80 can take a beating. M1 Abrams or M60 Pattons an issue? Not any more. Milans a problem? Not really for the T-80, as at best you’re bailed on a 1. The Side armour of 10 keeps autocannons at bay and with ERA you count as side armour 16 against HEAT weapons so if Carl Gustavs are a problem for you, they also can only bail if you roll a 1. The tank isn’t invincible as AT-23 has become a lot more prevalent but it’s a pretty tough nut to crack for most weapons.

Besides being the most armoured, the T-80 is also the fastest Soviet tank with a tactical move of 14” like the T-64 due to advanced stabilizers but sports a 2+ cross check making it ridiculously maneuverable on the battlefield. The same exceptional 125mm 2A46 gun with a AT of 22 is present but where the change sits is it can also take the AT-11 Sniper missile which unlike its predecessors has an AT of 22 and can fire on the move out to 48”, giving it a threat range of 62 inches before blitzing. Again, it’s a beast.

But where the shock T-80 becomes truly scary isn’t it’s armour or the gun, not even it’s mobility. The difference is the crew. Not being hit is the best armour, and this tank is harder to hit. At 4+ to hit the Shock tank platoon is a real tough nut to crack, fighting at range and against defensive fire. Add in cover and suddenly you’re sporting a near uncrackable tank that’s hit on 5’s while moving rapidly across the field. But there’s more, the crew also have 3+ skill and 4+ assault, meaning blitzes and other movement orders become likely rather than the exception and assaults get results. The T-80 is the Marshal Lynch (American football reference) of the Soviet Force, it’s beast mode.

Some people say with great power comes great responsibility, but I often find the more relevant consideration is cost. The Shock T-80 is 9 points a piece, for either the HQ or the platoons which consist of 2 or 3 tanks making platoons between 18 and 27 points a piece before you add on options like missiles or mine clearing ploughs.

With an HQ tank and two platoons you use up a minimum of 45 points in a force which comprises only 5 tanks. More likely you’ll want at least one platoon with 3 tanks so your base force will commonly comprise around 50-60 points of T-80s.

The big question I find people have difficulty with is answering the question “what are my T-80s here to do?” In fairness this question is often hard for many Soviet players to answer with their tanks. But if you’re spending half or more of your points on a handful of tanks you should probably have an answer for this question. With this list I feel like the answer is much clearer than with others, it’s there to bully people. The T-80U as described is a beast, but with only ROF 1 and AT 22 it isn’t going to gun down your opponents army, and in a gunfight at range with the more modern tanks you can expect a bun fight to ensue. So if not gunning down other big tanks what makes you want to take the Shock T-80U?

The T-80U is amazing at getting stuck in and staying there. The sumo wrestler of WWIII it can push people around and off of objectives while absorbing fire like almost no other tank can, and all for a very reasonable price. -see earlier “the T-80U is a beast”.

The Shock T-80U can get you through minefields, either by just driving clear through them with their skill of 3+ or by removing them with mine ploughs, reliably entering them the previous turn. Arguably there usually isn’t much in the army coming through after the T-80Us in a Shock Company so commonly you can save the points on ploughs and only take them if you’re going to guide through the Shock Infantry company. This alleviates one of the key problems Soviet forces have, being cut off in the offense. This opens up literal avenues that were formerly closed or at best uncomfortable.

After breaching, the T-80s are amazing at assaulting people off of objectives (not necessarily killing people but removing them from objectives). It’s not their 4+ assault that makes them great, but rather their durability. With 4+ to hit and ERA they are immune to most infantry AT assets and with a 3+ morale and 2+ cross, you’re racing killing off your opponent vs them breaking away. Because of this, the T-80U platoon with an HQ tank is a game winning group of tanks on the table and their ability for speed and violence cannot be overlooked. For these reasons, missions with early win conditions and defenders having reserves, or even deep reserves are this list’s wheelhouse.

So with roughly half of a 100 point list invested in a few tanks to start the game, this doesn’t leave a lot of points for support, or more important the only thing that properly takes and holds ground, Infantry. But this list does have a really cool option for them.

The Shock Tank Company comes with some very special support for your T-80s, highly trained infantry with the same skill and assault capability, the BMP Shock Motor Rifle Company. Possibly the most interesting inclusion in WWII: Soviets is the Shock Battalion infantry coy, if only because they can only be taken in a Shock T-80 company. They are not a black box choice but are a formation option for the T-80 Shock company and so bring you not only staying power but the ability to take and hold ground, in this regard, I’d say heavy on the former, less so on the later.

The T-80 Coy is not a subtle build, it’s not here to sit and wait, it’s purpose is to break lines, to push deep and turn the enemy, to make them run, and then run them down. Purpose built to support this is their infantry. While not as numerous as a standard infantry company you get in a word, ‘enough’. With an option for either a platoon sized element or company minus group, the shock infantry brings a ton of flexibility to the force.

The unit is equipped with the BMP-3s as the Shock Infantry’s transports, and these are a threat from the get go. While they can be downgraded to BMP-2s the BMP-3 gives them the mobility, firepower and survivability the unit needs. They can be placed aggressively in most missions and flaunt their ability to other players. In games where you may have the meeting engagement rules the BMP-3 can still move and fire its missile, making it the perfect piece to standoff against other missile systems, either you go first and fire first or they go first and don’t fire at all. With the 3+ skill they can also reliably use movement orders like blitz and shoot and scoot letting them be a constant thorn in the side of opponents. Simply put, these transports let you dictate the tempo and the opening of an engagement even more so than the T-80s do alone.  Holding a flank or simply threatening tanks side armour from across the table these vehicles give your T-80s freedom of movement and force players to hold back.

The infantry are what you’d expect, hard chargers. 4+ to hit infantry with 3+ skill, 4+ assault and AK-74s, they’ll start and finish the party in the trench lines. They are also armed with the new RPG-7VR, with AT 19 and FP 2+, this makes them a threat to any tank on the field of battle, being able to penetrate even the side armour of Chobham vehicles. Even the mighty M1A1 HCs and Challenger tanks have to respect this unit.

Against a pinned unit they can reliably get into assaults (smoke definitely helps) and once in they are hard to dislodge. What the Shock infantry can’t do is hold ground for long. Yes they are harder to hit, but they are much less numerous and can’t sit and take a beating for very long. They are meant to take an objective and win, or to assist the tanks in doing so, taking infantry out of buildings or covering their flanks as you advance.

With the tanks and the infantry sorted you have the usual suspects for formation support, artillery, reconnaissance and air defence assets but with two notable changes. First off the 2S6 Tunguska air defence system that provides you with a swiss army knife of support. The Tunguska has both missiles and 30mm cannons making it highly effective at providing anti-air support and as a counter to light armoured vehicles with it’s ROF 7 cannons. Players will have to think about the cost though as for the same price of 4 Tunguska you can take 8 Shilkas to provide more pockets of air defence on the table to your expensive tanks. Secondly the only reconnaissance option in the formation is the BMP-3 Shock Recon platoon. At 3 points a piece the recce cars are expensive, they bring a lot with all the same skill and to hit benefits as the rest of the Shock Battalion, but to save points taking divisional support options can get you BMP Recon Platoons of any variety.

There are a lot of options for support and T-80 Shock Battalion has far too few points to spend on all of them! Out of them all the one thing I always look for to support my T-80s is smoke. With so few tanks (albeit awesome tanks) I look to minimize my opponents ability to affect them. Smoke is huge, it’ll cover your breaching minefields, taking objectives or just cover a flank as you engage targets. Taking artillery has the added benefit of being exceptional against infantry in buildings, something that this list struggles with due to having so little infantry.

After smoke, I find that some air is always a big help. Hinds are an amazing option to bring a large number of shots for a very reasonable price. With their high AT and ability to relocate anywhere on the table they are a near perfect counter to enemy armour or a first choice to arrive from reserve. Lastly if you haven’t taken the Shock Motor Rifle Company, you may want to take a support company of infantry. This gives you a dramatic amount of options but as they are support they don’t help your formation stay on the table. A full company of Afghantsy are an excellent stand in, or you could swap in a mid size BMP-3 company for nearly the same points as the Shock company, trading skill for firepower and numbers. However you do it, you want to take at least a little infantry.

One last consideration should be tanks. But I already took the best tanks the Soviet army can provide, why do I need more tanks? Shots and distractions. It’s easy for someone to focus on your T-80s but something like a company of 10 T-55AM2s can distract an opponent from your T-80s and provide you with a lot more shots to help you disrupt your opponent while your T-80s do their work. Are they necessary? Nope. But more tanks are often fun tanks.

The Shock Battalion is a force that wants to attack, it was conceived, designed and built to attack. With that said, it can’t win a war of attrition, there just isn’t enough there to last. This list is about winning fast and going home. Let it do what it was made to do. Players using the more missions packages should really consider carefully any time they look at options other than Attack. The main reason for this is reserves, the Shock battalion hates reserves. With an elite Soviet force you have very little comparatively on the table and a huge number of points invested in ROF 1 tanks and any reduction in that makes victory that much more difficult. The Attack vs Defend missions are the perfect situation for this list, normally granting the attacker a solid position to press against a smaller footprint of enemy on the table. Speed and violence is what this list uses to win, setting that up in the pre game fight is key.

Remember you have a heavily armoured, hard to hit tank,  that can bypass mines regularly. It’s pretty much the road map of how to win with these.

The T-80Us of the Shock company make for an amazingly different but fun force on the table but they can also be added to other forces as a support choice. In all honesty, this is how I like using the T-80U shock platoon, as support. This makes a box of T-80s or the two player starter ideal for any Soviet player, even one not thinking of fielding a T-80 force. What the Shock T-80 platoon brings to play for normal Soviet lists that nothing else does is reliable breaching. Often Soviet players can be derailed by minefields in missions, being fairly unreliable to remove them, tanks and infantry commonly are shot up or die in the minefields. With the speed of the T-80U they can get to the minefields ahead of the assault force, with 3+ skill T-80s can reliably enter minefields without taking damage. they can use their FA 20 to withstand the fire thrown at them and remove the minefields opening the gap assumed closed by most NATO players.

The Shock T-80U platoon with missiles also pairs amazingly well with a platoon of Hinds to make a perfect reserve force. Why the missiles? They extend your range so coming in from reserve you’re pretty much guaranteed to be in range and a threat from the get go. By keeping these in reserve you have the time and space to hunt down high AT threats and air defence assets making the arrival of your reserve that much more successful.

As a Soviet player, let’s face the fact that we are all about to buy T-80s if we haven’t already.

It looks cool, it’s a beast on the table and it scares NATO players. With that out of the way, realize that WWIII:Soviets is bringing us a bunch of great ways to play these beasts. The Shock T-80U as either a formation or as support choice is a blast to play and is going to bring a whole new threat to a battlefield near you. The Shock Tank Platoon is the All Blacks of Soviet tanks, a huge machine specializing in pushing people around. In a game about objectives, It’s an offensive powerhouse and winning machine.

Wayne’s WWIII: Soviet Army List

With the new World War III: Soviet book out I have an opportunity to try a few things out with my Soviet forces. At the moment I have a bunch of T-72 tanks, a large BMP-2 Motor Rifle Company and a mix of supporting elements painted up. At 100 points I’ve been running my T-72s in to companies of 6 or 7 tanks with a BMP-2 Motor Rifle Company, a pair of SA-13 Gophers, two Shilkas, some more BMP-2 scouts and a battery of three 2S1 Carnations. I been playing with some sort of combination of these since Team Yankee first came out, so I thought it was time to change it up.

I plan to put together a force based around the new T-80s. These are better protected than the T-72s, more mobile with their Advanced Stabiliser, and can also fire the AT-11 Sniper gun launched anti-tank guided missile. The AT-11 is particularly impressive with a range out 120cm as well as being able to fire on the move, as long as to keep your tactical speed under 10”/25cm.

The other new things I’m tempted by are the new 2S6 Tunguska AA Tank, BM-27 Hurricane rocket launcher, and the BMP-3. With the BMP I just gabbed three to get me started, which I can either mount some of my already painted infantry in, or use them as a scout unit. As a scout unit they also make quite good tank destroyers with their AT-10 Stabber ATGMs.

This is my initial 100 point force.

The Big Four Of Late War have also been discussing playing some large point games, with the idea of focusing of the more expensive tanks and playing with a decent number of them. With this in mind I also made this 150 point force.

With the T-80s being quite meaty and expensive it won’t take me long to paint the 11 I need altogether. I’ve so far painted six and have another five sitting on my painting desk at home. I also already have my BMP-3s assembled. I just need to grab the BM-27 Hurricanes and the 2S6 Tunguskas.

I’ve done my T-80s in a camouflage scheme, which is probably post-cold war Russian rather than Soviet, but I wanted them to be completely different to my T-72s.

I’ll try and keep you up to date on my progress.

Be Bad With Your GBAD: Soviet Ground Based Air Defence

With Chris Allen

Successful Soviet Combat Operations are predicated on the effective and consistent use of the algorithm. Soviet military scientists applied rigorous consideration, and research to provide commanders with decision action tools. If you go through Soviet Doctrine you’ll find no shortage of these. They were made to be simple and effective means to plan operations. My personal favorite is a chart where you plot the speed of yourself, the enemy and the range you’re at and it pops out the time you have before the engagement starts. They are really useful and we now see the West today coming out with similar things on digital platforms. But where a million-dollar space pen was designed, a pencil still worked just fine. The same can be said of the Soviet algorithm tables and charts.

So how do you use this ‘calculator’ or algorithm chart?

First off you need to make a prediction of the enemy air power threat. There are two aspects to this process, first you understand your vulnerability to air power. What air power often does is reduce your freedom of movement. It seems weird at first, but follow me here. By having a bogey man of suddenly appearing threats, air reduces your freedom to move out of cover or away from air defence. It’s meant to scare you into smaller less advantageous action and then punish you when you don’t. The amount to which this can affect you is based on your own composition.

If your army is composed of BTR-60s, how much of a threat does air pose to this force? I would argue against something like this the threat of certain air platforms such as Apaches or Cobras is low. What is a hellfire or a TOW missile going to do that say a M242 Bushmaster isn’t? Not much. Turn this around and consider a force comprised of T-80s, where these high value tanks are vulnerable to high AT weapons with LOS to the whole table and you find yourself considering air weapons platforms as a high threat. This doesn’t mean that a force based on BTRs is always low threat, or that one with T-80s is always high. You need to understand your force and how you see the path to victory. The same BTR-60 formation could have a platoon of Shock T-80Us and that unit is needed to take the objective. This might then be a high threat consideration. But that part is up to you.

Once you’ve considered your vulnerability to air, to your force and your plan, you need to consider the threat that you expect. This can be difficult as it’s a prediction of the future and you’re working with very limited info. In casual play with friends you know your buddies, you know units they always take and if this includes air, it’s a good indication. Newly painted Hind platoon? Bet it’s showing up. Tournaments and other events like game nights are more difficult, but I find that if I expect at least one unit of air, be it strike aircraft or helicopters, I’m rarely disappointed in choosing to always bring ground-based air defence units. If you’re in a place where air is less common you can also consider taking platforms that are dual purpose like the ZSU-23-4 Shilka or the 2S6 Tunguska that can provide both anti air fire and suppress ground targets with their high rate of fire.

Once you’ve considered your vulnerability and the expected air threat, you should have an idea of what you’re going to see show up and how big a worry it is to you. This is where you start to prepare your force and how you are going to kill them. Using the table you can essentially add up the kill rate you believe you need to deal with a given threat by using the right hand column.

The table below gives you the expected normal output of full batteries of air defence weapons systems in service for the Soviets against expected targets based off their to hit and save values. So if you’re expecting a group of A-10s, consult the 3+ save sections, Hinds or Apaches look up the 4+ save areas based on their respective hit value. This will give you all of your relevant destruction data for the battery vs the target. If you are planning on using half platoons just reduce the expected kills per turn by half.

Vs to hit 3+ 5+ save
% chance to kill Shots to kill Shots per pl Kills per turn
Missile systems
Gaskin 14.81% 6.75 8 1.19
Gopher 22.22% 4.5 8 1.78
Gecko 29.63% 3.375 12 3.56
Tunguska 29.63% 3.375 8 2.37
Gun systems
Shilka 14.81% 6.75 24 3.56
Tunguska 14.81% 6.75

28

4.15
Vs to hit 3+ 4+ save
% chance to kill Shots to kill Shots per pl Kills per turn
Missile systems
Gaskin 11.11% 9 8 0.89
Gopher 16.67% 6 8 1.33
Gecko 22.22% 4.5 12 2.67
Tunguska 22.22% 4.5 8 1.78
Gun systems
Shilka 11.11% 9 24 2.67
Tunguska 11.11% 9

28

3.11
Vs to hit 4+ 5+ save
% chance to kill Shots to kill Shots per pl Kills per turn
Missile systems
Gaskin 11.11% 9 8 0.89
Gopher 16.67% 6 8 1.33
Gecko 22.22% 4.5 12 2.67
Tunguska 22.22% 4.5 8 1.78
Gun systems
Shilka 11.11% 9 24 2.67
Tunguska 11.11% 9 28 3.11
Vs to hit 4+ 4+ save
% chance to kill Shots to kill Shots per pl Kills per turn
Missile systems
Gaskin 8.33% 12 8 0.67
Gopher 12.50% 8 8 1.00
Gecko 16.67% 6 12 2.00
Tunguska 16.67% 6 8 1.33
Gun systems
Shilka 8.33% 12 24 2.00
Tunguska 8.33% 12 28 2.33
Vs to hit 4+ 3+ save
% chance to kill Shots to kill Shots per pl Kills per turn
Missile systems
Gaskin 5.56% 18 8 0.44
Gopher 8.33% 12 8 0.67
Gecko 11.11% 9 12 1.33
Tunguska 11.11% 9 8 0.89
Gun systems
Shilka 5.56% 18 24 1.33
Tunguska 5.56% 18 28 1.56
Vs to hit 5+ 5+ save
% chance to kill Shots to kill Shots per pl Kills per turn
Missile systems
Gaskin 7.41% 13.5 8 0.59
Gopher 11.11% 9 8 0.89
Gecko 14.81% 6.75 12 1.78
Tunguska 14.81% 6.75 8 1.19
Gun systems
Shilka 7.41% 13.5 24 1.78
Tunguska 7.41% 13.5 28 2.07
Vs to hit 5+ 4+ save
% chance to kill Shots to kill Shots per pl Kills per turn
Missile systems
Gaskin 5.56% 18 8 0.44
Gopher 8.33% 12 8 0.67
Gecko 11.11% 9 12 1.33
Tunguska 11.11% 9 8 0.89
Gun systems
Shilka 5.56% 18 24 1.33
Tunguska 5.56% 18 28 1.56
Vs to hit 5+ 3+ save
% chance to kill Shots to kill Shots per pl Kills per turn
Missile systems
Gaskin 3.70% 27 8 0.30
Gopher 5.56% 18 8 0.44
Gecko 7.41% 13.5 12 0.89
Tunguska 7.41% 13.5 8 0.59
Gun systems
Shilka 3.70% 27 24 0.89
Tunguska 3.70% 27 28 1.04
Vs to hit 6+ 5+ save
% chance to kill Shots to kill Shots per pl Kills per turn
Missile systems
Gaskin 3.70% 27 8 0.30
Gopher 5.56% 18 8 0.44
Gecko 7.41% 13.5 12 0.89
Tunguska 7.41% 13.5 8 0.59
Gun systems
Shilka 3.70% 27 24 0.89
Tunguska 3.70% 27 28 1.04
Vs to hit 6+ 4+ save
% chance to kill Shots to kill Shots per pl Kills per turn
Missile systems
Gaskin 2.78% 36 8 0.22
Gopher 4.17% 24 8 0.33
Gecko 5.56% 18 12 0.67
Tunguska 5.56% 18 8 0.44
Gun systems
Shilka 2.78% 36 24 0.67
Tunguska 2.78% 36 28 0.78

For example, if you want to destroy a unit of 4 Harriers before they can engage you with cluster munitions, you can consult the 4+ to hit column, or the 5+ to hit column if you expect to keep your ground-based air defence teams concealed in woods or behind buildings. With these inputs, we can see that a battery of Tunguskas should kill 3 Harriers, 2 if concealed, while two platoons of Shilkas will probably down 5 or 3-4 if concealed. Because the harrier has to get close to do it’s work, these gun systems are probably the best bet.

How about a pair of Cobras? Well consider that they will almost always be either a 5+ or 6+ to hit, and sitting in their own backfield you probably want to use a missile system. Geckos look to be the thing you need, but you could also consider taking Gophers, or even Tunguskas backed by Gaskins. This should give you coverage and enough scare factor to either keep the helicopters off the table until your air defence has been knocked out, or possibly have your opponent not fire for risk of losing their birds.

Purpose built or multi-tool?

Gun systems bring a lot to the table, and this includes the ability to fire at ground targets which is fairly amazing as anyone who’s ever run Shilkas can attest to. But while the gun systems have higher expected output than missile teams due to rate of fire, you need to remember that they also have a dramatically reduced range. This means you’ll have to escort units across the table if you want to protect them, or project your AA against long range missile systems like Apaches. If you want to take down these long-range systems, you need to either go get them or invest in missiles. Gaskins, Gophers, Geckos, even the lowly Gremlin (not included in the table but you can get the percentages from the Gaskin) can dominate the entire table being able to provide anti-aircraft fire to anything that shows up.

What the Shilka has going for it is its high rate of fire, albeit at a short range. With the introduction of the Tunguska you get the best of both worlds, an all-in-one package. It has missiles with the same profile (but lower rate of fire) as the Gecko and an amazing gun with a higher rate of fire than the Shilka and higher AT for all those ground targets. It’s kind of perfect.

The Soviet army had the largest most integrated and varied ground based air defence in the world, and this is no different in WWIII:Team Yankee. You can own the sky from the ground and gain freedom of movement for your forces to spread the Soviet Union’s ideals across Europe and beyond. Add to that the fact that these are some of the coolest models in the range, covered in guns and missiles,  and there’s pretty much no reason to leave home without them.

Happy Hunting.