
With Adam Brooker
“So once again we are called upon to plug the gaps and put out the fires!! We are the Frontschwein and the Feuerwehrmann, the ones they call when all else have broken and fled! We will stop the Allied Advance and throw them back into the sea!”
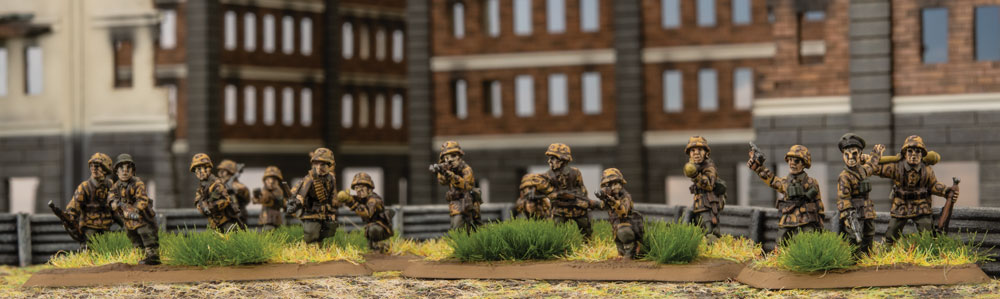
This is the job of the SS infantryman in Normandy, they are trying to stem the advance of the Allies and give enough time for more forces to arrive from other parts of the Reich to assist in the defence.
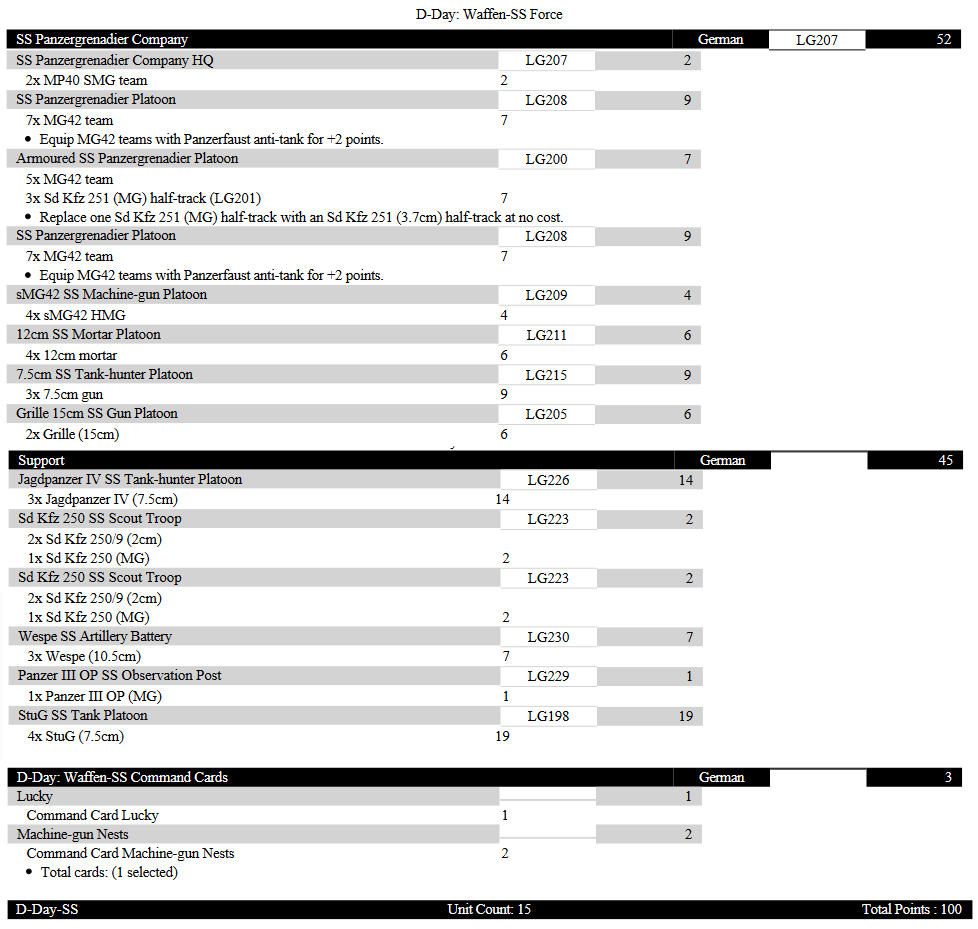
 So I’ve been asked to put together a good defensive force from the new D-Day: Waffen-SS book, and I have chosen the SS Panzergrenadier Company – an Infantry Formation. This force has all the tools to allow you to either dig-in hard like a tick on a dogs back, or with the right support counter-attack like von Manstein and secure the objectives. In V4 it’s much harder to win by just sitting back and trying to time out your opponent or to go for a draw. In fact in most missions you either win or lose, there are no draws (with the exception of time outs), and to win you need to actively clear the enemy from within 4” or 8” from the objectives.
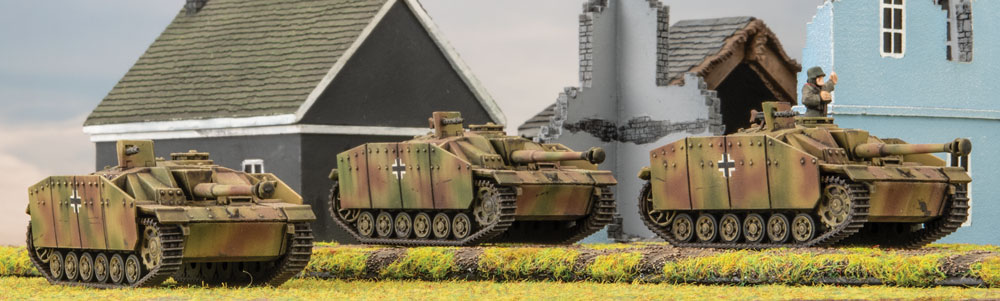
So what is required for a good infantry formation is a flexible force, combining infantry for defence, as well as static anti-tank guns, and template weapons to take out or pin your enemies artillery, infantry and static gun teams. But additionally, you also need some mobile forces to react to enemy movement, and when the time is right, strike out and take their objectives. I could have built a purely defensive force, stacked with 8.8cm anti tank and anti aircraft guns with the Pak-Front card, but I feel that list would be too static, and really only works well in conjunction with a mobile tank Formation. Instead I felt it would be better to represent them with the mobile forces that the Infantry companies would have available to them in defence, so Stug’s, Jagdpanzer IV, Grille, and Panzergrendiers in Sd Kfz 251 half-tracks. You can see the list below:
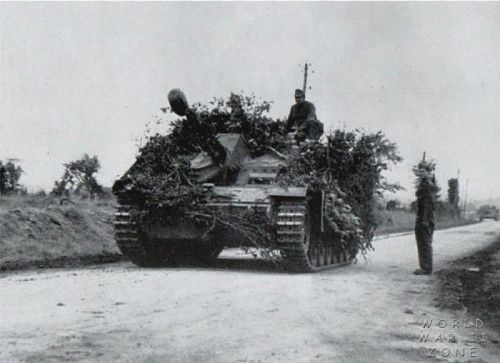
 Now I have to stress that this list is designed to be defensive, so you should almost always pick the Defensive Stance in the More Missions pack, or choose to be the Defender in the mission. This will allow you generally to have most if not all of your Forces on the field at the start and hopefully a unit will be able to ambush. I would usually pick the Stug to be the Ambush force, but you could also use the 7.5cm Pak40s, or Jagdpanzers. Usually the tanks are better as they can easily move if needed after the ambush is sprung.
Also, its important to look at the terrain, look at where you would attack if you were your opponent, and place your troops in response. Look at areas you can turn into choke points, and look for areas in your opponents side that you can use as cover for your Schwerpunkt (main focus) later in the game. It is very important to identify the main focus for your attack, and plan accordingly. It may not be needed to always take your opponents objective, as you can also win by breaking his formation, but this can be very hard to do, and it is good to have a plan for when you most likely will need to take them.
Also a lot of games can be lost on deployment, so make sure you put your anti tank guns in areas where they have the most fields of fire, if you place them in an area where they effectively only have one field of fire, then it is easy for your opponent to make them ineffective just by not giving them targets.
The same goes for your artillery pieces, you need to have either good fields of view so you can spot for your own fire, place your HQ units effectively for spotting, or ideally take a OP vehicle to allow you to place your artillery in places where they don’t need to expose themselves, and any return fire is concealed ( so harder to range in).
In this list I have included the Panzer III OP, as it gives you that extra spotting team, that can be put in a spot you would not normally place your own HQ or artillery, and it can be used to spot for all your artillery ( 12cm Mortars, Grille and Wespe), and is harder to kill than the Sd Kfz 250 OP. Make sure you place it in concealing terrain, and it has a good view of your enemies artillery. I would focus your opponents artillery first, to either wipe them out, of get them so low they are taking last stand rolls every turn. Then move onto the objective you are planning on taking, targeting the anti tank guns or infantry holding it.
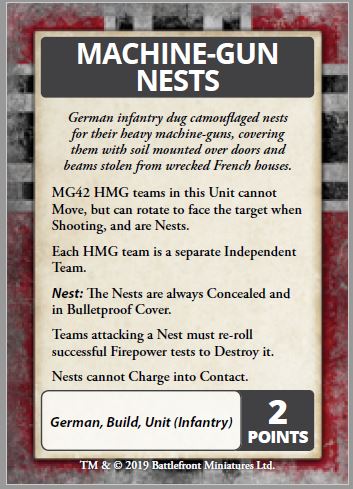 One other unit I added in this list that I have not taken much before is the HMG teams and the Machine Gun Nests Card. This should be good on the defensive, for a few reasons, it turns each team into a static independent team, that is in concealed, bulletproof cover and the enemy requires 2 successful firepower rolls to kill, they also fire in a 360° arc. They can be placed anywhere in your deployment zone, do not need to be in command, and are placed separately, so your 4 HMG platoon turns into 4 separate units. So these will be annoying to take out, allow you to place 24” ROF 6 machine guns to protect your gun teams from infantry, and allow you to string out your deployment in some cases so you can see where your opponent places certain units. So very useful for 6 points I feel.
The two units of Sd KFz 250 scout platoons are there also to help you in deployment, and in attack. Use them to confuse your opponent about where your Schwerpunkt is, and by pushing your scout units forward via the Spearhead rule, you also limit where he can place his Spearhead units. Additionally, you can place your infantry or attacking units forward into advantageous positions, that could allow you an easy victory. But beware of pushing some units too far forward, like anti tank guns, as they cannot easily retreat and can be overwhelmed and picked off. In some of my first events I placed my anti tank guns too far forwards looking for good fields of fire, only to lose them in a turn or two as they had no support and died to aggressive infantry or tanks flanking them.
 If you are in a mission where you need to put forces in Reserve, then I would choose, the Stug Platoon, the Jagdpanzer Platoon and the Armoured Panzergrenadier platoon as your reserve force. As they are your most mobile forces, and in the case of scattered reserves, can quickly move to where you want them. This is also why I take the Lucky Card ( allows a re-roll), as I often use it to re-roll my Reserve roll, which I often seem to fail and frustratingly not get any reserves until my third roll for Reserves ( where I get one unit automatically!!). I have found many games are lost or won on reserve rolls….
 One fun card I wanted to add but could not find the points was the Warrior Team – Emil Durr, you always lose a gun and sometimes all of them, but if you do, you replace the unit with a very angry Panzerfaust wielding maniac!! Which can run around and be very annoying!! This would be one card I can see finding the points to take, possibly not taking two Sd Kfz 250 scout units… I do enjoy annoying my opponents….
Additionally always make sure you read the victory conditions, so you can time your counter-attack properly. I can’t count the amount of games I have lost or won, because I or my opponent mis-remembered the victory conditions!!
So on the attack I would use your StuG, Jagdpanzers and Armoured Panzergrenadiers to push that assault, while using your artillery to either pin or destroy the defenders, especially the anti-tank guns, if they are not destroyed already (ideally they have been taken out after the enemy artillery). Don’t forget to use the smoke rounds from the Wespe to cover your advance too! Try to use cover in your advance to make it as hard as possible for the enemy to hit you. Also of note the Jagdpanzer IV has a better cross check (2+) than the StuGs (3+), so make sure you give yourself the best chance when moving through terrain.
Other units I considered were the Flame Thrower halftracks, which can be devastating, especially against infantry and gun teams, but need concealment and protection as they move up. But If I had the spare points, I would have taken them, or taken 4 instead of the Grilles. Also the 7.5cm infantry guns are for me one of the best units of Mid War and still can be useful in Late War. They have decent AT, ROF 2, and the ability to bombard and also fire direct smoke rounds to blind anything they cannot penetrate! At 10 points for 4 guns they are a great multi-purpose unit.
Well I hope this helps in fielding a good defensive infantry list. All this has got me thinking about putting together my own SS infantry force, damn….. not another army…… oh well what’s one more??
~Adam