
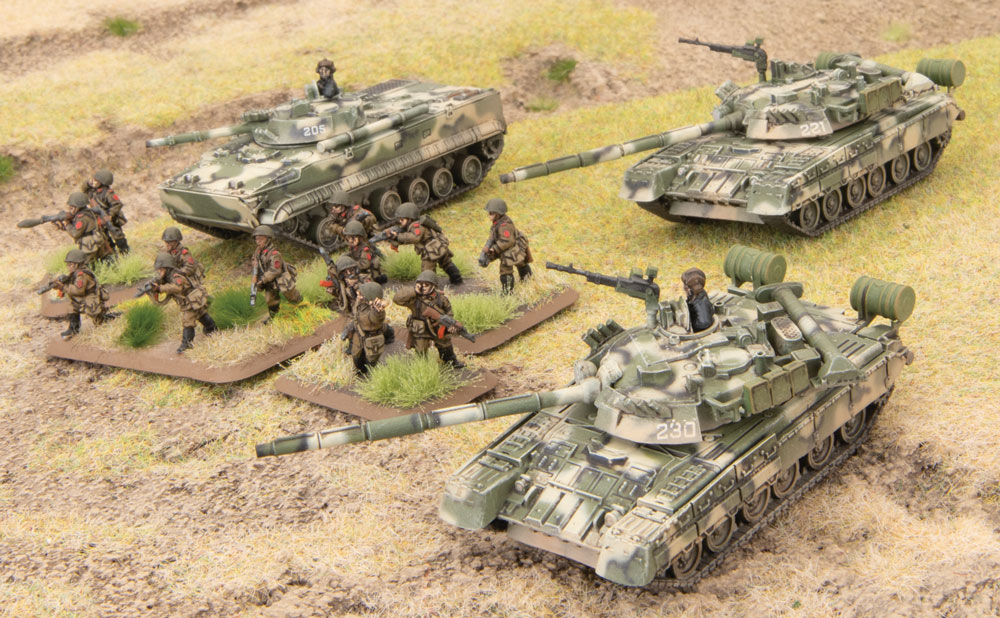
Chris and Wayne go toe to toe in this gripping Battle Report… This is one action packed battlefield with both factions prepared to sacrifice all for the win! Tune in 11:00 AM PST 15th November for the Dramatic LIVE Conclusion!
Tag: Soviet
Building a T-80 Shock Company List
With John Lee
Like most Soviet players, I have been eagerly waiting for the WW3: Soviet release to usher in the new toys for the Soviet players especially the T-80 and BMP-3 – to take on the NATO heavyweights such as Leopard, Challenger and M1 Abrams.
What is even better, is the release of the T-80 Shock Company in the book – finally a formation that is like most NATO lists – hit on 4+ – music to my ears.
Let us have a look at what comprises the formation:
- 1 T-80 Shock Tank Company HQ
- 2-3 T-80 Shock Tank Platoon
- 0-1 BMP Shock Motor Rifle Company
- 0-1 BMP-3 Shock Recon Platoon
- 0-1 ZSU-23-4 Shilka AA Platoon or 2S6 Tunguska AA Platoon
- 0-1 SA-9 Gaskin SAM Platoon or SA-13 Gopher SAM Platoon
- 0-1 2S1 Carnation SP Howitzer Battery
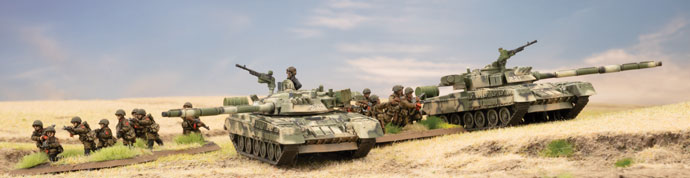
The T-80:
The core fighting units in the formation are “Shock” units (hit on 4+). Smaller more elite units that allow you to play NATO tactics with new Soviet equipment. Let us look at these in more detail.
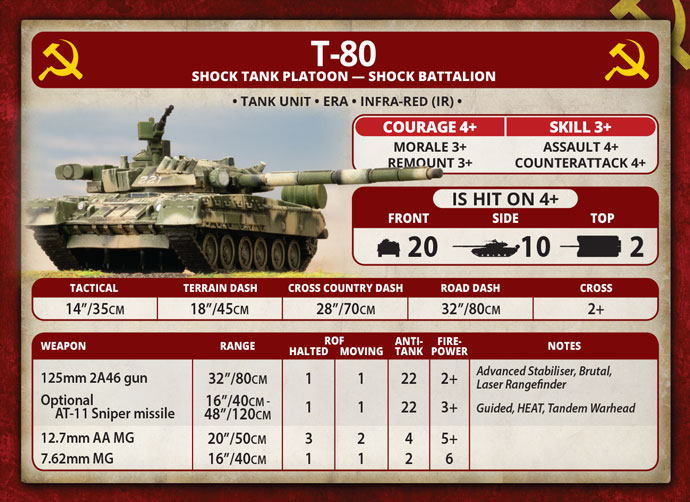
The T-80 tank has FA20 SA10 TA2, ERA (side 16 against HEAT), tactical 14” move, 32” range AT22 gun with advanced stabiliser, optional AT22 tandem warhead missile with range out to 48” that can be fired on the move! Did I mention also hit on 4+?
The gun – AT22 with advanced stabiliser means moving up to 14” and able to fire its main gun on the move with no penalty. So effectively its range is up to 46” if you move and fire. Brutal – hit dug in infantry with it and that infantry team is re-rolling its saves! Laser rangefinder – No +1 to hit targets over 16”.
The missile – AT22 that can be fired on the move with 16” – 48” range increases with tactical move of 14” to 62” range! Guided – no +1 to hit over 16”. HEAT – no +1 to armour save for over 16” range. Tandem Warhead – if target has ERA, it is ignored so use the normal armour rating! For those missions where you have scattered reserves and they turn up at the other end of the table – no problem anymore with coming on at tactical and firing your missile giving you 62” range.
The armour – 4+ to hit FA20 SA10 TA2. Finally, frontal armour on par with the NATO MBTs such as Challenger and M1A1. SA10 with ERA (effective against majority of HEAT weapons by increasing to SA16). Your tanks will be almost impervious to most infantry AT – assault at will!
The speed – 14” tactical speed means you will keep moving suffering no penalties for moving and firing. 2+ cross check which means you will pass them 83% of the time. 18” terrain dash and 28” cross country dash if you need it.
The stats – Skill 3+ so blitzing and shooting and scooting are useful orders. Remount is also 3+ so easier to get back in. Morale 3+ to stay in the battle. Assault and counterattack on 4+ – so get those assaults in and get them won! HQ has better stats of course, so you want the HQ close by for the assaults.
The Company HQ comprises one tank for 10pts and can add an optional missile for +1pt.
The Tank Platoon comprises either two tanks for 19pts or 29pts for three. You can add an optional missile for 1pt per tank. You can also fit a Mine Plough to one tank in the platoon for +1pt.
To me it is a no brainer to take an HQ tank plus two platoons of three tanks for 68pts as a minimum (unless playing smaller sided games where you take two platoons of two).
The Shock Motor Rifle Infantry:
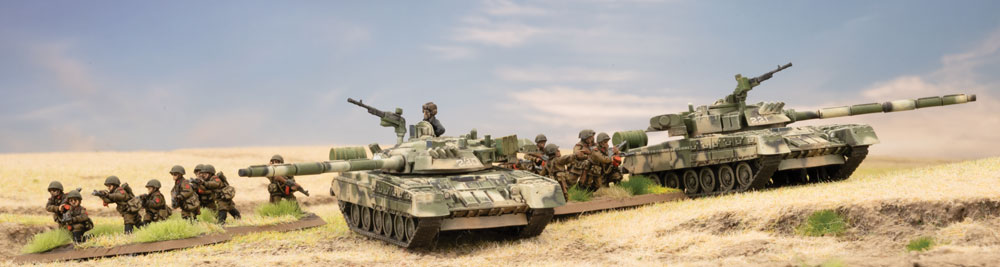
This is the most exciting unit for the T-80 Shock Tank Company. 4+ to hit infantry! Very hard to dig out and you have options to take a medium or small sized unit and choose to carry them in either BMP-2s or BMP-3s. This is a hard-hitting unit that will be difficult to dislodge or conversely stop during an assault – especially if combined with your Shock T-80s.
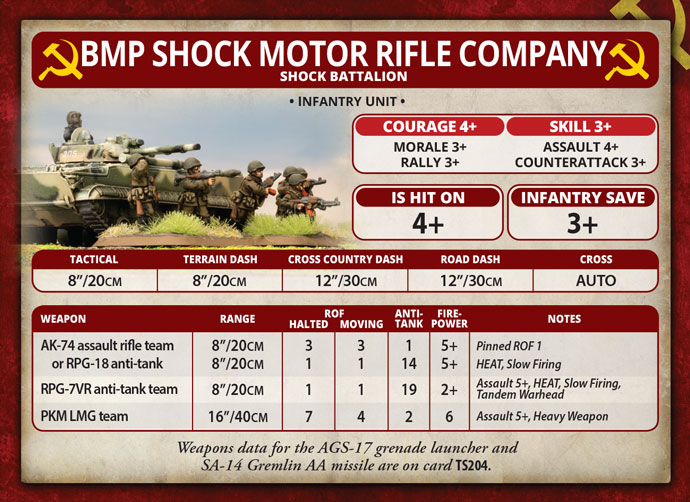
The weapons – stock standard AK-74s with 8” range ROF 3, RPG-18 with 8” range AT14 slow firing. The new RPG7VR infantry team with 8” range AT19 FP2+ slow firing, HEAT and Tandem Warhead – watchout NATO tanks! PKM LMG with range 16” ROF 7 to halt any infantry attacks or suppress infantry prior to assault. Optional AGS-17 range 16” ROF 9 to add to PKM LMGs firepower. Optional SA-14 range 48” ROF 3 AA SAM as intrinsic AA defence.
You can take either the medium size company for 24pts comprising of:
- 6 x AK-74 with RPG-18 anti-tank team
- 5 x RPG-7VR anti-tank team
- 1 x PKM LMG team
- 6 x Shock BMP-3
Or the small sized company for 15pts comprising of:
- 4 x AK-74 with RPG-18 anti-tank team
- 3 x RPG-7VR anti-tank team
- 4 x Shock BMP-3
Options for either are:
- 1 x AGS-17 grenade launcher team with BMP-3 for +3pts
- 1 x SA-14 Gremlin AA missile team with BMP-3 for +3pts
Downgrade all BMP-3s to BMP-2s for -3pts for the company
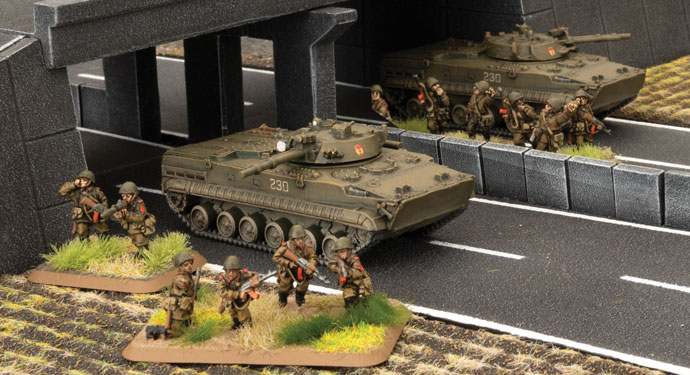
The BMP-3:
This multi-purpose, multi-weapon platform gives you a lot of versatility – whether carrying your shock troops into battle or in the recon role with spearhead to get you assault force into a better launch position to get amongst it.
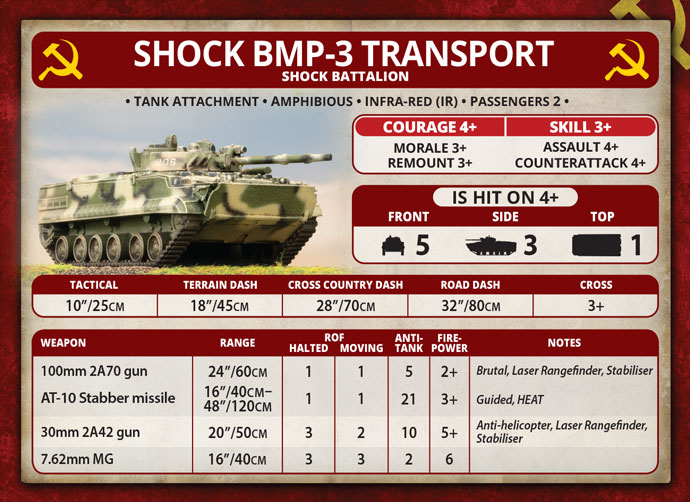
The guns – wow, two guns – a rapid fire 30mm cannon and a low powered 100mm gun for digging out infantry. The 30mm cannon has a range of 20” ROF 3 AT10 with stabiliser, laser rangefinder and anti-helicopter! Ideal for light vehicles, sneaky side shots into tanks and anti-infantry and helicopters. The 100mm gun has a range of 24” ROF 1 AT5 with brutal, laser rangefinder and stabiliser. Ideal for digging out infantry from their foxholes.
The missile – AT21 with a range of 16” – 48”. 58” actually as it can be fired on the move too with a 10” tactical move!
The armour – 4+ to hit – some say the best armour in the game. FA5 SA3 TA1. Better than its predecessor of FA2.
The speed – 10” tactical speed means you will keep on the move, suffering no penalties for moving and firing. With stabiliser on both guns, this means you can increase your tactical speed to 14” with a +1 to hit over 10”. 3+ cross check which means you will pass them 67% of the time. 18” terrain dash and 28” cross country dash if you need it.
So, the BMP-3 can be used to transport your Shock Motor Rifle Company or in the recon role performed by the Shock Recon Platoon. You can get three for 9pts or two for 7pts. Recon platoon gives you spearhead in certain missions to get your troops into a better position to launch your attack.
Army Building
Now the next part of the article is building lists based on the T-80 Shock Company for three different points levels (75, 100 and 120) to get some idea of core formation options plus what else you can add for flavour or to suit you play style. With version 2 of the rules, we have black box units for formation support now – so that provides us some interesting options for list building. On the flipside for this formation, we can now have a T-80 Shock Tank Platoon supporting other formations.
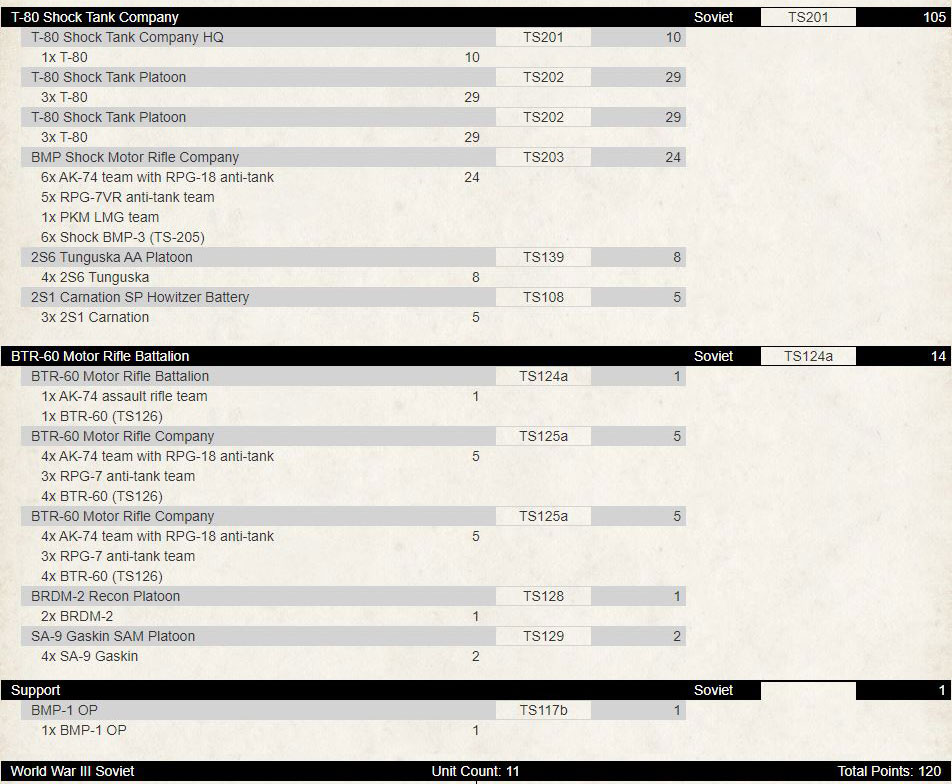
First option I look at is having a secondary formation for the extra 14pts. It gives me a cheap spearhead option for my primary attack force to get into a better position for those missions that allow it. I get two small infantry platoons to guard each of my objectives thus allowing my big Shock Motor Rifle Company to go on the offensive right away with my Shock T-80s. I have AA coverage with the new dual weapon system 2S6 Tunguska and SA-9 Gaskin. I have one artillery template (with backstop anti-tank if required with AT21 gun) with an observer to help range in better. If you wanted a second artillery template, you could downgrade the 2S6 Tunguskas to ZSU-23-4 Shilkas and use the 4pts saved for a battery of three BM-21 Hail Rocket Launchers to complement your 2S1 Carnations.
Another option is adding black box formation support units to your force instead of a secondary or allied formation. I like to run balanced forces and a second infantry option would be useful – Afgantsy Air Assault Company fits the bill nicely. Outside of the Shock Infantry, it is the best Soviet infantry available with 4+ skill and assault and 3+ everything else.
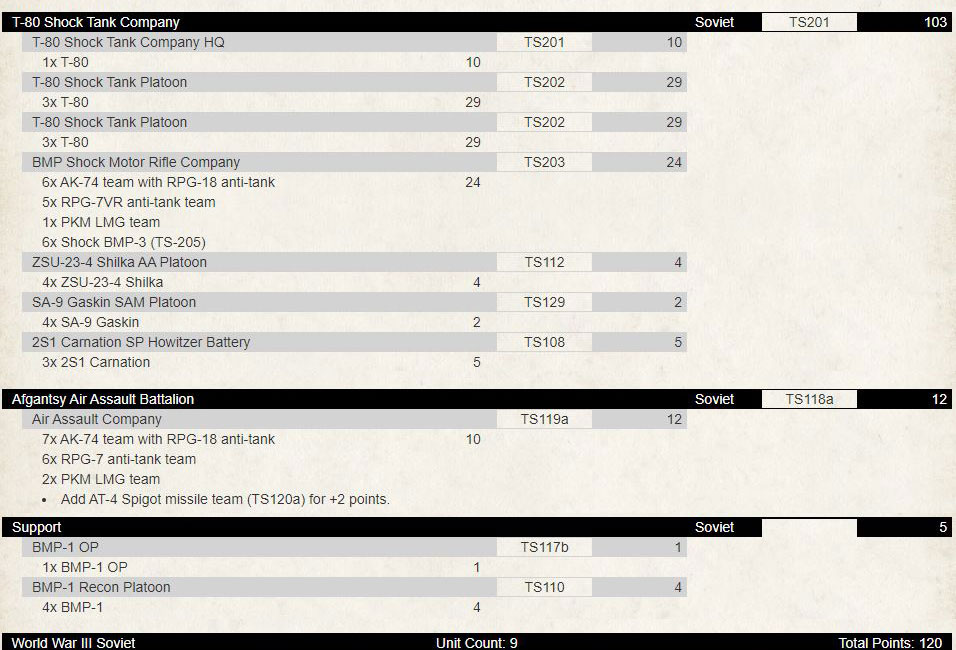
To fit in a medium Air Assault Company, and still allow the recon element, we downgraded the 2S6 Tunguskas to ZSU-23-4 Shilkas.
A third option where I do not want or need a cheap infantry formation or a second infantry company, but more surgical high-end firepower could be:
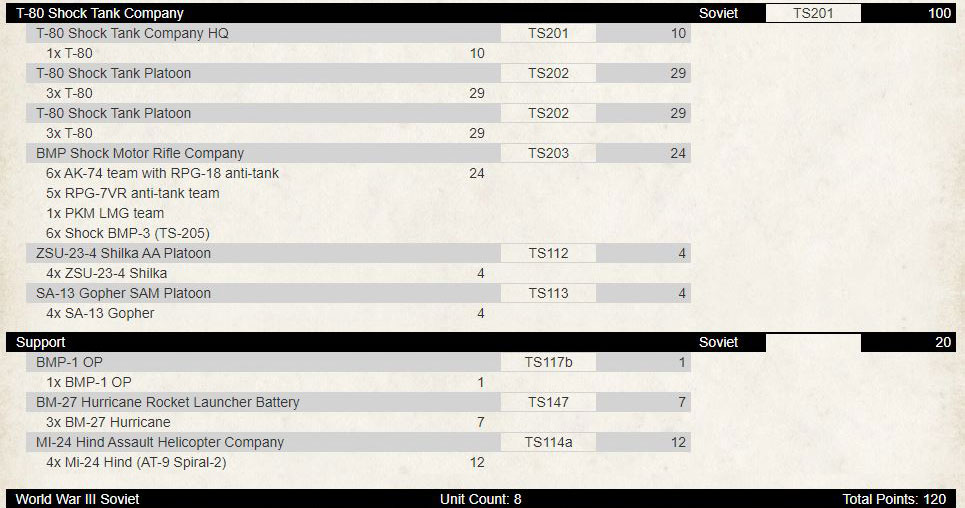
Adding in the BM-27 Hurricanes gives me access to minelets, which can ruin your opponent’s day plus with the salvo AT4 FP3+ makes it easier to shred their AA assets before you bring on your Hinds to kill their high end tanks with AT24 missiles, whilst your Shock T-80s and Motor Rifles mop up the rest and/or defend your own objectives. Want a full complement of six MI-24 Hinds with AT24 missiles instead of four, downgrade Shock BMP-3s to BMP-2s for -3pts and downgrade the BM-27s to BM-21 Hails for -3pts to get those 2 extra helicopters.
Feel like adding some more tanks to the force? We could add another new unit to supplement the T-80s – the new T-55AM. A unit you can use to bum rush from reserves or use to try and flank opponents or with the optional missile hang back and have massed missile fire from range. How could this look: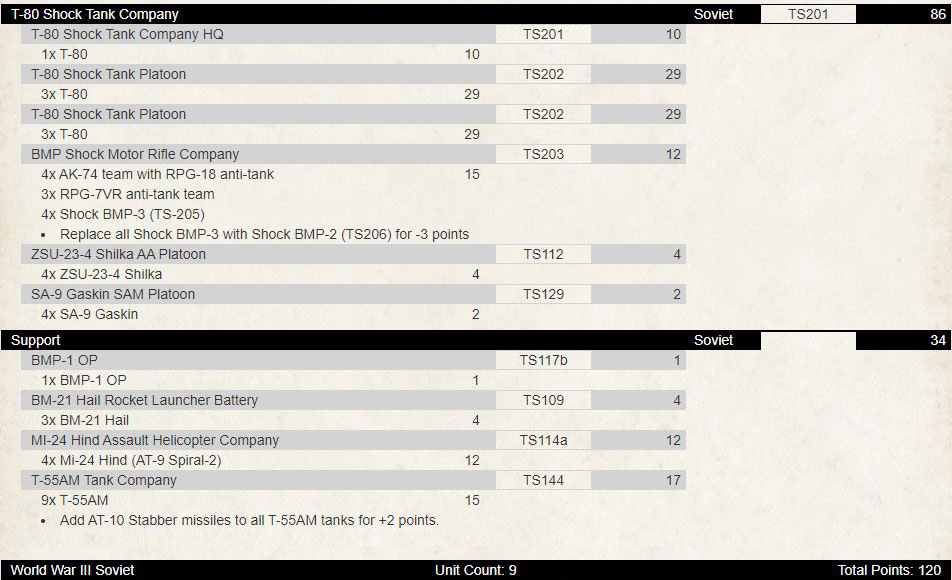
Tweaking the list by going with the small Shock Motor Rifle Company to add nine T-55AM with AT18 main gun (no slow firing rule!) and AT21 missile, gives you flexibility depending on the mission to outflank or hold back fire a missile barrage.
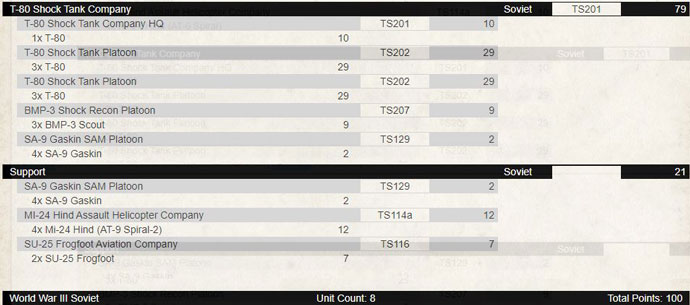
For 100pt lists we need to dial it back a bit as we lose 20pts so need to look at going with the smaller infantry unit as an option and compare it with the big unit option. Looking at the big unit option first:
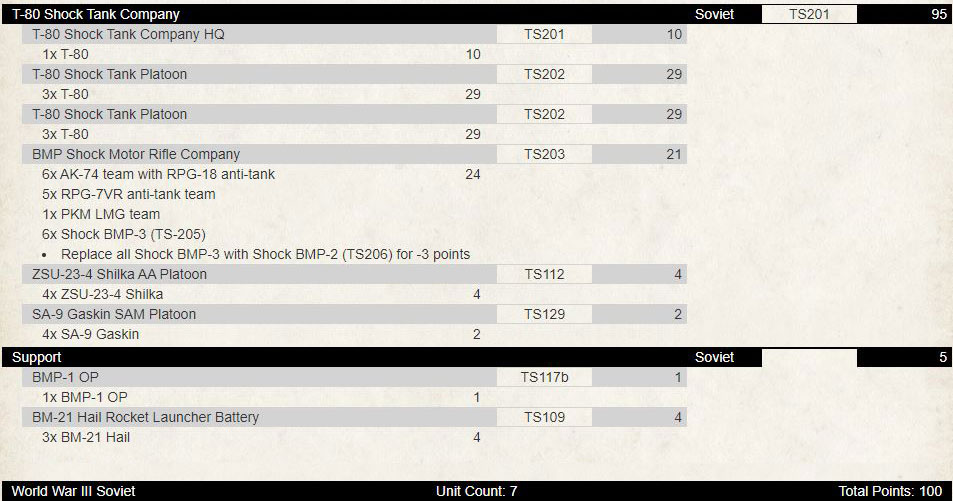
Downgrading the transports for Shock Motor Rifle Company, using SA-9 Gaskins and BM-21 Hails, we still fit everything in for 100pts. Still a good list to play. You have your shock elements with AA umbrella plus an artillery salvo unit with OP. Here is an example list with the small infantry option:
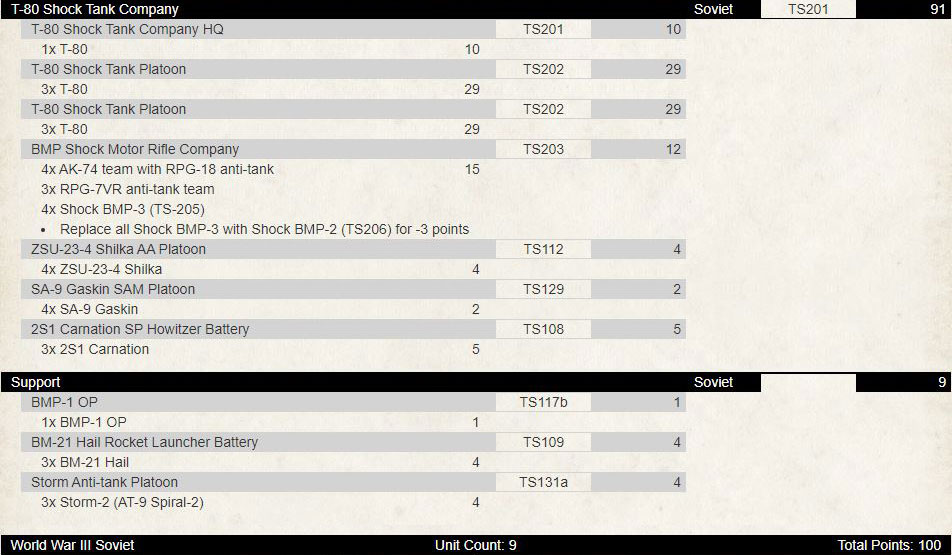
By going with a small unit of Shock Motor Rifle infantry, you can add in a second unit of artillery and a high-end anti-tank unit with AT-24 that you can spring an ambush from. Another alternative is to replace one unit of artillery with either a BMP-1 or BMP-2 recon platoon from the support box option. Replace the BM-21 Hails with four recon BMP-1 or the 2S1 Carnations with three recon BMP-2s thus giving your force spearhead.
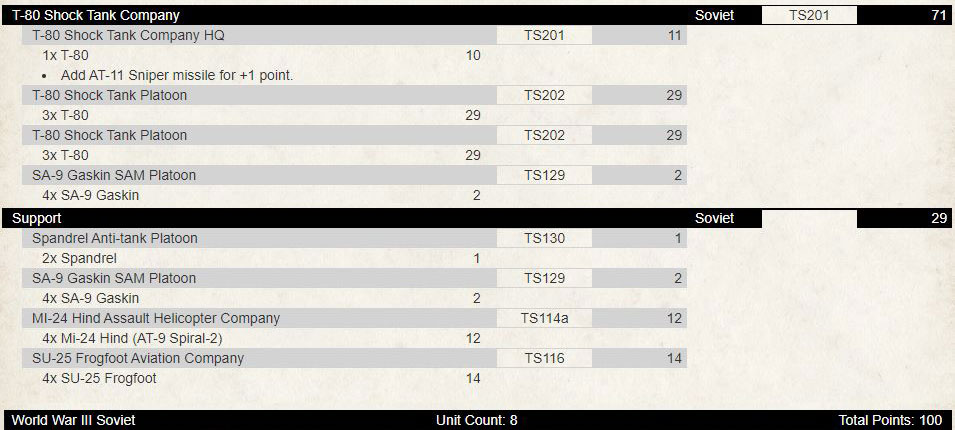
Having played at NukeCon here in Auckland a number of weeks ago, I thought I would see if I could get a T-80 Shock Company list together that I could have taken, if it was available then (I took an Iraqi T-72M force – was fun to play):

Taking the minimum T-80s you feel like a West German player taking Leopard 2s in platoons of two. In this case it is definitely feasible – I would consider dropping the ZSU-23-4 Shilkas and getting recon BMP-1s to replace them in the support box option. The Storm-2s give you AT24 – great ambush unit!
So, there you have it – this formation gives plenty of options depending on your play style and the points you are playing to. I love all the options you can add from either black box formation support or the support options. Do not forget you can also add allied formations too – Basij Infantry horde anyone?
Army Building With New Soviet Army Deal
With John Lee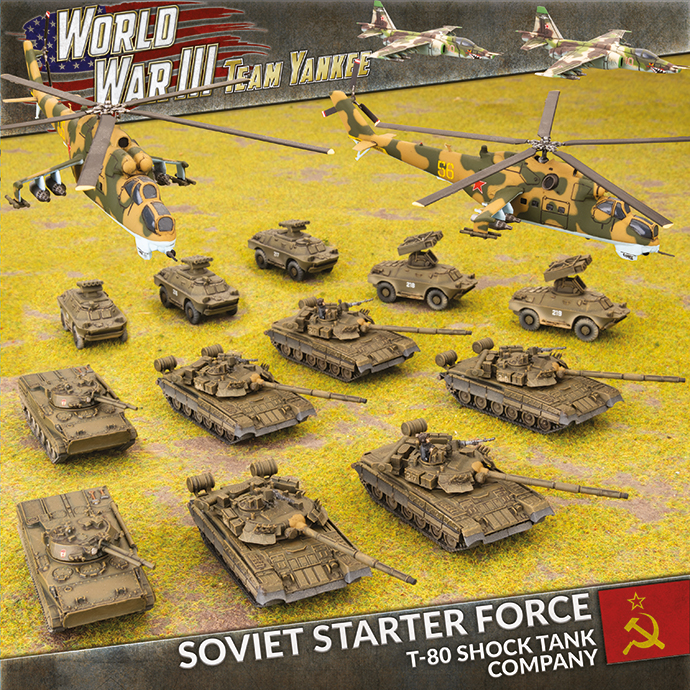
With the launch of the WW3 Soviet, I thought I would take a look at how could a new player or someone on a budget, could get a force on the table that would be competitive or at least hold its own with such iconic equipment as the T-80, BMP-3, Hind helicopter and Frogfoots. For the new player, it opens the door to playing WW3 without needing to buy, assemble or paint too much and get into playing the game quicker.
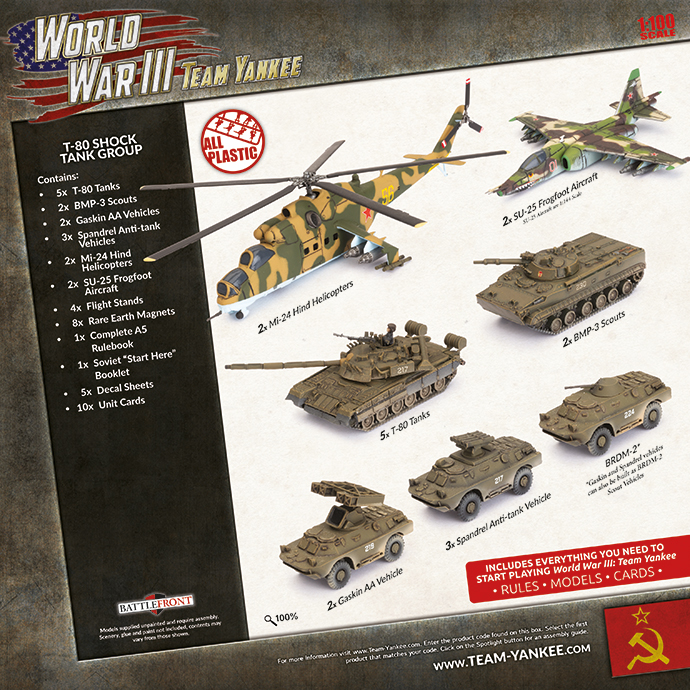
So, if we look at what we get in the excellent value starter set, that might help decide what formation to run. The starter set contains the following:
- Complete A5 Rulebook
- Soviet “Start Here” booklet
- 5 x T-80 Tanks
- 2 x BMP-3
- 5 x BRDM-2 family vehicles (makes BRMD-2, Spandrel and Gaskin)
- 2 x Mi-24 Hind Helicopters with rare earth magnets and flight stands
- 2 x SU-25 Frogfoot aircraft with rare earth magnets and flight stands
- 5 x Decal Sheets
- 10 x Unit Cards
The bonus here is that the rulebook is included in the box – so the new player makes a saving right away. Now if we look at what formations are in the WW3: Soviet book, we can see what we can maximize from what we get in the starter box. The best formations to maximize this straight out of the box is the T-80 Shock Tank Company and T-80 Tank Battalion. Let us look at what units comprise the T-80 Shock Tank Company formation first:
- 1 T-80 Shock Tank Company HQ
- 2-3 T-80 Shock Tank Platoon
- 0-1 BMP Shock Motor Rifle Company
- 0-1 BMP-3 Shock Recon Platoon
- 0-1 ZSU-23-4 Shilka AA Platoon or 2S6 Tunguska AA Platoon
- 0-1 SA-9 Gaskin SAM Platoon or SA-13 Gopher SAM Platoon
- 0-1 2S1 Carnation SP Howitzer Battery
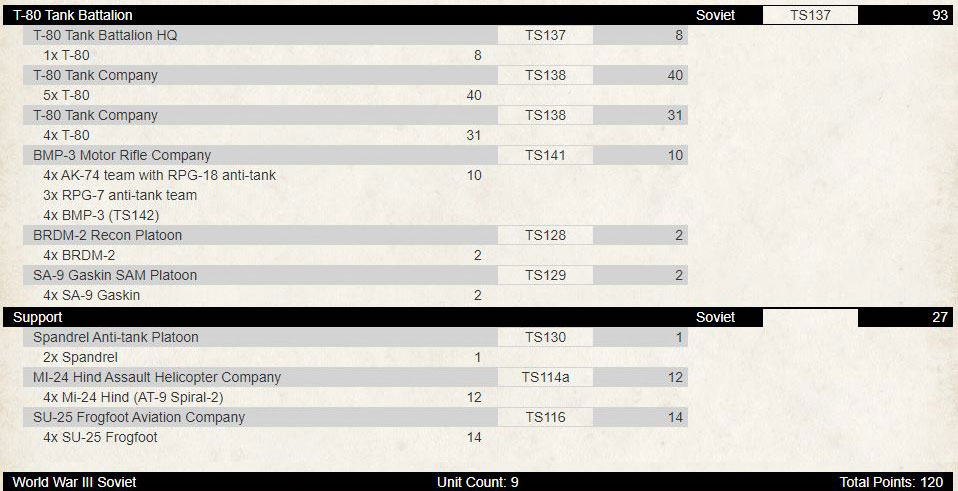
Now the best thing with this list is that everything that has “Shock” in the title are hit on 4+ – that’s right 4+! Looking at what is in the formation and what you get in the starter box, I would recommend you get two of the starters set plus a few other boxes to flesh this out. Let us look at how to build this list at 120pts and then 100pts.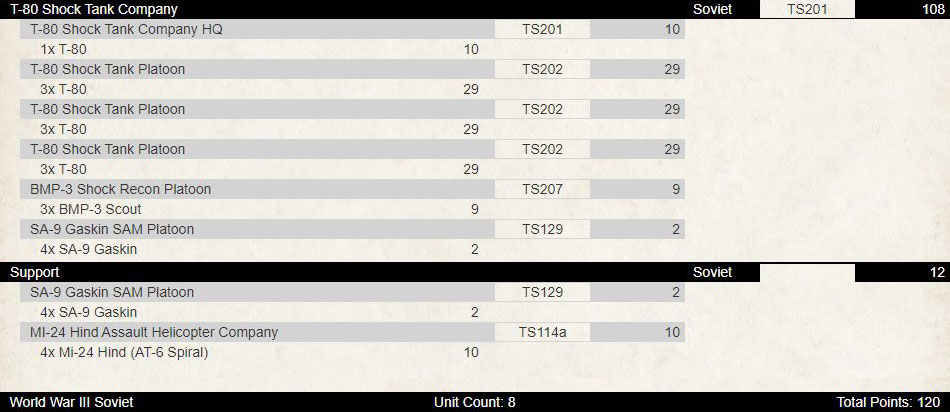
This formation is relatively strong with six units in the formation. You have cautious T-80s with FA20, AT22 and ERA making them almost impervious to infantry. The Shock Recon BMP-3s are useful all-round vehicles that can take on tanks, infantry, and helicopters plus provide spearhead for those missions that allow it. Hinds provide flexibility with their AT23 missiles and guns. This formation maximises your starter box investment using everything in the two boxes except for 1 BMP-3, 2 BRDM family, 4 Frogfoot sprues. As an alternative, you could swap out the support option SA-9 Gaskins for Spandrels instead for the same points.
To buy this army you need only to purchase the following for $220:
| 2 x TSUAB04 Soviet Starter Force: T-80 Shock Tank Company (Plastic) | $200 |
| 1 x WW3-04 World War III: Soviet: A4, Hardback | $20 |
| Total | $220 |
Looking at what we can do with 100pts now, we remove the third Shock Tank Platoon for 29 points and look at a few options to fill in the remaining 9 points. Option 1 could be:
There are five units for the formation, add a pair of Frogfoots and upgrade the Hinds to have AT24 – so still achieving the goal of utilising most of the two starter boxes. Again, you can swap out the support SA-9 Gaskins with Spandrels for the same cost.
Option 2 for a full complement of aircraft could look like this:
Only four units in the formation now but we have two units of aircraft and using all 10 of our BRDM family sprues!
The above lists you can play around with and add in other units such as infantry and artillery. For me, the value of the Shock Infantry is huge for the soviet player, so I explore that further in another article around the T-80 Shock Tank Company.
Now if we look at the T-80 Tank Battalion formation next, here is what it is made up of:
- 1 T-80 Tank Battalion HQ
- 2-3 T-80 Tank Company
- 0-1 BMP-3 Motor Rifle Company or BMP-2 Motor Rifle Company or BMP-1 Motor Rifle Company or BTR-60 Motor Rifle Company
- 0-1 BMP-3 Recon Platoon or BMP-2 Recon Platoon or BMP-1 Recon Platoon or BRDM-2 Recon Platoon
- 0-1 ZSU-23-4 Shilka AA Platoon or 2S6 Tunguska AA Platoon
- 0-1 SA-9 Gaskin SAM Platoon or SA-13 Gopher SAM Platoon
- 0-1 2S1 Carnation SP Howitzer Battery
So still using the idea of using two starter boxes to maximize the value we get, let us look at the 120pt list first and 100pt list second:
As you can see, we have used all our sprues in our two starter boxes to build this list! I have included a small motor rifle platoon for this one to anchor the formation. We have six units for the formation and lots of firepower. Adding the small motor company brings your total outlay to $229!
For 100pts, there are a couple of options on how we can optimize the two starter boxes:
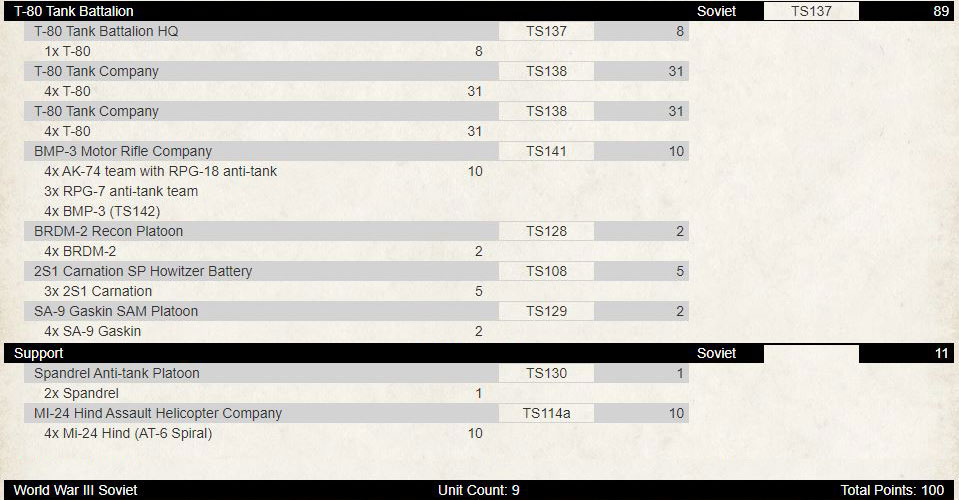
Dropping the Frogfoots, downgrading the Hinds, removing one T-80, keeping the infantry allows us to add an artillery component to our list for an additional small outlay brings our spend to $270.50.
Adding the artillery allows us to have a template to drop on infantry teams and light vehicles plus has AT21 allowing them to act as a stop gap anti-tank unit if we get desperate. Adding in this unit brings the number of units in the formation to six.
This starter set is great value and a couple of these plus maybe a couple of additional boxes will get you well on your way to playing Soviets!
For those existing players who already have Soviet armies, this is still a great addition to upgrade your armies. If you just need T-80s and BMP-3s and maybe an additional BRDM family unit then I recommend getting one of these starter boxes plus an additional T-80 or BMP-3 box.
World War III: Soviet book spotlight
With Wayne Turner
World War III: Soviet is our third updated book for World War III: Team Yankee. It features all the great options and units that were in Red Thunder, but with the addition of lots more Formations and Units. World War III: Soviet expands and enhances the forces available in Red Thunder for the Soviet Army.
Check out World War III: Soviet in the online store here…
What is Different?
There is more choice. More tank options with the introduction of the T-80, T-62M, T-55AM, and more Motor Rifle options with the BMP-3. These add more Formations to choose from with the addition of the T-80 Tank Battalion, T-62M Tank Battalion, and T-55AM Tank Battalion, as well as the elite veteran T-80 Shock Tank Company
There are a bunch more new formation and support Units and vehicles as well. The 2S6 Tunguska AA Platoon, the BMP-3 Recon Platoon, BMP-3 Motor Rifle Company, BMP-3 Shock Recon Platoon, BMP Shock Motor Rifle Company, BM-27 Hurricane Rocket Launcher Battery, and TOS-1 Thermobaric Rocket Launcher Battery.
Don’t worry, all your old favourites are still available. In fact these can also gain access to the new anti-tank, anti-aircraft, motor rifle, and recon options. You can still take a T-64 or T-72 Tank Battalion, or a BMP Motor Rifle Battalion, or an Afgantsy Air Assault Battalion.
What’s New?
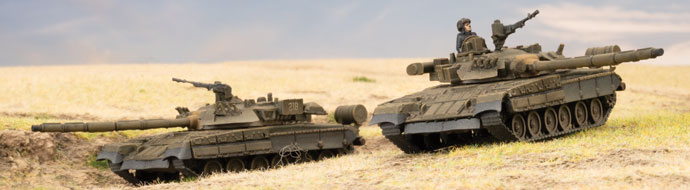
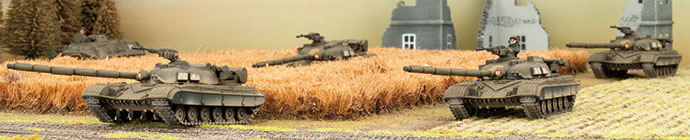
As mentioned above World War III: Soviet introduces a bunch of new Soviet vehicles. The two stars of this line-up are the T-80 tank and BMP-3 infantry fighting vehicle, both brand new plastic models. The T-80 takes the next step beyond the T-64 and T-72. The T-80 introduced in World War III: Soviet is the T-80U with its explosive reactive armour (ERA) giving it a distinct look that sets it apart from the other Soviet tanks. This ERA armour is more that cosmetic, it also enhances its protection against HEAT weapons as well as improving its armour against kinetic energy penetrator like those fired from other tanks. This gives it Front armour 20 and side 10, while the ERA gives it 16 versus HEAT weapon on the side. No pesky LAW or Panzerfaust is going to bother this tank. It is armed with the same powerful 125mm 2A46 smooth-bore gun as the T-64 and T-72, and like the T-64 it fire an excellent anti-tank missile for extended range. The T-80’s AT-11 Sniper missile can hit targets out to 48”/120cm with anti-tank 22. The gun is fully stabilised and allows the gun and missile to be fired on the move. It also has a Tandem Warhead which means it ignores ERA armour.
T-80 Shock Rifle Company represents an elite unit with a higher focus on training. They are Hit On 4+, have a Skill of 3+, while maintaining the excellent Courage, Morale and Remount/Rally of other Soviet troops. They are organised in platoons of three T-80 tanks to represent there better tactical flexibility. They also have their own BMP-3 Shock Scout Platoon with equally good ratings as well as the BMP-3 Shock Motor Rifle Company that can be mounted in either the new BMP-3 or the BMP-2.
As well as the above unit the BMP-3 introduces another options for Scout Platoons and Motor Rifle Battalions and Companies. The BMP-3 is more armoured than the BMP-1 or 2, with Front 5, Side 3, and Top 1. It also maintains the good mobility of its predecessors. It can carry two passengers, is Amphibious and it fitted with Infra-red vision equipment. It is armed with low pressure 100mm gun that doubles as a missile launcher. It fires the AT-10 Stabber missile out to 48”/120cm and can be fired on the move. It has an AT of 21 and FP 3+. The 100mm also fires high-explosive rounds out to 24”/60cm with ROF 1/1, AT 5, FP 2+, Brutal, Laser Range Finder, and Stabiliser. For additional firepower against light vehicles it has a co-ax 30mm gun (Range 20”/50cm, ROF 3/2, AT 10, FP 5+).
 All the motor rifle companies, whether mounted in a BMP-3, BMP-2, BMP-1, or BTR-60, also gain optional access to the RPG-7VR to replace their RPG-7s. The RPG-7VR has a shorter range by packs a more powerful punch (Range 8”/20cm, ROF 1/1, AT 19, FP 2+, Assault 6, HEAT, Slow Firing, Tandem Warhead).
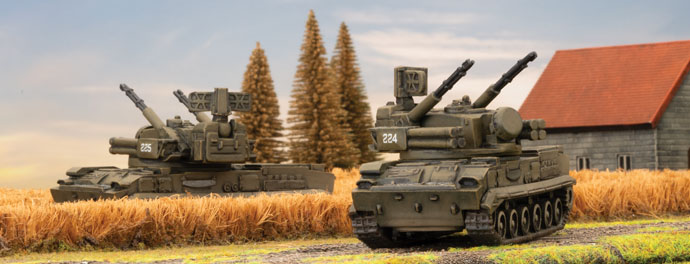
As a replacement for the aging ZSU-23-4 Shilka the Soviets designed the 2S6 Tunguska. It is armed with heavier twin 30mm guns giving better range and rate-of-fire (36”/90cm range against aircraft, ROF 7/5). Additionally it is also armed with SA-19 Grendel AA missiles integrated into the same system, giving it an accurate long range option (range 64”/160cm, ROF 2/-, FP 3+)
The second line or reserve tank units in the Soviet Army were armed with older tanks like the T-62M. However, a modernisation program had brought a number of improvement to these old tanks. Improved ammunition give the 115mm 2A20 gun an anti-tank of 21. It also has a Laser Rangefinder some does not suffer a long range penalty To Hit. They can also fire the same AT-10 Stabber Missile as they BMP-3. Thought not quite as tough as the T-72, its armour of Front 14, Side 9, and Top 2 makes it tough opposition for the likes of Leopard 1s, AMX-30s, or M60s.
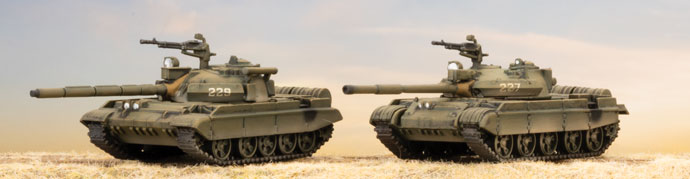
For those reservists not lucky enough to get a T-62M, there was also the T-55AM. Like the T-55s used by their Warsaw Pact allies, these had been upgraded with improved armour (Front 14, Side 9, Top 2) as well as a Laser Rangefinder and AT-10 Stabber missile for its main gun. The 100mm gun was also had some level of stabilisation (no Slow Firing penalty for moving ROF) and improved ammunition (AT 18).
World War III: Soviet has some new support units. The first of these is the BM-27 Hurricane Rocket Launcher Battery. These have better range, anti-tank, and firepower than the old BM-21 Hail.
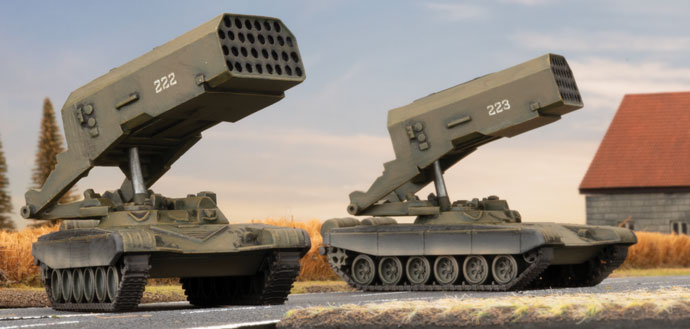 The TOS-1 Thermobaric Rocket Launcher is a different beat altogether with its pod of 24 220mm thermobaric rockets mounted on a T-72 tank hull. These rockets’ fiery blast devastates a large area in one volley. It is short ranged for a rocket launcher (48”/120cm), but packs a mighty punch hitting with a big Salvo template with its AUTO firepower and Brutal rating (re-roll Infantry Saves).
Old Favourites
The T-72 is the Soviet Union’s everyman’s tank. Cheaper and less complicated than the T-80 or T-64, it is armed with powerful 125mm gun that packs an excellent anti-tank 22. With Front Armour 16 and BDD (13 against HEAT) it does alright against western tanks, and can dominate the lighter armoured varieties.
If you are not looking for a fancy ride like the BMP-3 with all its bells and whistles you still can’t go passed the trust BMP-2 with its excellent 30mm gun with ROF 3/2, and anti-tank 10. It is also a pretty good ride for your motor riflemen with good protect and excellent mobility. It can also fire the AT-5 Spandrel missile (AT 21, FP 3+).
For something a bit cheaper, but just as mobile and protected there is the BMP-1. This infantry fighting vehicle is armed with a 73mm gun and an AT-3 Sagger missile (AT 19, FP 3+). Both BMPs can carry two passengers.
The BTR-60 is an 8-wheeled armoured personnel carrier mounting 14.5mm and 7.62mm machine-guns in its small turret. Each BTR-60 can carrier two teams as passengers, who are protected from small arms fire by its Front 1, Side 0, and Top 0 armour. The Motor Rifle units mounted in the BTR-60 also have AT-4 Spigot missile teams because, unlike the BMPs, the BTR-60 doesn’t mount an anti-tank missile team. The AT-4 team has a range 8”/20cm – 40”/100cm, ROF 3, AT 19 and FP 3+ and is HEAT and Guided.
The Storm anti-tank missile carrier mounts an AT-6 Spiral guided anti-tank missile on the MT-LB armoured tractor (the same vehicle that the SA-13 Gopher is based on). The launcher is fitted with one tube, but can be lowered into the hull for reloading. The chassis provides the crew with protection from small arms fire with Front 1, Side 1, and Top 1, so don’t expose the Storm too much. However, the AT-6 is very long range (8”/20cm – 56”/140cm) and powerful (with ROF 1, Anti-tank 23, FP 3+ using the HEAT and Guided rules). The units come in two or three Storms and is available as a support. The Storm now also has options to upgrade to the improved Storm-2 armed with the AT-9 Spiral-2 missile with longer 64”/160cm range, AT 24, and a Tandem Warhead.
A quick mention should be made of the SA-13 Gopher as it is still an excellent anti-aircraft option with its 56”/140cm range, ROF 2/- and FP 4+. As a Guided AA weapon it doesn’t have to worry about being a long range.
Another divisional support anti-aircraft option is the SA-8 Gecko SAM launcher. This big 6-wheeled vehicle is an all-in-one design that mounts the missiles and radar together to allow it to detect, track, and engage target aircraft independently. The SA-8 Gecko AA missile has a massive range of 72”/180cm, giving it coverage of most table tops. It has a Halted ROF 3, a FP 3+ and uses the Guided AA rule which gives it not penalty to hit at over 16”/40cm.
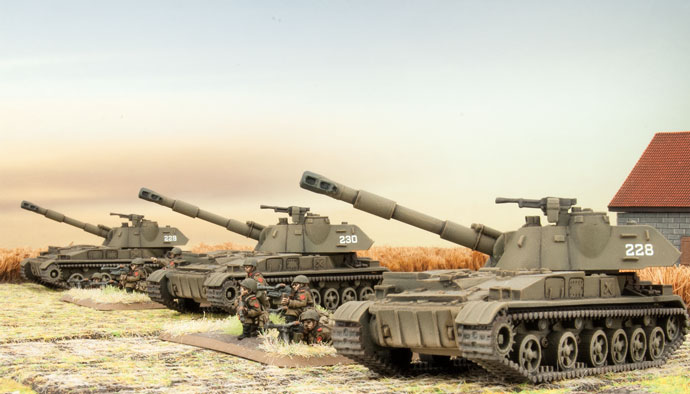 For heavy artillery support World War III: Soviet has the 2S3 Acacia 152mm self-propelled howitzer. The 2S3 Acacia has Front 2, Side 1 and Top 1 armour. It can fire its 152mm howitzer as Artillery (Range: 88”/220cm, AT 4, FP 2+ with Smoke Bombardment), or in direct fire (Range: 16”/40cm, ROF 1, AT 14, FP 1+, and uses the Brutal, HEAT, Slow Firing, and Smoke rules). It also has a third option, firing laser-guided Krasnopol Projectiles (Range: 88”/220cm, Halted ROF 1, AT 4, FP 1+ and uses the Brutal, and Krasnopol Projectiles rules). This works a little differently to the American laser-guided projectiles found in the rulebook.
Krasnopol Projectiles are designed for taking out small ground targets rather than tanks. An Observer Team requests Krasnopol Projectiles rather than a bombardment. Then each weapon in the artillery unit fires a Krasnopol Projectile using the normal shooting rules, except using the Observer Team to determine the Line Of Sight. The unit does not suffer +1 to hit for range over 16”/40cm, Armoured Vehicles use Top Armour for saves, and the target team’s armour is not increased by +1 for being over 16”/40cm away.
There still all the tried and tested units like the ZSU-23-4 Shilka AA Platoon, 2S1 Carnation SP Howitzer Battery, the BM-21 Hail Rocket Launcher Battery, SU-25 Frogfoot Aviation Company, and Mi-24 Hind Assault Helicopter Company.
New But Old Models
Red Thunder introduced the BDRM-2 and its variants to World War III: Team Yankee, but World War III: Soviet introduces these three vehicles as plastic kits!
The first of these is the BRDM-2 scout car. These can be taken in the BRDM-2 Recon Platoon in a unit of two or four either as part of a Formation or as support. Like the BTR-60, the BRDM-2 mounts 14.5mm and 7.62mm machines in a small armoured turret. The vehicle itself is protected from small arms fire with Front 1, Side 0, and Top 0 armour. The vehicle is amphibious and fitted with IR (Infra-red) equipment for night fighting, while the unit uses the Spearhead rule.
The second variant of the BRDM-2 is the Spandrel which mounts an AT-5 Spandrel guided anti-tank missile launcher system instead of the turret. The AT5 Spandrel is a powerful anti-tank missile with a range 8”/20cm – 48”/120cm, ROF 1, AT 21, FP 3+ with the Guided and HEAT special rules. These are available in units of two or three either as part of a Formation or as support.
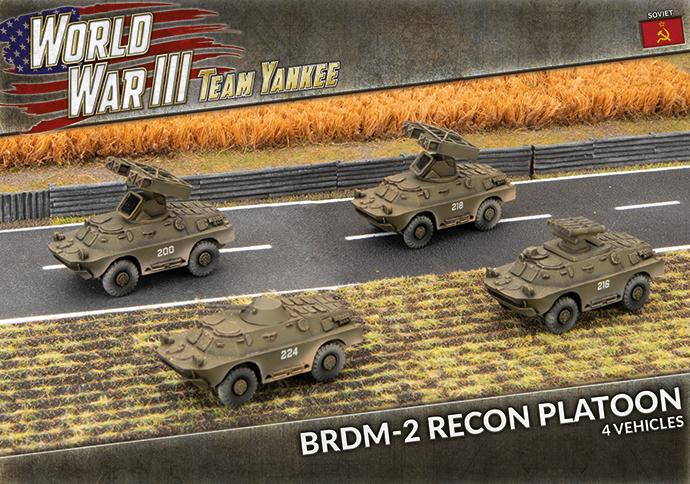 Supplementing the powerful SA-13 Gopher SAM Platoon, is the lighter and cheaper SA-9 Gaskin SAM. This vehicle is based on the BRDM-2 scout car, but mounts a SA-9 anti-aircraft guided missile launcher system on top. It has a 360 degree arc of fire and can shoot aircraft out to 48”/120cm away without penalty for long range. These can either be got as pairs or in fours and are available as part.
What About My Old Force?
If you are happy running your Soviet force as it is, it is still a perfectly valid force, no units or options have been invalidated. However, there are plenty of great new options that many of you will find very tempting.
If you’ve been thinking about getting some Soviets, but haven’t dived in, this is the perfect time, there has never been so many different options for fielding the Soviet Army in World War III.
Lots Of Extras
World War III: Soviet is also packed full of other stuff. We also have three Scenarios that can either be played as one off games or as part of a three game campaign. The book also covers the exploits of the 2nd Guards Tank Army, 94th Guards Motor Rifle Division, 7th Guards Tank Division, Major Yuri Volkov’s Tank Battalion, and 18th Guards Motor Rifle Division during World War III, plus lots of other background and technical information. It contains a Soviet painting guide and a product catalogue listing all the models available to field a Soviet force in World War III: Team Yankee, making World War III: Soviet a one stop shop for planning the collection of your force.
So get stuck in and enjoy!
~Wayne
Bagration: Soviet Live Launch Round-Up
Bagration: Soviet is Live on Forces and Digital
Race To Minsk: Ace Campaign
Tactics and Gaming
Returning to the Rodina T-34 Battalion
Casey’s Soviet Reconnaissance
Building a Forward Detachment Formation
Wayne’s Hero Shock Rifle Battalion
Battle for the Concrete Jungle – City Fighting in Flames Of War
Object 249 and the “Killer of Beasts
IS-2s, The Anvil
Victor’s Heroes Ride Again
Multi-Mission Infantry – The Soviet Engineer-Sapper
Hunting the Big Cats – A Look at the IS Series in Flames Of War
Anything More Than A 76mm Is Overkill
Wittmann vs the IS-2?
The Red Tide: A look at Soviet Infantry in Bagration
Tiger Tiger, Burning Bright
Army Building With The Heavy Assault Group Starter
T-34s, The Hammer
Army Building With The T-34 Starter Box
Bagration: Soviet Community Previews
Videos
Blitz and Peaces: City Ruins
Painting Late War Soviet Armour
Opening Up The New Army Deals
Painting and Modelling
Adding Detail To Your Plastic T-34s
Thanks For Watching…
Thanks for watching, reading and of course interacting over on social media – don’t forget our competition to help us improve this in the future!
It has been great fun to share this new book with you and hopefully you have picked up some great ideas on how you can build a new Soviet army.
And stay tuned… next up, WWIII: Soviets! You think the IS-2 is cool (okay, it really is), well the T-80 is even better…
The Battlefront Team
Live Launch Competition!
 We’ve enjoyed putting together today’s Live Launch but we would really like to hear from you about what content you have enjoyed the most, and what you would like to see us do in the future!
Head over to our Instagram or Twitter (or both if you want to double your chances), follow and post your comment, and we will pick a random reply to win a copy of the Bagration: Soviet book and Army Deal! How easy is that?

Adding Detail To Your Plastic T-34s
 With James Brown
If you want to field large Tankovy units in a hurry, chances are you won’t be interested in giving yourself any extra work. But if you have some spare time and you want to show off your modelling skills, you can give your new tanks that little something extra to make them stand out from the crowd.
Adding Wire Grab Bars
There’s nothing wrong with the moulded plastic grab rails – they paint up very nicely. But if you want to add a bit more realism, it’s actually a lot easier than it looks to replace them with wire.
You will need:
■ Hobby knife.
■ Wire.
■ A pin vice with a drill bit roughly the same diameter as the wire, but preferable slightly bigger.
■ Pliers – ideally two pairs: one with flat jaws and one with tapered, notched jaws.
■ Clippers/sprue cutters.
■ Superglue or green stuff epoxy putty.
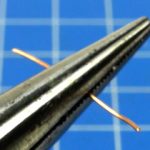
First things first: choosing the right wire. It needs to be flexible enough that you can bend it into a crisp 90-degree angle, but rigid enough for the finished model to survive reasonable handling. I used .5mm copper wire, but slightly finer or heavier gauges will do fine, as long as you have a drill bit to suit.
 Bending The Wire
 Bending The Wire
A pair of tapered, serrated pliers is very helpful for getting a consistant size. Measure along the grip of the pliers until you find a notch 1.5mm narrower than the length of the grab bar you want to make, to allow for the extra width added by the curve of the wire at the bends; I found 1.5mm was perfect for the gauge of wire I used, but your results may vary, so you should experiment a bit, bending a few practice grab bars and carefully measuring them until you have identified the correct notch. Or I should say notches, because you will need two different lengths of grab bar:
5.5mm – 4 per tank (for the T-34/85 turret sides and rear, and the T-34/76 turret sides)
7mm – 6 per tank (for the T-34/76 turret rear, and the hull sides)
Mark the notches clearly with paint or a pencil, and voila – your pliers are now a precision wire-bending tool, letting you churn out dozens of nifty grab bars super-fast. OK, to be honest, it’s going to take a while, but probably not as long as you think.
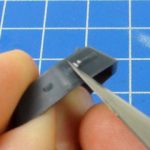
The method is simple. Grip a short piece of of wire between the pliers at the marked notch. Bend down the ends with your fingers. If you have another pair of pliers, use them to crimp the ends down tightly, to give as sharp a bend as possible. Or you can press the ends firmly against a hard surface.
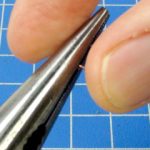
After removing the wire from the ridged pliers, you can further sharpen up the bend by squeezing tightly on either side of the bend, refining that 90-degree angle.
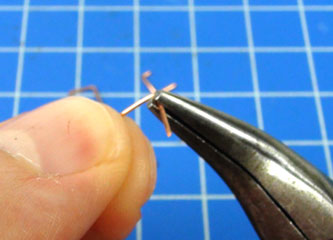
Clip off the excess wire with clippers or sprue cutters, leaving a few millimetres to stick into the tank.
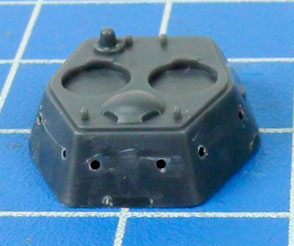
Drilling The Holes
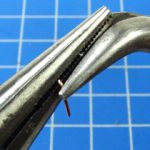
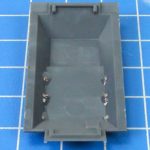
Drill a hole at each end of the moulded plastic grab bars. I recommend using the tip of your hobby knife to bore a small hole first. This makes it a little easier to hit the exact point where you want each hole, and the drill bit will naturally centre itself there.
Be careful with the placement of your holes. Try to ensure they are at the same height, or your grab bars will end up on a crazy angle.
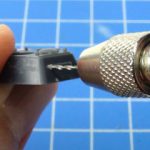
Drill all the way through the plastic to the other side.
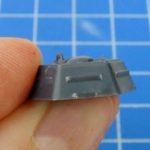
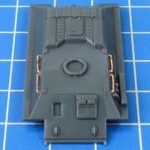
Once you have drilled the holes, carefully shave off the plastic grab bars with a sharp hobby knife. Take care not to cut any of the detail on the hull when removing those grab bars
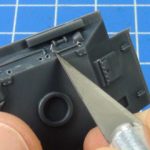
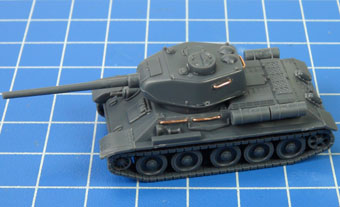
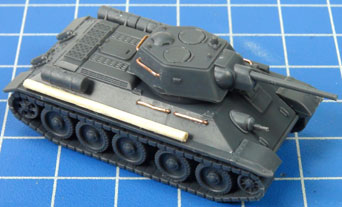
The 76mm turret with holes drilled, ready to insert the wire grab bars
Adding The Grab Bars
Insert your grab bars into the holes. How closely you want them to sit against the surface of the tank is a matter of taste. To strictly match correct scale, they should be pressed right up against the surface. But you’ll probably prefer to leave a small gap, just for the look of it.
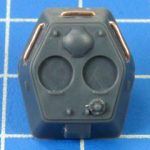
Once you have all of the grab bars positioned to your liking, you can fix them in place from the inside with either a drop of superglue or a small blob of epoxy modelling putty (ie green stuff or similar). Obviously this means you need to add them before attaching the bottom parts of the turrets and hull.

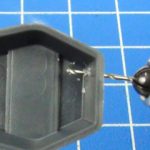
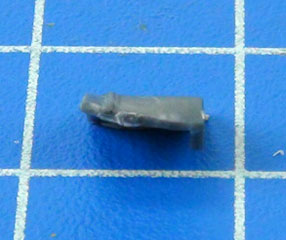
Bending Mudguards
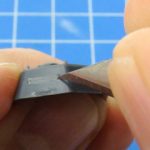
Looking at historical photos of T-34s, you’ll quickly notice that the mudguards – made of relatively thin sheet metal – were prone to bending and crumpling. They could also be quite easily removed, so the easiest customisation option is to simply leave them off.
Heating up the plastic until it becomes soft and pliable seems like it would be a good idea. But there is a very specific temperature window where the plastic is soft enough to bend but not so hot that it melts completely. An open flame is not much use – hold the part even slightly too close and it will instantly melt into a vague blob. A heat gun (if you haven’t used one of these, it’s essentially a juiced-up hair dryer) gives you more control, but you can still easily ruin the plastic part if you’re not extremely careful.
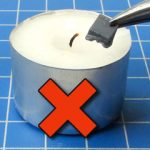
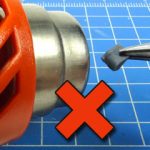
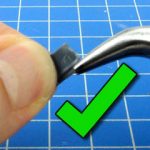
 After quite a lot of experimentation with different heat sources, I have come to the conclusion that it’s not worth the effort. By all means give it a try if you’re feeling brave – you can get some very effective-looking results if everything goes right. But I think the best option is the simplest: just grip the mudguard firmly with your pliers and bend it by brute force.
 Unditching Logs
 Unditching Logs
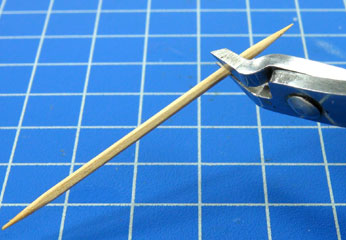
Also crude but effective – you can clip the ends off toothpicks to simulate the improvised unditching beams (ie. logs) which were often carried on Soviet tanks. Toothpicks already have a suitably woody texture, which you can enhance by scratching up the surface a little with your hobby knife. Either simply glue the ‘log’ in place, or else wind around a few coils of heavy sewing thread or fine fuse wire, to simulate rope securing the log in place.
I’m sure these detailing techniques won’t be for everyone, but for those creative types who feel like adding a little something extra to their tanks, good luck, and I look forward to seeing your work in person or on the Facebook Groups.
~ James
Returning To The Rodina – T-34 Battalion
With Chris
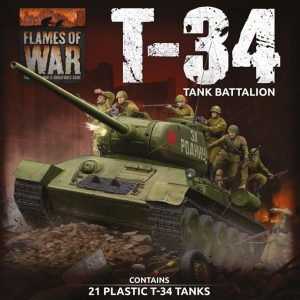
A long time ago, in a very different building, I remember being so excited about our latest army deal I grabbed one with the intention of painting 21 T-34s in 28 days. Spoiler alert, I got it done! Now this was long before we had the awesome full plastic T-34 that we have now, but it was still a fantastic project and I really enjoyed it. Best of all, by challenging myself with a strict timeline and series of web articles I got it done, and finished the basis for a great Soviet army.
Learn about Chris’ original tank project here…
Fast forward a few years and we have a similar deal, just with all plastic and at a better price than last time! Thinking about it has made me dust off my box o’ T-34s and think about how I might deploy them under V4…
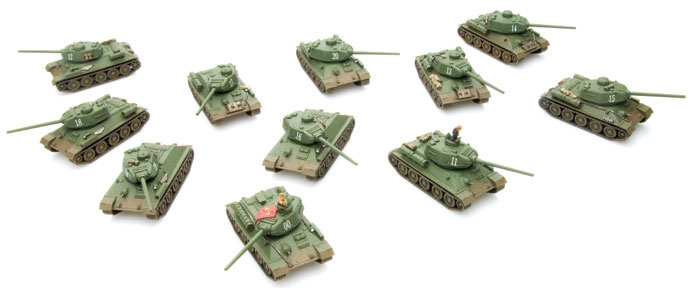
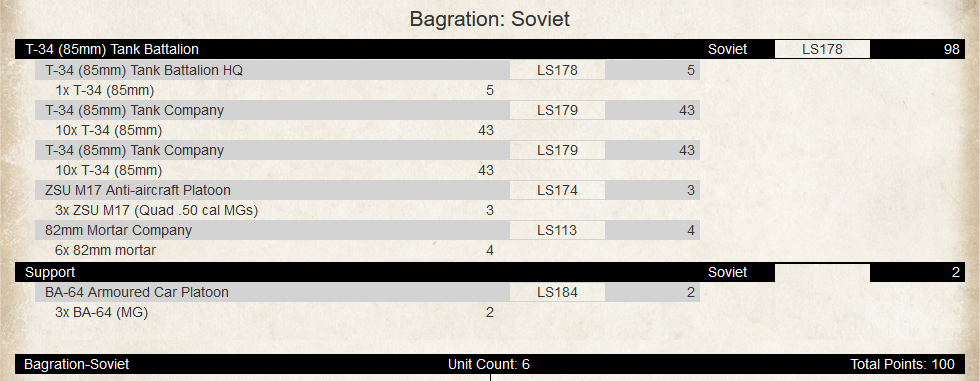
All The T-34s
Straight out of the gate we have the simple, straightforward and fairly brute force approach. Start with 21 T-34 (85mm) tanks and garnish with some simple additions. ZSU M17 AA because they are plastic, they are cheap, they are in Formation, they are cool, and packing all those .50cal machine-guns they will put some fear into infantry. The addition of the mortars is really about adding another unit to the Formation and whilst I was tempted to make it a unit of three (and using those points elsewhere) I thought six will mean that they might actually be useful and if they can pin or knockout a couple of AT guns then they will have easily paid for themselves by potentially saving the lives of a few tanks. Last, but certainly not least, are thee BA-64s. I love these little bad boys so much I have painted close to 20 of them as I paint a unit up for every Soviet army I build. Cheap, cheerful, with a machine-gun and Spearhead they can get your T-34s a little closer to the enemy – drive me closer so I can hit them with by 85mm gun!
With so many fast AT12 guns in the force I managed to chew up my points pretty quickly. So lets try removing a few….
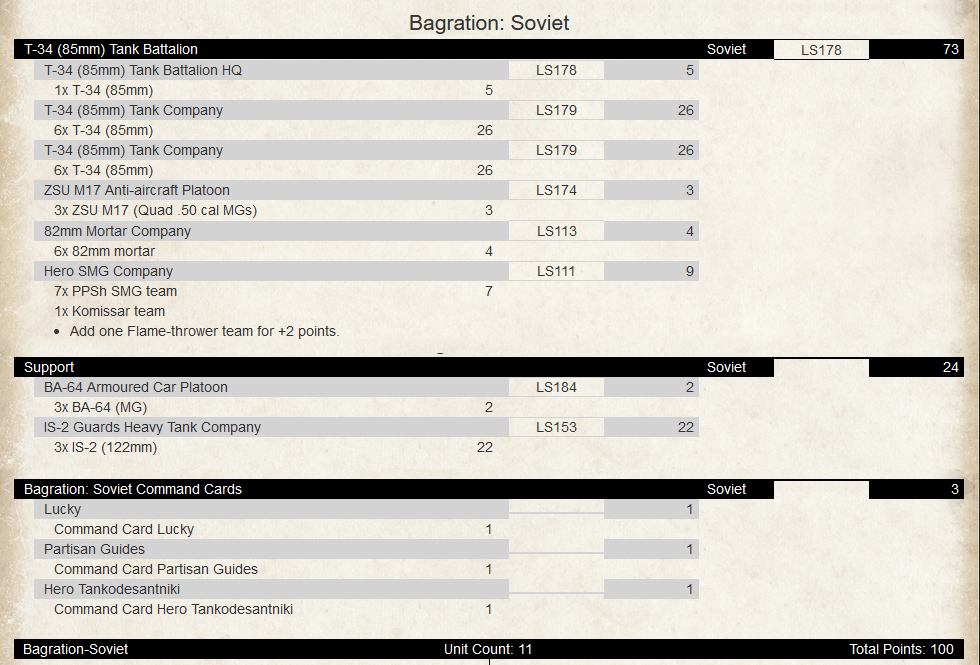
Dirty Dozen (Plus One)
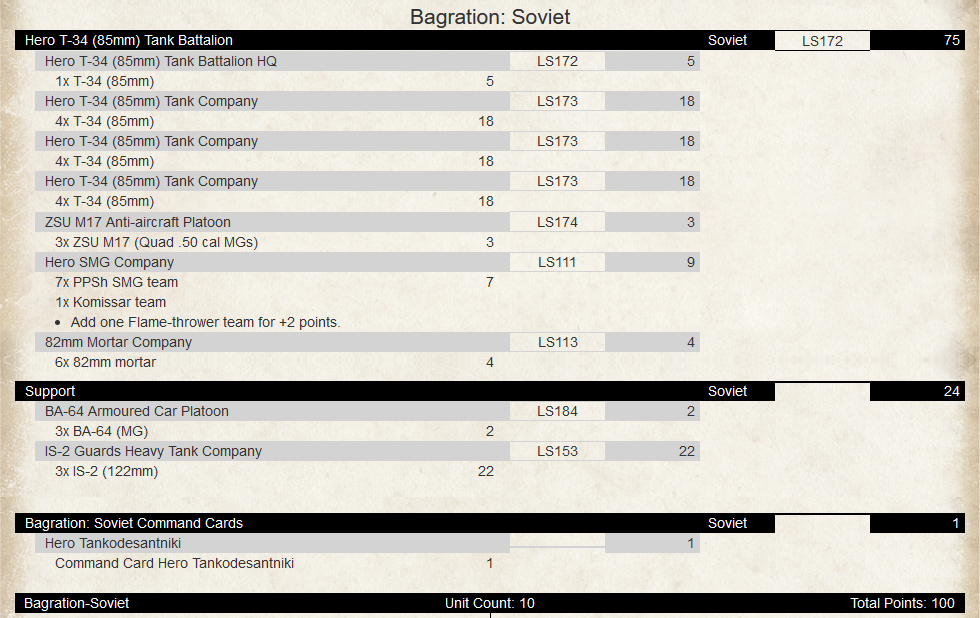
For this version I have reduced the T-34 count down to 13 – hopefully it will be unlucky for my opponents! With the points saved I have added in a Hero SMG Company and the Hero Tankodesantniki Command Card so I can have an aggressive group packed with infantry and tanks to charge at the enemy.
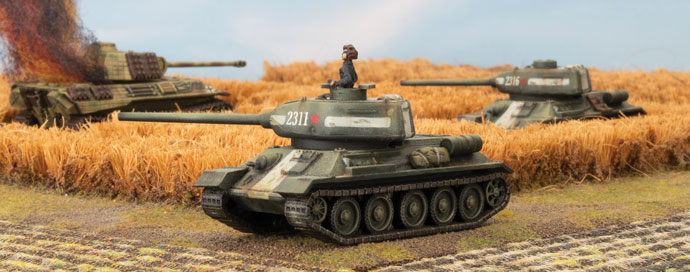
In addition, I’ve added in three IS-2 tanks as some heavy armour and big guns! I thought about adding four but three meant that I could pair them up with a company of T-34 tanks and they could form a counterattack force in any mission where I had reserves. To increase my chances of getting any reserves early I have also added in Partisan Guides to give me an extra dice on a reserve roll.
Next up, despite what Tina Turner said there is always a place for a Hero Company…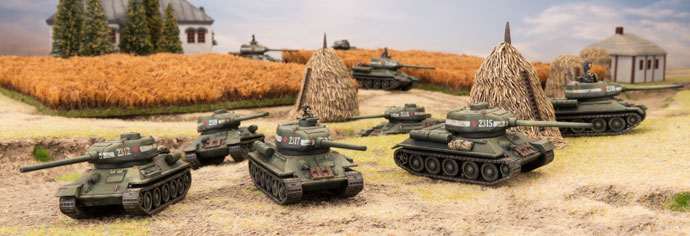
We Don’t Need Another Hero…
Changing out to a Hero T-34 (85mm) Company gives me another way to use the army and still have quite a different feel. Smaller units of tanks and a better Skill rating mean that I can be a little more cunning with the units the tabletop. Plus I still have all my favourite support options packed in to the list so I get good value out of the extra models.
 There we have it, three different lists with quite different play styles, but with a similar mix of models and a strong core of T-34s. If you want to add some more variation you can start looking into mixed 76mm and 85mm T-34 Formations (remember the plastic comes with both turrets) as these come in both “normal” and Hero versions, giving you a way to keep your tank count up, but still saving a few points by keeping some cheaper tanks in the mix.
~Chris
Casey’s Soviet Reconnaissance
With Casey
A Soviet Reconnaissance company, or Rota Razvedki in the old days, is a list that I’ve always wanted to build but never got around to doing. Our Big Four Of Late War project and the release of Bagration: Soviet book is giving me the chance to finally start it.
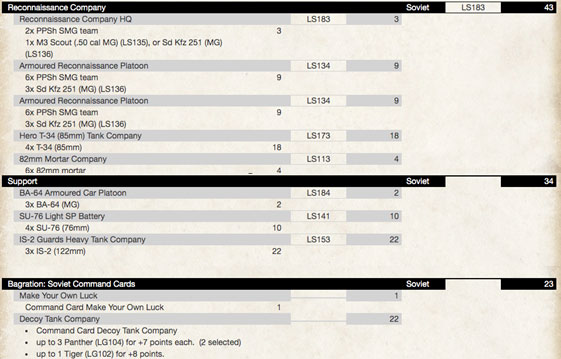
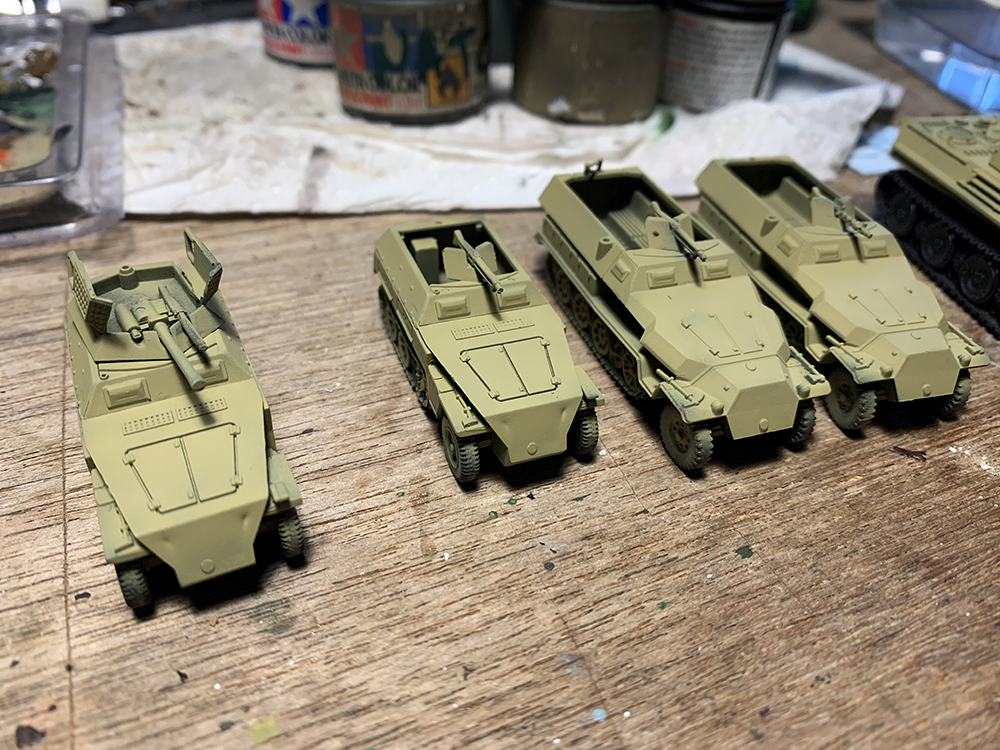
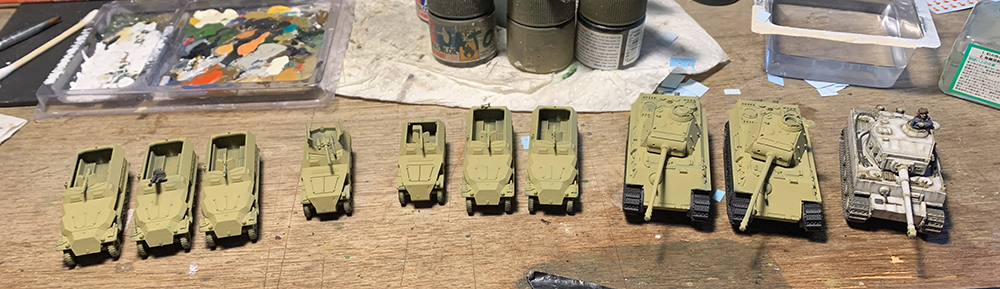
The core of my force is going to be built around an HQ and 2 Armoured Reconnaissance platoons in captured Sd Kfz 251 half-tracks. The M3 scout car is probably a more gamey choice because it has an .50 cal rather than a standard MG, but I’m a sucker for captured equipment. I’ve chosen to model the platoons with a mix of plastic Sd Kfz 251/1Cs and our new plastic Sd Kfz 250s. I’ve made a couple of modifications to make the look more ‘Soviet’ like replacing one of the mgs with a DSHK. The commanders half-track I’ve modelled as a 250/9 2cm, just to make it stand out on the table.
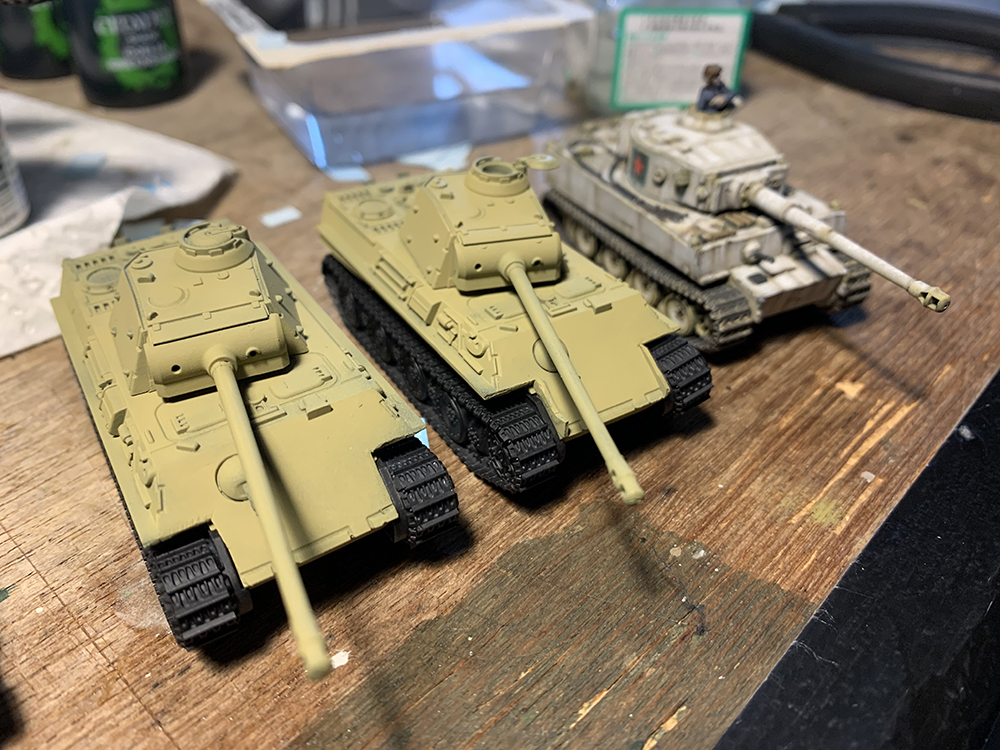
The next unit is where the list really shines. The Armoured Reconnaissance Company has a BA-64 platoon as part of its Formation, but I’m going to use the Decoy Tank Company Command Card to replace it with a platoon of two Panthers and a Tiger for 22 points. Note that these now count towards Morale now! See my previous article talking about captured tanks.
Next up I’m going to add a Hero T-34/85 platoon for 18 points. T-34s are useful in any army and are there to add to Formation morale and deal with enemy medium tanks.
Finally, inside the Formation I’m going to add a platoon of six mortars for 4 points for a bit of cheap artillery.
On to support.
The first platoon I’m going to add is an IS-2 Company. Their massive armour makes these tanks assault beasts. They are in the list to push the enemy off their objective, or at least soften the enemy position up enough that the infantry can get in there and finish the job. The fact that they have a brutal AT14 gun is a bonus, but their primary role is not to engage tanks.
To help soften up the objective, through both direct and indirect fire, is a platoon of 5 SU-76’s. I never rated the SU-76 under previous editions of the game as they were a single role vehicle that I though was a bit over pointed. Now that they are multi-role and relatively cheap I think they will find their way into a lot of my forces, however I’m not as crazy as Chris and probably won’t paint a full regiment of them. Click here to see Chris’s article…
With 3 points left I’m going to add a support platoon of BA-64s. There are probably better options to spend the points on as I don’t really need any more Spearhead options in the army, since I already have three, but it is in theme to add more reconnaissance.
The last point will be spent on the Make Your Own Luck, which allows you to automatically roll a 4 on a dice roll. This I will hold onto till late game for either a critical firepower roll to destroy a tank or motivation roll during an assault to hopefully turn the tide of the game.
~Casey